Tool Search: Ed-fi
This article outlines the steps to properly move Ed-Fi to the next school year. It also contains general recommendations for processes to complete at the beginning and end of the school year.
For more information, see the Kansas Ed-Fi article.
Before you start
Update Campus to at least Release Pack Campus 2635 (August 2026) or higher. Failure to do this may result in an inability to properly report data for the next school year.
Set appropriate tool rights for users who need access to Ed-Fi tools.
Step 1 - Enable Ed-Fi Functionality
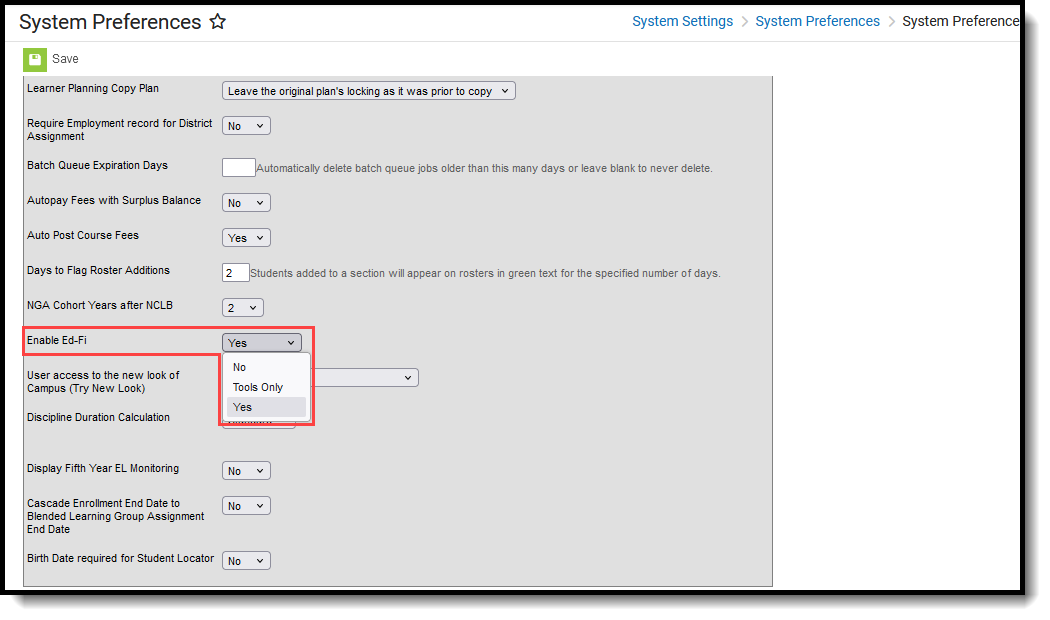 Enable Ed-Fi in System Preferences by setting the Enable Ed-Fi option to Yes.
Enable Ed-Fi functionality via the Enable Ed-Fi system preference.
- Yes - Ed-Fi functionality is enabled and Ed-Fi data syncs from Campus to the Ed-Fi system (when properly enabled via Ed-Fi Configuration tools).
-
Tools Only - You are able to fill out Ed-Fi fields (such as Ed-Fi ID) within Campus but this data does not sync to the Ed-Fi system until this field is set to Yes. This is especially useful when setting up Ed-Fi IDs for students within a school or district so that data properly syncs between Campus and Ed-Fi prior to enabling it.
-
No - Ed-Fi functionality is not enabled for the district and users cannot access Ed-Fi tools within Campus.
Step 2 - Create a new Ed-Fi Configuration for the next school year
 Configure an Ed-Fi connection by entering the school year, API endpoints, timeout value, and connection credentials.
Create a new Ed-Fi configuration for the next school year.
- Click New. The Ed-Fi Connection Detail editor displays.
- Select the Connection Type of State.
- Enter a Connection Name of 26-27 Ed-Fi Configuration or a similar name.
- Select the School Year of 2026-27. This requires the 2026-27 School Year to be created.
- Enter the appropriate values. Refer to the table below for example values.
- Click Test Connection to verify that the configuration values are correct and that a connection to Ed-Fi was established. A "Connection is Valid" message displays when the connection is successful.
- Click Save.
| Field | Value and description |
|---|---|
| O-Auth URL | This URL is provided by the Kansas Department of Education. |
| API URL | This URL is provided by the Kansas Department of Education. |
| Post-Amble |
/data/v3/ |
| Timeout in Seconds | This field defaults to 60 seconds. If the connection exceeds this duration, Campus marks the connection as timed out and processes the events during the next time a quartz job runs. |
| Multiple Credentials | Turn this feature on when more than one Key and Secret is required for the school year. See the Multiple Applications section on the Ed-Fi Configuration article for more information. |
| Client Key | This is the same Client Key that was provided by the Kansas Department of Education. |
| Client Secret | This is the same Client Secret that was provided by the Kansas Department of Education. |
Step 3 - Review the Ed-Fi Setup Checklist to ensure items are complete
| Task | Campus Location |
|---|---|
| Enable Ed-Fi functionality via the Enable Ed-Fi system preference. | System Administration > Preferences > System Preferences > Enable Ed-Fi
|
| Enter Ed-Fi Configuration values. | Reporting > Ed-Fi > Configuration |
|
Set all Resources to 'Off' and map the Ed-Fi Codes to Campus Codes via the Ed-Fi Resource Preferences. |
Reporting > Ed-Fi > Configuration > Resource Preferences
Infinite Campus automaps most codes. However, auto-mapping does not occur when the dictionary is unlocked (the user can create custom codes) or when mapping depends on dates/terms (such as the Sessions resource). Auto-mapping occurs only if the user successfully creates a connection (see Step 2). If the initial connection creation was not configured correctly, it will not properly auto-map.
|
| Assign tool rights for Ed-Fi. | User Management > User Account Administration > User Account |
| Assign Ed-Fi IDs. | Demographics > Person Identifiers |
| Confirm all Relationship Types have an associated State Code. | Census > People Setup > Relationship Type Setup |
| Confirm that all Attendance Codes that should be reported to the state (Excused and Unexcused Absences) have an associated State Code. | Attendance Office > Settings > Attendance Code Setup |
| Confirm that all behavior Event Types that should be reported to the state have an associated State Event Code (Mapping). | Behavior Office > Settings > Event Type Setup |
| Set the Ed-Fi Transcript Term Override for all manually added transcripts. | Student Information > General > Transcripts > New > Ed-Fi Transcript Term Override |
|
Set Calendar Dates on all reportable calendars
|
Scheduling & Courses > Calendar Setup > Day Setup |
| Add a Level to a Course, if applicable. | Scheduling & Courses > Courses > Section Information |
| Set Ed-Fi Term Descriptor Override on Course Sections. | Scheduling & Courses > Courses > Section Information |
| Add a Room to all Course Sections for state-reporting courses. | Scheduling & Courses > Courses > Section Information |
| Add a Teacher Role on Staff History for teachers who must report to Ed-Fi. | Scheduling & Courses > Courses > Section Staff History |
| Toggle Resources to 'On' in Ed-Fi Resource Preferences once all data setup is complete. | Reporting > Ed-Fi > Configuration > Resource Preferences
Auto-mapping occurs only if the user successfully creates a connection (see Step 3). If the initial connection creation was not configured correctly, it will not properly auto-map.
|
Step 4 - Perform an Ed-Fi Resync for the next scope year
 Resync data with the updated Configuration for the new school year
Now that the next school year's Ed-Fi Configuration is in place and data has been properly reviewed, an ordered resync should be completed as the first resync of the year.
- Verify that the 2026-27 school year is selected in the Context Switcher.
- Select the 2026-27 Configuration option from the Ed-Fi Configuration dropdown.
- Select Start Resync.
This action generates a large volume of items in the event queue, so it may be helpful to plan the resync for an off-peak time and resync in groups of calendars rather than all calendars at once.
Impact
With the new Ed-Fi Configuration created, data for the next school year can begin being sent to the state.
Once the configuration is active and the Ed-Fi preference is enabled, database triggers fire on monitored tables, inserting records into the Ed-Fi Event Queue. The Ed-Fi processor (a Quartz job running approximately every minute) pulls from this queue and sends data to the ODS. Each qualifying change can generate up to two queue entries: one for Core and one for State resources.
