Path: Student Information > General > Fees
To appear in the Fees Editor, a fee must first be assigned to a person, either individually or en masse using the Fee Wizard.
This guide explains how to assign fees to an individual student.
For more information, see Fees - Start here
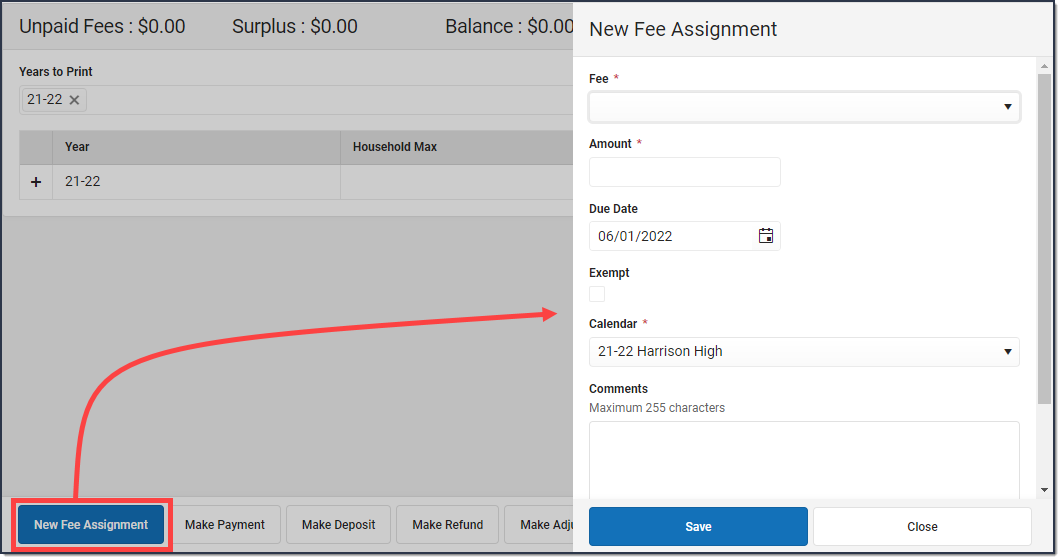 New Fee Assignment
Before you start
- Assigned fees cannot be deleted. If entered incorrectly, they need to be voided or adjusted.
- Fees available for assignment depend on the options set by the school or district and are created in the Fees tool. Only fees marked Active can be assigned to students.
- Set appropriate tool rights.
Assign a Fee
- Click the New Fee Assignment button.
- Select a Fee from the dropdown list in the New Fee Assignment side panel.
- If applicable, enter the fee Amount.
- Fee Amounts may be pre-set when the fee was created and can't be changed.
- If the fee is set as a variable rate fee, an asterisk (*) appears next to the name. The amount can be changed as needed.
- Enter a Due Date for the fee. Clicking the date field opens a calendar that defaults to the current date.
- If the person is exempt from paying this fee, mark the Exempt checkbox.
- Select the Calendar to which the fee should be assigned. By default, the calendar for the student's primary enrollment in the active school year is selected.
- Enter any comments related to the fee assignment in the Comments field.
- Click the Save button.
Edit a Fee Assignment
Once a fee is assigned, click the Assignment line to display the Assignment panel. Only the Due Date, Exempt, and comments can be edited once a fee is saved. To change the amount due, make an adjustment.
If the fee was assigned in error, it can't be deleted; the fee assignment needs to be voided.
