Tool Search: Staff Messenger
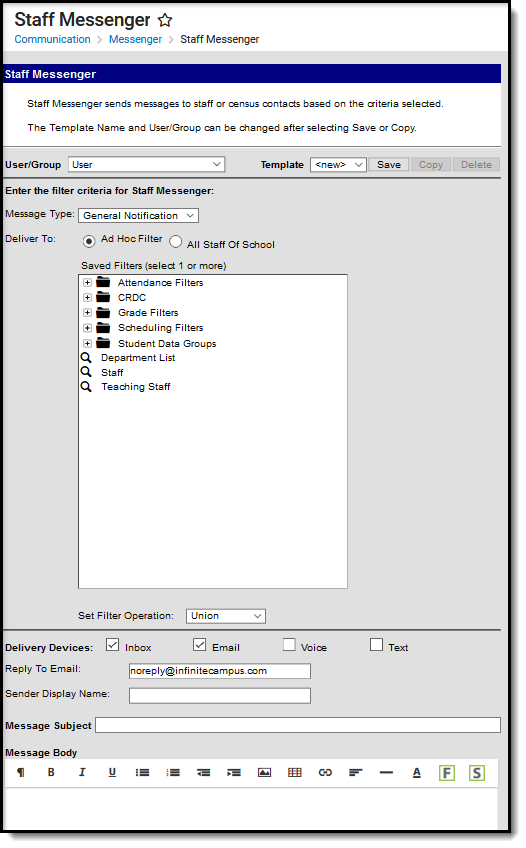
The Staff Messenger tool allows a district to send messages to its staff members. Phone messages can be delivered to staff if a district has purchased Campus Messenger with Voice. To receive email and/or phone messages, the recipients must have the corresponding Messenger Preference of General Notification and Priority Notification set on their Demographics tab to receive messages.
Field Descriptions
| Field | Description | ||||||
|---|---|---|---|---|---|---|---|
| User/Group | This dropdown list allows you to save message templates to your user account or a user group to which you belong. Users need Tool Rights to User Group Formats under Staff Messenger to share and save templates to Groups. | ||||||
| Template | This dropdown list displays a list of available templates. To create a new template, select <new>from this list. Templates save to either the User (default), or User Group where they are accessible to other members in the group. Minimize future message setup time by creating and saving templates. Templates save:
| ||||||
| Filter Criteria | |||||||
| Message Type | This field determines the type of message that is sent. The following options are available:
| ||||||
| Deliver To: | This selection determines which staff receive the message. Select the radio button for an Ad hoc filter or for All Staff of School. In order to be included in the delivery of message sent when using the All Staff of School option, a staff person needs both a District Employment record AND a District Assignment record. | ||||||
| Set Filter Operation | This field determines what the tool should do with the filters. The default value Union is used most often. Union indicates that all members of all selected filters are included. Intersection indicates that only the members who exist within each of the selected filters are included. | ||||||
| Delivery Devices | |||||||
| Inbox | The Inbox option is automatically selected. This option places a note in the user's inbox that a new message is available. Infinite Campus strongly recommends leaving this option marked to ensure delivery to a staff account when no other delivery device is marked for messages. | ||||||
| The Email option sends an email to the email address on record (entered in Census > People > Demographics). | |||||||
| Voice | The Voice option calls the phone number on record (entered in Census > People > Demographics). | ||||||
| Text | The Text option sends a text message to a mobile device. Recipients who have indicated a desire to receive text messages must have the Text (SMS) checkbox marked in the Personal Contact Information editor of the Demographics tab to receive text messages. | ||||||
| Message Details | |||||||
| Reply ToEmail | This field displays the email address that is automatically included in the message body for message recipients to reference.
This field can be changed if the Allow Custom Sender's Email Address checkbox is marked on the Email Settings tab. Existing templates may display a different address if the Allow Custom Sender's Email Address checkbox is marked and a user modified the Sender’s Email field. | ||||||
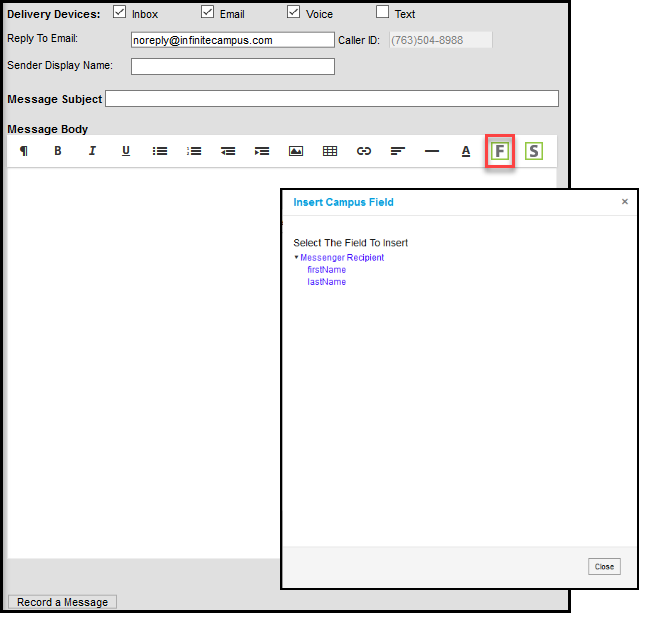
| Caller ID | This field displays the phone number that is automatically included in the message body for message recipients to reference.
This field can only be changed if the Allow Custom Caller ID checkbox is marked on the Voice Settings tab. Existing templates may display a different Caller ID if the Allow Custom Caller ID checkbox is marked and a user modified the Caller ID field. | ||||||
| Sender Display Name | Entries to this field will display in the recipient's email inbox for easier sender identification. Sender Display Name This field is only available if the Allow Custom Sender Display Name checkbox is marked on the Email Settings tab AND Email is selected from the Delivery Devices options in the message template. | ||||||
| Message Subject | This field determines the text that displays in the Subject field of the email message. | ||||||
| Message Body | You can enter comments in the Message Body using the WYSIWYG editor. Do NOT copy attribute fields from another Messenger tool in Campus. The attribute fields are not the same. For more information about using the options available with the editor, see the WYSIWYG Editors article. Message Body supports the use of Chinese characters for email messages only. | ||||||
This option allows you to send a voice message. See the article Messenger with Voice - Setup and Details for more information about this feature. You must click the Upload button after browsing for the attachment. When an attachment is properly uploaded, the Attach File message displays on the screen. The ability to send voice messages is controlled by a preference set by the District Administrator. | |||||||
| Browse and upload an email attachment | This option allows you to add an attachment to the email. See the article the Digital Repository Preferences for information about supported file types and sizes. You must click the Upload button after browsing for the attachment. When an attachment is properly uploaded, the Attach File message displays on the screen. This option is controlled by an email preference set by the District Administrator and may not display in all districts. | ||||||
| Text Message | The text message to be sent to the mobile device. The ability to send text messages is controlled by a preference set by the District Administrator. There is a character limit of 400 characters for text messages. Infinite Campus recommends not exceeding 140 characters as this may result in multiple messages being sent to recipients in random order. The maximum length of a text message is set to 400 characters. When a text message reaches this length, a warning message displays indicating such. The message cannot be saved until the character limit is met. Existing text message templates still display in their entirety, but need to be modified to be within this limit before sending. If users wish to stop receiving text messages, they can text STOP to the short code. This results in the user receiving no further text messages from Campus, even if the user has the Text option marked on their Contact Preferences. Users need to go through the opt in process again to start receiving texts at a later date. | ||||||
| Delivery Date: | The day on which the message should be sent. | ||||||
| Send Inbox/Emails at: | The time inbox and/or email messages begin delivery. The time saves with the templates. If messages should always go out immediately after Send is selected, this field should be left blank. | ||||||
| Dial Window | These fields create a dialing window during which a general voice message may be sent. The default values for these fields are set up on the Voice Settings tab System Administration > Messenger > Messenger Preferences > Voice Settings). Dial Window times must be entered and saved with templates. If the start time entered on the message is earlier than the start time on the template (and the start time on the template is after the start time entered on the Voice Settings tab), Messenger uses the start time on the template and does not send the message until that time is reached. If the end time on the Dial Window is earlier than the end time entered on the Voice Settings tab, calls do not stop. Instead, they continue until the end time on the Voice Settings is reached. In addition, if a voice message is still delivering when the District end time is reached, message delivery stops and is not completed. | ||||||
Campus Fields and Sub-Reports for Staff Messenger
Campus Fields and Sub-Reports includes specific fields for use in the Message Body WYSIWYG. These fields are designed to pull the latest qualifying event, based on filter criteria. Other fields are available but they use ad hoc logic and may not return the most recent event data if there are multiple events in a year.
Any ad hoc fields that have been deactivated display in red. Use the Element Replacement tool to locate deactivated elements and replace them with the new field.
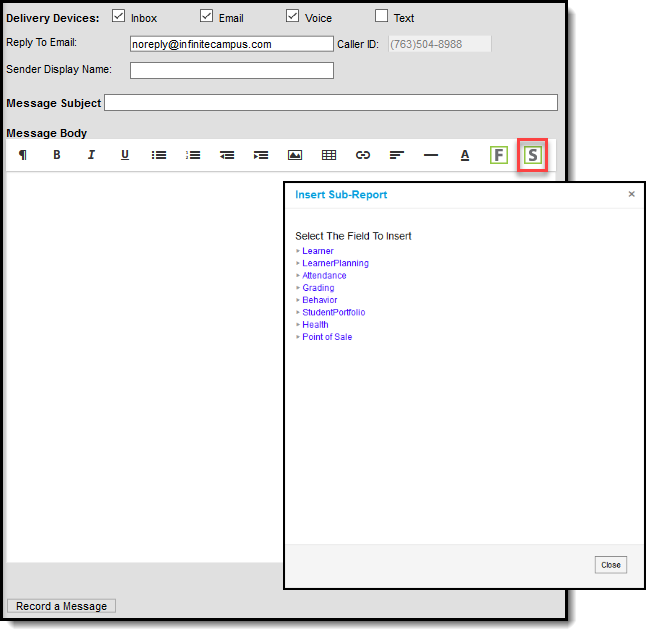 Staff Messenger Sub-Reports Selection
Sub-Report Options
The following table lists the sub-report options for each area.
| Area | Sub-Reports |
|---|---|
| Learner | Student Schedule Active and Dropped Student Schedule |
| Learner Planning | Course Requests Course Plan |
| Attendance | Period Mark Summary Course Mark Summary Whole/Half Day Summary Exact Day Summary Single Day Count Summary |
| Grading | Grade Detail Term GPA Summary |
| Behavior | Discipline Summary Behavior Summary |
| Student Portfolio | Cumulative GPA and Class Rank |
| Health | Immunization Health Screening Concussion Health Screening Dental Health Screening Hearing Health Screening Scoliosis Health Screening Vision |
| Point of Sale | POS Account Balance |
When using sub-reports in letters, please note the following:
- All behavior data is included when adding either of the sub-reports.
- A field only displays if there is data for that field. If a field is chosen from the sub-report but there is no saved data for that student, information for that field does not display.
- A sub-report option only displays if the district/school records that data.
Create a New Template
Templates allow you to create messages that can be sent at a later date. Templates also allow you to create reusable messages that save time and standardize content. The following information is saved with the template: Filter criteria, Delivery Devices, Sender Display Name (if enabled), Message Subject, Message Body, wav file (if uploaded), email attachment (if enabled and uploaded) and Text Message Body (if enabled).
- Select the <New> option from the Template dropdown list.
- Select User (default) or a User Group that the template should be saved to from the User/User Group dropdown field. Templates saved under a User Group are available to other members in the group.
- Use the Field Descriptions to complete the Staff Messenger editor.
The Message Body uses a WYSIWYG editor.
Do NOT copy attribute fields from another Messenger tool in Campus. The attribute fields are not the same.
For more information about using the options available with the editor, see the WYSIWYG Editors article. - Click the Save button at the top message editor.
- Enter a name for the template in the pop-up box. The template appears in the Template dropdown list.
Delete a Template
- Select the template you want to delete from the Template dropdown list.
- Click the Delete button. A confirmation message displays.
- Click the OK button. Campus removes the template and it does not display in the Template dropdown list.
Create Messages
- Select an existing Template from the Template dropdown list.
- Use the Field Descriptions to complete Message Builder editor.
The Message Body uses a WYSIWYG editor. For more information about using the options available with the editor, see the WYSIWYG Editors article.
Browse and upload an email/voice attachment. (optional)
You must click the Upload button after browsing for the attachment. When an attachment is properly uploaded, the Attach File message displays on the screen.
Click the Test button to review the message and its recipients.
Infinite Campus strongly recommends testing messages before delivering them. A message is sent in the exact manner it is delivered to recipients. The Test Message screen confirms that the test message was sent.
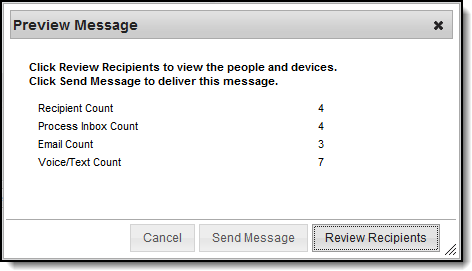
- Click the Preview/Send Message button. The Preview Message screen displays.
Click the Review Recipients button. The Review Recipients screen displays.
Complete the following tasks on the Review Recipients screen. (Optional)
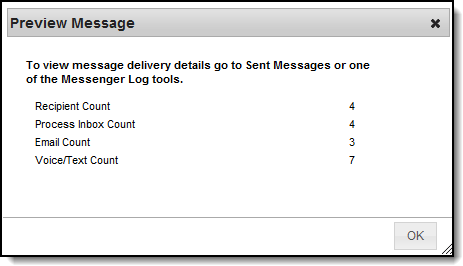
Task Description To exclude recipients/phone numbers Clear the checkbox next to a name or phone number. Preview the message Click the page icon in the Preview column. To exit and return to the Message Preview screen Click the Save & Return button if changes have been made to the recipient list. Otherwise, if no changes have been made, click the Cancel button. - Click the Send Message button on the PreviewMessage screen. The Preview Message screen displays. This screen confirms that the message tasks has been completely set up for delivery at the times entered in the Send Emails At and/or Dial Window fields of the main Message Builder screen. This screen does not indicate that the message is currently being sent.
- Click OK.
