Location: Grade Book > expand Settings menu > Multi-Post Grades; Progress Monitor > Multi-Post Grades; Post Grades > Multi-Post Grades
The Multi-Post Grades tool allows teachers to post grades for multiple tasks or standards at the same time. Grades are sourced from the In-Progress grades area of the Grade Book. This tool can save time for teachers who have to post grades often (such as to a weekly Progress task) or who have to post grades to many tasks or standards.

Use the Multi-Post Grades tool to post grades to multiple tasks/standards en masse.
The Multi-Post Grades tool right in Additional Access Rights > Instruction Tools is required to access this tool.
See the Instruction Tool Rights article for more information.
Access the Multi-Post Grades tool from the Settings menu of the Grade Book, from the Post Grades tool, or from the Progress Monitor.
Because the Multi-Post Grades tool pulls in-progress grades and proficiency estimates from the Grade Book, the Grade Calculation Options for each section must be set up. Additionally, tasks and standards must be added to a course to be used in the posting process.
Step 1 - Select Source and Destination
The first step of posting grades en masse is selecting which source sections/tasks are posting to which destination tasks. The scenario shown in the images below is of a teacher posting a Progress grade for her sections from the Term Grade task.
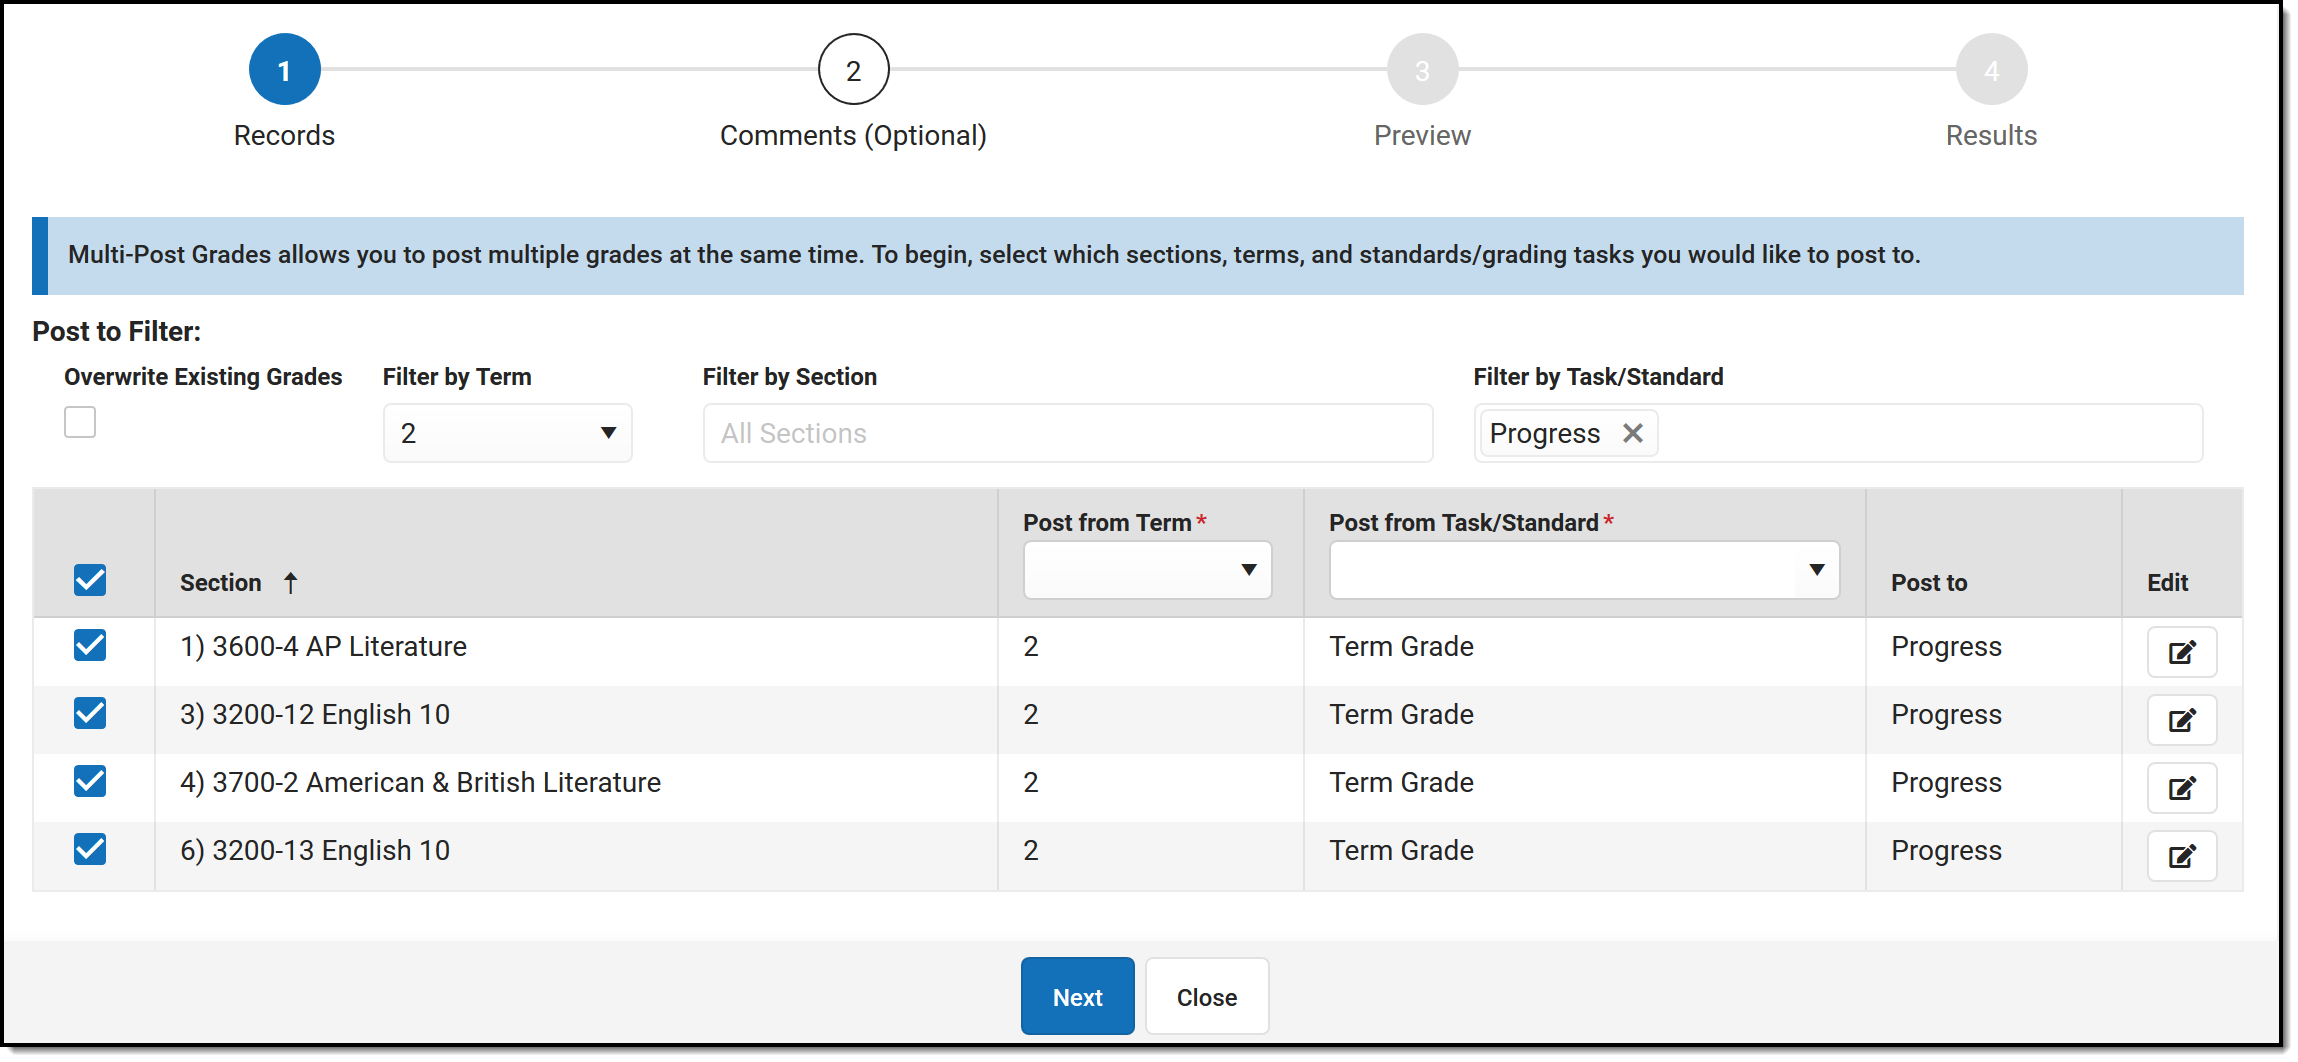
Step 1: Selecting Destination and Source
- Indicate if grades being posted should Overwrite Existing Grades that have already been posted.
- Filter the list of destination sections and tasks by Term, Section, and Task/Standard. Multiple sections and tasks can be selected. The table below is filtered based on these selections and shows the sections and tasks/standards that grades will be posted TO. The grading window must be open for at least one task in the section for it to display.
- Indicate where grades should be posted FROM by selecting the Term and Task/Standard that serve as the source of the posted grade. Click the Edit button at the right of each row to edit.
- The destination sections listed in the Post to column depends on the Filter by Task/Standards selected above the table.
- Click Next to review comments.
Step 2 - Comments
Step 2 is optional. If desired, enter report card comments. Click Next when finished or Skip to move to step 3.

Step 2: Entered report card comments by section or individually.
If any of the selected sections have unreleased scores, a message displays at the top indicating that In-Progress grades may be incomplete. See the Release Scores article for more information.
In-Progress grades/Proficiency Estimates are calculated using only released scores. To see the difference between the In-Progress Grade calculated using all scores or only released scores, visit the Grade Book or Progress Monitor and toggle between the two calculation options. To release all scores prior to posting, visit the Curriculum List, filter to only Unreleased assignments, and click Release All Scores.
Options available may vary based on your district's setup. See the Commenting in Campus Instruction article for more information about where these comments display for students and parents.
Comments typed in a section's row are included for all students in that section. If enabled, click ![]() to view a list of available canned comments.
to view a list of available canned comments.
To provide different comments by student, click the  button in the Individualize column to enter comments by student.
Comment Fill Options
Fill comments by entering them in the table header and pressing ![]() . The Comment Fill Options above the table determine how filled comments are applied:
. The Comment Fill Options above the table determine how filled comments are applied:
- Append: adds the entered comment to any existing comments for all students.
- Empty: adds the entered comment for any students who do not yet have a comment.
- Overwrite: overwrites any existing comments with the entered comment for all students.
Step 3 - Preview Prior to Post
The preview screen summarizes what grades will be posted.
The New/Updated Grades column shows the number of students for whom grades will be posted and the No Grades column indicates students who do not have a grade to post.
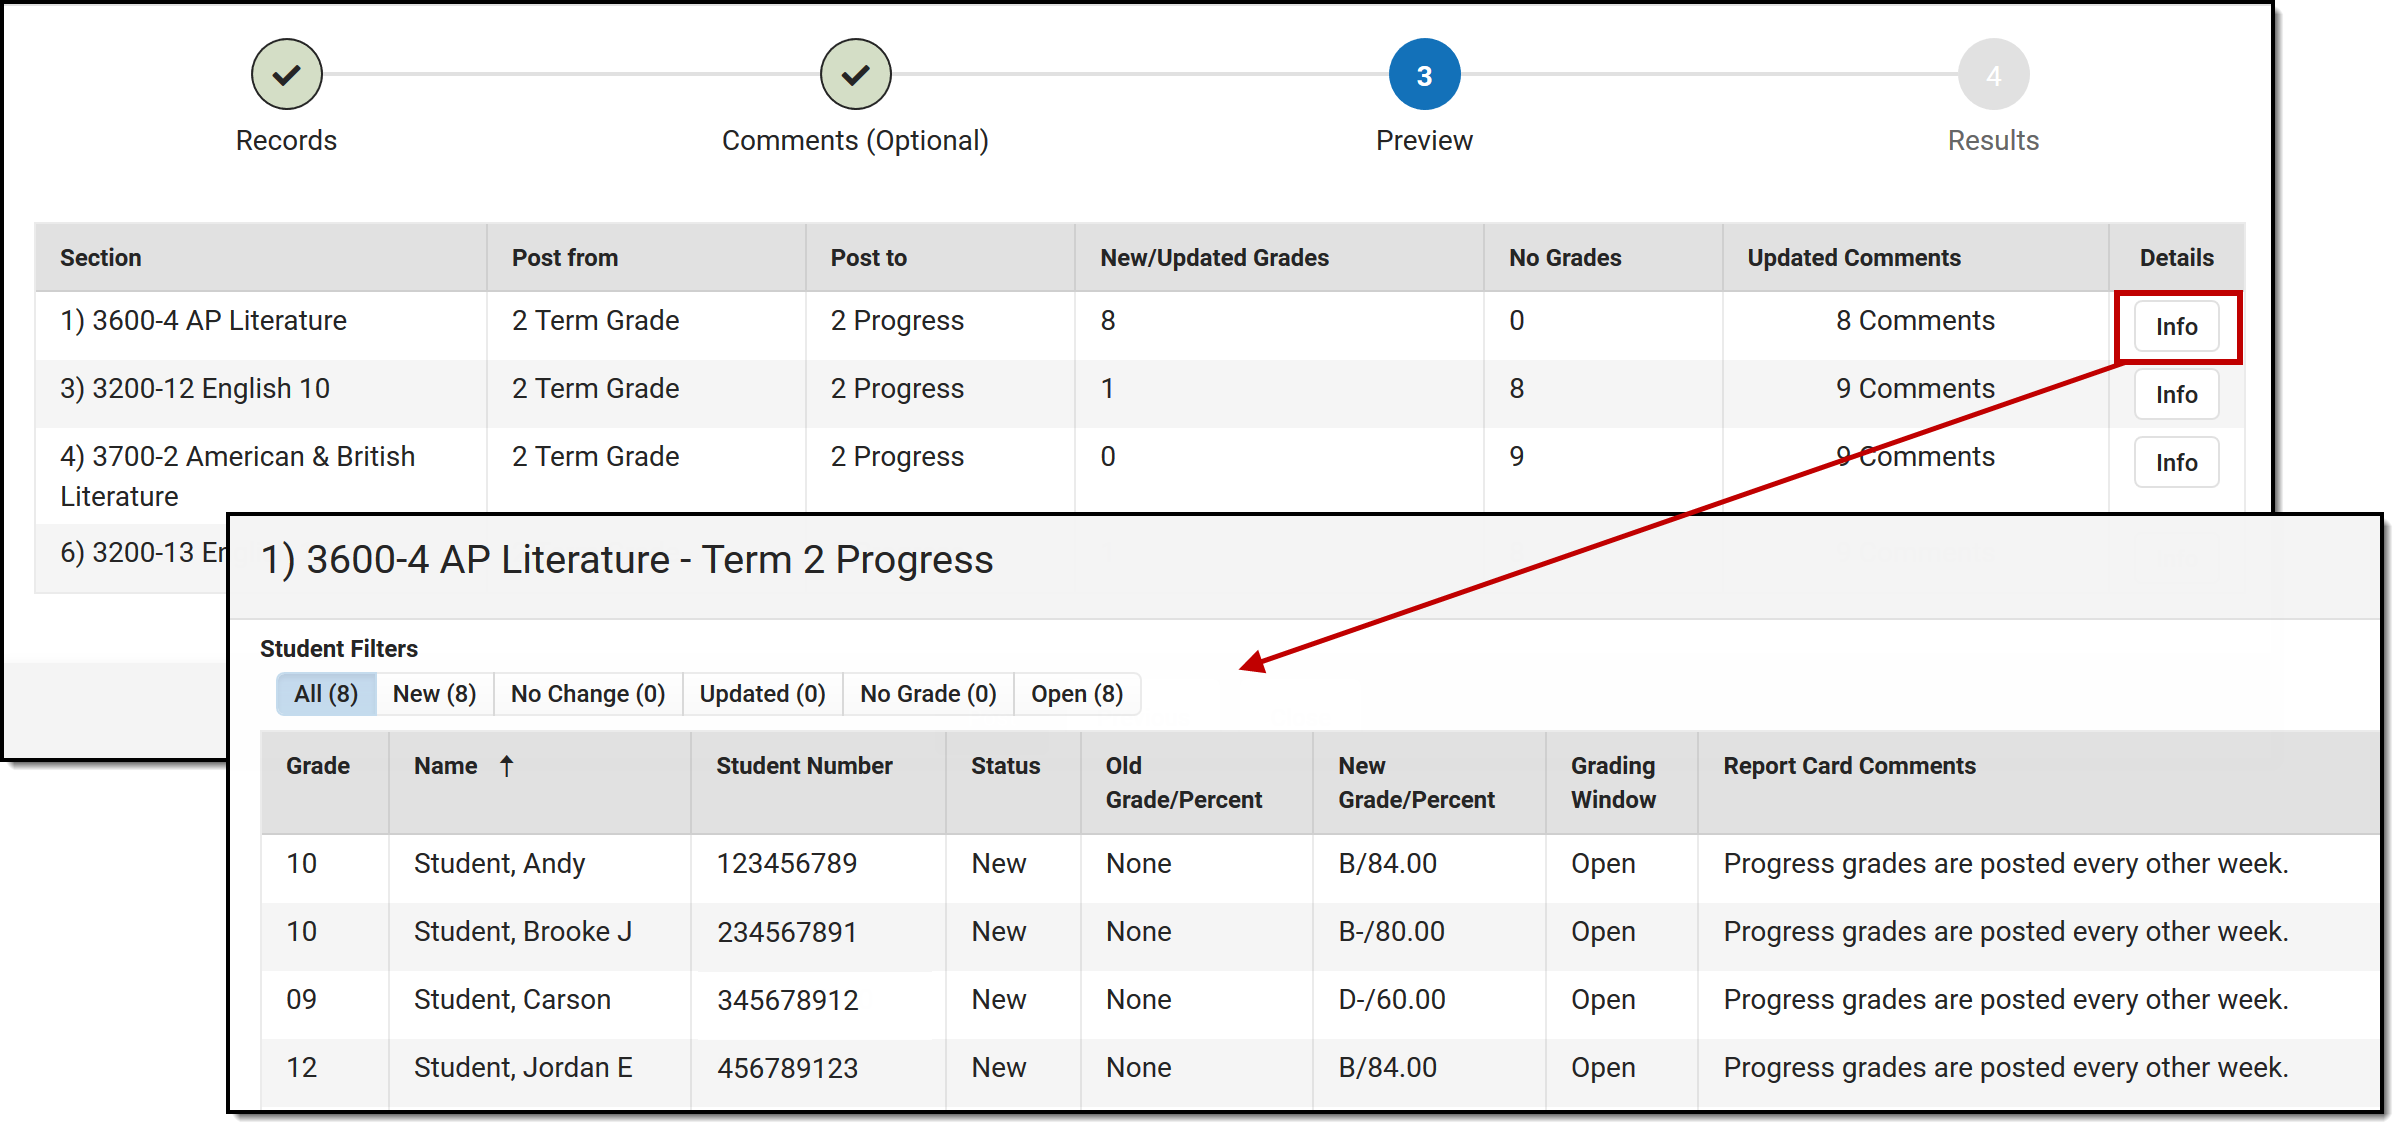
Step 3: Review grades before you post.
Click ![]() to view a list of students with old and new grades.
to view a list of students with old and new grades.
| Column | Description |
|---|---|
| Status | Indicates if the grade being posted is a new grade, is updating (overwriting) an already posted grade, or is an existing grade that will not be overwritten. This column also indicates if there is no grade to post or no change in the grade. |
| Old Grade/Percent | Shows any existing posted grade/percent for the student. |
| New Grade/Percent | Shows the grade that will be posted when the teacher clicks Post on the summary screen. |
Filter the student list using the options at the top:
- All: Shows all students in the section.
- New: Shows students for whom new grades will be posted.
- No Change: Shows students who have existing grades that will not be overwritten when grades are posted.
- Updated: Shows students who have existing grades that will be overwritten when grades are posted.
- No Grade: Shows students who do not have an In-Progress grade or Proficiency Estimate in the Grade Book to post.
- Open: Shows students for whom the grading window is open.
Step 4 - Post Grades
After reviewing grades to be posted, click Post to post grades. Click Close to return to the Grade Book or Post Grades tool.
Printing a Report
Click Generate Spreadsheet to generate a report of posted grades. This report can also be generated as a PDF by clicking the arrow next to the Generate button and selecting Generate PDF.
