Tool Search: Combine Person
The Combine Person tool allows administrators to search for and combine two people (and their corresponding records) within Campus. When selecting two people to be merged, existing data for both people is presented to the user and Pre and Post Audit Reports are provided as a way to audit a subset of each user's information before and after a merge occurs.
When merging two people, duplicate information is deleted, similar data is merged and unique data is kept.
Use the Duplicate Student Search Report and Duplicate IDs Report to identify potential duplicate students before using the Combine Person tool.
 Combine Person Wizard
See the Combine Person Tool Rights Article for details on what tool rights to assign to users.
When running the Combine Person tool in a District Edition linked to a State Edition of Campus, the person initiating the merge MUST exist at the state level, and their records must be synced from district to state. Because a person merge is automatically performed at the state level once merged at the district level, failure to exist at the state level will result in records not properly merging.
Combine Person Logic
- The Combine Person tool uses three different processes: Merge, Update, and Delete.
- Merge logic will compare two similar records and merge data into one record.
- Update logic will update the Drop Person's record with the Keep Person's personID.
- Delete logic will delete the Drop Person's record when it's determined that two records are duplicates.
- Identity records are never merged but instead are added as historical records on the kept person's Identities tab.
- In order for users to be properly merged at the state, the person who initiates the merge at the district level MUST exist as a person that is State-Linked (at the state level and their data has been synced to the state edition) in order for state level records to merge correctly.
- When using this tool in State Edition for two people who have the same State ID, same last name, same first name, but different person IDs, these two people display as two different person records based off of the associated person ID.
- When using this tool in a State Edition for two people who have the same Staff State ID, same last name, same first name, but different person IDs, these two people display as two different person records based off their associated person ID.
- For environments using Ed-Fi functionality: When two people are merged, all data for the deleted person is removed from Ed-Fi and a resync is performed to update Ed-Fi data for the remaining person.
- User accounts are moved to the kept person.
Manually Cleaning up Duplicate Data Prior to Merging
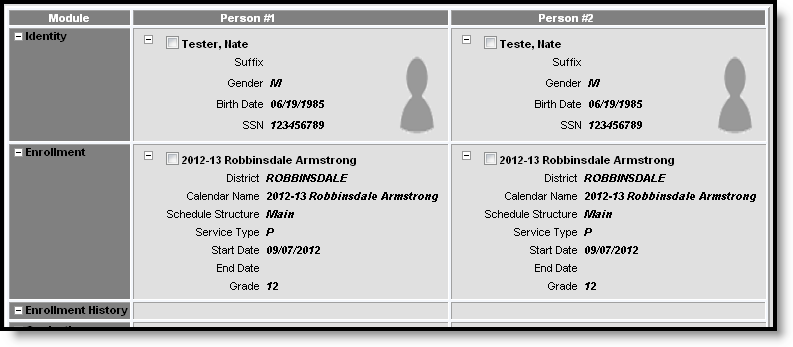
When merging two people, records that appear identical (based on the fields used to identify duplicate records for the module) will result in one duplicate record being deleted. If both records should be kept and merged to the base person (the person existing after the merge), users will need to manually modify one of the records so that they are no longer identical.
When two identical records are identified and the record to be deleted contains different information than the record being kept (such as state-specific data not used in matching duplicate records), users are highly encouraged to review both records and reconcile field value differences on the record being kept prior to merging.
For example, in the image below, the record being deleted contains different state-specific field values than the record being kept. Users should review these values to ensure the record being kept is accurate.
 Field Value Differences Between Two Enrollment Records
Using the Combine Person Tool
Properly using the Combine Person tool means understanding which people are duplicates, which data will be merged, deleted, or kept once two people are merged and what data must be manually cleaned up to ensure records are merged appropriately.
Merging two people means not only are personID fields updated to the kept person, but also Modified By, Referred By and other identifier fields throughout Infinite Campus.
The following topics describe each step of the Combine Person process.
- Step 1. Search for Two People to Merge
- Step 2. Collect Duplicate Person Data
- Step 3. Previewing Merge Data
- Step 4. Merge Two People
- Step 5. Reviewing Post-Merge Data
DO NOT use the Combine Person tool while logged in as a generic Administrator account. If more than one person in a district is an administrator, users will not be able to identify exactly who performed what merges and data changes.
The transactions that combine or delete people can block data input on affected tables for the duration of the transaction. When run during busy times in the school day this can cause significant blocking and noticeable slowdowns or make the app appear to hang. Users are advised to use this tool during non-peak hours.
Step 1. Search for Two People to Merge
The first step in combining two duplicate people is properly searching for and identifying them via person identifiers (i.e., Person ID, Local Staff #, Student State ID, etc).
 Search for the First Duplicate Person
To search for and add a person for merging:
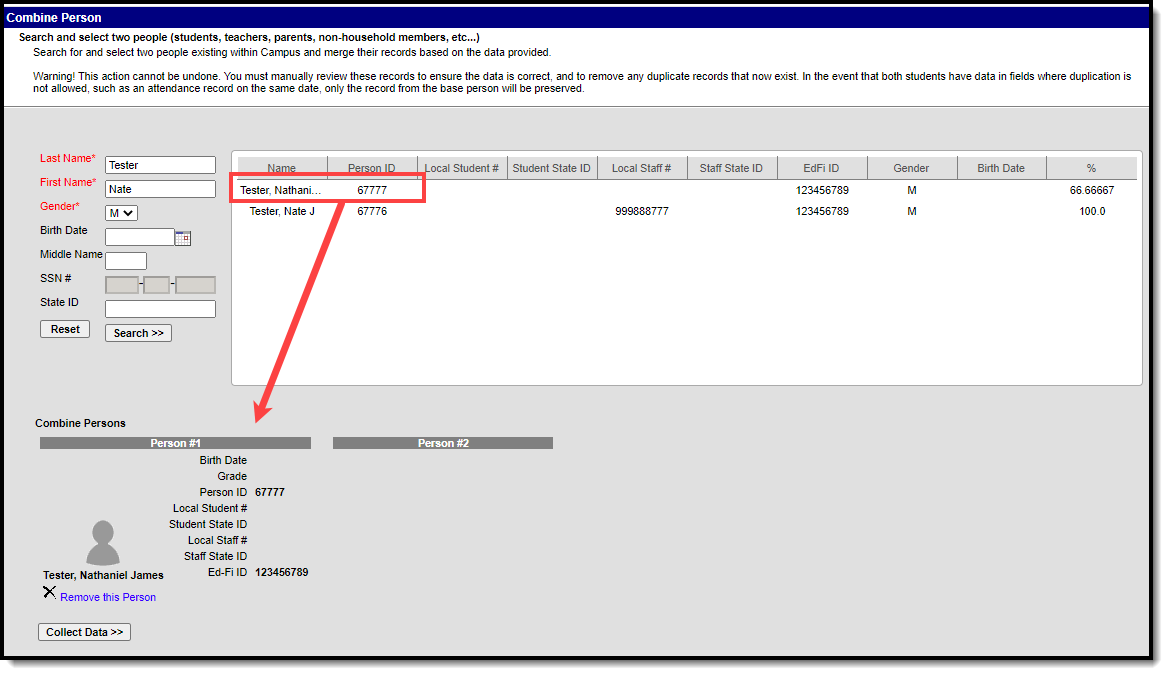
- Enter at least the person's Last Name, First Name and Gender.
- Select the Search button. People matching the search criteria entered will appear in the window on the right.
Note: EdFi ID data will only appear for users whose district is utilizing EdFi functionality.Search results are based on people whose name is exactly, similarly spelled or sounds like the name entered in search criteria. The % column will indicate how close of a match each person's name is to search criteria entered.
- Select the first duplicate person from the search results window. The person (and identifier data) will appear in the Person #1 column of the Combine Persons section.
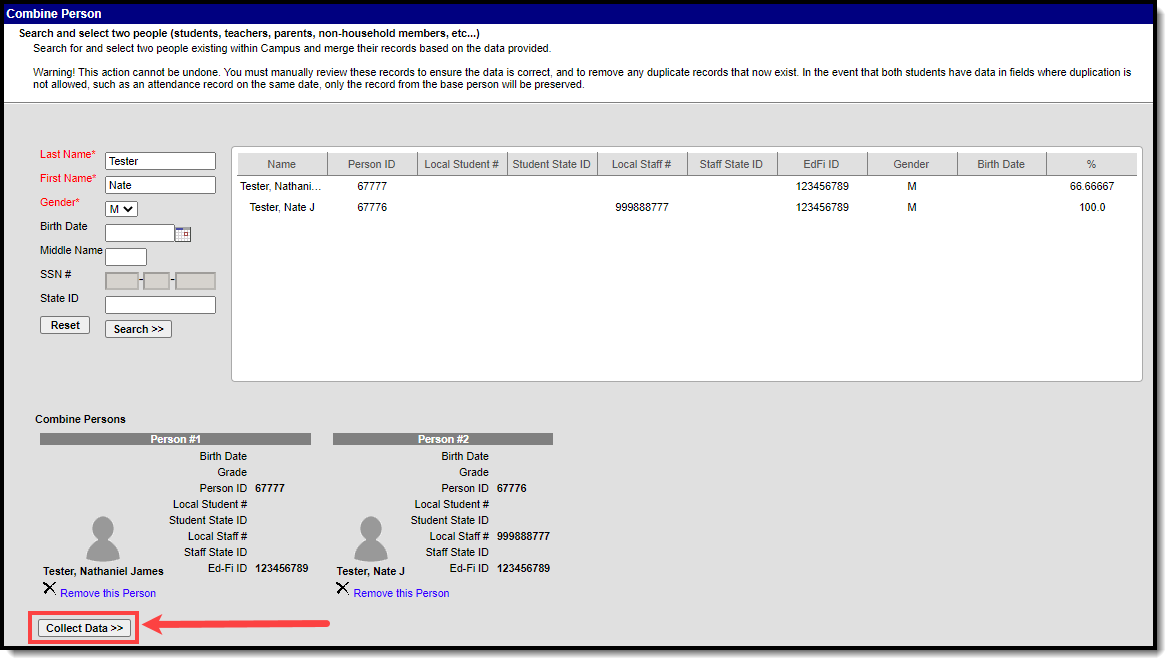
- Now that the first duplicate person has been selected, the second duplicate person must be identified and selected. Select the second duplicate person, making the person appear under the Person #2 column of the Combine Persons section.
 Searching for the Second Duplicate Person
Step 2. Collect Duplicate Person Data
Now that two duplicate people have been identified and selected, duplicate record data must be collected. Collecting data allows users to view duplicate records and determine which records should be kept during the person merge.
 Collecting Record Date
To collect data, click the Collect Data button. Data for specific modules will appear for each person. This is not a comprehensive list of all records/data that will be merged.
 Duplicate Person Record Information
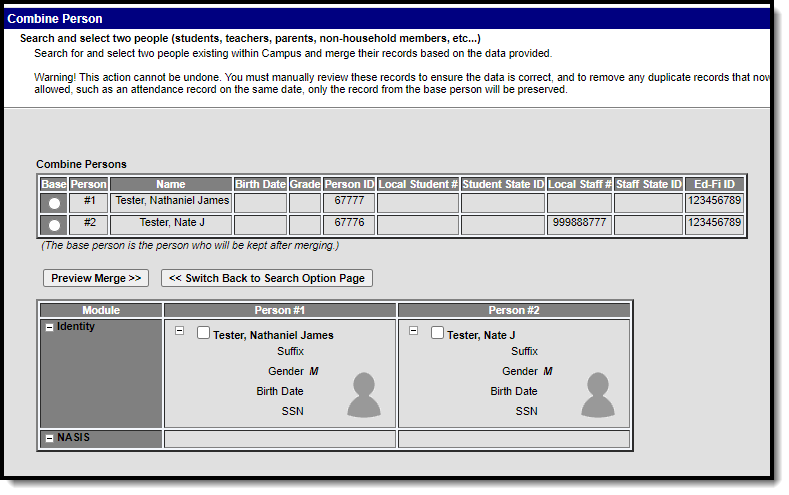
Once data is collected, record information will appear for each person. Select (+) to expand each section for information about record field values. For example, each duplicate person's enrollment record data is shown.
 Expanded View of Record Information
Step 3. Preview Merge Data
Select the base person (the person who will remain after the merge, highlighted in yellow) and select the Preview Merge button.
End-dated households will only show start and end dates (no household name).
Once duplicate record data has been reviewed, select the base person (the person who will remain after the merge, highlighted in yellow) and click the Preview Merge button.
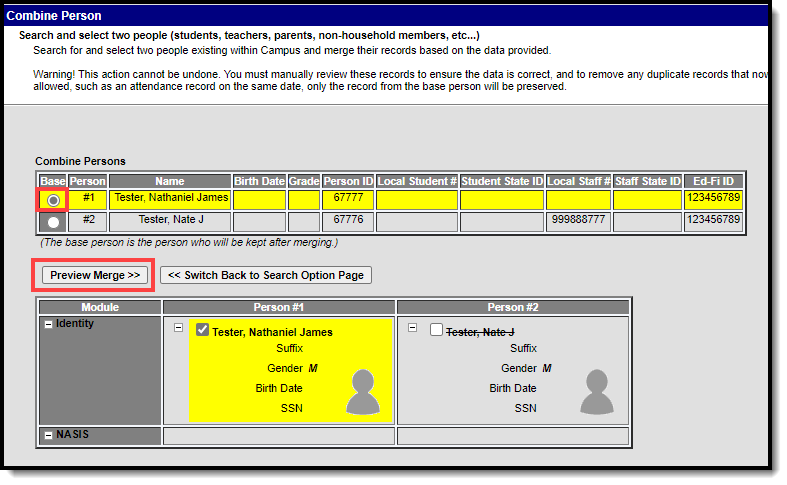 Selecting a Base Person and Preview Merge Button
Duplicate data will appear with a strike-through it. Records that will remain after the merge will have their corresponding checkbox marked, and data will be highlighted in yellow.
To change which record(s) should be kept, select the record's corresponding checkbox. The new record will highlight in yellow and duplicate records will appear crossed out.
 Reviewing Merge Data
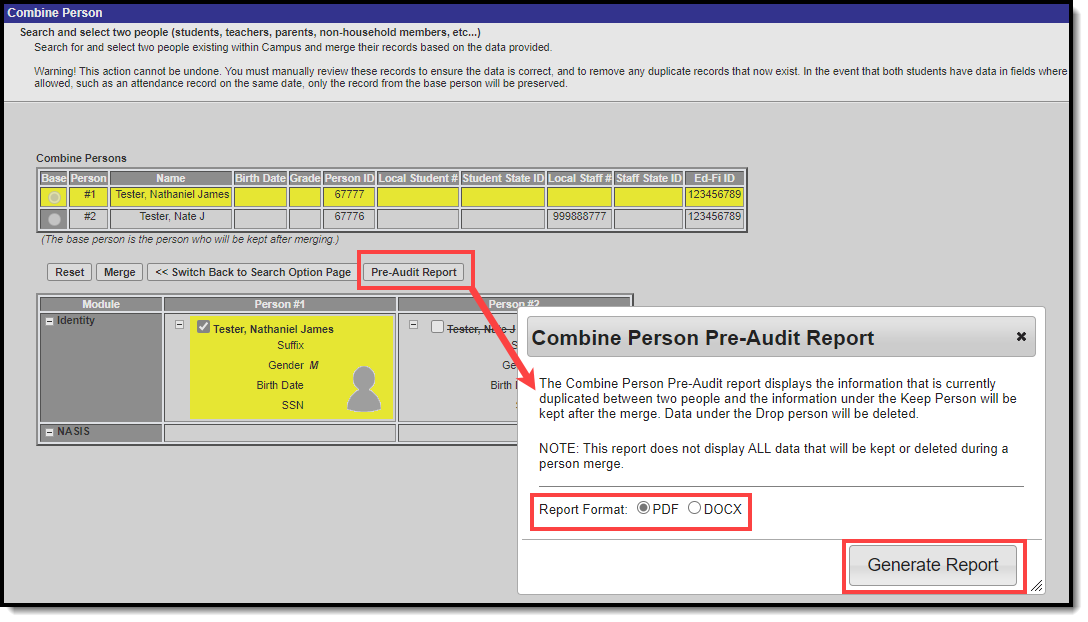
To view duplicate record data in report format, click the Pre-Audit Report button, select a Report Format, and select Generate Report. The Combine Person Pre-Audit Report will appear in a separate window in the designated format.
This report does not display all data that will be kept or deleted during a person merge. Any data listed under the drop person which should be kept must be manually modified within Campus prior to merge in order for the record to no longer appear as a duplicate.
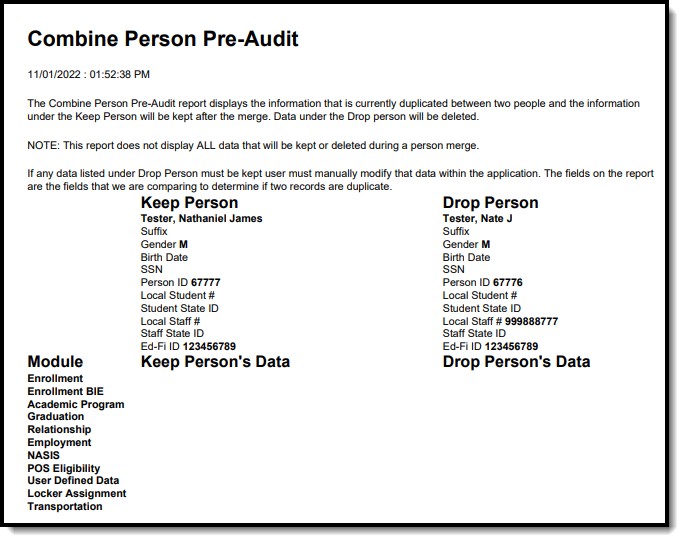 Combine Person Pre-Audit Report
Step 4. Merge Two People
Once data has been reviewed and all appropriate records have been selected, select the Merge button. A warning message will appear, detailing data to be merged and requiring confirmation of the merge.
Select the Agree to Merge button to initiate merge of the two people. Select Cancel to cancel merging of the two people (no data will be changed).
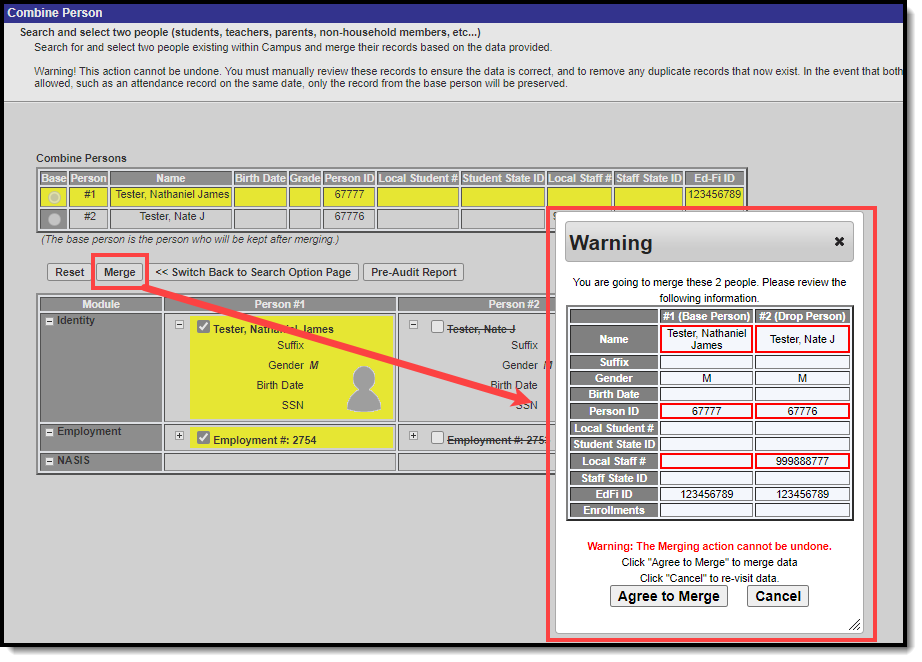 Initiating Merge
Once Agree to Merge is selected, the following will occur based on whether or not you are within a District Edition linked to a State Edition of Campus:
If connected to a State Edition of Campus: Once a merge is initiated at the district level, the same merge is initiated at the state level to ensure records match. The user who initiates the merge at the district level MUST exist as a person that is State Linked (at the state level and their data has been synced to the state edition) in order for state level records to merge correctly.
Once the merge is complete, a Process Alerts message will appear at both the state and district level for the user indicating whether or not the merge was successful at the state level.
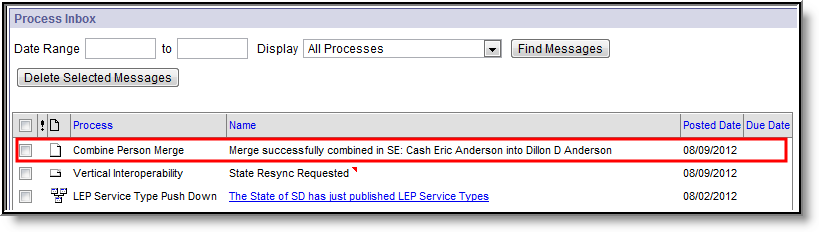 Process Inbox Message Confirming Successful State Merge
If NOT connected to a State Edition of Campus: The loading screen will appear and continue to spin until the merge is complete.
IF THE MERGE FAILS, a message displays with a short description of what caused the failure. If you do not understand the reason for the merge failure, please contact Infinite Campus Support.
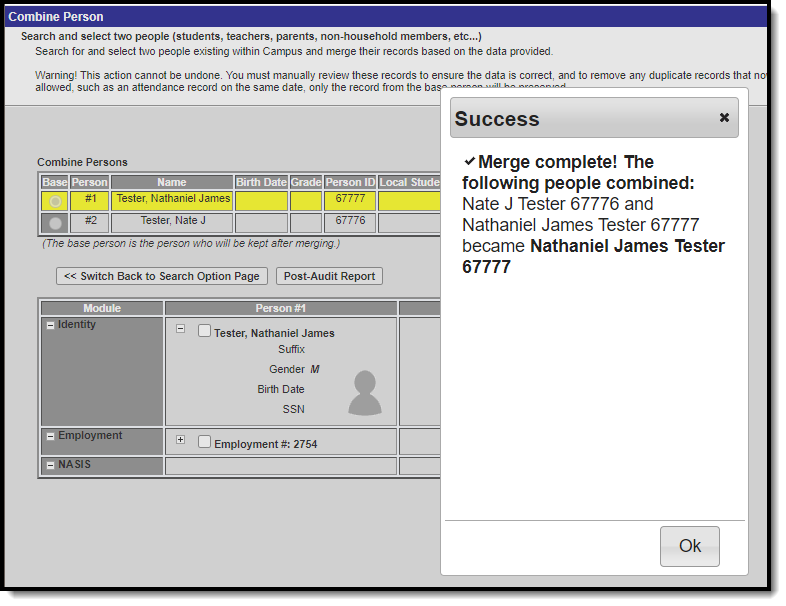 Confirmation of a Successful Merge
Once the merge is complete, a pop-up message will appear indicating a successful merge.
Step 5. Review Post-Merge Data
Once two people have been merged, users can then run the Post Audit Report to validate data now linked to the person that was kept.
 Generate the Post Audit Report
To generate the Post Audit Report, click the Post Audit Report button. The report will appear in a separate window in PDF format. This is not a comprehensive list of ALL data changes that occurred when the two people were merged.
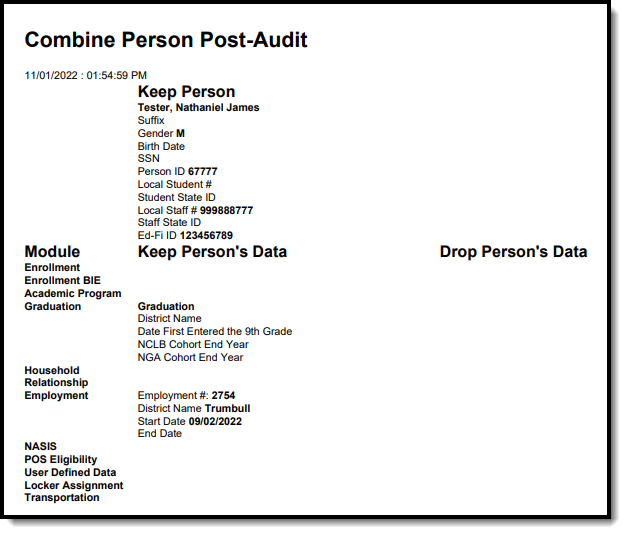 Post Audit Report
The Post Audit Report displays a summary of information kept and merged into the keep person's records. Depending on which records were selected to keep on the Combine Person editor (indicated by selecting the checkbox and having the data highlighted), kept information can appear under the Drop Person's Data column indicating which records from the drop person were kept and merged into the keep person.
Modules and Fields Shown for Duplicate Record Analysis
The following table describes all potential fields displayed within the Combine Person tool and in the Post and Pre Audit Reports. This is NOT a comprehensive list of ALL fields looked at and/or affected by a person merge within the Combine Person tool. This list describes all fields which will display within the Combine Person tool for describing duplicate record information.
All user accounts are moved from the dropped person to the kept person.
The Action column indicates the action occurring during a person merge.
- "Merge" means the dropped person's records are merged with the kept person's records.
- "Combine" means the dropped person's records are combined into the kept person's records.
|
Table |
Field(s) |
Action |
|---|---|---|
|
Employment |
|
Merge |
|
Enrollment |
|
Merge |
|
Fee Assignment |
|
Merge |
| Academic Program |
When the keep person doesn't have an academic program and the drop person does, the drop person's Academic Program moves to the keep person. If there is no academic program selected, the final warning pop-up window does not display until at least one academic program is selected when trying to merge. |
Merge |
|
Graduation |
|
Combine |
|
Household Member |
|
Merge |
|
Identity |
|
Keep both records |
|
NASIS |
|
Merge |
|
POS Account Access |
|
Merge |
|
POS Eligibility |
|
Merge |
|
POS Identification |
|
Merge |
|
Relationship |
|
Merge |
SIF Logic Tied to the Combine Person Tool
The following SIF logic is implemented when people are merged via the Combine Person tool:
- When a District Assignment record is added for a staff member for the first time, a SIF StaffPersonal and StaffAssignment ADD event is provided.
- When a District Assignment record is updated for a staff member or an additional District Assignment record is added, a SIF StaffPersonal CHANGE event is provided.
- When the last District Assignment record is deleted for a staff member, a SIF StaffPersonal DELETE event is provided.
- When two students are combined using the Combine Person tool, a DELETE event is sent for all objects related to the discarded (merged record) person’s Staff or Student (or both) RefId:
- For students:
- StudentPersonal
- StudentSchoolEnrollment
- StudentSectionEnrollment
- StudentContact
- StudentSectionMarks
- StudentContactRelationship
- StudentDailyAttendance (Delete only)
- StudentPeriodAttendance
- StudentActivityParticipation
- StudentParticipation
- StudentScoreSet
- For staff:
- StaffPersonal
- StaffAssignment
- For students:
- When the Combine Person tool is used to combine two person records, the primary, non-discarded person will generate a CHANGE event for the following SIF objects, which depend upon whether the person is a student or staff member (or both):
- For students:
- StudentPersonal
- StudentSchoolEnrollment
- StudentSectionEnrollment
- StudentContact
- StudentContactRelationship
- StudentPeriodAttendance
- For staff:
- StaffPersonal
- StaffAssignment
- For students:
