Tool Search: Screenings
The Health Screenings tool stores health screening information for a student. If a screening has been completed in the past, it will be shown within the Screening History window. When a Type of screening is selected, only the required sub-screens open.
 Student Health Screenings Tool
See the Screenings Tool Rights article for information about rights needed to use this tool.
Enter Health Screening Results
Health Screenings are entered as a record to track health and wellness screening data for students. The Screenings tool stores the results of the screening, and health office staff can add follow-up recommendations for students and parents if further testing or notifications are needed.
Multiple screenings can be added for a student. Screenings display in chronological order with the most recent screening listed first. When multiple different screenings are entered on the same day, the most recently entered one is listed first.
The Screening Type is locked from editing once the screening has been saved. Editing and expanding of sub-screenings may still occur after the initial save.
Add a Health Screening
- Click the New button.
- The Date will auto-populate with the current date. If applicable, enter a different date in mmddyy format or by clicking the calendar icon and selecting the date.
- Select the type of screening from the Type dropdown. This will open the appropriate sub-screening records to be filled in for this Type.
- Enter information related to the student’s screening within the appropriate fields. Follow-up data can also be added at this time.
- When finished, click Save. This screening record will now displays within the Screening History editor.
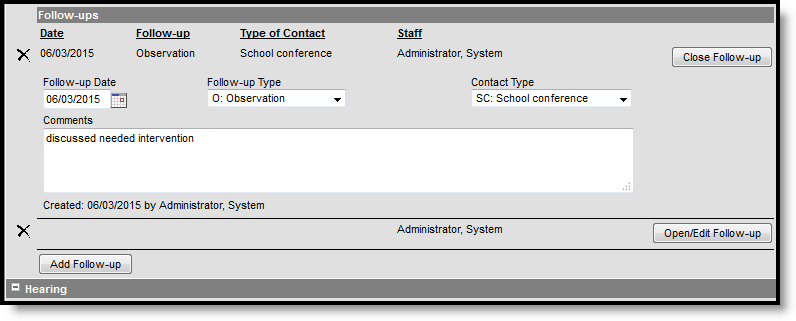
Add a Screening Follow-up
- In the Screening History list, select an existing screening. The related screening panels open.
- Locate the Follow-up editor within that screening and click the Add Follow-up button.
- Enter the Follow-up Date in mmddyy format or use the calendar icon to select a date.
- Select the Follow-up Type from the dropdown.
- Select the Contact Type from the dropdown.
- Enter Comments about the Follow-up that describe the reason and any further actions needed by the health office staff or the student's guardians.
- Click Save when finished.
Multiple follow-ups can be added to a screening.
 Add Screening Follow-ups
Required Field Logic
If a Health Screening field is set in the Attribute/Dictionary as required, it will only be required when the Type of screening selected when creating a new screening record contains the sub-screening with the required field. For example, if the Status field in the Vision sub-screening is set as required, it will only be required if the screening Type includes the sub-screening (Early Childhood, Health Appraisal, Child & Teen Checkup, Placement, Vision, Hearing/Vision, Other). If a sub-screening with a required field that is not part of a Type is expanded and data is entered, the required field will be enforced.
If a screening record was originally created without any required fields, and the record is later edited, newly required fields will be enforced upon saving.
View Screenings and Follow-ups
To view an existing screening, select that screening from the Screening History list. The screening panels related to that screening expand to see the entered data.
To view a follow-up for an existing screening, select that screening from the Screening History list and navigate to the Follow-ups editor. Use the Open/Edit Follow-up button to expand the record. When finished viewing, use the Close Follow-up button to collapse the record. Click the X to the left of the follow-up record to delete the follow-up record.
 View recorded follow-up records
Created and Modified information displays, indicating when the record was first entered and when it was last modified, and by whom. This data appears when creating or modifying any sub-screening and when adding follow-up data (Created by only).
Screenings created and saved prior to the .1525 Release will NOT display this information until the record is modified again. New or modified data on these historic records will be stored, causing the Created date to be the date it was re-saved, but it will NOT modify the original Screening Date.
 Created and Modified Values on Sub-Screenings and Follow-up Records
Screenings and Sub-Screenings
When adding a new health screening, health staff can select a Screening Type from the Screening Detail section and populate data for the opened screening editors. These editors that open are referred to as sub-screenings, and the following table lists which screening types open which screening editors. Sometimes the screening type has the same name as an editor.
Health staff are able to populate additional sub-screening editors by expanding the plus sign next to a collapsed editor.
Screening Type | Sub-Screenings |
|---|---|
Early Childhood | Height/Weight and Vital Signs Vision Hearing Early Childhood Screening Developmental Social-Emotional Speech |
Health Appraisal | Height/Weight and Vital Signs Vision Hearing |
Tuberculosis | Tuberculosis |
Sports Physical | Sports Physical |
Child and Teen Checkup | Height/Weight and Vital Signs Vision Hearing Child and Teen Checkup Developmental Social-Emotional |
Placement | Height/Weight and Vital Signs Vision Hearing Tuberculosis |
Height/Weight and Vital Signs | Height/Weight and Vital Signs |
Re Screen | N/A |
Vision | Vision |
Hearing | Hearing |
Vision/Hearing | Vision Hearing |
Dental | Dental |
Scoliosis | Scoliosis |
| Lead Level | Lead Level |
| Developmental | Developmental |
| Social-Emotional | Social-Emotional |
| Concussion | Concussion |
| Speech | Speech |
Other | Height/Weight and Vital Signs Vision Hearing Developmental Social-Emotional Speech Scoliosis |
Screening Type Fields and Description
The following table defines the fields needed for each type of screening. Options listed in the dropdowns can be modified (if proper tool rights are assigned) in the Attribute Dictionary.
Screenings are localized to a specific state. The information here may not apply to all states.
Sub-Screening Editor | Fields | Description |
|---|---|---|
| Sports Physical | ||
| Status | Indicates the result of the student's sports physical. The default dictionary may be modified for localized district use. | |
| Comments | Provides a text field for entering details about the screening. | |
| Height, Weight and Vital Signs | ||
| Screening Date | Date the student received the screening. This field populates based on the Screening Date entered when a Screening Type is selected, but it can be modified as needed. | |
| Status | Indicates the student's growth assessment, based on the BMI percentile. Options are:
Enter the student's height and weight. These fields allow the BMI and BMI Percentile to calculate. Based on the BMI Percentile, the Status can be assigned. | |
| Examiner | The personnel who performed the health screening. | |
| Height | Defined as the distance from the student's feet to the top of his/her head. This data is entered in inches. If a student were 6 feet, 2 inches tall, the height would be entered at 74 inches. This field is limited to four characters - two places before the decimal point and two characters after (e.g. 74.22) | |
| Weight | Indicates how much the student weighs in pounds. This field is limited to five characters - 3 places before the decimal point and 2 places after. | |
| BMI | The Body Mass Index is a measure of a student's weight in relation to height. This field is auto-calculated based on the entered height and weight values, and cannot be modified. The calculation formula is: (weight in pounds/(height in inches)2) times 703. | |
| BMI Percentile | A value on the CDC BMI for age growth charts, determined after the calculation of the student's BMI. This value is auto-calculated based on the student's BMI, age and gender using data from a CDC-recommended chart that is built into the calculation. This value is an estimate and may not be accurate. Students must be between 2 and 20 years of age on the date of the screening to have the BMI Percentile auto-calculated. While this field is auto-calculated, the value can be modified if the district is using a different chart for calculating percentile. | |
| Blood Pressure | This is the force exerted by circulating blood on the walls of blood vessels. Enter values in XXX/XX format. | |
| Pulse | Value indicates the heartbeats per minute. Enter values in XXXX format. | |
| Respiration | Indicates the number of breaths per minute. Enter values in XXX format. | |
| Comments | Provides a text field for entering details about the screening. | |
| Vision | ||
| Screening Date | Date the student received the screening. This field populates based on the Screening Date entered when a Screening Type is selected, but it can be modified as needed. | |
| Vision Check Type | Identifies the results as being from a vision screening (S) or vision exam (E). | |
| Test Type | Indicate the name of the vision screening instrument being used to test the student's visual acuity. Tests are assumed to measure acuity at 20 feet, except for codes H, O1, SY10, SN10, and VT10 which measure acuity at 10 feet. The default dictionary is shown below:
| |
| Status | Indicates the result of the screening. The default dictionary may be modified for localized district use. | |
| Far Acuity R | Indicates the ability of the left eye to see at a distance. Entry is limited to five digits. The leading number (10 or 20) is determined by the Test Type code selected) | |
| Far Acuity L | Indicates the ability of the right eye to see at a distance. Entry is limited to five digits. The leading number (10 or 20) is determined by the Test Type code selected) | |
| Cor(rective) Lens | Indicates whether the student wears corrective lenses for proper vision. The default dictionary may be modified for localized district use. | |
| External Inspection | Indicates the result of an examination of the visual appearance of the eye. The default dictionary may be modified for localized district use. | |
| Near Acuity R | Indicates the ability of the left eye to see near. Entry is limited to five digits. The leading number (10 or 20) is determined by the Test Type code selected) | |
| Near Acuity L | Indicates the ability of the right eye to see near. Entry is limited to five digits. The leading number (10 or 20) is determined by the Test Type code selected) | |
| Plus Lens | Indicates the results of a test for far-sightedness (hyperopia). Also referred to as Convex Lens testing. The default dictionary may be modified for localized district use. | |
| Stereo Vision | Indicates the results of a test for depth perception. Also referred to as binocular vision or muscle balance. The default dictionary may be modified for localized district use. | |
| Cover Test | Indicates the results of a test for the presence and amount of ocular deviation. The default dictionary may be modified for localized district use. | |
| Color Vision | Indicates the results of a test for color blindness. The default dictionary may be modified for localized district use. | |
| Convergence | Indicates the results of a test for alignment of the eyes when focusing on nearby objects. The default dictionary may be modified for localized district use. | |
| Corneal Reflex | Indicates the results of a test for the reflex stimulated when the cornea is touched. The default dictionary may be modified for localized district use. | |
| Referral Date | Indicates the date the student was given a referral for a vision test. Use the Follow-up functionality to track referrals. | |
| Examiner | The personnel who performed the health screening. | |
| Comments | Provides a text field for entering details about the screening. | |
| Hearing | ||
| Screening Date | Indicates the date the student received the hearing test. This field populates based on the Screening Date entered when a Screening Type is selected, but it can be modified as needed. | |
| Status | Displays the results of the hearing test. The default dictionary may be modified for localized district use. | |
| Type | Selection indicates the type of test given. The default dictionary may be modified for localized district use. | |
| Otoacoustic Emissions R | Results of the measurement of sounds given off by the inner ear when the cochlea is stimulated by a sound in the right ear. The default dictionary may be modified for localized district use. | |
| Otoacoustic Emissions L | Results of the measurement of sounds given off by the inner ear when the cochlea is stimulated by a sound in the left ear. The default dictionary may be modified for localized district use. | |
| Tympanometry R | Results of a test of the condition of the middle ear and the mobility of the eardrum in the right ear. The default dictionary may be modified for localized district use. | |
| Tympanometry L | Results of a test of the condition of the middle ear and the mobility of the eardrum in the left ear. The default dictionary may be modified for localized district use. | |
| Otoscopic R | Results of an examination of the auditory canal and eardrum in the right ear. The default dictionary may be modified for localized district use. | |
| Otoscopic L | Results of an examination of the auditory canal and eardrum in the left ear. The default dictionary may be modified for localized district use. | |
| 250 L - 8000 R | Indicates the range, in Hz, at which the student can hear frequencies of sound for the right ear. These are values entered up to 3 characters. | |
| 250 L - 8000 L | Indicates the range, in Hz, at which the student can hear frequencies of sound for the left ear. These are values entered up to 3 characters. | |
| Comments | Provides a text field for entering details about the screening. | |
| Examiner | The personnel who performed the health screening. | |
| Early Childhood | ||
| Provider | Indicates where the screening took place. Not used in any core Health reports; the default dictionary may be modified for localized district use. | |
| Early Ed Experiences | Indicates where the student received education before attending school. Not used in any core Health reports; the default dictionary may be modified for localized district use. | |
| Readiness Referral | Indicates where the student has been referred for Early Childhood services. Not used in any core Health reports; the default dictionary may be modified for localized district use. | |
| Healthcare | Indicates the student's healthcare coverage. Not used in any core Health reports; the default dictionary may be modified for localized district use. | |
| Comments | Provides a text field for entering details about the screening. | |
| Child and Teen Checkup Screening | ||
| Date of Exam | Indicates when the exam occurred. This field populates based on the Screening Date entered when a Screening Type is selected, but it can be modified as needed. | |
| Type | Indicates the reason for the test. The default dictionary may be modified for localized district use. | |
| Location | Indicates where the test was performed. The default dictionary may be modified for localized district use. | |
| Status | Displays the results of the screening. The default dictionary may be modified for localized district use. | |
| Early Childhood Expiration Date | Indicates the date the student's screening expires. This date must be AFTER the date entered in the Date of the Exam field. | |
| Healthcare | Indicates the student's healthcare coverage. The default dictionary may be modified for localized district use. | |
| Comments | Provides a text field for entering details about the screening. | |
| Developmental | ||
| Screening Date | Indicates the date the screening occurred. This field populates based on the Screening Date entered when a Screening Type is selected, but it can be modified as needed. | |
| Score | Indicates the score the student received. This can be a whole number or a number with a decimal place (NN.N). | |
| Development Test | Indicates the type of test the student received. The default dictionary may be modified for localized district use. | |
| Development Status | Indicates the result of the test. The default dictionary may be modified for localized district use. | |
| Social/Emotional Status | Displays the student's status for social and emotional health. There is a separate Social-Emotional sub-screening and this field is no longer necessary. It can be hidden through the Attribute/Dictionary to preserve historical data while avoiding incorrect data entry in the future. | |
| Comments | Provides a text field for entering details about the screening. | |
| Social-Emotional | ||
| Screening Date | Indicates the date the screening occurred. This field populates based on the Screening Date entered when a Screening Type is selected, but it can be modified as needed. | |
| Test Type | Indicates the test used in this screening. The default dictionary may be modified for localized district use. | |
| Score | Indicates the score the student received. Up to four characters can be entered. | |
| Status | Indicates the result of the test. The default dictionary may be modified for localized district use. | |
| Comments | Provides a text field for entering details about the screening. | |
| Speech | ||
| Date | Indicates the date the screening occurred. This field populates based on the Screening Date entered when a Screening Type is selected, but it can be modified as needed. | |
| Test | Indicates the type of test given to the student. The default dictionary may be modified for localized district use. | |
| Status | Indicates the results of the screening. The default dictionary may be modified for localized district use. | |
| Comments | Provides a text field for entering details about the screening. | |
| Tuberculosis | ||
| TB Risk Assessment | The Tuberculosis Risk Assessment requirements. The dictionary that populates this list is unlocked, except for Delaware users:
| |
| Risk Assessment Completed By | The person/agency who completed the Tuberculosis Risk Assessment. The dictionary that populates this list is unlocked, except for Delaware users:
| |
| Risk Assessment Completed Date | The day of Tuberculosis Risk Assessment. | |
| TB Risk Assessment Results | The results of the Tuberculosis Risk Assessment. Options include:
| |
| Skin Test Date | Date the student received the TB skin test. This field populates based on the Screening Date entered when a Screening Type is selected, but it can be modified as needed. | |
| Place Given | Indicates where the student received the test. The default dictionary may be modified for localized district use. | |
| Date Read | Date the results of the test were read. | |
| Results mm | Indicates the results of the skin test. Up to 5 characters can be entered | |
| X-Ray Date | Indicates the date the student received an X-Ray. | |
| Status | Indicates the results of the X-Ray. The default dictionary may be modified for localized district use. | |
| Med Start Date | If medication is given for treatment of TB, the entered date indicates when the medication was first taken. | |
| Med End Date | If medication is given for treatment of TB, the entered date indicates when the medication will last be taken. | |
| Refused Date | Date the student (or parents/guardians) refused treatment. | |
| Free from Communicable TB | When marked, indicates the student does not have TB. | |
| Comments | Provides a text field for entering details about the screening. | |
| Scoliosis | ||
| Screening Date | Indicates the date the student received the scoliosis screening. This field populates based on the Screening Date entered when a Screening Type is selected, but it can be modified as needed. | |
| Character | Indicates the results of the test. The default dictionary may be modified for localized district use. | |
| Type | Indicates the type of scoliosis test given. The default dictionary may be modified for localized district use. | |
| Degree of Curve | The measurement, in degrees, of spinal curvature. Up to 3 characters can be entered. | |
| Curvature Location | Identification of the area of the student's back in which the degree of curve is measured. The default dictionary may be modified for localized district use. The default dictionary is shown below:
| |
| Comments | Provides a text field for entering details about the screening. | |
| Examiner | The personnel who performed the health screening. | |
| Dental | ||
| Date | Indicates the date the student received the dental screening. This field populates based on the Screening Date entered when a Screening Type is selected, but it can be modified as needed. |
| Test Type | Indicates the type of dental screening performed was an exam (E) or screening (S). The default dictionary may be modified for localized district use. | |
| Status | Indicates the results of the dental screening or exam. The default dictionary may be modified for localized district use. | |
| Expiration Date | Indicates the date the dental screening expires. This date must be AFTER the date entered in the Date field. | |
| Dental Sealants Present | Indicates if sealants are present. The default dictionary may be modified for localized district use. | |
| Caries History | Indicates the student has any existing decay of teeth that has been treated. The default dictionary may be modified for localized district use. | |
| Untreated Caries | Indicates the student has existing decay of teeth that has not been treated. The default dictionary may be modified for localized district use. | |
| Soft Tissue Pathology | Indicates the student has existing dental soft tissue pathology. The default dictionary may be modified for localized district use. | |
| Malocclusion | Indicates the student has existing issues with the jaw sitting correctly when the mouth is closed. The default dictionary may be modified for localized district use. | |
| Urgent Treatment | Indicates the student needs care immediately. The default dictionary may be modified for localized district use. | |
| Restorative Care | Indicates the student has received care to restore teeth. The default dictionary may be modified for localized district use. | |
| Preventative Care | Indicates the student receives preventative dental care. The default dictionary may be modified for localized district use. | |
| Dental Erosion | Indicates the result of an examination of the student's dental enamel for areas of discoloration or erosion. The default dictionary may be modified for localized district use. | |
| Dental Waiver Date | Indicates the date of the student's dental waiver. | |
| Dental Waiver Reason | Indicates the reason for the dental waiver. The default dictionary may be modified for localized district use. | |
| Referral Date | Indicates the date the student was referred for dental care. Use the Follow-up functionality to track referrals. | |
| Examiner | The personnel who performed the health screening. | |
| Dental Other | Provides a text field for entering details about the screening. | |
| Lead Level | ||
| Screening Date | Indicates the date the student took the screening. This field populates based on the Screening Date entered when a Screening Type is selected, but it can be modified as needed. | |
| Lead Level | Indicates the level of lead for the student, usually administered as a blood test. This is a five character alphanumeric field. | |
| Status | Indicates the result of the lead screening. The default dictionary may be modified for localized district use. | |
| Comments | Provides a text field for entering details about the screening. | |
| Concussion | ||
| Screening Date | Indicates the date the student took the screening. This field populates based on the Screening Date entered when a Screening Type is selected, but it can be modified as needed. | |
| Test Type | Indicates the type of concussion test administered (e.g. baseline or post-injury). The default dictionary may be modified for localized district use. | |
| Score | Indicates the score the student received. This is an eight-character field. | |
| Status | Indicates the results of the screening. The default dictionary may be modified for localized district use. | |
| Expiration Date | Indicates the date the screening expires. This date must be AFTER the original screening date. | |
| Comments | Provides a text field for entering details about the screening. | |
Print Student Screening Records
Select one of the Print buttons at the top of the Screenings tab. The report can be generated as a PDF or DOCX format.
These print options print screening records for the selected student only. More health reports are available in the Health Reports folder.
 Screenings Summary Report Format Options
Print All
The Print All option prints all records of saved screenings for the student. Screenings print in chronological order (the earliest screening prints first).
Print Selected Year
The Print Selected Year option prints the entered screenings recorded during the year selected in the Campus toolbar. If a screening was recorded in December of 2013, and the year in the Campus toolbar was 2013-14, the screening prints. If the screening was recorded in December of 2013, and the year selected in the Campus toolbar was 2014-15, the screening does not print.
Print Selected Screening
The Print Selected Screening option prints a summary of the selected screening from the Screening History list only. For this option, a screening must be selected.
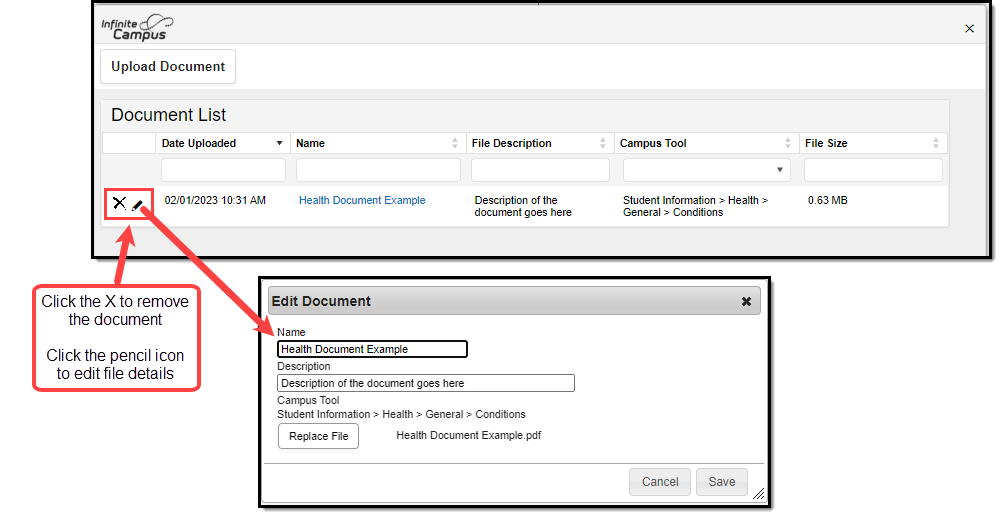
Upload and Manage Screening Documents
The Screenings tool allows you to store, manage, and view all screening-related documents associated with the selected person.
To Upload a New Document:
- Click the Documents button. A separate window will appear, containing an Upload Document button and the Documents List.
- To begin uploading a new document, click the Upload Document button and select Add Files.
- Locate the file on your local hard drive or network and click OK.
- The file will appear in the Upload Documents list. From here you can add a Description (optional), see what tool will be associated with the file, and the size of the file.
- Mark the checkbox in the left-hand corner to agree to the terms of the Infinite Campus Acceptable Use Policy (as well as any district-mandated policies).
- Click Upload. The file is now uploaded and attached to the student where it can be accessed at any time.
Delete or Edit an Existing File
If you need to delete the file, click the next to the file needing deletion.
If you need to edit file details, click the  icon next to the file. The Edit Document editor will appear, allowing you to edit the file name, description, or replace the file.
 Edit Document
Use Letter Designer and Letter Builder to Report Screening Information
Tool Search: Letter Builder, Letter Designer
Use the following procedures to create letters that can be sent to parents/guardians for students who may be missing screenings or to report the results of a recent screening.
- These examples use the Filter Designer, Letter Builder and Letter Designer tools.
- Students must be in a household with at least one address marked as mailing to receive a letter.
- Campus sub-reports are available in the Letter Designer for Dental, Vision, Hearing, Concussion, and Scoliosis screenings.
Missing Screenings
- Create an Ad hoc Filter to find students who may be missing a specific screening during set time. Use these fields from Screening Counts:
- screeningCounts.subformCounts (subform is the specific sub-screening; if the letter is for missing hearing screenings, this field would be screeningCounts.hearingCounts).
- screeningCounts.date (this will be used twice)
- screeningCounts.calendarID
- additional fields like identity.lastName, identity.firstName, etc,. can also be selected.
- Click the Next button.
- On the Parameters screen, add a second screeningCounts.date by clicking the Add button and select that field from the dropdown list.
- Set the fields like so:
- screeningCounts.subformCount = 0
- screeningCounts.date IS NULL
- screeningCounts.calendarID = enter the calendar ID of your selected calendar (navigate to System Administration > Calendar > Calendar to locate this)
- screeningCounts.date BETWEEN DATE (enter desired date range in the appropriate fields).
- Enter this text in the Logical Expression field. Instead of the field names, enter the ID numbers of the row in which that field is located. (subformCount AND calendarID AND (date #1 OR date #2))
- in this example, the expression would be (3 AND 5 AND (4 OR 6))
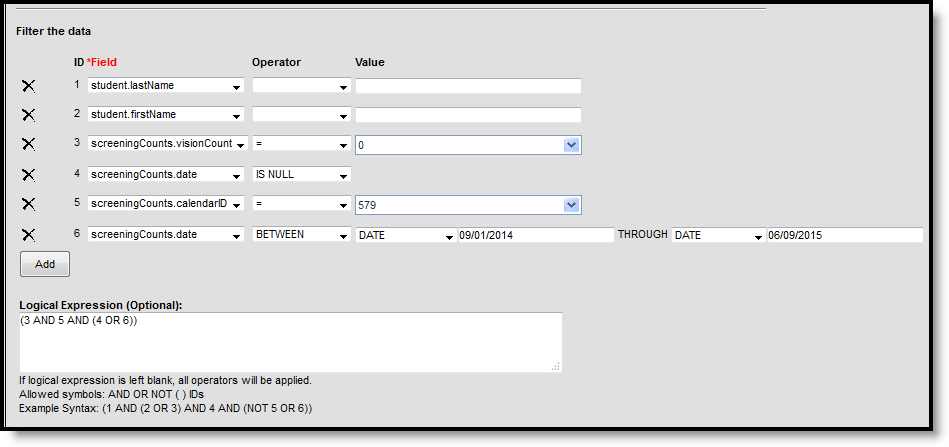
- in this example, the expression would be (3 AND 5 AND (4 OR 6))
- Save.
- In the Letter Designer, create and save the letter.
- In the Letter Builder, select the created ad hoc filter and the letter created in the previous steps.
- Click the Build Letters button.

Report of Screenings
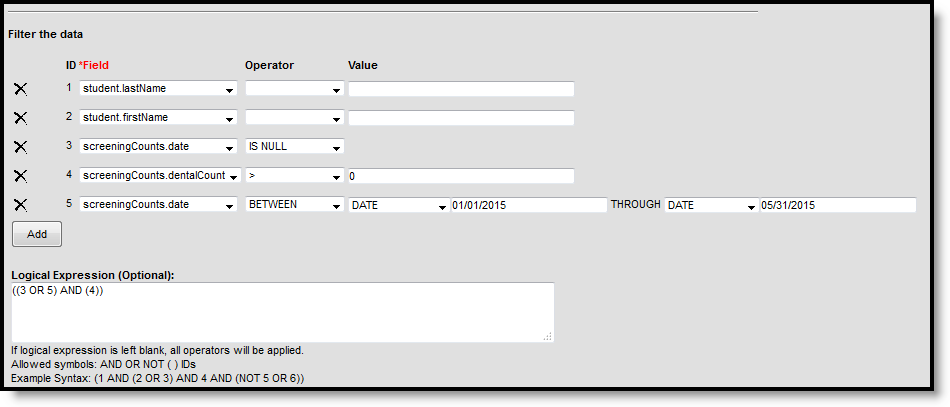
- Create an Ad hoc Filter to find students who may be missing a specific screening during set time. Use these fields from Screening Counts. The filter can contain multiple subform counts, but the only Sub-reports available are Dental, Hearing, Vision, Scoliosis, and Concussion.
- screeningCounts.subformCounts (subform is the specific sub-screening; if the letter is for missing hearing screenings, this field would be screeningCounts.hearingCounts).
- screeningCounts.date (this will be used twice)
- additional fields like identity.lastName, identity.firstName, etc,. can also be selected
- On the Parameters screen, add a second screeningCounts.date by clicking the Add button and select that field from the dropdown list.
- Set the Parameters as follows:
- screeningCounts.subformCount > 0
- screeningCounts.date IS NULL
- screeningCounts.date BETWEEN DATE (enter desired date range in the appropriate fields).
- Enter this text in the Logical Expression field. Instead of the field names, enter the ID numbers of the row in which that field is located. (screeningCounts.date #1 OR date #2) AND (subformCounts 1 OR subformCounts 2 OR subformCounts 3))
- in this example, the expression would be ((3 OR 5) AND (4))
- Only one subform.Count has been added, but if more than one were included, additional ID numbers would be added.
- Save.
- In Letter Designer, create and save your letter.
- Include the desired Health Sub-reports. The Screening Counts used in the Ad hoc filter and the Sub-reports in the letter should be for the same screenings.
In the Letter Builder, select the created ad hoc filter and the letter created in the previous steps.

