Tool Search: POS Account Messenger Scheduler
The POS Account Messenger Scheduler allows districts to select a day and time for Campus to send account balance information and other routine food service notices. This tool uses the message templates created with the POS Account Messenger.
The POS Account Messenger Scheduler will automatically generate messages based on the data available at that time. A confirmation email will be sent to the person who created the messenger schedule telling them that it has run and how many phones/email devices received the message if the Send confirmation email checkbox is marked. The person must have an email address entered on their Census > Demographics tab.
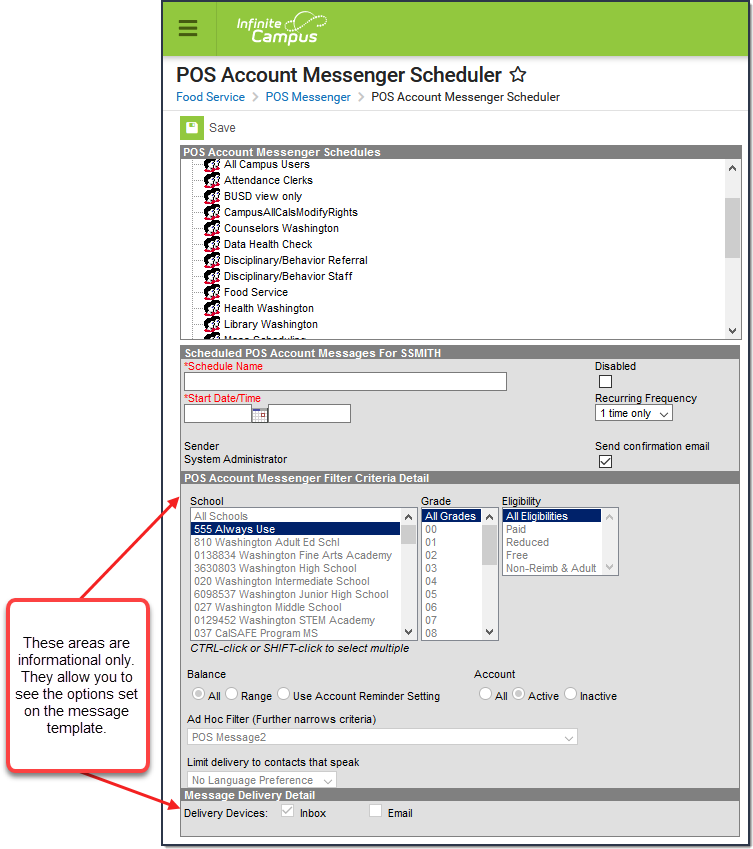 Example POS Account Messenger Scheduler
See the POS Account Messenger Tool Rights article for information about rights needed to use this tool.
Important Information About this Tool
Keep the following in mind before you schedule POS Account Messenger Scheduler.
- Review and determine the options for POS Account Messenger Scheduler Preferences under Point of Sale > Account Maintenance > POS Preferences.
- Create message templates with the POS Account Messenger tool.
- Messages should not be sent until all meal services are complete.
- Multiple scheduled messages should be about 10 minutes apart and prioritized in the following manner to ensure the messages have the correct sense of urgency (based on Template language used) when sent out:
- Negative balance notifications
- Low balance notifications
- Use Account Reminder Settings (Optional if this Account setting feature is used by the district).
- Avoid scheduling calls too early in the morning or too late in the evening when entering a Start Date/Time.
- If the Recurring Frequency selected is Hourly or Daily, messages may go out during weekends depending on POS Preferences settings for the scheduler.
- If there are multiple schedules set up with a variety of Recurring Frequencies of Hourly, Daily, Weekly and/or Monthly, messages may go out during weekends for some accounts.
- Templates can have Send Emails at and Dial Window times entered and saved, these settings affect the POS Account Messenger Scheduler's Start Date/Time. The scheduler will create the campaign to send the messages at the Start Date/Time, but the messages will be sent based on the times saved on the template.
- POS Account Messenger templates that include email attachments will send the same attachment each time the message is sent. Keep this in mind if the email attachment was not meant to be sent repeatedly.
- Always review and compare Ad hoc results to recipient lists. If you are scheduling the same message but using different templates for different audiences or setting up a recurring schedule, this step will help you avoid unintentionally sending the message multiple times to the same recipients because of the crossover created by the ad hoc lists. You can use the POS Account Messenger tool to review the recipient list.
- Emancipated minors who have a non-household Messenger relationship to themselves on the Census > People > Relationships tab will receive Point of Sale messages.
Scheduling a POS Account Message
- Select a template from the Message Builder Schedules table.
- Enter the Schedule Name.
- Enter the Start Date/Time of the message.
The Start Date/Time should be when all meal service is complete. Avoid scheduling calls too early in the morning or too late in the evening.
If the time entered on the Scheduler is... Then the message will be sent... the same or later than the time entered in the Dial Window or Send Email field on the template
at the time entered on the Scheduler. earlier than the time entered in the Dial Window or Send Email field on the template at the time set on the template. - Choose how often to send the message by selecting an option from the Recurring Frequency dropdown list.
- Mark the Send Confirmation Email checkbox to receive an email when the message has been sent. A confirmation email will be sent to the person who set up the Message Builder Schedule.
- Select the Save icon when finished. The new schedule will appear below its respective template in the POS Account Messenger Schedules table.
Add more schedules by selecting the newly added schedule in the Message Builder Schedules list and selecting the Add Scheduled Message Builder.
If the Message Builder Schedule should be disabled, mark the Disabled checkbox. If disabled, no future messages will be sent for the schedule.
