Tool Search: Filter Designer
In the Query Wizard, elements are organized in a straightforward pattern, so it is easy to select the elements needed. Filters can be designed with student information, census/staff information or course/section information. Queries for students and course/section data pulls results from the calendar selected in the Campus toolbar. Census/Staff data pulls results from the entire Campus database, regardless of the calendar selected.

- Select fewer fields to include in the query
- Add more filters (see Functions) to reduce the number of records
- Use direct SQL access
Filters including GPA fields may task the server. It is recommended that these queries be generated after normal school hours.
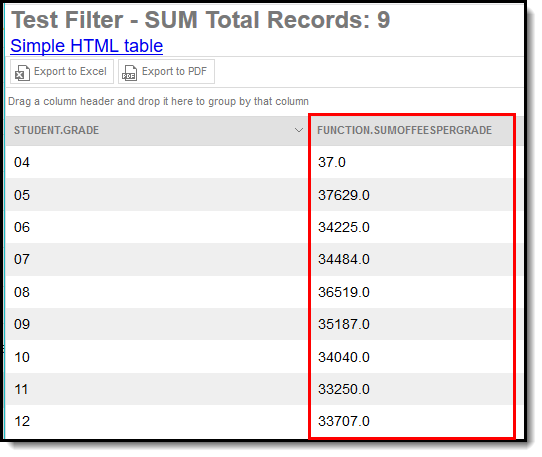
Filters built in the the Filter Designer display in HTML format. The HTML output allows for column sorting, filtering, grouping, and exporting to Excel or PDF.
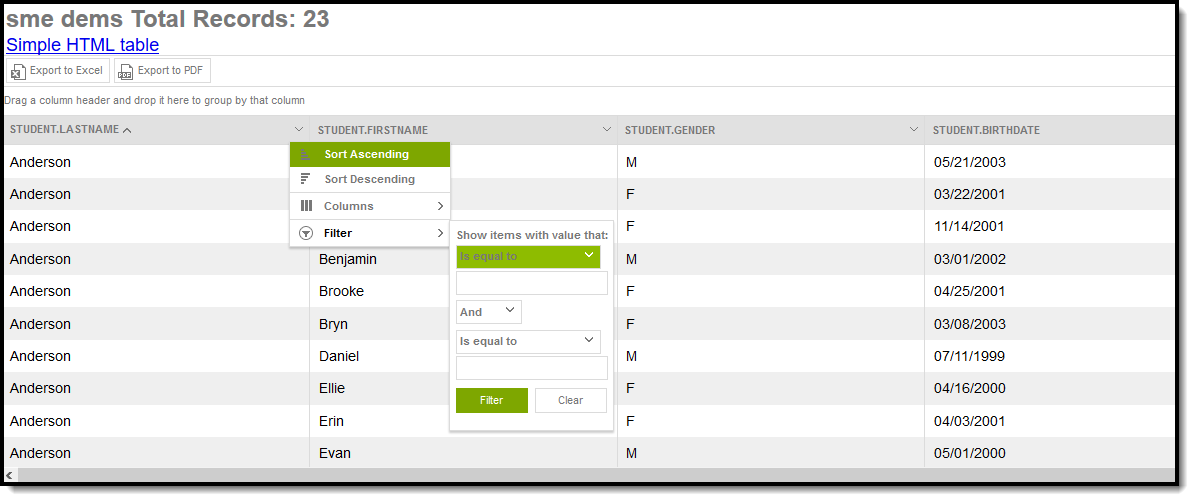 HTML Filter Display
To view the output in a simple HTML table, click the link at the top of the output. This displays the output without the ability to sort, group and organize the columns.
Query Wizard functionality allows users to easily create Ad hoc filters by organizing elements in a straightforward manner. Query Wizard filters are dynamic and always pull current information from the database based on the fields and filter options selected.
When using Custom Tab fields within Ad Hoc Query Wizard, all students are included in the results even if the student does not have a record within the custom dated tab. To exclude students without records for fields from a custom tab that is a Table or List Element tab type, set the statusDate Operator to IS NOT NULL. When pulling in fields from a custom tab that is a Table or List Element tab type, Ad Hoc logic outputs every possible combination based on a specific date and time. The Table Tab Type stores specific times. The List Element Tab type always stores 12:00 AM. See the Custom Tool Setup article for more information.
Query Wizard Features
Short and Long Filter Descriptions
This provides additional information and context about the filter. It's displayed when a user selects that filter from the Saved Filters list and when the filter is being modified.

To attach short and/or long descriptions to a filter, enter this information within the Short Description and Long Description text fields. To access the Long Description text box, select the (+) icon. Once the filter itself is saved, all descriptions entered are saved.
Once a filter has a long description entered and saved, this information displays on the Filter Designer editor when the filter is selected in the Saved Filters window. This is useful when determining what filter to use as well as communicating any important information about the filter prior to editing or making modifications. If a short description has been entered, this information displays when the cursor hovers over the filter within the Saved Filters window.
Both the Short and Long Descriptions display when a saved filter is edited/modified. Although the Long Description field appears locked, it can be modified by selecting the (+) icon.
 Filter Description Display
Filter Operators
Filter operators allow users to set specific parameters per field within a filter. These parameters uniquely filter each field while maintaining the filter as a whole.
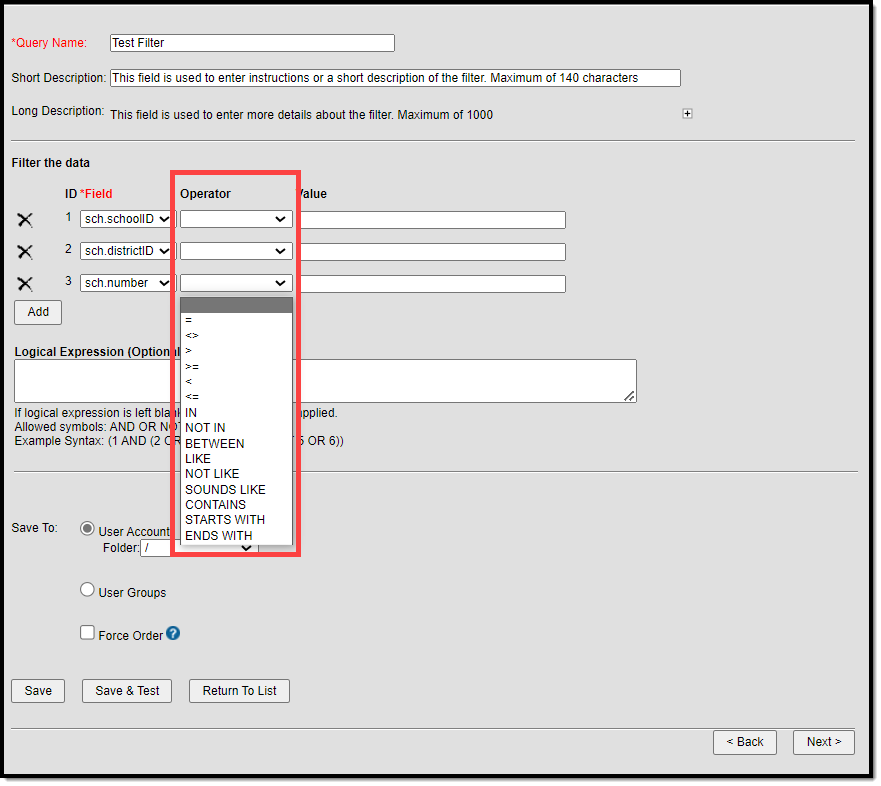
Users may apply multiple operators to the same field by clicking the Add Filter button and selecting a field. If a Logical Expression exists, all fields assigned an Operator must be included within the expression.
The following table describes each available filter operators:
| Operator | Results | Example |
|---|---|---|
= (Equals) | Returns exact match of value. | student.grade=3 |
< > (Does not equal) | Returns results not equal to the value. | student.gender < > M |
> (Greater than) | Returns results that are greater than the entered numeric value. | student.age > 16 |
> = (Greater than or equal to) | Returns results that are greater than or equal to the entered numeric value. | student.age >= 16 |
< (Less than) | Returns results that are less than the entered numeric value. | student.age < 16 |
< = (Less than or equal to) | Returns results that are less than or equal to the entered numeric value. | student.age <= 16 |
IN | Includes value. | student.grade IN 9,10
When using this format, do not put spaces after the comma. |
NOT IN | Excludes value. | student.grade NOT IN 11,12 This operator allows NULL values. When using this format, do not put spaces after the comma. |
BETWEEN | Filters data between two specified values. Works with numbers, dates and strings.
| For BETWEEN: student.stateID BETWEEN 00001 THROUGH 100000. |
IS CURRENT USER | Returns the current user's ID. | Learner Plan Manager Setting learningPlan.planManagerPersonID IS CURRENT USER reports the current user's ID, along with data only applicable to that user. Current Teacher Sections For courseSection.personID IS CURRENT USER limits the results to students in the current teacher's section. This is useful for a report of student birthdays with a homeroom, or a Spirit Squad Advisor who needs to make locker signs and needs a list of participants and locker information. |
LIKE | Searches for test string in the field. | course LIKE hist |
NOT LIKE | Searches for test string and filters data that is not like the user-defined value. | course NOT LIKE hist |
SOUNDS LIKE | Uses a database function to return names with similar sound patterns. | student.lastName SOUNDS LIKE Ball |
CONTAINS | Searches for strings that include the same data entered by the user in the field. Any string that does not contain the user-defined value is filtered out. Any wildcard characters entered are treated as standard SQL wildcards. | student.birthCountry CONTAINS Cana |
STARTS WITH | Searches for strings that begin with the same data entered by the user in the field. Any string that does not contain the user-defined value is filtered out. Any wildcard characters entered are treated as standard SQL wildcards. | student.birthCountry STARTS WITH Mexi |
ENDS WITH | Searches for strings that end with the same data entered by the user in the field. Any string that does not contain the user-defined value is filtered out. Any wildcard characters entered are treated as standard SQL wildcards. | student.birthCountry ENDS WITH many |
IS NULL | Returns fields that are completely NULL (0 is considered a value). | student.stateID IS NULL |
IS NOT NULL | Returns all fields that are not NULL (0 is considered a value). | student.ssn IS NOT NULL |
IS TODAY | Returns result dates as the current date. | start.date IS TODAY |
IS YESTERDAY | Returns result dates as of yesterday's date. | start.date IS YESTERDAY |
IS TOMORROW | Returns result dates as of tomorrow's date. | end.date IS TOMORROW |
IN THE MONTH | Returns all database field data for the month entered. | employment.districtStartDate IN THE MONTH October |
=TRUE | Returns checkbox values of "true" (checkbox is marked) | enrollment.stateExclude = TRUE |
=FALSE | Returns checkbox values of "false" (checkbox is not marked) | enrollment.stateExclude = FALSE |
In addition to the options above, wildcard searching is also available. The following is a list of options:
| Wildcard or Pattern | SQL Meaning | Standard Examples |
|---|---|---|
% | 0 or more characters | Entering the word Man returns the same results when entering Man%. |
_ (underscore) | One character | Olson_Zierke and Olson Sierke return the same results. |
[token] | A range of possible characters | L[ae] finds names that start with La or Le. |
,James | No SQL wildcard | Searches for first name equal to or beginning with James. This can only be used in the Quick Search fields. |
Gonzales-Uribe | Compound name | Finds that last name.
|
Gonzales Uribe or | A compound name with a space. | Finds the name with or without a space or hyphen. Try wildcards if there is a space between the compound names. |
Users can also use the following combinations when using the Like operator:
| Wildcard or Pattern | SQL Meaning | Standard Examples |
|---|---|---|
% | 0 or more characters | L% finds names that start with L |
_ (underscore) | One character | L__ (two underscores) finds Lee and Lor, not Luewenhook. |
[token] | A range of possible characters | L[ae]% finds names that start with La or Le. |
^ | Negation of token | L[Query Wizard^ae] finds names that do not start with La or Le. |
Rules for Operators by Data Type
The following table describes all rules for allowing or disallowing operators by data type, where Y = Allowed, N = Not Allowed, and D = Depends on Field.
| Option | Number | Float | String | Date | Text | Bit |
|---|---|---|---|---|---|---|
> | Y | Y | Y | Y | Y | N |
>= | Y | Y | Y | Y | Y | N |
< | Y | Y | Y | Y | Y | N |
<= | Y | Y | Y | Y | Y | N |
< > | Y | Y | Y | Y | Y | N |
= | Y | Y | Y | Y | Y | N |
IS NULL | D | D | D | D | D | N |
IS NOT NULL | D | D | D | D | D | N |
BETWEEN | Y | Y | Y | Y | Y | N |
IS TODAY | N | N | N | Y | N | N |
IS YESTERDAY | N | N | N | Y | N | N |
IS TOMORROW | N | N | N | Y | N | N |
IN | Y | Y | Y | Y | Y | N |
NOT IN | Y | Y | Y | Y | Y | N |
LIKE | N | N | Y | N | N | N |
STARTS WITH | N | N | Y | N | N | N |
ENDS WITH | N | N | Y | N | N | N |
CONTAINS | N | N | Y | N | N | N |
SOUNDS LIKE | N | N | Y | N | N | N |
=TRUE | N | N | N | N | N | Y |
=FALSE | N | N | N | N | N | Y |
Use a Field as an Operator Value
Depending on the operator chosen for the field, a field may be used as an operator's value allowing a comparison between two fields. Logic only allows fields of the same data type to be used as the Operator's Value. For example, date fields are allowed to use other date fields as an operator value. When the appropriate operator is used, the Value column can act as a dropdown list while remaining static allowing the user to select a field or input a value. Deleting a field also removes it from the Value field, clearing out the operator for the field using it. Additionally, replacing a field with the Element Replacement tool replaces the field and the operator's value if the replaced field is being used as the value.
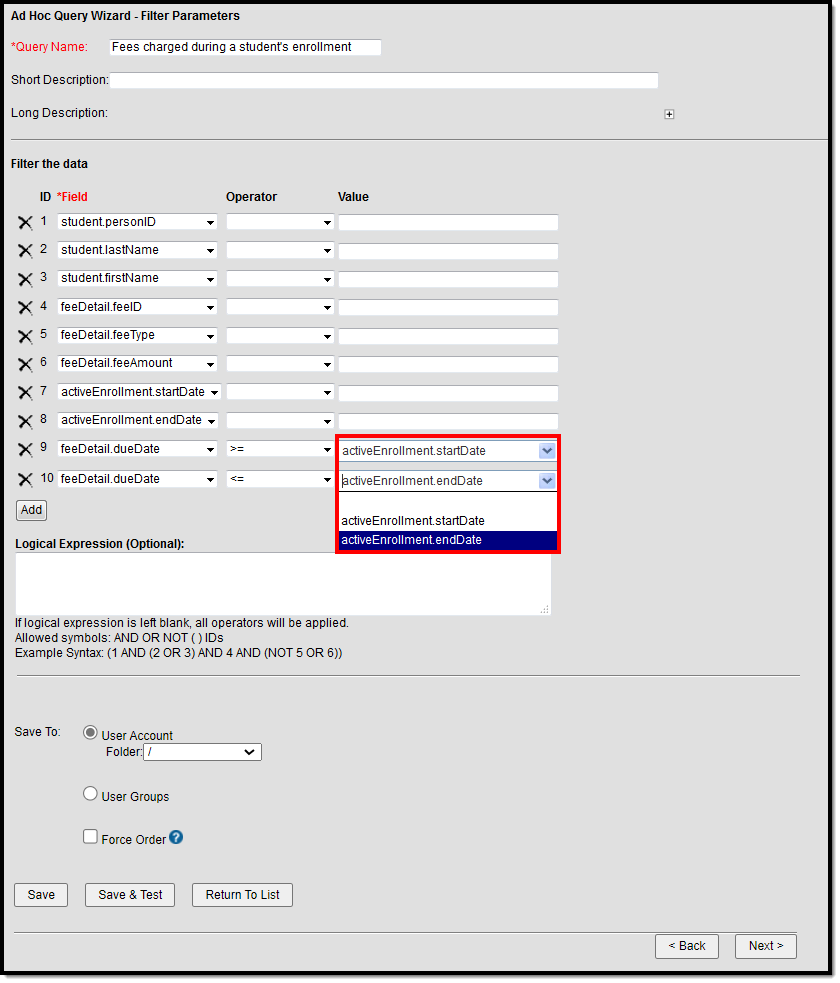
In the above example, a query was set to report students with fees charged during enrollment. Using the fields activeEnrollment.startDate (7) and activeEnrollment.endDate (8) as operator values for feeDetail.dueDate (9, 10), the query reports students with fees due on or after the student's active enrollment start date AND on or before the student's active enrollment end date.
Operators Allowed to Use a Field as Values
| Operator | Allowed |
|---|---|
> | Y |
>= | Y |
< | Y |
<= | Y |
< > | Y |
= | Y |
BETWEEN | Y |
IS CURRENT USER | N |
IN THE MONTH OF | N |
MONTHS BEFORE | N |
DAYS BEFORE | N |
IS NOT NULL | N |
IS NULL | N |
IS TODAY | N |
IS YESTERDAY | N |
IS TOMORROW | N |
IN | N |
NOT IN | N |
LIKE | N |
STARTS WITH | N |
ENDS WITH | N |
CONTAINS | N |
SOUNDS LIKE | N |
=TRUE | N |
=FALSE | N |
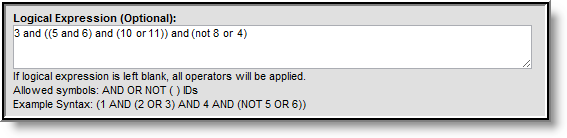
Logical Expressions
The Logical Expression field allows users to incorporate conditions between fields within a filter. This field effectively uses the OR, AND, and NOT conditions between fields and groups of fields.
- Only fields assigned an Operator are allowed to be included within logical expressions.
- Logical Expressions are created using the ID number associated with each field.
 Logical Expression with a Filter
 Logical expressions can be grouped using ( ) symbols and the ID number to define the order in which the tool should include or exclude a person. In the example above, the ( ) symbols indicate the tool should determine the student's End Date (5) and grade (6) and include these students depending on whether they are Asian (10) or White (11). This determination and group of students is then applied to the remaining parts of the logical expression.
Using ( ) symbols is especially useful when using the OR condition, as users can include or exclude people based on whether or not they meet the criteria for the fields included within a group of fields. For example, students with a State ID less than 1000 (8) or an End Status populated (4) are not included in the remaining calculation for the logical expression.
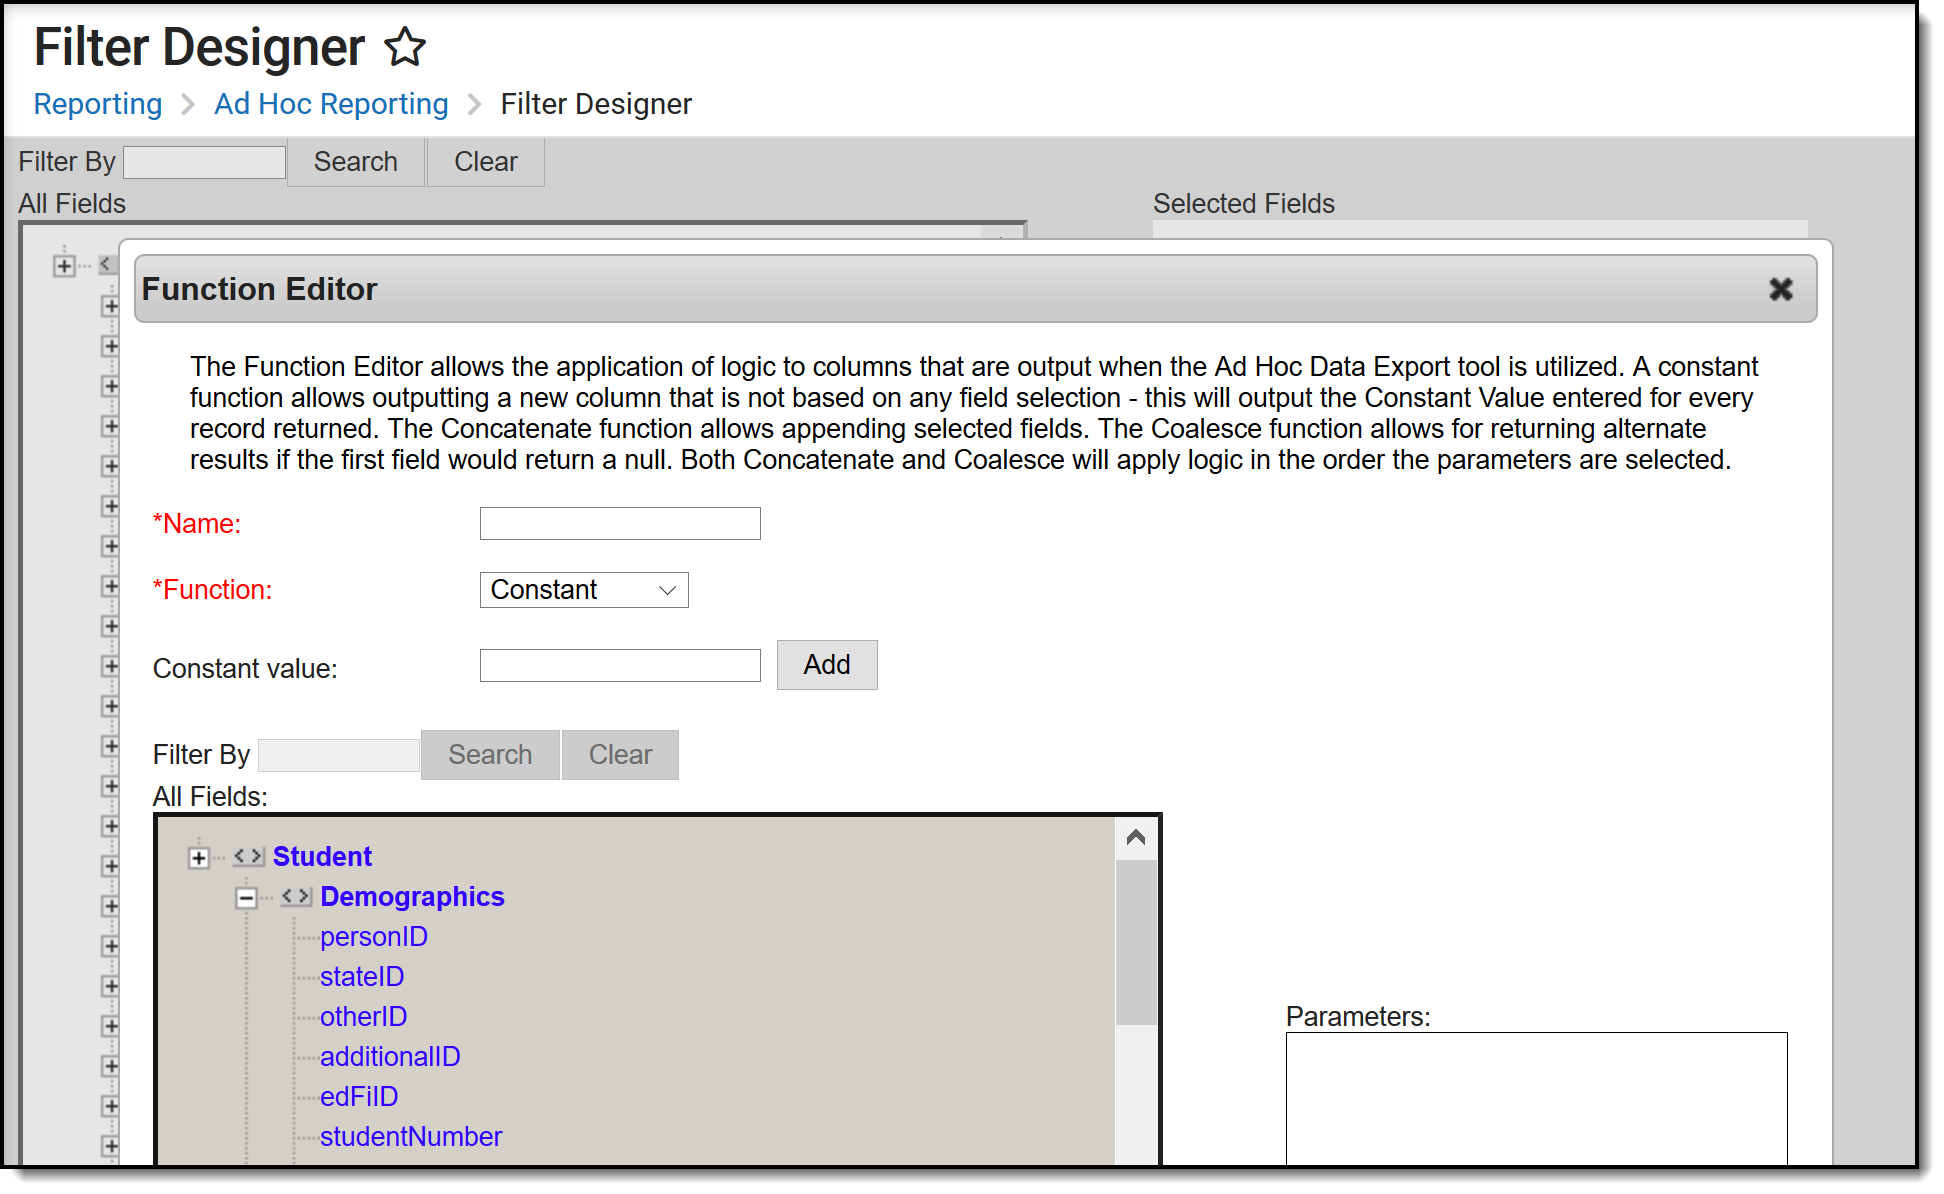
Functions
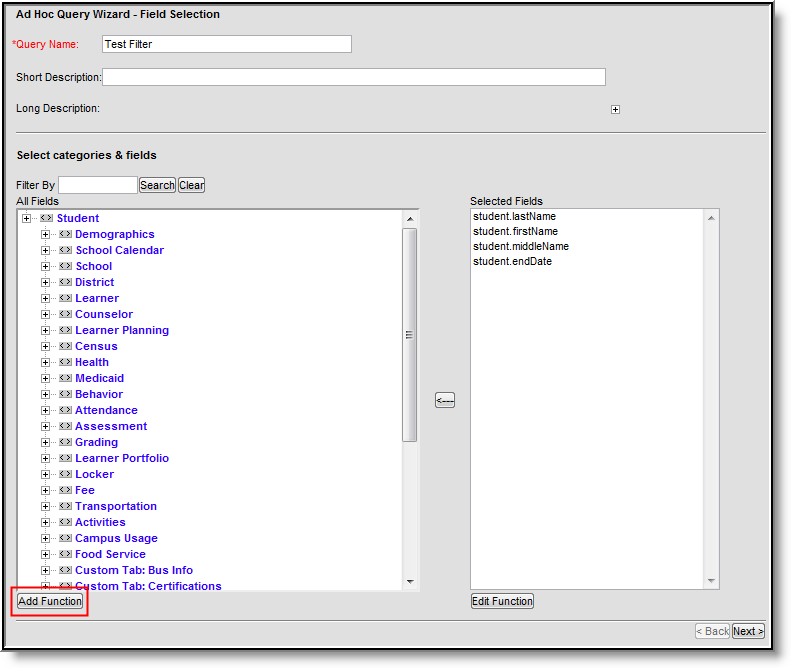
Functions can be added to filters, which allow logic to be applied to field columns when the filter is generated via the Data Export tool. To add a function to a filter, select the Add Function button. The Function Editor appears in a new window.
 Add Function
Add Functions to Queries
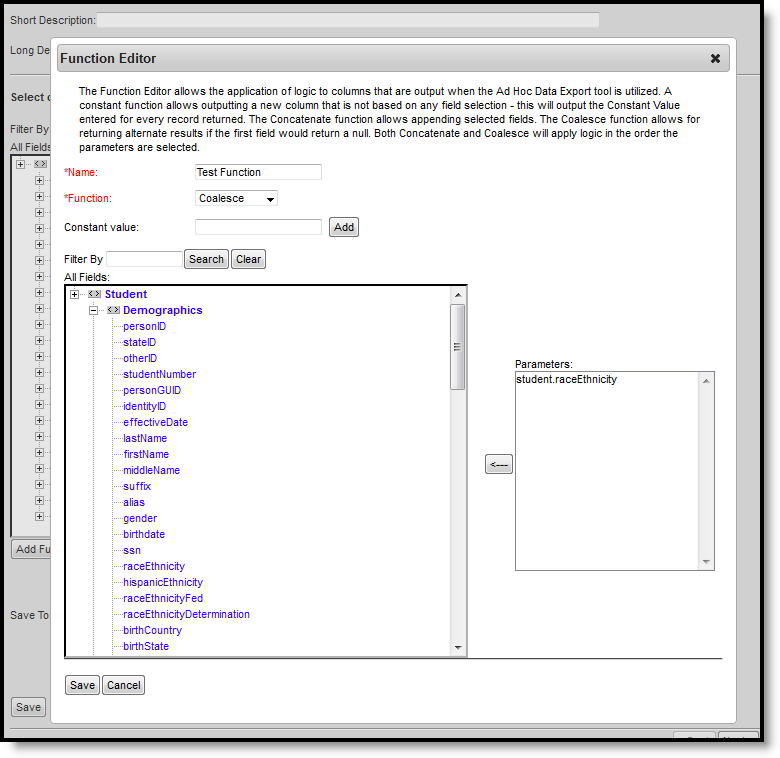
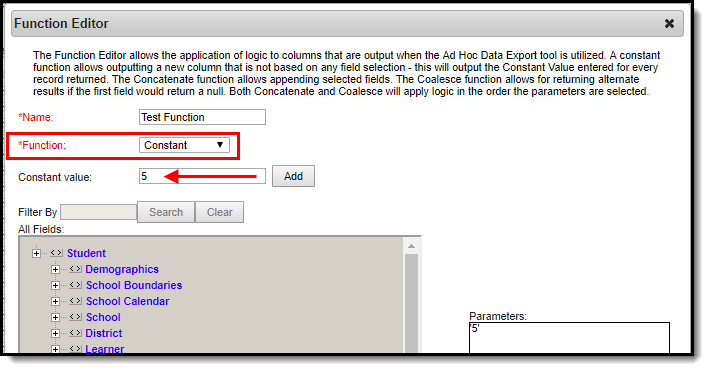
- Enter the Name of the function. This name differentiates the function from other functions within the Selected Fields window and on filters generated via the Data Export tool.
- Select the desired Function from the dropdown list. The Function Descriptions section below provides descriptions and examples of each function. Once a function is selected, the Filter By Search field (see step 4) becomes active.
- If the Constant Function is selected, enter the Constant Value and click the Add button. The value entered displays in the Parameters window and is reported on every record returned.
- Use the Filter By Search field to search for desired fields. Entering a search value and clicking the Search button resets the list of fields to only return matching fields. Click the Clear button to remove entered search values and see the entire list of fields.
- Select which fields to include within the function by clicking on each field within the All Fields window. Selected fields move into the Parameters window, indicating which fields have been added to the function.
- Select the Save icon.
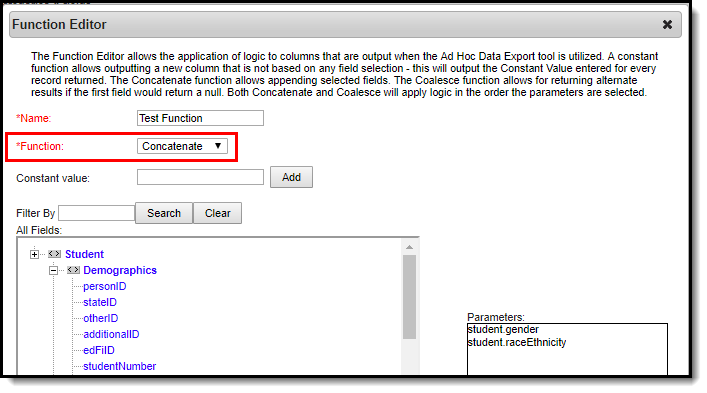
 Adding a Function to a Filter
 Enter Data into the Function Editor
The Field Selection editor appears after saving the added function. Functions created and added to the filter are displayed in the Selected Fields window. The function's name always appears to the left of the period (i.e., function.functionName).
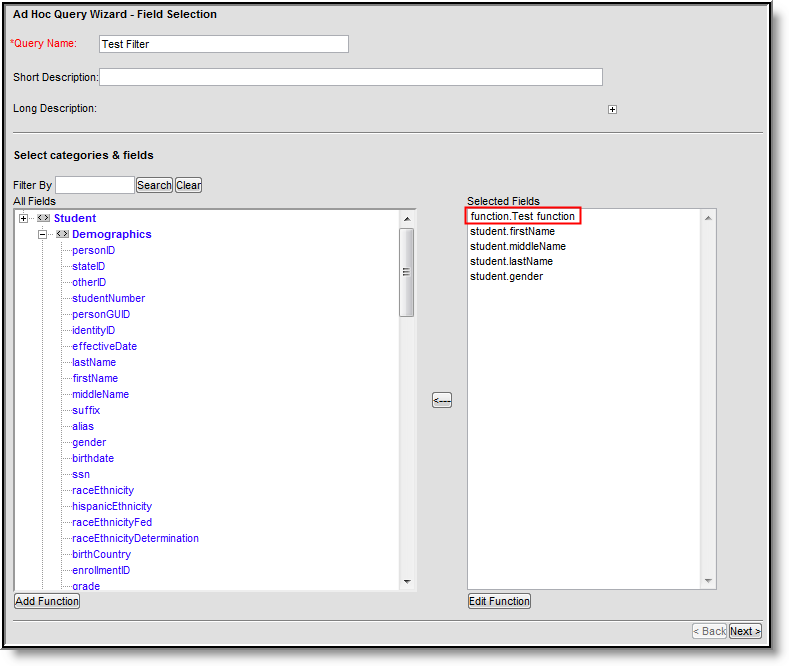 View Functions Added to a Filter
Edit Functions
Existing functions can be edited by selecting the function within the Selected Fields window and clicking the Edit Function button.
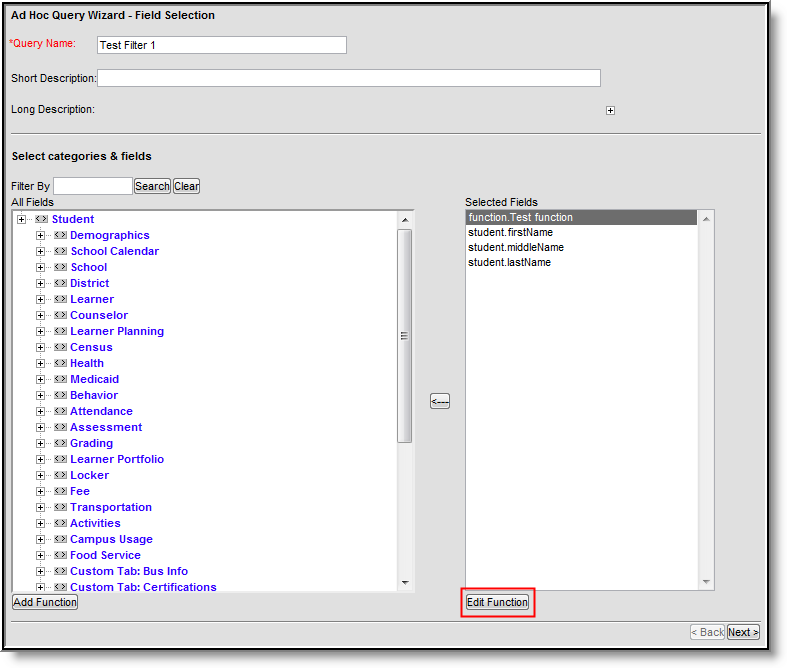 Edit Existing Functions
Function Descriptions
The following describes each available function.
| Function | Description | Example |
|---|---|---|
| Constant | The Constant function outputs the Constant Value entered on each record returned when the filter is exported. A Constant Value of 5 is entered and added to the filter in the examples to the right. When the filter is exported, a column is reported displaying the Constant Value entered. | |
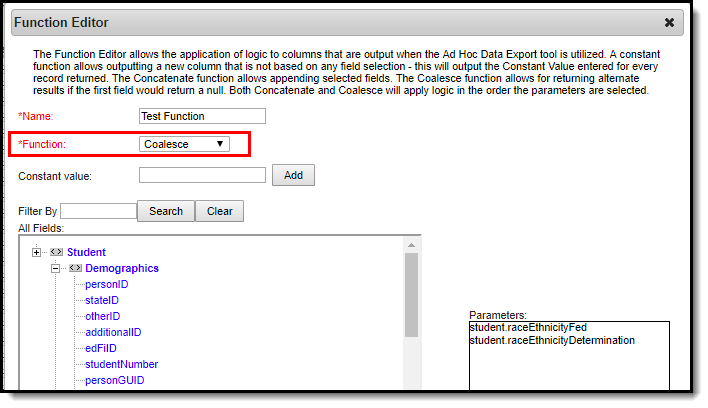
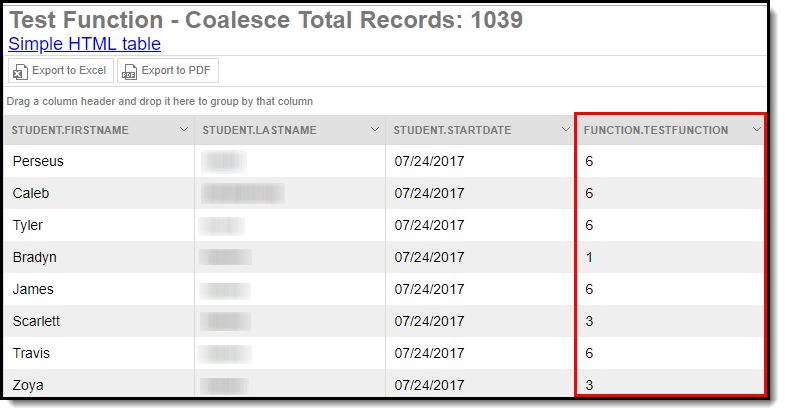
| Coalesce | The Coalesce function allows users to define multiple fields where logic pulls the first field, and if NULL, the second field is pulled, and so on down the line of added fields until a value is found. Logic pulls field values in the order fields are selected in the Function Editor. A Coalesce function for Federal Race Ethnicity and Race Ethnicity Determination fields was added to the examples to the right. This means logic first pulls and reports student Federal Race Ethnicity field values and for any that are NULL, the student's Race Ethnicity Determination reports. When the filter is exported, the function reports field data within a specific column. Student Federal Race Ethnicity values are reported. | |
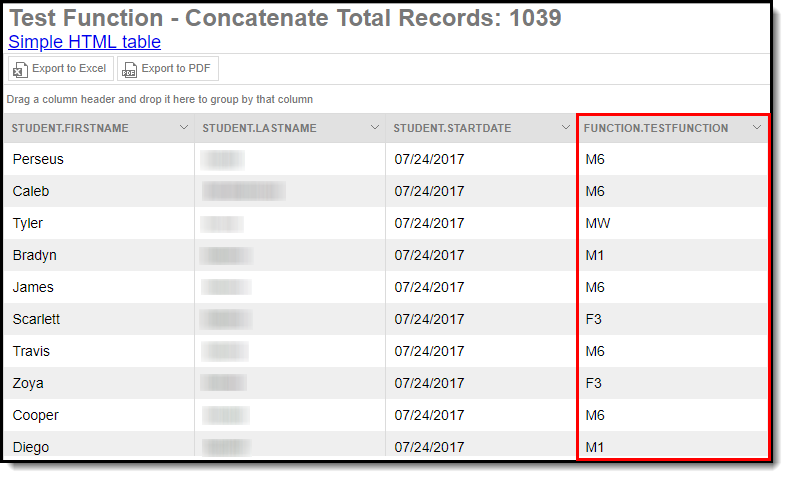
| Concatenate | The Concatenate function allows field values to be appended when the filter is exported. In the example to the right, a Concatenate function for fields Gender and Race Ethnicity was added. When the filter is exported, field values are appended and reported. Student Gender values (M, F) are reported alongside student Race Ethnicity values.
| |
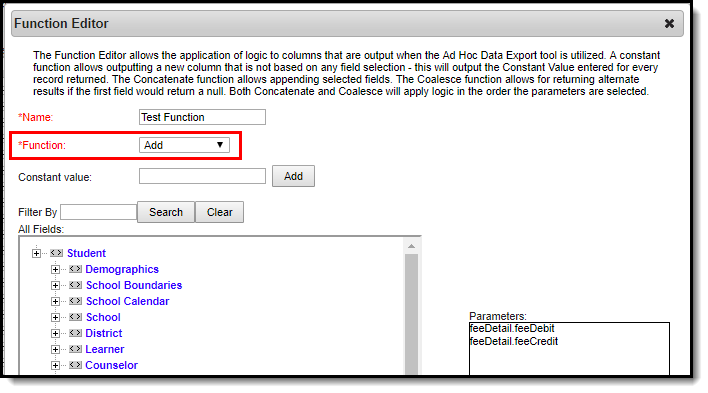
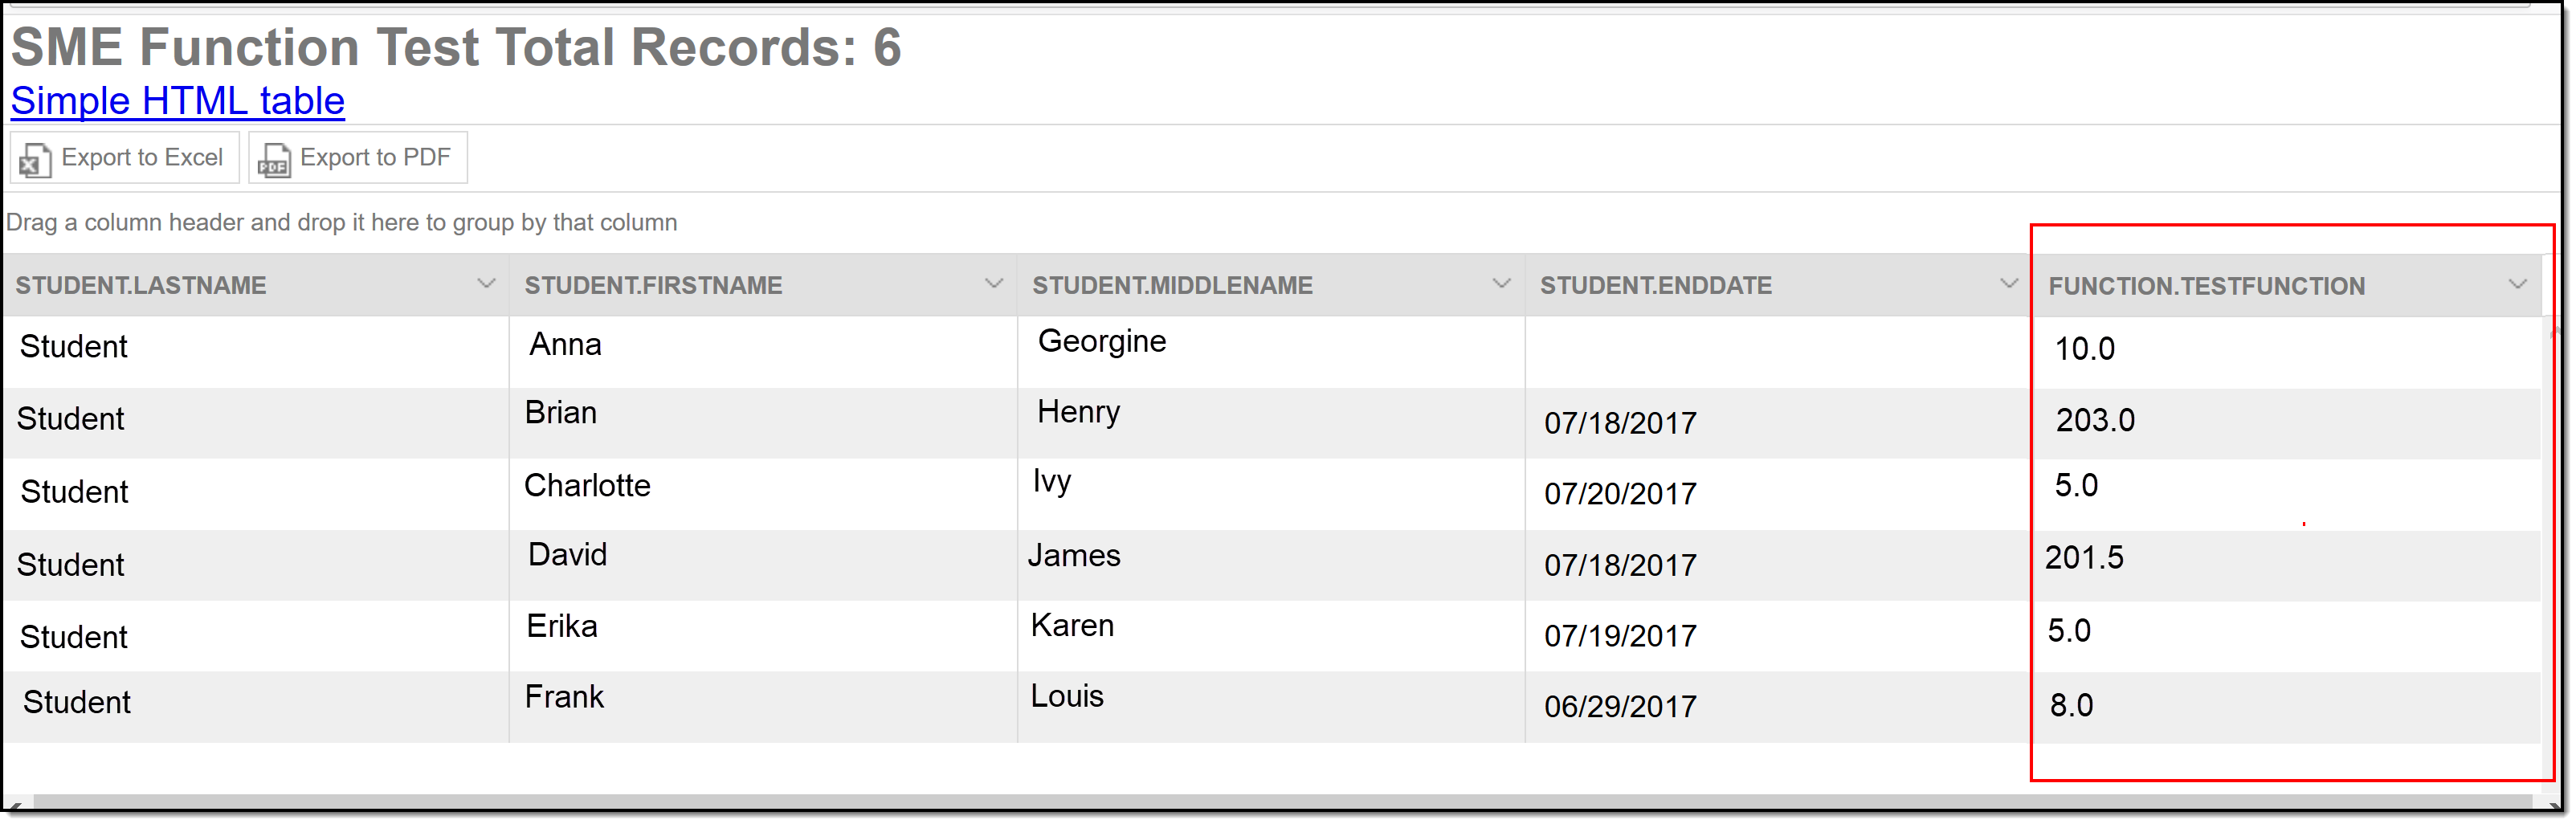
| Add | The Add function allows field values to be added together to output a single result (i.e., field 1 + field 2). In the example to the right, Fee Debit is added to Fee Credit to generate a total balance. When the filter is exported, field values are added and reported as a single value. | |
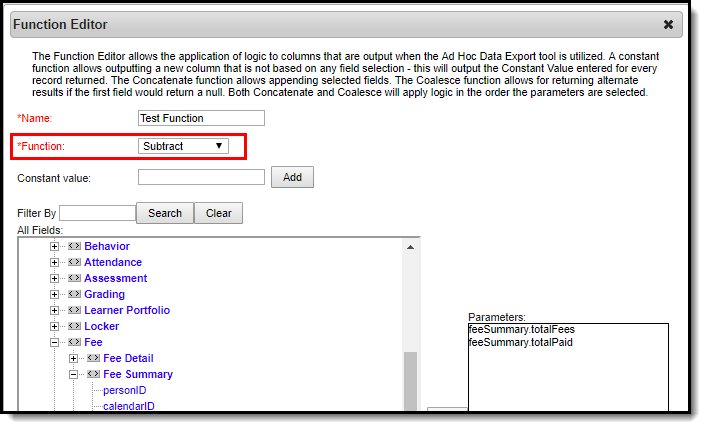
| Subtract | The Subtract function allows field values to be subtracted from each other to output a single result. In the example to the right, total Fees are subtracted from Total Paid to report a student's outstanding balance. When the filter is exported, field values are subtracted and reported as a single value. | |
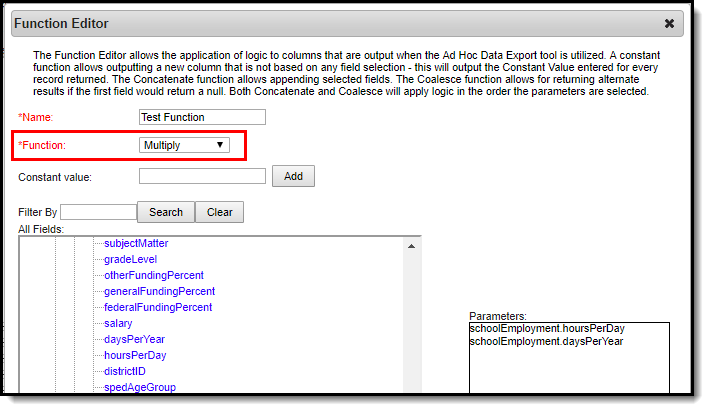
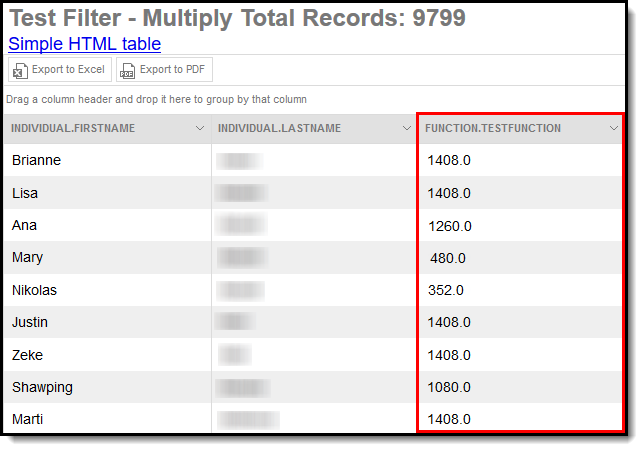
| Multiply | The Multiply function allows field values to be multiplied together to output a single result (i.e., field 1 x field 2). In the right-hand example, employee hours per day are multiplied by the number of days employed for the year. When the filter is exported, field values are multiplied and reported as a single value. | |
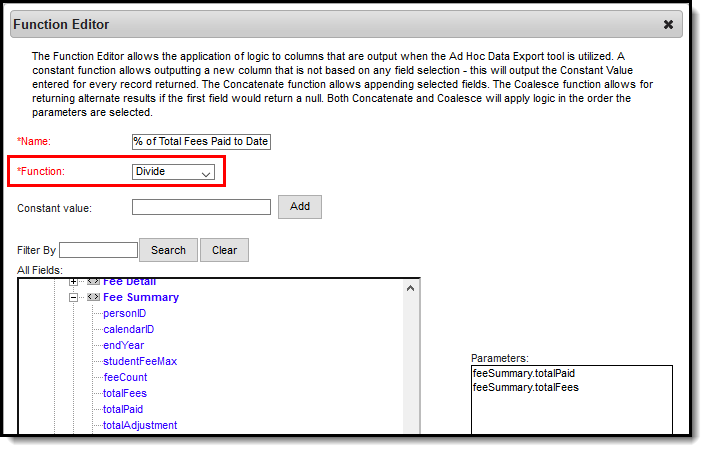
| Divide | The Divide function allows a field or more fields to be divided and output into a single result (i.e., field 1 / field 2). In the example to the right, the total number of fees is divided by the total amount of fees paid to get the percentage of total fees paid to date. If applicable, decimal places are included in the output. When the filter is exported, field values are divided and reported as a single value. | |
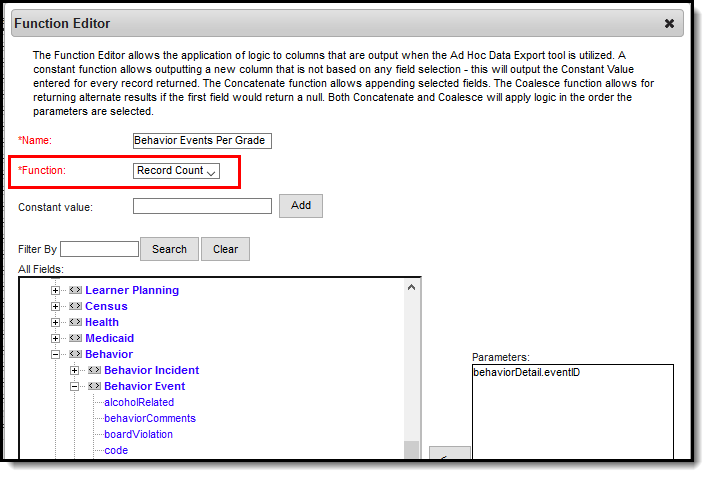
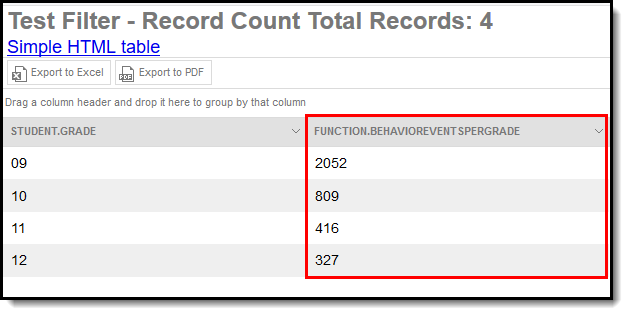
| Record Count | The Record Count function allows users to report a record count for the field selected. In the example to the right, a record count of behavior events is used to report a count of behavior events per grade level. When the filter is exported, a record count of the field is calculated and reported. | |
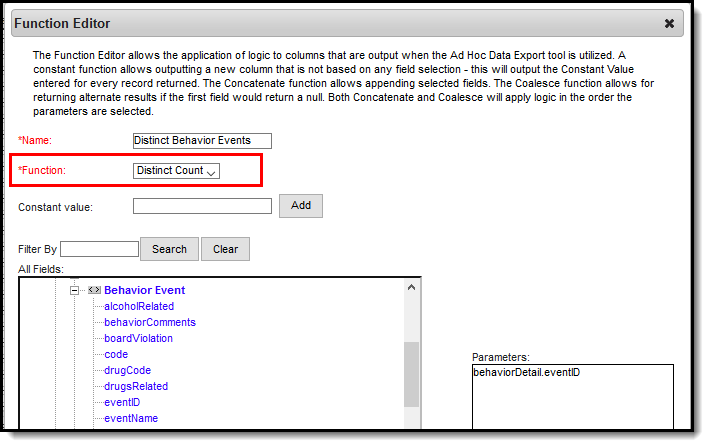
| Distinct Count | The Distinct function allows users to report a distinct count for the field selected. In the example to the right, a distinct count of behavior events is used to report the distinct count of behavior events per grade level. When the filter is exported, a record count of the field is calculated and reported
| |
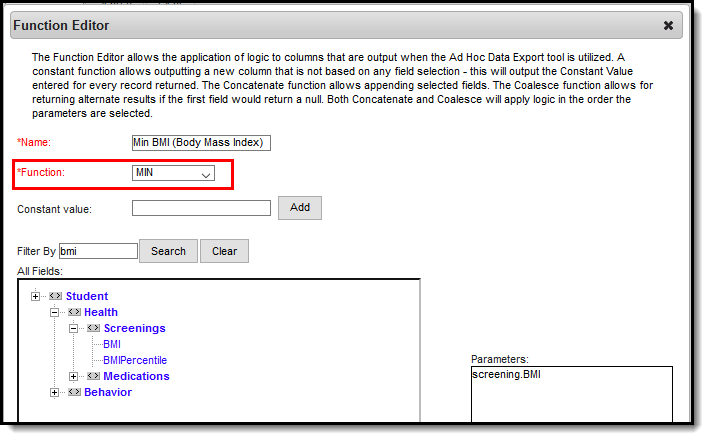
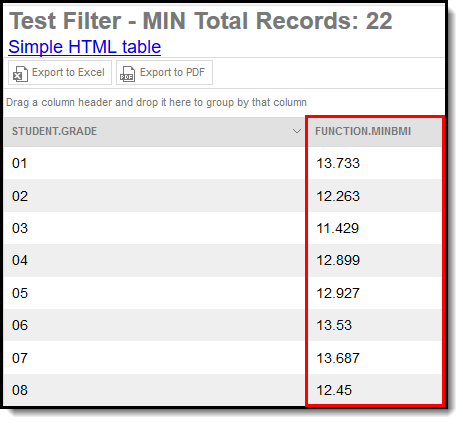
| MIN | The MIN function allows users to report the minimum value for a field. In the example to the right, the MIN BMI function reports the minimum BMI (Body Mass Index) per grade level. When the filter is exported, the MIN of the field is calculated and reported. | |
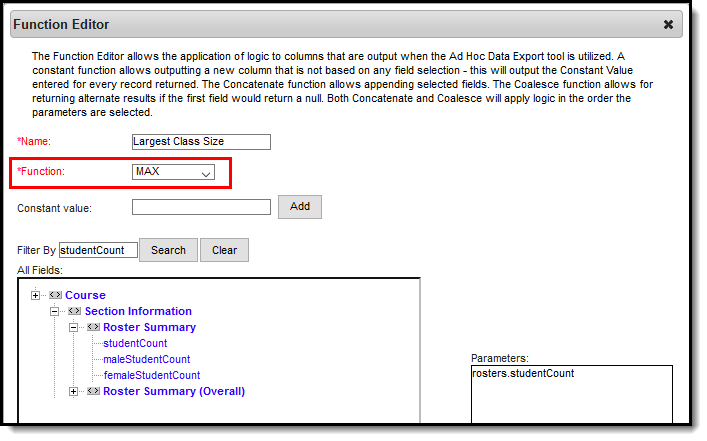
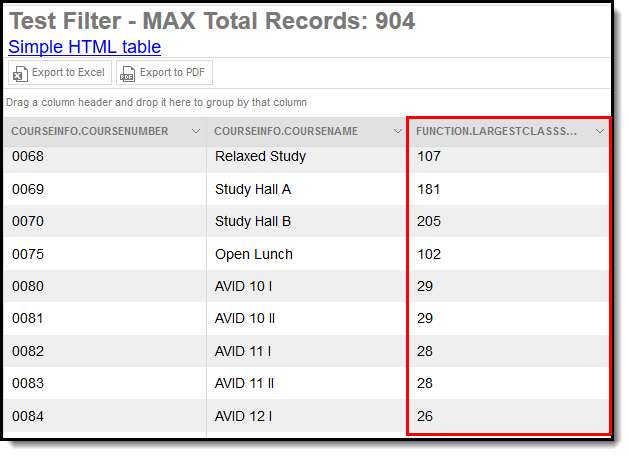
| MAX | The MAX function allows users to report the maximum value for a field. In the example to the right, the MAX student count is used as the function to report the largest class size per course. When the filter is exported, the MAX of the field is calculated and reported. | |
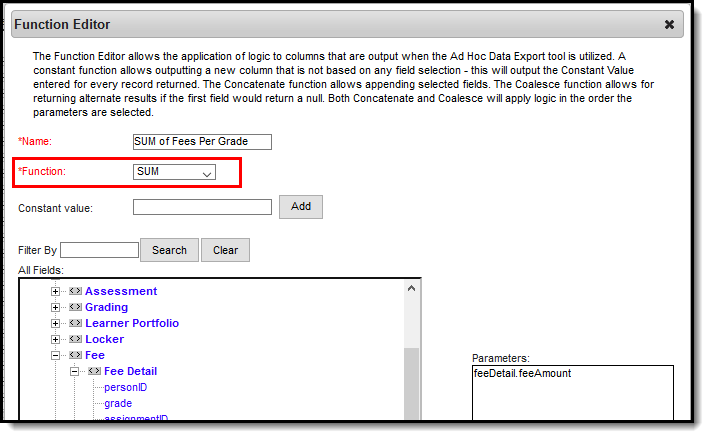
| SUM | The SUM function adds the value or field selected over all other aggregated fields. In the example to the right, the SUM of fee amounts is used to report the SUM of fees per grade. When the filter is exported, the SUM field is calculated and reported. | |
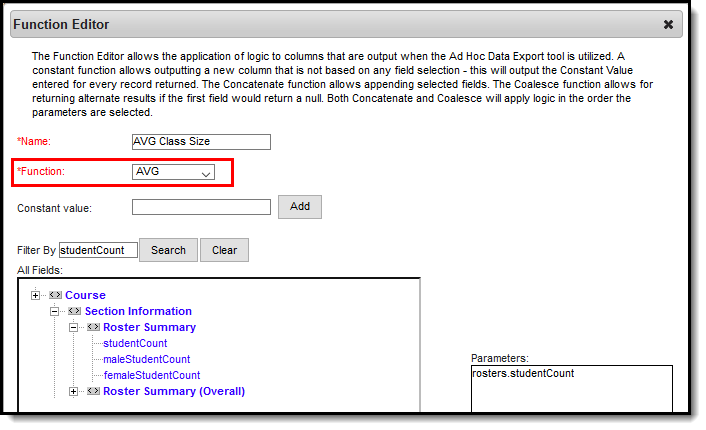
| AVG | The AVG function allows users to report the average value for a field. In the example to the right, the AVG of roster student count is used to report the average class size per department. When the filter is exported, the AVG field is calculated and reported. | |


Output Formatting
The Output Formatting editor lets users control how each field is reported and displayed when exported.
Grouping and Aggregation Descriptions
Grouping and aggregation place results into groups, and calculations can be performed on the results. Aggregations are displayed at the bottom of each data group when extracting data. These options are not available for fixed-width output formats.
Create a Filter
The following is a basic workflow for creating a filter. See the Query Wizard Features for additional formatting and modifications that can be applied to more advanced filters.
Step 1. Choose Filter and Data Type
- Select the Query Wizard radio button.
- Select a Data Type. This determines which fields are available for selection: Student, Census/Staff, or Course/Section.
- Click the Next button. The screen displays a list of fields to select in order to create the filter.
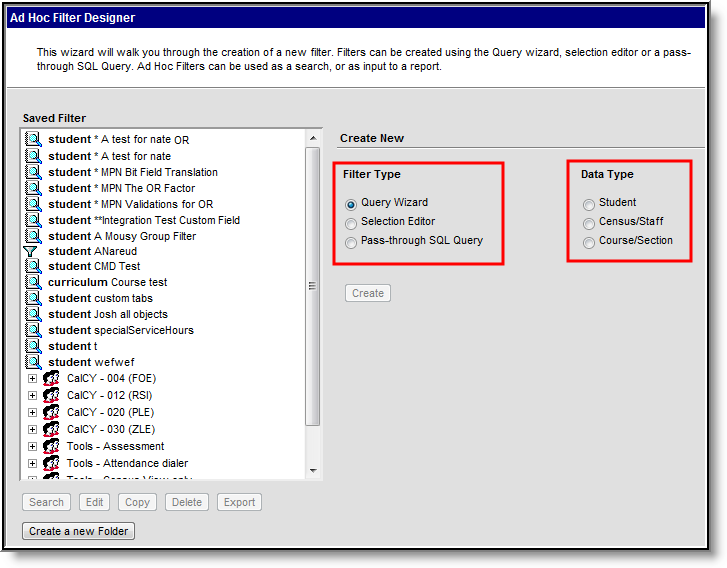 Filter Type, Data Type Selection
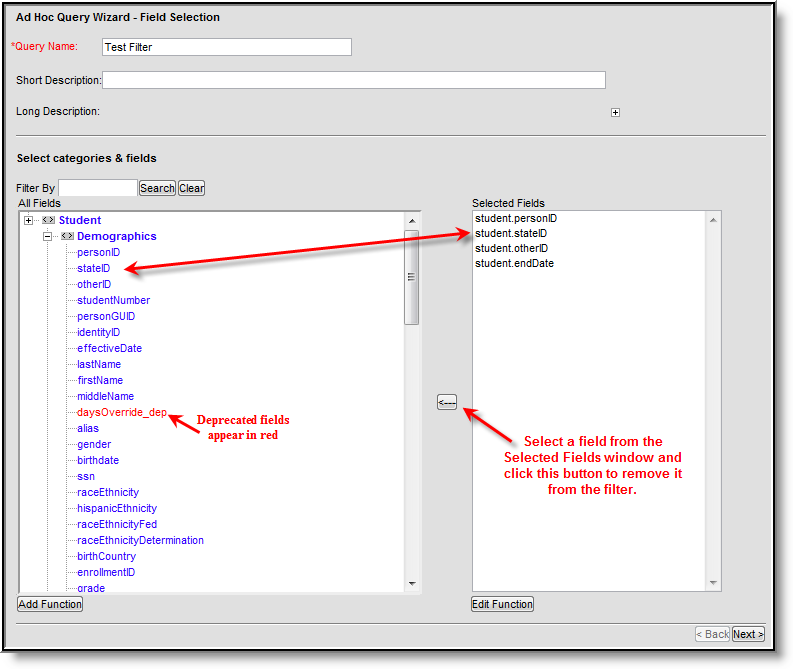
Step 2. Select Categories and Fields
Campus fields are organized into specific categories relating to the Filter Data Type selected on the previous screen. Categories are organized in a hierarchy format, where selecting the (+) open available fields and additional subcategories within the category. Users may include Campus and user-created custom fields when building filters.
- Enter a Query Name for the filter.
- Enter a Short and or Long Description about the filter (if applicable).
- Select the data elements from the All Fields list by clicking on them. The fields move to the Selected Fields list. To remove a field from the Selected Fields list, click on it to highlight it and click the left-pointing arrow button.
- Select the Add Function button to add a function to the filter.
- To search for a particular field, enter part of its name in the Filter By section and click the Search button. Select the appropriate options for the query. All fields that contain that name display in the All Fields list. To clear the selection, click the Clear button, and all available fields display again.
- To save the filter right now without testing it or modifying any results of the selected fields, choose Save or Save and Test.
- To continue, click the Next button to continue creating the filter, narrow returned results and sort the filter into the desired order.
 Adding/Removing Filter Fields
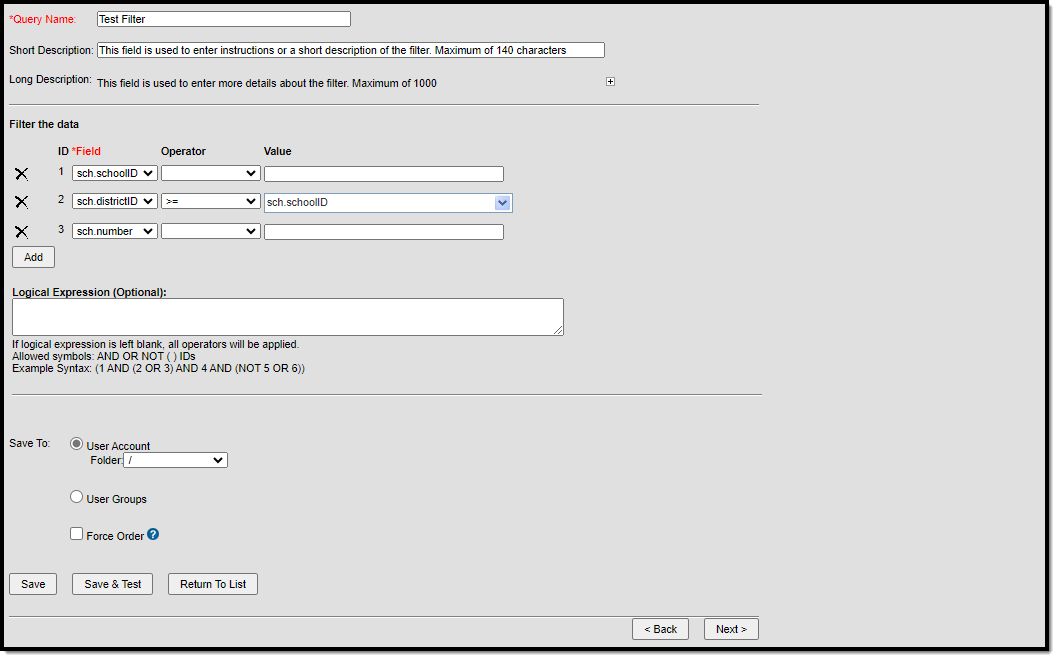
Step 3. Enter Filter Parameters
Filter parameters allow users to define specific constraints for how each field is filtered within the filter. This tool allows users to filter very specific data within reports and other exported files.
- Enter the Query Name and a Short/Long Description (if applicable).
- Select the Operator for each Field. The available fields are based on the data elements selected in the previous Field Selection screen.
- Enter the Value for each Operator. This is the value being used in conjunction with the Operator selected (i.e., student.age > 5, where 5 is the value entered and the output is all students older than 5 years of age).
- If a BETWEEN Operator was selected, fill in all appropriate fields.
- Click the Add Filter button to apply multiple operators to the same field(s). Selecting this button adds an additional field area where users can select an already existing filter field and apply additional operators.
- Enter a Logical Expression, if necessary.
- For complicated filters that report data from several calendars and/or have many fields from many different areas, mark the Force Order checkbox. When marked, the database fields in the query are executed in a particular order to increase the filter's performance. When a filter takes several minutes to generate, try generating it again with this checkbox marked. Marking this on every filter is not recommended.
- To save the filter right now without testing it or modifying any results of the selected fields, choose Save or Save and Test.
- Select the Next button if output formatting and/or group data needs to be defined for the filter.
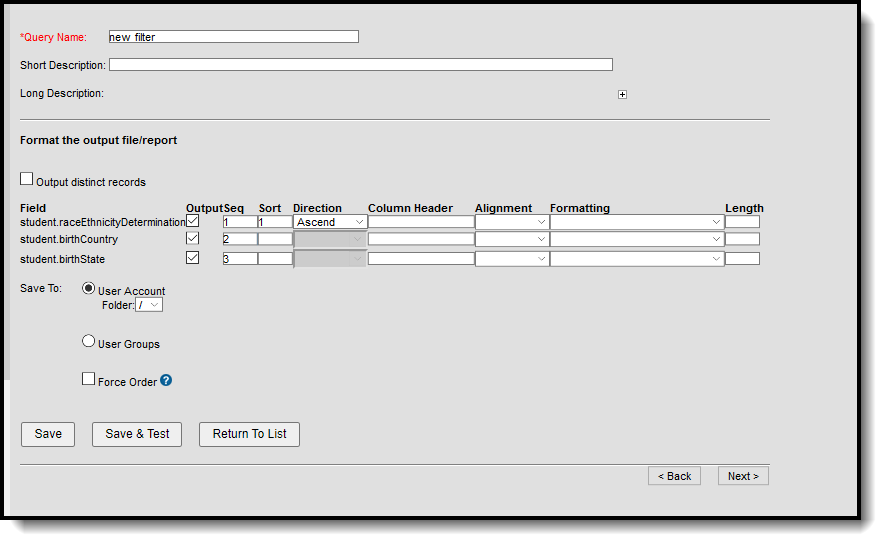
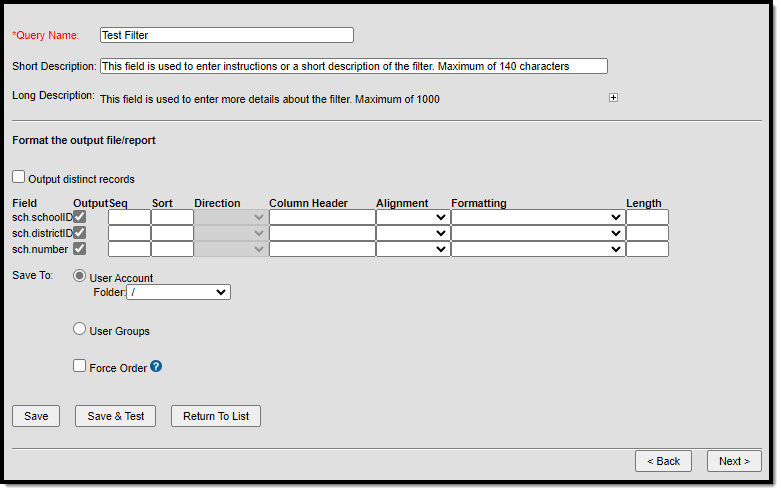
Step 4. Enter Output Formatting Values
- Enter the Query Name and a Short/Long Description (if applicable).
- If data should output in unduplicated records based on field values, mark the Output distinct records checkbox.
- If the field should appear in the filter output, verify the Output checkbox is marked. If it is not marked, the field does not display in the output but is used to filter data. For example, the field student.activeToday might be chosen to filter out inactive students (student.activeToday = 1), but the Output checkbox could be unselected so that field is not included in the output.
- Enter the Sequence. This number places the field in that order on the output.
- Enter a number in the Sort field. This determines the order in which fields are sorted.
- If a number was entered in the Sort field, determine how the field should be sorted by selecting a Direction. Data can be sorted by ascending or descending direction. If the Sequence and Sort fields are left blank, the fields display in the order selected and sort how the elements appear on the screen.
- Enter a Column Header for each field. This is the header that display in the column relating to the field. If no header is entered, the field name is used as the header for the column (i.e., student.otherID displays a column name of student.otherID if no header is entered).
- Determine the field's Alignment on files exported via the Data Export tool.
- Select the Formatting of outputted field data. These options allow users to specify how data is reported in exported files.
- Enter the field Length. This field determines the maximum amount of characters the field reports data before truncation. If data is exported using the Fixed Width format, each field with the Output checkbox checked must have a length value entered.
- To save the filter right now without testing it or modifying any results of the selected fields, choose Save or Save and Test.
- To continue, click the Next button to continue creating the filter, narrow returned results and sort the filter into the desired order.
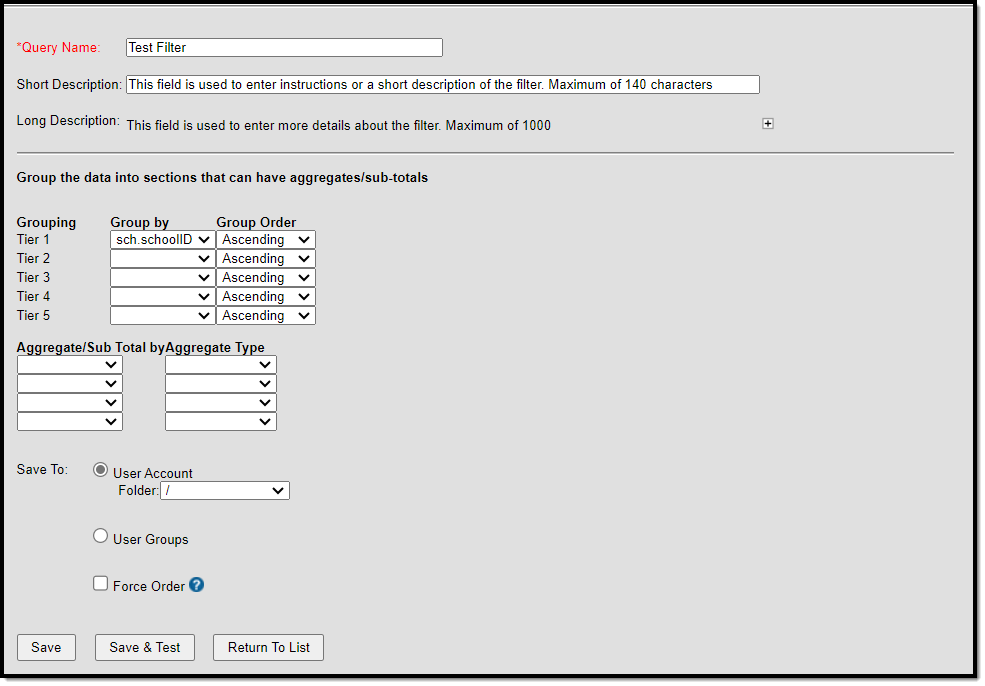
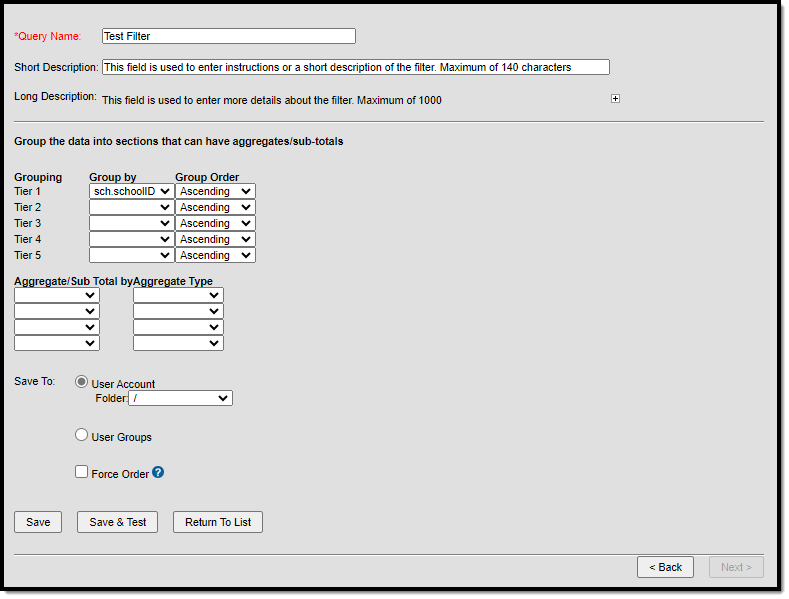
Step 5. Define Data Filter Grouping, Calculations and Subtotals
The Grouping and Aggregation editor allows users to group fields into sections and report specific aggregates/sub-totals for each section.
- Enter the Query Name and a Short/Long Description (if applicable).
- Select each field to Group By for each tier. This field determines which fields are grouped into sections, allowing the field to have separate aggregate/sub-totals reported.
- Select each tier Group Order. This determines how aggregate/sub-total data is reported for the tier.
- Select the field and determine the Aggregate/Sub Total by Aggregate Type. Data within each group aggregates based on the field and Aggregate Type selected. See the table below for information about each available aggregate type
Step 6. Save the Filter
To quickly save the filter, click the Save button. To quickly save and verify the filter's return data, click the Save and Test button. Both options save the filter and can be found in the Saved Filter list. The Save and Test option saves the filter and generates it in HTML format for a quick review of the selected fields and format. Users must have pop-ups enabled on the web browser in order to view Test results.
For more advanced save features, follow the procedures below.
- Determine if the filter needs to be saved to a User Account Folder. If yes, choose that radio button and select the appropriate folder.
- Determine if the filter needs to be available to particular User Groups. If yes, choose that radio button and select the appropriate user groups. If a filter is saved to more than one User Group, a separate copy is stored for each group. Each group can independently edit the filter without affecting another group's copy.
User Groups in which you are a member are the only groups that will be displayed. You cannot add a filter to a User Group if you are not already a member.
3. For complicated filters that report data from several calendars and/or have many fields from many different areas, mark the Force Order checkbox. When marked, the database fields in the query are executed in a particular order to increase the filter's performance. When a filter takes several minutes to generate, try generating it again with this checkbox marked. Marking this on every filter is not recommended.
4. Select the Save icon. The filter is now saved and can be selected from the Saved Filter list on the main page of the Filter Designer.
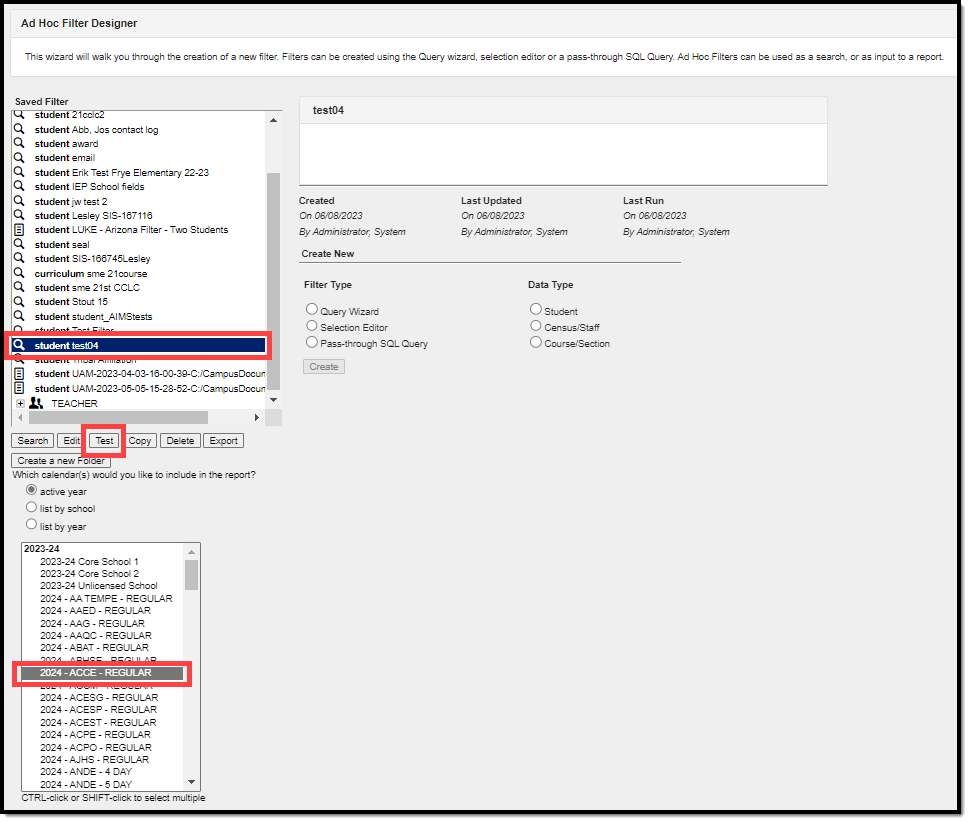
To generate a saved filter:
- Select the desired filter from the Saved Filter list.
- Choose the appropriate Calendar.
- Click the Test button. The filter will appear as a report in a separate window.
Calendars cannot be selected if the query is for Census/Staff Data Types. Only calendars to which the user is assigned calendar rights are available for selection.
Manage Filters
Save Filters to Folders
Ad hoc filters can be saved to specific folders created within the Filter Designer tool, User Accounts, or User Groups.
For complicated filters that report data from several calendars and/or have many fields from many different areas, mark the Force Order checkbox. When marked, the database fields in the query are executed in a particular order to increase the filter's performance. When a filter takes several minutes to generate, try generating it again with this checkbox marked. Marking this on every filter is not recommended.

Remove Fields from the Filter Parameters Editor
Fields can be removed from the Filter Parameters editor without being removed from the filter as a whole. This allows users to reduce the Filter Parameters editor to only those fields in which operators are assigned or only those fields in which the user wants to see.
Fields removed from the Filter Parameters editor are not removed from the filter; they are only the user's view of the editor.
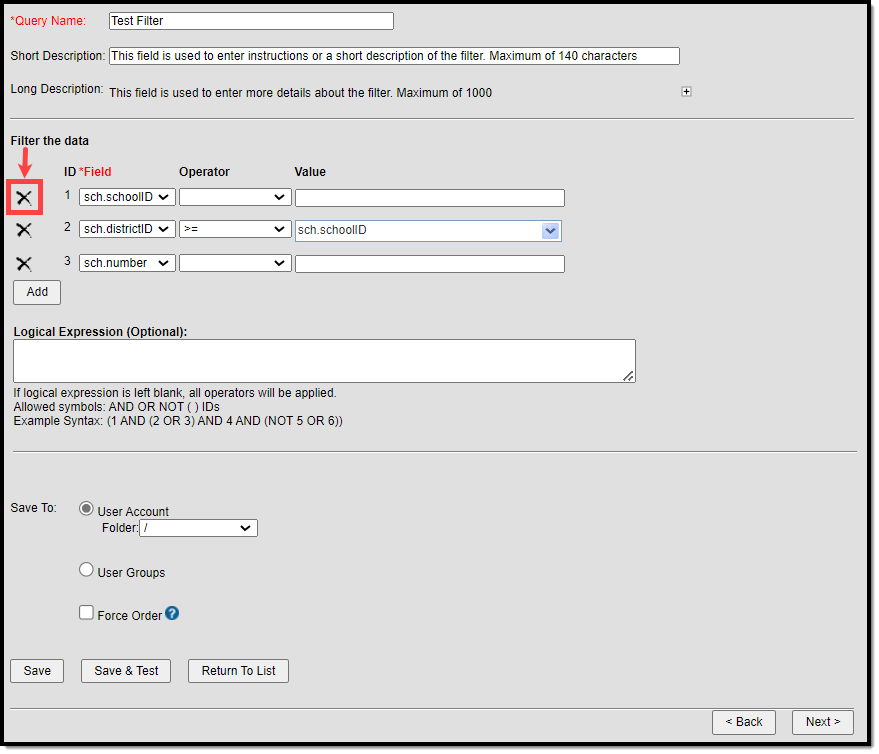
Select the X next to each field to remove fields from the Filter Parameters Editor.
Removing a field from the list does not remove it from the filter output.
All fields not assigned an Operator were removed, and the field IDs were automatically renumbered. The Logical Expression automatically updates to match new field IDs.
The Filter Designer tool allows users to create folders for organizing and storing Ad hoc filters. Folders can be organized in a hierarchy format, where sub-folders exist within parent folders. By creating folders, users can better manage large volumes of existing Ad hoc filters and group them in a logical order.
If a field in the query has been deactivated (displays in red), use the Element Replacement Tool to update the filter. This removes the deactivated field and adds the equivalent field to the filter.
Create Folders for Filters
Folders allow users to better manage Ad hoc filters within the Filter Designer tool.
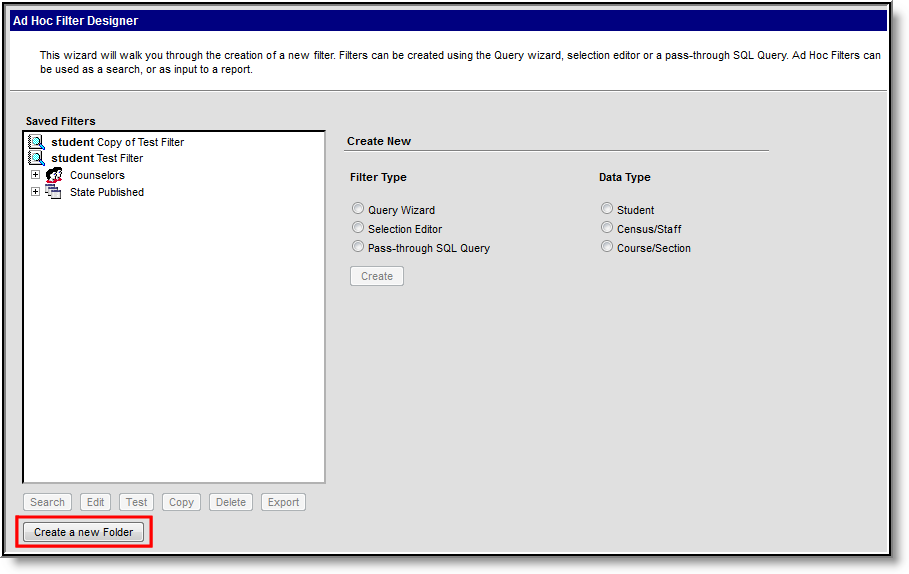 Create a New Folder
To create a new folder, select the Create a new Folder button. The Create a new folder editor displays.
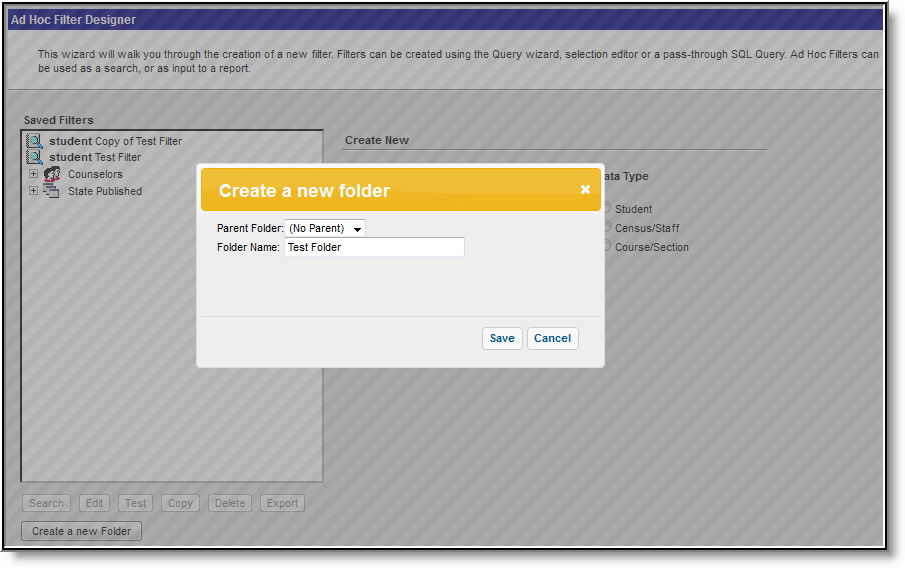 Create a New Folder Editor
If the folder should not be tied to a parent folder, leave the Parent Folder field as (No Parent), enter a Folder Name and select the Save button. The folder displays in the Saved Filters field and is now available for storing Ad hoc filters.
If the folder should be assigned to a parent folder, select the parent folder from the Parent Folder field.
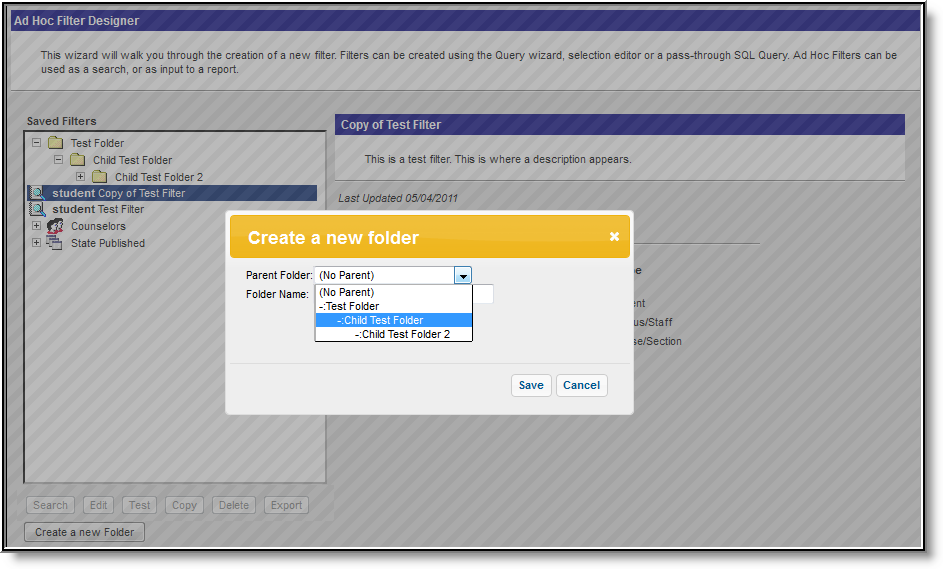 Selecting a Parent Folder
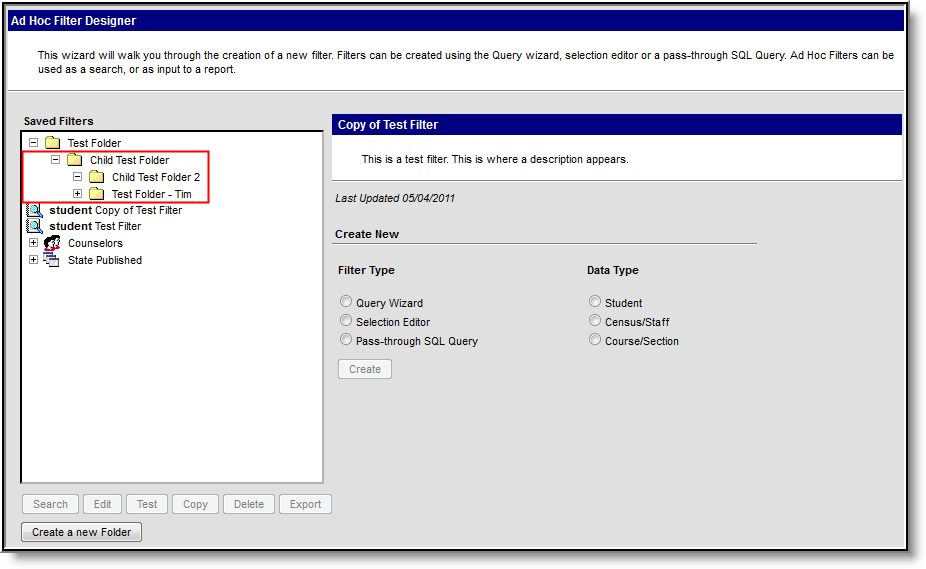
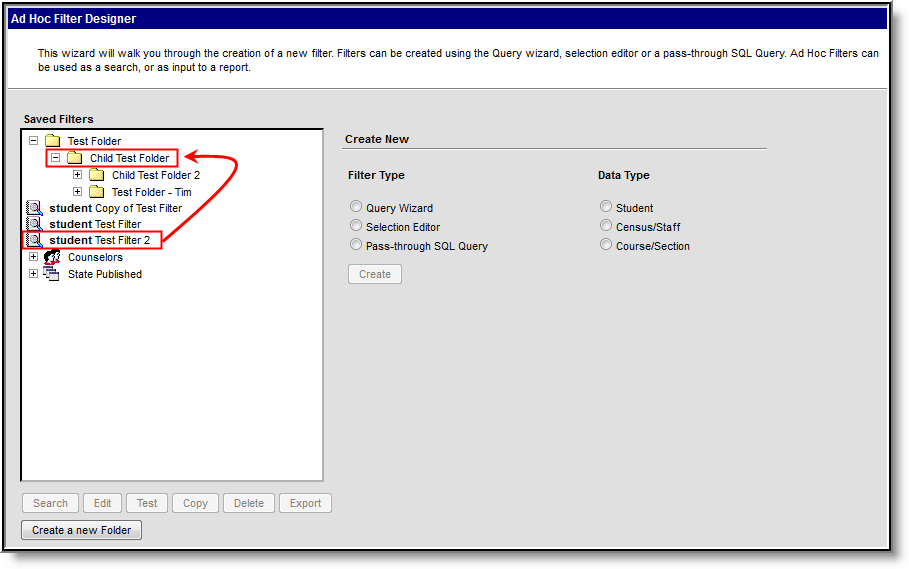
Locate the appropriate parent folder. The indentation next to each folder name indicates its relationship to the previous folder (i.e., the Grandchild 1 folder is indented two times because it exists within the Child 1 (Testing) folder which exists within the Parent Folder (Testing) folder). In the example above, the folder being created exists within the Child Test Folder parent folder.
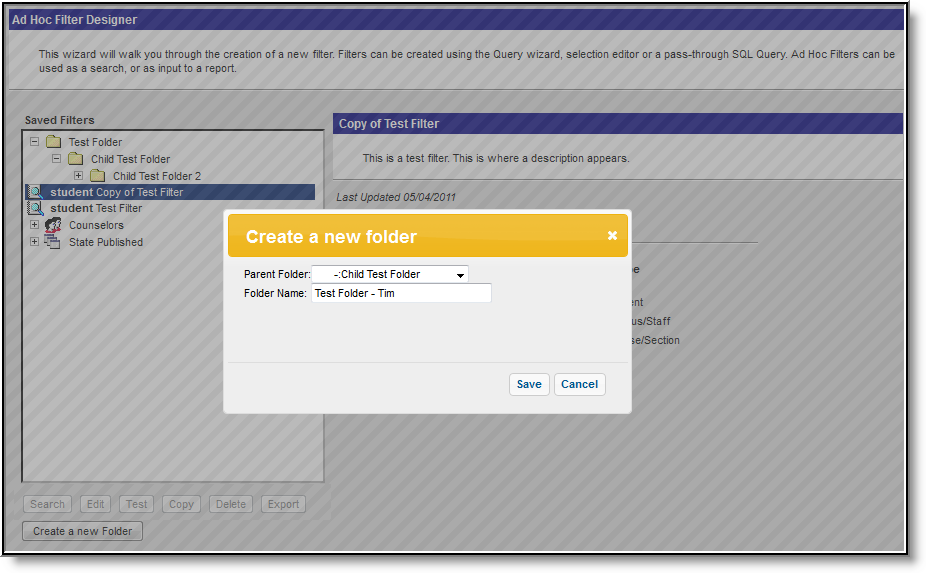 Entering a Folder Name
Once the parent folder has been selected, it displays in the Parent Folder field. Enter the Folder Name of the folder being created and select the Save button. The folder displays in the Saved Filters field and is now available to store Ad hoc filters.
 Created Folder
As the example above shows, the created folder Test Folder - Tim now exists within its parent folder Child Test Folder.
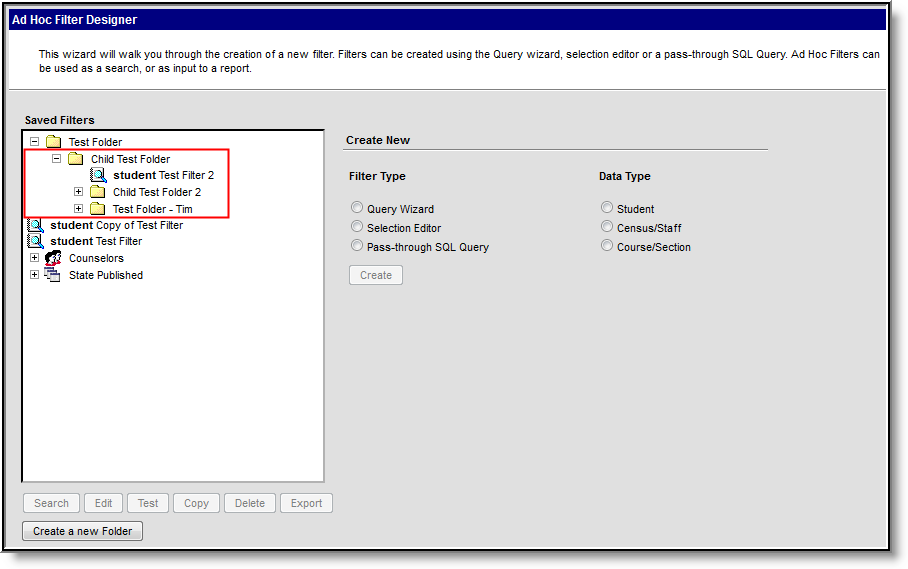
Add a Saved Query to a Folder
Once folders have been created, Ad hoc filters can now be assigned to those folders.
 Saving an Ad hoc Filter to a Folder
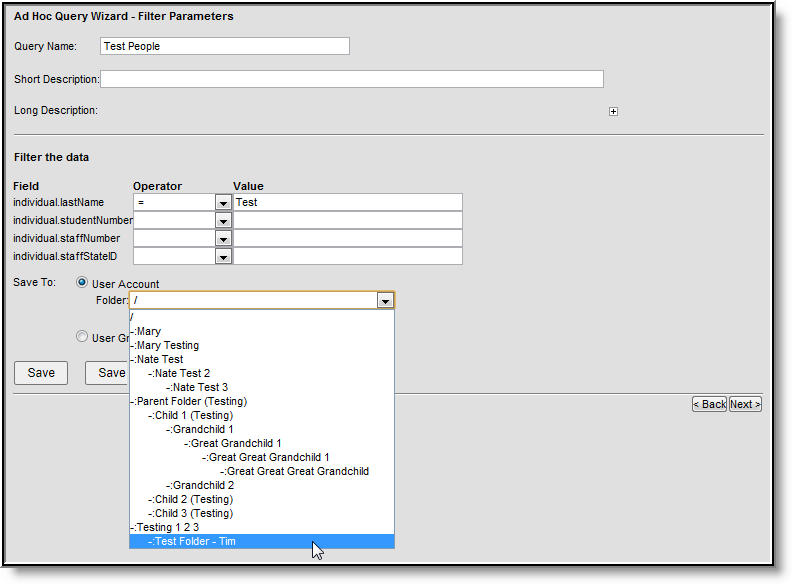
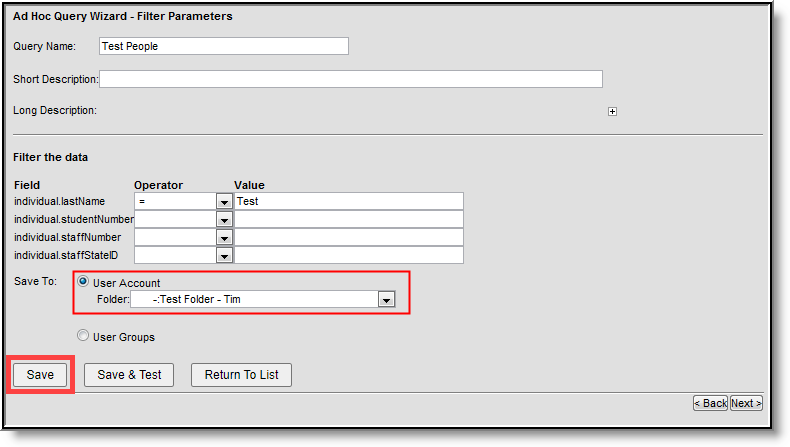
To assign an Ad hoc filter to a folder, click the User Account radio button and select the folder from the Folder field.
 Selecting the Saved Folder
In the example above, the Ad hoc filter is being assigned to the Test Folder - Tim folder.
 Saving the Ad hoc Filter to a Folder
Once the folder is selected, the Folder field displays the folder name. Select the Save button to save the filter to the folder.
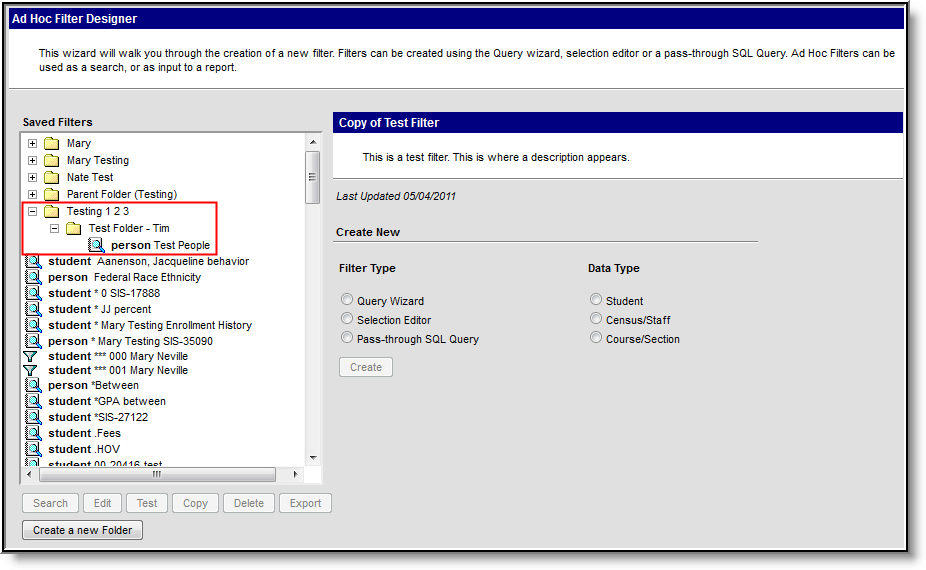 Viewing the Saved Filter in the Folder
The Ad hoc filter is now saved and accessible within the assigned folder.
Move Filters between Folders
Ad hoc filters can be easily moved and organized between folders.
 Moving an Ad hoc Filter to a Folder
To move an Ad hoc filter into an existing folder, left-click, hold, and drag the filter into the designated folder. A pop-up message displays, asking the user to confirm the action. Select the OK button to move the Ad hoc filter.
 Viewing a Moved Ad hoc Filter
The moved filter now displays under the appropriate folder. This functionality moves filters in, out, and to another folder.
Existing filters can be easily copied if desired. This maintains the original version of the filter and lets users change a filter to add new fields and functions.
Copy Filters
Filters can be copied for additional editing. Select a saved filter and click the Copy button. A pop-up message displays indicating the filter has been copied. Copied filters are named Copy of [Original Filter Name].
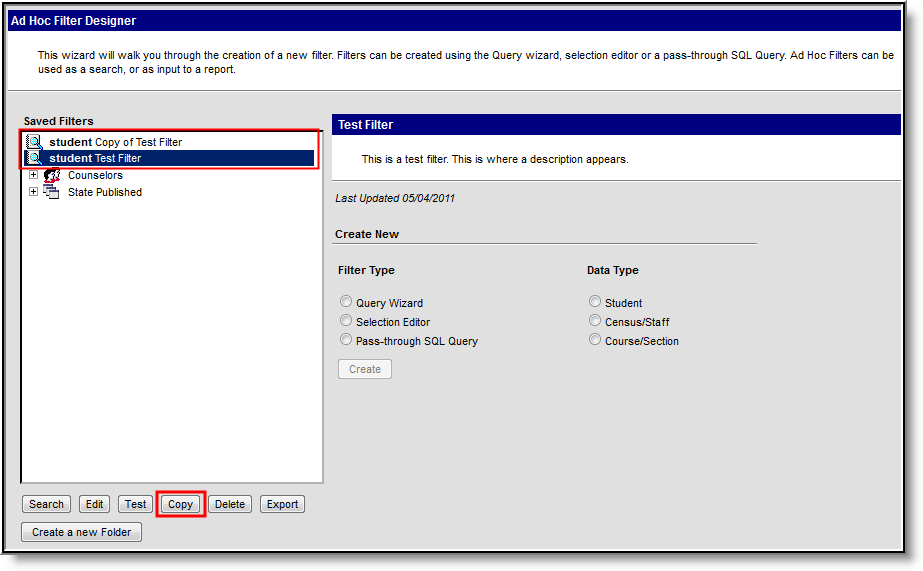 Copied Filters
Delete Filters
A saved filter created by a user can also be deleted by that user. However, because filters can be shared with other users, only the person who created the filter can delete it.
District users cannot delete State-Published filters.
Deleting a Filter
Select a filter from the Saved Filters window and click the Delete button to delete it. A pop-up message confirms the deletion. You can also delete multiple filters by holding the Ctrl key, selecting each filter, and clicking the Delete button.
Modify a Query Created by Another User
Saved filters can be edited anytime by selecting the filter and clicking the Edit button. This displays the filter so users can modify the selected fields and verify the operations and export options.
Search results on the Search tab can be populated with saved filters. When a saved filter is selected, click the Search button. Results returned in the filter displays in the Search tab.
 Searching with a Filter
If a saved filter contains deprecated fields, the filter is highlighted in red within the Saved Filters window.
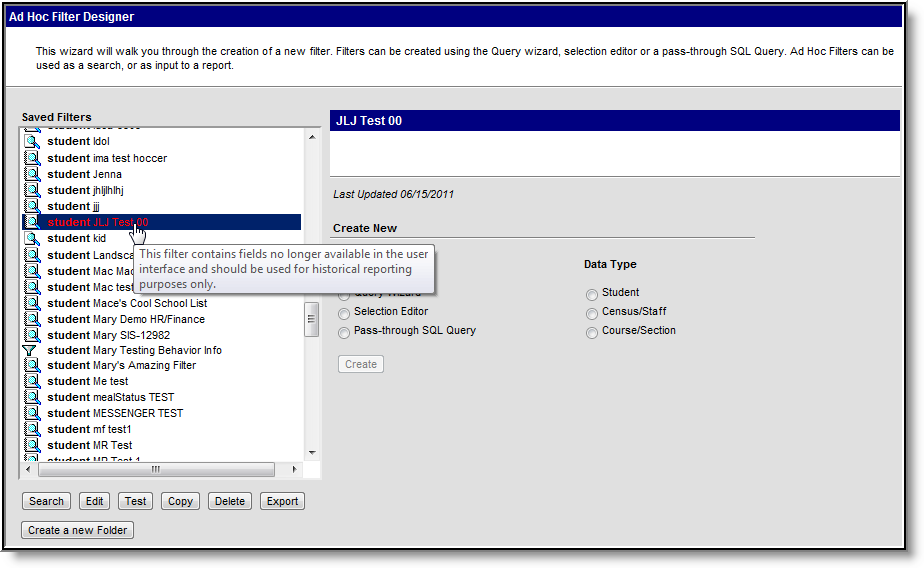 Filter Containing Deprecated Fields
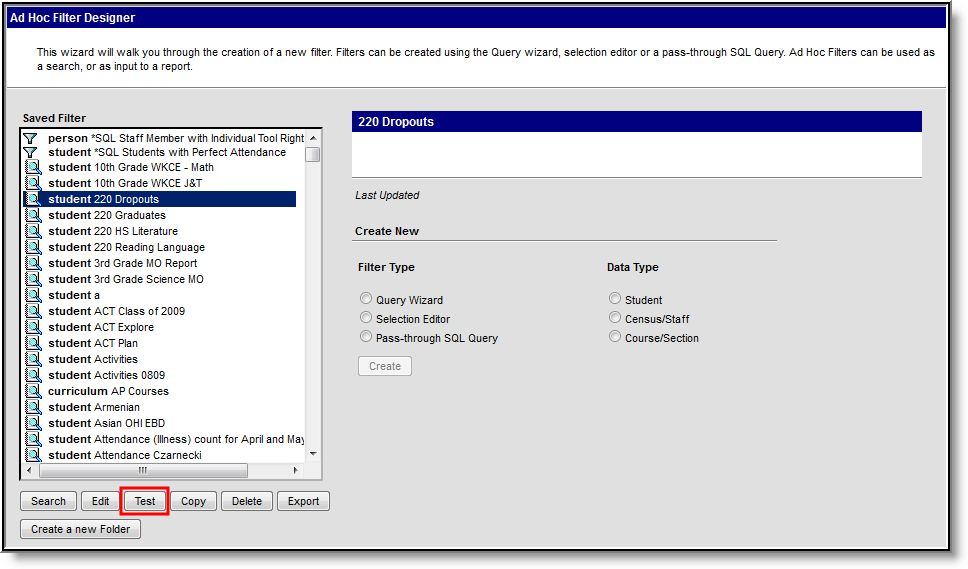
Test Saved Filters
Select the filter from the Saved Filter window to test an existing filter and click the Test button. A separate window displays, displaying filter results in HTML format.
 Testing an Existing Filter
Last Updated, Last Run, and Last Run By Information
Users can view the last time an existing filter was updated, the last time a test of the filter was run, and who ran the last test of the filter.
If the timestamp or user is unknown, a value of Unknown is reported.
 Example of a Filter Tracking Information
