Tool Search: Behavior Referral
The Behavior Referral Form allows school staff members to complete an online referral for a student behavior event and submit it to a staff member responsible for managing behavior for further action. Email notifications are sent to the email address entered on the person's Demographic record.
This article describes how to:
- Modify an existing referral or create a new one.
- Enter Incident-level referral information.
- Attach events to an incident.
- Designate participants in an event.
- Add a response to a behavior incident related to crisis intervention.
- Save a referral as a draft or submit it to the Behavior Management tool.
- Manage any files that are attached to the Behavior Referral.
A Behavior Referral is made up of two parts: Incident Information, which provides the general information about the behavior incident, and Events and Participants, which describes the individual events within the incident and the participants in each event. Information entered in these areas is viewable in the student's Behavior tool as described below:
Area | Where Information Displays |
|---|---|
Incident Information | Viewable for all participants. |
Event Information | Viewable for all participants in that event. |
Participant Information | Only viewable for that participant. |
See the Behavior Referral Tool Rights article for information on available tool rights.
Behavior Preferences Related to Referrals
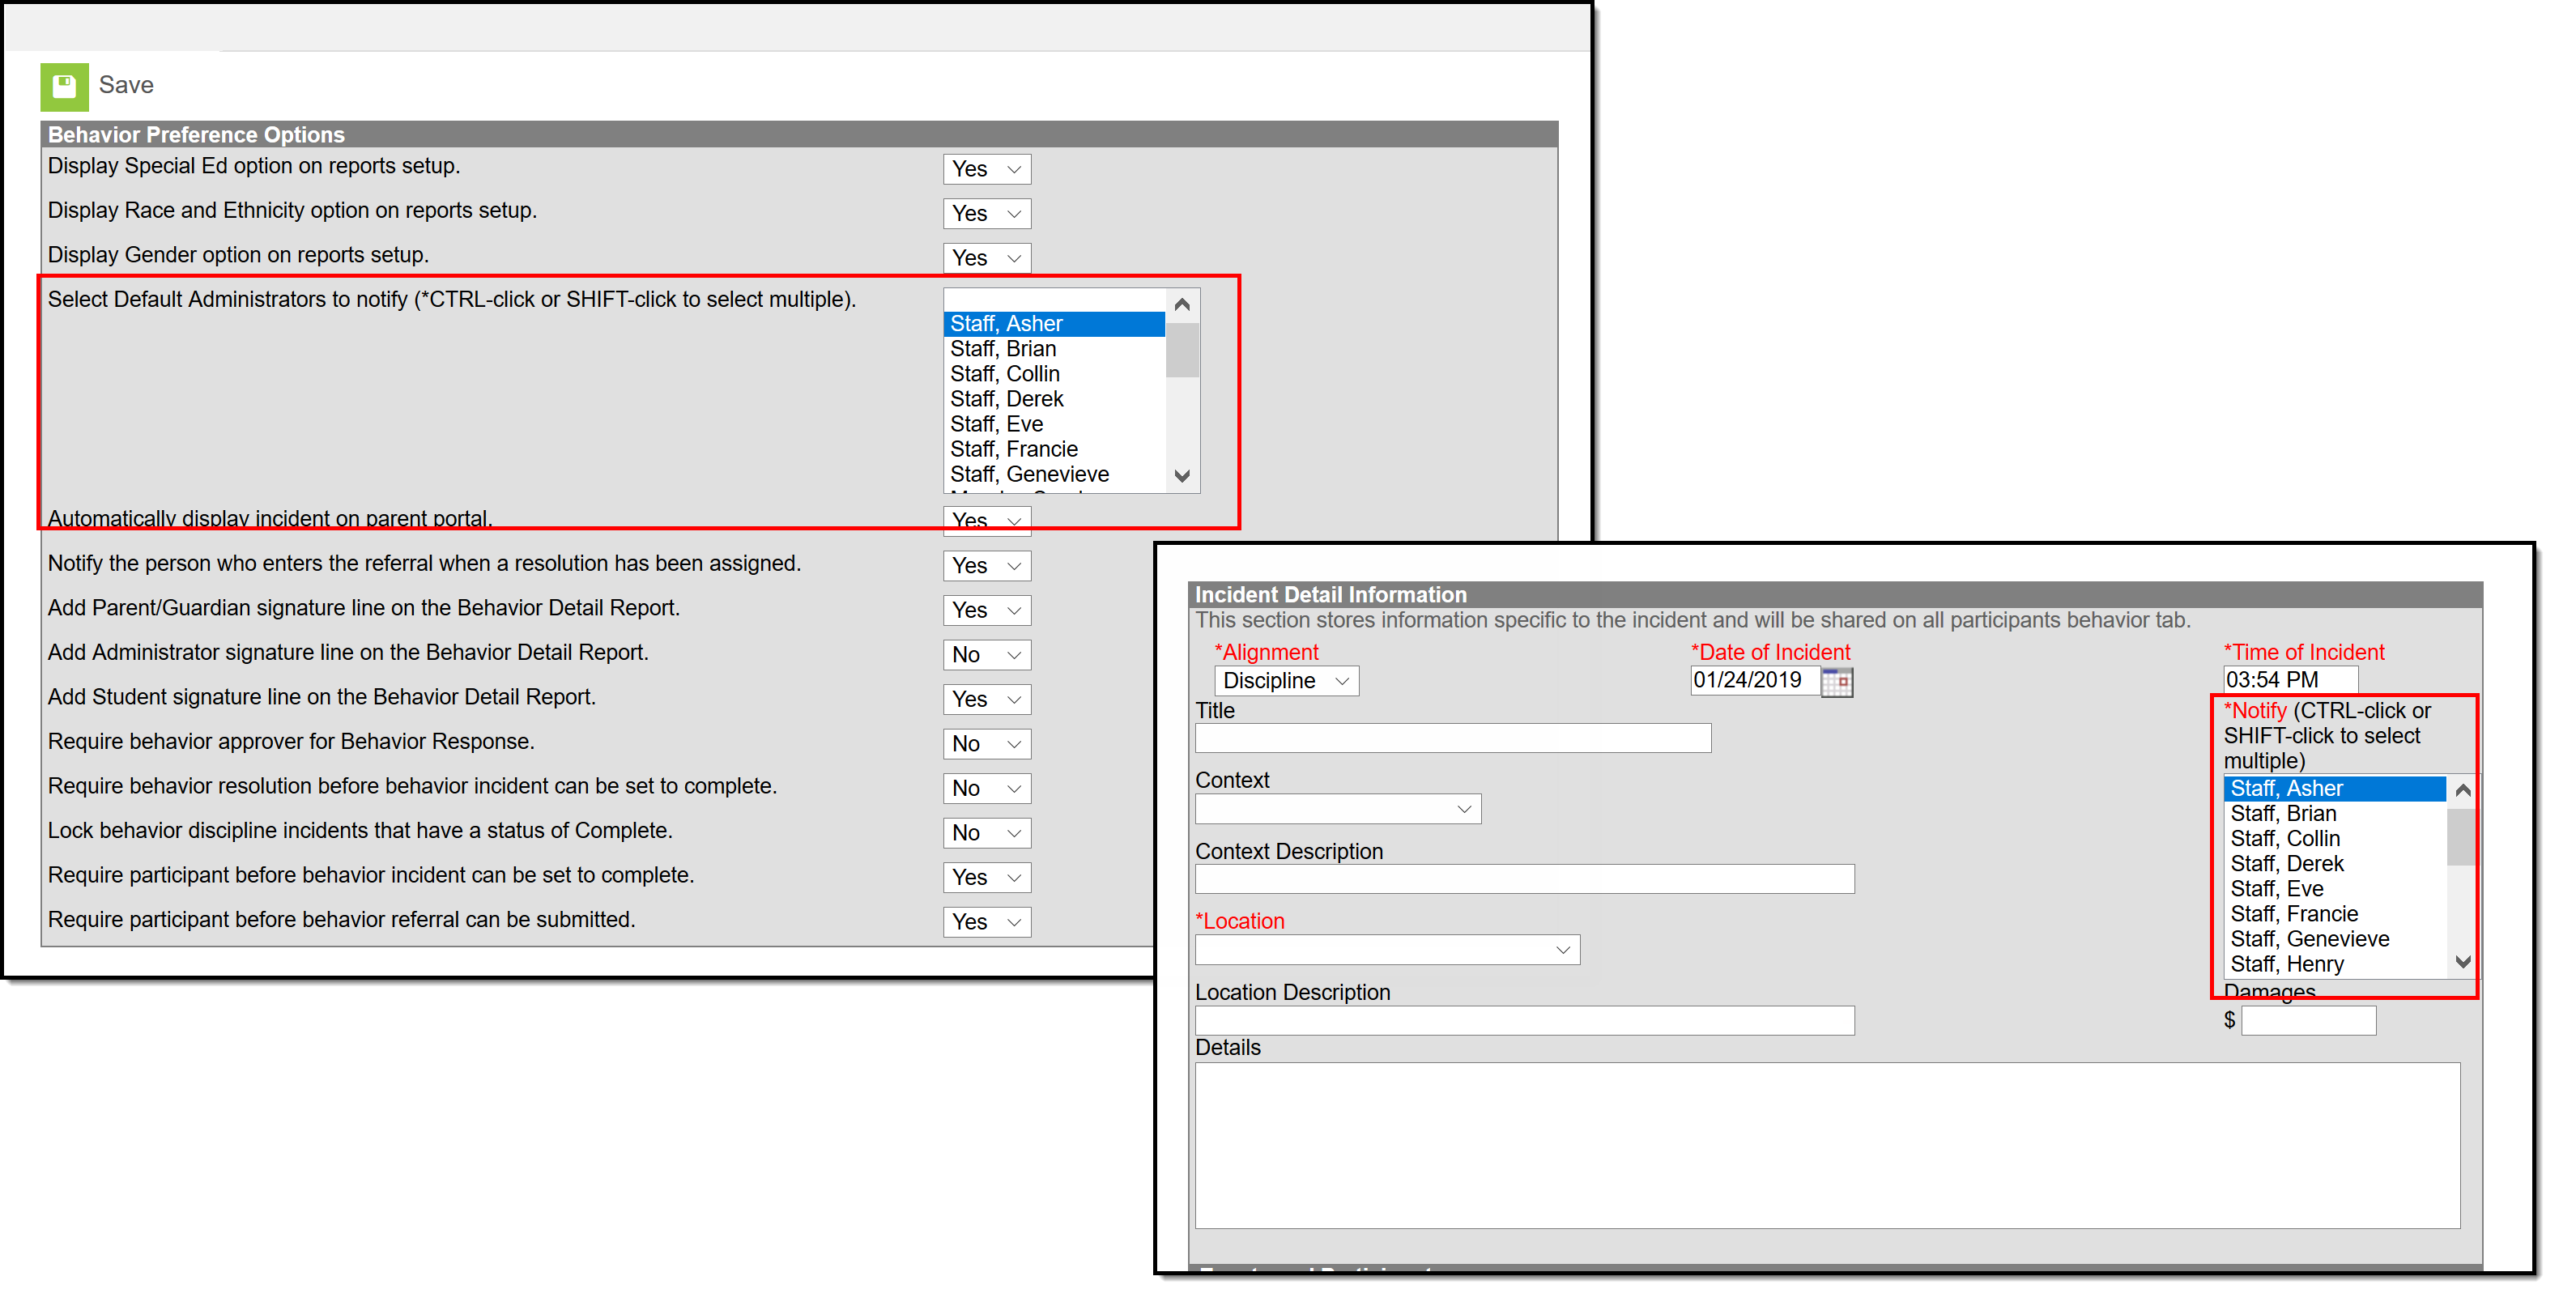
A Behavior Preference is available that automatically notifies administrators when a referral is submitted. Users are listed for selection when their District Assignments record has the Staff checkbox marked. Individuals selected here are automatically selected in the Notify field on the Referral. Additional individuals can be selected on the Referral editor if necessary.
When a referral is submitted, a Process Alerts message and email are sent to the individuals selected in the Notify field. The email is only sent if the recipient has an email address and has Staff checkbox marked in the Demographics tool.
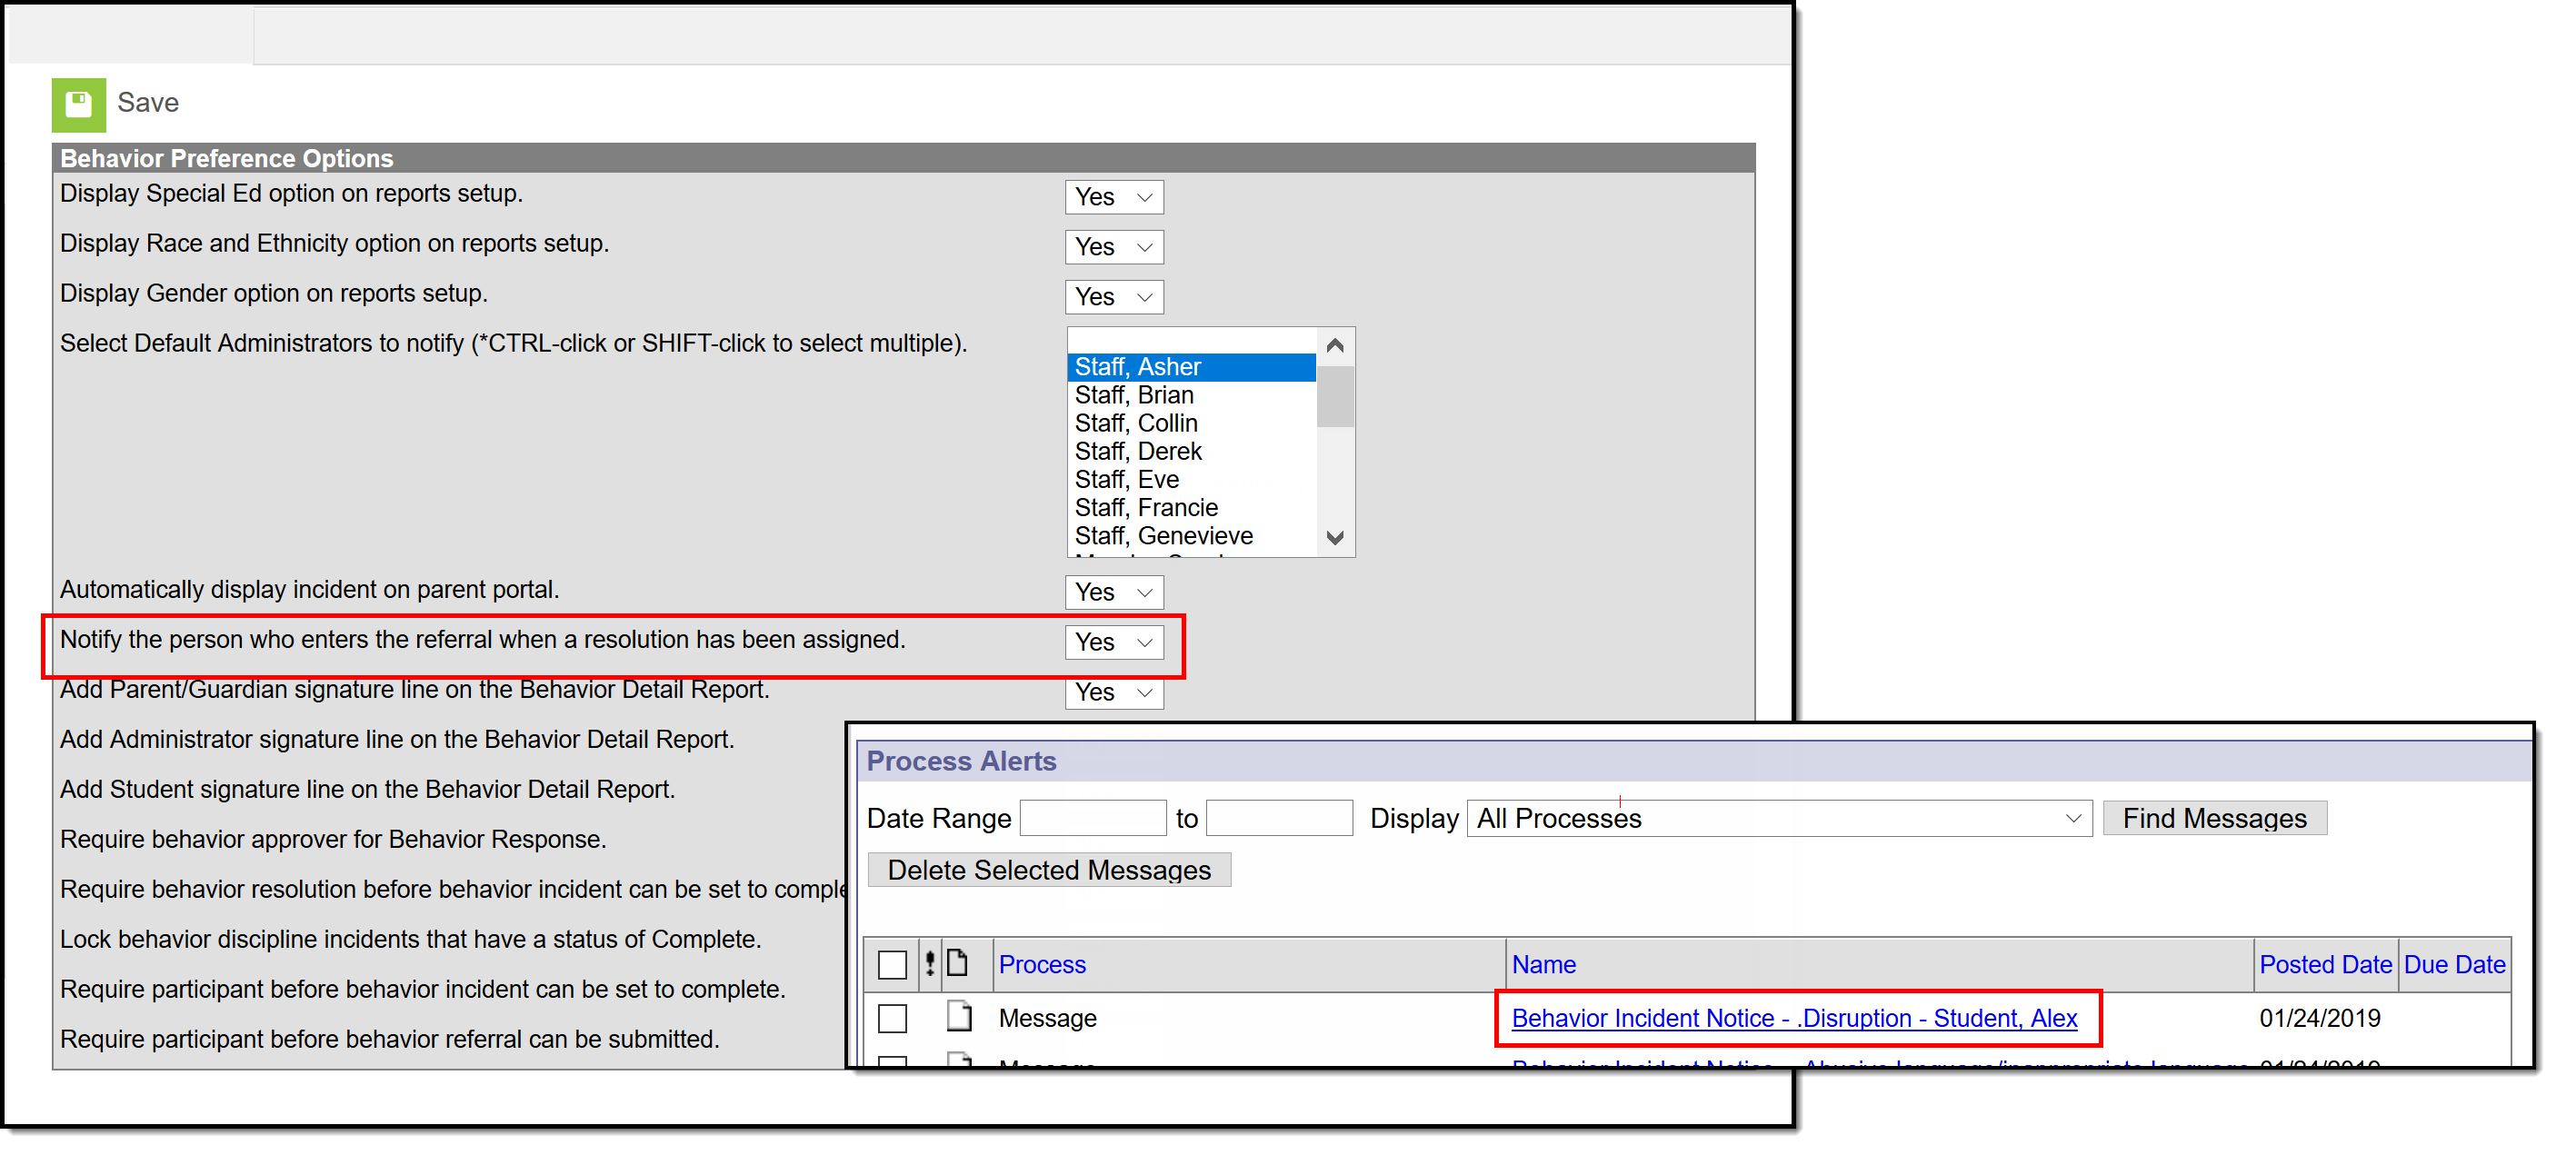
A Behavior Preference is available that notifies the person who enters the referral when a resolution has been assigned. When this preference is set to Yes, both a Process Alerts message and an email are sent to the person who submitted the referral. The email is only sent if the recipient has an email address and has Staff checkbox marked in the Demographics tool.
- Messages are sent ONLY when this preference is set to Yes.
- Only one message is sent, regardless of the amount of resolutions associated with the event.
- If an incident is marked Complete and no resolutions are entered, a message is not sent.
- If an incident moves from Complete to In-Progress and back to Complete, a message is sent (unless there are no resolutions).
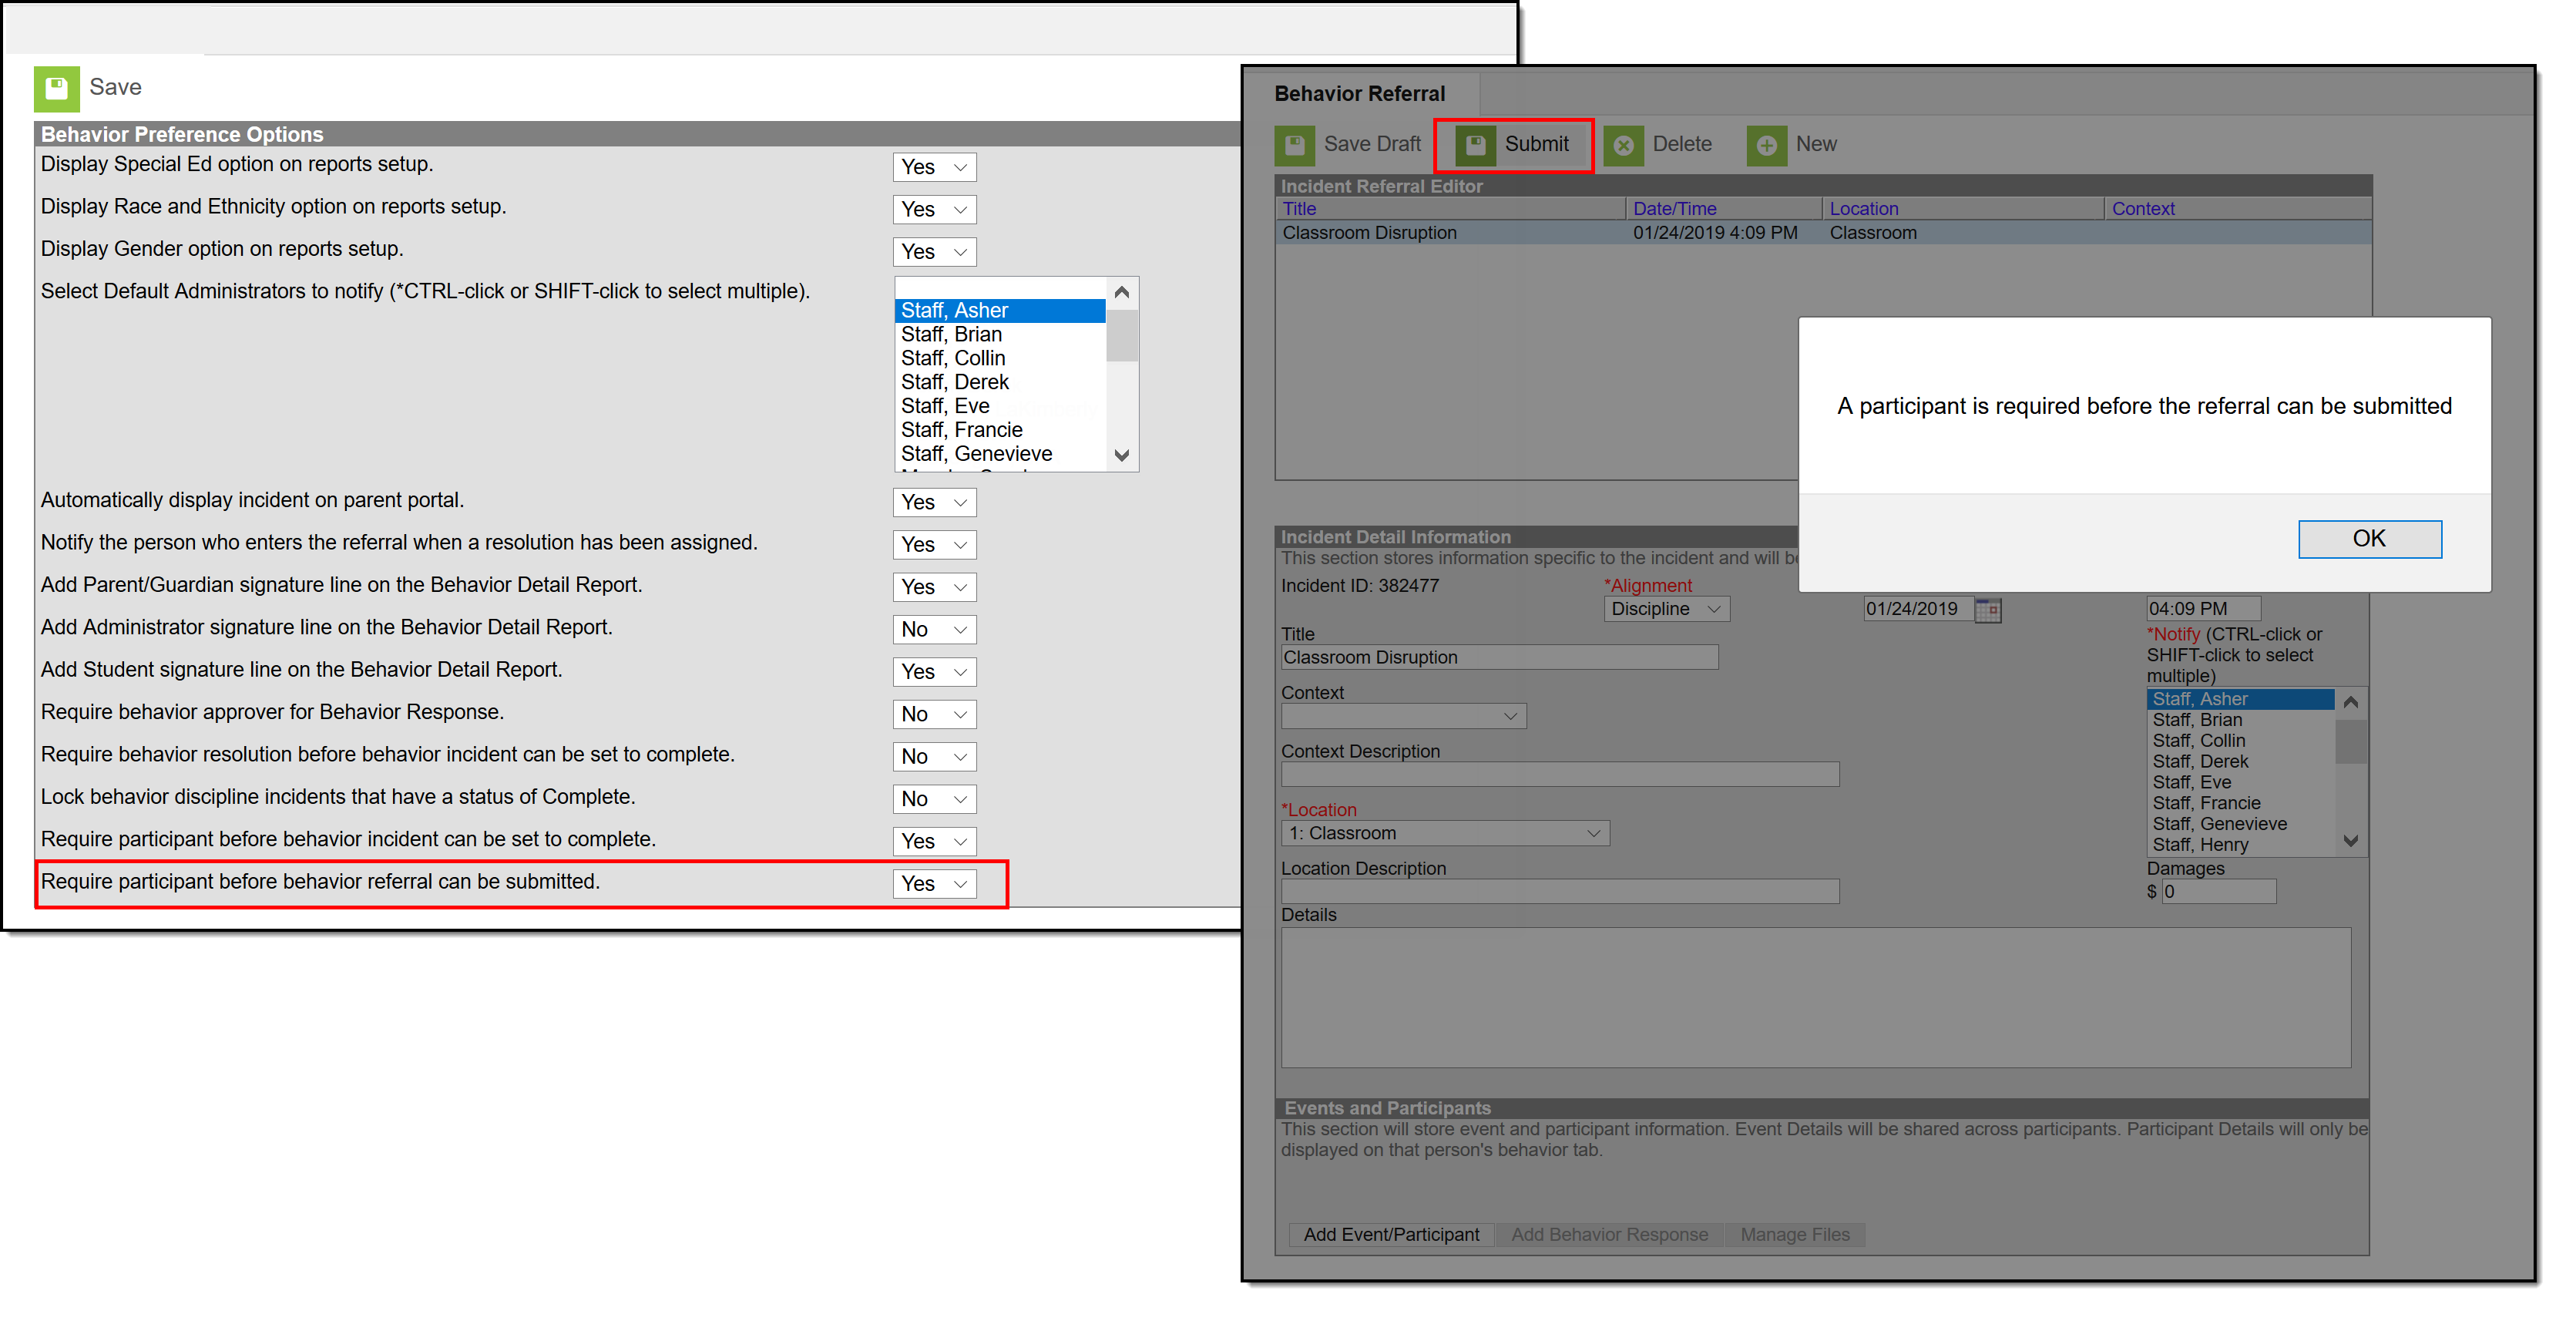
A Behavior Preference is available that requires a participant to be assigned to the behavior referral before it can be submitted.
- When this preference is set to Yes, at least one person (student, staff, etc.) needs to be assigned as a participant of the event before the referral can be submitted for further processing (additional event information, assignment of resolution, etc.). When the referral is submitted and a participant has not been associated with it, a message displays indicating it cannot be submitted until a participant is assigned (see image below).
- When this preference is set to No, or when it is set to Yes and a person has been assigned as a participant, the referral can be submitted without error.
Create a Behavior Referral
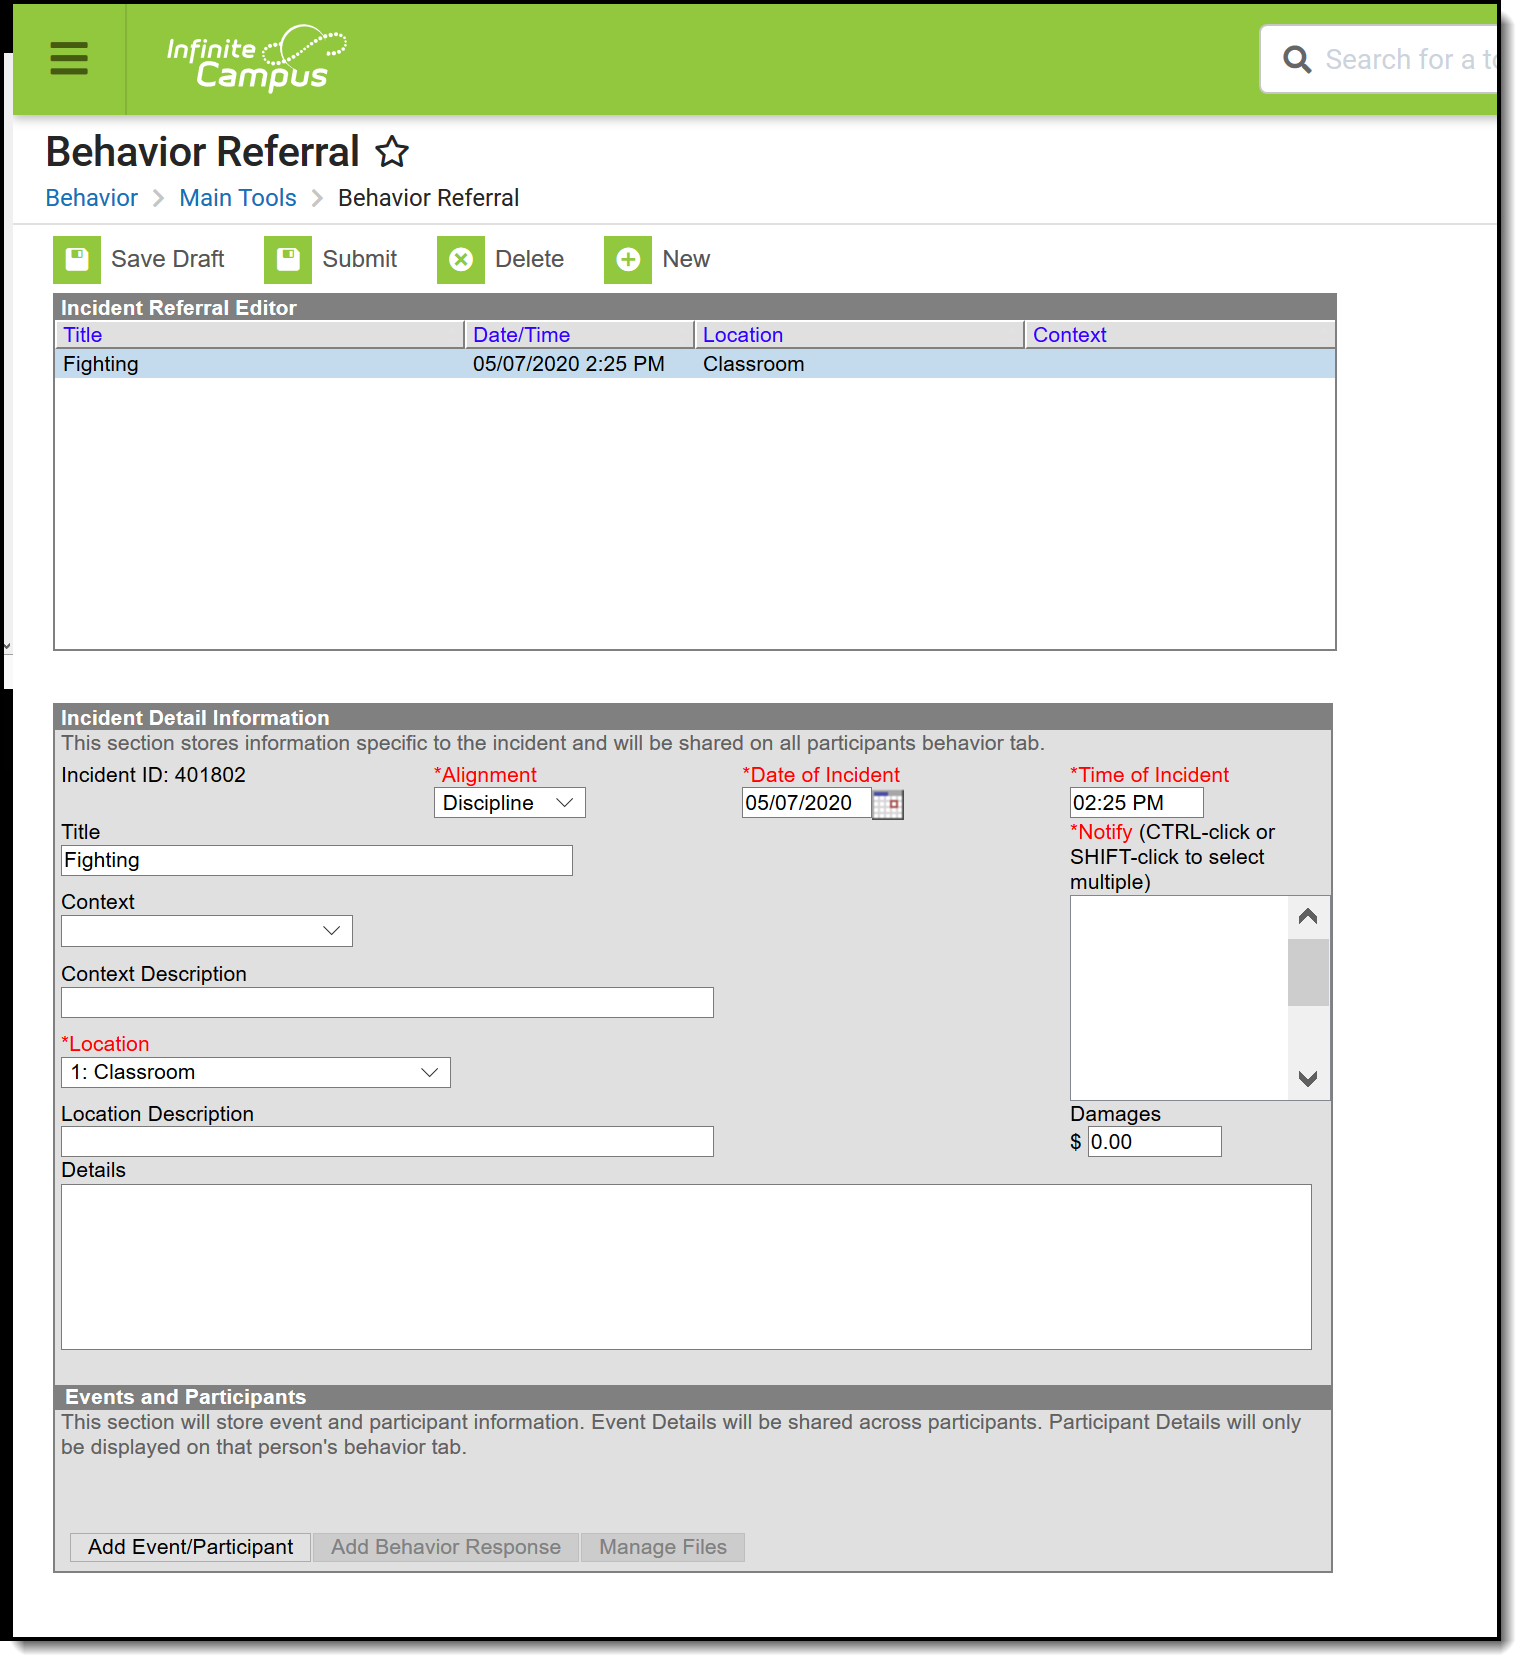
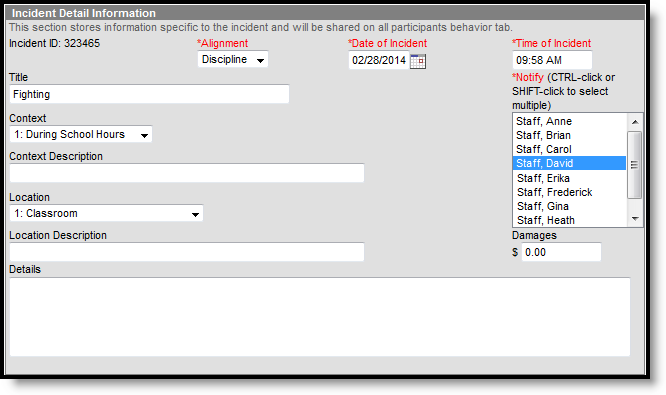
First, click New to open a new Referral and enter information for the incident as a whole in the Incident Detail Information.
Refer to the following Incident, Event and Resolution sections for descriptions of each field in the referral.
- Enter information in the referral as needed based on these descriptions. Fields may vary by state.
- At any point while creating a referral, clicking Save Draft for the referral or Event/Participant editor saves the entered information in draft status.
- Clicking Submit submits the referral with any entered information. The incident is no longer available in the referral tool.
A Process Inbox message is sent to the individuals selected in the Notify field, and the incident is available through the Behavior Management tool for the calendar selected in the Campus toolbar when entering the Referral. An email is also sent to those marked as Behavior Admins on their District Assignment record.
When a referral is submitted, a Process Alerts message and email are sent to the individuals selected in the Notify field. The email is only sent if the recipient has an email address and has Staff checkbox marked in the Demographics tool.
When a resolution is entered for a referral and the incident is then marked as complete, if the preference to "Notify the person who enters the referral when a resolution has been assigned." is set to Yes, then both a Process Alerts message and email are sent to the person who submitted the referral. The email is only sent if the recipient has an email address and has the Staff checkbox marked in the Demographics tool.
- Messages are sent ONLY if the Notify the person who enters the referral when a resolution has been assigned is set to Yes.
- Only one message is sent, regardless of the amount of resolutions associated with the event.
- If an incident is marked Complete and no resolutions are entered, a message is not sent.
- If an incident moves from Complete to In-Progress and back to Complete, a message is sent (unless there are no resolutions).
Incident Information
Field | Description |
|---|---|
Incident ID | The unique identification number assigned to the incident once the referral is saved. This field cannot be edited. |
Alignment Required | Indicates if the incident is related to Discipline (Negative) or Award (Positive). |
Date of Incident Required | The date the incident takes place. Defaults to the date the referral is created. |
Time of Incident Required | The time the incident takes place. Defaults to the time the referral is created. |
Title | A brief description of the incident. If no title is entered for the incident, the Event Type Name(s) populates as the incident name. |
Context | Indication of the setting or time of day the incident took place. |
Context Description | Additional information about the context of the incident. |
Location | Where the incident took place. |
Location Description | Additional information about the location of the incident. |
Notify Required | Once the referral is submitted, a message is sent to the process inbox of the individual(s) selected. This list of individuals is populated with those staff members who have the Behavior Admin checkbox marked on their District Assignments record. Also note that there is a Staff checkbox in the Messenger Contact Preferences on the Demographics tool. When that checkbox is marked, behavior referrals are sent to the desired messenger delivery devise. In Behavior Preferences, select a set of users to notify of new referrals automatically. |
Damages | The total cost of all damages that occurred as a result of the incident. |
Details | Any additional information about the incident, including a description of what occurred. |
Fields in red text indicated by an asterisk are required and must be entered before the record can be submitted. Once general incident information has been established, add Events to describe the individual occurrences and the Participants in each event.
Delete a Behavior Referral
To delete a referral, click the Delete button in the action bar. The incident is removed, along with all event, participant, response and resolution information within this tool and elsewhere. Submitted referrals cannot be deleted from the Behavior Referral tool.
Add Events and Participants to Saved Behavior Referrals
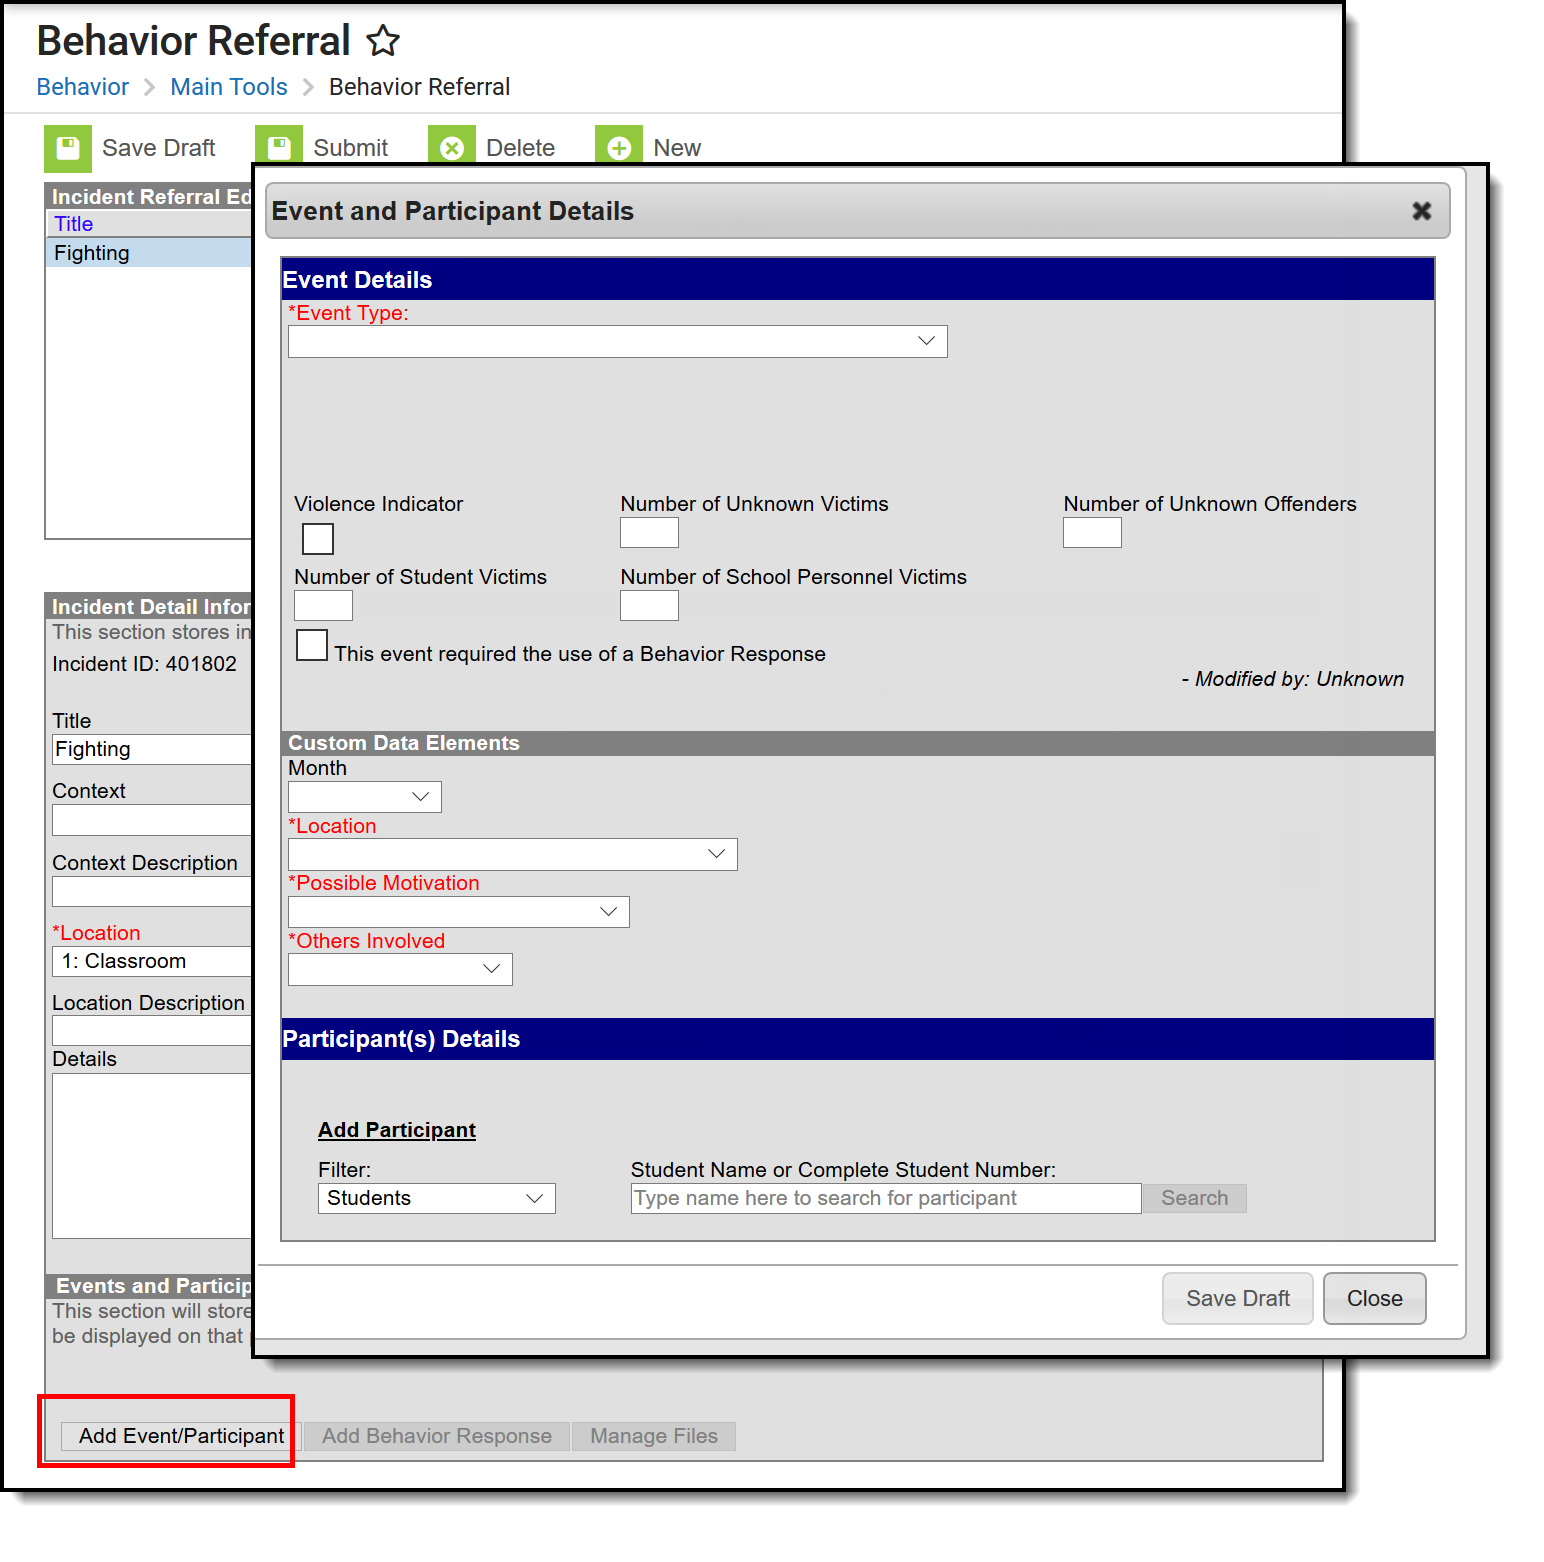
Event Information
After the incident has been created, the entry can be Saved as Draft, or continue with adding event and participant information.
Enter information about the event as described in the following table. Options may differ by state.
Field | Description |
|---|---|
Event Type Required | The identifying code and name of the event, sorted alphabetically by name. Event types are created in the Behavior Settings area and can be mapped to State Event Codes. Options are dependent on the Alignment selected for the Incident; only Event Types with the same alignment are available. |
Demerits/Points | Indicates a mark of poor conduct for a discipline event or a mark of positive action for an award event. This field displays the value entered for the Event Type. |
State Code | The State Event Code to which the event is mapped. This information is used in report behavior events to the state. This field displays the value entered for the Event Type. |
Category | Indicates whether the event is considered to be Minor, Serious or Extreme. This field displays the value entered for the Event Type. |
| Weapon | Indicates whether a weapon was used in the event. |
| Violence Indicator | When marked, indicates the student showed extreme violence in the event. |
| This event requires the use of a Behavior Response | When marked, indicates a crisis intervention was necessary. Marking this also allows the entry of a Behavior Response to describe what that intervention was. |
Additional events with distinct or repeated participants can be added to an incident. Click Save Draft and then Add Event/Participant. There is no limit to the number of events that can be added to an incident.
To modify an event, click the hyperlinked Event Type, make the desired modification and click Save. To delete an event from the incident, click the hyperlinked Event Type and click Delete. Deleting an event also removes the associated participants' roles from the incident.
Participant Information
Participants are attached to individual events since participants may be involved in multiple events in different capacities such as a student involved in a fight who was also found in possession of drugs.
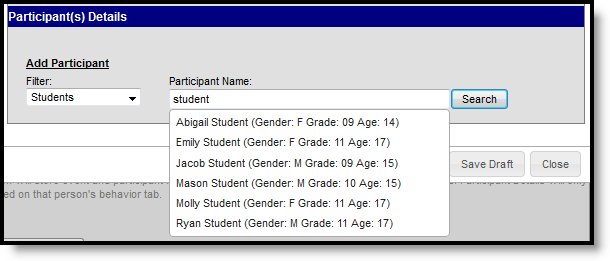
To attach a participant to an event, Search for at least the first two characters of the Participant Name or a Student Number (or staff number). Search results can be Filtered to include Students (active enrollment), School Employees (active district assignment) and All People (Person record in Census).
Student names are followed by the student's Gender, Grade and Age. School Employees includes Gender and Title. All People only includes Gender. Results include the student's middle initial and student number.
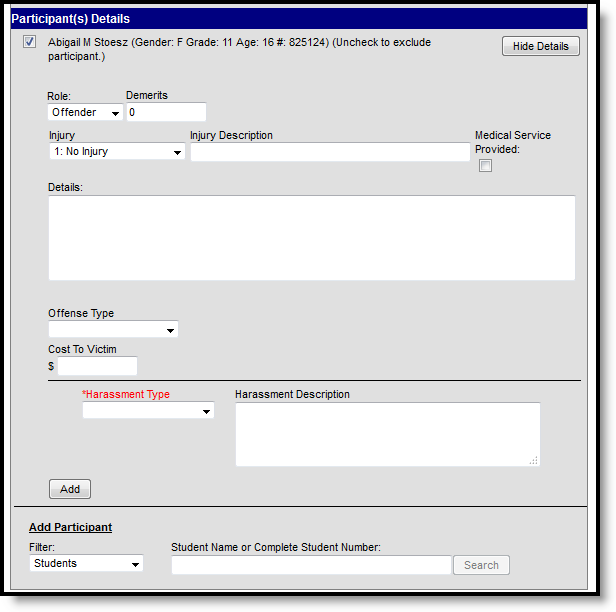
Click the participant's name to add the individual to the event. Participant details open for the individual.
Enter participant details based on the following table. Options may differ by state.
Field | Description |
|---|---|
Role | The way in which the individual participated in the event, as an Offender, a Participant, a Victim or a Witness. For Award incidents, the available role is Recipient. |
Demerits/Points | Indicates a mark of poor conduct for a discipline event or a mark of positive action for an award event. |
Injury | Indicates if the participant received an injury as a result of the event. |
Injury Description | Additional information about the student's injury. |
Medical Service Provided | Indicates if medical service was provided to the individual as a result of the event. |
Details | Additional information about the individual's participation in the event. |
Drug Fields These fields appear only when the selected event type has the Drug Classification field selected. | |
| Drug Type | Indicates the type of drug the student had in his/her possession. This is a core set of drug types; localized options may be available. |
| Drug Description | Provides detailed information about the drug violation. |
Harassment Fields These fields appear only when the the selected event type has the Harassment Classification field selected. | |
| Harassment Type | Indicates the type of harassment the student performed. This list contains the types reported in the Civil Right Data Collection. |
| Harassment Description | Provides detailed information about the harassment violation. |
Weapons Fields These fields appear only when the selected event type has the Weapon Classification field selected. | |
Weapons Type | Indicates the type of weapon the student had in his/her possession. This is a core set of drug types; localized options may be available. |
| Weapons Description | Provides detailed information about the weapon violation. |
Additional participants can be added by searching for a name and selecting the participants. A participant can only be searched for and added to an event once. Participant details can be condensed by clicking the Hide Details button. There is no limit to the number of participants that can be added to an event.
To remove a participant, remove the check mark from the checkbox next to the participant's name. The participant is removed when the event is saved.
When adding participants to any events after the first one recorded, participants of other events in the incident is automatically be available for selection. Mark the checkbox next to the participant's name to include them in the event.
Once Event and participant details have been entered, click Save Draft to save the event and keep the referral in draft status. To submit a referral, click the Submit button on the referral. Once a referral is submitted, it cannot be modified in the Referral tool. A Process Inbox message is sent to the individuals indicated in the Notify field and the incident is available through the Behavior Management tool for the calendar selected in the Campus toolbar when entering the Referral.
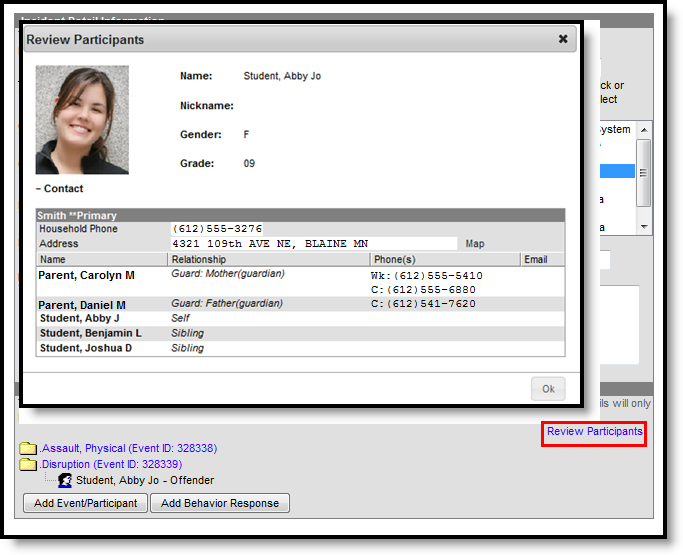
The Review Participants hyperlink displays a list of all participants, basic demographic information and parent/guardian contact information.
Add a Behavior Response
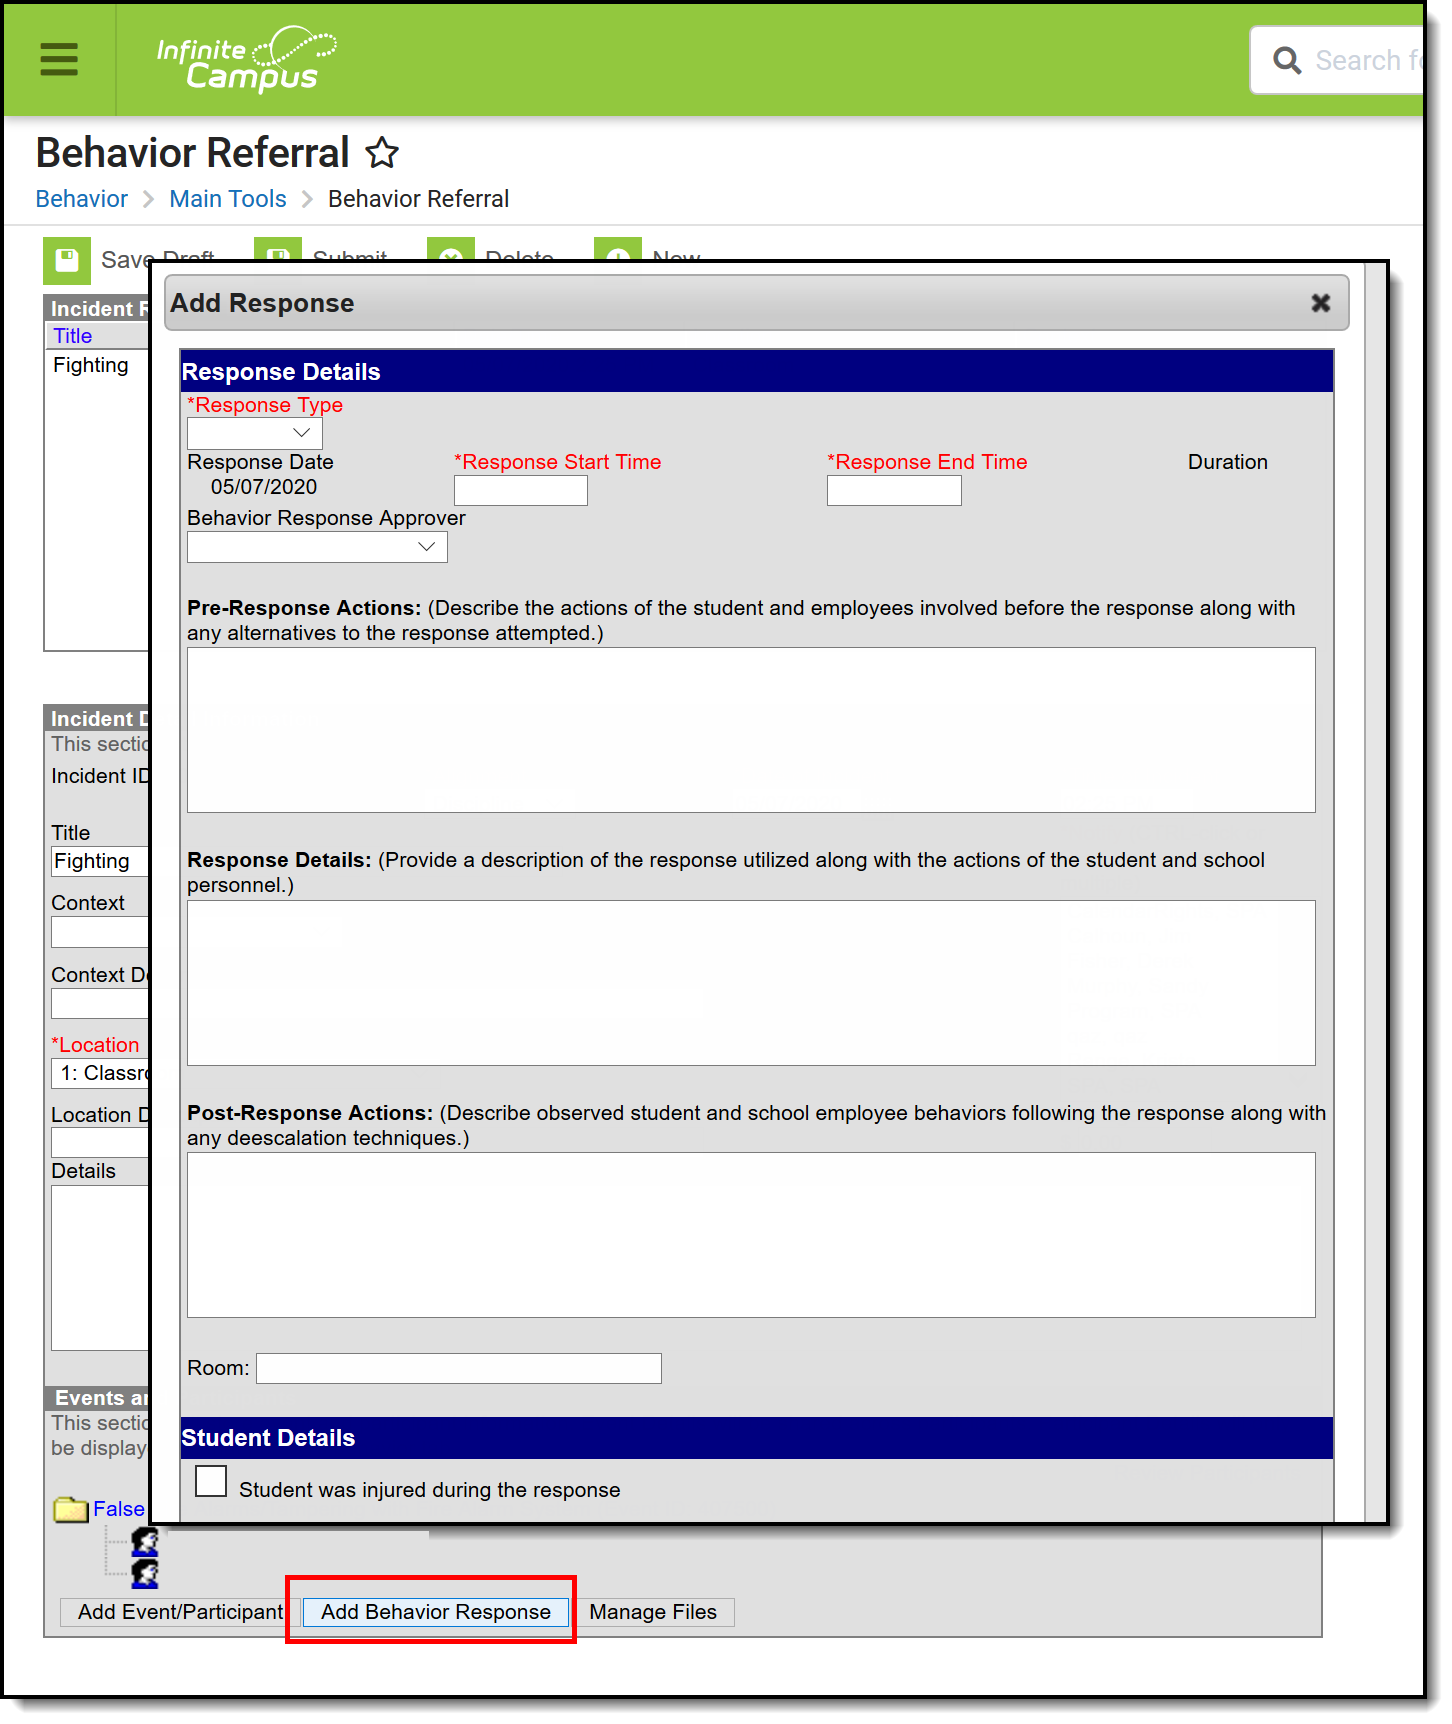
A Behavior Response is added to an event when a staff person needs to administer a restraint on the student, following recommended training and guidelines. This option is available for selection when:
- The incident alignment is a discipline event.
- At least one Response Type has been created.
- At least one Behavior Event has been created.
- At least one participant has been added to the event.
In addition, the following also needs to be completed before adding a behavior response:
- At least one staff person at the school building needs to be designated as a Behavior Response Approver on their District Assignment record (optional).
- At least one staff person at the school building needs to have an active Crisis Intervention Credential (optional).
- Response Types need to be created in the Behavior Admin toolset.
If a Behavior Incident has been marked to include a Behavior Response but it has not been entered, the Event and Participant editor displays an orange icon indicating the behavior response information is missing.
Behavior Response Editor
| Field | Description |
|---|---|
| Response Details | |
Response Type Required | Indicates the type of response that was given. These options are based on the active Response Types entered in the Behavior Admin tool. |
Response Date Required | Entered date reflects when the response occurred. This date automatically displays the date the incident occurred and cannot be modified. |
Response Start Time Required | Entered time (in HH:MM format) indicates when the staff person began administering the response. The start time of the response must be after the start time of the behavior incident. |
Response End Time Required | Entered time (in HH:MM format) indicates when the staff person stopped administering the response. The end time of the response must be after the start time of the response. |
| Duration | This field auto-calculates based on the entered start and end time. |
| Behavior Response Approver | Indicates the person authorizing the use of the response. This field populates with staff members who have the Behavior Response Approver checkbox marked on their District Assignment record. |
| Pre-Response Actions | Text entered here describes the actions performed by the staff and student before the response was administered. |
| Response Details | Text entered here describes the details of the response. |
| Post-Response Actions | Text entered here describes the actions performed by the staff and student after the response was administered. |
| Room | Indicates where the response occurred. |
| Student Details | |
| Student was injured from the response | If the student assigned to the event was injured as part of the response, mark this checkbox. |
Describe any injuries to the student Required | When the above checkbox is marked, this comment field displays. Details entered here should reflect the injuries the student experienced. |
Apply To Required | Indicates the student who received the behavior response. If more than one student is involved in the event, only one student can be selected on the response editor. |
| Guardian Contacted | Indicates the student's parent/guardian was contacted as a result of the response. When marked, the following four fields displays:
|
| Date | Entered date reflects when the guardian was contacted. This field defaults to the current date. Dates are entered in mmddyy format, but can be modified by clicking the calendar icon. |
| Time | Entered time reflects when the guardian was contacted. Time is entered in HH:MM format. |
| Contact | Indicates the name of the guardian who was contacted. |
| Details | Provides a description of what was discussed when the guardian was contacted. |
| Participant Details | |
| Name | Displays the name of the staff person involved in the response, as determined by the name selected in the Behavior Response Approver field. |
| Role | Select the type of position the staff person had in the response.
|
| Participant was injured during the response | If the staff person was injured, mark this checkbox. |
Describe any injuries to the participant Required | When the above checkbox is marked, this comment field displays. Details entered here should reflect the injuries the staff person experienced. |
| Add Participant | Enter the start or all of another person's name, and search, to add that individual to the response.
If another student is added as a participant, make sure that student is added to the event as a witness or other participant. This way, that student has a behavior event on their behavior tool and the school can track any injuries or other results of the event accordingly. In some situations, the Participant may be another student who is not involved in the incident, but is observing the response/seclusion in order to meet a district requirement. |
Manage Files Attached to Behavior Events and Participants
Images, documents, videos, etc. can be associated with a particular student involved in a behavior event, or associated with a particular behavior event. The district MUST be using Campus Digital Repository in order to use this feature.
Digital Repository settings must be enabled to display the Manage Files button:
- Mark the Behavior checkbox on the Digital Repository Preferences tool.
- Mark which Behavior tools (Behavior Management, Behavior Referral, Student Information General) allow files to be uploaded on the Digital Repository Behavior tool.
See the File Types article for information on which types of files can be uploaded.
Also, uploaded files cannot exceed the total max file size selected in Campus Digital Repository. There is no limit to the number of files that can be uploaded.
Attach Files to an Event/Participant
- Select the desired Incident from the Incident Referral Editor.
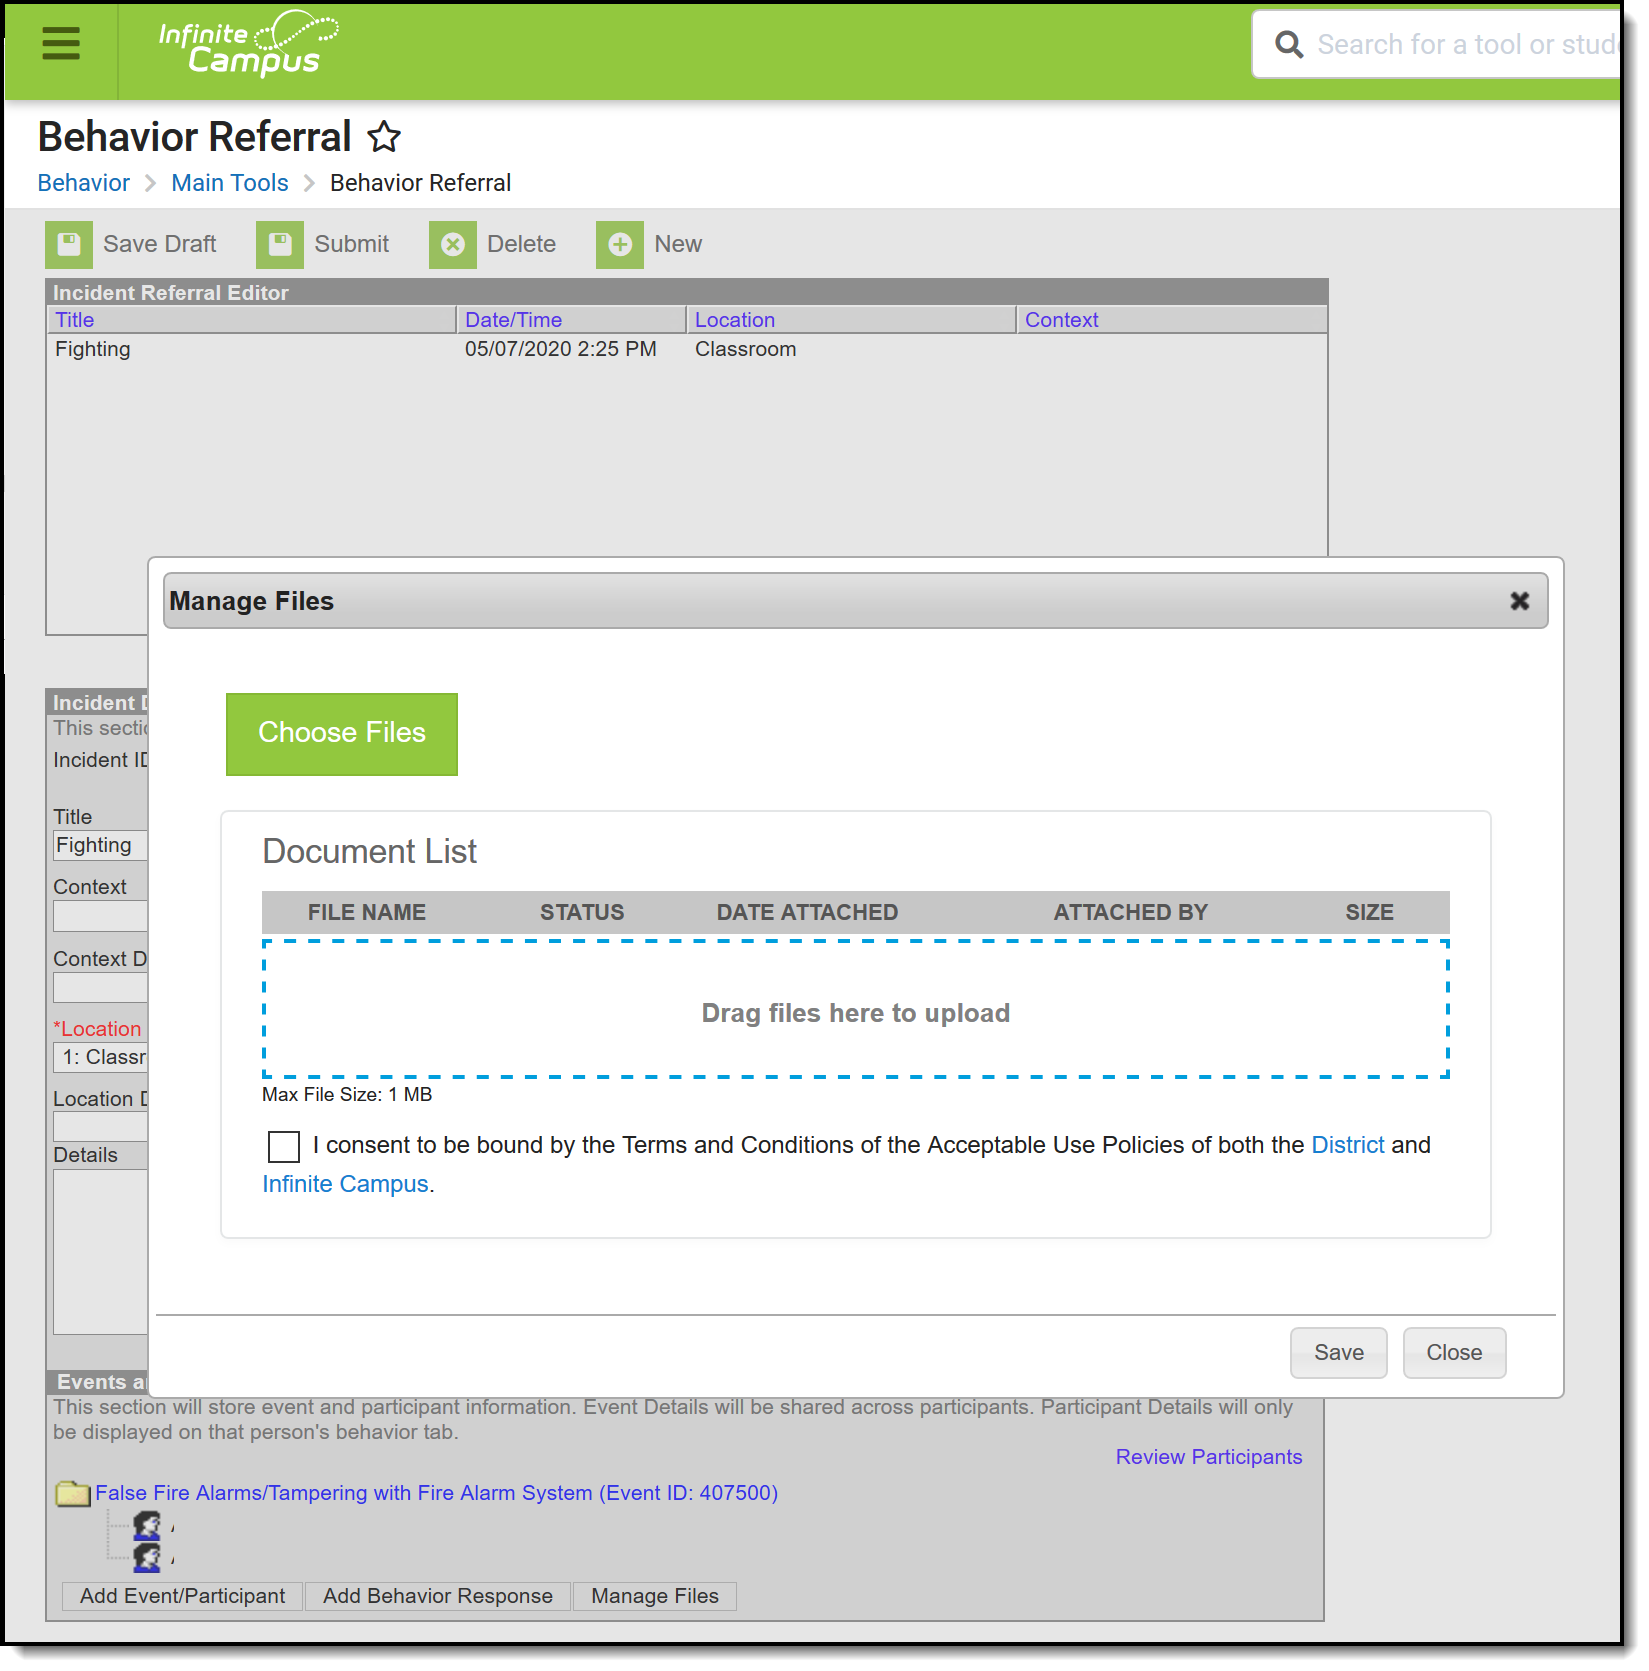
- In the Events and Participants section, click the Manage Files button. A Manage Files modal displays.
- Click the Choose Files button in the upper left-hand corner. Files can also be dragged from a user's desktop to the Drag Files to be Uploaded space.
- Locate the file to upload following the standard file upload procedures of your computer. Once located and selected to upload, the file displays in the Document List. If more than one file need to be added, locate all at one time.
- Enter a Description of the file, if desired.
- Determine if the file should be associated with the event and the student, or just the event. This needs to be selected for each file that is uploaded.
- Select the event by marking the radio button next to the event name. This must be selected in order to attach the file: files must be associated with an event, but may be associated with students or other participants.
- Select the student(s) by marking the checkbox. This does not need to be selected.
- Mark the Terms and Conditions checkbox. This is a required selection for any file that is uploaded.
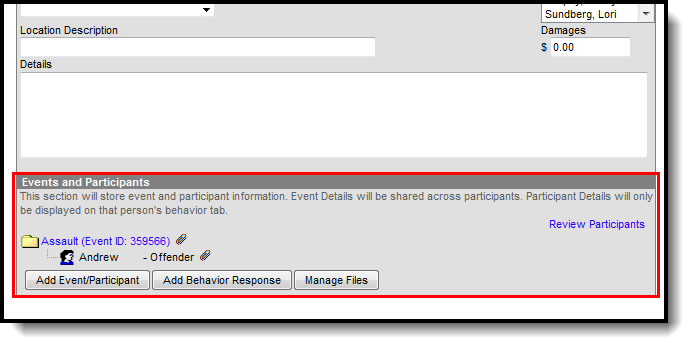
- Click the Save button when finished. The file is uploaded and paperclips display next to the event and/or the participant names. Only one paperclip displays regardless of the number of files that are uploaded.
View Uploaded Files
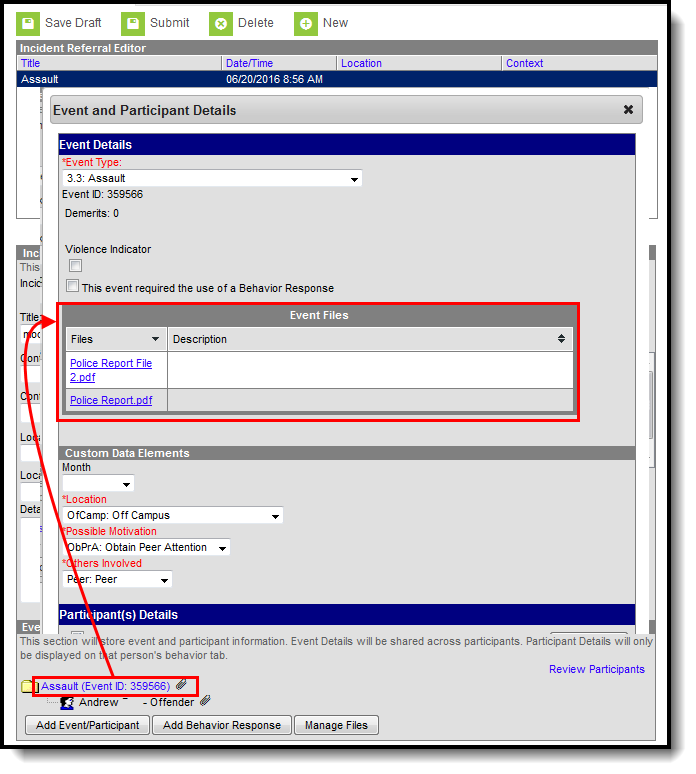
From the Events and Participants editor, click the Event name. The files that are associated with that event display in an Event Files section in the Event Details section. Click the link for the file to view it.
If files were associated with a participant, those files are also viewable here in the Participant Details section in a Participant Files section. If more than one student is associated with the event, and the file was associated with multiple participants, each participant displays a separate Participant Files section.
If the participants are students, files can also be viewed with proper tool rights from the Student Behavior tool (if Digital Repository preferences for that are turned on).
Manage Attached Files
Use the Manage Files button to make any necessary changes with the uploaded files:
- Click the X next to the file name to remove the file completely. The file is removed once the Save button is chosen (the status column changes from Attached to Remove on Save).
- Click the X next to the file to set the file to be deleted. The file status changes to Remove on Save and the is deleted upon saving.
- Re-select the X button of a file to negate the Remove on Save delete command, and have the file remain.
- Remove the checkbox selection for alignment with a participant.
- Upload more files for the selected event.
- Modify the description of the file as needed.
Save any changes that were made before exiting the Manage Files modal.
