The Attendance tools are used to enter student attendance information, maintain historical records and generate reports and letters.
Attendance Setup Overview
The video below provides an overview of the attendance tool.
This video explains the overview of setting up Infinite Campus Attendance.
Classroom Monitor
The Classroom Monitor shows which teachers have submitted attendance for their course sections and can be used to view and enter attendance for course sections. The Incomplete Teacher Attendance Report shows which teachers have not submitted attendance.
Tool Search: Classroom Monitor
The Classroom Monitor shows which teachers have recorded attendance for a course section during the appropriate period. In addition, the Classroom Monitor allows the attendance clerk to rapidly enter attendance for teachers or substitute teachers if they are provided a roster or other list of students in that section.

See the Classroom Monitor Tool Rightsarticle for information about rights needed to use this tool.
Districts should have a policy about the proper use of the Classroom Monitor. For example, the attendance clerk can contact the teacher after the standard attendance recording time to remind them to take attendance. Or, the attendance clerk can record attendance.
- Students are only counted for courses in which they are currently enrolled. If the student has an end date in Section A within Period 2 and is currently enrolled in Section B also within Period 2, the student is only counted one time for that period.
- Attendance information displays entered attendance results for course sections that span multiple periods.
- When a course section has multiple primary teachers, the correct roster and assigned primary teacher (on the Staff History tab) on the entered date display. For example, if Primary Teacher A is ended as of October 10, and Primary Teacher B is added as of October 11, and the Classroom Roster date is October 12, Primary Teacher B and the active list of students as of October 12 is listed.
Students added to a course section after the term begins display in green font for the number of days entered in the Days to Flag Roster Additions System Preference.
Classroom Monitor View
The following describes the fields available on the Classroom Monitor tool.
Field | Description |
|---|---|
Date and Date Refresh | Displays the date for which attendance information has been or will be recorded. The field always displays the current date unless it is modified to another date. If changing the date, enter that date or use the calendar icon to select a date, and then click the Refresh button to display the attendance sections for the correct date. Dates can be entered in the following valid date formats:
Any other date format is considered an invalid format and returns a warning message that directs the user to reenter the date in a valid format. |
Incomplete Teacher Attendance Print | When selected, a report of Incomplete Teacher Attendance displays, listing the teacher's name, course period, course section and the name of the course. |
Primary Teachers Only | When selected, only those teachers considered the Primary Teacher of the section are listed on the Classroom Monitor. |
| Last Refreshed Timestamp | Indicates when the Classroom Monitor was fully refreshed with the latest attendance recording. This refresh occurs when the user selects, or re-selects, the Classroom Monitor from the Index, selects the Refresh button next to the date field or marks the Primary Teachers Only checkbox. |
Teacher Name | Lists the names of the teachers assigned to course sections in alphabetical order by last name. |
Department | If entered, the department to which the teacher is assigned as noted on the District Assignments. |
Contact Information | Displays the work phone number (hover over the phone icon) of the assigned teacher or the teacher's email address (hover over the envelope). This information is entered on the staff person's Demographics page. |
Course Periods | The periods used in the calendar are displayed in order by sequence across the top of the page. |
A course section displays in green when attendance has been saved for that section, entered either by the teacher or the attendance office. A course section displays in red when attendance has not been saved for that section. A count of the total number of students marked present and the the total students enrolled in the section displays in parentheses. The first number indicates the number of students marked present; the second number indicates the total number of students actively enrolled in the section. If attendance has not yet been recorded for the section, the first number displays as --.
If multiple course sections are scheduled into multiple sequential periods, entering attendance in the Classroom Monitor for one section updates the attendance for all sections.
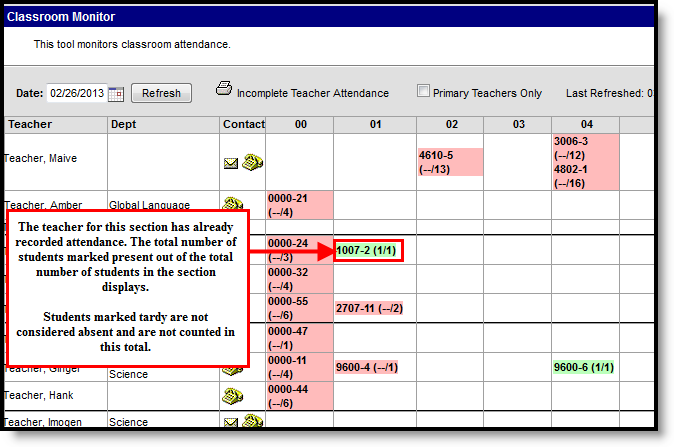 Recorded Attendance Display
Record Attendance Using the Classroom Monitor
- Select the Course Section for which to record attendance. The screen reflects the teacher view of attendance.
- Mark the appropriate students as Absent or Tardy by clicking the appropriate radio button.
- If no students are absent or tardy, do not make any changes.
- Enter any Comments related to the attendance entry.
- Click the Save icon when finished. The page will refresh and display the main Classroom Monitor view again with the Course Section that was just modified in green.
If the section was selected in error, click the Close button to return to the main view of the Classroom Monitor.
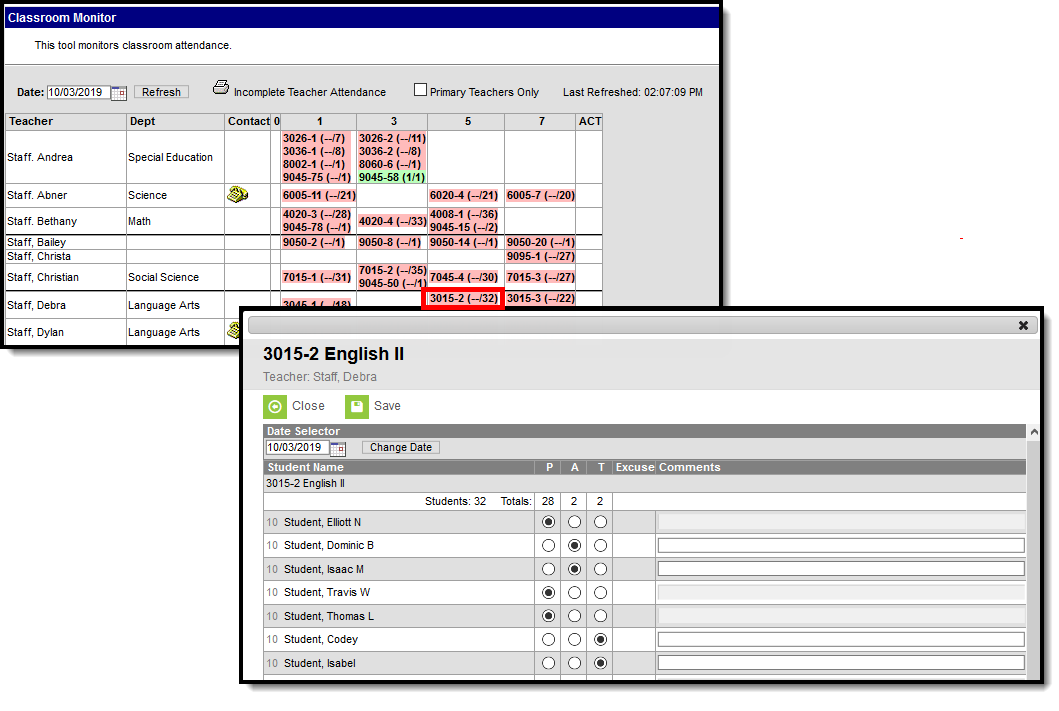 Recording Attendance
Record Attendance for Virtual Students
Students who are virtual on the selected date display in a separate section from students who are physical. When Virtual Attendance is not enabled, or when it is enabled but the Disable Classroom Attendance option is marked, virtual students can be marked as Present, Absent or Tardy, just like physical students.
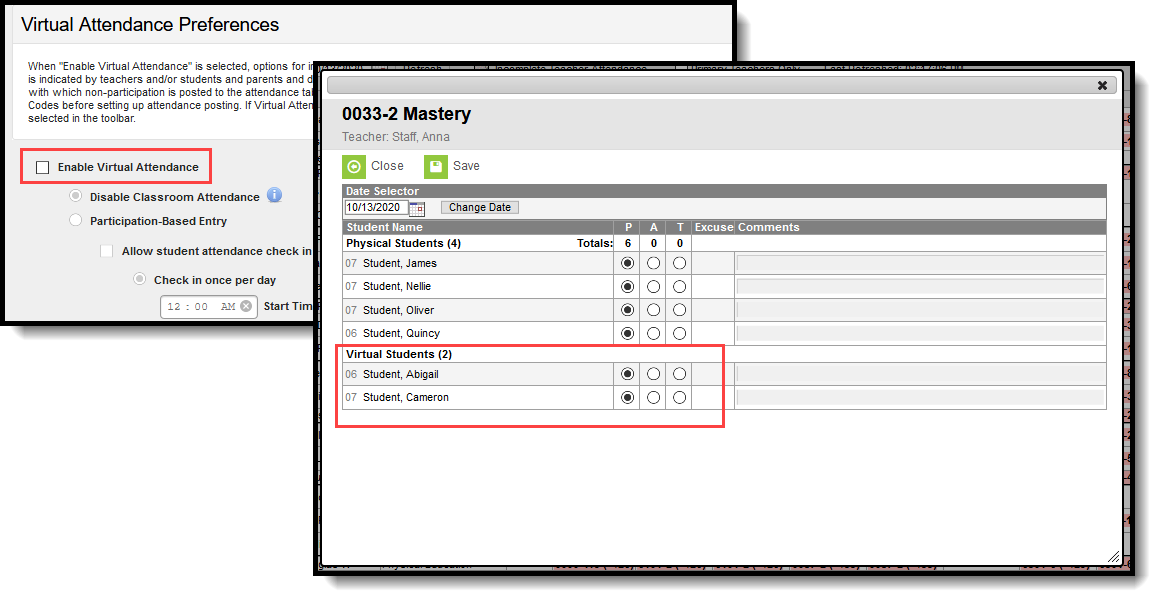 Students are marked as Present, Absent or Tardy when Virtual Attendance Preferences are not enabled
When Virtual Attendance is enabled with Participation-based entry marked, virtual students have a Participation checkbox. If Participation-based entry with Student or Parent Check In is selected, a read-only column displaying Check In information displays.
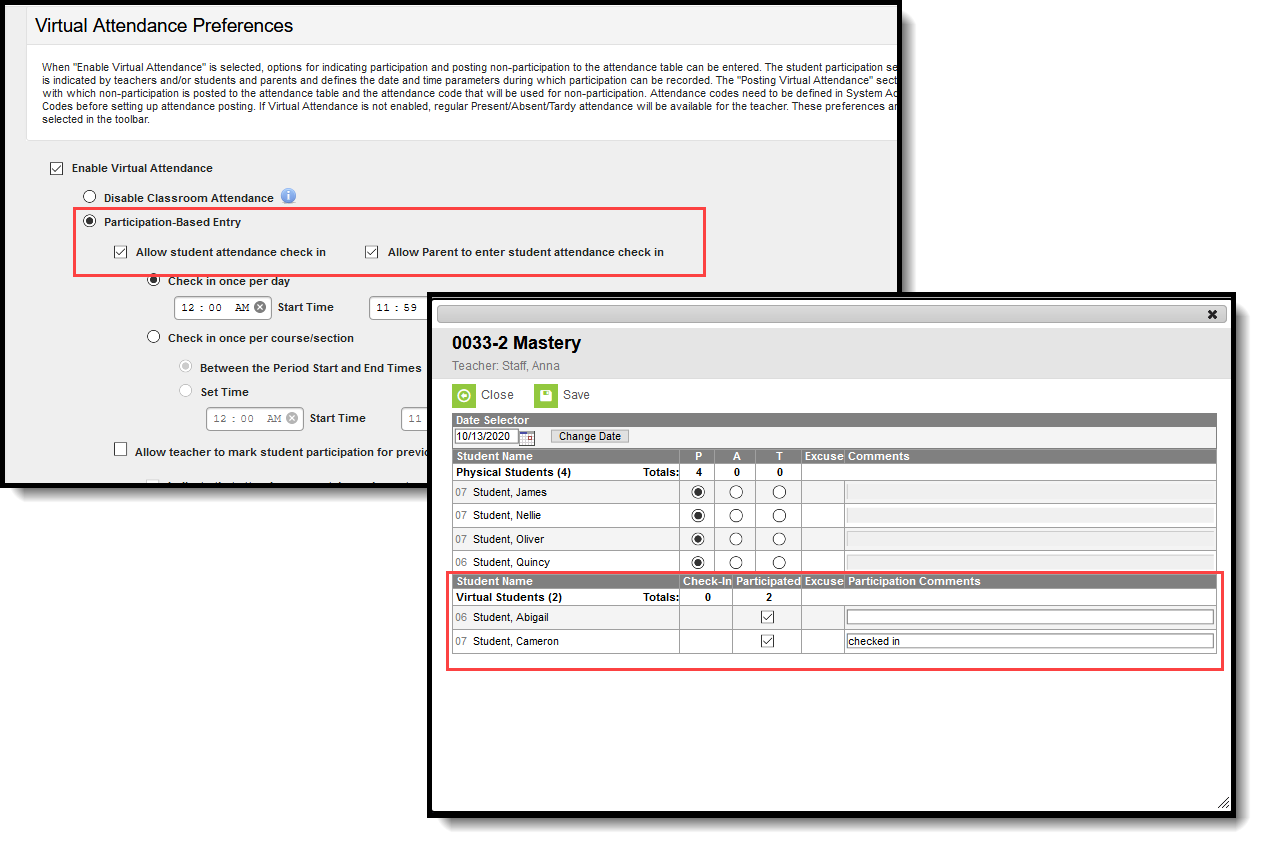 Students are marked as Participated when Virtual Attendance Preferences are enabled
When a Student or Parent checks in, a participation event is entered. Hovering over a student/parent check in displays who checked in and when.
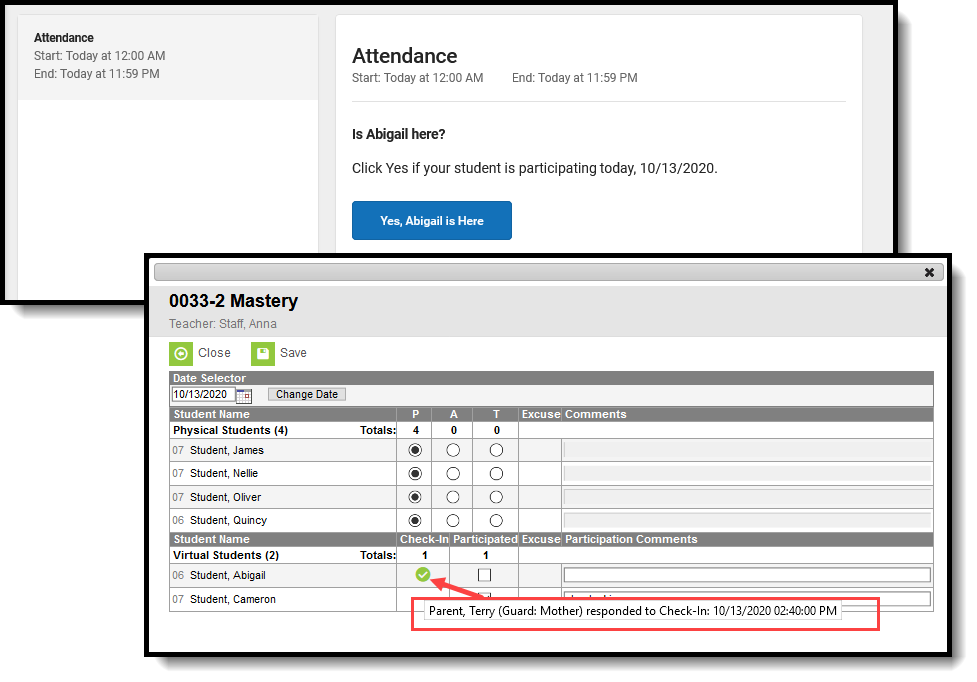 Student/Parent Check In information displays when hovering over the Participation Check In Mark
To indicate the student participated in the section, mark the Participation checkbox. Leave it unmarked to indicate the student did not participate in the section.
Attendance excuses display in the Excuse column. Participation and Participation comments display in the teacher's attendance view and in Section Attendance.
Participation Type
A Participation Type column displays when the StudentVirtualParticipation Type attribute in the Core Attribute Dictionary is turned on and has values associated with it. Attendance Office Staff (and teachers) can indicate whether a virtual student participated in the class at the same time as other students who were physically in the class (synchronous) or at a different time (asynchronous). Synchronous and Asynchronous are default participation codes; they can be modified or other options may be available.
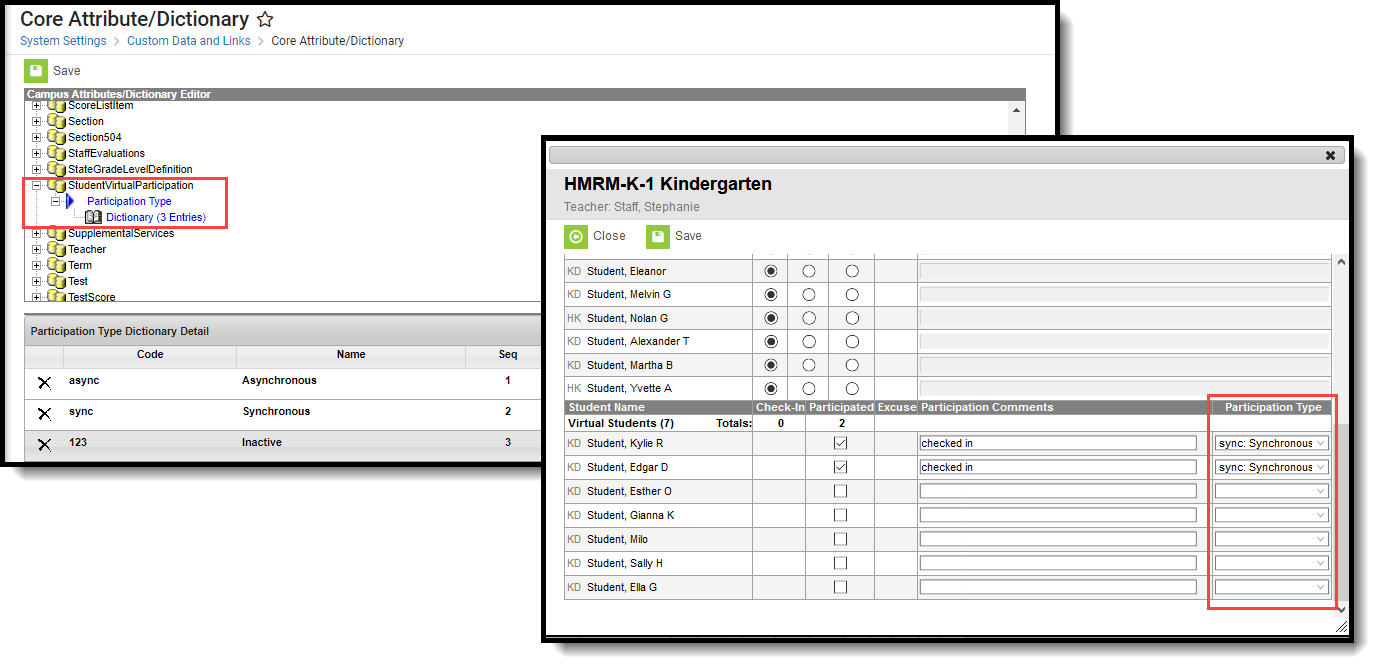 Virtual Students - Participation TypeValues selected in this field are visible in Campus Instruction Attendance and Teaching Center and in Section Attendance. Teachers can modify these values if the Virtual Attendance Preference for teachers to modify attendance after check in is turned on.
Override
When the Virtual Attendance Preference of Allow teacher to move physical students to virtual and mark them as participated in a period is selected, any course that has students assigned to a Blended Learning Group that is NOT assigned to the current day displays an override option. This allows teachers and office staff to move a physical student (on-site) to a virtual student without modifying their Blended Learning Group. The Override only applies to the current day and selected period.
Upon saving, those students who were marked as Override now display in the list of Virtual Students. An exclamation point in the Participated column indicating that student was participating in the class from another location than the physical students.
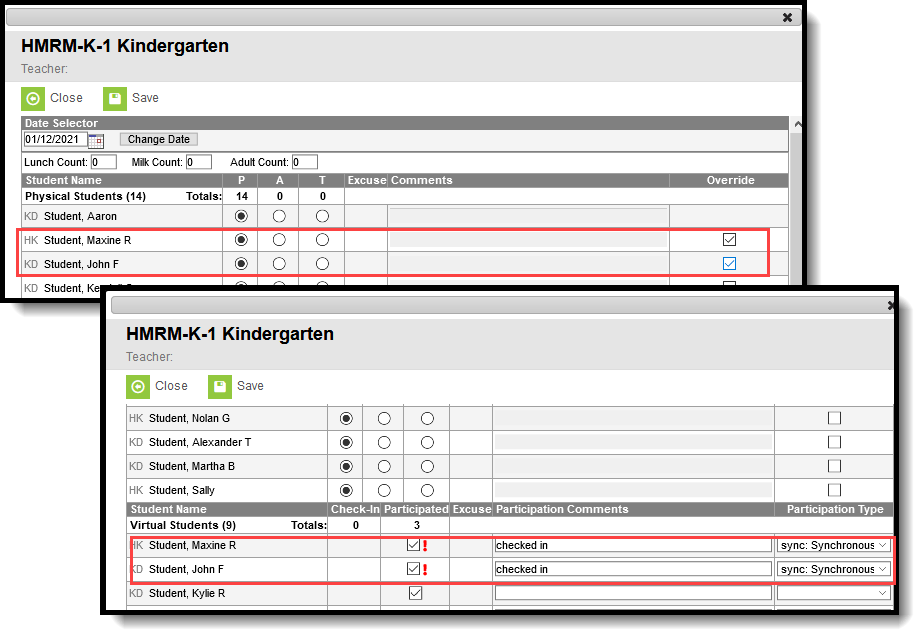 Physical Student Override to Virtual Student
Students who are not assigned to a Blended Learning Group (are considered Physical Students) do not have the ability to be marked as Override.
To move an Override Virtual Student back to a Physical Student, remove the checkbox from the Participated column.
Participation records are not deleted when a student is assigned to a new virtual Blended Learning Group. Participation records are deleted when an Override student is moved back to a Physical student.
See the Blended Learning Groups article for more information.
School Months
For districts using School Months, users may modify attendance after a closed date of the School Month when:
- At least RW rights are assigned to Classroom Monitor
- Modify Rights checkbox is marked on the Calendar School Year rights
- At least RW rights are assigned to School Months OR
- Close School Months checkbox is marked on the Calendar School Year rights
A message displays when the entered date is in a closed school month.
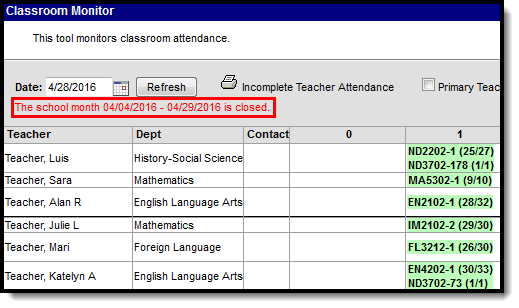 Closed School Month Display
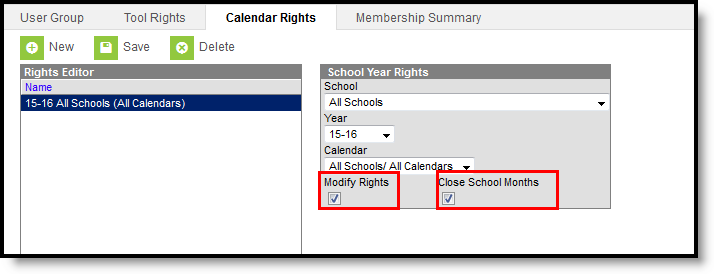 User Calendar Rights
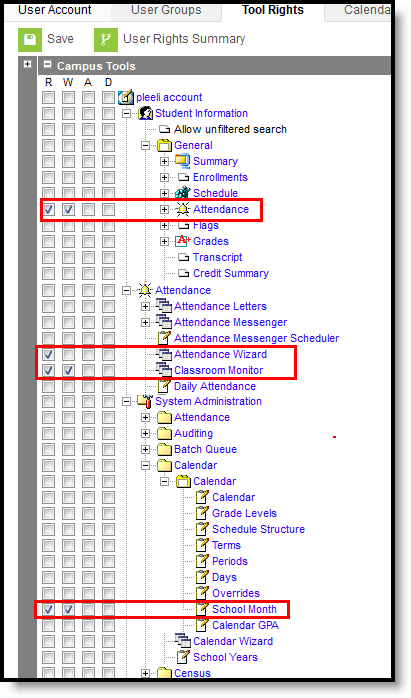 Tool Rights - School Months Attendance Modification
If the user does not have rights to enter/modify attendance, a warning message displays indicating sufficient tool rights are not assigned.
Print the Incomplete Teacher Attendance Report
Click the Print icon at the top of the Classroom Monitor to generate a report in either PDF or DOCX format listing the teachers who have not recorded attendance for the entered date. This should be generated at the end of the day.
When only including primary teachers (the Primary Teachers Only checkbox is marked), the primary teacher included on the report is based on the reporting date and the primary teacher's start date of teaching the section.
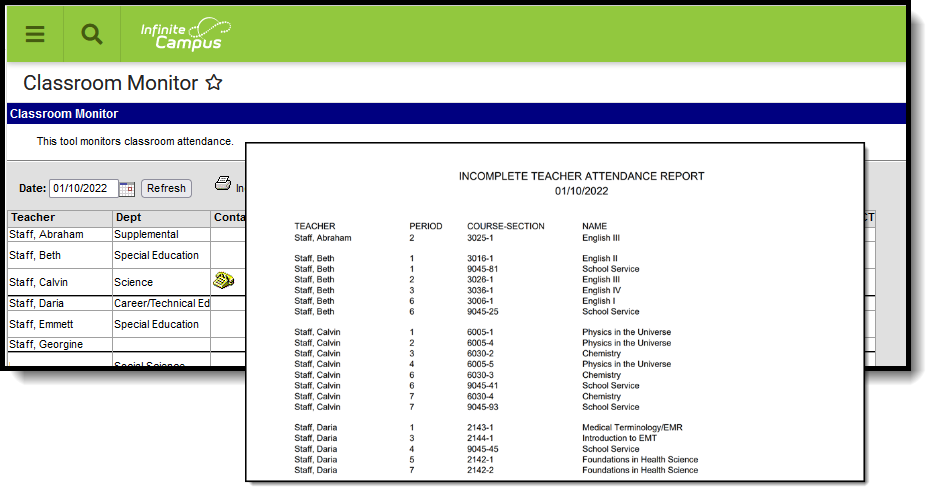 Incomplete Teacher Attendance Report
The Classroom Monitor shows whether teachers have submitted attendance during any period on a selected day. Attendance clerks can enter, edit, or process manually-submitted attendance using this tool.
Daily Attendance
The Daily Attendance tool is used to view and edit groups of students' attendance events for a particular date.
Tool Search: Daily Attendance
The Daily Attendance Processing tool displays student attendance events (absences or tardies) for a given day. From here, an attendance clerk may process individual student attendance events following district policy. Daily Attendance displays the current date by default. Users can enter another date to view attendance information for that day. Dates are controlled by the Year, School and Calendar selected in the Campus Toolbar.
 Daily Attendance
See the Daily Attendance Processing Tool Rights article for information about rights needed to use this tool.
Attendance information entered by a teacher will appear as the attendance type, (A)ttendance or (T)ardy in yellow, indicating that the attendance record still needs to be processed by the attendance office. Hovering over an attendance event displays a pop-up window to display, showing the meaning of the code, the course name, teacher, the person who entered the event, and any comments that were entered regarding the attendance event.
Students display on the Daily Attendance tab when:
- the student is actively enrolled on the entered date.
- the student is scheduled into a course section and has an attendance event on the entered date.
The following can be done using the Daily Attendance tool:
- View attendance information for all students who have an attendance event on the entered date
- Review and process attendance entries by the Student Name
- Review and process attendance entries by the Attendance Event
- Review and process attendance entries using an Ad hoc Filter
- Generate the Daily Attendance Summary Report
- Generate the Caller Report
- Generate the Person Summary Report
- MMDDYY
- MM/DD/YY
- MM-DD-YY
- MMDDYYYY
- MM/DD/YYYY
- MM-DD-YYYY
Or, select the calendar icon to choose a new date.
Any other date format is considered an invalid format and will return a warning message that directs the user to reenter the date in a valid format.
Also available is the student's active Blended Learning Group. The blended learning group icon displays next to their name. Hovering over the icon displays the name of the Blended Learning Group. This icon only displays when the student is participating in virtual classes for the selected date. See the Blended Learning Groups article for more information.
Process Daily Attendance by Student
Clicking a student's name from the Daily Attendance tool displays a summary of that student's attendance for the school year and the school selected in the Campus Toolbar. Attendance events are grouped by Term, by Course and individually by Period. Click Daily Attendance in the Index to return to the daily summary.
A pop-up text box listing the student's homeroom teacher displays when hovering over the student's name.
From this view, users can select the Period Detail or Daily Detail reports. To return to the student's Daily Attendance view, click the Back to Attendance link.
- Use the calendar icon to change the date in the Date field (to process attendance for a date that is not the current date). The screen will reload with the attendance data for the entered date.
- Select a student from the list by clicking on the student's Name. The student's attendance information as viewed from the Student Attendance tab displays.
- Modify the attendance for the entered date by either selecting the date from the list of dates or by clicking on the attendance entry.
- Click the Save icon when finished. After saving the user is returned to the main Daily Attendance view.
Process Daily Attendance by Event
Clicking an attendance event for a student displays the event details. The Code describing the attendance event can be modified, which will update the Status and Excuse columns when the record is saved. Present Minutes allows the user to enter the number of minutes for which the student was present in class in the cases of partial-attendance, such as tardies. Any comments entered for the event will appear and can be added or edited as desired.
A pop-up text box listing details of the attendance event displays when hovering over the event.
- Use the calendar icon to change the date in the Date field (to process attendance for a date that is not the current date). The screen will reload with the attendance data for the entered date.
- Select an attendance event for the desired student by clicking on the attendance code. The student's attendance information as viewable on the Student Attendance tab.
- Click the Save icon when finished. After saving the user is returned to the main Daily Attendance view.
Process Daily Attendance Using an Ad hoc Filter
An Ad hoc filter can be selected that contains students in a particular section, participating in a particular program or involved in after-school activities. When selected, only those students included in that filter who have attendance entries for the entered date display on the Daily Attendance editor. This can be used to review attendance information for students on a field trip. The Ad hoc filter will remain selected until the user selects a different filter or until the field is cleared.
Ad hoc Filter Queries, Pass-through SQL Queries and Selection Editor Queries are available in the Ad hoc Filter dropdown list.
- Use the calendar icon to change the date in the Date field (to process attendance for a date that is not the current date). The screen will reload with the attendance data for the entered date.
- Select an Ad hoc Filter from the dropdown list to only display students included in that filter.
- Select an attendance event for the desired student by clicking on the attendance code. The student's attendance information as viewable on the Student Attendance tab.
- Click the Save icon when finished. After saving the user is returned to the main Daily Attendance view.
Generate Daily Attendance Reports
Click the Summary Report icon to generate the Daily Attendance Summary Report. This report displays the attendance events for each student and period for the day entered on the Daily Attendance Tab, and can be generated in either PDF or DOCX format. An explanation of the codes describing each attendance event appears at the end of the report. Homeroom teacher, where used, appears below the student's name. This report displays all attendance entries for the day, including those with an Unknown excuse and those that have been processed by the attendance office.
 Daily Attendance Summary Report
Click the Caller Report icon to generate the Caller Report. This report lists students whose parents/guardians may need to be contacted to determine the status of the attendance event, and can be generated in either PDF or DOCX format. Contact information displays along with the details of the attendance event for each student. Homeroom teacher, where used, appears below the student's name. The Caller Report displays attendance events on the entered date that have a status of Absent and an Excuse type of Unknown.
Only parents/guardians in the student's Primary Household display on the report. Parents/guardians from a secondary household are not displayed.
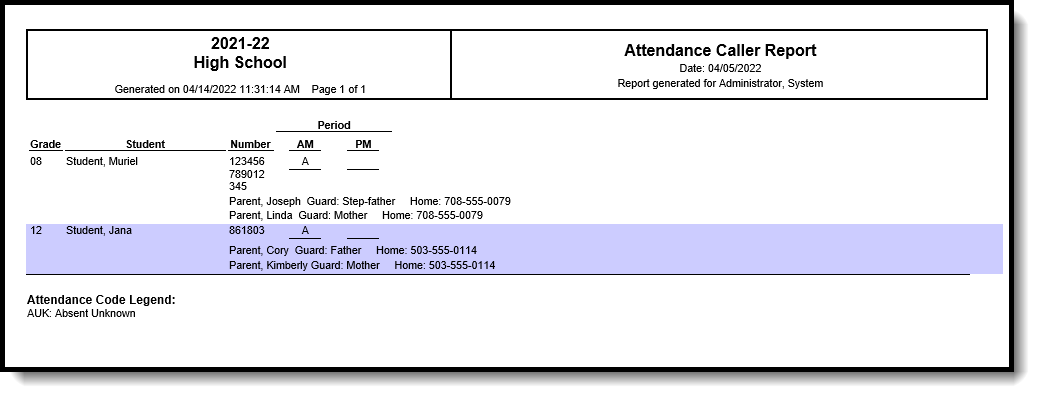 Daily Attendance Summary Report
Click the Details link to generate the Daily Attendance Person Summary Report. This is the same report that generated from the student's Summary tab.
The Person Summary Report includes person data that is displayed in the Person Information area of the Summary tab, Household information displayed in the Household area of the Summary tab (both primary and secondary household information), Contact Information and Race/Ethnicity information.
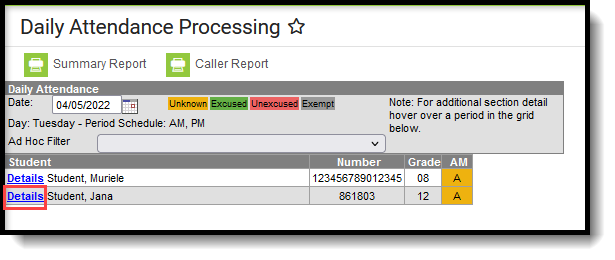 Daily Attendance Details Report (Person Summary Report)
The Daily Attendance Processing tool is used to review, process and report on attendance marks that have been entered on a selected date. Only users with rights to do so can make changes to attendance records.
Attendance Entry Wizard
The Attendance Wizard tool allows the attendance office to quickly create or change attendance data for a group of students using a variety of modes. Follow the document link for an overview of the tool. Follow the video link to see a demonstration of how all the attendance mode options available in the tool are used.
Tool Search: Attendance Entry Wizard
The Attendance Wizard tool allows the attendance office to quickly create or change attendance data for a group of students using a variety of modes. Attendance is entered for the current date by default. This date can be changed to another instructional day where attendance was recorded.
See the following articles for more information:
 Attendance Entry Wizard
This tool is for use by Attendance Clerks or other office personnel. The Attendance Wizard allows the entering of Attendance Codes and comments. When the attendance office has updated attendance for a day, teachers will see the entered code and comments but will not be able to modify that attendance or add to the comments. In addition, attendance information displays on the student's Attendance tab in real time and on the Campus Portal and Mobile Portal (if Attendance data is selected to display).
Prerequisites
Before attendance can be taken in ANY of the attendance tools available in Campus, the following must be done:
- Attendance Codes must be entered and mapped to State Attendance Codes, if applicable.
- The Calendar Days must be set and marked to record attendance (day is marked for Attendance) and it must be a school day (day is marked for Instruction).
- Students must be enrolled into the school selected in the Campus toolbar and must be actively scheduled into course sections.
Districts often have a policy regarding the automatic changing of unknown absences to unexcused absences after a designated amount of time (48 hours, etc.). Use the Task Scheduler to set up a script to do this.
Attendance Wizard Navigation
The Attendance Wizard is broken into five parts. Options for recording attendance vary depending on the options selected here.
1. Attendance Date
The entered date (always displays the current date) reflects the day for which student attendance is recorded. This date can be modified by entering another date in mmddyy format, or by using the calendar icon to select a date.
Attendance can only be recorded for calendar dates that are marked to record attendance. This is done in the School Days editor. There is a warning when the date selected is not an Attendance day.
2. Type
Attendance can be entered using either the Standard Attendance option or the Positive Attendance option.
- Standard Attendance records a student as being absent for a period of time on a specific date. Users select the appropriate attendance code for the absent record.
- Positive Attendance records a student as being present for a period time. Users enter the amount of time a student was in attendance.
This section only displays on the Attendance Wizard when the Positive Attendance Preference is set to Yes. When it is set to No, this section does not display, and the remaining sections are renumbered accordingly.

Attendance Wizard Types
3. Modes
Attendance modes determine how attendance is recorded. Different mods are available based on the Type chosen above. The following options are available.
|
Mode |
Description |
Scenarios of When to Use |
|---|---|---|
| Standard Attendance | ||
|
Daily |
Records student attendance for the entire day. The student is marked absent for all scheduled attendance periods in the day.
This mode is automatically selected. |
Student or parent/guardian calls the attendance office notifying the staff of the student being absent for the entire day. The Daily mode marks the student absent for the entire school day. |
|
Period |
Records student attendance for the selected period. |
Student has an appointment off campus or missed his regular class for just the selected period. This mode marks the student absent for the selected period only. |
|
Batch |
Records student attendance for the entered date range and time range. |
Student is unable to attend school for a set date range starting at a certain time, perhaps for a school function. The Batch mode marks the student absent from the entered time of the start date through the entered time of the end date. |
|
Edit |
Allows an existing attendance record to be modified with a different attendance code or different comments. |
The attendance office has already recorded attendance for the day. However, a weather issue has caused the administration to cancel school for the day. Use the Edit mode to modify attendance that has already been recorded. |
|
Batch Edit |
Records attendance for a date range for the selected periods. The students are marked absent for the same periods on all attendance days during the entered range. |
The yearbook class is meeting off campus for three days during the week in the mornings only. These students are marked Absent/Exempt for the class periods that meet in the morning only for all days in the date range. |
|
Check In |
Using this mode marks the student as present (in attendance) for the rest of the day from the current time forward.
|
Student comes to school AFTER he has already been marked absent for the entire day. Check In removes the attendance record from the time he arrives through the end of the day. If a code is entered that has a status of Tardy, the Present Minutes still calculate as if the code has a status of Absent. |
|
Check Out |
Using this mode marks the student as absent (not in attendance) for the rest of day from the current time forward. |
Student leaves school after being in attendance from the beginning of the school day through the current time. Check Out applies the attendance record from the time he leaves school through the end of the day. |
| Positive Attendance | ||
| Batch | Records student attendance for the entered date range and time range. |
Student was present for the class throughout the day from a starting time to an ending time in 60 minute segments. |
| Edit | Allows attendance to be modified for previously entered positive attendance entries. |
A record exists for a student for 30 minutes of attendance, but needs to be changed to 45 minutes for the same date and course section. |
For each mode, a different way to enter attendance displays for the fifth item in the Attendance Wizard where attendance codes are assigned to the attendance entry.
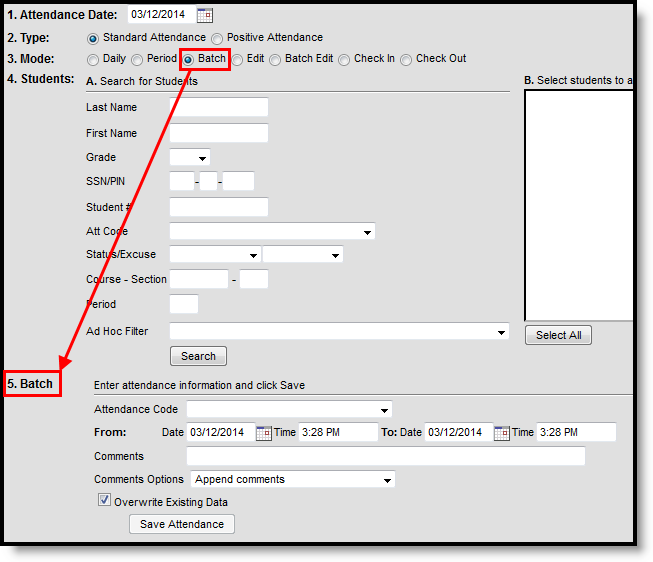
Attendance Wizard Modes
4. Student Search
Attendance clerks can search for students in the following ways. A combination of these fields could be entered, or just one search field can be used to search for students.
After searching for students and noticing the entered Attendance Date is incorrect, changing the date removes any student names that display in the search results. Changing the selected Mode also removes student names from the search results.
|
Search Option |
Description |
|---|---|
|
Last Name |
Enter the student's last name. If searching for a particular student, enter the full last name for a shorter result list. Or, enter part of a last name to return results for more students. Entering "Joh" or "Smi" returns student last names that begin with those letters. |
|
First Name |
Enter the student's full first name or partial first name. |
|
Grade |
Select the grade level of enrollment from the dropdown list. This list only contains grade levels in the selected school in the Campus toolbar. If the 9th grade students have an off-campus activity, select that grade level from the dropdown list to return all 9th grade students in the school. |
|
SSN/PIN |
Enter the student's Social Security number or Personal Identification Number. |
|
Student Number |
Enter the student's district-assigned student number (not the state identification number). This value must be entered in its entirety for results to return. |
|
Attendance Code |
Searching by an attendance code returns students who have already been assigned the selected code. This can be done to modify the information or to remove attendance entries for the entered date.
This only applies when recording Standard Attendance. |
|
Status/Excuse |
Searching by a status and excuse returns students who have already been assigned an attendance entry with the selected combination of statuses (Absent, Tardy or Early Release, Present) and excused (Unknown, Excused, Unexcused, Exempt). If completing attendance recorded by a teacher, select the Unknown excuse. This returns a list of students who have a status of absent or tardy but no assigned excuse (teachers cannot record attendance excuses, just attendance statuses). This only applies when recording Standard Attendance. |
|
Course - Section |
Enter the course number and section number to return students scheduled into a particular course. For example, if the orchestra band members have an event for a day, enter that course number and section number to return all students scheduled into that course section.
Only numbers are allowed for entry in the Section field.
This is a required selection when entering positive attendance in Batch Mode. |
|
Period |
Enter the period of the day to search for students for a particular period.
This only applies when recording Standard Attendance. |
|
Ad hoc Filter |
Select students using an ad hoc filter, allowing additional student attributes to be used when searching. |
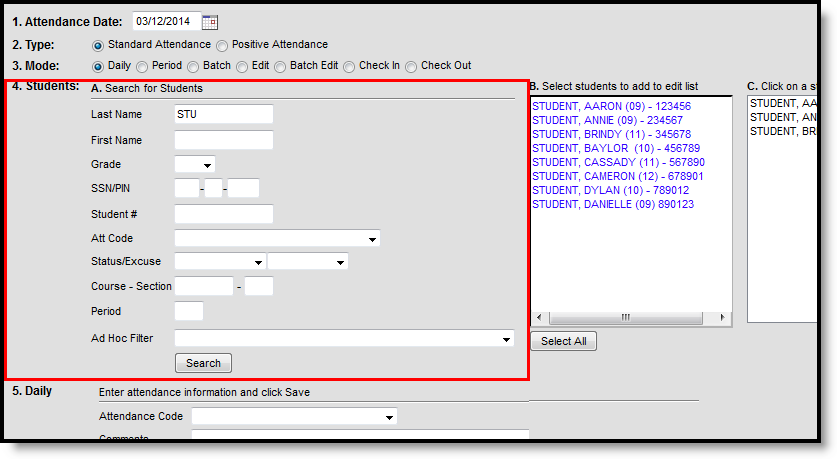
Attendance Wizard Search Options
After search fields are entered, clicking the Search button finds matching student names and place them in Column B. If only one student is found that matches the results, the student's name is placed in Columns B and C. Selecting a student's name in Column B moves that name to Column C where attendance can be recorded.
If all students returned in Column B need attendance information entered, click the Select All button, which moves all returned names into Column C.
5. Recording Attendance
Options for recording attendance display when the desired Attendance Mode is chosen. Users need to select an Attendance Code from the dropdown list for any option selected. Other items to enter vary on the type of attendance being recorded. Users also need to determine if there is existing attendance information entered for a student if that data should be overwritten with new data.
For example, a student may be marked absent through the end of the week; during that week, a class in which the student is scheduled takes a field trip. This would mean all students in that class are marked Absent/Exempt for that day. But the student who is already out through the end of the week should not have the same attendance entry as the other students in the class. Thus, the Overwrite Existing Data checkbox should not be selected in this instance.
Attendance comments can also be overwritten or appended, as needed, if student attendance is being modified. Select the desired option from the Comments Options dropdown list as appropriate.
When saved, student attendance is entered and immediately visible on the student's Attendance (Student) tab and when viewing attendance in Campus Student or Campus Parent.
See the following articles for more information:
State-Specific Information
Fields may vary by state:
The Attendance Entry Wizard is used to mass-enter and edit student attendance.
This video demonstrates all the Attendance Entry Wizard Modes. To jump from one mode to the next, hover over the timeline and look for the black marks that indicate where demonstration of each mode starts.
Mode start positions on video timeline:
Daily :15
Period 2:44
Batch 3:14
Edit 3:42
Batch Edit 4:18
Check In/Check Out 4:43
Daily Mode
Daily Mode is useful for marking a group of students absent for all periods of the day.
Tool Search: Attendance Wizard
The Daily Mode records student attendance for the entire day. The student will be marked absent for all scheduled attendance periods in the day. For example, if a parent/guardian calls the attendance office indicating their student is ill and will not be in attendance, the attendance clerk can use the Daily Mode to process that student.
The Daily Mode is automatically selected when recording attendance.
- Enter the Attendance Date for which to record attendance.
- Verify the Daily Mode is selected.
- Enter Search criteria to return students.
- Click the Search button. Students matching the entered criteria display in Column B.
- Select the students from Column B to move to Column C. Only students in Column C will have attendance entered for them.
- Select the Attendance Code from the dropdown list. This code will be applied to all students in Column C.
- Enter Comments related to the attendance entry.
- Select the appropriate Comments Options from the dropdown list. This affects students who may already have attendance and attendance comments entered.
- Determine if existing attendance data should be overwritten with this new information. Select or remove the Overwrite Existing Data checkbox as needed.
- Click the Save Attendance button.
If the entered date is a non-attendance day (set on the Calendar Days tab) in the School and Schedule selected in the Campus toolbar, a warning message displays indicating attendance can only be recorded for days marked as attendance.
- When a school has multiple schedule structures and a specific schedule is selected in the Schedule field, that schedule is used to determine if the entered date is an attendance day.
- When a school has multiple schedule structures and the Schedule field is set to All, the schedule with the highest structureID is used to determine if the entered date is an attendance day.
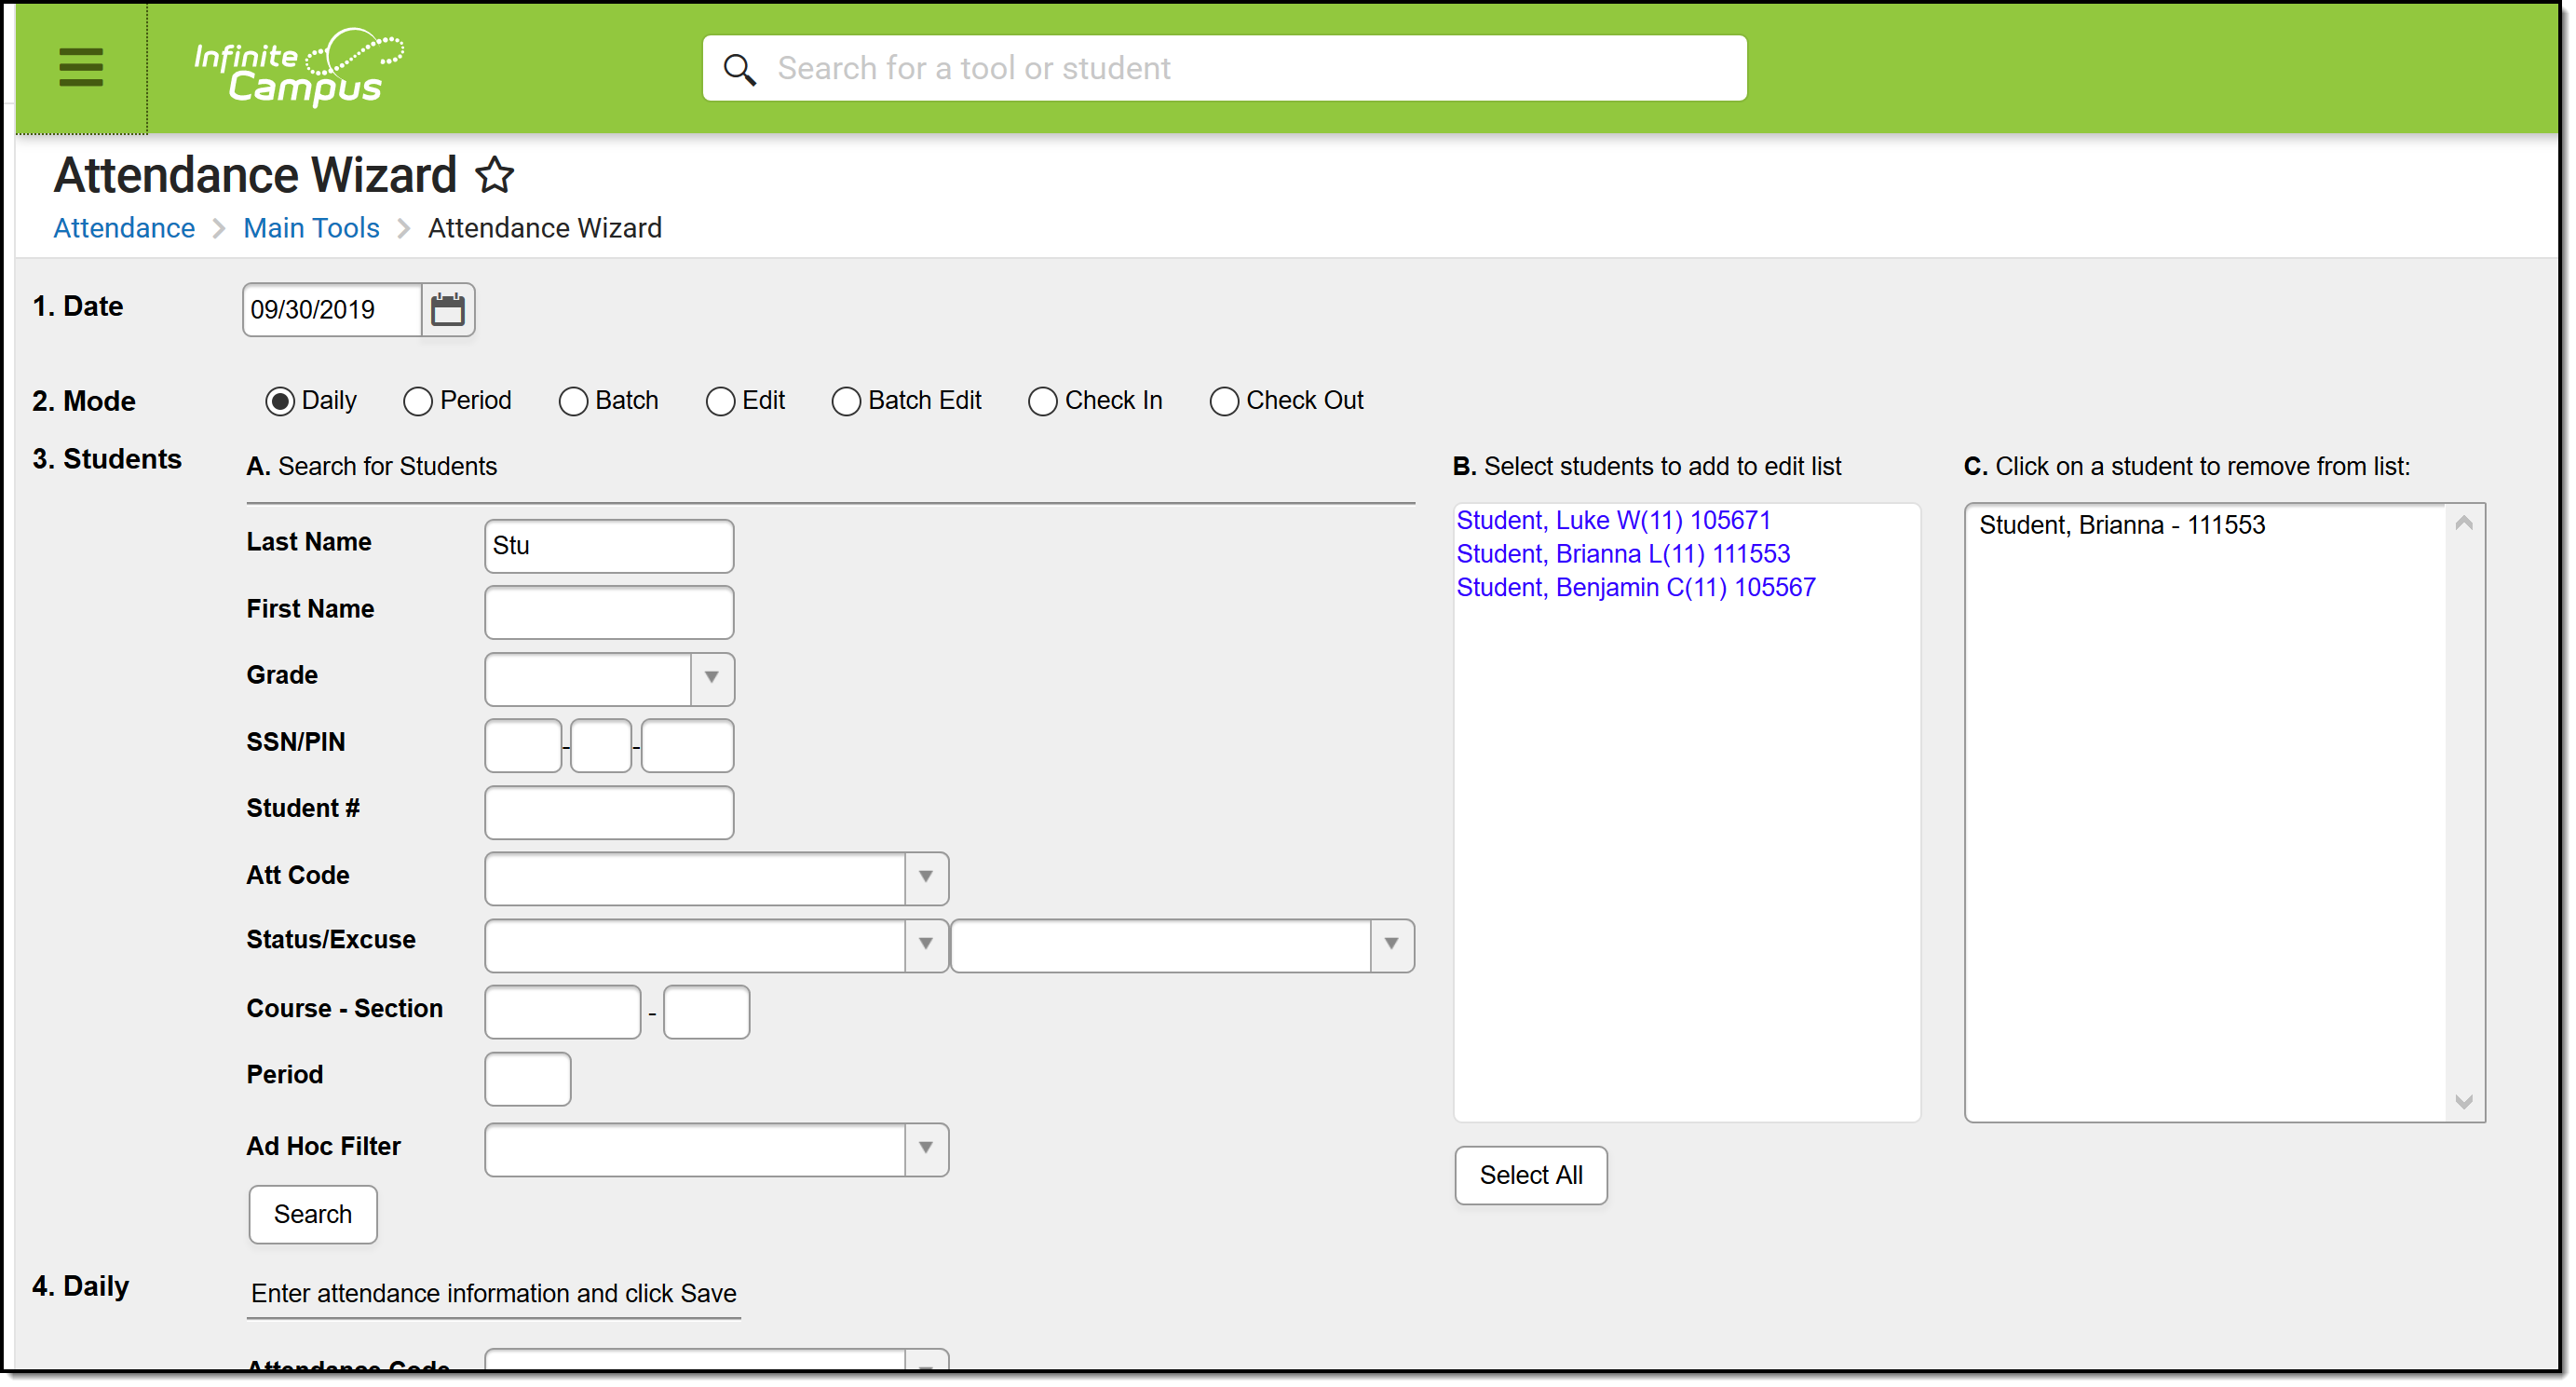
Daily Mode Options
Period Mode
Period Mode records an individual student or a groups' attendance for a selected period.
Tool Search: Attendance Wizard
The Period mode records attendance for one or more students for a selected period. This mode would be used if a student has an appointment off campus or missed their regular class for just the selected period. This mode marks the student absent for the selected period only.
Attendance is only recorded for students in Column C.
- Enter the Attendance Date for which to record attendance.
- Select the Period Mode.
- Enter Search criteria to return students.
- Click the Search button. Students matching the entered criteria display in Column B.
- Select the students from Column B to move to Column C. Only those students in Column C will have attendance entered for them.
- Select the Current Period from the dropdown list. Period meeting times display in the dropdown list. A period must be selected in order to save attendance.
- Select the Attendance Code from the dropdown list. This code will be applied to all students in Column C.
- Enter Comments related to the attendance entry.
- Select the appropriate Comments Options from the dropdown list. This affects students who may already have attendance and attendance comments entered.
- Determine if existing attendance data should be overwritten with this new information. Select or remove the Overwrite Existing Data checkbox as needed.
- Click the Save Attendance button.
If the entered date is a non-attendance day (set on the Calendar Days tab) in the School and Schedule selected in the Campus toolbar, a warning message displays indicating attendance can only be recorded for days marked as attendance.
- When a school has multiple schedule structures and a specific schedule is selected in the Schedule field, that schedule is used to determine if the entered date is an attendance day.
- When a school has multiple schedule structures and the Schedule field is set to All, the schedule with the highest structureID is used to determine if the entered date is an attendance day.
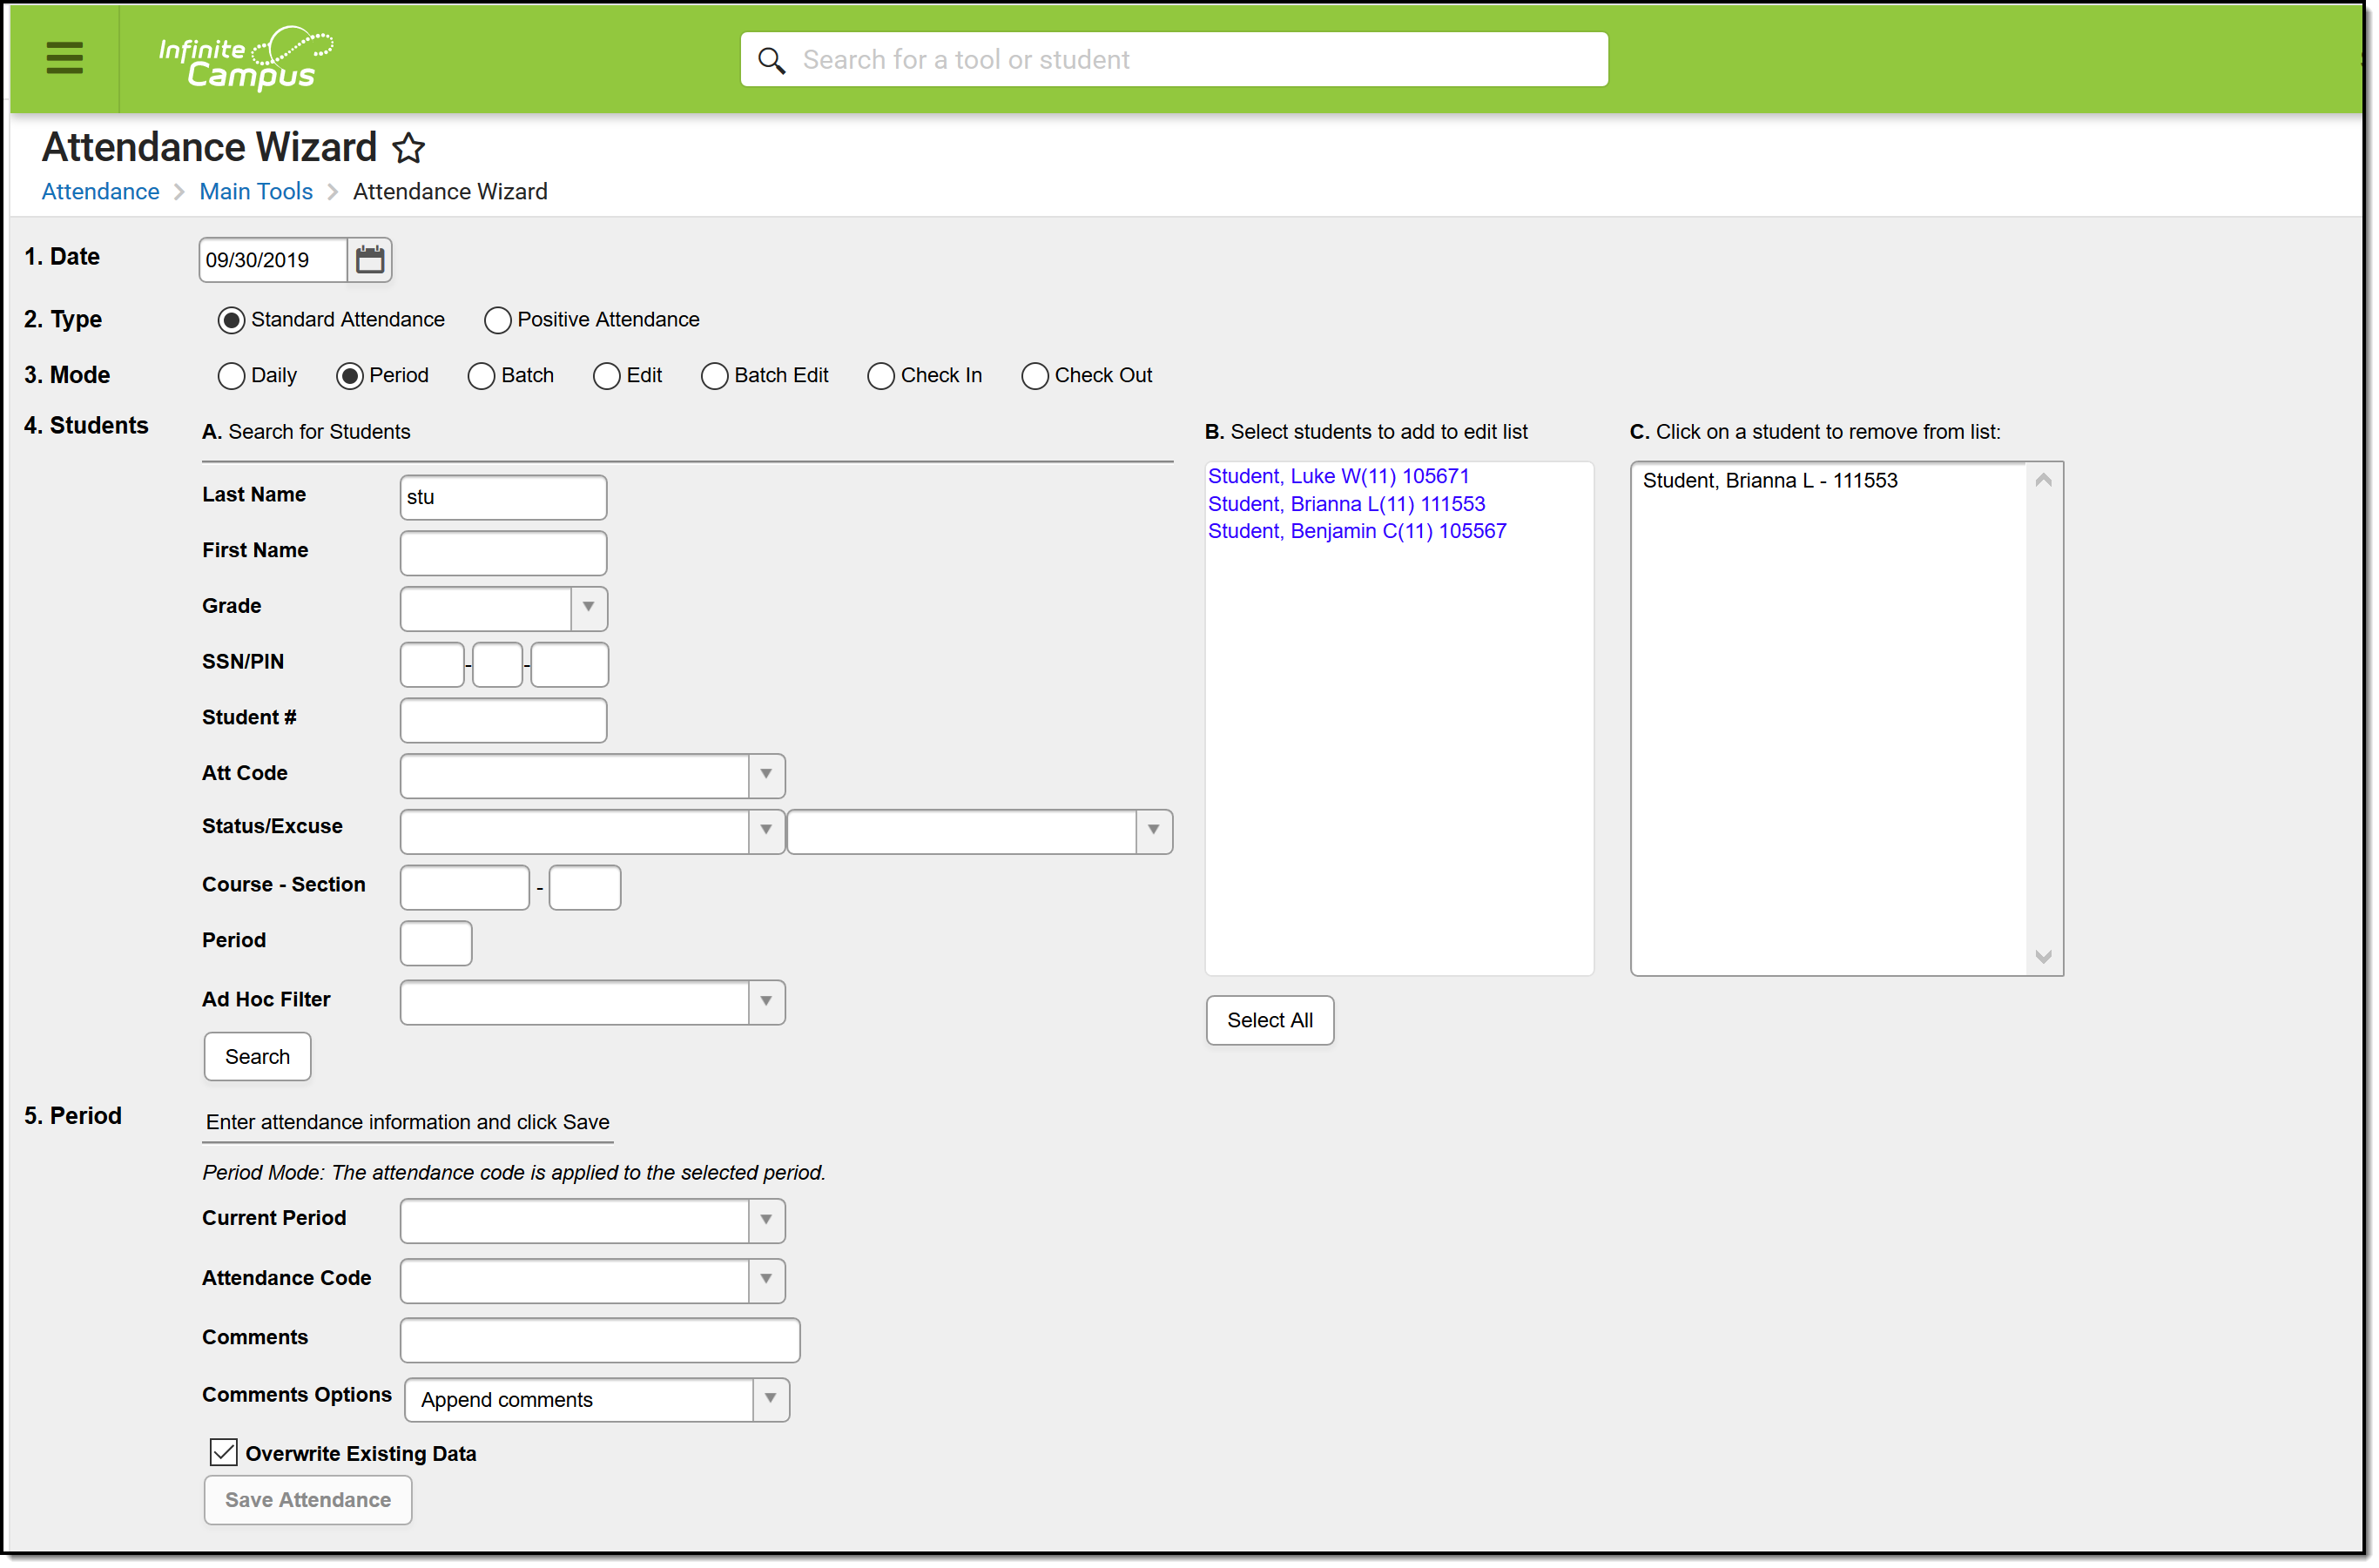
Period Mode Options
Batch Mode
Batch Mode records an individual student or a group of students' attendance for an entered date and time range.
Tool Search: Attendance Wizard
The Batch Edit Mode records attendance for a date range for the selected periods. Students are marked absent for the same periods on all attendance days during the entered range. This mode can also be used to change unknown absences to excused absences.
- Enter the Attendance Date for which to record attendance.
- Select the Batch Edit Mode.
- Enter Search criteria to return students.
- Click the Search button. Students matching the entered criteria display in Column B.
- Select the students from Column B to move to Column C. Only those students in Column C will have attendance entered for them.
- Enter the Date Range of the attendance entry in mmddyy format. Attendance information will be entered for all school attendance days during this range.
- Select the Attendance Code from the dropdown list. This code will be applied to all students in Column C.
- To apply the changes to all periods, click the Fill Down button.
- To clear entered attendance, click the Clear button.
- Enter Comments related to the attendance entry.
- Select the appropriate Comments Options from the dropdown list. This affects students who may already have attendance and attendance comments entered.
- Determine if existing attendance data should be overwritten with this new information. Select or remove the Overwrite Existing Data checkbox as needed.
- Click the Save Attendance button.
If the entered date is a non-attendance day (set on the Calendar Days tab) in the School and Schedule selected in the Campus toolbar, a warning message displays indicating attendance can only be recorded for days marked as attendance.
- When a school has multiple schedule structures and a specific schedule is selected in the Schedule field, that schedule is used to determine if the entered date is an attendance day.
- When a school has multiple schedule structures and the Schedule field is set to All, the schedule with the highest structureID is used to determine if the entered date is an attendance day.
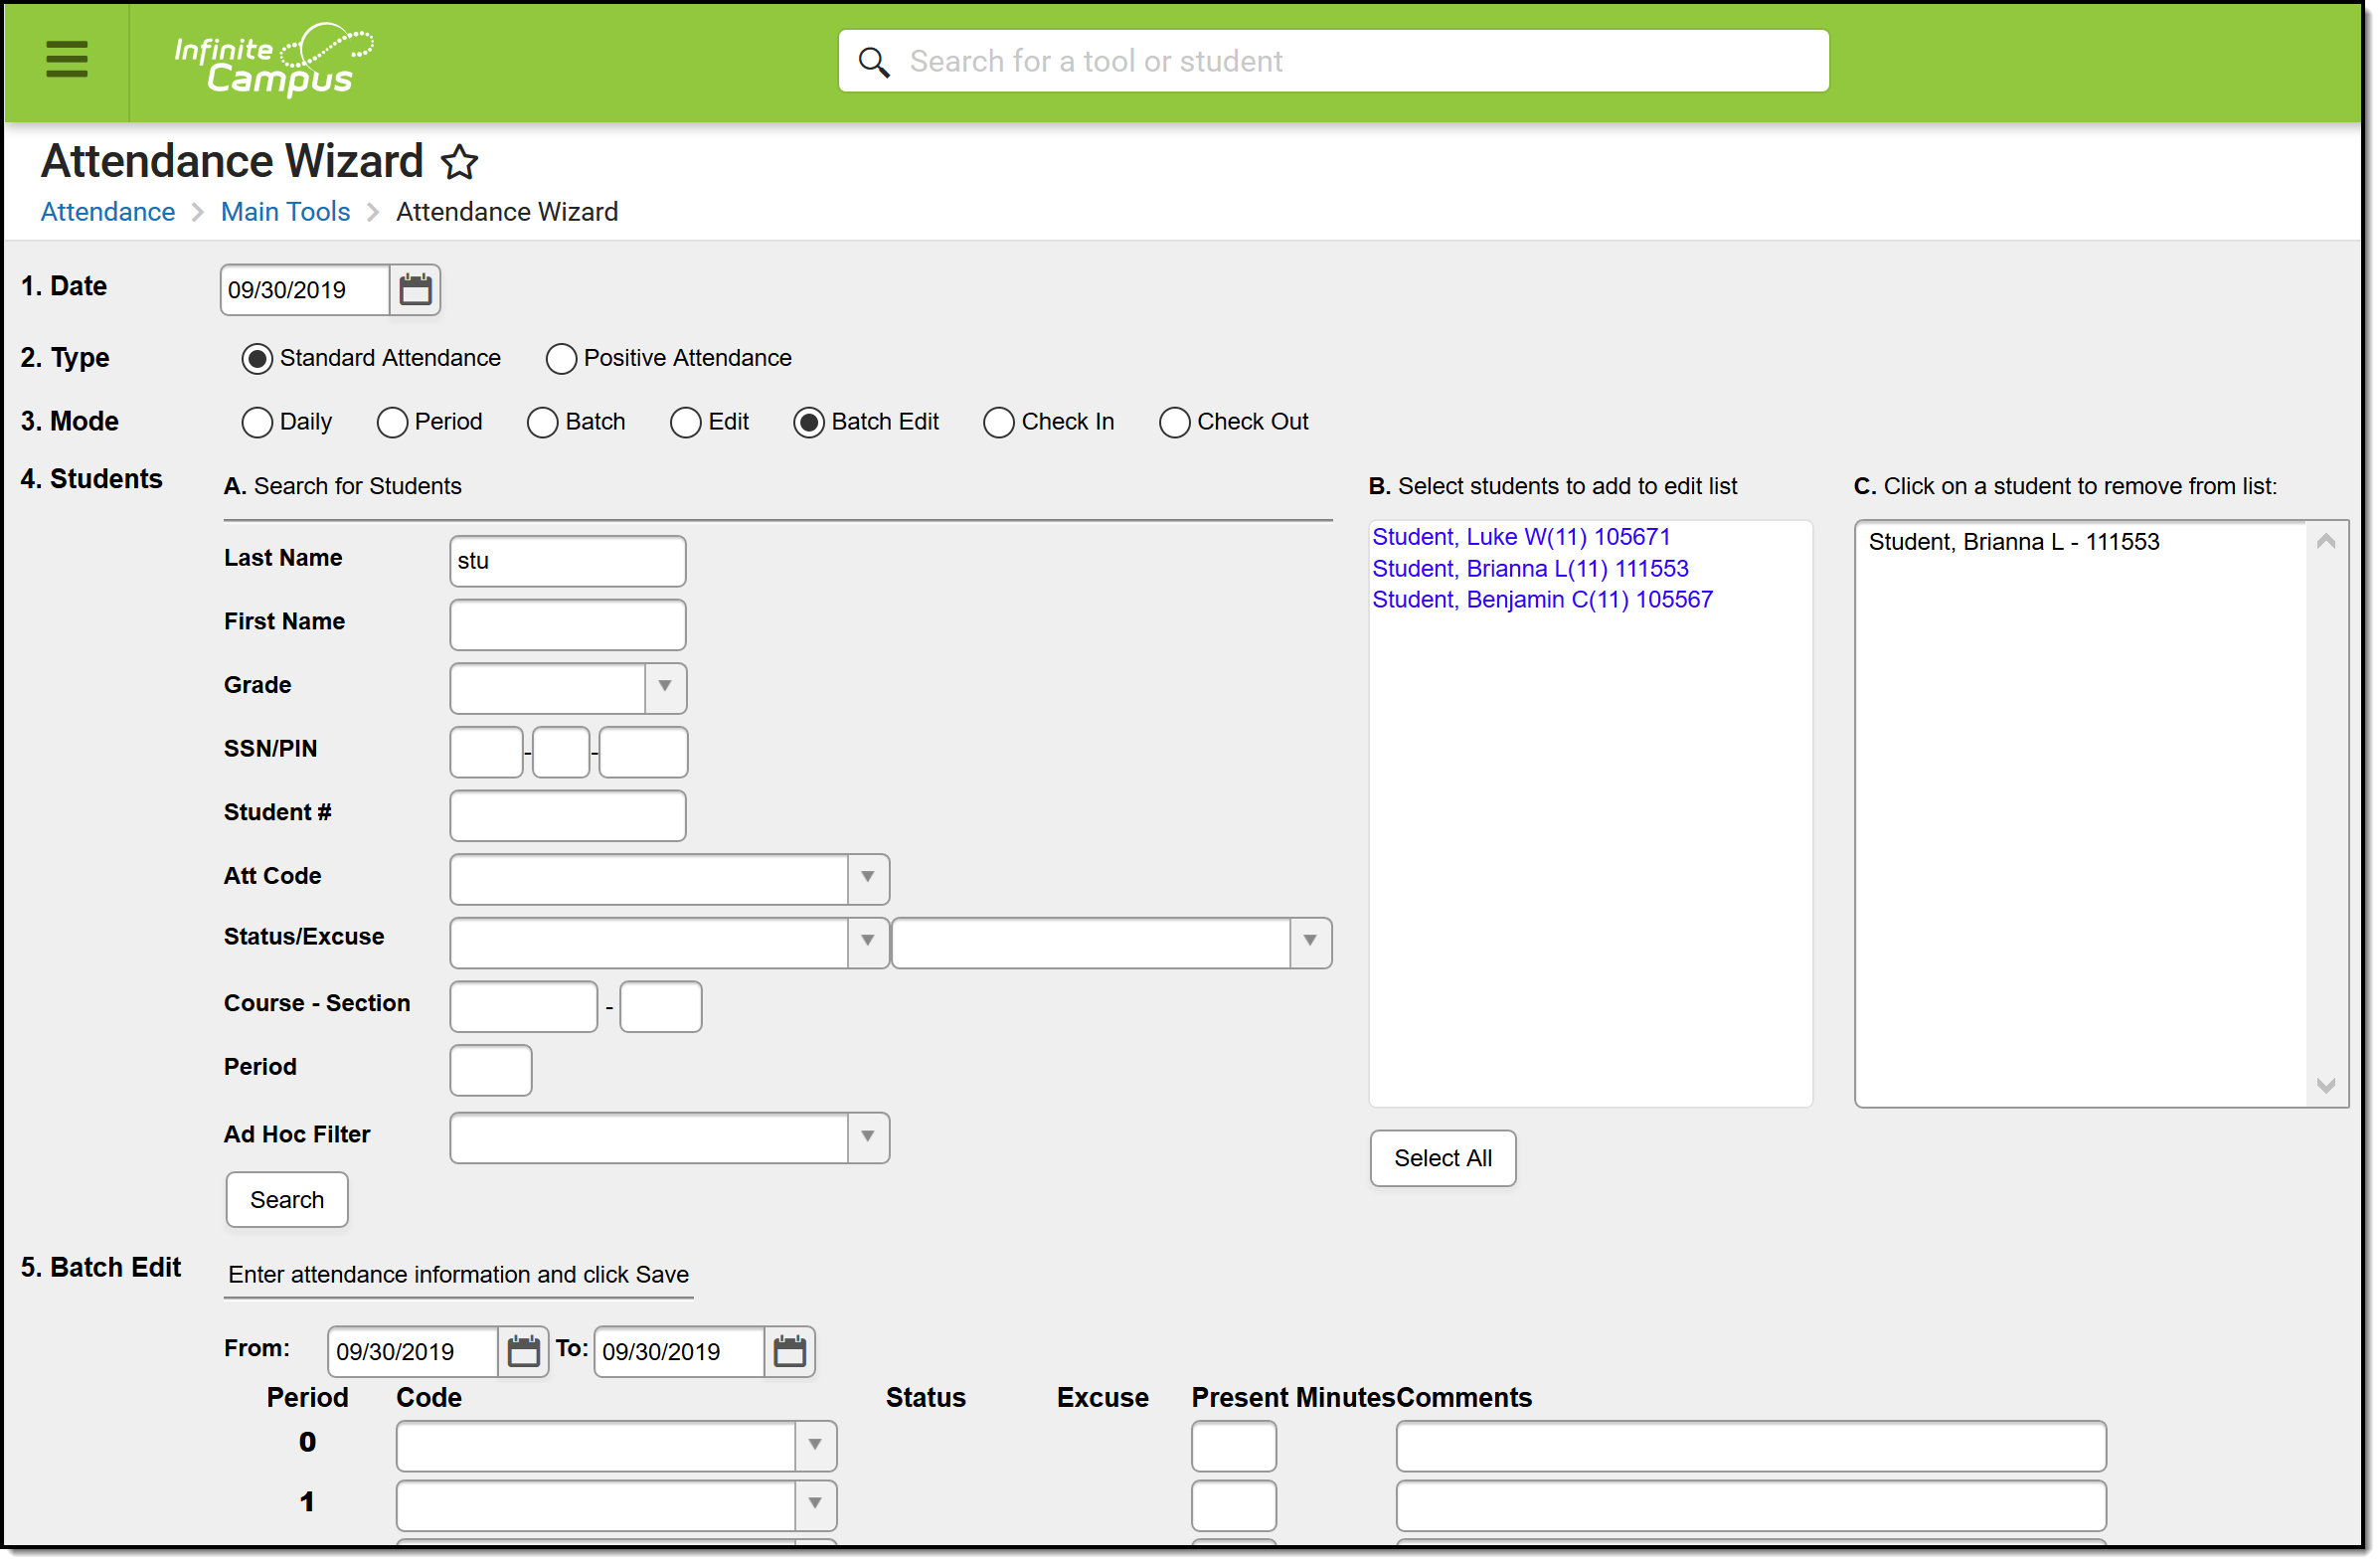 Batch Edit Mode Options
Edit Mode
Edit Mode is used to modify existing attendance records.
Tool Search: Attendance Wizard
- Enter the Attendance Date for which to record attendance.
- Select the Edit Mode.
- Search results do not need to be entered for this mode, as attendance edits can only be made for students who already have attendance entries. Instead, select the name of the student for whom to edit attendance from Column B. Existing attendance data will appear in the Edit section.
- Modify the previously assigned Attendance Code, Present Minutes or Comments.
- To apply the changes to all periods, click the Fill Down button.
- To clear entered attendance, click the Clear button.
- Click the Save Attendance button.
If the entered date is a non-attendance day (set on the Calendar Days tab) in the School and Schedule selected in the Campus toolbar, a warning message displays indicating attendance can only be recorded for days marked as attendance.
- When a school has multiple schedule structures and a specific schedule is selected in the Schedule field, that schedule is used to determine if the entered date is an attendance day.
- When a school has multiple schedule structures and the Schedule field is set to All, the schedule with the highest structureID is used to determine if the entered date is an attendance day.
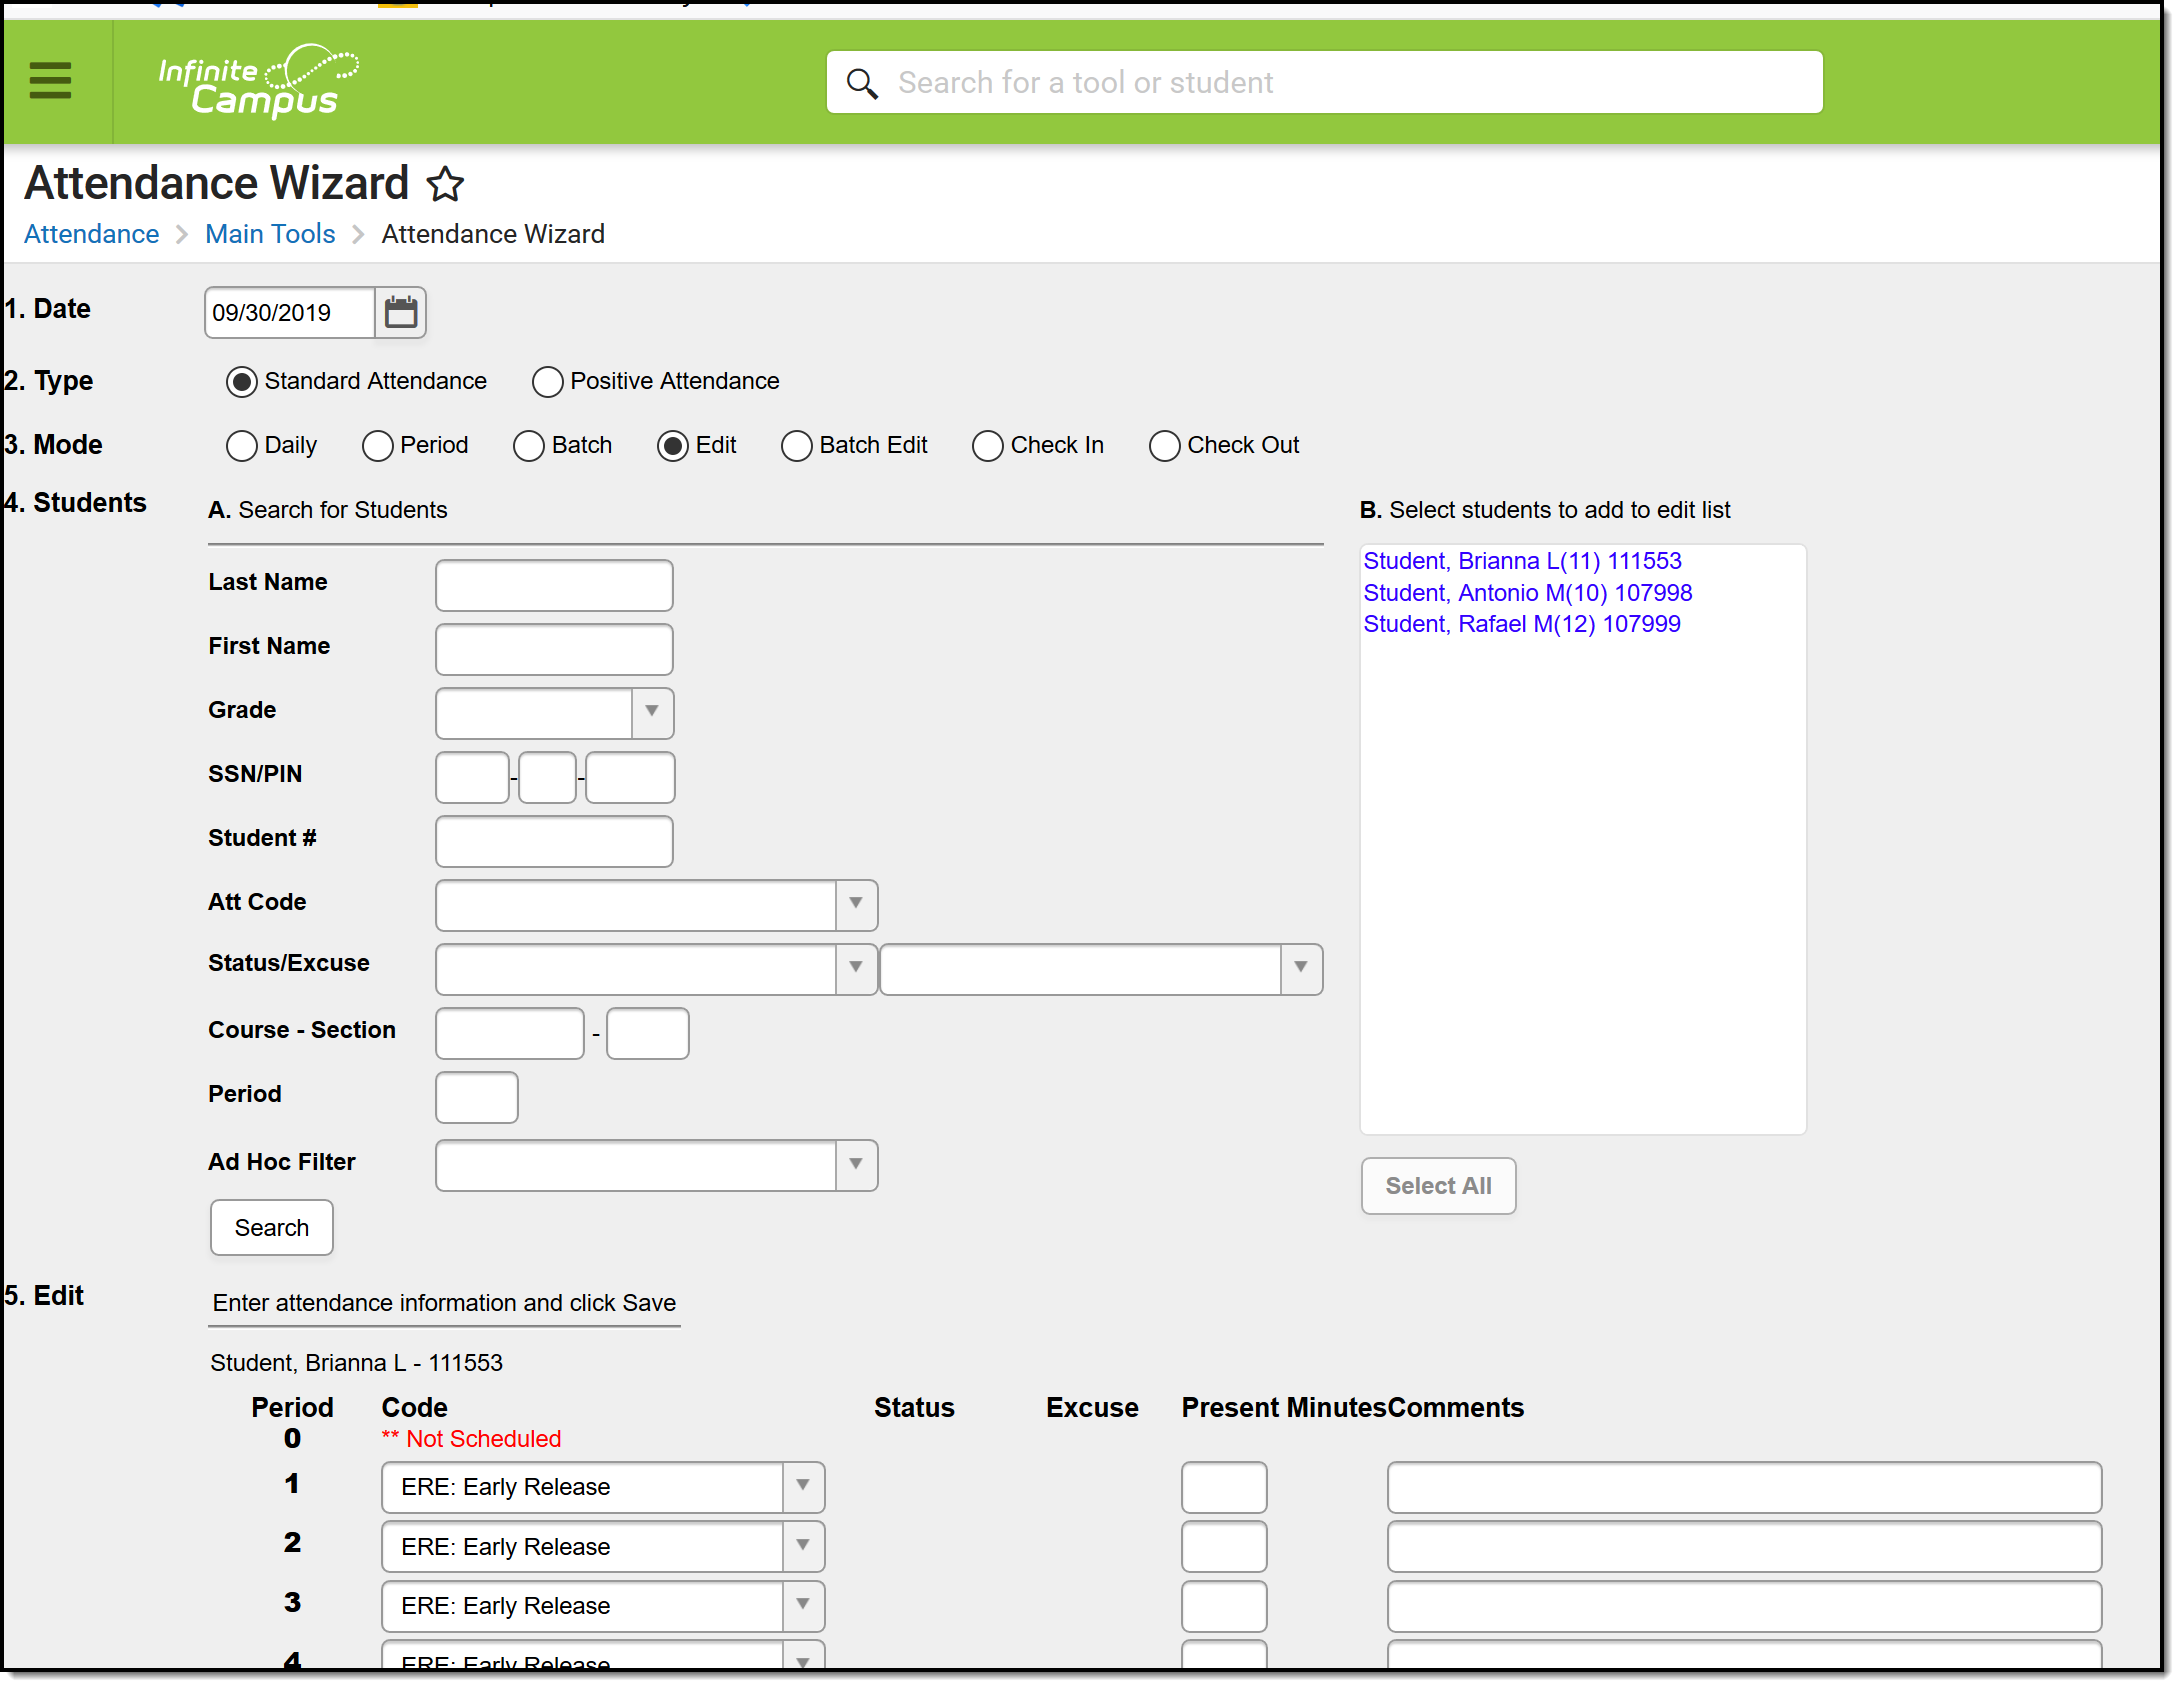
Edit Mode Options
Batch Edit Mode
The Batch Edit Mode is used to create attendance marks for groups of students for specific class periods over a range of dates.
Tool Search: Attendance Wizard
The Batch Edit Mode records attendance for a date range for the selected periods. Students are marked absent for the same periods on all attendance days during the entered range. This mode can also be used to change unknown absences to excused absences.
- Enter the Attendance Date for which to record attendance.
- Select the Batch Edit Mode.
- Enter Search criteria to return students.
- Click the Search button. Students matching the entered criteria display in Column B.
- Select the students from Column B to move to Column C. Only those students in Column C will have attendance entered for them.
- Enter the Date Range of the attendance entry in mmddyy format. Attendance information will be entered for all school attendance days during this range.
- Select the Attendance Code from the dropdown list. This code will be applied to all students in Column C.
- To apply the changes to all periods, click the Fill Down button.
- To clear entered attendance, click the Clear button.
- Enter Comments related to the attendance entry.
- Select the appropriate Comments Options from the dropdown list. This affects students who may already have attendance and attendance comments entered.
- Determine if existing attendance data should be overwritten with this new information. Select or remove the Overwrite Existing Data checkbox as needed.
- Click the Save Attendance button.
If the entered date is a non-attendance day (set on the Calendar Days tab) in the School and Schedule selected in the Campus toolbar, a warning message displays indicating attendance can only be recorded for days marked as attendance.
- When a school has multiple schedule structures and a specific schedule is selected in the Schedule field, that schedule is used to determine if the entered date is an attendance day.
- When a school has multiple schedule structures and the Schedule field is set to All, the schedule with the highest structureID is used to determine if the entered date is an attendance day.
 Batch Edit Mode Options
Check In Mode
The Check In Mode marks students PRESENT if they have already been marked ABSENT for part of the current day.
The Check In Mode marks students PRESENT if they have already been marked ABSENT for part of the current day. For example, a student was absent for all of Period 1 and part of Period 2, arriving at school before the end of Period 2. Using the Check In Mode marks the student PRESENT for the remainder of Period 2 and the rest of the school day. The attendance code entered when checking the student in is applied to all scheduled periods before the check in time.
When a code is entered that has a status of Tardy, the Present Minutes will still calculate as if the code has a status of Absent.
When a code is entered that has a status of Present or Early Release, the student will not populate for selection in Search Box B.
This mode can work with groups of students, as well as a single student. For example, if the ASB club met earlier in the day for a breakfast meeting with the school district leaders, were marked absent, and then arrived at school sometime during Period 3, use the Check In Mode to give the entire club an appropriate absence code before the check in time and record present minutes for the period with the check in.
Overwriting of a check out code by a check in code uses period times (not period sequence) to determine which periods are overwritten.
In a calendar with multiple period schedules, logic considers the period schedule associated with the day on which the check in happens and only applies the attendance entry to periods in that schedule. A student must be scheduled into an attendance-taking course in the period for attendance to be modified.
For the Check In Mode, attendance codes are applied to absences occurring before the current time on the entered attendance date. Absences after this time will be removed.
Only students who have an attendance entry on the selected date with a status of Absent, Tardy, or a teacher-entered Absent or Tardy can be selected for check in. Students who do not have attendance entries for the selected date (Present) cannot be checked in. If the student is absent at some point on the Attendance Date but is checked in during a period when the student is in a scheduled, attendance-taking course but is not marked absent, the check in will not be saved.
- Enter the Attendance Date for which to record attendance.
- Select the Check In Mode. Selecting this mode first ensures that the students available for selection are absent at some time on the Attendance Date.
- Enter Search criteria to return students.
- Click the Search button. Students matching the entered criteria display in Column B.
- Select the students from Column B to move to Column C. Only those students in Column C will have attendance entered for them.
- Select the Attendance Code from the dropdown list. This code will be applied to all students in Column C.
- Modify the Current Time field as necessary.
- Enter Comments related to the attendance entry.
- Click the Save Attendance button.
If the entered date is a non-attendance day (set on the Calendar Days tab) in the School and Schedule selected in the Campus toolbar, a warning message displays indicating attendance can only be recorded for days marked as attendance.
- When a school has multiple schedule structures and a specific schedule is selected in the Schedule field, that schedule is used to determine if the entered date is an attendance day.
- When a school has multiple schedule structures and the Schedule field is set to All, the schedule with the highest structureID is used to determine if the entered date is an attendance day.
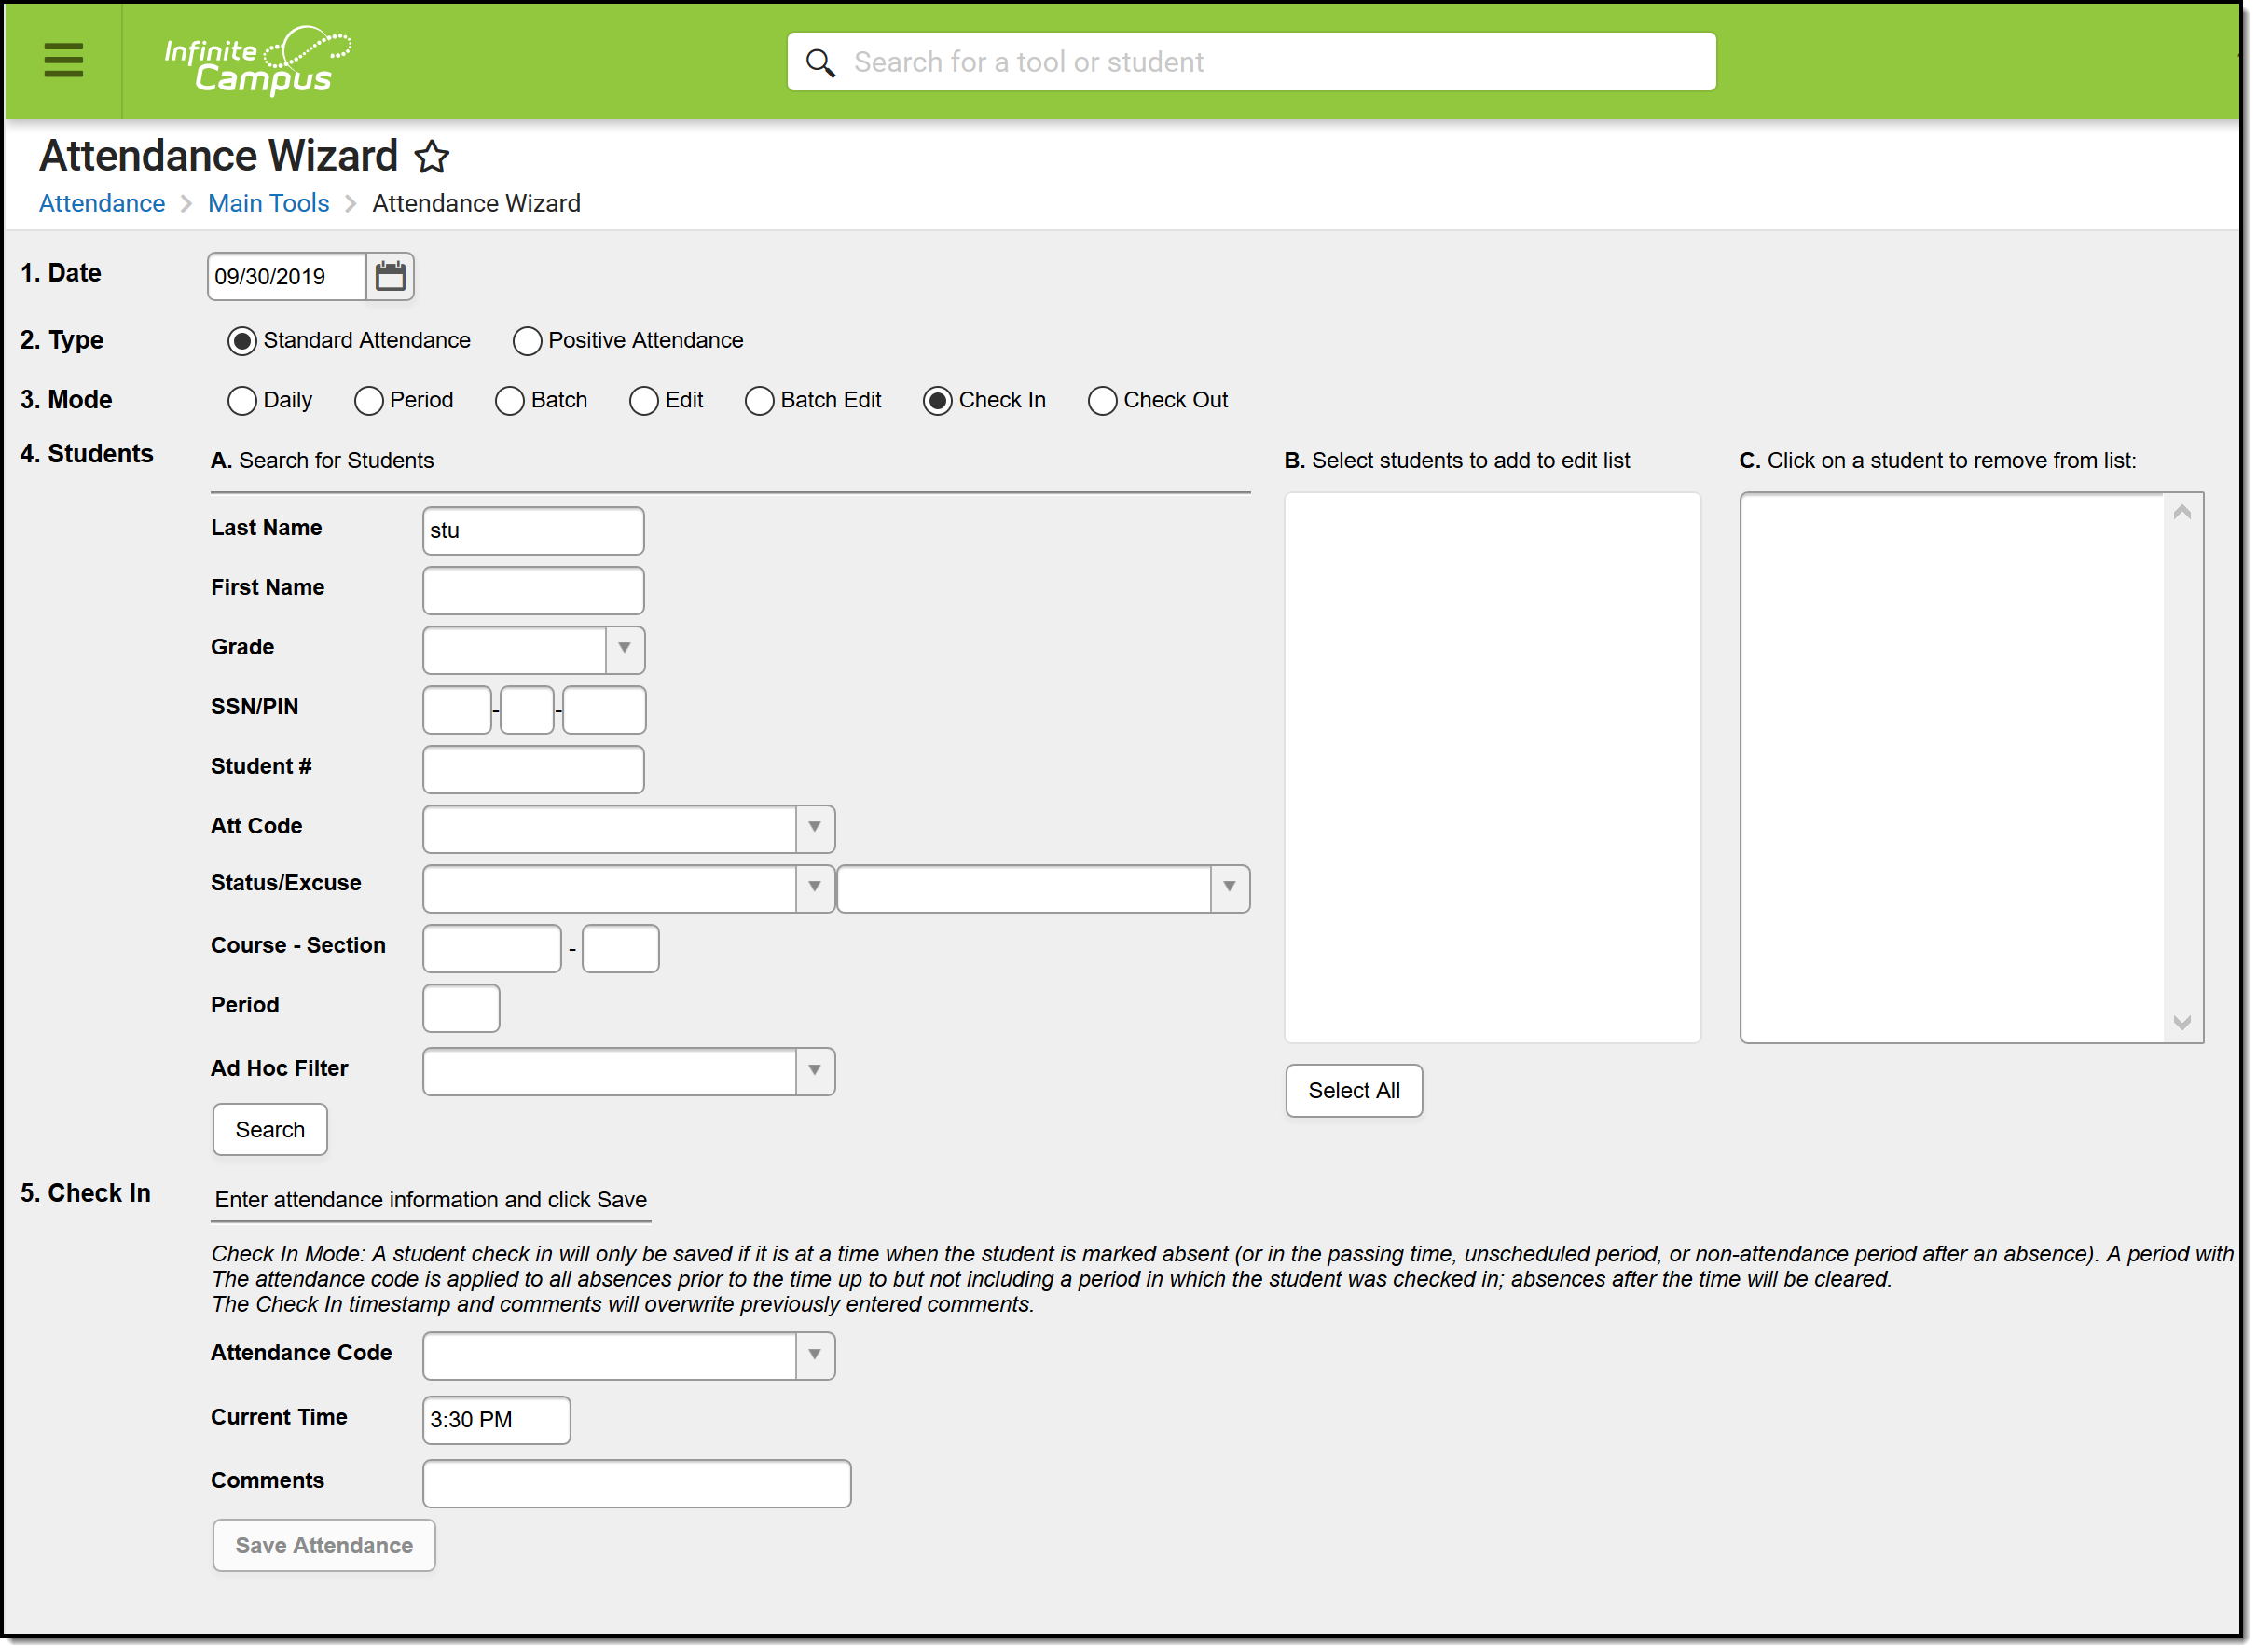 Check-In Mode Options
- When a student is checked in during an unscheduled period, the check in attendance code applies to all periods before the check in where the student is marked absent. Those periods have zero present minutes. Absent codes in the scheduled, attendance-taking periods after the check in are deleted.
- When a student is checked in during the passing time between periods, the check in attendance code does not overwrite the check out code in a prior period where the student is marked absent. Those periods will all have zero present minutes. Absent codes in the scheduled, attendance-taking periods after the check in are deleted.
- When a student is checked in at the last minute of a period, the check in attendance code applies to that period and all earlier periods where the student is marked absent. That period and all previous periods have zero present minutes. Absent codes in the scheduled, attendance-taking periods after the check in are deleted.
- When a student is checked in after a period where the student is present, OR where there is a non-attendance-taking course, OR where the period is unscheduled, the check in code overwrites the code in all absent periods before the check in time, skipping over the period where the student is present/in a non-attendance-taking course/unscheduled. Absent codes in the scheduled, attendance-taking periods after the check in are deleted. If there is an unscheduled period or a period with a non-attendance-taking course after the check in, it is also skipped over and periods after such a period have the absence code deleted. However, if the student was checked out in a previous period before the check in, the check in does not overwrite the check out attendance marks.
- The calculated amount of present minutes in a period is always reduced by the number of lunch minutes in that period. When Lunch Setup is used for a period, priority is given so that those minutes are used. When Lunch Setup is not used the lunch minutes assigned to the period in Period Setup will be used. When a section has a lunch label that has no lunch minutes assigned in Period Setup, normal check-in and check-out logic applies.
When there has been an earlier check-out and a subsequent check-in occurred early in a period that contains lunch minutes,
- The student is considered absent during the lunch minutes so the check-in can be saved.
- When there are already zero (0) present minutes in the period (because of absence/check-out), the check-in present minutes are calculated as time to the end of the period minus lunch minutes. If this results in a negative number, a value of zero (0) reports.
- When there are present minutes in the period, the check-in present minutes are calculated as the time to the end of the period plus the existing present minutes.
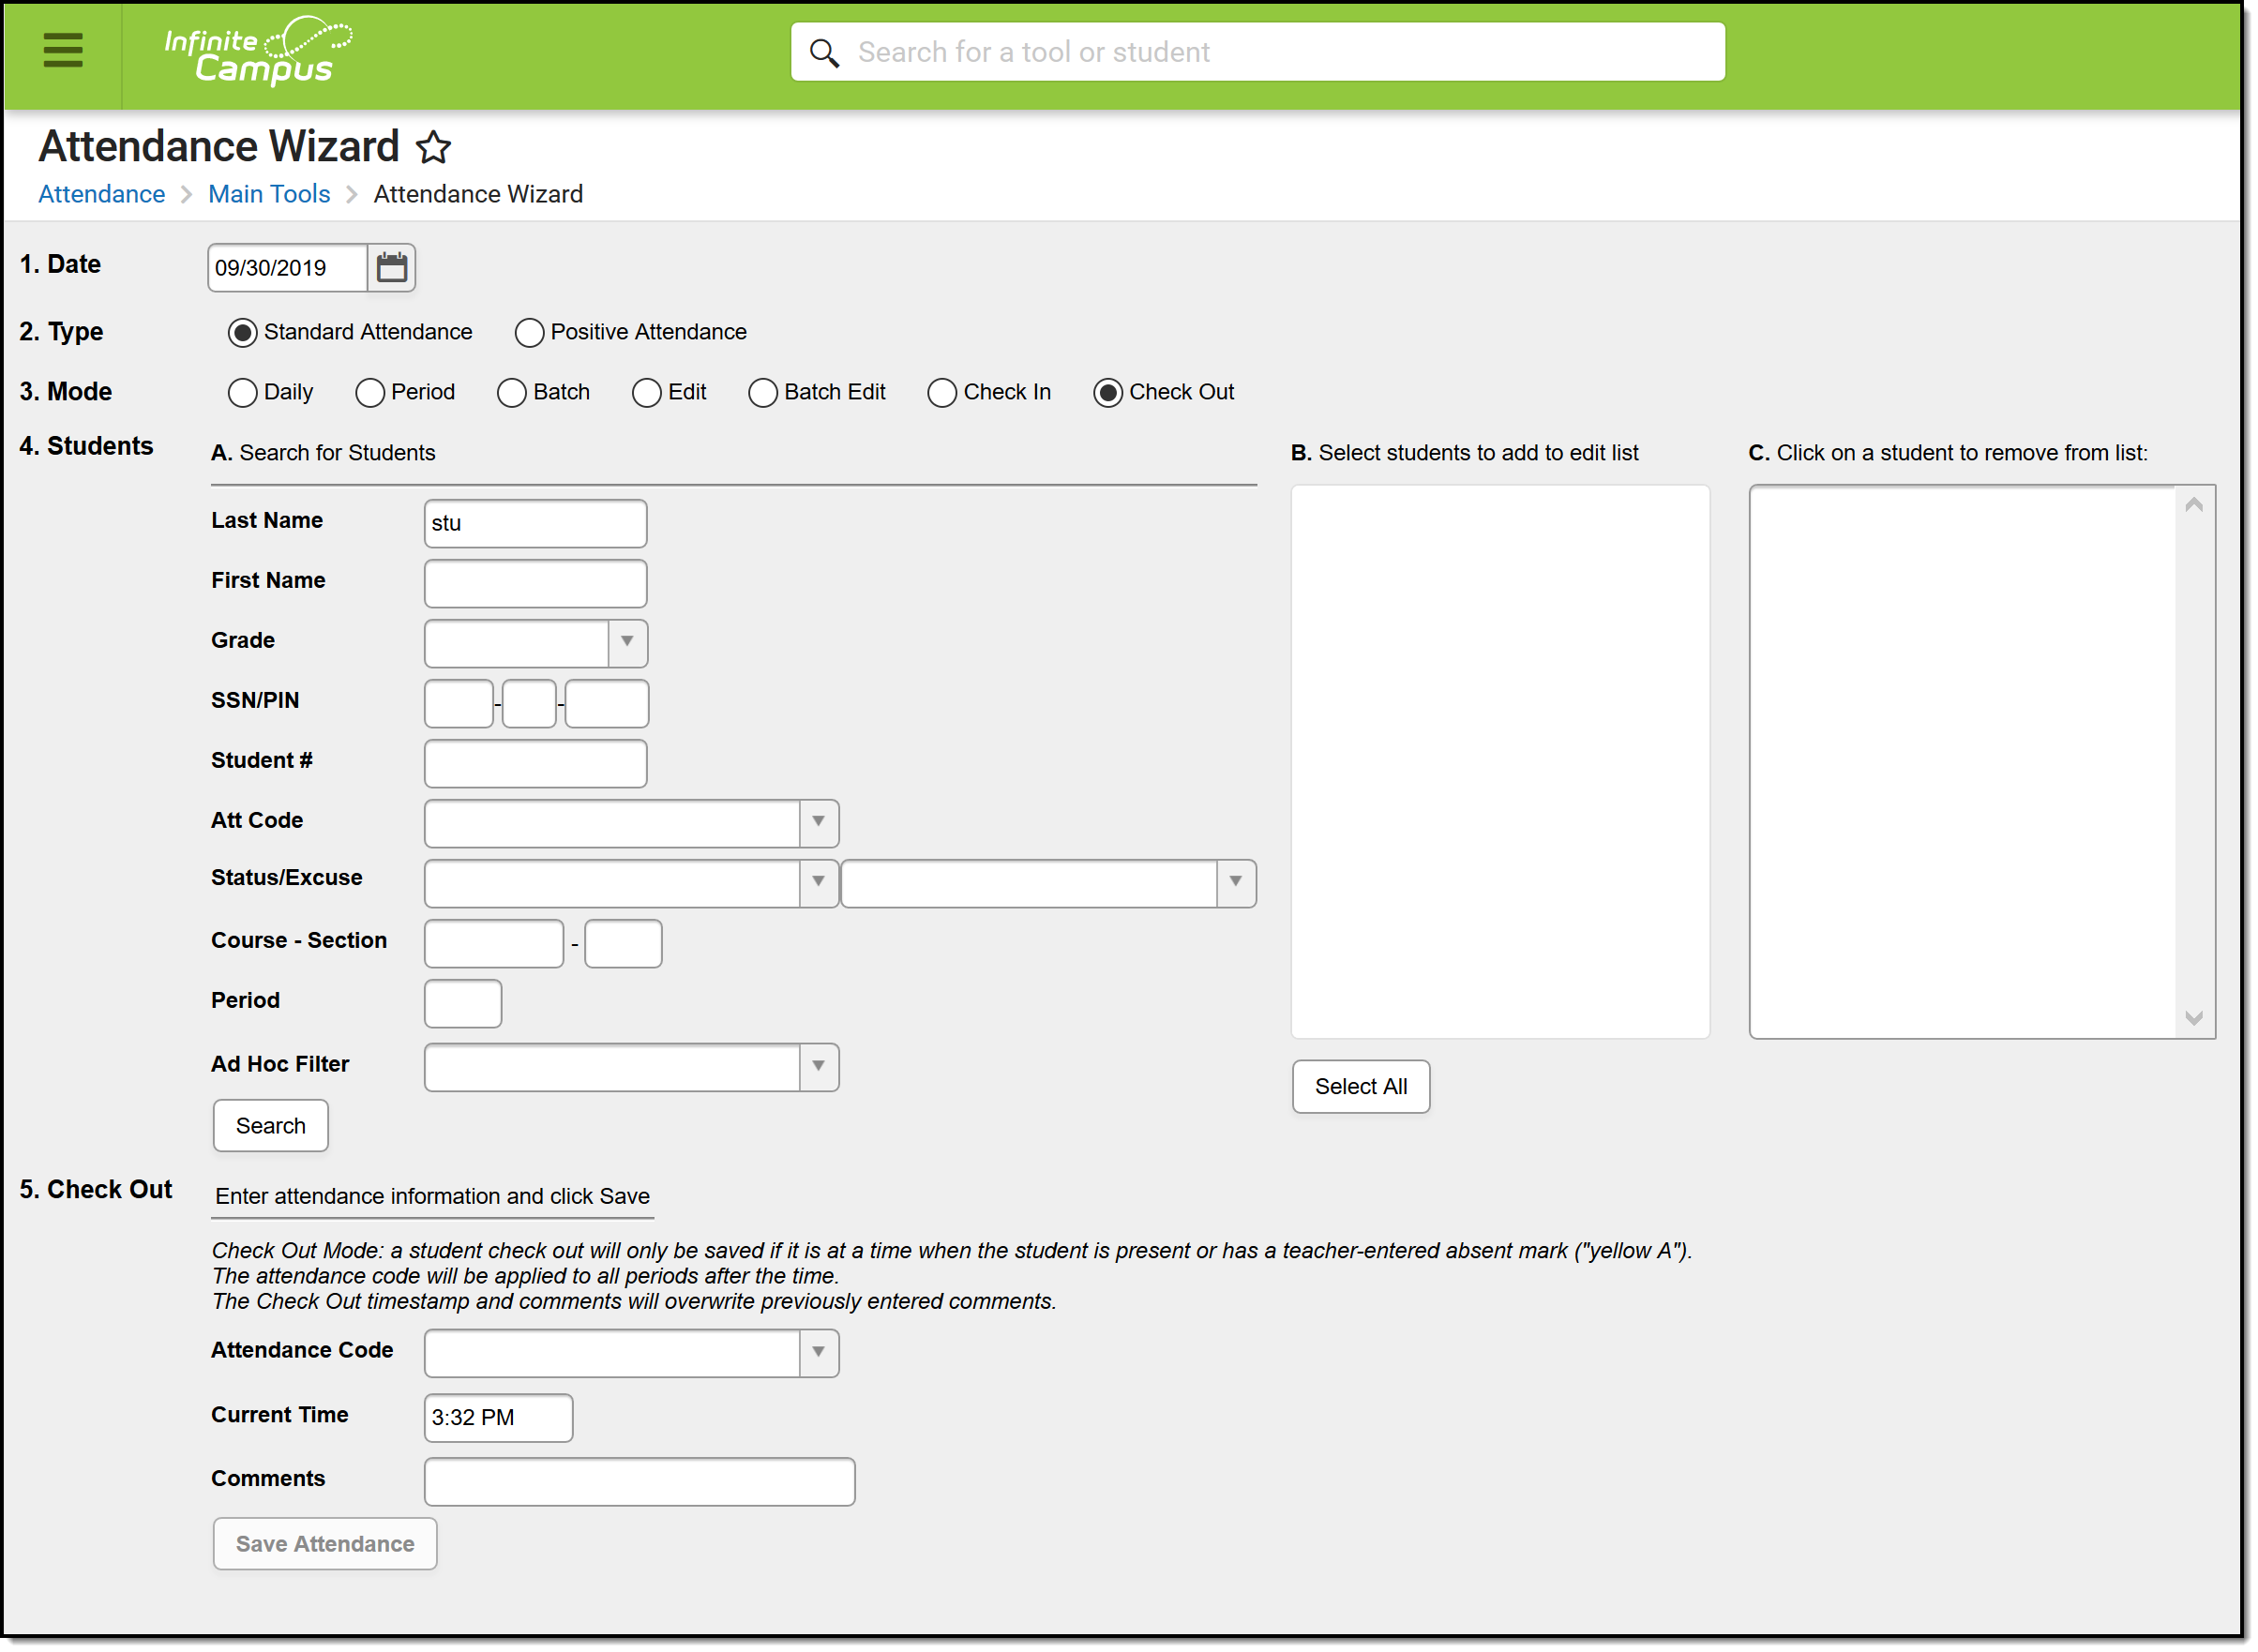
Check Out Mode
The Check Out mode is used to check out students for the rest of the day from the current time forward.
Using this mode marks the student as absent (not in attendance) for the rest of day from the current time forward.
When students leave school after being in attendance, use the Check Out Mode to apply the appropriate attendance code from the time they leave school through the end of the day.
Multiple students can be marked absent using this mode.
For the Check Out Mode, attendance codes are applied to periods occurring at the time of and after the check out time on the attendance date.
Logic considers the period schedule associated with the day on which the check out happens and only applies the attendance entry to periods in that schedule. A student must be scheduled into an attendance-taking course in the period for attendance to be modified.
- Enter the Attendance Date for which to record attendance.
- Select the Check Out Mode.
- Enter Search criteria to return students.
- Click the Search button. Students matching the entered criteria display in Column B.
- Select the students from Column B to move to Column C. Only those students in Column C will have attendance entered for them.
- Select the Attendance Code from the dropdown list. This code will be applied to all students in Column C.
- Modify the Current Time field as necessary.
- Enter Comments related to the attendance entry.
- Click the Save Attendance button.
If the entered date is a non-attendance day (set on the Calendar Days tab) in the School and Schedule selected in the Campus toolbar, a warning message displays indicating attendance can only be recorded for days marked as attendance.
- When a school has multiple schedule structures and a specific schedule is selected in the Schedule field, that schedule is used to determine if the entered date is an attendance day.
- When a school has multiple schedule structures and the Schedule field is set to All, the schedule with the highest structureID is used to determine if the entered date is an attendance day.
 Check Out Mode Options
A student can only be checked out when the student is present, EXCEPT when a student is checked out during a period when the student is marked absent by a teacher, but no attendance Excuse (excused, unexcused, etc.) has been assigned to that absence. In this instance, the check out attendance code is applied to that period and all subsequent periods, and the present minutes are calculated based on the check out time.
- A student is present when there is no attendance code in a period with an attendance-taking course, or when there is an attendance code with a Status of Present, Tardy, or Early Release (Excuse does not matter)
- A student is absent when there is an attendance code in a period with an attendance-taking course that has a Status of Absent (Excuse does not matter).
- The calculated amount of present minutes in a period is always reduced by the number of lunch minutes in that period.
Student Attendance
Individual Student Attendance
Attendance can be entered and edited for individual students.
Tool Search: Attendance
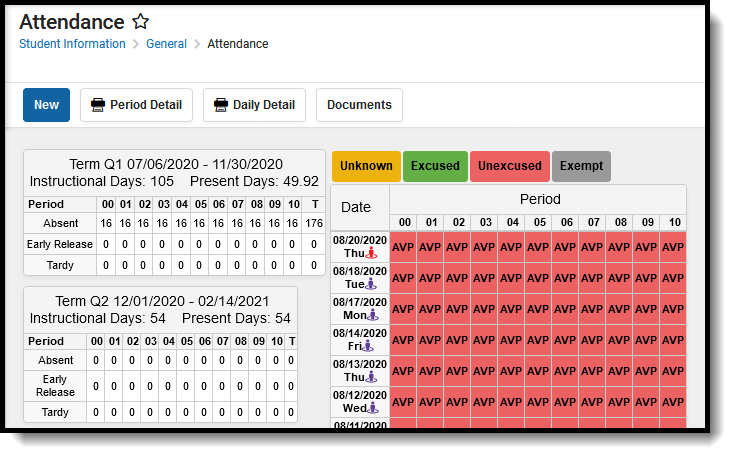
All attendance data for each student is displayed on the Attendance tool. This information is given at the detail level for each day. Summaries are available both by term and course. Attendance events are color-coded according to the key at the top of the tool.
 Student Attendance Editor
Attendance Codes must be entered in System Administration in order to record student attendance.
See the Attendance (Student) Tool Rights article for information about rights needed to use this tool.
Attendance Process
Attendance can be recorded in a school by several different people. The following is a high-level summary of the attendance process:
- Teachers enter attendance information for each Course Section.
- The Attendance Office processes entered teacher attendance, assigning excuse codes to each entry using the Attendance Wizard or Daily Attendance.
- The Attendance Office can also manually add attendance events to a student's Attendance tool.
Student Attendance Information in Ad hoc Query Wizard
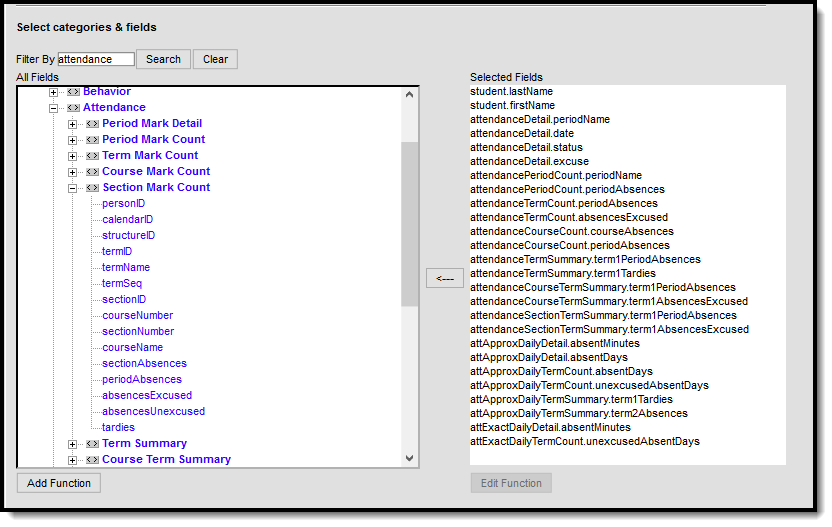
Use the Student Data Type in the Filter Designer to build reports that include attendance information. There are several options available within the Student > Attendance folder, and the available elements are essentially the same; the difference is around how the attendance data is grouped. There are items that organize attendance data by term and items that organize data by Course.
Spend some time building filters that include fields from each section, so you can see how the attendance information for a student displays differently depending on what options are selected. There are several core reports available that also report attendance data.
 Attendance Filter Designer Options
Chronic Absenteeism Data
There is no core report available for finding students who are considered chronically absent. Filters can be created in the Filter Designer that report this information. Example reports of the Chronic Absenteeism fields are included below. Reports can also be created using the Attendance Day Detail and Attendance Day Summary view options (Approximate, Exact, Exact Minute, Federal). The following images list a student and the Chronic Absentee Detail information for each of the detail and summary views.
Choosing fields from the Chronic Absenteeism folder reports information included in the Chronic Absenteeism editor viewable on the Student Attendance tool. Data that reports in ad hoc filters using these fields varies depending on the assigned Attendance Aggregation Preferences.
In these examples, attendance data is returned for a range of dates.
Linking Behavior Records and Attendance Records
When schools have chosen to link behavior incidents to attendance records, attendance records display automatically when the behavior resolution is saved on the behavior management record, based on the dates entered on the behavior resolution.
| Task | Tool |
|---|---|
| Mark the appropriate attendance codes that relate to behavior resolutions. | Attendance Codes |
| Mark the appropriate behavior resolution types to allow for attendance modification. | Resolution Types |
| Create a behavior incident, assigning events and participants . | |
| Enter a behavior resolution for one of the event participants. | |
| Verify the entered behavior event and resolution, and mark the incident complete. | Behavior Management |
| Verify the behavior event displays on the student's behavior tool. | Student Behavior |
| Verify the attendance tool displays an entry for the behavior resolution. | Student Attendance |
Generate a report looking for any inconsistencies in linked behavior/attendance records. |
Behavior Attendance Audit Report |
When the behavior resolution is entered with an Attendance Code and any attendance conflicts have been addressed, the student's attendance tool is updated accordingly.
 Step 7 - Linked Attendance/Behavior Record
The pop-up message indicates the record was because of a behavior incident. This also displays in the record's Comments field when clicking an entry from here.
 Step 7 - Linked Attendance/Behavior Record Detail
Virtual Attendance Indicator
When a student has an attendance entry for a day when their assigned Blended Learning Group that is virtual on that day (the Blended Learning Group is assigned to the Calendar Day), a Blended Learning Group icon displays next to the date for that attendance entry.
![]() Blended Learning Group Display Next to Attendance Date
Blended Learning Group Display Next to Attendance Date
This icon displays ONLY when the student has an attendance entry for a date where their Blended Learning Group is assigned to the Calendar Day so the student is attending classes virtually.
See the Blended Learning Groups article for an overview of the entire Blended Learning Group process.
Student Attendance Navigation
All attendance data for each student is displayed on the Attendance tool. This information is given at the detail level for each day. Summaries are available both by term and course. Attendance events are color-coded according to the key at the top of the tool.
 Student Attendance
The Student Attendance tool lists relative information about the student's attendance history in the selected school bar. Most schools use the Attendance Wizard or other available attendance management tools to record daily attendance; while attendance events can be added from here, this tool is mostly used to view attendance information for a single student.
In order to record attendance:
- The Calendar Day must be marked as an Attendance Day.
- Attendance Codes must be entered.
- The student must be scheduled into courses and be actively enrolled in the school.
Attendance Color Codes
The following colors are displayed with the attendance code for each type of attendance event. These are created in the Attendance Codes tool in System Administration.
 Attendance Color Codes
Code |
Excuse |
|---|---|
Yellow |
Unknown (default when no attendance code set) This displays when the teacher has marked a student absent or tardy, but no excuse has been entered for that record yet. |
Green |
Excused |
Red |
Unexcused |
Gray |
Exempt |
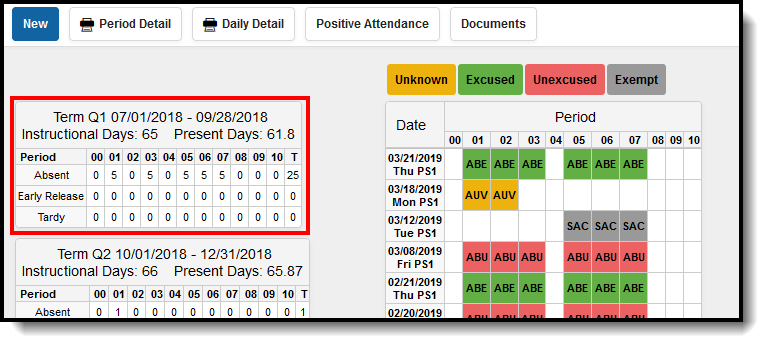
Summary Information
Attendance data is summarized by Term and by Course and is organized by period and attendance status (absent, early release and tardy). The values are totaled using all excuse types (excluding Exempt attendance marks).
 Attendance Term Summary
Instructional Days
The total Instructional days for a school is determined by the district. This value is based on the number of Instruction days associated with the calendar. It is not entered into a field, but rather, when calendar days are set, each day can be marked as Instruction, as well as a variety of other day types.
This value does not change based on a student's attendance record. As a student progresses through the term, the total number of Instructional Days remains at the same value (the total number of school days from the start of the term to the end of the term, as long as the student is enrolled in courses).
If a student is enrolled from the first day of the term to the last day of the term, with no interruptions in enrollment, the instructional days value matches the total number of school days for the term. If a student is not enrolled at all during a term, NaN displays and the instructional days field will be blank.
When a student has multiple enrollments during the term (the student's enrollment ends and a new enrollment begins at a later date), the Instructional Days value does not change.
Present Days
The Present Days value is calculated by subtracting Absent Days from Enrolled Days. If a student has perfect attendance (no attendance marks), the Present Days value matches the Instructional Days value. When a student has an absent attendance mark (that is not exempt), the Present Days value will change based on how many minutes the student was absent. The number of minutes a student is absent in a period (minutes from start time to end time minus lunch minutes and present minutes) is divided by the Instructional minutes for the day and the period absent minutes are summed to determine the Absent Day value. The Instructional minutes for the day are derived from the Grade Level Standard Day minutes or the Calendar Student Day minutes (in that order). If these values are not populated, 360 is used. If the Calendar has multiple Period Schedules with differing numbers of Instructional minutes, the calculation will always use the Standard Day/Student Day/360 minutes in the calculation, which can make the calculation less precise.
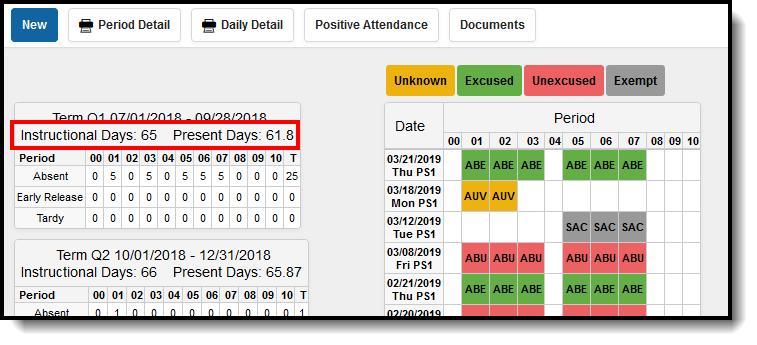
If the student is enrolled on at least one day during a term, the Instructional Days will be the number of days in the term.
Course Summary
For the primary term schedule the total number of absent and tardy events are calculated for each distinct course. The results are displayed in the course summary.
A course will only show up in the Course Summary within Student Information > General > Attendance if there is an attendance event tied to a period when that section meets.
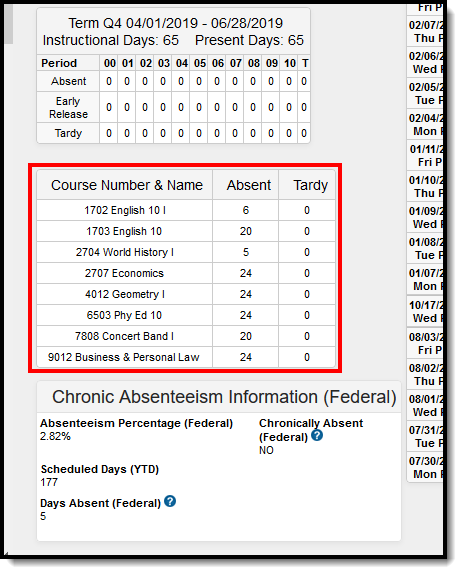 Student Course Information
Chronic Absenteeism Information
Chronic Absentee information for a student displays after the Course Summary. This display depends on the assigned Attendance Aggregation Preferences Summary View.
Tool rights are necessary to see this information.
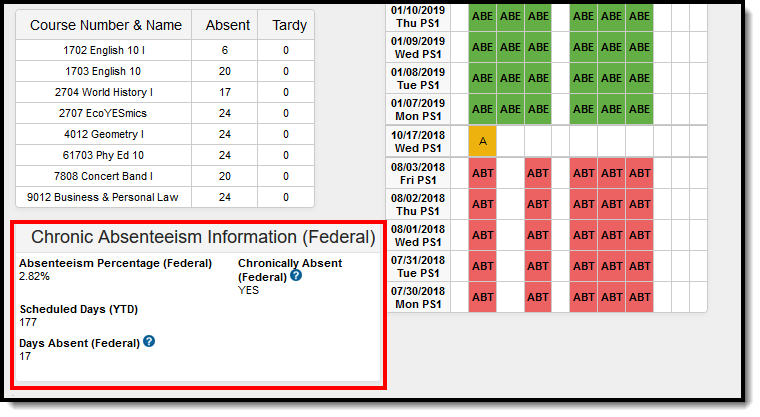 Chronic Absenteeism Information
Chronic Absenteeism calculations could differ from your state reporting attendance calculations. A discussion with appropriate staff within the district is necessary when deciding which attendance aggregation preference to use.
Absenteeism Percentages and Chronically Absent information is calculated for the calendar selected in the Campus toolbar.
- When a student has multiple enrollments in multiple schedule structures in the SAME calendar, the Chronic Absenteeism Information is totaled for all enrollments.
- When a student has multiple enrollments in DIFFERENT calendars, the Chronic Absenteeism information is NOT totaled together for the different enrollments. Chronically absent information for each enrollment in each calendar displays for the calendar selected in the toolbar.
Attendance Aggregation Preferences
The information displayed in the Chronic Absenteeism Information editor varies depending on which Summary View in the Attendance Aggregation Preference is assigned for the district.
Chronic Absenteeism Descriptions
| Field | Description | Ad hoc Field |
|---|---|---|
| Absenteeism Percentage | Reports the student's percentage of being absent. Values are dependent on the assigned Attendance Aggregation Preferences (see information above). | attChronicAbsenteeism.absenteeismPercentage |
| Scheduled Days | Lists the year-to-date number of days the student has been scheduled into attendance taking courses. | attChronicAbsenteeism.scheduledDays |
| Days Absent | Lists the total number of days the student has been absent. Values are dependent on the assigned Attendance Aggregation Preferences (see information above). When the Federal Summary View is assigned as the Attendance Aggregation Preference, this field displays the words Federal and includes a tooltip that lists the Federal definition of what is considered an absent day: when a student is absent for 50% or more of the school day (attendance codes of Absent Excused, Absent Unexcused or Absent Unknown). |
attChronicAbsenteeism.daysAbsent |
| Chronically Absent | Indicates the student is considered to be chronically absent. When the Federal Summary View is assigned as the Attendance Aggregation Preference, this field displays the words Federal and includes a tooltip that lists the Federal definition of what is considered chronically absent: when a student is marked absent for any non-instructional reason for more than 10% of school days during the year for those students enrolled a minimum of 10 school days. |
attChronicAbsenteeism.chronicallyAbsent Reports as 1 (Yes) or 0 (No) |
Modification Alerts
The Attendance tool will note the last person to have modified the student's attendance record when the entry is hovered over. This is reported when a new entry is added or when an existing entry is modified.
 Attendance Modification Notice
Attendance Options
Attendance can be entered using Standard Attendance (attendance is based on absence) or Positive Attendance (attendance is based on presence). Choose the Positive Attendance icon to enter present records, or choose the Standard Attendance (default display) to enter absent records.
The Positive Attendance option only displays if the Positive Attendance Preference is set to Yes.
When entering Positive Attendance records, attendance records are organized by the Term in which the attendance event occurred. Events can then be organized by Term then Date, Term then Section, or Section then Term. The editor can also be expanded to show all events in the terms, or collapsed to show no events in the term. Use the plus/minus signs to expand areas as needed.
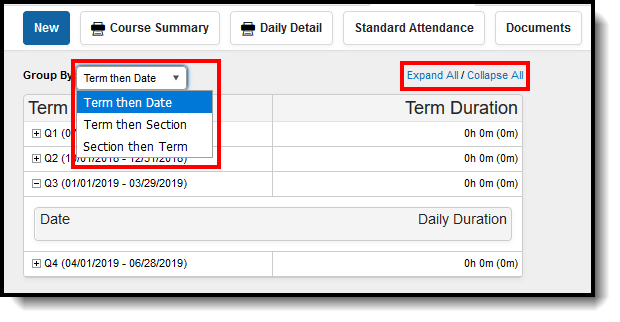 Positive Attendance Entries - Group by Options, Collapse/Expand Options
Selecting a positive attendance entry from this date view displays a summary of the entry.
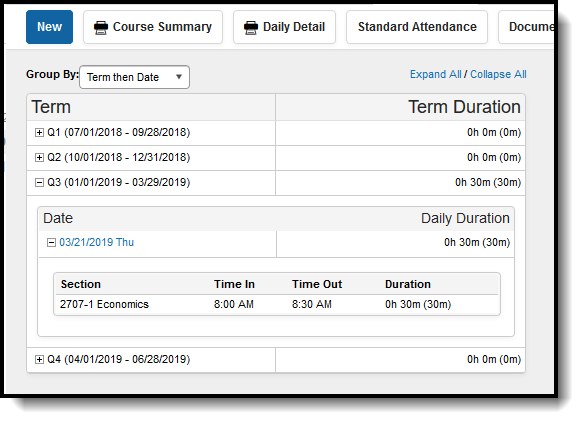 Positive Attendance Summary View
Record and Print Standard Attendance Information
Standard Attendance marks a student as being absent or tardy, and requires the use of Attendance Codes. This is the default attendance option.
If you would rather record attendance from a time present standpoint, use the Positive Attendance option.
Attendance Data and Enrollments
When a start date is changed on an enrollment record, a warning displays indicating that any previously entered attendance that may have occurred prior to the new start date is not deleted, unless the student's start date in course sections is also adjusted.
If the student's enrollment already has an end date (or where an end date is entered when the start date is adjusted), attendance that is outside of the start/end dates will be deleted.
Add a New Standard Attendance Event
Attendance can only be recorded for periods where the student is scheduled in a course section.
- Click the New icon at the top of the Attendance tool. An Attendance entry screen will appear.
- Enter the Date of the attendance and click the Refresh button. This date displays the current date and can be changed by using the calendar icon.
- In the Code dropdown menu for the period where the student had an event, select the Attendance Code that best matches the situation.
- Enter any Comments to describe the event in more detail.
- If the event needs to be copied to subsequent periods on that day, click the Fill Down button.
- If the incorrect attendance code was chosen, click the Clear button.
- Enter the number of Present Minutes for the event, if needed. For example, if a student was in the class for 45 minutes but left for the remaining 30 minutes of the period, enter 45 minutes. This field can be left blank for period attendance.
- Click Save when finished.
Dates can be entered in the following valid date formats:
- MMDDYY
- MM/DD/YY
- MM-DD-YY
- MMDDYYYY
- MM/DD/YYYY
- MM-DD-YYYY
Or, select the calendar icon to choose a new date.
Any other date format is considered an invalid format and will return a warning message that directs the user to reenter the date in a valid format.
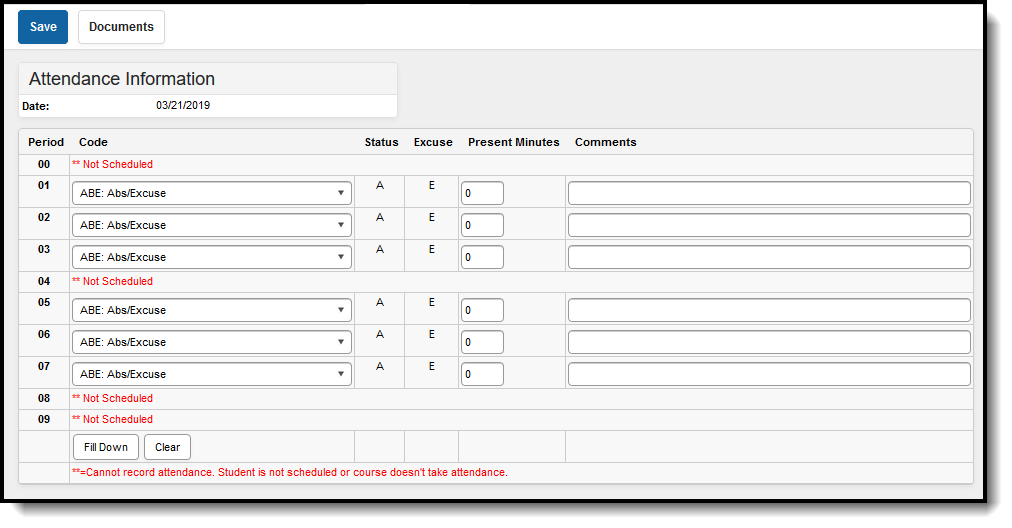 Attendance Entry Editor
Edit an Existing Standard Attendance Event
- Select the date of the attendance event in the Daily Event Summary.
- Change the attendance code for the period which needs to be changed.
- Change the comments as needed.
- Click the Save icon when finished.
Print Standard Attendance Reports
Use the print icons on the Attendance tool to print the Period Detail Report or the Daily Detail Report. When there are multiple enrollments for the student, use the Additional Enrollments Print options.
Additional attendance related reports are available in the Attendance Reports folder.
Standard Attendance Period Detail
When the Period Detail Print icon is selected, an option editor displays allowing the user to select the terms and the type of attendance summaries they wish to include in the Attendance Period Detail Report for the selected student. To return to the student attendance tool, click the Back to Attendance icon.
This report that can be generated for multiple students at once using the Period Detail Batch Report.
The following provides a definition of each available section.
Option |
Description |
|---|---|
Term Summary |
Users have the options of selecting one or multiple Terms to appear in the report. Term options are determined by the School selected in the Campus Toolbar and are set in the Terms tool of the Calendar. All terms are selected by default. The dates of the terms also display. |
Attendance Summary |
Attendance information can be grouped in four different Summary Types, Course, Period, Day and Term. |
Report Orientation |
This report can be generated in either Portrait or Landscape format. |
Non-Instructional Periods |
Attendance taken in periods marked as Non-Instructional can also display on the report, if desired. If this checkbox is not marked, only attendance from Instructional periods will print.
|
| Report Format | Determines how the report generates - PDF or DOCX. |
Generate the Period Detail Student Report
- Indicate which Terms should appear in the report.
- Select which Attendance Summaries should appear in the report.
- Determine how the report page layout should print - in Portrait or Landscape.
- Determine if Non-Instructional period attendance should display on the report.
- Select the desired Report Format.
- Click Generate Report to generate the batch report in PDF format.
If a student does not have any attendance records, the following text appears on the print: This student does not have any attendance events.
Daily Detail Report
The Daily Detail Report, available by selecting the Daily Detail Print icon, displays a daily minute summary (not including exempt attendance events) for each attendance entry in the selected school year. In the pop-up, select the desired Report Format and then select the Generate Report button.
Information in this report uses data stored in the AttendanceDayAggregation tool. This means that attendance data for the current date is accurate as of the previous night's attendance calculation, or the last time the Attendance Aggregation Refresh was run. If needed, the Attendance Aggregation Refresh tool can be run to force an attendance recalculation to pull in the current day's data.
Additional Enrollments Print
When the student has multiple enrollments within the district, an Additional Enrollments dropdown list displays (when user is assigned proper tool rights to the Additional Enrollment Attendance right). Selecting this option prints the Student Period Attendance Detail Report that lists the attendance data from the other enrollment.
Record and Print Positive Attendance Information
Positive Attendance records student attendance using time present. This option requires preferences to be set first.
If you would rather record attendance based on time absent, use the Standard Attendance option. See the Positive Attendance article for more information.
Attendance Data and Enrollments
When a start date is changed on an enrollment record, a warning displays indicating that any previously entered attendance that may have occurred prior to the new start date is not deleted, unless the student's start date in course sections is also adjusted.
If the student's enrollment already has an end date (or where an end date is entered when the start date is adjusted), attendance that is outside of the start/end dates will be deleted.
Enter a New Positive Attendance Event
When entering positive attendance, if you click New before selecting the Positive Attendance icon in the action bar, you will see **Not Scheduled for the student.
- Search for the student using the Student Attendance tool. Student Information > General > Attendance
- Click the Positive Attendance icon in the action bar. The Positive Attendance Summary tool displays.
- Click the New icon.
- Enter the Date of the positive attendance event.
- Enter the Time In and Time Out of the attendance event. The Duration field auto-populates based on the entered time. See the Time Validations used in Positive Attendance for more information.
- Select the Course to which the attendance event applies.
- Enter a Comment (if desired) about the attendance event.
- Click the Add button to add another attendance event.
- Click the Save icon when finished. Click the Back To Summary icon to return to the Positive Attendance summary view.
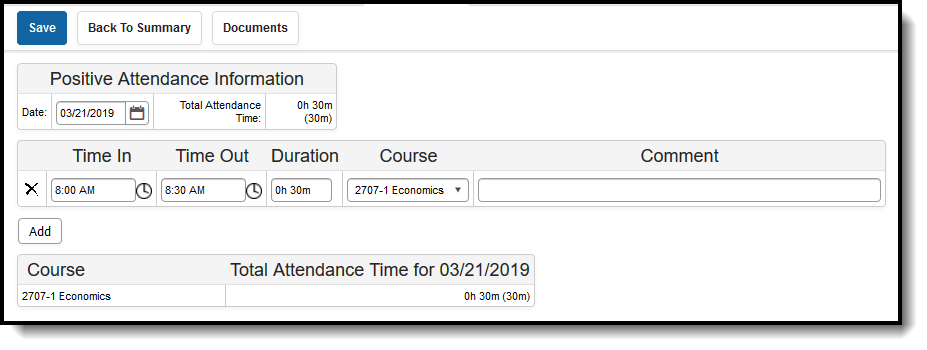 Positive Attendance Entry
Edit Positive Attendance Entries
- From the Positive Attendance Summary, expand the terms to find the desired date to modify.
- Click the hyperlinked date within the term. The attendance entry displays.
- Modify the information as needed.
- Click the Save icon when finished.
Entries can also be entered or edited by clicking the clock icon next to the Time In/Time Out fields. Click the Period name in the P column, or the Start time of the period, or the End time of the period. Doing so populates the Time In/Time Out fields and fills the Duration column with the correct time calculation. The course field still needs to be chosen.
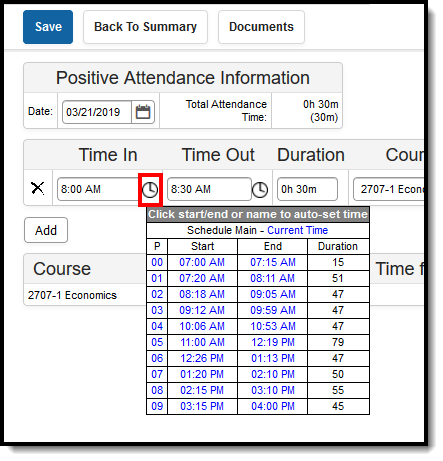 Period, Start/End Time Selection
Print Positive Attendance Reports
Use the print icons on the Attendance tool to print the Course Summary Report or the Daily Detail Report. Additional attendance related reports are available in the Attendance Reports folder.
Both of these reports can be generated in PDF or DOCX format.
Positive Attendance Course Summary Report
The Course Summary Report lists the student's present time for each course in which time was recorded in each term. The report totals the student's duration in the course and the expected hours for each course.
Positive Attendance Daily Detail Report
The Positive Attendance Daily Detail Report lists the student's present time in a Term Summary view, and includes a Time In/Time Out Detail in date order.
Information in this report uses data stored in the AttendanceDayAggregation tool. This means that attendance data for the current date is accurate as of the previous night's attendance calculation, or the last time the Attendance Aggregation Refresh was run. If needed, the Attendance Aggregation Refresh tool can be run to force an attendance recalculation to pull in the current day's data.
Documents
To view documents, click the Documents button on the action bar. See the Student Person Documents article for more information.
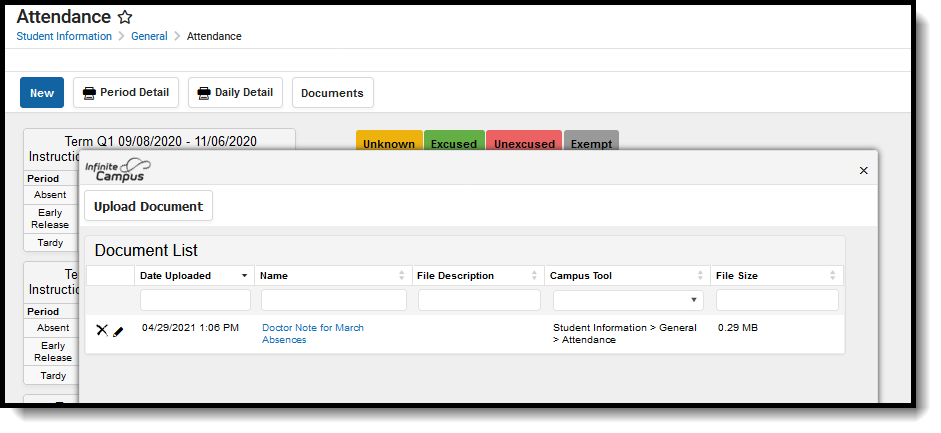 Student Attendance Documents
State-Specific Information
Fields may vary by state:
This video shows how to manage and report an individual student's attendance records.
Positive Attendance (Individual Student)
Positive Attendance can be used to record student attendance using time present.
This video shows how to record and manage positive attendance records for individual students. Positive attendance tools must be enabled and courses marked to accept positive attendance.
Reports
Use this link to access an article describing available attendance office reports.
