Tool Search: Course Information
Course Information contains all the important details about a course, things like Course Name and Number, how the course is built (4 terms, 2 schedules, etc.), information about standards and GPA, data that may be included in state reports, and any district-specific fields that may be localized.
Fields vary by state. Please see your state's State Tools articles for more information on Course and Section procedures in your state.
 Course Information Editor
See the Course Information Tool Rights article for information about rights and subrights needed to use this tool.
Navigation
The Course editor is organized into the following sections:
- General Course Information includes identifying course information, whether it's an active course (students can be scheduled into it), SCED information, and a course description.
- Scheduling includes the length of the course, the number of periods it meets in one day, the number of schedules it meets in, the department name, the maximum student count, etc.
- Course Setup includes fields like the course is an attendance-taking course, uses positive attendance, is standards-based, reports scores on a student's transcript, and much more.
- State Defined lists all of the fields that are used for state reporting in your state and includes fields like Dual Credit and State Report Exclude.
- District Defined lists any field your district has chosen to collect data on. These are added using the Custom Attribute/Dictionary.
- Comments lists any additional information about the course that your school or district wants known. This could be a note when the course was added to the catalog, that it must meet in a certain room, that it's only for seniors, or some other piece of information.
For State Edition users, all fields are read-only. Data syncs between District Edition and State Edition.
See the Course Information Field Descriptions for more details on the available fields.
 Course Information Editor - All Cards Collapsed
Click on the gray header or use the plus sign on the right side to expand the card. Use the Expand All/Collapse All button at the top of the tool to open or close all of these sections.
 Open or Close Course Information Cards
The Save, Delete, Push to Sections, and Full Screen view buttons display across the bottom of the tool.
 Course Information - Save, Delete, Push to Sections, Full Screen
Edit Course Information
Existing course information can be modified by changing current values for the selected course. Any new courses need to be added using the Add Course tool.
Best Practices for modifying course data:
- Always follow your school's/district's policies for updating course information.
- For schools/districts using Course Master, changes to courses need to be made in Course Master Information.
- Changes to courses are best managed before the start of the school year.
- Locate and modify the desired value for the appropriate field. The required fields must have a value to save the updates.
- Click Save when finished.
Once course information is saved, Section data can be created. Or, when building sections from scratch using the Scheduling Board, sections are created based on the number of students registering for a course.
Use the Add Course tool to create new courses.
Delete Courses
- Search for and select the Courses to delete.
- Click Delete.
 Delete Course Validation Error
When there are no validation errors, the course and its corresponding sections are deleted. Once deleted, the screen goes blank, and then the Course Search option opens.
Courses should only be deleted when they were created in error. While users assigned full tool rights to Course Information can delete courses, this is not a recommended practice.
- Deleting a course causes a loss of current and historical data, including student scores, transcript records, attendance data, etc.
- Courses cannot be deleted when:
- The Active Trial is locked.
- Sections are assigned to the course.
- Cross-Site Enrollment students are scheduled into the course.
- Responsive Course Schedules are aligned with the course.
- Scheduling Rules and Planning Rules are associated with the course.
- Assessments are aligned to the course.
Instead of deleting the course, set the course to inactive by removing the Active checkbox. An inactive course remains when searching for the course but it will not be placed when using the Scheduling Board, and students cannot request the course or be scheduled into the course. Inactive courses still roll forward to future calendars and can be marked as Active when they need to be available again. This way, historical data is not lost.
Push to Sections
The Push to Sections option moves the grading setup from a course to its sections. Districts should exercise caution when moving changes to sections once classes are in session, as changes may affect grade calculations.
Note the following:
- When a category pushed from a course and a category created by the teacher in the section have the same name, the teacher's category is appended with (1) to distinguish it from the category from the course.
- Categories pushed to sections are locked from editing by teachers.
- Changes made to calculations in Grade Calc Options and Composite Grading may result in changes to students' grades once classes are in session.
- This option is NOT available when the course is a mapped Cross-Site Enrollment course.
This option requires Read rights to the Push to Sections subright. See the Course Information Tool Rights article for details.
- Click Push to Sections.
- In the pop-up that opens, Categories, Grade Calc Options, Composite Grades and Weights, and Advisory are automatically selected. Remove the checkbox for any course data that should not be pushed.
- Mark Overwrite Categories when any categories at the section level should be overwritten with course-level data.
- Review the list of sections and assigned teachers that will be updated with this push.
- Mark the I understand and wish to continue checkbox to indicate that the changes have been reviewed.
- Click Push to update sections with grading data from the course.
 Course Information - Push to Sections
Course information is the core reporting information unless the Section is populated. This means:
- Values populated in the Section Information fields take precedence over the values populated in the Course Information fields.
- Section Information fields appear blank unless they are populated manually.
- Section Information fields should only be populated when the values need to differ from the Course Information fields.
See the Locked Fields on Course Information and Section Information explanation on the Course Catalog article for details.
Set Course Parameters Used in Scheduling Processes
These fields are used in the Scheduling Board when building courses for the next school year.
The values entered for Terms, Schedules, and Periods must be within the limits of the calendar structure. For example, a value of six for Terms is not a valid entry for a calendar that has four terms.
- Enter the number of Terms, Schedules, and Periods in which a course section meets. For example, Integrated Math I A course sections meets for two terms, two days of the rotation (or both days when it is an A/B rotation), and for one period each meeting.
- Enter the number of Sections to Build.
- Enter the maximum number of students who can be placed in a course section the Max Students field.
- Enter the priority that should be assigned to the course in the Schedule Load Priority field.
- Review any other values selected for the course and modify as needed.
- Click the Save button when finished.
 Course Information - Scheduling Card
Manage NCES and SCED Course Data
The National Center for Education Statistics (NCES) collects and analyzes data related to education. Codes are used in the collecting and processing of data that facilitates the exchange of information to ensure uniform values. In Campus, these codes are assigned to courses on the Course editor, the Course Masters tool and used in the Course Catalog. These fields are also available in the Ad hoc Reporting Filter Designer when generating reports using the Course/Section Data Type.
 SCED Course Fields
The NCES Code is a 12-digit number. When the SCED Subject Area and the SCED Course Identifier fields are populated, the NCES Code displays as a 5-digit number. When the remaining SCED fields are populated, the NCES Code displays a 12-digit number. When the Course Level field uses localized values with codes that are more than one character, the NCES Code can be longer than 12 digits.
NCES Code Sequence
The following information describes how the NCES Code is derived.
| NCES Number Display | NCES Code |
|---|---|
| 5-digit Number | 2 digits from SCED Subject Area (01001)
3 digits from SCED Course Identifier (03003)  |
| 12-digit Number | 2 digits from SCED Subject Area (01001G091212)
3 digits from SCED Course Identifier (01001G091212) 2 digits from SCED Lowest Grade (01001G091212) 2 digits from SCED Highest Grade (01001G091212) 1 value from SCED Course Level (01001G091212) 2 digits from SCED Sequence (01001G091212) |
| 12-digit Number with Carnegie Unit Credit Populated | 2 digits from SCED Subject Area (01001G1.0012)
3 digits from SCED Course Identifier (01001G1.0012) 4 digits (includes decimal) from Available Carnegie Unit Credit (01001G1.0012) 1 value from SCED Course Level (01001G1.0012) 2 digits from SCED Sequence (01003G1.0012)  Available Carnegie Unit Credit values report when present over SCED Lowest/Highest Grade. |
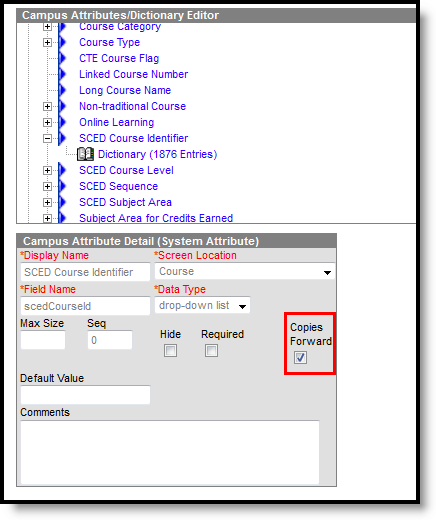
NCES and SCED options are not editable in the Attribute Dictionary as they are a nationally standardized set of codes. These codes are automatically marked to copy forward with newly created calendars.
NCES Data syncs to State Edition applications. NCES Data also rolls forward with calendars, as NCES selections are tied to a courseID. Additional items added to the Attribute/Dictionary are automatically marked as Copies Forward.
 NCES Data - Copies Forward
Course Information Field Descriptions
The following is a list of fields available in each of the Course Information cards.
General Course Information
 General Course Information Card
| Field Name | Description | Location |
|---|---|---|
| Course Master Linked | Displays when the course is linked to a Course Master. Clicking the link takes you to the Course Master Information tool where fields can be modified and pushed to the courses.
When a course is linked to a Course Master, fields populated by the Course Master become uneditable on the Course Information tool. |
Database: Course.courseMasterID
Ad hoc Reporting: Course/Section Data Type: Course > Course Information > courseMasterID (courseInfo.courseMasterID) |
| Number Required |
This number is used for identification, searching, and making requests. It is also displayed on student schedules and transcripts.
Spaces are not allowed at the beginning or end of this field. Numbers or letters can be entered. |
Database: Course.number
Ad hoc Reporting: Student Data Type: Student > Learner > Schedule > Course/Section > courseNumber (courseSection.courseNumber) Course/Section Data Type: Course > Course Information > courseNumber (courseInfo.courseNumber) |
| Name Required |
A more descriptive identifier, the course name is visible in many places in Campus and can be up to 30 characters in length.
Spaces are not allowed at the beginning or end of this field. |
Database: Course.name
Ad hoc Reporting: Student Data Type: Student > Learner > Schedule > Course/Section > courseName (courseSection.courseName) Course/Section Data Type: Course > Course Information > courseName (courseInfo.courseName) |
| Active | Indicates whether the course is active and therefore available for requests and scheduling.
An Active Course is defined as a course that is not yet dropped, which has one of three impacts, depending on the context of the course:
Academic Planning Logic
|
Database: Course.active
Ad hoc Reporting: Student Data Type: Student > Learner > Schedule > Course/Section > active (courseSection.active) Course/Section Data Type: Course > Course Information > active (courseInfo.active) Additional Ad hoc Information |
| State Code | A code assigned to a course that is used in state reports, up to 20 characters long. The entered value can be numbers or letters, decimals or special characters.
See the Responsive Scheduling article for this field's impact on responsive courses. This field behaves differently in each state. See the State Code Field Logic section for details. |
Database: Course.statecode
Ad hoc Reporting: Student Data Type: Student > Learner > Schedule > Course/Section > stateCode (courseSection.stateCode) Course/Section Data Type: Course > Course Information > stateCode (courseInfo.stateCode) |
| NCES Code | A 5-digit or 12-digit alphanumeric value (depending on what fields are populated) that is a combination of the populated SCED codes and Available Carnegie Unit value.
See the NCES Code Sequence section for details on how the code is derived.
There is a core set of NCES values provided by the National Center for Education Statistics website. In certain states, these values may be localized.
Note that the NCES code field displays "none" until the Subject Area and the SCED Course Identifier fields have been populated. When those values have been cleared, the NCES code field displays "none" |
Database: N/A (calculated field using the Subject Area and SchedCourseID)
Ad hoc Reporting: Student Data Type: Student > Learner > Schedule > Course/Section > NCESCode (courseSection.NCESCode) Course/Section Data Type: Course > Course Information > NCES Code (courseInfo.NCES Code) |
| SCED Subject Area | The Secondary School Course Classification System: School Codes for the Exchange of Data (SCED) presents a taxonomy and course descriptions for secondary education.
This is intended to help schools and education agencies maintain longitudinal information about students' coursework in an efficient, standardized format that facilitates the exchange of records as students transfer from one school to another, or to post-secondary education.
For a list of the SCED Subject Area Codes, see the National Center for Education Statistics website. |
Database: CourseInfo.SCEDSubjectArea Ad hoc Reporting: Student Data Type: Student > Learner > Schedule > Course/Section > scedSubjectArea (courseSection.scedSubjectArea) Course/Section Data Type: Course > Course Information > SCED Subject Area (courseInfo.SCED Subject Area) |
| SCED Course Identifier Required |
A 3-digit number that distinguishes a course within a Course within SCED Subject Area.
These identifiers are general but provide enough specificity to identify the course's topic and to distinguish it from other courses in that subject area. |
Database: CourseInfo.SCEDCourseIdentifier Ad hoc Reporting: Student Data Type: Student > Learner > Schedule > Course/Section > scedCourseID (courseSection.scedCourseID) Course/Section Data Type: Course > Course Information > SCED Course Identifier (courseInfo.SCED Course Identifier) |
| Available Carnegie Unit Credit | Indicates the amount of credit available to a student who successfully meets the objectives of the course. It is a measure of "seat time" rather than a measure of attainment of the course objectives.
The Carnegie Foundation defined the Carnegie Unit as 120 hours of class or contact time with an instructor over the course of a year at the secondary (American high school) level. This breaks down into a single one-hour meeting on each of five days per week for a total of 24 weeks per year. However, knowing that classes usually meet for 50 minutes yields a value of 30 weeks per year. A semester (one-half of a full year) earns 1/2 a Carnegie Unit.
The entered value formats as N.NN. When a value of 1.5 is entered, the NCES Course Code includes this as 1.50. See the NCES Code Sequence section for details on how the code is derived.
A course meeting every day for one period of the school day over the span of a school year offers one Carnegie unit.
Values of 1 up to 999.99 can be entered. |
Database: CourseInfo.SCEDAvailableCredit Ad hoc Reporting: Student Data Type: Student > Learner > Schedule > Course/Section > scedAvailableCredit (courseSection.scedAvailableCredit) Course/Section Data Type: Course > Course Information > SCED Available Credit (courseInfo.SCED Available Credit) |
| SCED Course Level | The secondary course's level of rigor.
Options may be localized in some states. |
Database: CourseInfo.SCEDCourseLevel Ad hoc Reporting: Student Data Type: Student > Learner > Schedule > Course/Section > scedCourseLevel (courseSection.scedCourseLevel) Course/Section Data Type: Course > Course Information > SCED Course Level (courseInfo.SCED Course Level) |
| SCED Sequence (part n of m parts) | Describes the manner in which schools may break up courses into multiple courses to address complex course content.
Chemistry may be broken into 2 different courses: Chemistry 1 and Chemistry 2. Taking Chemistry 1 would be course "one of two" or "1 2". It is important to remember that sequence describes the order in which courses are taken.
The first sequence field cannot have a higher value than the second sequence field.
These fields are automatically populated with values of 1 of 1.
|
Database: CourseInfo.SCEDSequenceNumber CourseInfo.SCEDSequenceMax Ad hoc Reporting: Student Data Type: Student > Learner > Schedule > Course/Section > scedSequenceNum (courseSection.secSequenceNum) Student Data Type: Student > Learner > Schedule > Course/Section > scedSequenceMax (courseSection.secSequenceMax) Course/Section Data Type: Course > Course Information > SCED Sequence Number (courseInfo.SCED Sequence Number) Course/Section Data Type: Course > Course Information > SCED Sequence Max (courseInfo.SCED Sequence Max) Ad hoc Additional Information |
| SCED Lowest Grade | Indicates the lowest grade level offered for a specific course. This field is used for pre-secondary courses (e.g., elementary and middle school courses) and can be selected when the SCED Subject Areas field has a value of the following and a SCED Course Identifier is selected:
The entered grade level must be less than the entered grade level for SCED Highest Grade. This field is not available in all states. |
Database: CourseInfo.SCEDLowestGrade
Ad hoc Reporting: Student Data Type: Student > Learner > Schedule > Course/Section > scedLowestGrade (courseSection.scedLowestGrade) Course/Section Data Type: Course > Course Information > SCED Lowest Grade (courseInfo.SCED Lowest Grade) |
| SCED Highest Grade | Indicates the highest grade level offered for a specific course. This field is used for pre-secondary courses (e.g., elementary and middle school courses) and can be selected when the SCED Subject Areas field has a value of the following and a SCED Course Identifier is selected:
The entered grade level must be greater than the entered grade level for SCED Lowest Grade. This field is not available in all states. |
Database: CourseInfo.SCEDHighestGrade Ad hoc Reporting: Student Data Type: Student > Learner > Schedule > Course/Section > scedHighestGrade (courseSection.active) Course/Section Data Type: Course > Course Information > SCED Highest Grade (courseInfo.SCED Highest Grade) |
| Description | The Course Description section displays the detailed description of the course. This description is visible in the Course Catalog and when students request courses on the Campus Portal. It can only be modified from the Course Catalog. | Database: Course.description
Ad hoc Reporting: Student Data Type: Student > Learner > Schedule > Course/Section > description (courseSection.description) Course/Section Data Type: Course > Course Information > description (courseInfo.description) |
State Code Field Logic
The State Code field behaves differently in each state. The following summarizes these differences. Follow your state's procedures when using this field.
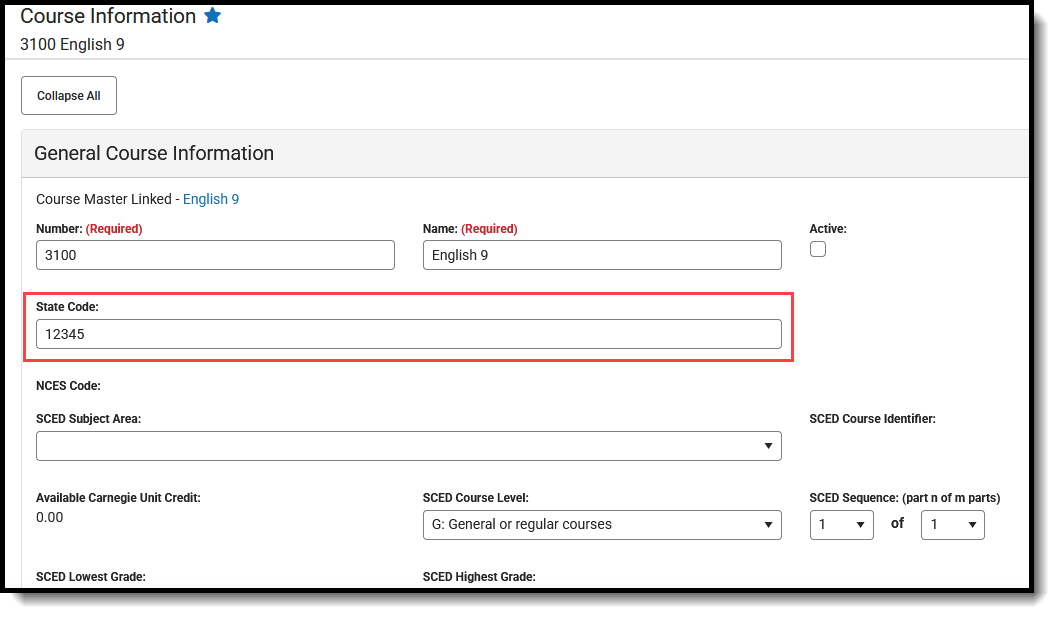 State Code Field on General Course Information Card
For states that use the Course Management tool to define State Codes:
- The State Code field is a searchable dropdown with values defined in Course Management.
- No additional values can be added on the Course Information tool.
- When the State Code field is populated on the Course Master Information tool, the field is read-only on the Course Information tool.
- When the State Code field is NOT populated on the Course Master Information tool and is not locked, the field can be populated on the Course Information tool.
For states that use the State Code attribute and define dictionary values in either the Course attribute or the Definition attribute via the Core Attribute/Dictionary:
- The State Code field is a searchable dropdown with values defined in Course Management.
- No additional values can be added on the Course Information tool.
- When the State Code field is populated on the Course Master Information tool, the field is read-only on the Course Information tool.
- When the State Code field is NOT populated on the Course Master Information tool and is not locked, the field can be populated on the Course Information tool.
For states that do not use Course Management or the State Code Attribute to define values:
- The State Code field is a text box instead of a searchable field.
- When the State Code field is populated on the Course Master Information tool, the field is read-only on the Course Information tool.
- When the State Code field is NOT populated on the Course Master Information tool and is not locked, the field can be populated on the Course Information tool.
Scheduling
 Scheduling Card
| Field | Description | Location |
|---|---|---|
| Terms | Indicates the number of terms one instance of the course covers, such as a semester long course that lasts for two terms in a four quarter schedule.
This field, along with the Schedules and Periods fields, needs to be populated in order to accurately reflect a student's requested units. The entered number for this field must be greater than zero (0) and must not be more than the maximum number of terms set on the calendar. For example, a a value of 6 cannot be entered for a calendar that has only 4 terms. Academic Planning Logic |
Database: Course.terms
Ad hoc Reporting: Student Data Type: Student > Learner > Schedule > Course/Section > terms (courseSection.terms) Course/Section Data Type: Course > Course Information > terms (courseInfo.terms) |
| Schedules | Indicates the total number of period schedules in which the course meets.
This field, along with the Terms and Periods fields, needs to be populated in order to accurately reflect a student's requested units. The entered number for this field must be greater than zero (0) and must not be more than the maximum number of schedules assigned to the calendar. For example, a a value of 6 cannot be entered for a calendar that has only 4 schedules. |
Database: Course.schedules
Ad hoc Reporting: Student Data Type: Student > Learner > Schedule > Course/Section > schedules (courseSection.schedules) Course/Section Data Type: Course > Course Information > schedules (courseInfo.schedules) |
| Periods | Indicates the number of periods in one day a course is taught.
This value is most often one. For schools using block scheduling, this number would be two - the student attends the same course for two hours. This field, along with the Terms and Schedules fields, must be populated to accurately reflect a student's requested units. The entered number for this field must be greater than zero (0) and must not be more than the maximum number of periods set on the calendar. For example, a a value of 6 cannot be entered for a calendar that has only 4 periods. |
Database: Course.period
Ad hoc Reporting: Student Data Type: Student > Learner > Schedule > Course/Section > periods (courseSection.periods) Course/Section Data Type: Course > Course Information > periods (courseInfo.periods) |
| Sections to Build | Indicates to the Scheduling Board how many sections of this course exist. | Database: Course.sectionToBuild
Ad hoc Reporting: Student > Learner Planning > Course Requests > Course > sectionsToBuild (course.sectionToBuild) Course/Section Data Type: Course > Course Information > sectionsToBuild (courseInfo.sectionsToBuild) |
| Max Students | Displays the maximum number of students who can be scheduled into sections of the course. This field is also on the Section editor; it only needs to be populated in one location (either on the Course editor or the Section editor).
Enter positive whole numbers or a zero (0). NOTE: Sections with a Max Students value of 0 will not have students loaded into them when using the Scheduling Board. |
Database: Course.maxStudents
Ad hoc Reporting: Student Data Type: Student > Learner > Schedule > Course/Section > maxStudents (courseSection.maxStudents) Course/Section Data Type: Course > Course Information > maxStudents (courseInfo.maxStudents) |
| Department | Contains the lists of departments created in that can be used to organize courses. Assigning a department to courses helps in the organization of the schedule.
When using the Scheduling Board or when searching by department, all courses in that department are grouped together. |
Database: Course.departmentName
Ad hoc Reporting: Student Data Type: Student > Learner > Schedule > Course/Section > departmentName (courseSection.departmentName) Course/Section Data Type: Course > Course Information > departmentName (courseInfo.departmentName) |
| Schedule Load Priority | Indicates priority that should be given to a course during scheduling. This is used in the Scheduling Board when loading course requests. A value of 1 indicates the courses are first, which might be helpful for courses that aren't offered every year. |
Database: Course.priority
Ad hoc Reporting: Student Data Type: Student > Learner > Schedule > Course/Section > priority (courseSection.priority) Course/Section Data Type: Course > Course Information > departmentName (courseInfo.departmentName) |
| Preferred Room Type | Lists the type of room in which this course can be scheduled. Room types are created in the Attribute/Dictionary.
See the Room Setup article for more information. |
Database: Course.roomType
Ad hoc Reporting: Student Data Type: Student > Learner > Schedule > Course/Section > roomType (courseSection.roomType) Course/Section Data Type: Course > Course Information > departmentName (courseInfo.departmentName) |
| Section Template Group | Indicates to which Section Template Group the course is assigned. This is used in section placement for schools that have a complex schedules (rotating days with different periods on each day, waterfall schedules, biometric scheduling, etc.).
When this field is populated, the Terms, Schedules and Periods fields cannot be modified. |
Database: Course.sectionTemplateGroup Ad hoc Reporting: Course/Section Data Type: Course > Course Information > sectionTemplateGroup (courseInfo.sectionTemplateGroup) |
| Allow Teacher Reqs/Recs | Indicates teachers are able to recommend students for the course. When marked, teachers can suggest courses for the student using the Course Requests tool and can recommend future courses for the student using Student Course Recommendations.
See the Teacher Course Requests and Course Recommendations article for more information. Student Course Recommendations are used in the Academic Planning process and require the student to have an active Academic Plan. Teacher Course Requests are used in the Scheduling process. Academic Planning Logic |
Database: Course.allowTeacherRequests
Ad hoc Reporting: Course/Section Data Type: Course > Course Information > allowTeacherRequsts (courseInfo.allowTeacherRequests) Ad hoc Information: Reports a value of zero (0) when the checkbox is not marked, and a value of 1 when the checkbox is marked. |
| Allow Student Requests | Indicates students can request this course through the Portal.
When this is not marked, the course displays in the Course Catalog search results with a message that states courses can only be added by a counselor, and students are not allowed to request this on the Portal. Academic Planning Logic |
Database: Course.requestable
Ad hoc Reporting: Student Data Type: Student > Learner > Schedule > Course/Section > requestable (courseSection.requestable) Course/Section Data Type: Course > Course Information > requestable (courseInfo.requestable) |
| Repeatable | Courses marked as repeatable can be chosen by students multiple times to add to their academic plan.
Academic Planning Logic |
Database: Course.repeatable
Ad hoc Reporting: Student Data Type: Student > Learner > Schedule > Course/Section > repeatable (courseSection.repeatable) Course/Section Data Type: Course > Course Information > repeatable (courseInfo.repeatable) Additional Ad hoc Information Reports a value of zero (0) when the checkbox is not marked, and a value of 1 when the checkbox is marked. |
| Required | Indicates whether the course is required.
Marking this does not mean the course is necessary for a student to graduate (those courses are indicated on a student's Graduation Plan). There is no logic associated with marking this, but when a school were to use this checkbox to note which courses a student needed in order to meet graduation requirements, this would be used in a report. Then, all courses marked as Required could be found. |
Database: Course.required
Ad hoc Reporting: Student Data Type: Student > Learner > Schedule > Course/Section > required (courseSection.required) Course/Section Data Type: Course > Course Information > required (courseInfo.required) Additional Ad hoc Information Reports a value of zero (0) when the checkbox is not marked, and a value of 1 when the checkbox is marked. |
| Advisory | Identifies a course as an advisory course, a regularly scheduled time in the school day where a small group of students meets with a teacher or staff member to receive support on academic, social, and personal issues. Marking this checkbox enables special summary views for Instruction tools. Courses and Sections can both be marked as Advisory. At the course level, all sections of the course are considered Advisory; at the section level, that section is considered Advisory, while the other sections of the course may not be. |
Database: Course.advisory
Ad hoc Reporting: Course/Section Data Type: Course > Course Information > advisory (courseInfo.advisory) |
| Homeroom | Indicates that this course functions as a homeroom.
This field is used in scheduling and attendance reports and functions as a sort option when scheduling courses for the next school year. It also causes the teacher's name to print on the Report Card. |
Database: Course.homeroom
Ad hoc Reporting: Student Data Type: Student > Learner > Schedule > Course/Section > homeroom (courseSection.homeroom) Course/Section Data Type: Course > Course Information > homeroom (courseInfo.homeroom) Ad hoc Information Reports a value of zero (0) when the checkbox is not marked, and a value of 1 when the checkbox is marked. |
| Responsive | When marked, indicates the course allows for Responsive Course offerings.
See the Responsive Scheduling articles for more information. This checkbox cannot be marked for Cross-Site Enrollment courses. When this checkbox is marked, the following fields are disabled:
|
Database: Course.responsive
Ad hoc Reporting: Student Data Type: Student > Learner > Schedule > Course/Section > responsive (courseSection.responsive) Course/Section Data Type: Course > Course Information > responsive (courseInfo.responsive) Ad hoc Information Reports a value of zero (0) when the checkbox is not marked, and a value of 1 when the checkbox is marked. |
| Cross-Site Enrollment | When marked, indicates this course is available for students participating in Cross-Site Enrollment courses.
This only displays when the Course Master Information has Cross-Site Enrollment marked. See the Cross-Site Enrollment articles for more information. |
Database: Course.allowCrossSiteEnrollment
Ad hoc Reporting: Course/Section Data Type: Course > Course Information > Cross-Site Enabled (courseInfo.Cross-SiteEnabled) |
Course Setup
 Course Setup Card
| Field | Description | Location |
|---|---|---|
| Subject Type | Indicates whether the information taught in the course applies to one of the following:
When the information does not fall into one of these categories, select NA: Not Applicable. When CORE is selected, a required Core Academic Class field displays. |
Database: Course.subjectType
Ad hoc Reporting: Student Data Type: Student > Learner > Schedule > Course/Section > subjectType (courseSection.subjectType) Course/Section Data Type: Course > Course Information > subjectType (courseInfo.subjectType) |
| Core Academic Class Required |
This field is required when the Subject Type is set to CORE: Core Academic Subject Area.
Core Academic Classes refer to any course in one of the following areas:
|
Database: Course.coreSubject
Ad hoc Reporting: Student Data Type: Student > Learner > Schedule > Course/Section > coreSubject (courseSection.coreSubject) Course/Section Data Type: Course > Course Information > coreSubject (courseInfo.coreSubject) |
| Transcript | Indicates whether the course should be included on student transcripts. | Database: Course.transcript
Ad hoc Reporting: Student Data Type: Student > Learner > Schedule > Course/Section > transcript (courseSection.transcript) Course/Section Data Type: Course > Course Information > transcript (courseInfo.transcript) Ad hoc Information: Reports a value of zero (0) when the checkbox is not marked, and a value of 1 when the checkbox is marked. |
| GPA Weight | Indicates that the course contributes to the student’s cumulative GPA calculation. It indicates the impact of the course score in GPA calculations relative to other courses.
For example, a school’s score group is on a standard 4.0 scale. A course has a weight of 2. For a student that receives an A (4.0), the GPA value then equals an 8, thus inflating the calculation. Most often, this field is set to a 1. When the course does not contribute to the GPA at all, leave the field blank.
When the GPA Weight on a Transcript Course Record is blank/null/zero, the GPA Value for that Course is not included in any Weighted or Unweighted GPA calculations on the transcript. |
Database: course.gpaWeight
Ad hoc Reporting: Student Data Type: Student > Learner > Schedule > Course/Section > gpaWeight (courseSection.gpaWeight) Course/Section Data Type: Course > Course Information > gpaWeight (courseInfo.gpaWeight) |
| Bonus Points | Indicates whether bonus points are used in calculating GPA. | Database: Course.bonusPointsAvail
Ad hoc Reporting: Student Data Type: Student > Learner Planning > Course Requests > Course > bonusPointsAvail (course.bonusPointsAvail) Course/Section Data Type: Course > Course Information > bonusPointsAvail (courseInfo.bonusPointsAvail) Ad hoc Information: Reports a value of zero (0) when the checkbox is not marked, and a value of 1 when the checkbox is marked. |
| Course-Only Curriculum | Prevents teachers from aligning assignments aligned to sections in this course to sections in any other courses.
Normally, teachers can align an assignment to any section they teach, including those in multiple sections. This option restricts that ability; when an assignment is aligned to a section in this course, only other sections of the same course can be selected in the Section Selector of the assignment. |
Database: Course.courseOnlyCurriculum
Ad hoc Reporting: Student Data Type: Student > Learner Planning > Course Requests > Course > courseOnlyCurriculum (course.courseOnlyCurriculum) Course/Section Data Type: Course > Course Information > courseOnlyCurriculum (courseInfo.courseOnlyCurriculum) Ad hoc Information: Reports a value of zero (0) when the checkbox is not marked or a value of 1 when the checkbox is marked. |
| Attendance | Indicates whether attendance is taken during this course. | Database: Course.attendance
Ad hoc Reporting: Student Data Type: Student > Learner > Schedule > Course/Section > attendance (courseSection.attendance) Course/Section Data Type: Course > Course Information > attendance (courseInfo.attendance) Ad hoc Information: Reports a value of zero (0) when the checkbox is not marked, and a value of 1 when the checkbox is marked. |
| Positive Attendance | Indicates whether attendance recorded for this section is in the form of positive attendance, in which the teacher tracks how long students work in a given course area.
When the Positive Attendance Preference is set to No, this field is used as an indicator. When the preference is set to Yes, additional logic is turned on, allowing schools to enter positive attendance data for these courses. |
Database: Course.unitAttendance
Ad hoc Reporting: Student Data Type: Student > Learner > Schedule > Course/Section > unitAttendance (courseSection.unitAttendance) Course/Section Data Type: Course > Course Information > unitAttendance (courseInfo.unitAttendance) Ad hoc Information: Reports a value of zero (0) when the checkbox is not marked, and a value of 1 when the checkbox is marked. |
| Expected Hours | When the Positive Attendance Preference is set to Yes, this field displays, indicating the total number of hours of attendance a student enrolled in this class is required to have.
Hours can be entered as whole numbers or as decimal numbers up to 6 characters (1000.25, etc.). A maximum value of 8760 hours can be entered. |
Database: Course.expectedHours
Ad hoc Reporting: Student Data Type: Student > Learner > Schedule > Course/Section > expectedHours (courseSection.expectedHours) Course/Section Data Type: Course > Course Information > expectedHours (courseInfo.expectedHours) |
| Standards-Based | Indicates whether this course is graded using a traditional grading scale or aligned with a standards area. | Database: Course.standardsBased
Ad hoc Reporting: Student Data Type: Student > Learner > Schedule > Course/Section > standardsBased (courseSection.standardsBased) Course/Section Data Type: Course > Course Information > standardsBased (courseInfo.standardsBased) |
| Hide Standards On Portal | Hides the standards assigned to a course from being viewed on the Portal and Student App. Standards still display for teachers in Campus Instruction.
Marking this checkbox marks it for all of a course's section upon save. |
Database: Course.hideStandardsOnPortal
Ad hoc Reporting: Student Data Type: Student > Learner Planning > Course Requests > Course > hideStandardsOnPortal (course.hideStandardsOnPortal) |
| Ignore Master Push | Prevents this course from being updated when grading setup is pushed from the Course Master. Grading setup can be pushed from Course Master Information or using the Push All Course Masters tool.
Displays when the course is linked to a Course Master. Only users with tool rights for Push All Course Masters can edit this field. |
Database: Course.ignoreMasterPush
Ad hoc Reporting: Student Data Type: Student > Learner Planning > Course Requests > Course > ignoreCourseMasterPush (course.ignoreCourseMasterPush) Course/Section Data Type: Course > Course Information > ignoreCourseMasterPush (courseInfo.ignoreCourseMasterPush) Ad hoc Information: Reports a value of zero (0) when the checkbox is not marked or a value of 1 when the checkbox is marked. |
| External LMS Exclude | When a district is sharing Campus data with an external learning management system, this checkbox can be used to exclude specific records from being shared.
This designation also applies to all Sections associated with this Course. When the Exclude checkbox is marked for the School or Calendar associated with this Course, that designation also applies to this Course. |
Database: Course.externalLMS
Ad hoc Reporting: Student Data Type: Student > Learner > Schedule > Course/Section > externalLMSExclude (course.externalLMSExclude) Course/Section Data Type: Course > Course Information > externalLMSExclude (courseInfo.externalLMSExclude) Ad hoc Information: Reports a value of zero (0) when the checkbox is not marked or a value of 1 when the checkbox is marked. |
| Activity | Indicates the course is being used to track an activity such as an athletic team or extra-curricular. It may use a state- or district-defined set of codes. | Database: Course.activityCode
Ad hoc Reporting: Student Data Type: Student > Learner > Schedule > Course/Section > activityCode (course.activityCode) Course/Section Data Type: Course > Course Information > activityCode (courseInfo.activityCode) |
State Defined
The State Defined card includes any field required for your state's reports and extracts, and any field your state needs to track but may not be included in reports/extracts.
The top three fields (highlighted in the image below) are used throughout Campus in other areas, and are defined below.
Fields vary by state. Review your state's content for more information.
 State Defined Course Card
| Field | Description | Location |
|---|---|---|
| State Report Exclude | When marked, course information is not included in any state reports.
See the Responsive Scheduling and Course Management section for this field's impact on responsive courses. |
Database: Course.stateReportExclude
Ad hoc Reporting: Student Data Type: Student > Learner > Schedule > Course/Section > stateReportExclude (courseSection.stateReportExclude) Course/Section Data Type: Course > Course Information > stateReportExclude (courseInfo.stateReportExclude) Ad hoc Information: Reports a value of zero (0) when the checkbox is not marked or a value of 1 when the checkbox is marked. |
| Ed-Fi Term Descriptor Override | This field determines whether the course is eligible to be mapped to a different Sessions resource in Ed-Fi than the one that would be referenced based on the Section Schedule Placement.
This field only displays when your state used Ed-Fi to collect student data through Ed-Fi Resources. |
Database: Course.edFiTermType
Ad hoc Reporting: Student Data Type: Student > Learner > Schedule > Course/Section > edFiTermType (courseSection.edFiTermType) Course/Section Data Type: Course > Course Information > edFiTermType (courseInfo.edFiTermType) |
| Type | The options available in this dropdown can be edited in the Attribute Dictionary and provide additional filtering fields in Ad hoc Reporting. | Database: Course.type
Ad hoc Reporting: Student Data Type: Student > Learner > Schedule > Course/Section > type (courseSection.type) Course/Section Data Type: Course > Course Information > type (courseInfo.Type) |
District Defined
This section lists any fields and values your district has chosen to track. These are localized fields that may or may not be reported in local reports or state reports.
 District Defined Fields Display
These fields are created in the Custom Attribute/Dictionary tool.
Your district should provide guidance on district-defined fields. When no district-defined fields are created, text indicating such fields displays in place of any fields.
 No District Defined Fields
Comments
The Comments section provides any additional information added for the course. This is a text field where staff can enter items related to when it was added to the catalog, who added it, etc. It differs from the Description field in that it is used for internal notes about the course and not used in any other scheduling tool or process.
 Course Information - Comments Section
State-Specific Information
Fields may vary by state:
