Tool Search: User Account Messenger
The User Account Messenger tool allows you to send Campus user account-related emails to a specific set of people based on search criteria or Ad hoc filter.
A primary function of this tool is its ability to email user account activation messages to users without Campus Portal accounts or who have recently had a user account created via the User Account Batch Import Tool or Account Security Preferences.
For staff accounts created via the User Account Batch Import Tool or Account Security Preferences, this tool may be used to email notifications by using a staff member's individual search or a Census/Staff based Ad Hoc filter and bypassing the activation URL and expiration date.
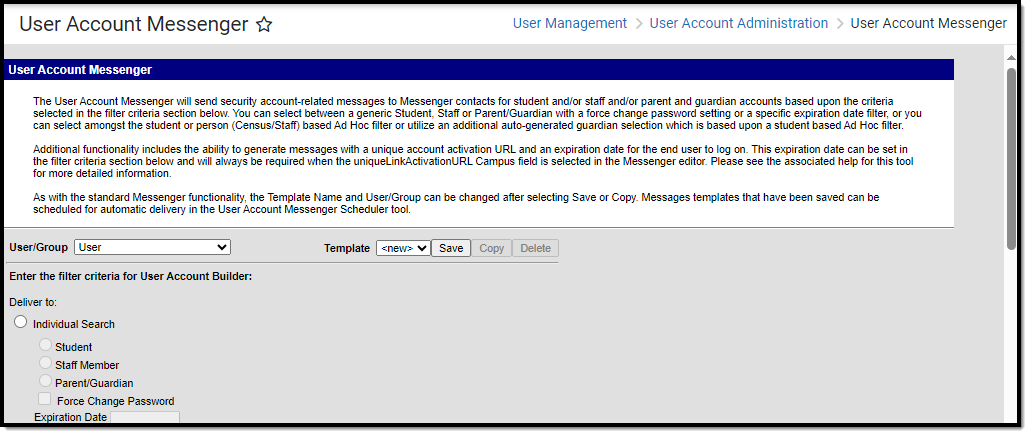
Image 1: User Account Messenger Tool
Prerequisites
- Filters need to be created within Filter Designer.
- If sending Campus account activation messages using an import file Ad hoc filter, a file must first be imported via the User Account Batch Import Tool.
- Under Census > People > Demographics > Messenger Preference Contact Reason, General must be selected to see Parents/Guardians emails.
Building and Sending an Account Message
The following steps will walk you through the process of building and sending a user account message:
- Step 1. Select a Template
- Step 2. Enter Filter Criteria
- Step 3. Enter an Account Activation URL Expiration Date
- Step 4. Create the Message
- Step 5. Test the Message
- Step 6. Preview and Send the Message
Step 1. Select a Template
The first step in this process is to select an existing user account messenger template or create a new template (see Image 2).
If an existing template is selected, review Steps 2-4 and begin Step 5.
If a new template is being created, select <new> from the Template field and proceed to Step 2.
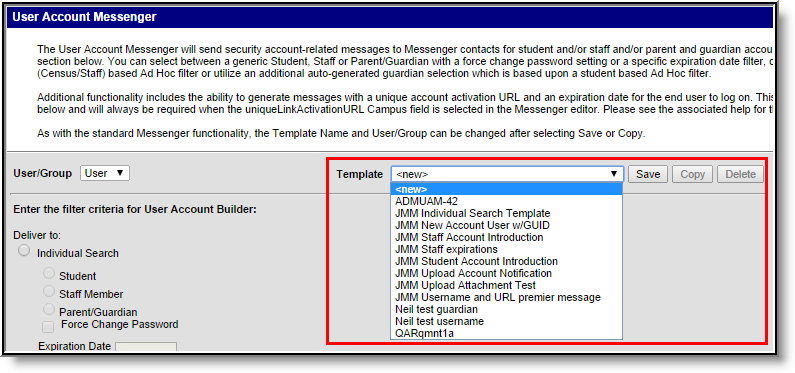
Image 2: Selecting a Template
Step 2. Enter Filter Criteria
The next step is enter filter criteria. This will determine which Campus users will receive the email message. Use the table below for help in understanding each option.
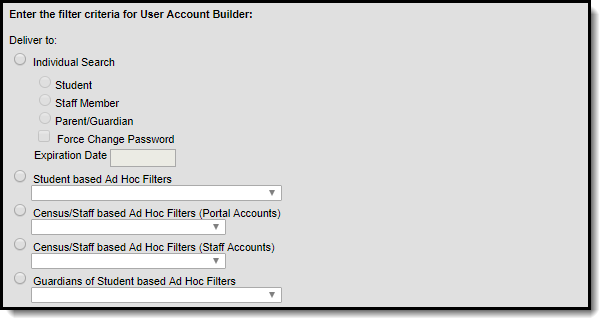
Image 3: Entering Filter Criteria
| Field | Description |
|---|---|
| Individual Search | Student - If selected, email messages will be sent to all students within the calendar selected in the Campus toolbar. |
| Staff Member - If selected, email messages will be sent to all staff members within the calendar selected in the Campus toolbar. | |
| Parent/Guardian - If selected, email messages will be sent to all guardians of students with a current or future enrollment record in the selected calendar. | |
| Force Change Password - If marked, only students, staff members or parent/guardians who have not completed a pending change password request will be sent an email. This option is especially useful for routinely sending out email reminders to these users. | |
| Expiration Date - Only users whose accounts are expiring on this date will be sent the message. This is useful for sending reminder emails to these users. | |
| Student based Ad Hoc Filters | Only students meeting this filter's criteria will be sent the message. You can build effective user account-related filters using the Ad Hoc Reporting Query Wizard . |
| Census/Staff based Ad Hoc Filters (Portal Accounts) | Only staff members with a Homepage set to 'Portal' will be sent the message. You can build effective user account-related filters using the Ad Hoc Reporting Query Wizard. Selecting this option when building Activation URL messages means the messages will only go to users with a Homepage set to 'Portal' (System Administration > Users > User Account > Homepage) and only staff Portal accounts will be activated. |
| Census/Staff based Ad Hoc Filters (Staff Accounts) | Only staff members with a Homepage set to 'Campus Application' or 'Campus Instruction' will be sent the message. You can build effective user account-related filters using the Ad Hoc Reporting Query Wizard. Selecting this option when building Activation URL messages means the messages will only go to users with a Homepage set to 'Campus Application' or 'Campus Instruction' (System Administration > Users > User Account > Homepage) and only staff Campus Application accounts will be activated. |
| Guardians of Student based Ad Hoc Filters | Only guardians of students meeting this filter's criteria will be send the message. You can build effective user account-related filters using the Ad Hoc Reporting Query Wizard. |
Step 3. Enter an Account Activation URL Expiration Date
Once filter criteria has been entered, determine if the message you are creating will contain the accountManagement.uniqueLinkActivationURL campus field. If so, the date entered in this field will determine when the unique URL generated within the message will expire. This field will automatically default to 5 days from the current date unless modified.
The accountManagement.uniqueLinkActivationURL field generates a unique Campus Portal user account activation URL which email recipients can select to activate their newly created Campus Portal user account. This is especially useful for sending out messages to all users who have had Portal accounts recently created via the User Account Batch Wizard.
See the Building Activation Messages for Newly Imported/Created Campus Portal Accounts section for an example of this feature.
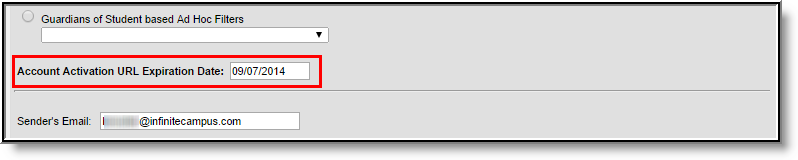
Image 4: Entering an Account Activation URL Expiration Date
Step 4. Create the Message
Now it is time to create the message being sent. First, enter the Sender's Email address and Message Subject. This is the email address and email subject that will appear for each recipient.
This field will default to the value entered in the Default Sender Email Address field found on the Email Settings tab. This field will be read-only unless the Allow Custom Sender's Email Address checkbox is marked on the Email Settings tab.
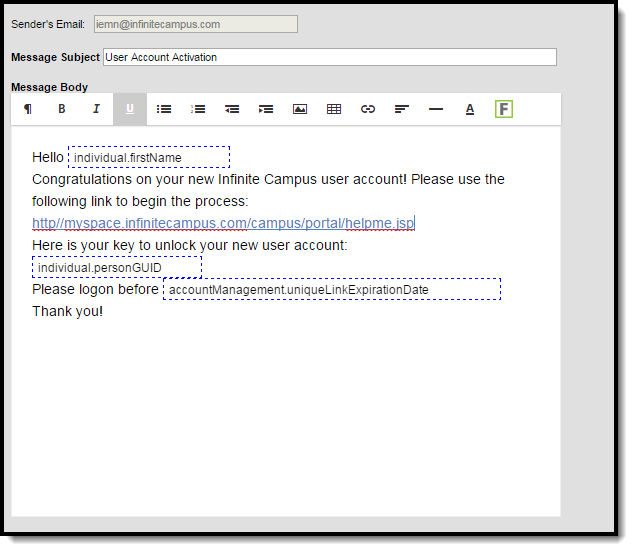
Image 5: Creating the Message
Begin to write your message in the Message Body. The message body is a WYSIWYG editor which provides standard text formatting as well as the ability to enter Campus Fields. Campus fields are accessed by selecting the small icon in the upper right-hand corner allow you to generate specific Campus data within the message which will report uniquely for each message recipient (see Image 6).
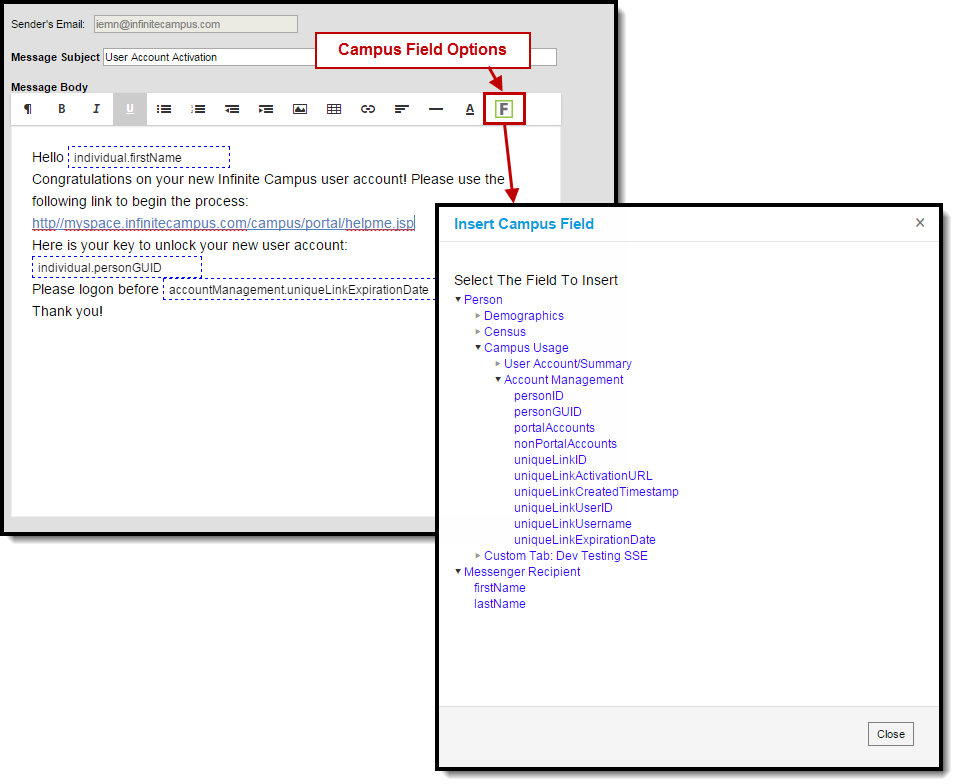
Image 6: Inserting Campus Fields
For example, in the image below, Campus fields individual.firstName, individual.personGUID and accountManagement.uniqueLinkExpirationDate are inserted into the message.
When this message is generated, the individual.firstName field will state the recipient's first name, the individual.personGUID will state the recipient's GUID and the accountManagement.uniqueLinkExpirationDate field will indicate when the account activation window will expire (see Image 7).
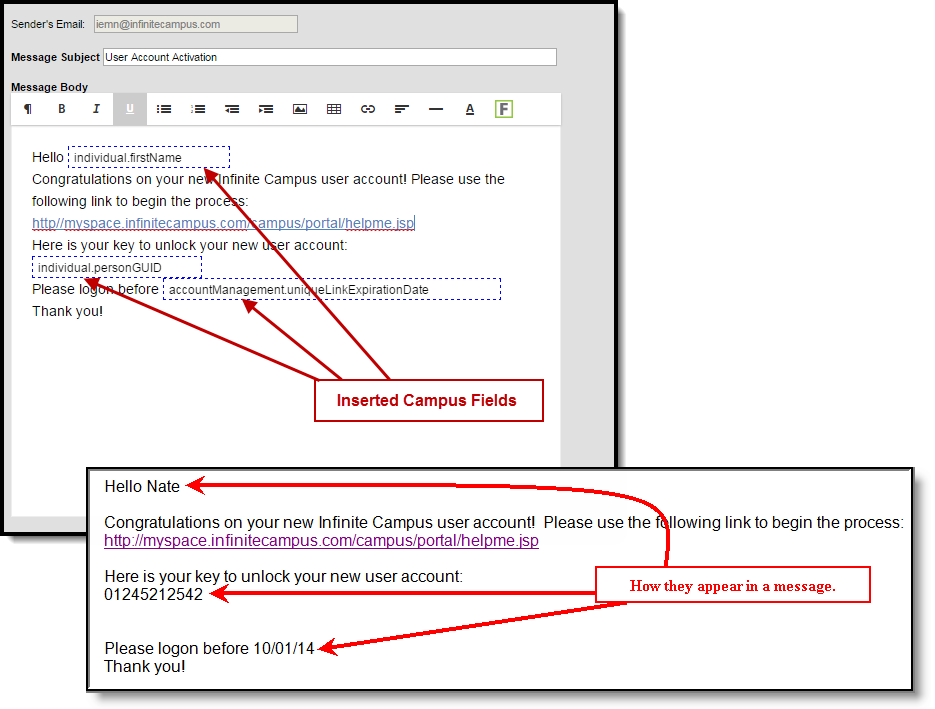
Image 7: Example of Inserted Campus Fields
If you like to attach a file to the message, click the Choose File button and locate the file on your hard drive or network. Once selected, click the Upload button (see Image 8)
If you need to attach multiple files, attach a Zip file.
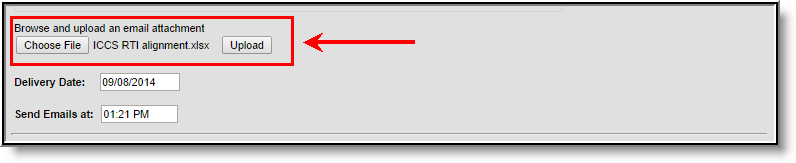
Image 8: Attaching a File to the Message
Step 5. Test the Message
Now that filter criteria has been established and the message has been created, it's time to test the message before sending it out to users. To test the message, click the Test icon. The Send Test Message window will appear, asking you to designate a Destination Email, or where you'd like the test message to be sent so that you can ensure it appears correctly and click the Send Test button (Image 9).
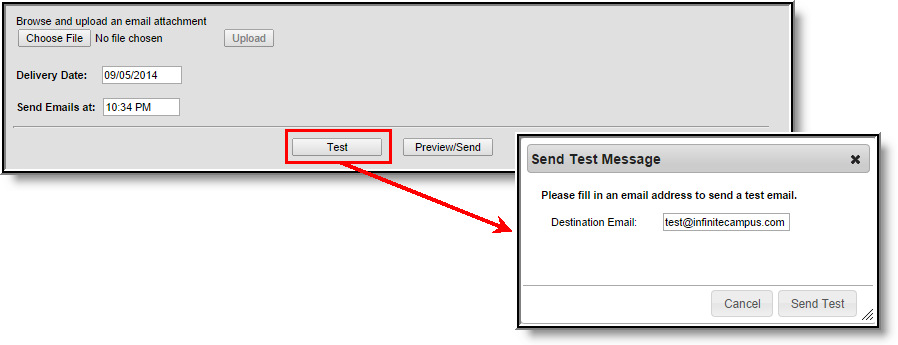
Image 9: Testing the Message
Below is an example of a test message received using the message created in Image 7.
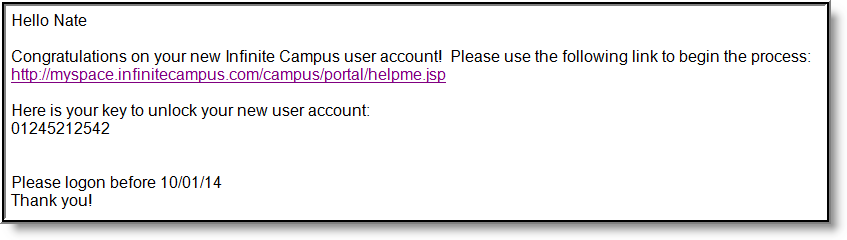
Image 10: Example of a Test Message
Step 6. Preview and Send the Message
If the test message appears correctly and you are ready to send the message, determine the Delivery Date (the date the emails will be sent) and the time during the delivery date in which the message should be sent (Send Emails at).
Click the Preview/Send button. The Preview Message window will appear, describing the amount of email recipients and providing you with the ability to review these recipients by clicking Review Recipients (see Image 11).
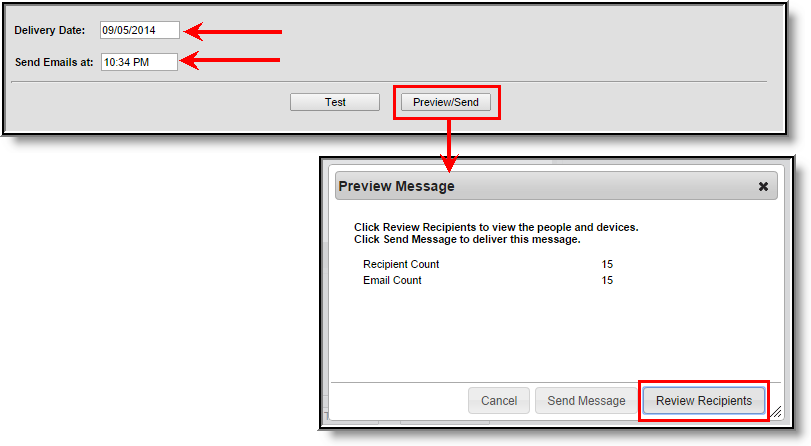
Image 11: Reviewing Message Recipients
Once Review Recipients is selected, an editor will appear listing each recipient and allowing you to unmark specific people you do not want to receive the message. You may also preview a specific person's message by clicking the small icon in the Preview column (see Image 12).
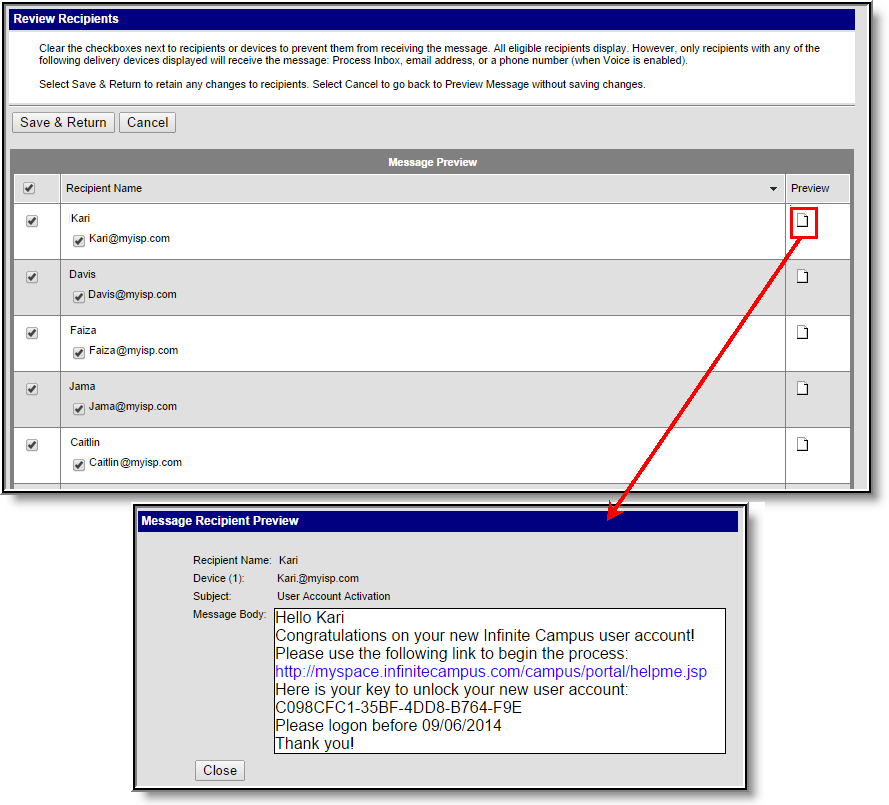
Image 12: Previewing a Message
Once recipients have been reviewed and you are ready to send the message, click the Send Message button. The Preview Message window will appear, detailing the count of emails sent (see Image 13).
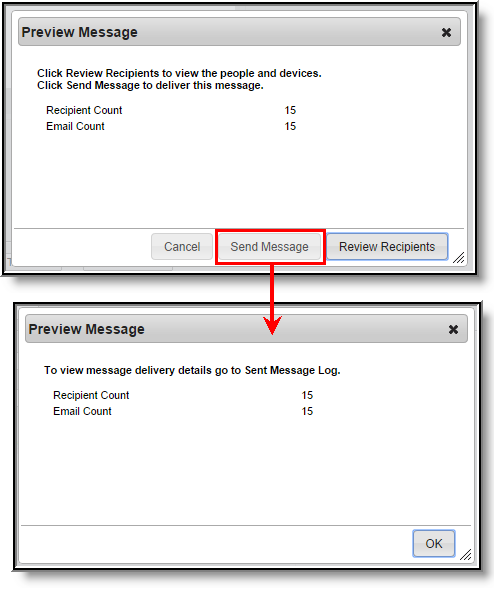
Image 13: Sending the Message
To review the status of this message request, see the Sent Message Log (Image 14).
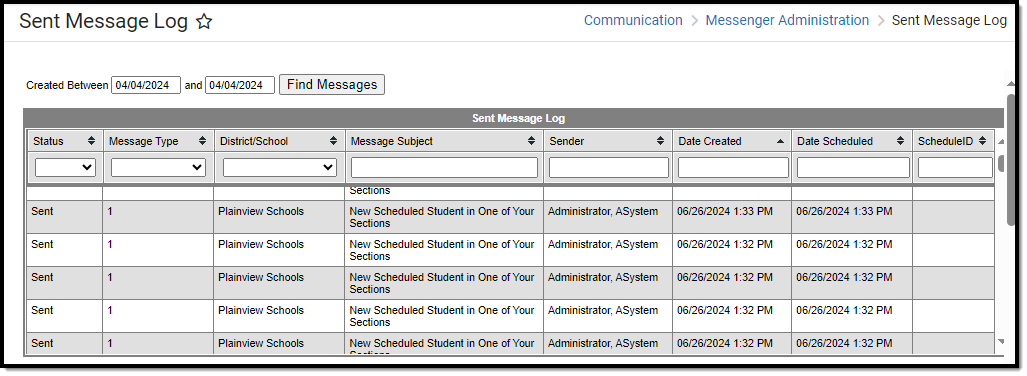
Image 14: Viewing the Sent Message Log
User Account Messenger Examples/Scenarios
The following are examples of useful ways to use the User Account Messenger.
- Build Activation Messages for Newly Imported/Created Campus Portal Accounts
- Remind Staff their Campus Portal Account is About to Expire
- Informing Users of Newly Created User Account
- Establishing a Recurring User Account Activation Message
- Schedule Campus Parent Portal Account Creation Emails
- Parent Has No Account and Needs to Create One
Build Activation Messages for Newly Imported/Created Campus Portal Accounts
Once user accounts are imported and created via the User Account Batch Import Tool, messages should be sent to these users directing them to activate their accounts.
Step 1. Design an Activation Message
The first step in this scenario is to design an activation message. This message should include the following Campus fields:
- The accountManagement.uniqueLinkActivationURL field.
- The accountManagmeent.uniqueLinkExpirationDate field.
- A line about what the person should do if they fail to activate their account before the URL expiration date.
For example, in the image below (Image 15), a message was built including these items and an example of how this message will look once generated is shown.
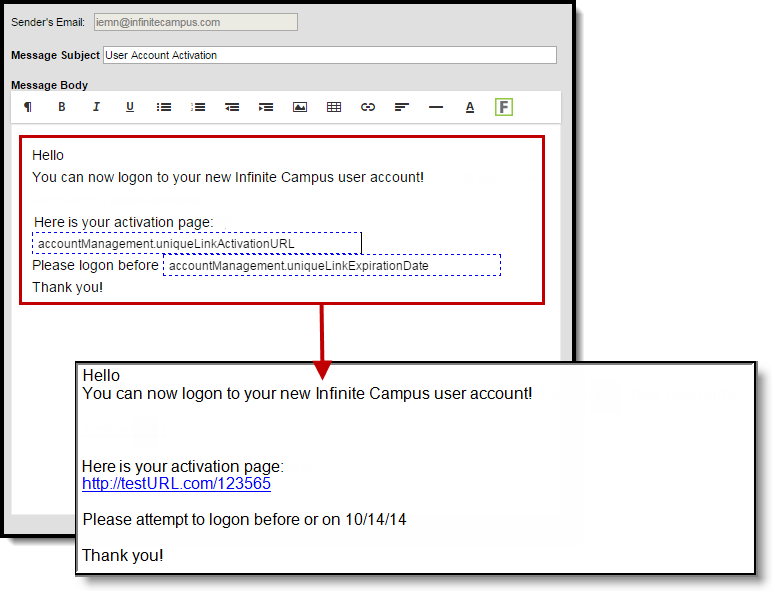
Image 15: Example of an Account Activation Message
Step 2. Send Email Messages Using the Import Ad Hoc Filter
The next step is to send messages using the Ad hoc filter created when accounts were imported via the User Account Batch Import Tool and the message format created in Step 1. The filter will contain all users who had accounts generated via the import.
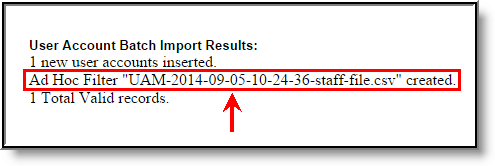
Filters created via an import are saved as UAM - the date and time the import was generated - the file name. For example, UAM-2014-08-13-12-35-23-file20.csv (see Image 16).
Upon import of a file, the Import Results Summary will list the newly created Ad hoc filter (see below).
| Student Portal Accounts | Staff Portal Accounts |
|---|---|
If the accounts imported were student accounts, select the filter in the Student based Ad Hoc Filters field.
| If the accounts imported were staff Portal accounts, select the filter in the Census/Staff based Ad Hoc Filters (Portal Accounts) field.
|
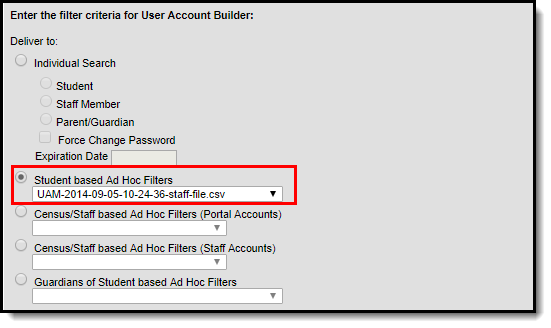
Image 16: Example of an Import File Ad Hoc Filter
Remind Staff their Campus Portal Account is About to Expire
Another useful scenario is generating a message for all staff whose Campus Portal accounts are about to expire.
In the example below, an Ad hoc filter was created, finding active staff members with user accounts about to expire, and a letter was created containing the username and account expiration date (Image 17).
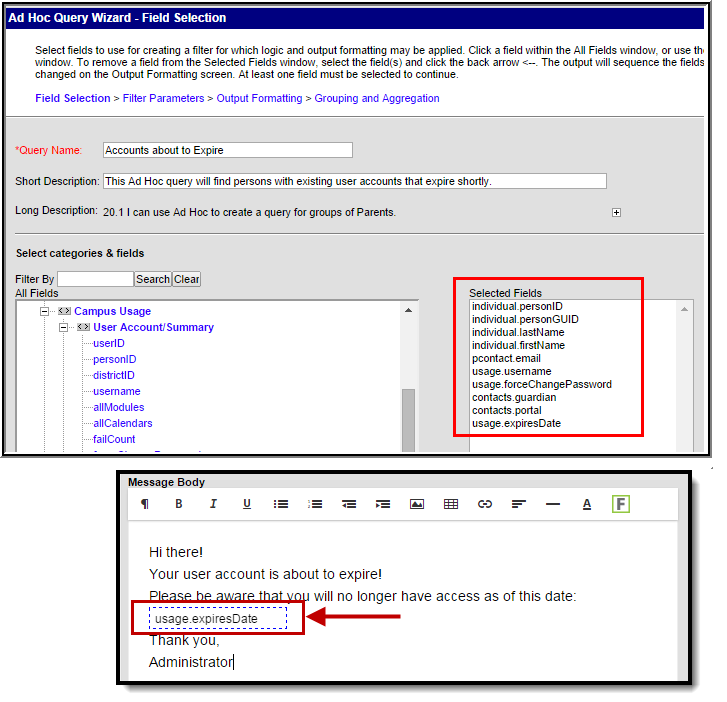
Image 17: Creating an Account Expiring Filter and Message
Once the filter and message have been created, find the filter within the Census/Staff based Ad Hoc Filters (Portal Accounts) field and send the message (Image 18).
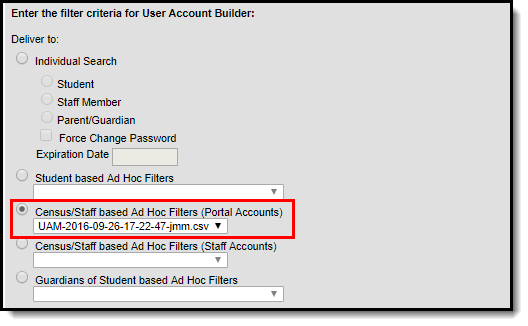
Image 18: Selecting the Filter within the User Account Messenger Tool
Informing Users of Newly Created User Accounts
You can inform all users who have a newly created user account or who have never logged into their user account to log into their account and update their account password. This scenario is especially useful for user accounts created automatically via Account Security Preferences or the User Account Batch Wizard.
In the example below, an Ad hoc filter was created which includes the total login count (usage.totalLoginCount) and if the account is flagged to require a password change (usage.forceChangePassword). These fields are important as can be combined with Filter Parameters to identify only those users who have a Campus user account who have never logged into their account and need to change their password (which will be the case for any accounts auto-generated via Account Security Preferences).
Use the following values to ensure a proper list is generated (see Image 19):
- usage.totalLoginCount
- Operator: =
- Value: 0
- usage.forceChangePassword
- Operator: =TRUE
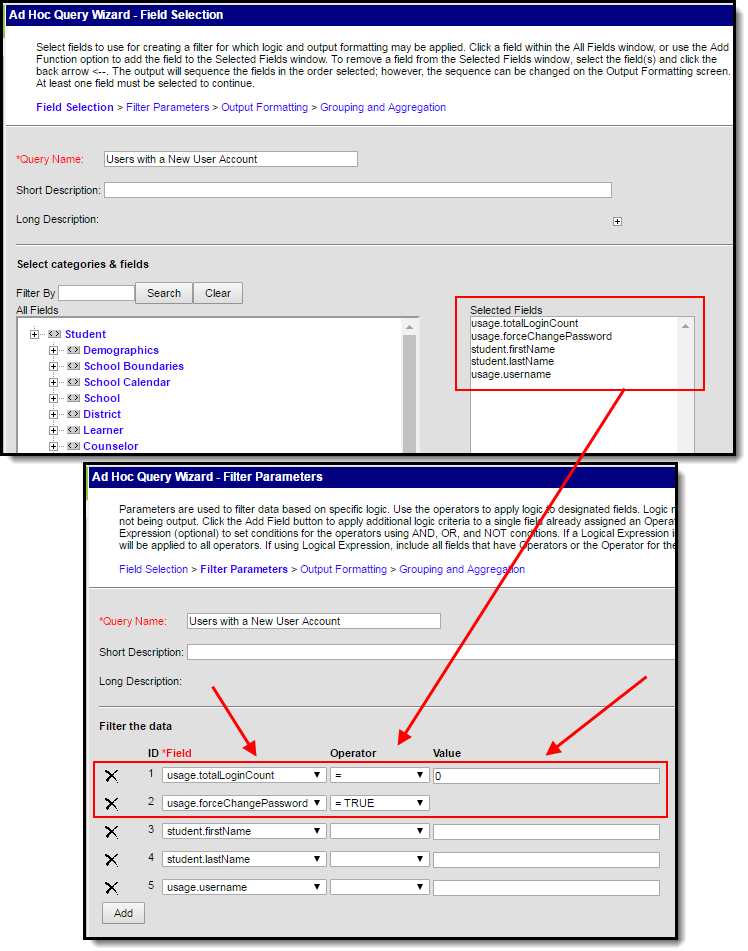
Image 19: Filter of Users Who Need to Log into their User Account
Once this filter is created, use the User Account Messenger to send a message to each one of these users.
This message should include the following Campus fields:
- The accountManagement.uniqueLinkActivationURL field.
- The accountManagmeent.uniqueLinkExpirationDate field.
You should also enter an Account Activation URL Expiration Date (see Image 20). This is the date the unique activation URL contained in the message will expire. Users will need to select this URL prior to this date.
Filter criteria is important when sending this message. Only users who match the filter criteria selected (e.g., Student based Ad Hoc Filters, Census/Staff based Ad hoc Filters (Portal Accounts), etc) will receive the message and be able to activate their accounts.
For notifying Staff, please consider the following:
- If notifying staff of their newly created staff Portal accounts (System Administration > User Security > Users > User Account > Homepage = Campus Portal), use the Census/Staff based Ad Hoc Filters (Portal Accounts) filter option.
- If notifying staff of their newly created Campus Application accounts (System Administration > User Security > Users > User Account > Homepage = Campus Instruction OR Campus Application), use the Census/Staff based Ad Hoc Filters (Staff Accounts) filter option.
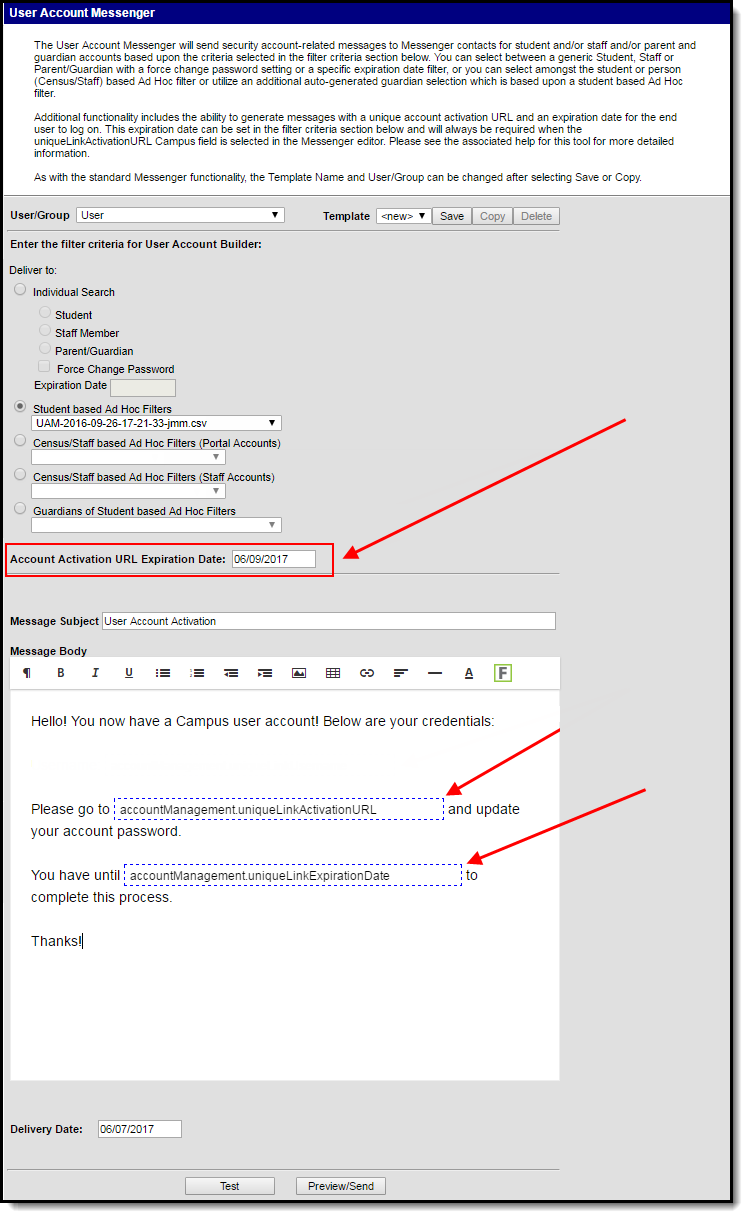
Image 20: Informing Users who Need to Log into Their User Account
Establishing a Recurring User Account Activation Message
Once you have created and saved a user account activation message in the User Account Messenger tool (meaning you hit Save in the upper right-hand corner to save the message as a template), you can establish a daily, weekly, or monthly recurring message event using the User Account Messenger Scheduler.
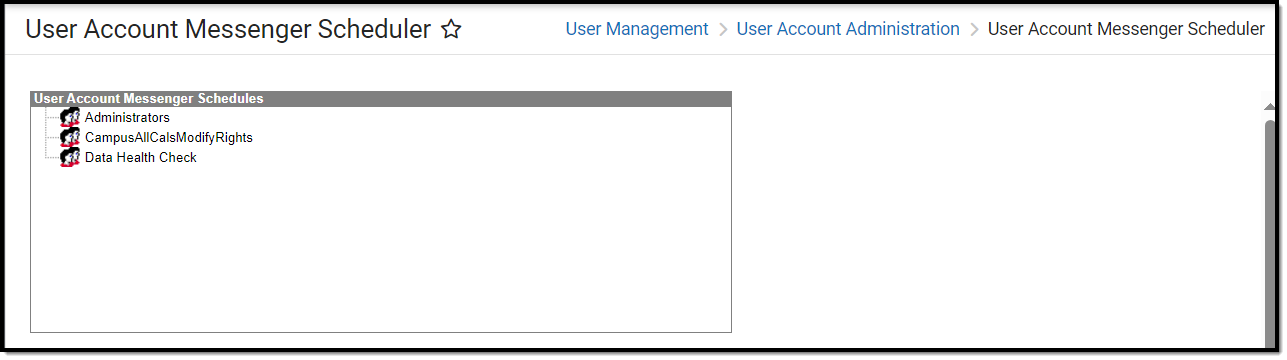
Image 21: Establishing a Recurring User Account Activation Letter
For example, using a user account activation message template and setting to a frequency of daily, you can set the User Account Messenger Scheduler to send the user account activation email to any user accounts created in the last 24 hours and repeat this process every day within a certain timeframe.
See the User Account Messenger Scheduler article for more information about this process.
Schedule Campus Parent Portal Account Creation Emails
For detailed steps on scheduling Campus Parent Portal account creation emails, see this article.
Parent Has No Account and Needs to Create One
For assistance and steps on how a parent who has no account but is given an Activation Key can log in a create a new account, see the Getting Started - Campus Student and Campus Portal guide.
Users can also watch this video, which walks them through this process: Getting Started with Campus Parent and Campus Student - Video | Infinite Campus
This article also explains how users can log into the Campus Student/Campus Portal App, how to log in using a web browser, and how parents can turn on notifications.
