Tool Search: LDAP Configuration
In a district that requires a user management system, Campus LDAP (Lightweight Directory Access Protocol) tools allow Campus users to be linked to LDAP user accounts. LDAP tools enable secure system management and reduce the time a system administrator must spend managing user security tasks.
Users of both small and large districts can be authenticated via LDAP, even when an existing LDAP structure is already in use. LDAP supports multiple domains/ directory trees and sub-second login capabilities. Users can exist virtually anywhere within tiers of multiple organizational units because they are bound to LDAP on an individual basis.
Using Active Directory/LDAP functionality is not required. A district may still authenticate against the Campus database, if desired.
Enabling LDAP Authentication does not mean ALL accounts must be verified via LDAP. Campus accounts can be configured to LDAP while existing within the same environment.
Only users assigned a Product Security Role of Student Information System (SIS) are allowed to use this tool.
LDAP Technical Components
The Lightweight Directory Access Protocol (LDAP) is a standardized application protocol that provides access to information directories for querying and modifying data. LDAP allows access to credentials information. It supports TCP/IP communication and allows most applications across platforms the ability to obtain directory information.
The LDAP directory tree reflects directory boundaries. A directory tree has many entries, or objects with similar attributes, organized in a logical and hierarchical manner.
Each entry has attributes, attribute names, and attribute values as defined in the Campus schema. Each entry also has a unique identifier, known as a Distinguished Name.
Campus Schema Details
While LDAP is an open standard, it is similar to XML in that it does not define a schema.
In Campus, the Distinguished Name (DN) for the applicable directory instance will be stored at the user account level. The DN value will serve no functional purpose beyond reporting or reference.
If a district wants to use a different LDAP implementation, it will need to add UUID/GUIDs to its user account objects.
Initial Considerations
Please consider the following before configuring LDAP authentication.
| Firewall Adjustments | If there is a firewall between Campus application servers and the Active Directory servers, it should be configured to allow LDAP requests from the Campus servers to the Active Directory servers. |
| Active Directory |
Active Directory uses Relative Distinguished Names for authentication. This type of authentication process only requires a username to be unique to the organizational unit in which it is directly contained. Campus setup is more restrictive, requiring that the Active Directory attribute used as a login name be unique. All Campus users MUST have unique login names in the Active Directory domain assigned to them. |
| District System Administrator Accounts |
Each district using LDAP should create a system administrator user that is allowed to authenticate against the Campus database. The district system administrator account SHOULD NOT be linked to LDAP. He/she should have two accounts: a normal administrator account linked to Active Directory and a backup account configured to authenticate against Campus in the event that the LDAP service is unavailable. |
| Allow List Campus IPs | In order to properly connect to third-party servers, firewalls and other network systems must allow list Campus IPs. |
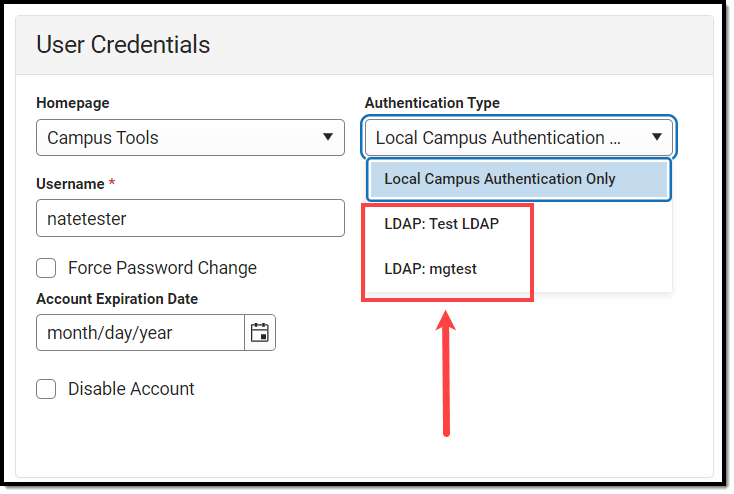
Configuring Campus for LDAP Authentication
This section walks you through configuring Campus for LDAP authentication.
Enabling LDAP Authentication does not mean ALL accounts must be verified via LDAP. Campus accounts can be linked or unlinked to LDAP while existing within the same environment.

- Click the New icon.
- Determine if you plan to utilize TLS:
-
If Yes - Upload an LDAPS certificate via the LDAPS Certificates tool and then continue the steps listed below.
Users configuring LDAP for SASL must use TLS.
- If No - Move on to Step 2 below.
-
- Enter an LDAPName for the LDAP server. Entering a recognizable name is important so that users who assign an LDAP server to a user account can easily identify the correct server.
- Mark the Enable LDAP Authentication checkbox to enable LDAP authentication for Campus log-ins.
- Mark the Use this configuration to enable Portal login for SSOusers checkbox to enable the ability for portal users with SSO credentials to log into Campus when using a mobile device.
- Enter the Server Host name(s) of the LDAP Servers.
- NOTE: Your third-party SFTP server must allow traffic from the Campus IPs on the allow list. For more information, see this article.
If Server Host 1 fails to connect, the system will try the next host entered (Server Host 2) and continue down the Server Host list until it makes a successful connection.
- NOTE: Your third-party SFTP server must allow traffic from the Campus IPs on the allow list. For more information, see this article.
- Enter the Port numbers of the LDAP server(s) entered in Step 6.
- Leave the Use TLS (Strongly Recommended) checkbox marked to use TLS for all connections.
This TLS option is only applicable when using LDAPS ports. Users configuring LDAP for SASL must use TLS.
In order to utilize TLS, you must upload an LDAPS certificate via the LDAPS Certificates tool.
- Determine if you are enabling a Simple or SASL connection:
- Simple - The most common way to configure an LDAP connection. This requires the Bind User DN and Bind User Password.
- SASL - This is for authenticating via an LDAP SASL such as Google Suite. For more information on configuring Google Suite to work with Campus, see the Configuring Google Suite to Work with Campus LDAP section.
- If Simple is selected, specify the Bind User DN and Binder User Password (Note: there is a 20-character limit).
- Indicate a User Search Base level at which LDAP will start searching for users.
- Enter the User Search Filter. See the table below for more information about using this field.
- Mark the Search entire subtree of the user search base checkbox. This ensures all subtrees in the search base are searched when locating LDAP accounts for authentication with Campus.
Campus highly recommends marking this checkbox.
-
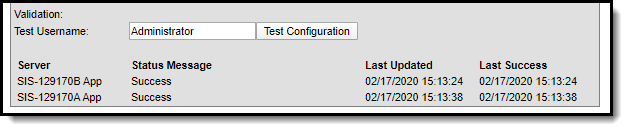
Enter a Test Username and click the Test Configuration button. This will allow you to test and ensure the configuration values entered above are correct. Test results will appear below this field.
USERS ARE HIGHLY ADVISED TO TEST ANY CONFIGURATION PRIOR TO SAVING.
FAILURE TO ENTER THE CORRECT LDAP AUTHENTICATION CONFIGURATION INFORMATION WILL RESULT IN AN INABILITY TO LOG IN TO CAMPUS USING LDAP FOR ANY USER IN THAT SERVER.
-
If successful, select the Save icon. The LDAP server is now configured and saved within Campus.
If additional servers need to be added (such as a multi-forest environment), Click the New button and repeat Steps 1 through 12.
Now that LDAP is enabled, you may want to convert all user accounts from using local Campus authentication to LDAP authentication. See the Converting Existing Campus User Accounts to LDAP Authentication section for more information.
LDAP Configuration Field Definitions
|
Field |
Description and Details | |||||||||||||||||||||
|---|---|---|---|---|---|---|---|---|---|---|---|---|---|---|---|---|---|---|---|---|---|---|
| LDAP Name |
The name of the LDAP server being configured. Entering a recognizable name is important so that users assigning an LDAP server to a user account are able to identify the correct server easily.
| |||||||||||||||||||||
|
Enable LDAP Authentication |
If marked, this indicates Campus users can be authenticated using this LDAP Configuration. | |||||||||||||||||||||
| Use this configuration to enable Portal login for SSO users. |
If marked, Portal users with SSO credentials are able to log into Campus when using a mobile device. | |||||||||||||||||||||
|
Server (1, 2, 3, 4) Host |
Server 1 Hostname is required for LDAP. This should be the name of the Active Directory server. Up to three additional servers may be specified. When two or more servers are configured, Campus will balance data between available servers using internal load balancing technology. | |||||||||||||||||||||
|
Port |
LDAP is firewall-sensitive. When LDAPS ports are used, the Use TLS checkbox should be marked. Ports specified for LDAP servers are generally one of the following:
| |||||||||||||||||||||
|
Use TLS |
The Use TLS checkbox should only be marked when LDAPS ports are used. Users configuring LDAP for SASL must use TLS. Using TLS/LDAPS is strongly recommended. Regular LDAP bind operations send passwords in plain text. The use of TLS is all/nothing; it cannot be configured per connection. In order to utilize TLS, you must upload an LDAPS certificate via the LDAPS Certificates tool. | |||||||||||||||||||||
| Simple | The most common way to configure an LDAP connection. This requires the Bind User DN and Bind User Password. | |||||||||||||||||||||
| SASL |
This is for authenticating via an LDAP SASL such as Google Suite.
For more information on configuring Google Suite to work with Campus, see the Configuring Google Suite to Work with Campus LDAP section. | |||||||||||||||||||||
|
Bind User DN |
The bind user is the administrative username for the directory server. It is needed in order for Campus to run LDAP queries to find and update user accounts. This field is used to bind a read rights user to the LDAP server.
To LDAP, the bind user is the same type of user account as a user trying to authenticate his/herself into the system. Campus recommends using your SAMAccountName and if the test fails, use your LDAP distinguished name.
This is encouraged because if the bind user gets moved within the active directory, an update to this reference won’t be needed. Although Microsoft Active Directory will accept a sAMAccountName or domain\username format, it is recommended that the actual Distinguished Name format be used (i.e., CN=John Doe,OU=Employee,DC=example,DC=com) so that there will be no mistaking the user providing the access to the instance of Active Directory, OpenLDAP, etc. | |||||||||||||||||||||
|
Bind User Password |
The administrative password for the directory server. 20-character limit. | |||||||||||||||||||||
|
User Search Base |
The search base is the highest level of the LDAP tree at which LDAP should begin searching for users. This value used in conjunction with the Search entire subtree of the user search base checkbox can apply the largest scope to a simple filter for the best results. | |||||||||||||||||||||
|
User Search Filter |
Filters the user search to allow certain entries in the subtree while excluding others. The following are some examples:
The following table describes some common filter operands:
| |||||||||||||||||||||
| Search entire subtree of the user search base | When marked, Infinite Campus will search the LDAP server from the level specified in the User Search Base field downwards until the server restricts the results or the search reaches the bottom of the tree. This option provides the best results and use of it is highly encouraged. | |||||||||||||||||||||
| Test Username |
This field allows you to test and ensure the configuration values entered are correct. Once selected, test results will appear below, indicating whether or not the test was a success.
USERS ARE HIGHLY ADVISED TO TEST ANY CONFIGURATION PRIOR TO SAVING.
FAILURE TO ENTER CORRECT LDAP AUTHENTICATION CONFIGURATION INFORMATION WILL RESULT IN AN INABILITY TO LOG INTO CAMPUS USING LDAP FOR ANY USER IN THAT SERVER. |
Successful User Login
When the user attempts to log in to Campus with their LDAP credentials for the first time, the system will query the directory using the filter defined in the applicable LDAP configuration.
If a user can log in to Campus, the LDAP account has been found, and the authentication process is complete. Additionally, the directory Distinguished Name (DN) will be stored as a complementary reference to the user account.
If the LDAP user attempting authentication has already been successfully authenticated, or if an account with the same name already exists, the existing account will be updated with the new DN, and the user will log in without issues.
Unsuccessful User Login
If a user is unable to log into Campus, the authentication process failed.
Failure to log on using the LDAP account with the Campus user-entered credentials will occur if the user’s LDAP account is disabled or locked out, or if the wrong credentials are entered.
Configuring LDAP for Multi-Forest Support
The LDAP Authentication tool allows you to configure and validate against multiple domains within a different LDAP repository. Each LDAP configuration created will appear within the LDAP Server Configuration window with an indication of whether or not each is enabled (or disabled) and its Server URL (Image 4).
To add an LDAP configuration, select the New button.
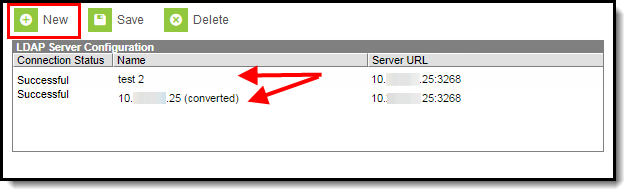
Image 4: Example of a Multi-Forest LDAP Configuration
Configuring LDAP for SASL
This section walks you through the steps to configure LDAP for SASL.
For a step-by-step guide on how to configure Campus to work with Google Suite, see the Configuring Google Suite to Work with Campus LDAP section.

- Select the New icon. The Configuration Detail editor will appear at the bottom of the screen.
- Enter the LDAP Name. Campus recommends naming it something that's easy to identify.
- Mark the Enable this LDAP Configuration checkbox.
- Enter the Server 1 Host. This should be the name of the SASL server. Up to three additional servers may be specified.
- Enter the Port.
- Leave the Use TLS checkbox checked. This is required in order to configure a SASL connection.
- Click the SASL radio button.
- Indicate a User Search Base level at which LDAP will start searching for users. See the table in the section above for more information about using this field.
- Enter the User Search Filter. See the table in the section above for more information about using this field.
- Mark the Search entire subtree of the user search base checkbox.
- Click Save.
- Navigate to the LDAPS Certificates tool and upload your Certificate and Key files. See the LDAPS Certificates article for more information about this process.
- Once Cert and Key files have been uploaded into Campus, return to the LDAP Authentication tool, enter a Test Username (test email address), and click Test Configuration. The tool will indicate whether the test was successful or failed. If successful, LDAP is now properly configured in Campus.
Now that LDAP is enabled, you may want to convert all user accounts from using local Campus authentication to LDAP authentication. See the Converting Existing Campus User Accounts to LDAP Authentication section for more information.
Converting Existing Campus User Accounts to LDAP Authentication
Tool Search: User Account Type Wizard
Existing Campus accounts can be converted individually or en masse to LDAP authentication by using the User Account Type Wizard.
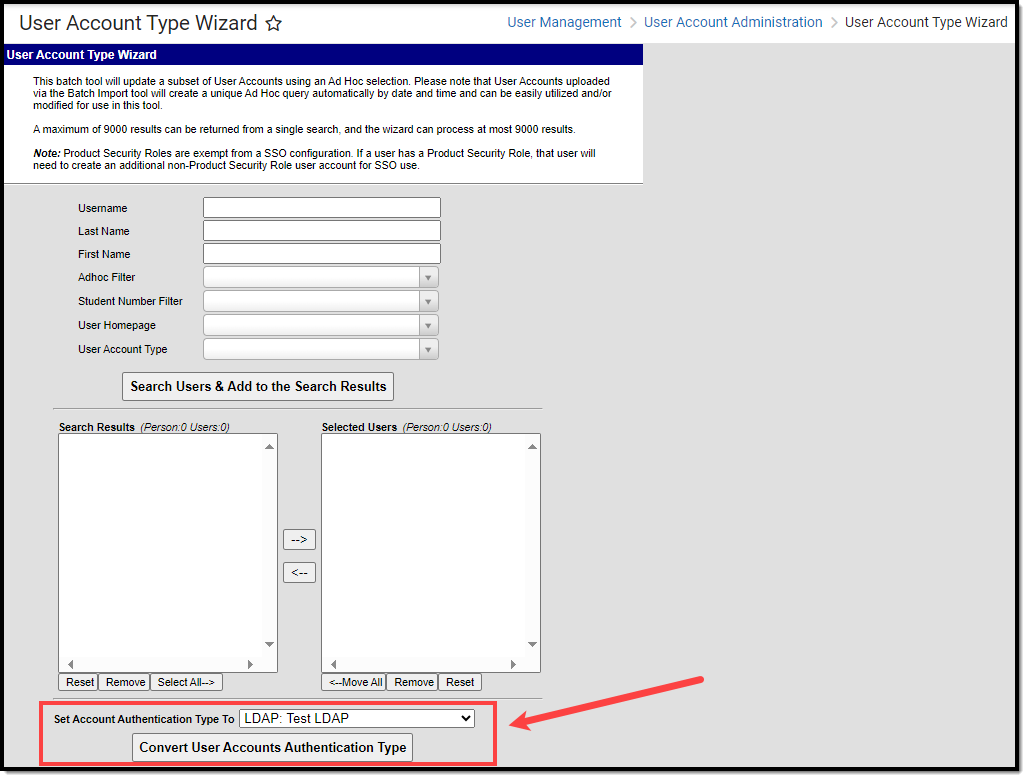
Image 5: Converting Campus Accounts to LDAP
Enabling LDAP Authentication does not mean ALL accounts must be verified via LDAP. Campus accounts can be linked or unlinked to LDAP while existing within the same environment.
LDAP Authentication Methods
The following describes possible LDAP authentication methods/scenarios:
When attempting to log a user into Campus, the system reacts to accounts in the following ways:
- LDAP accounts are distinguished from normal Campus accounts because the ldapConfigurationID is not null.
- User accounts with null ldapConfigurationID field is authenticated as normal Campus accounts.
Standard Logins
In a normal, successful login scenario, the user is authenticated as follows:
- The user enters his/her LDAP username and password.
- The UserAccount object is located in the Campus database. The LDAP server info is retrieved using the ldapConfigurationID field of the UserAccount.
- The user's distinguished name (DN) is retrieved by searching the username within the LDAP directory using the bind admin user from the LDAP configuration.
- Binding an LDAP user with the user’s DN and password succeeds and does not produce authentication errors.
- The user is successfully logged in/authenticated.
Logins after User Changes in Active Directory
If a user’s Organizational Unit or Distinguished Name changes in Active Directory, the user can still log in, and the system will automatically update cached information.
Campus will attempt a search against the Active Directory tree as the user account assigned LDAP configuration dictates (please see "Search Filter" above). If the search is successful, the Active Directory will return the user’s new Distinguished Name and update the Campus database. Since the search filter is executed upon every logon attempt, organization changes in Active Directory should not factor unless the search base is restricted and/or the subtree checkbox is not checked, or the search filter is restrictive.
The process works as follows:
- The user types in his or her LDAP username and password.
- The UserAccount object is located in the Campus database. The LDAPDN field is null or populated from a previous successful authentication.
- Binding an LDAP user with the user’s username and password succeeds and does not produce authentication errors.
- The user is successfully logged in/authenticated.
Converting LDAP Accounts Back to Campus-Authenticated Accounts
Tool Search: User Account Type Wizard
You can convert LDAP accounts back to using Campus authentication by using the User Account Type Wizard.
Enabling LDAP Authentication does not mean ALL accounts must be verified via LDAP. Campus accounts can be configured to or removed from LDAP while existing within the same environment.
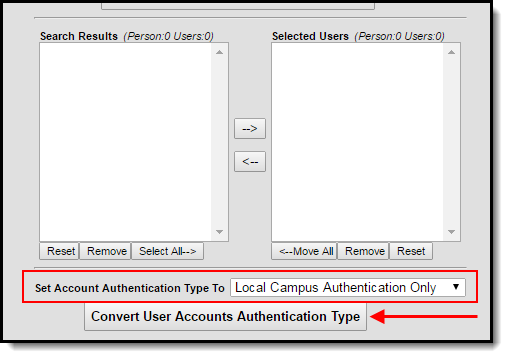
Image 6: Converting LDAP Accounts to Campus-Authenticated Accounts
Generating a List of LDAP-Enabled Students/Staff
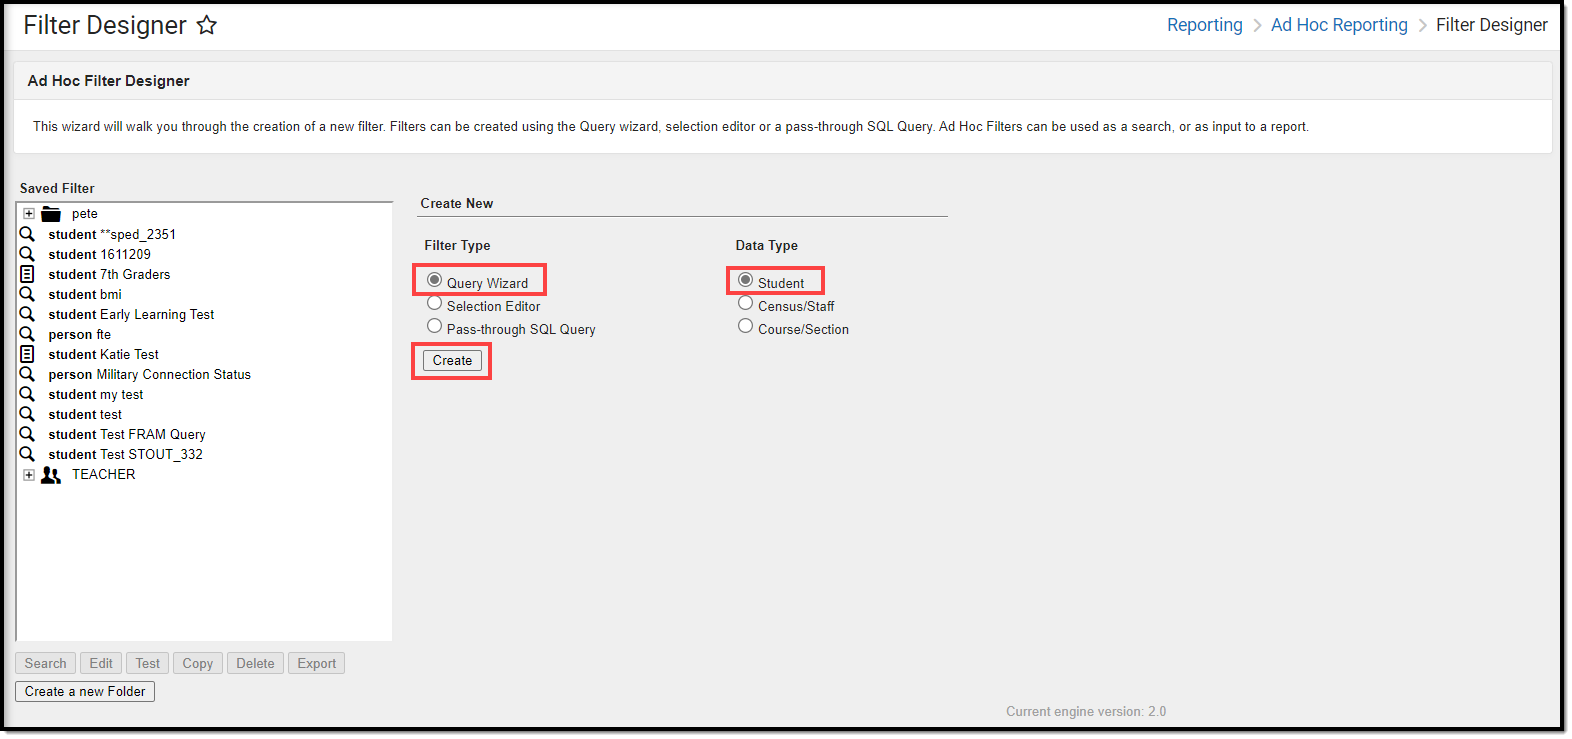
Tool Search: Filter Designer
Using the Filter Designer, you can build filters that indicate which students and staff members have LDAP enabled for their account.
Students with LDAP Enabled
To generate a list of students who have LDAP enabled:
- Select a Filter Type of Query Wizard and Data Type of Student.
- Select the Create button.
- Enter a Query Name.
- Go to Campus Usage > User Account/Summary and select ldapAccount. The usage.ldapAccount field will appear in the Selected Fields window.
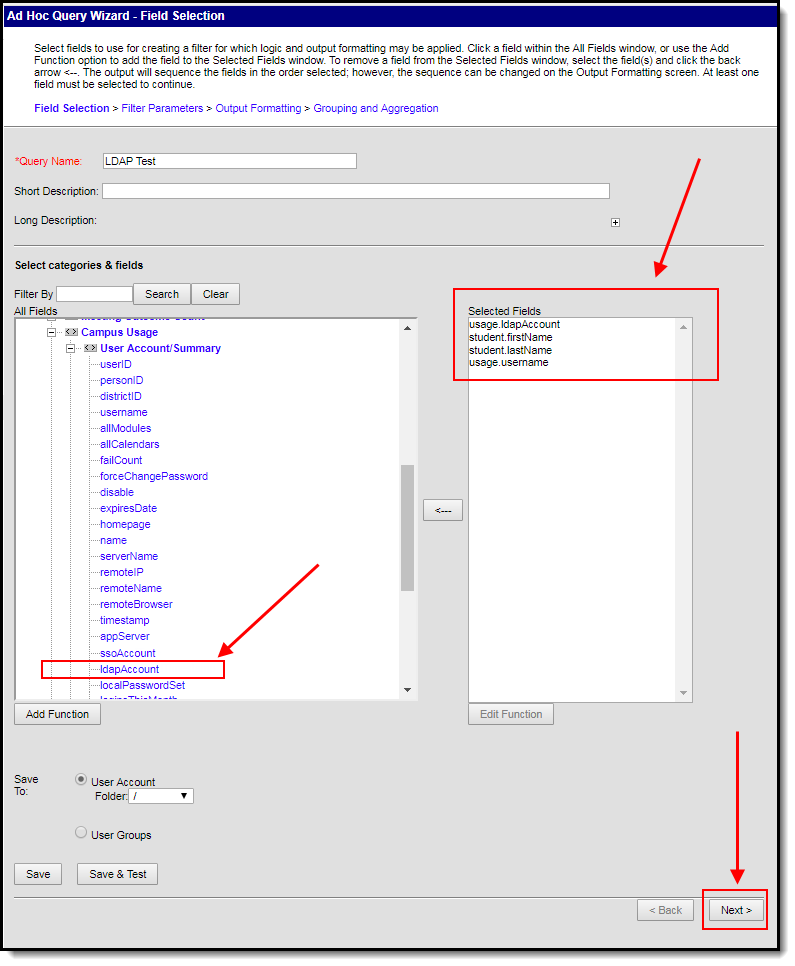
- Add additional fields to the filter, preferably identifiers such as first name, last name, username, etc to help in identifying and differentiating between filter results. Below are a few examples:
- student.firstName
- student.lastName
- usage.username
- Click the Next button. You will be redirected to the Filter Parameters editor.
- Give the usage.ldapAccount the following values:
- An Operator of =
- A Value of 1 (see image below).
This ensures the field only reports users who have LDAP enabled (indicated by a value of 1). To do the reverse and identify users who do not have LDAP enabled, give this field a value of 0).
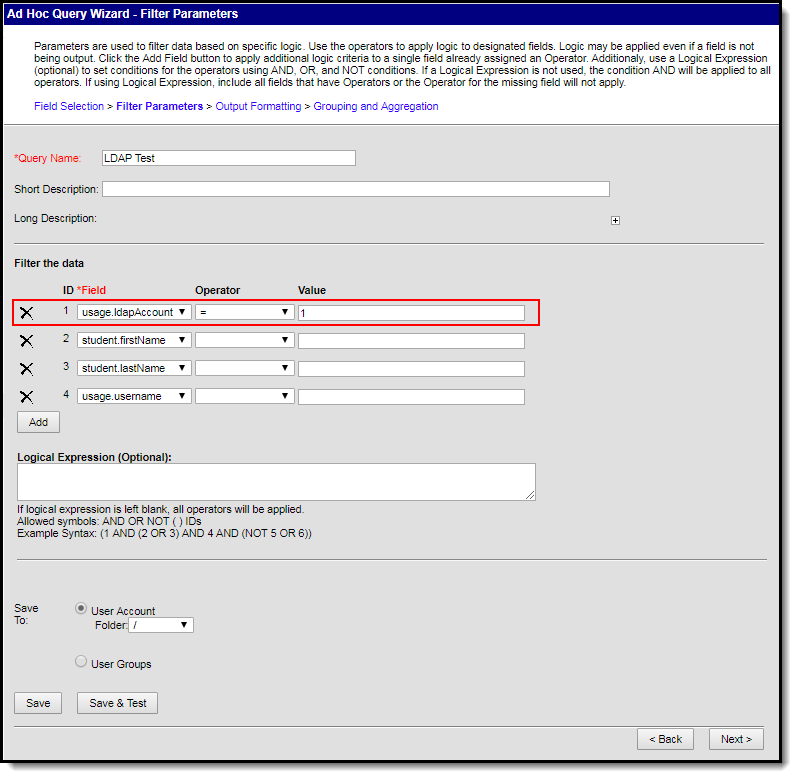
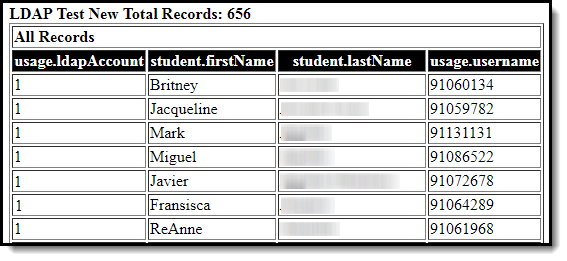
- Click the Save & Test button. The filter will be saved and a separate window will appear, displaying filter report results. For example:


Staff with LDAP Enabled
To generate a list of staff who have LDAP enabled:
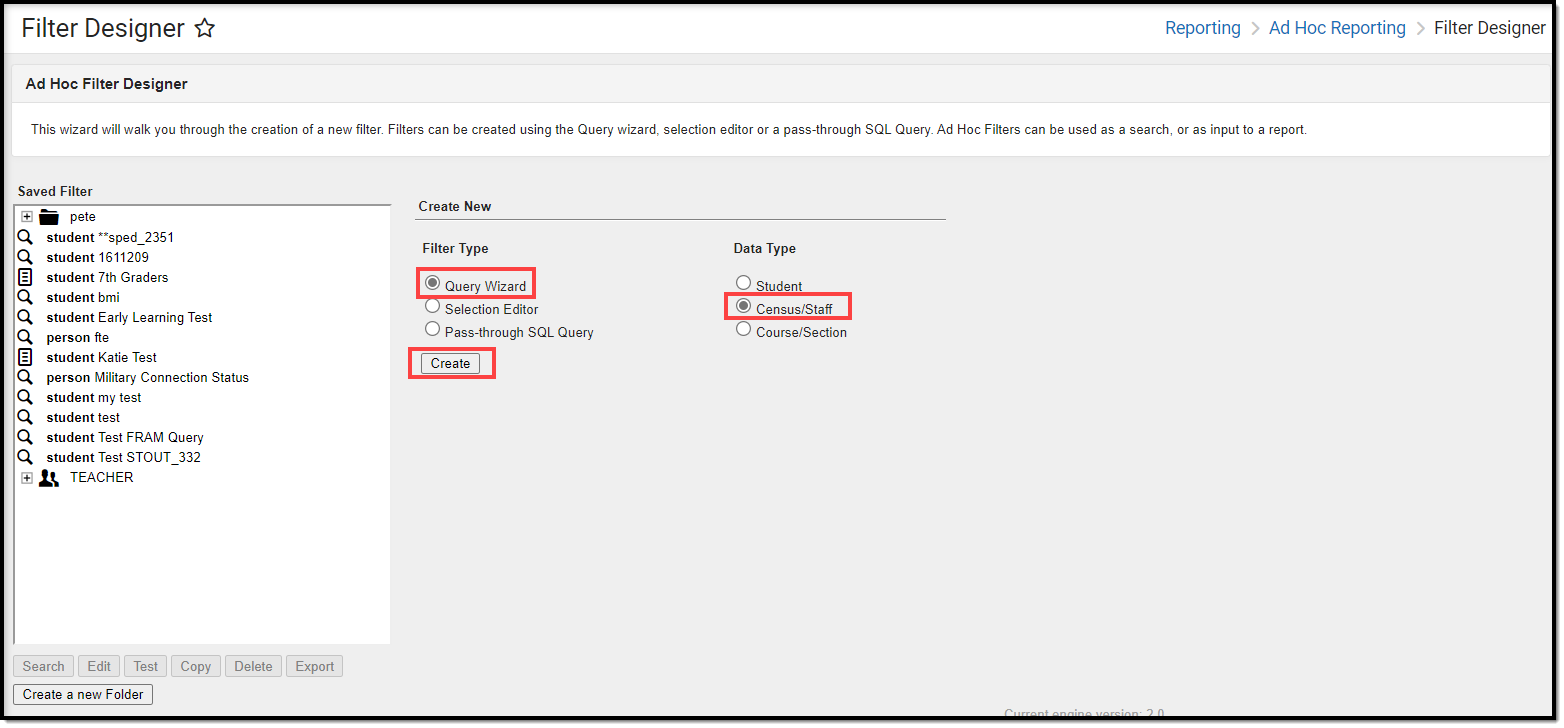
- Navigate to the Filter Designer tool.
- Select a Filter Type of Query Wizard and Data Type of Staff.
- Select the Create button.
- Go to Campus Usage > User Account/Summary and select ldapAccount. The usage.ldapAccount field will appear in the Selected Fields window.
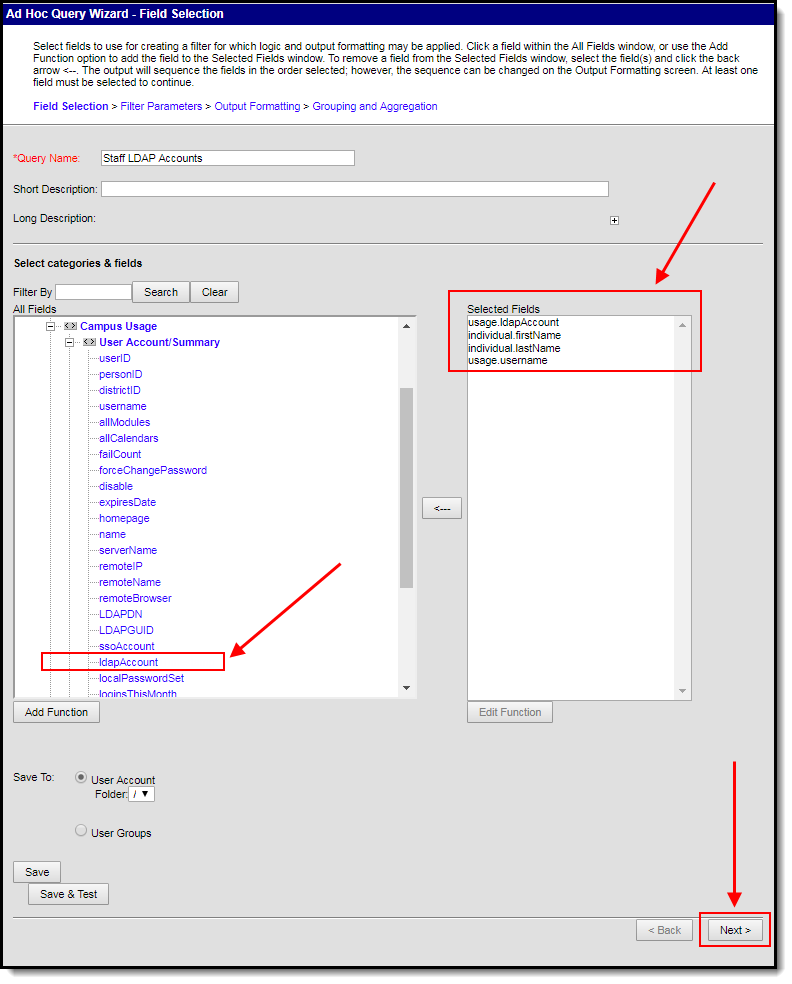
- Add additional fields to the filter, preferably identifiers such as first name, last name, username, etc to help in identifying and differentiating between filter results. Below are a few examples:
- individual.firstName
- individual.lastName
- usage.username
- Click the Next button. You will be redirected to the Filter Parameters editor.
- Give the usage.ldapAccount the following values:
- An Operator of =
- A Value of 1 (see image below).
This ensures the field only reports users who have LDAP enabled (indicated by a value of 1). To do the reverse and identify users who do not have LDAP enabled, give this field a value of 0).

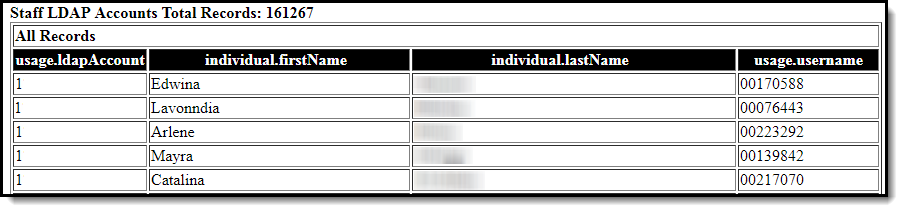
- Click the Save & Test button. The filter will be saved, and a separate window will appear, displaying the filter report results. For example:


Configuring Google Suite to Work with Campus LDAP
This section walks you through configuring Google and Campus to set up an LDAP SASL connection.
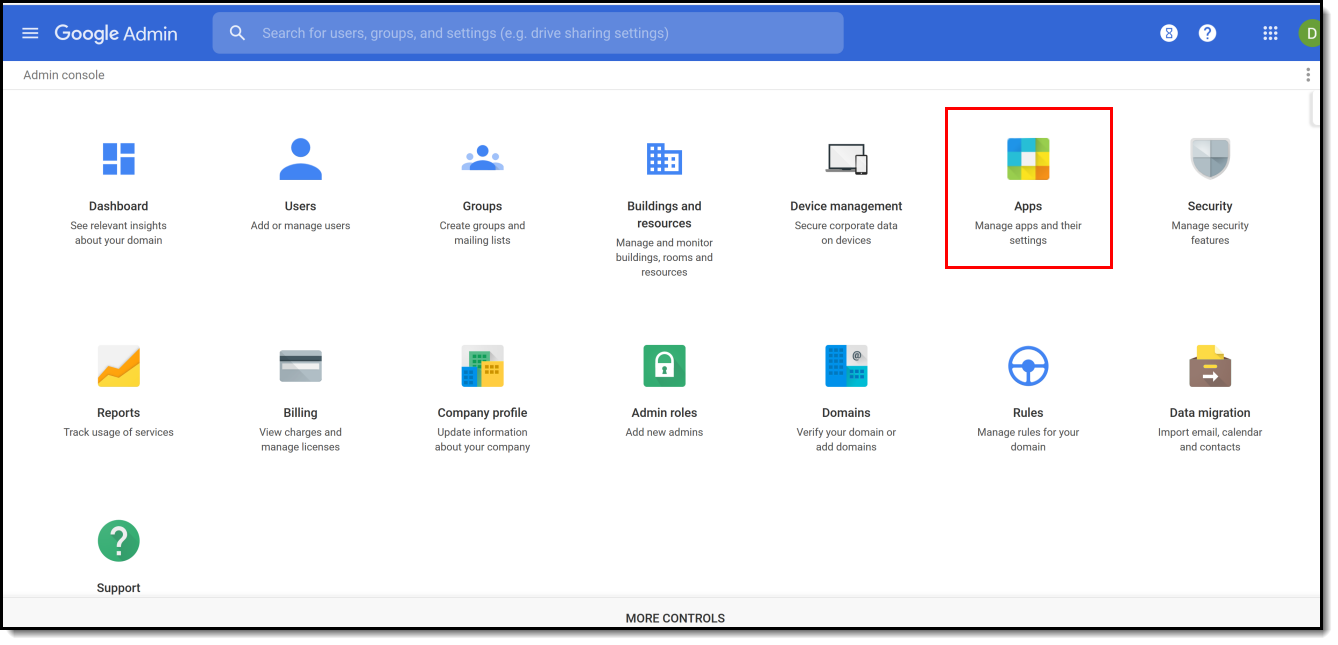
- Log in to your Google Admin console.
- Select Apps.
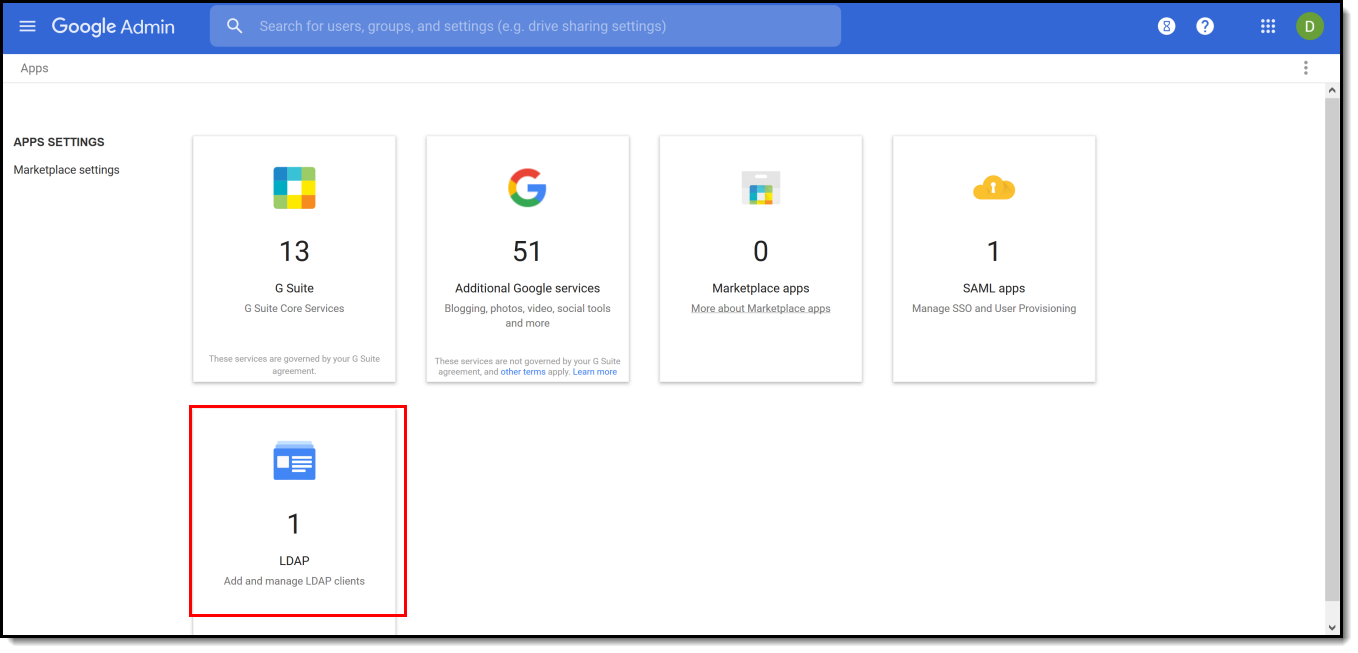
- Select LDAP.
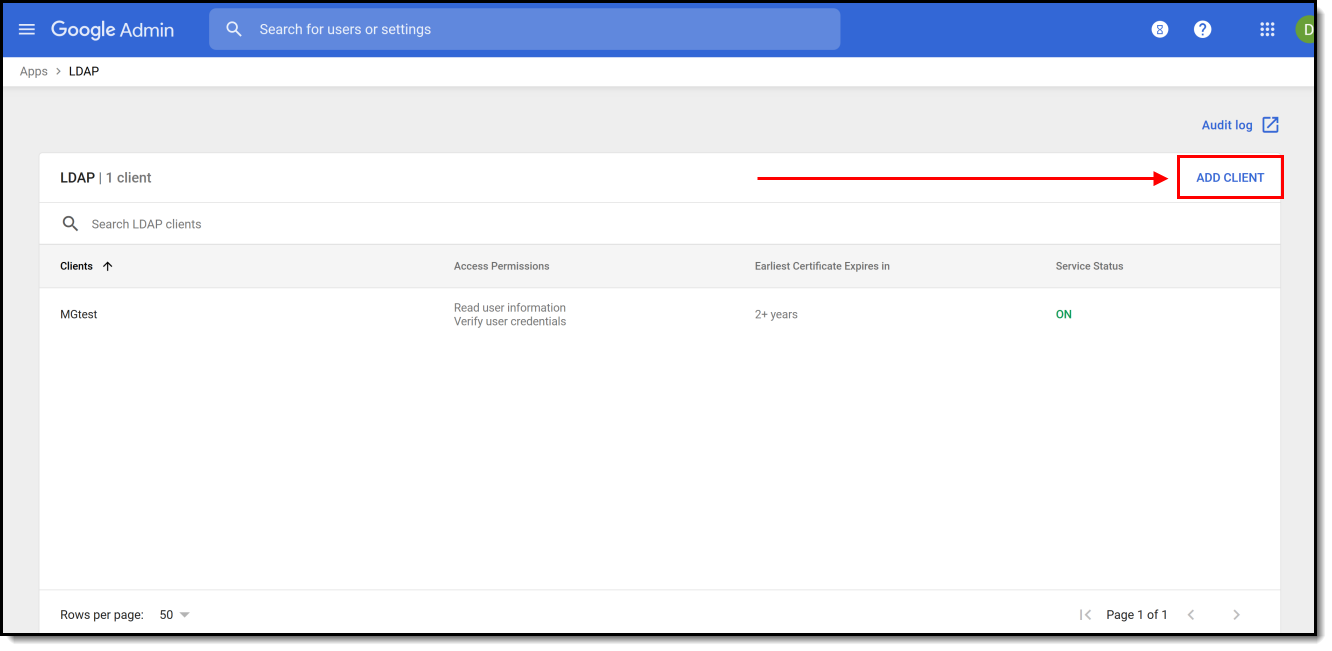
- Click Add Client.
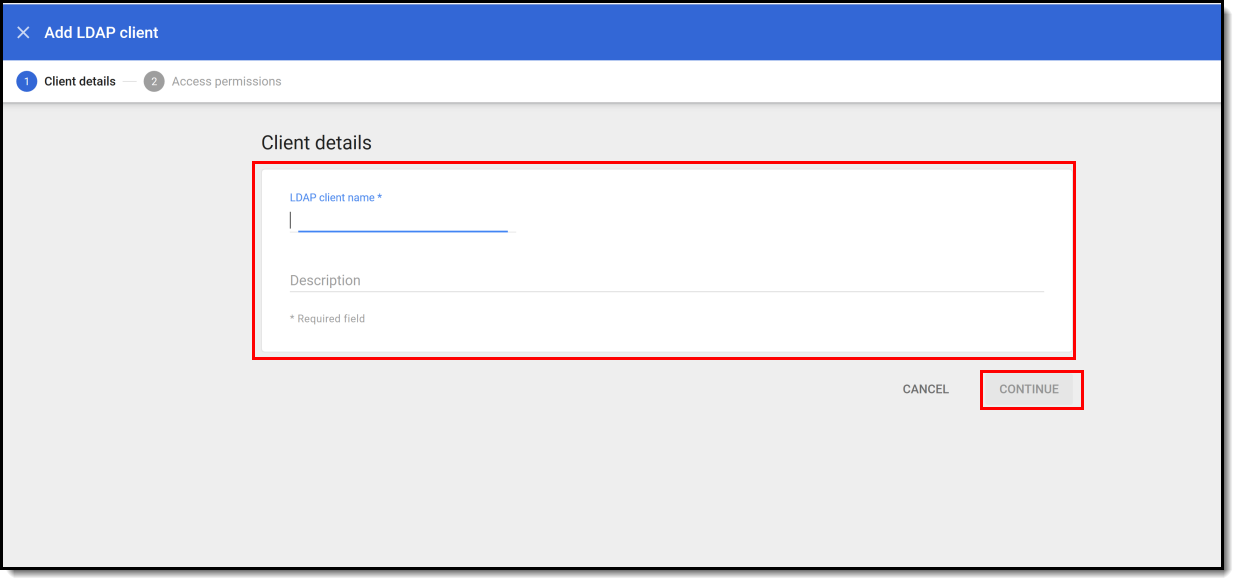
- Enter the LDAP Client Name and Description. Campus recommends naming this something that allows you to easily identify it as the LDAP client being used for Campus.
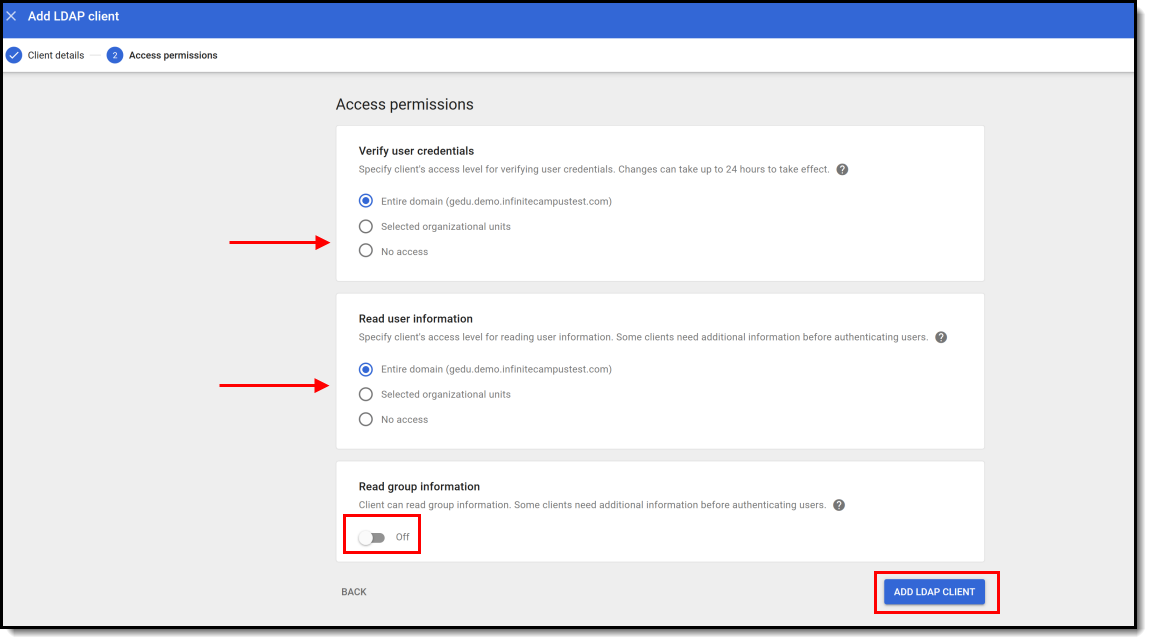
- Establish access permissions:
- Set Verify user credentials to 'Entire Domain'.
- Set Read user information to 'Entire Domain'
- Leave the Read group information toggle as Off.
- Select the Add LDAP Client button.
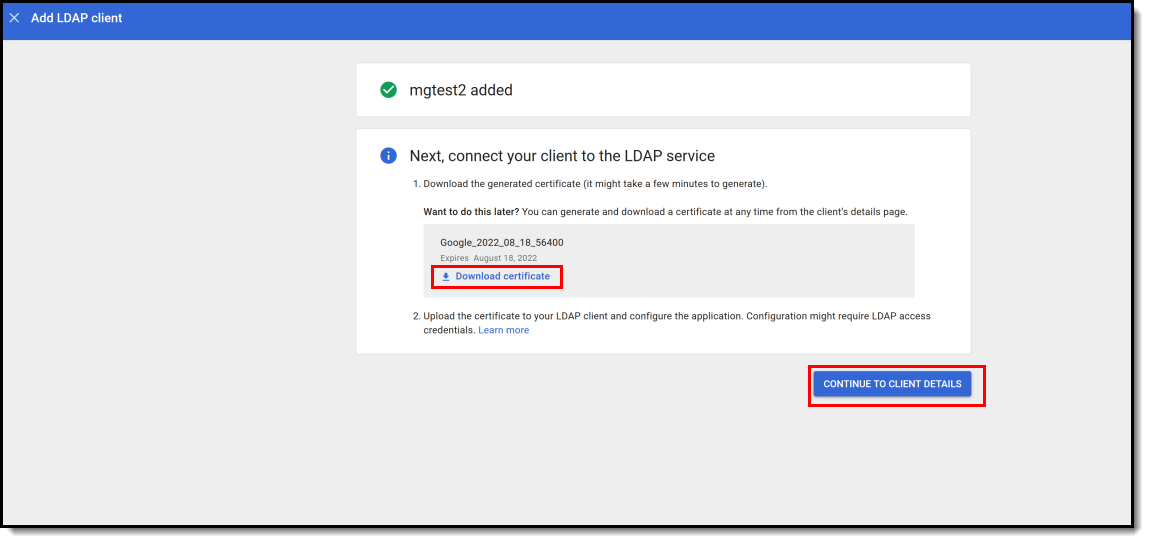
-
Download the LDAP service certificates by clicking the Download certificate hyperlink. Once downloaded, click Continue to Client Details.
This file is critical to successfully connecting Campus to Google. Unzip and save these files somewhere where you can easily access them as they will be used later in this process.
- Click the OFF button found in the Service Status area. This will open Service Status options. Select ON for everyone and then click Save.
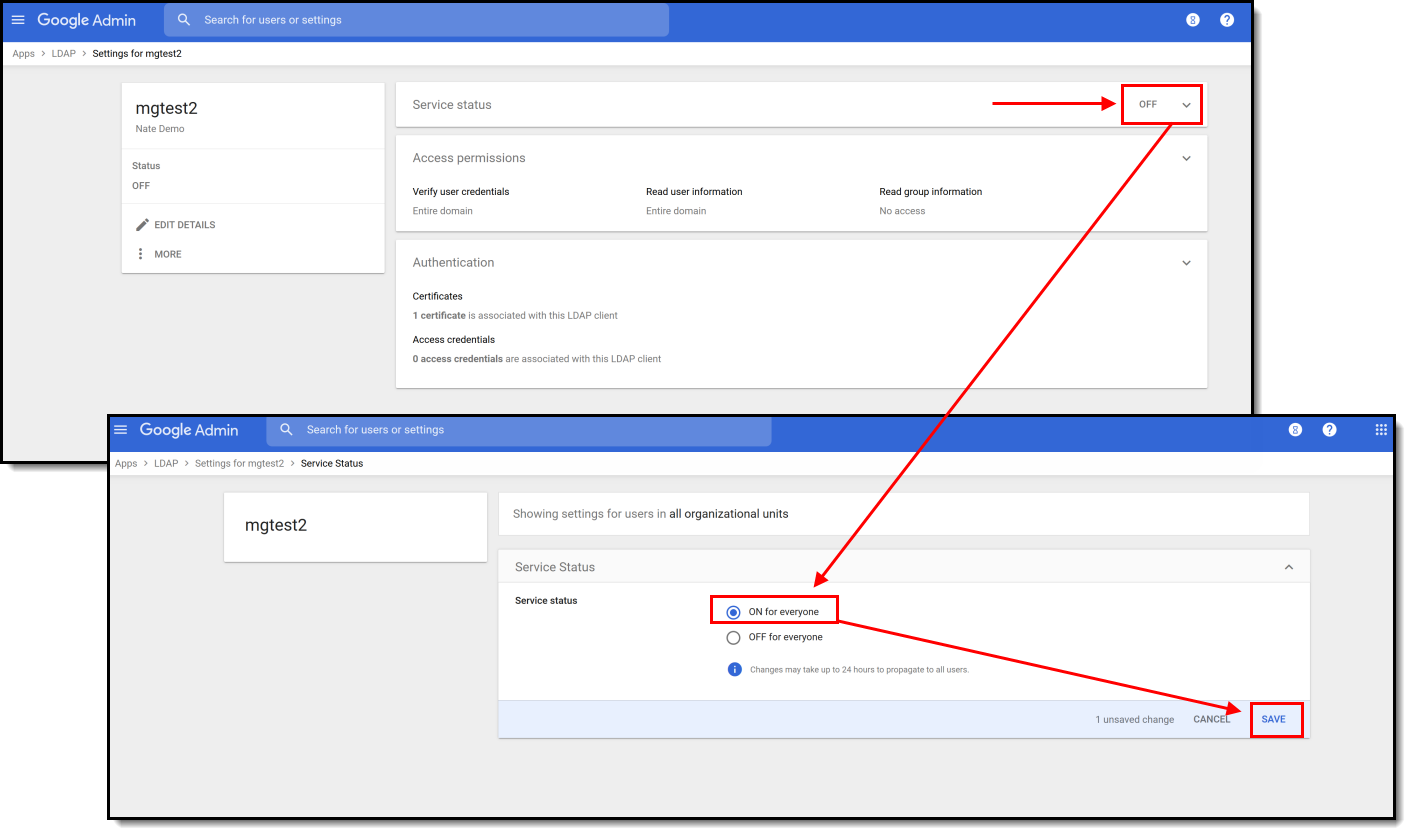
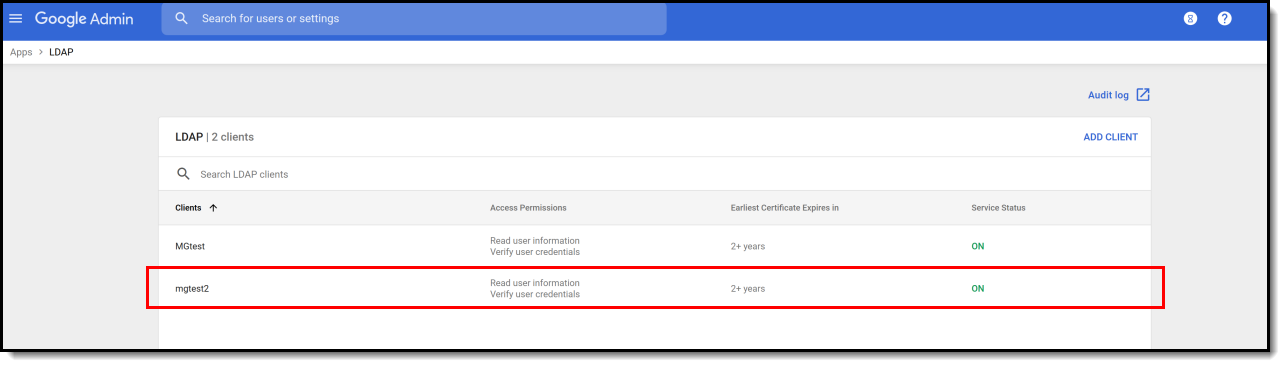
- The service has now been added to your Google Suite and should show a Service Status of ON.
- Now you need to configure the LDAP connection within Campus. Please follow the steps outlined in the Configuring LDAP for SASL section to complete the process.


