Tool Search: Schedule
The Scheduling Messenger allows users to send messages to a student's current Teacher(s)/Staff. Sections that were modified today by the current user display by default in the Recipient Selection list, making it easier to notify teachers about roster changes. A default message is provided, but the user may create and save their own templates. Recipient filtering options allow users to decide which of the student's teachers receive the message. Teachers/Staff receive one message for each course/section.
 Scheduling Messenger Example
Create a New Message
- Select New from the Template dropdown list. The WYSIWYG editor displays with an editable version of the sample message.
- Type the layout for the letter.
- Select the predefined Campus Field Properties or click the Insert/Edit Campus Field button to select the Campus fields that display in the message. The Campus Field Properties dialog displays.
- Select the fields to include then click the Cancel button.
- Click the Save button. The Save Template As dialog displays.
- Enter a name and click OK. Campus saves the template. The template may be used to send messages.
Send a Message
- Select the message template from the Template dropdown list.
- Filter the potential recipients by making selections in the Recipients, Term, Course Status, and Sections dropdown lists.
- In the Recipient Selection box, select the teacher/staff members to whom the message must be sent. When a teacher/staff member is selected, their name displays in gray. Click Select All to quickly add all teacher/staff members to the Message Recipients. Click Remove All to quickly remove all teacher/staff members from the Message Recipients.
- Select whether the message should be delivered to the recipients Email address.
- Select the date the message should begin delivery.
- Enter the time the message should begin delivery.
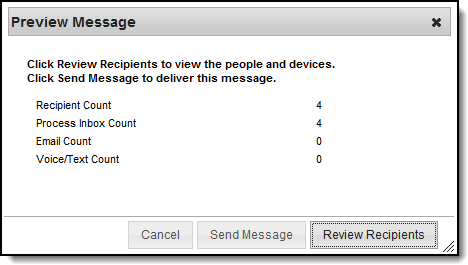
- Click the Preview/Send button to preview the message for each recipient before the message is sent. The Preview Message screen displays.
-
Click the Review Recipients button. The Review Recipients screen displays. To cancel a message, clear the checkbox next to the recipient's name or email address.

- Click the icon in the Preview column. The Message Recipient Preview window displays.
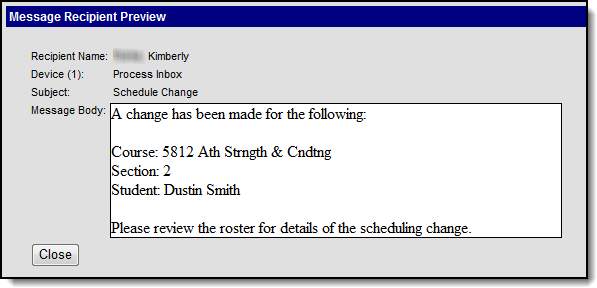
- Click Close to return to the Review Recipients screen.
- Click Save Recipients or Cancel to return to the Message Preview screen.
- Click Send Message. Campus sends the message on the day and time specified.


Troubleshooting
|
Problem |
Solution |
|---|---|
|
An expected course is not appearing in the Recipient Selection. |
Verify the course section has a Primary Teacher assigned on the Sections tab in Campus. Only courses with a Primary Teacher appear in the All Teachers, Primary Teachers, and Secondary Teachers results.
|
Field Descriptions
|
Field |
Description | ||||||
|---|---|---|---|---|---|---|---|
| User/Group |
This dropdown list allows you to save message templates to your user account or a user group to which you belong. You must have tool rights to User Group Formats for this tool in order to share group templates. | ||||||
| Template | This dropdown list displays a list of available templates. To create a new template, select <new> from this list. | ||||||
| Filter Criteria | |||||||
|
Recipients |
The Recipients dropdown list determines which teachers/staff display for a course section in the Recipient Selection List. Teachers and staff are assigned to course sections on the Sections tab in Campus.
Note that the staff person's Demographics Contact Preferences also need the General checkbox marked. | ||||||
|
Term |
The Term dropdown list determines which course sections display in the Recipient Selection list. The current term of the primary term schedule is the default selection. If there are multiple term schedules, the terms display ordered by sequence number with the primary term schedule first. | ||||||
|
Course Status |
The Course Status dropdown list filters potential recipients to teachers/staff associated with active or inactive courses as of today's date. Courses are considered active on the date they are dropped.
An Active Course is defined as a course that is not yet dropped, which has one of three impacts, depending on the context of the course:
| ||||||
|
Sections |
The Sections dropdown list filters the sections from which recipients may be selected.
| ||||||
|
Recipient Selection |
A list of potential recipients. The potential recipients are sorted by course section. When a teacher/staff member is selected, their name displays in gray. Click Select All to quickly add all teacher/staff members to the Message Recipients list. | ||||||
|
Message Recipients |
The intended recipients of the message. Click Remove All to quickly remove all teacher/staff members from the Message Recipients list. | ||||||
| Delivery Devices | |||||||
| Inbox | The Inbox option is automatically selected. This option places a note in the recipient's inbox that a new message is available. Infinite Campus strongly recommends leaving this option marked to ensure delivery to a Portal Account when no other delivery devices are marked for messages. | ||||||
| The Email option sends an email to the staff's email address on record (entered in Census > People > Demographics). | |||||||
| Sender's Email |
This field displays the email address that is automatically included in the message body for message recipients to reference.
This field can be changed if the Allow Custom Sender's Email Address checkbox is marked on the Email Settings tab.
Existing templates may display a different address if the the Allow Custom Sender's Email Address checkbox is marked and a user modified the Sender’s Email field. | ||||||
| Message Details | |||||||
| Message Subject | This field determines the text that displays in the Subject field of the email message. The default subject is Schedule Change but can be changed to something else. | ||||||
| Message Body |
A generic template is provided for sending messages; however, you can create a new message with specific information in the Message Body using the WYSIWYG editor.
Do NOT copy attribute fields from another Messenger tool in Campus. The attribute fields are not the same. Message Body supports the use of Chinese characters for email messages only. | ||||||
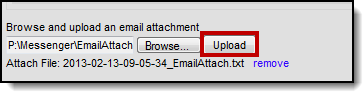
| Browse and Upload an Email Attachment |
This option allows you to add an attachment to the email. See the article the Digital Repository Preferences for information about supported file types and sizes.
You must click the Upload button after browsing for the attachment. When an attachment is properly uploaded, the Attach File message displays on the screen.
This option is controlled by an email preference set by the District Administrator and may not display in all districts. | ||||||
|
Delivery Date |
The date the message should begin delivery. The default selection is the current date. | ||||||
|
Send Inbox/Emails at |
The time inbox and/or email messages begin delivery. The time saves with the templates. If you want messages to always go out immediately after Send is selected, the template should be saved with this field blank. | ||||||
|
Test Message |
Test messages can be sent in advance to preview your message. Clicking this button allows you to send a test message. | ||||||
|
Preview/Send |
Clicking this button allows you to preview the message for each recipient before the message is sent. | ||||||