This article is for Campus Online Registration (OLR) and Campus Online Registration-Prime (OLR Prime). If you're not using OLR Prime, you have limited functionality in the OLR Builder.
Tool Search: OLR Builder
Use the OLR Builder to add or modify fields that display on Pleats.

Important Information About OLR Builder
- Not all Campus fields are available. Certain fields may be locked so that you cannot edit them or may not even appear in the OLR Builder.
- Modifying these fields is only supported through Campus tools to prevent various configuration issues.
- Fields can be deleted, but deleting fields removes all OLR data associated with that field. If data should be kept, disable the field instead.
- Folders do not collapse when new pleats or fields are added.
- Creating pleats that have a large number of fields or having too long of Receipt literal text can prevent the Receipt from printing the full amount of text. Ensure your Receipt prints correctly by checking it as you build your application.
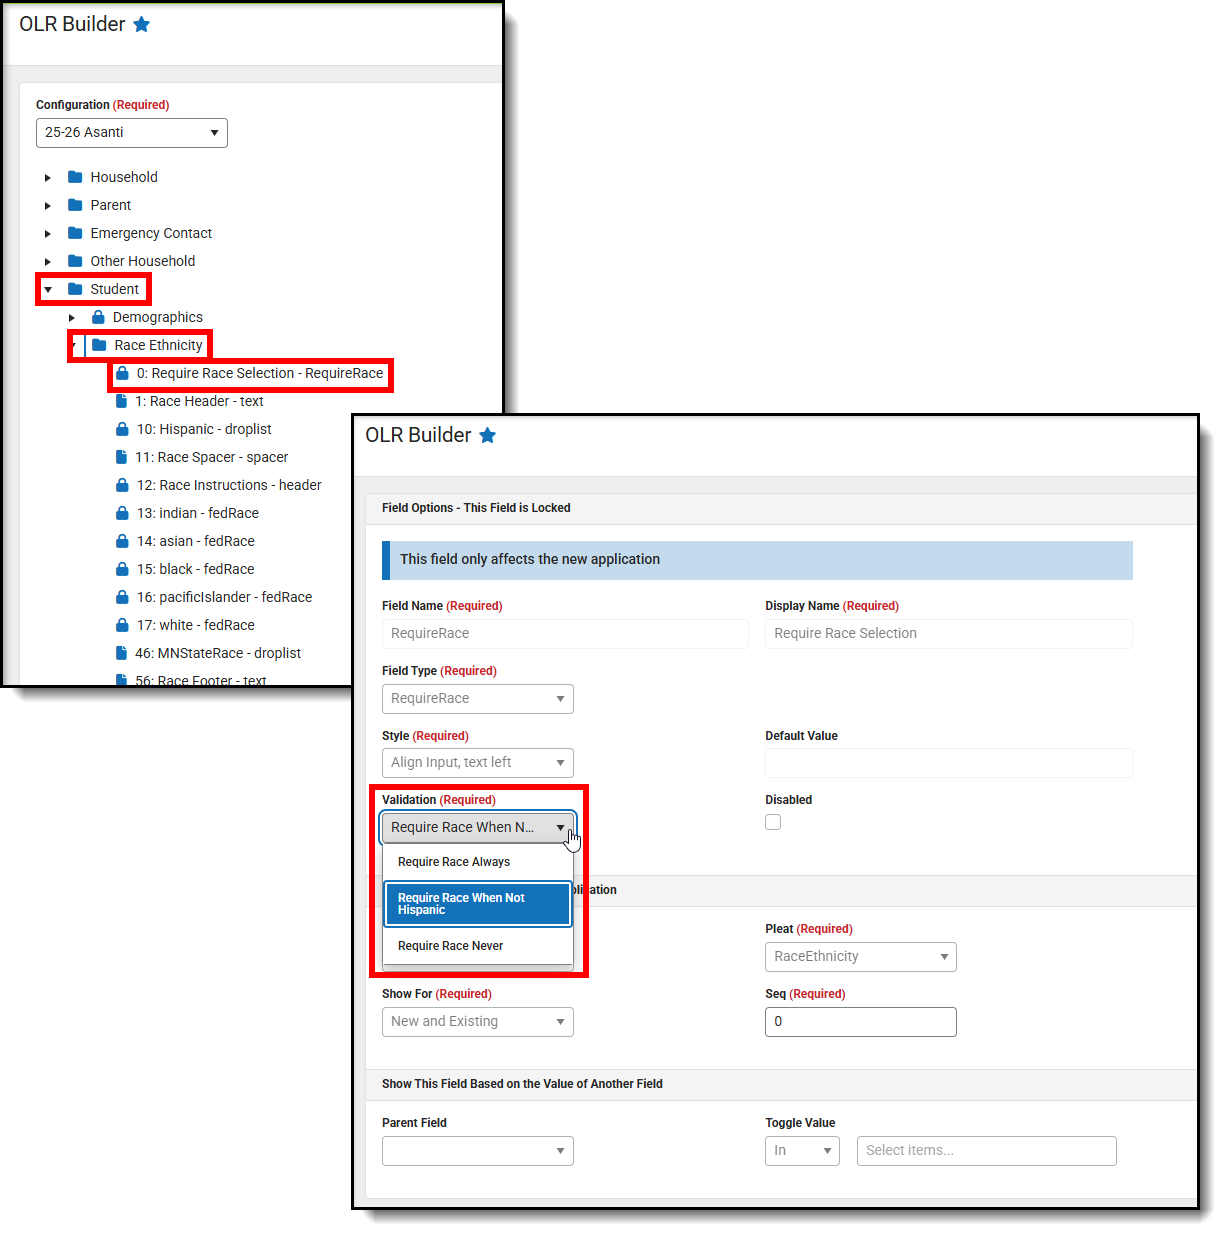
- The Always Require Race Selection System Setting is located in the following location (see screenshots below). It allows you to determine whether you Always Require Race Selection, Require Race Selection if not Hispanic/Latino, or Never Require Race Selection.

Add a New Pleat
Adding additional pleats is only available in OLR Prime.
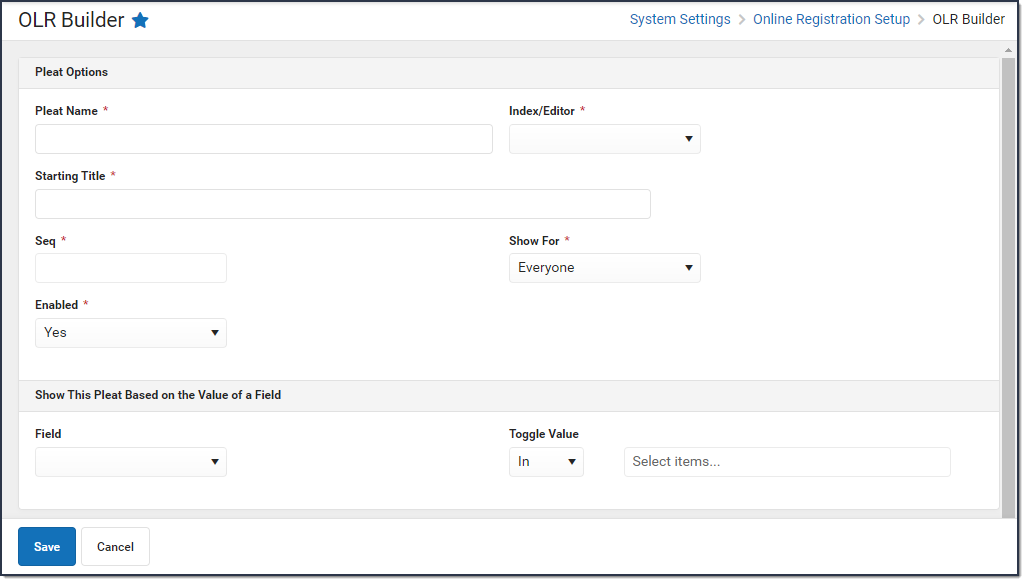
To add a new pleat, click the New Pleat button at the bottom of the OLR Builder. The Pleat setup options display. Use the following Pleat Field Descriptions to complete the screen.

Pleat Field Descriptions
| Field | Description |
|---|---|
| Pleat Name Required |
The name for the pleat being added/modified. |
| Index/Editor Required |
Controls which section of the OLR application in which the new pleat is included. |
| Starting Title Required |
The pleat's title in English language applications when first saved. If changes are needed after the pleat is saved, they are made in the OLR Literals Bank.
If the pleat's title needs changing, be sure to change both the pleat and the receipt in the OLR Literals Bank. |
| Seq Required |
Defines the order among other pleats. |
| Show For Required |
Indicates who can see the field. Options include:
|
| Enabled Required |
Controls if the pleat is visible on the application. |
| Show This Pleat Based on the Value of a Field | |
| Field | Allows the ability to make a pleat conditional based on a previous question/answer on the OLR application.
Not having a parent field selected will make this pleat show based on the settings in the Show For field. |
| Toggle Value | The field operation for the Field to determine if the pleat will display. |
| Select Items... | Items entered in this field are the values in the conditional Field that trigger display of the new pleat. |
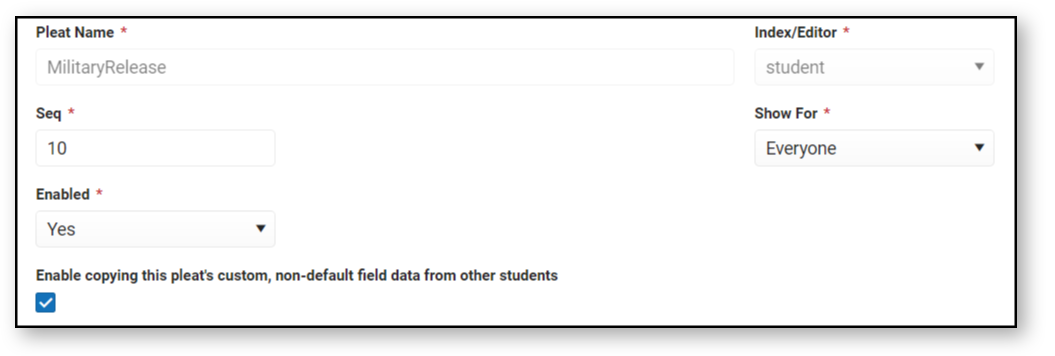
If a new pleat is added to the Student index, an additional option to "Enable copying this pleat's custom, non-default field data from other students" will display when a saved pleat is edited. This option allows parents to enter values for one student and then copy the data they entered if it is the same.

Add a New Field
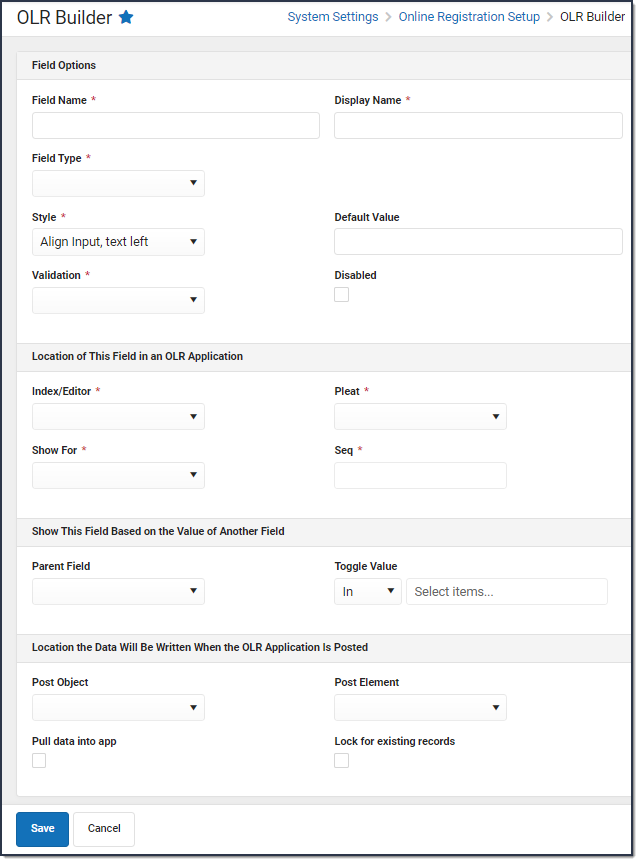
Fields are created with default values for the wording. You must edit the wording in the OLR Literals Bank after creating a field.

| Field | Description |
|---|---|
Field Name Required |
The internal name of the field. No special characters (#, $, etc.), and no spaces can be entered, and it must be an original, unique field. There cannot be other OLR fields with the same name. |
Display Name Required |
The name that displays in the tree to the left of the editor. It is used for reference only. The parent sees this in the application. Keep in mind, this field is only 35 characters long. Display Names are created and managed in the OLR Literals Bank. |
Field Type Required |
The type of field. Options include the following:
The chosen option changes the other fields that may be available for entry. |
| Style Required |
Indicates how the fields display in the pleat.
|
| Default Value | The default value for the field, if applicable. |
| Validation Required |
Indicates the field is required (displays in red with an asterisk, information cannot be saved until entry is made), email/required email requires the format to be in an email address (includes "@"), number/required number requires the format to be numeric. |
| Disabled | When marked, indicates the field does not display and users cannot modify content related to that field. Marking a field as disabled keeps all data associated with that field (unlike deleting a field). |
| Show in Application Processing Review | When checked, the Pleat Name, Question Name, and the answer the parent gave to the question in the application will appear in Application Processing Review. |
Index/Editor Required |
Selection indicates where the field displays. This allows the district to place the new question in the index/editor of their choosing, such as Primary Household, Parent/Guardian, etc. |
Pleat Required |
Allows the district to place the new question in the pleat of their choosing, such as a core pleat or a custom pleat that the district creates. |
| Show For Required |
Indicates who can see the field - Everyone (new and existing students), New (students who are enrolling for the first time in the district), or Existing (students who have a previous enrollment in the district). |
Seq Required |
The entered number indicates the order in which the item being added displays (field, text, radio button, etc.). |
| Parent Field | Allows the ability to make the question on a pleat conditional based on a previous question/answer on the OLR application.
Not having a parent field selected will make this pleat/question show based upon if it was for new, existing, or both. |
| Toggle Value | The field operation. |
| Select items... | This field is used in conjunction with the Parent Field. When a field is set in the Parent Field, the selected items need to be chosen by the user in order for the question/pleat to display. See the examples noted in the Parent Field description for more information. |
Post Object |
Selection indicates where data is written when an application is posted. Enrollment fields or fields that depend on enrollments are not included. For example, a parent submits an application and a staff approves it. Upon that approval, the selected field's data is added to the selected object (custom tab/custom attribute of the districts choosing) and is viewable within Campus in that area. Core options are as follows:
|
Post Element |
Selection indicates where data is written when an application is posted. Enrollment fields or fields that depend on enrollments are not included. For example, a parent submits an application and a staff approves it. Upon that approval, the selected field's data is added to the selected object custom tab/custom attribute of the districts choosing and is viewable within Campus in that area. |
| Prevent Batch Posting Value | If an OLR application has a value for a field that matches the value in the Prevent Batch Posting Value field, then that OLR application will not qualify for batch posting or auto-posting on submission. Prevent Batch Posting Value is only be available for custom YN Radio Button field types and only for fields in the Household section. |
Pull Data Into Application |
When marked, information is pushed from OLR to Campus AND information is pulled from Campus to OLR. |
Lock for Existing Records |
When marked, existing parents cannot make modifications to the field. The field pulls from Campus and displays as uneditable. |
Exporting and Importing a Pleat
The Pleat Export/Import tooling allows users to export pleats out of their OLR Configuration and import them into another. This is a fantastic way for states to create pleats that they wish every district to use and simply give them the file to import. Or for districts to share their amazing pleats that they have created.
Exporting a Pleat

- Click on the pleat you wish to export.
- Click Export to File at the bottom of the screen.
Importing a Pleat

- Click Import From File.
- Click Select files and select your file, or drag and drop your file here.
- Click Import.
- Go through the Import Instructions and review all items listed to ensure everything is correct. This will help find issues with fields that are mapped back, document uploads, OLR Lists, and Parent Field Toggles.
Please note the following:
- You cannot import a pleat into an OLR Configuration if another pleat with the same name already exists in that configuration.
- When you import a pleat, it will import into the same Index it was exported from. For example, if you export a pleat from the Parent Index, you cannot import it into the Student Index.
- The export/import process will attempt to bring over all literals for all languages associated with the pleat. While English literals will always be transferred, it will try to match the other languages based on Language Group name and code. However, if a language does not exist on the district's site at the time of importing, the additional translated literals will not be imported.
- If a language does not exist, a note will appear in the Import Instructions informing you that the translated literals were not brought over.

