Tool Search: Conditions
The Conditions tool lists all medical conditions that have been reported for a student at the school. From this tool, users are able to view or delete current conditions or create a new condition for a student. This tool also allows users to enter treatment information on a condition and establish a schedule for when treatment(s) should occur.
 Health Conditions Tool
See the Conditions Tool Rights article for information about rights needed to use this tool.
The Health Condition/EMT symbol only displays next to the student's name throughout Infinite Campus if the following is set:
- The System Preference Flag Health Conditions is set to Yes.
- The Condition in the Condition List is marked as flagged.
- The Health Condition assignment for the student is marked as flagged.
Conditions and treatments can be added for a student AFTER the Condition List and Treatment List are populated in System Administration.
Health Conditions and Treatments are often entered together. The Student Health interface combines the entry of conditions and the entry of treatments for complete health information on a student.
Conditions are entered into Campus with a Code and Description. The International Classification of Diseases (ICD) medical coding system and/or district created codes and descriptions can be entered. Add a Condition for a student using the Code Search or the Description Search box located in the top right corner and activated by selecting the magnifying glass icon. Conditions not previously entered in System Administration can be entered using the Code and Description fields. Health Condition Fields
Health Condition Fields
The following table defines the available data elements on the student's Health Condition.
| Field | Description |
|---|---|
|
Code Search |
Search field used to return codes associated with a health condition. Conditions which are not marked as Active in the Condition List do not display in this search. |
|
Description Search |
Search field used to return health descriptions associated with a condition. Conditions which are not marked as Active in the Condition List will not appear in this search. |
|
Code |
Code associated with a health condition. |
|
Description |
Description of a health condition. Conditions no longer marked as "Active" in the Condition List will be labelled as INACTIVE. |
|
Start Date |
Date the health condition was first assigned to the student. This start date is the date the school became aware of the condition, not when the student was diagnosed with the condition. |
|
End Date |
End date of the health condition. Ended conditions display in red with the start/end dates. |
|
Status |
Indicates the status of the Health Condition. Default values are as shown, but they can be modified in the Attribute/Dictionary.
|
|
Initials |
Initials of the individual entering the health condition. |
| Referring Provider | |
| Link to Person | This dropdown is populated with active providers set up in the Referring Provider tool. The Name field auto-populates with the person's name after selection in this dropdown. |
|
Name |
Name of the student's provider. This information is used in conjunction with Medicaid billing services. |
|
Phone |
Phone number of the provider. |
| Credential Suffix | An abbreviated name of the provider's health credential. |
| NPI Number | The person's National Provider ID. This is a unique 10-digit number for every medical provider across the nation. |
| NPI Enum Date | The date the NPI was assigned. |
| Primary Taxonomy | The code that identifies the provider's specialty. |
|
| |
|
Flag |
Indicates the health condition can be marked to appear next to the student's name. This is selected when a flag displays next to the student’s name in the header row. The condition start and end dates determine when the icon displays. |
|
User Warning |
The tooltip that displays when the EMT symbol is hovered over. This field is required when the Flag checkbox is marked. |
|
Instructions |
Detailed guidance on how to handle the student when the health condition affects the student during the school day. When the health condition is flagged, the Instructions display when the EMT symbol is clicked |
|
Comments |
Additional comments related to the health condition. |
| POS Display Health Comments (text displays on Point of Sale Terminal)
Food Service Users Only |
Entered text displays on Food Service Terminals for the student, such as nut or fish allergies. This field only displays for Food Service users. |
Health Condition Flags
New Medical flags cannot be created. New flags are only available for districts who created flags prior to 2010.
When a student has more than one condition that is flagged, only one EMT symbol displays. All user warnings are listed in one hover box. Health Condition flags that display as an EMT symbol are not the same as medical flags that may be created.
As previously mentioned, the EMT symbol only display when the following is set:
- The System Preference Flag Health Conditions is set to Yes.
- The Condition in the Condition List is marked as flagged.
- The Health Condition assignment for the student is marked as flagged.
Medical flags display when:
- The school or district has created a flag called medical.
- The Medical flag is assigned to the student.
For more information about the condition, users can click the EMT symbol, which will display descriptions, the entered user warnings and any entered instructions in a pop-up window.
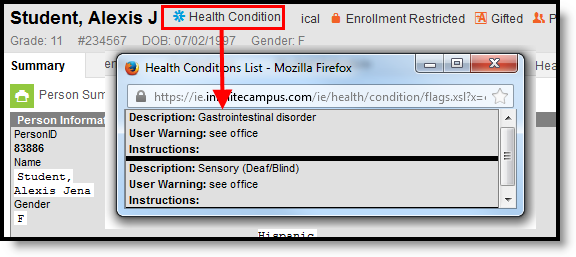 Health Condition Flag
Print Health Conditions
Click the Print button to display a list of the student's conditions. The report can be generated as either a PDF or DOCX format.
 Print Health Condition Summary Modal
For reports with more detail, see the Health Condition Summary report or the Health Condition Alerts report.
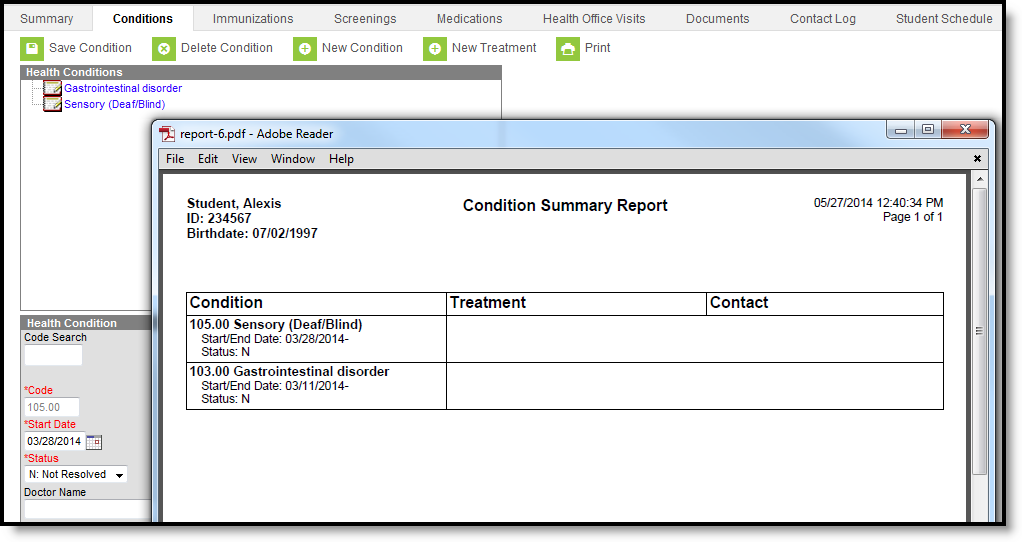 Health Condition Report Example
Enter a New Condition
- Select the New Condition icon in the action bar at the top of the Conditions tool.
- Enter the name of the condition within the Description Search field. Clicking the magnifying glass icon will search for matching International Classification of Diseases (ICD) entries. Matching entries will appear in blue text.
- Select an entry to load both the description and ICD code.
- Enter the Start Date by typing the date in mmddyy format or by clicking the calendar icon and selecting the date.
- An End Date should be entered if the condition is no longer being tracked or has been resolved.
- Enter the initials of the user entering this data within the Initials field.
- When applicable, select the provider name from the Link to Provider dropdown.
- Enter the name of the doctor who diagnosed this condition within the Name field.
- Enter the Phone number, when available.
- Enter the provider's Credential Suffix.
- Enter the provider's NPI Number.
- Enter the NPI Enum Date in mmddyy format, or click the calendar icon to select a date.
- Enter the Primary Taxonomy.
- Select the Display Flag checkbox.
This checkbox may only be chosen if the condition is marked as able to be flagged in the Health Conditions list in System Administration. If the chosen condition is not able to be flagged, a warning will appear upon selection of the checkbox, noting the condition is not able to be flagged.
- Enter a User Warning comment. This comment will appear when the flag is hovered over by a user.
- Provide Instructions for the condition.
- In the Comments field, enter any additional information related to the condition as needed.
- Select the Save Condition button when finished. The condition will display in the Health Conditions section.
End Health Conditions
- Select the Health Condition that should be ended.
- Enter an End Date for this condition.
- Change the Status to be R: Resolved.
- Click the Save button when finished. The health condition that is ended will display in the Health Conditions window in red text with the start and end date of the condition, indicating it has been ended.
Ended health conditions display AFTER active health conditions.
Entered dates are considered active through the end of that day. For example, if a condition was ended on November 11, 2014, the condition appears active until midnight on November 11. On November 12, the condition is considered ended.
 End Dated Health Condition
Add a Treatment to a Health Condition
A Treatment record should document the nature of what needs to be done each time the student receives the treatment. When the treatment is actually provided, it should be entered in a Health Office Visit.
See the Treatment List or the Health Office Visits documentation for additional information.
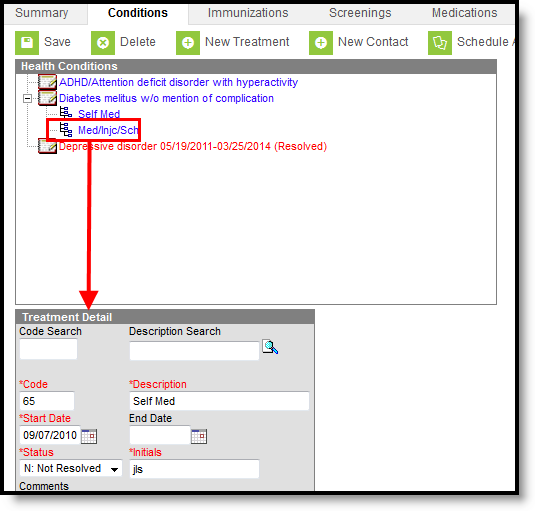 Treatment Detail
Treatment Fields
The following table defines the available fields on the student's Health Condition Treatment.
|
Data Elements |
Description |
|---|---|
|
Code Search |
Search field used to return codes associated with a treatment for the health condition. |
|
Description Search |
Search field used to return health descriptions associated with a treatment for the condition. |
|
Code |
Code associated with a treatment for the health condition. |
|
Description |
Description of a treatment health condition. |
|
Start Date |
Date the treatment was first assigned to the student. Dates determine whether the treatment appears in the Health Office Visits tool. |
|
End Date |
End date of the health condition treatment. Dates determine whether the treatment appears in the Health Office Visits tool. |
| Status |
Indicates the status of the Health Condition. Default values are as shown, but they can be modified in the Attribute/Dictionary.
|
|
Initials |
Initials of the individual entering the health condition treatment. |
|
Comments |
Additional comments related to the health condition treatment. |
Enter a New Treatment
- Select an existing condition from the student’s Health Conditions list.
- Select the New Treatment button at the top of the Conditions tab. This will link the treatment to the selected condition.
- In the Code Search or Description Search field, enter a code or description of the treatment and click the magnifying glass icon to search for matching entries. Matching entries will appear in blue text. Selecting an entry will auto-populate the Description and Code fields. A Code and Description that are not in the Treatment List can also be entered.
- Enter the Start Date by typing in the date in mmddyy format or by clicking on the calendar icon and selecting the date.
- Enter an End Date to indicate when the treatment is no longer needed if applicable.
- Enter a Status if applicable.
- Enter the initials of the user entering this data within the Initials field.
- In the Comments box, enter any pertinent information related to the treatment.
- Select the Save button when finished.
When a selected treatment description contains special characters (quotation or question marks), a warning message displays indicating such. Modify the description to remove those special characters to allow saving.
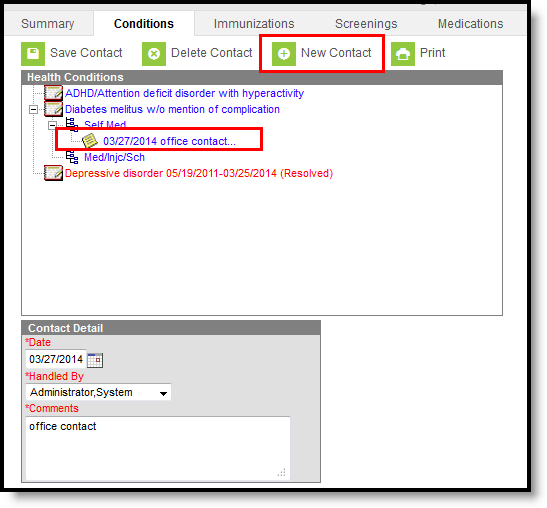
Enter Health Condition Contact Records
Once a condition is entered and a treatment for that condition is entered, a Contact record can be added each time the health staff contacts the student or parent about the condition or treatment. The Treatment must be selected in order to display the New Contact button.
 Health Condition Contact Detail
Enter Contact Records
- Select the New Contact icon from the action bar. A Contact Detail editor displays.
- Enter the Date of the contact.
- Select the staff person who made the contact from the Handled By dropdown list. Staff in this list have the Health checkbox marked on their District Assignment record.
- Enter Comments about the contact.
- Click the Save button. The contact record displays underneath the Treatment record.
If the staff person who handled the contact ends their district assignment at the school, the staff person's name still displays in the field but displays the start and end dates of the Assignment. This allows historical tracking of entered data for the student's health record.
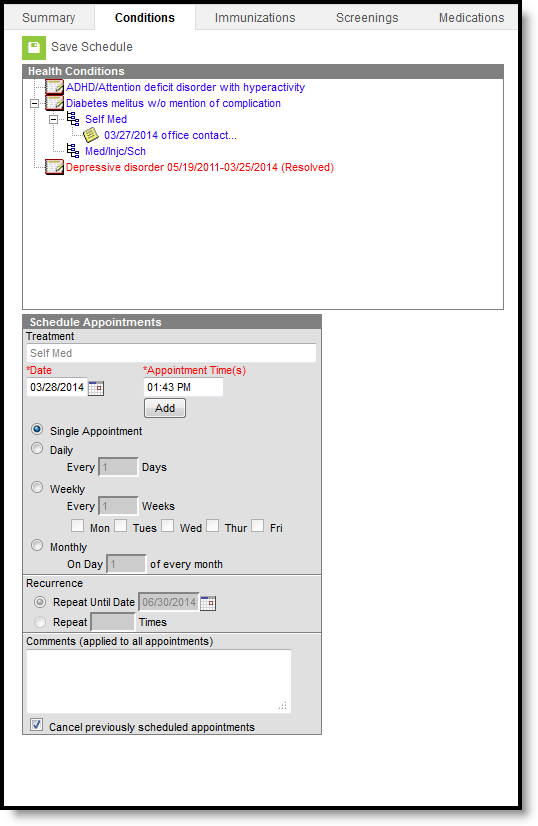
Schedule Health Office Appointments
A user can attach appointments to a treatment after a treatment has been linked to a condition. Both single and recurring appointments can be assigned, and users can determine the frequency of recurring visits.
Users must have calendar rights to the calendar selected to schedule Health Office appointments.
 Schedule Appointments
Add Scheduled Appointments
- Select an existing Treatment in blue from the Health Conditions editor.
- Select the Schedule Appointments button. This will link the appointment schedule to the treatment.
- Enter the Date by typing it in mmddyy format or by clicking the calendar icon and selecting the date. This date is when the appointment was first scheduled. It defaults to the current date.
- Enter the Appointment Time and click the Add button to attach it to the date. To add multiple appointment times to a scheduled appointment, simply enter the appointment time and press the Add button. Users may also delete specific appointment times by selecting the black X located to the right of the appointment time(s).
- Select the occurrence of the scheduled appointment (i.e. Single Appointment, Daily, Weekly, Monthly).
- Place an end date on the recurring appointment by selecting the Repeat Until Date radio button and entering the date in mmddyy format or by using the calendar icon and selecting the date.
- To limit the number of times the appointment should occur, select the Repeat Times radio button and enter the desired number.
- Enter any additional information within the Comments field.
- Select the Save Schedule button when finished.
The Health Office Visit Scheduler displays a warning message when users schedule appointments that fall on a non-instructional and non-attendance day if the scheduling frequency is Weekly or Monthly. The warning message allows users to view the date(s) of the appointment(s) that could not be scheduled.
Users cannot create treatment appointments that extend past the End Date for a Treatment or for inactive Treatments.
Cancel Scheduled Appointments
- Select the existing Treatment in blue from the Health Conditions editor.
- Select the Cancel Future Appointments icon. This will cancel all future appointments linked to this treatment. Future appointments are unsaved appointments on the cancel date and later. Previously scheduled appointments can also be canceled by selecting the checkbox at the bottom of the Schedule Appointments editor when creating new appointments.
- Enter the date in mmddyy format or by clicking the calendar icon and selecting the date.
- Click the Save button when finished. This will cancel all unsaved appointments scheduled on or following the date entered.
Future appointments are not automatically cancelled when a student’s enrollment ends.
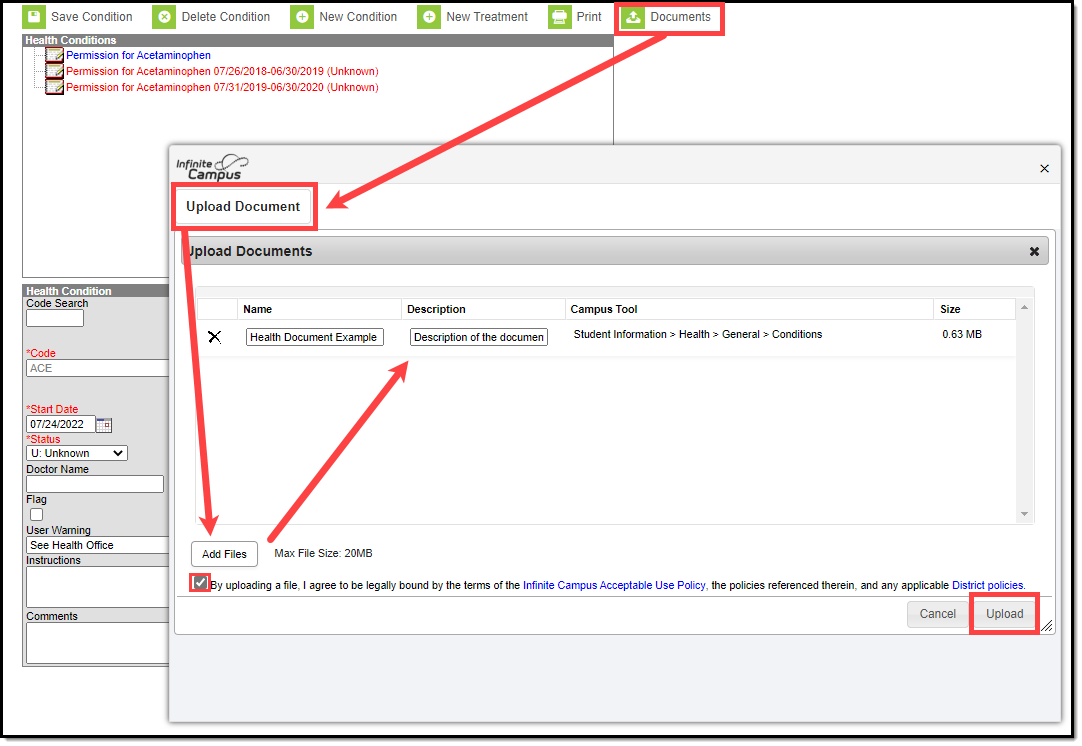
Manage Condition Documents
The Conditions tool allows you to store, manage, and view all condition/health-related documents associated with the selected person.
Upload a New Condition Document(s)
- Click the Documents button. A separate window will appear, containing an Upload Document button and the Documents List.
- To begin uploading a new document, click the Upload Document button and select Add Files.
- Locate the file on your local hard drive or network and click OK.
- The file will appear in the Upload Documents list. From here you can add a Description (optional), see what tool will be associated with the file, and the size of the file.
- Mark the checkbox in the left-hand corner to agree to the terms of the Infinite Campus Acceptable Use Policy (as well as any district-mandated policies).
- Click Upload. The file is now uploaded and attached to the student where it can be accessed at any time.
 Upload Condition Document
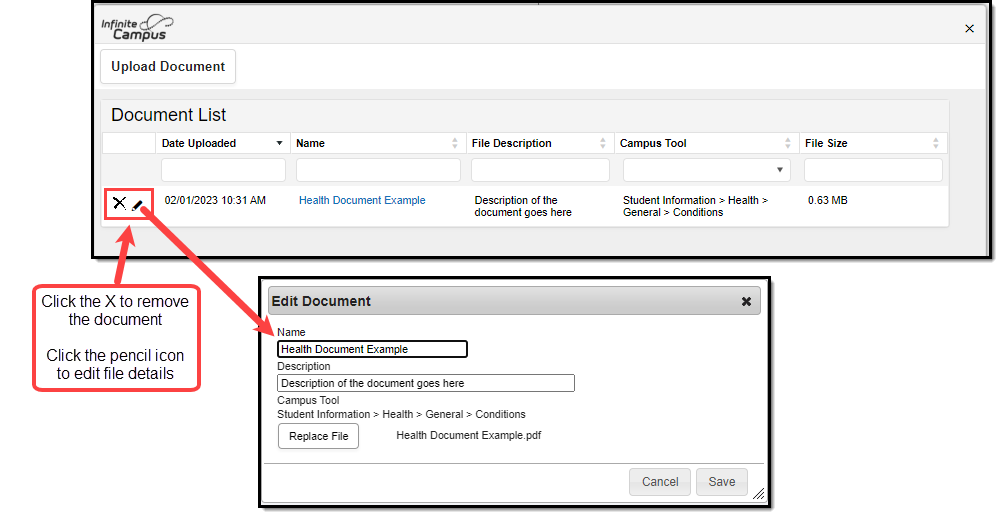
Delete or Edit an Existing File
When you need to delete the file, click the X ( ) next to the file needing deletion.
When you need to edit file details, click the pencil icon ( ) next to the file. The Edit Document editor will appear, allowing you to edit the file name, description, or replace the file.
 Delete Condition Document
