Tool Search: Credit Groups
Credit Groups define how credits earned by students are counted on the transcripts and used to track a student's progress toward graduation. Credits on the transcript display chronologically, but a summary of student work is available on the transcript, showing the number of credits in each category defined in the Credit Group.
Credit Groups do not include the number of credits earned by a student, which is determined by the course's Grading Tasks, but instead organize credits earned across courses on the student's Credit Summary. See the Things to Know About Credit Groups and Types for more information.
This article provides information to verify or set up Credit Groups to meet North Carolina compliance; initial setup was handled during implementation.
To ensure accurate calculation of student graduation progress and to maintain consistency in transcript reporting, all districts must use the state-defined credit groups without modifications. These credit groups are set up according to SBE Policy GRAD-004 and should not be modified.
Creating new credit groups or altering existing ones disrupts historical data integrity and directly affects the system’s ability to:
- Accurately calculate and display graduation progress,
- Populate the North Carolina Official Transcript correctly, and
- Submit accurate data for the electronic transcript (e-Transcript) as required by state regulations.
The use of unauthorized or customized credit groups will result in incomplete or inaccurate transcripts, which may negatively impact student outcomes, including college admissions and scholarship opportunities.
 Credit Group Setup
Refer to the Credit Groups Setup article for information on credit groups, credit types, best practices and how to create groups.
Credit Groups are set up at the District level. Credit Groups and Credit Types are associated with Course Masters. Because of this, DO NOT MODIFY these groups and types.
Things to Know about Credit Groups and Types
- NC Credit Groups are ES, MS, HS, and SU.
- The Credit Group Tree displays the Credit Type(s) when the Credit Group is expanded.
- High School Credit Types now align with the NC Department List.
- Historical grades were not converted. Instead, they were converted as transcript records using the credit types for non-High School Credit Courses as ES and MS.
- Review the Credit Summary and Course Display sections of the North Carolina Transcripts article.
- The Credit Overflow Rollup field is not associated with Course Masters, Courses or Transcripts.
- The PESC Mapping field is used for eTranscripts. Refer to the following for more information on eTranscripts:
 North Carolina Credit Groups
Elementary (ES) Credit Group
Step 1. Create the Credit Group
- Select New Group. The Credit Group Detail editor displays.
- In the Name field, enter ES.
- Click Save. The new Credit Group displays in the Credit Group Tree.
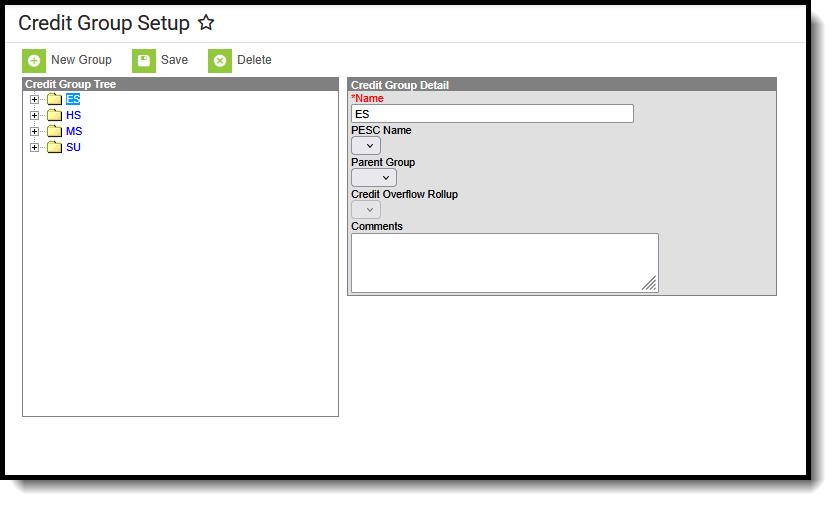 ES Credit Group
Step 2. Create the Credit Type
- Select New Group. The Credit Group Detail editor displays.
- In the Name field, enter Elementary.
- Select ES from the Parent Group dropdown.
- Click Save. The new Credit Type displays as a child of the ES Credit Group.
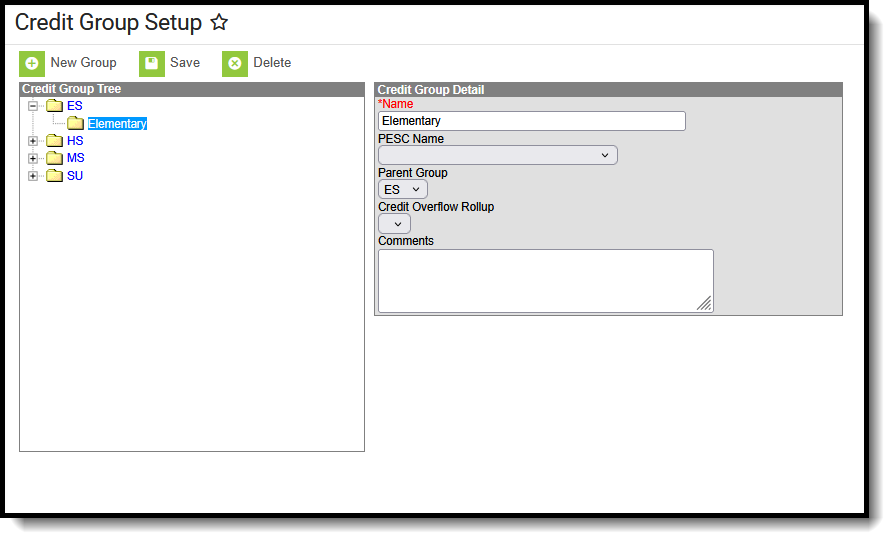 Elementary Credit Type with Parent Group ES Selected
Middle School (MS) Credit Group
Step 1. Create the Credit Group
- Select New Group. The Credit Group Detail editor displays.
- In the Name field, enter MS.
- Click Save. The new Credit Group displays in the Credit Group Tree.
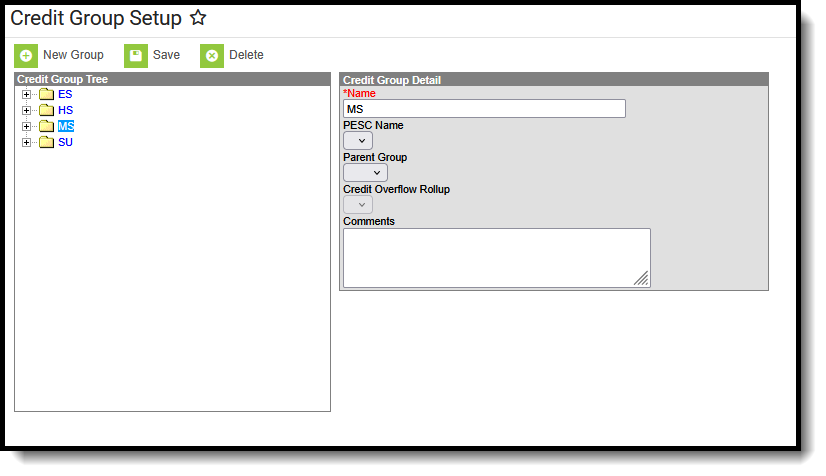 MS Credit Group
Step 2. Create the Credit Type
- Select New Group. The Credit Group Detail editor displays.
- In the Name field, enter Middle.
- Select MS from the Parent Group dropdown.
- Click Save. The new Credit Type displays as a child of the MS Credit Group.
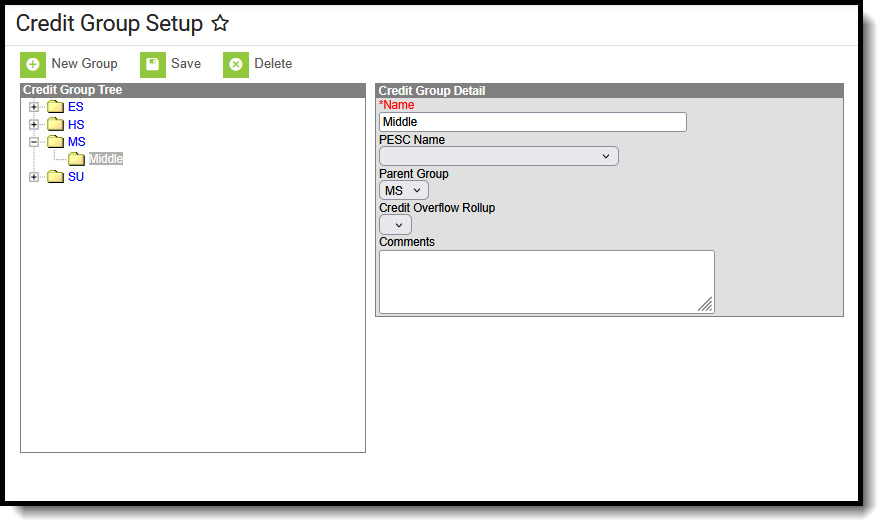 Middle Credit Type with MS Parent Group Selected
Suppressed (SU) Credit Group
This credit group can be used when a student repeats a class that should not display on the printed transcript.
Step 1. Create the Credit Group
- Select New Group. The Credit Group Detail editor displays.
- In the Name field, enter SU.
- Click Save. The new Credit Group displays in the Credit Group Tree.
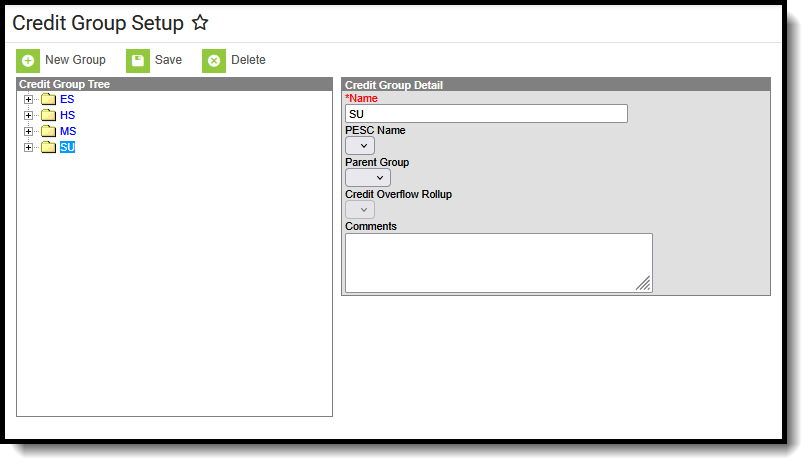 SU Credit Group
Step 2. Create the Credit Type
- Select New Group. The Credit Group Detail editor displays.
- In the Name field, enter Suppressed.
- Select SU from the Parent Group dropdown.
- Click Save. The new Credit Type displays as a child of the SU Credit Group.
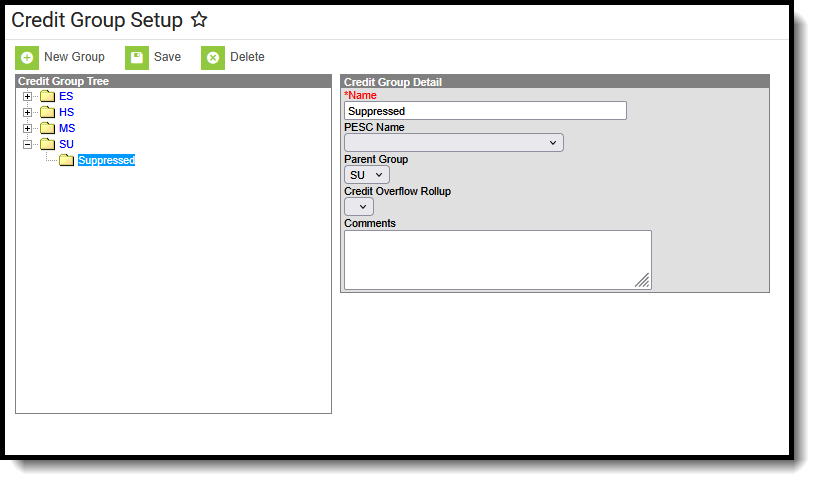 Suppressed Credit Type
High School (HS) Credit Group
The High School Credit Group and Credit Types report on Student Transcripts. Credit Types MUST be set up as noted below for proper Transcripts posting for both printed official NC transcripts and eTranscripts.
Step 1. Create the Credit Group
- Select New Group. The Credit Group Detail editor displays.
- In the Name field, enter HS.
- Click Save. The new Credit Group displays in the Credit Group Tree.
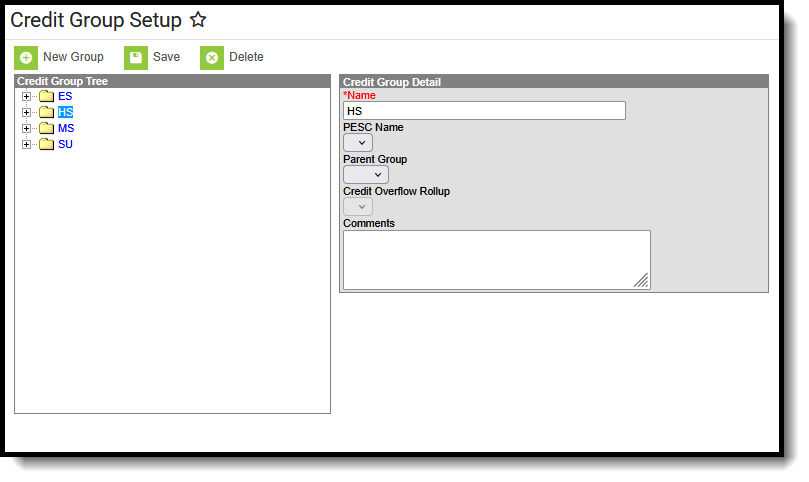 HS Credit Group
Step 2. Create the Credit Types
There are EIGHT Credit Types to create for the HS Credit Group. Follow these steps exactly for accurate Credit Types on the Transcripts, eTranscripts, etc.
Refer to the Required High School Credit Types table for reference.
ECS
- Select New Group. The Credit Group Detail editor displays.
- In the Name field, enter ECS.
- Select Miscellaneous from the PESC Name dropdown list.
- Select HS from the Parent Group dropdown list.
- Select Other for the Credit Overflow Rollup dropdown list.
- Click Save. The new Credit Type displays as a child of the HS Credit Group.
ELA
- Select New Group. The Credit Group Detail editor displays.
- In the Name field, enter ELA.
- Select EnglishLanguageLiterature from the PESC Name dropdown list.
- Select HS from the Parent Group dropdown list.
- Select Other for the Credit Overflow Rollup dropdown list.
- Click Save. The new Credit Type displays as a child of the HS Credit Group.
Health & PE
- Select New Group. The Credit Group Detail editor displays.
- In the Name field, enter Hlth & PE.
- Select PhysicalHealthSafetyEducation from the PESC Name dropdown list.
- Select HS from the Parent Group dropdown list.
- Select Other for the Credit Overflow Rollup dropdown list.
- Click Save. The new Credit Type displays as a child of the HS Credit Group.
Math
- Select New Group. The Credit Group Detail editor displays.
- In the Name field, enter Math.
- Select Mathematics from the PESC Name dropdown list.
- Select HS from the Parent Group dropdown list.
- Select Other for the Credit Overflow Rollup dropdown list.
- Click Save. The new Credit Type displays as a child of the HS Credit Group.
OCS
- Select New Group. The Credit Group Detail editor displays.
- In the Name field, enter OCS.
- Select Miscellaneous from the PESC Name dropdown list.
- Select HS from the Parent Group dropdown list.
- Select Other for the Credit Overflow Rollup dropdown list.
- Click Save. The new Credit Type displays as a child of the HS Credit Group.
Other
- Select New Group. The Credit Group Detail editor displays.
- In the Name field, enter Other.
- Select Miscellaneous from the PESC Name dropdown list.
- Select HS from the Parent Group dropdown list.
- Leave the Credit Overflow Rollup field blank.
- Click Save. The new Credit Type displays as a child of the HS Credit Group.
Science
- Select New Group. The Credit Group Detail editor displays.
- In the Name field, enter Science.
- Select LifePhysicalSciences from the PESC Name dropdown list.
- Select HS from the Parent Group dropdown list.
- Select Other for the Credit Overflow Rollup dropdown list.
- Click Save. The new Credit Type displays as a child of the HS Credit Group.
Social Studies
- Select New Group. The Credit Group Detail editor displays.
- In the Name field, enter Soc Stud.
- Select SocialSciencesHistory from the PESC Name dropdown list.
- Select HS from the Parent Group dropdown list.
- Select Other for the Credit Overflow Rollup dropdown list.
- Click Save. The new Credit Type displays as a child of the HS Credit Group.
When finished adding credit types, the HS Credit Group will look like this:
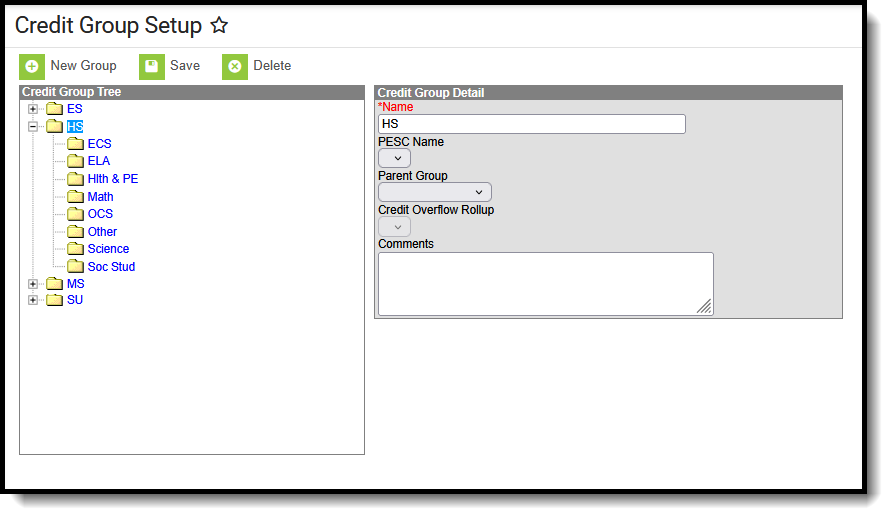 High School Credit Types
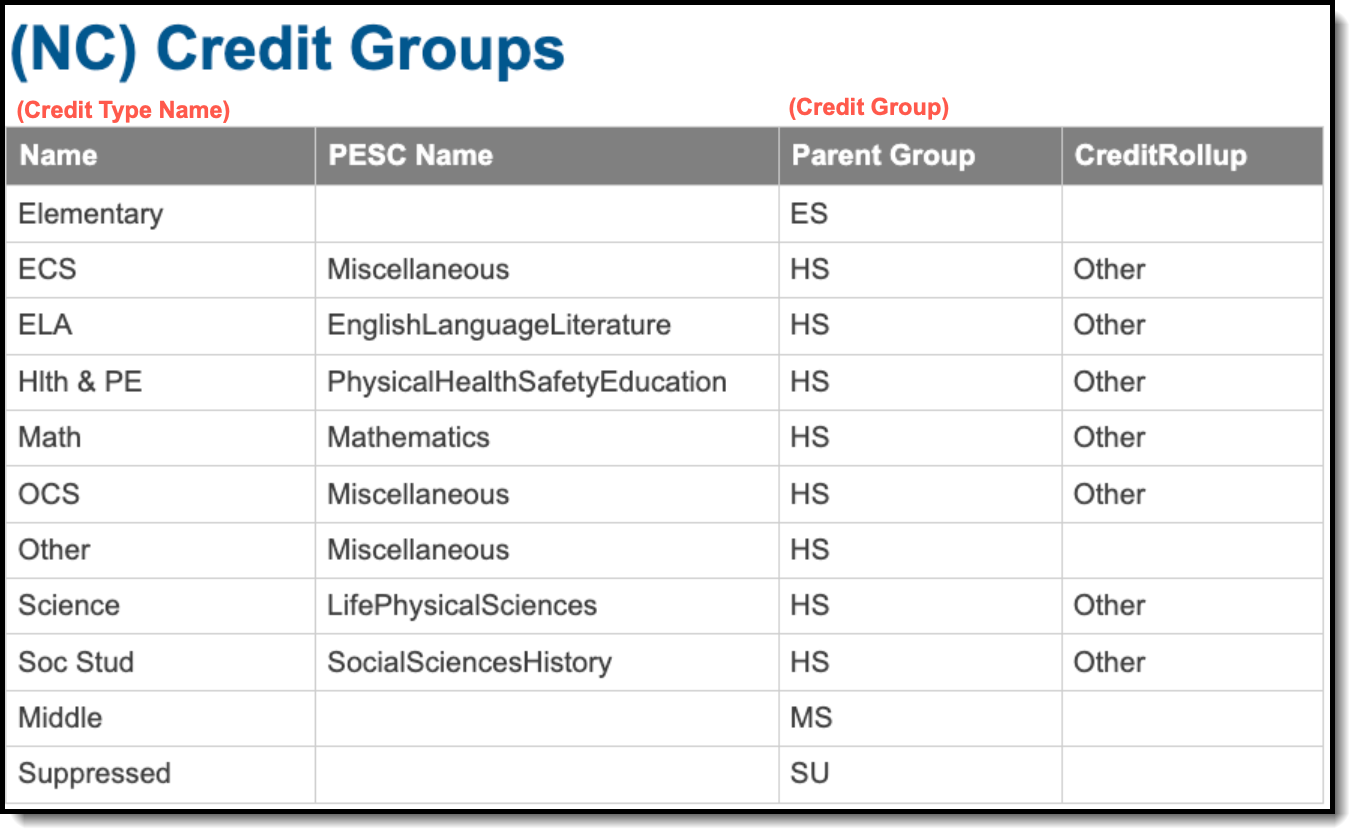
Required High School Credit Types
| Name | PESC Name | Parent Group | Credit Overflow Rollup |
|---|---|---|---|
| ECS | Miscellaneous | HS | Other |
| ELA | EnglishLanguageLiterature | HS | Other |
| Hlth & PE | PhysicalHealthSafetyEducation | HS | Other |
| Math | Mathematics | HS | Other |
| OCS | Miscellaneous | HS | Other |
| Other | Miscellaneous | HS | |
| Science | LifePhysicalSciences | HS | Other |
| Soc Stud | SocialSciencesHistory | HS | Other |
