Tool Search: English Learners
The EL tool allows schools and districts to manage student English Learners (EL) programs. The EL tool was designed as a way to provide a single area for managing EL information and pulling data for state and federal reports.
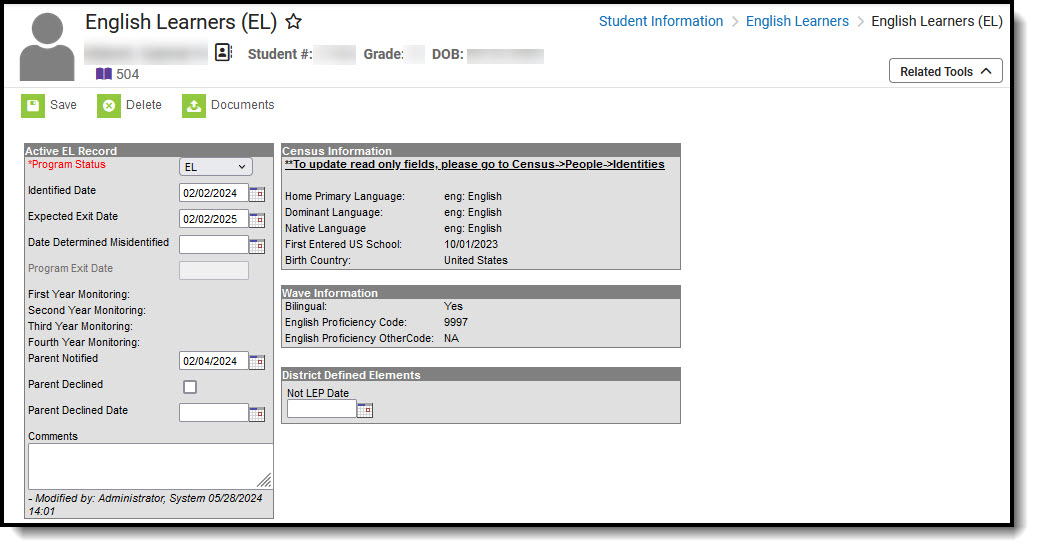 English Learners (EL)
English Learners Information in Ad Hoc Query Wizard
English Learners information is available in the Query Wizard for Student data types in Learner > EL folder.
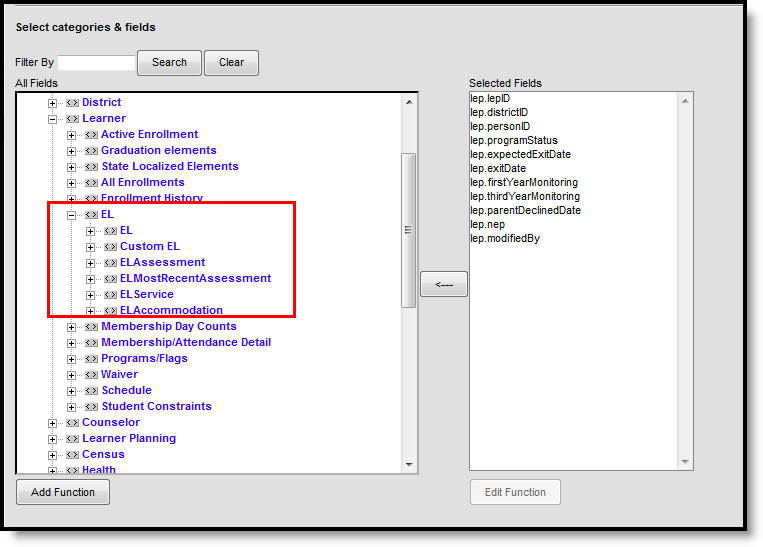 English Learners Related Ad hoc Fields
EL Fields
Fields | Description | Ad hoc Field |
|---|---|---|
| Active EL Record | ||
Program Status Required | Indicates the student's EL status. Options include:
| lep.programStatus |
Identified Date | Indicates the date the student was identified as eligible for an EL program or service. This date reflects the date the student took the Screener/Initial Determination Test. This date is used to determine if the student is participating in an EL program. | lep.identifiedDate |
Expected Exit Date | Indicates the date the student is expected to exit the EL program. | lep.expectedDate |
Program Exit Date | Indicates the date the student exited the EL program. This means the student is no longer reported as EL within state and local reports. Federal reporting continues to track EL students for two years beyond the date entered in this field. This information is reflected in the First Year Monitoring and Second Year Monitoring fields. | lep.exitDate |
First Year Monitoring | A read-only field calculated as exactly one year from the Program Exit Date. This field is used in federal reports for tracking and reporting purposes. | lep.firstYearMonitoring |
Second Year Monitoring | A read-only field calculated as exactly two years from the Program Exit Date. This field is used in federal reports for tracking and reporting purposes. | lep.secondYearMonitoring |
| Third Year Monitoring | A read-only field calculated as exactly three years from the Program Exit Date. This field is used in federal reports for tracking and reporting purposes. | lep.thirdYearMonitoring |
| Fourth Year Monitoring | A read-only field calculated as exactly four years from the Program Exit Date. This field is used in federal reports for tracking and reporting purposes. | lep.fourthYearMonitoring |
| Fifth Year Monitoring | A read-only field calculated as exactly five years from the Program Exit Date. This field is used in federal reports for tracking and reporting purposes. This requires the Display Fifth Year EL Monitoring System Preference to be set to Yes. | lep.fifthYearMonitoring |
Parent Notified | Indicates the date the student's parent(s) were notified about the student being eligible for EL services. | lep.parentNotified |
Parent Declined Date | This field indicates the date on which the student's parent(s) declined EL services. This field can be marked in the Attribute/Dictionary to not display. Mark the Hide checkbox in the Attribute/Dictionary if this is desired. | lep.parentDeclinedDate |
Comments | Any comments related to the student's EL record (500 character maximum). | lep.comments |
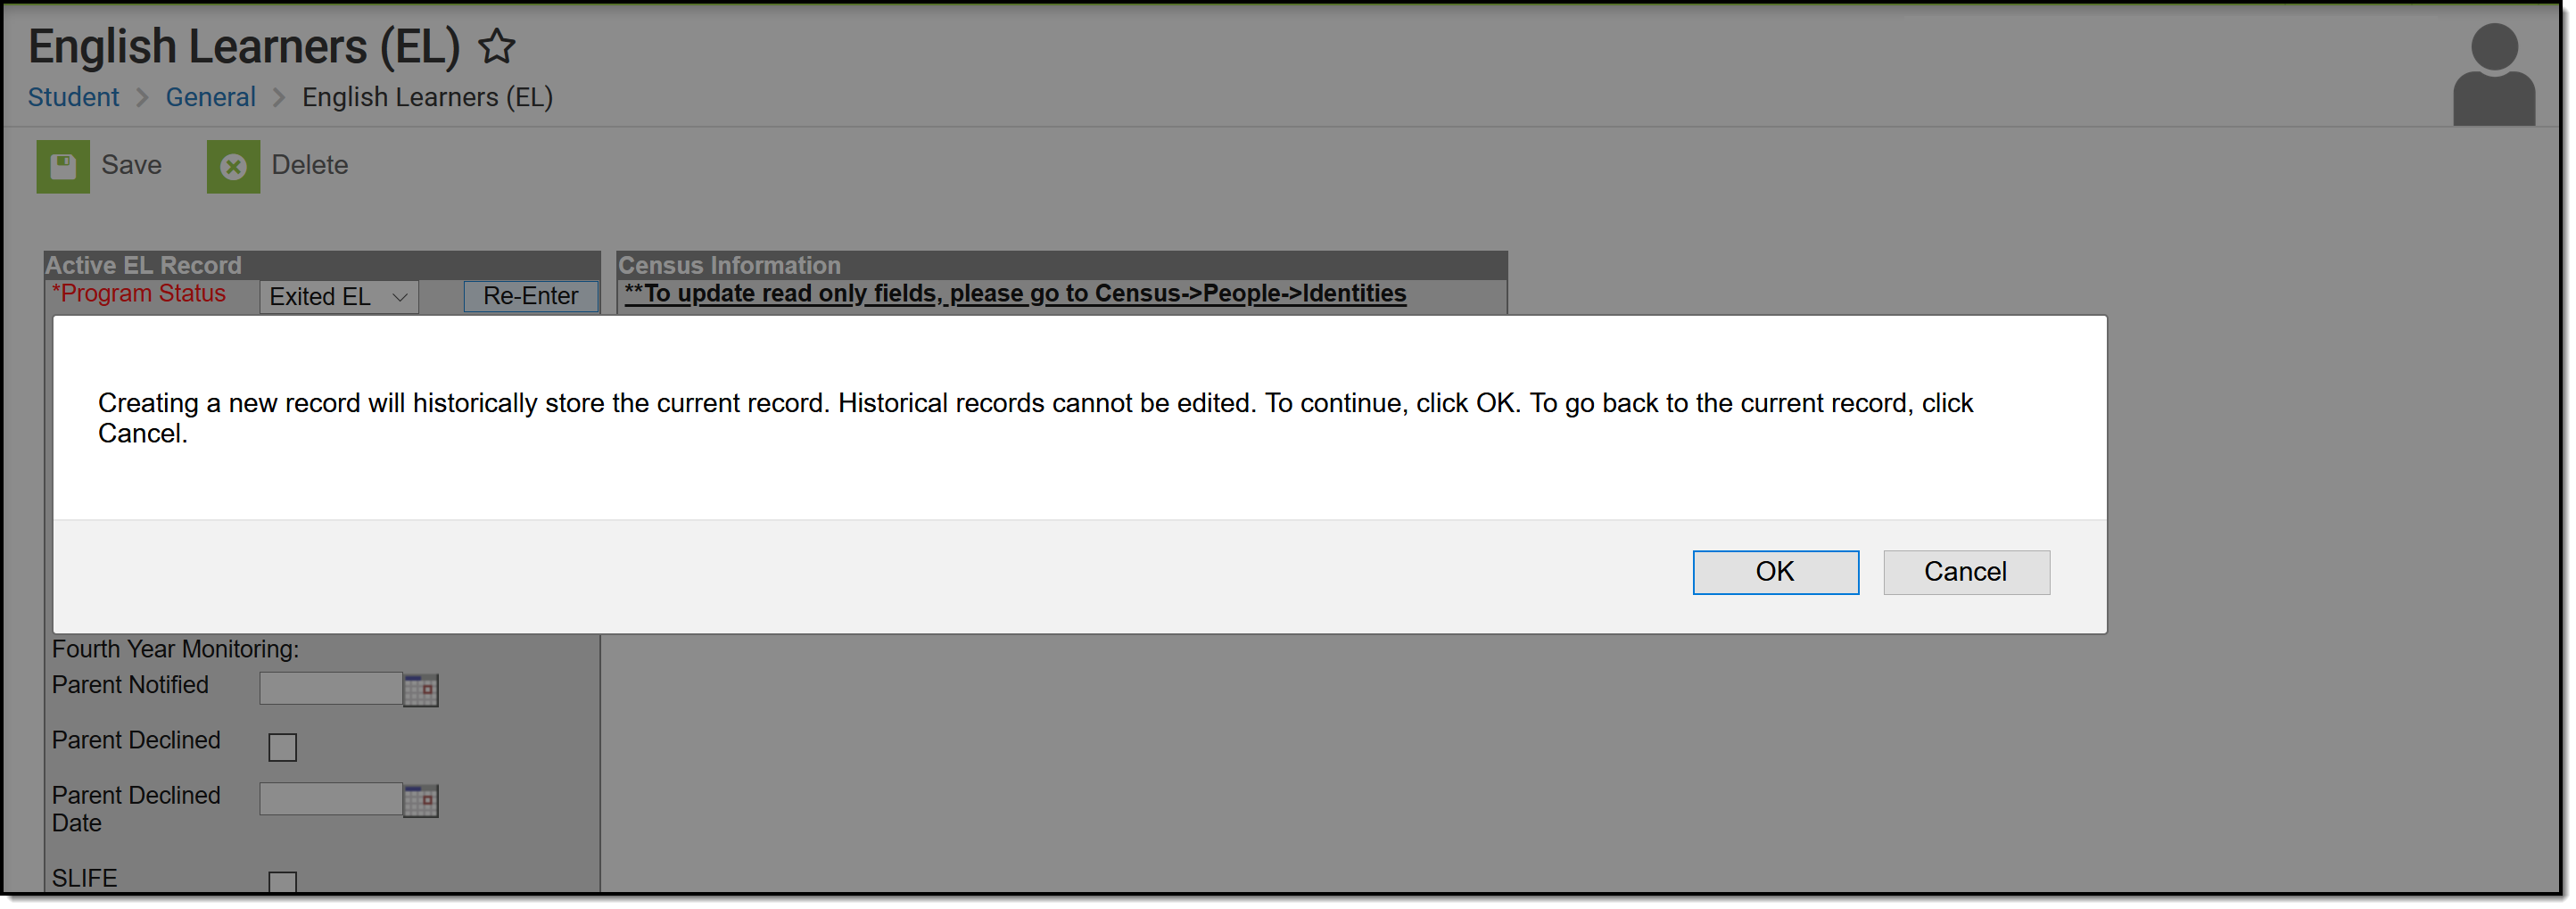
Re-Enter | Indicates the student has re-entered EL programming for a previously exited EL student. This button is only available for students who have an exited EL program record. If selected, the most recent EL record is historically saved and a new EL record is created. | N/A |
| Census Information | ||
Home Primary Language | Displays of the student's current Home Primary Language value. This field is read-only. This field populated based on values set in the Home Primary Language field found on the Identities tool. This value MUST be set in order to create an EL record. If no Home Primary Language value is established on the student's Identities tool, the default value established for the field within the Attribute/Dictionary reports in the Home Primary Language Field on the student's EL tool. | lepAssessment.language |
| Dominant Language | The language the student predominately speaks. | Identity.languageAlt |
| Native Language | The student's native language. | Identity.languageAlt2 |
First Entered US School | Displays the date the student first entered a U.S. school. This field is read-only. This field populates based on the date entered in the First Entered US School field found on the Identities tool. This field is not required, however, users are highly encouraged to populate this field. | ident.dateEnteredUSSchool |
| Birth Country | Displays the country in which the student was born, populated on the Identities tool. This field is read-only. | student.birthCountry |
| Wave Information | ||
Bilingual | Displays the student's Bilingual status (bilingual checkbox) from their most recent enrollment (then primary enrollment). This read-only field which displays the status that is reported through SIF in StudentPersonal/ExtendedElements/ExtendedElement/Bilingual. | |
| English Proficiency Code | Indicates the student's English Proficiency code. Displays the StudentPersonal/EnglishProficiency/Code being provided through SIF. | |
| English Proficiency OtherCode | Displays the StudentPersonal/EnglishProficiency/OtherCodeList/OtherCode being provided through SIF. | |
| District Defined Elements | ||
Districts can create their own custom elements for use on EL editors. These elements do not sync to State Edition and cannot be copied forward. These elements are available in Ad hoc Reporting in order to create filters based off of this data. | ||
When a student transfers and the school has used the Student Records Transfer process, EL services received at the previous school displays as links on the EL tool. PDF reports generate when the links are selected.
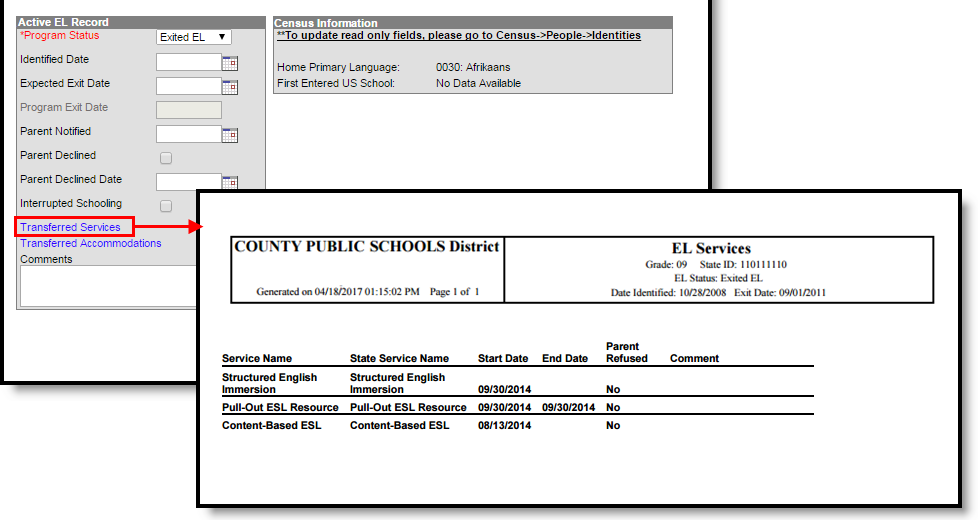 EL Records Transfer Data
In addition to assigned EL tool rights, viewing this transfer information requires Read rights to System Administration > Data Utilities > Student Records Transfer.
Create an EL Record
- Ensure the Home Primary Language and First Entered US School fields are populated on the student's Identities tool. Only the Home Primary Language Field is required in order to create an EL record; however, users are highly encouraged to also enter First Entered US School data.
- Select a Program Status.
- If the student has taken an Initial Determination Test (for example, the WAPT) and was found eligible, enter the Identified Date.
- If the student is eligible and currently receiving EL services, enter the Expected Exit Date.
- If the student is exiting their EL program or services, enter the Program Exit Date.
- If the student has taken an Initial Determination Test (such as the WAPT) and was found eligible for EL services, enter the Parent Notified date.
- If the student's parents were notified and refused EL services, mark the Parent Declined checkbox.
- If the parent declines EL services, enter the date in which the parent declined.
- Enter any Comments about the student's EL record.
- Select the Save button.
Home Primary Language Logic
A Home Primary Language value on a student's Identities tool is needed in order to create an EL record for the student. If a student has a NULL Home Primary Language value but a Default Value has been established for the field within the Attribute/Dictionary, the default value reports on the student's EL record. The default value MUST be a valid language code in order for it to report on a student's EL record. A valid Home Primary Language code is defined as the two letter code corresponding to the desired language.
The Home Primary Language field uses ISO language codes. To review and identify proper Home Primary Language code values, refer to the codes set within the Home Primary Language field on the Identities tool.
Re-Enter EL Students
Periodically, a student who was considered EL but passed the ACCESS and exited EL services needs to re-enter EL services. In order for these students to have accurate EL records, the Re-Enter button must be used on the student's most recent EL record.
- Select the Re-Enter button. A validation box displays, asking the user to confirm the action. Select OK to historically store the previous EL record and create a new record. Select Cancel to cancel the process.
- Enter all appropriate information within the available fields. See the Create an EL Record and EL Fields sections for more information about these fields.
- Click the Save icon when finished. The student now has a new re-entry EL record. The previous EL record is visible in the EL History section.
 Re-entering EL Services
View Historical EL Records
Every time a new EL record is created for a student, the previous record is historically stored and viewable within the EL History section. For State Editions users, this section describes both historical and active EL record information.
Both district defined fields and state localized fields appear in this section.
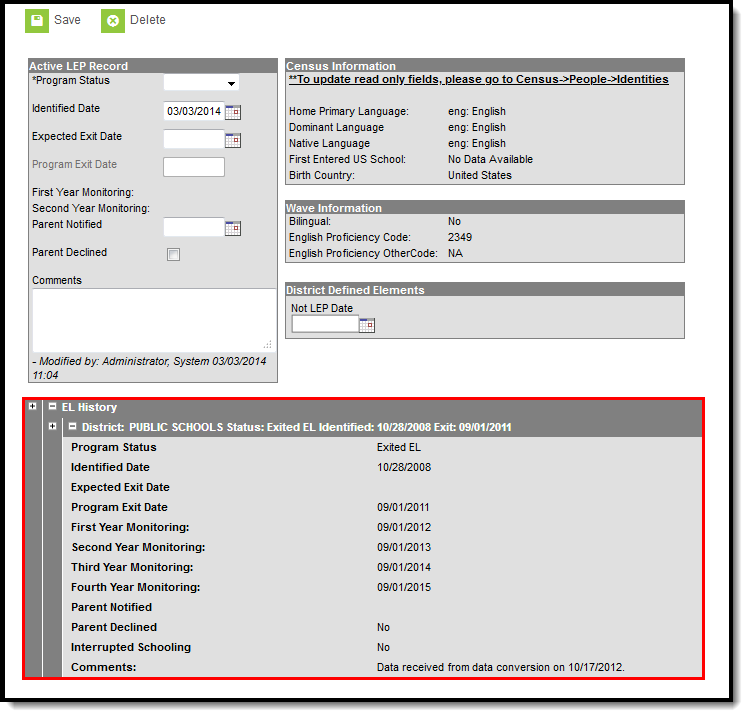
In the image above, the student's historical EL record is viewable by selecting the (+) next to the EL History and Status header. Because State Edition users are not allowed to modify EL records, the EL History section displays the active record as well as all historical EL records.
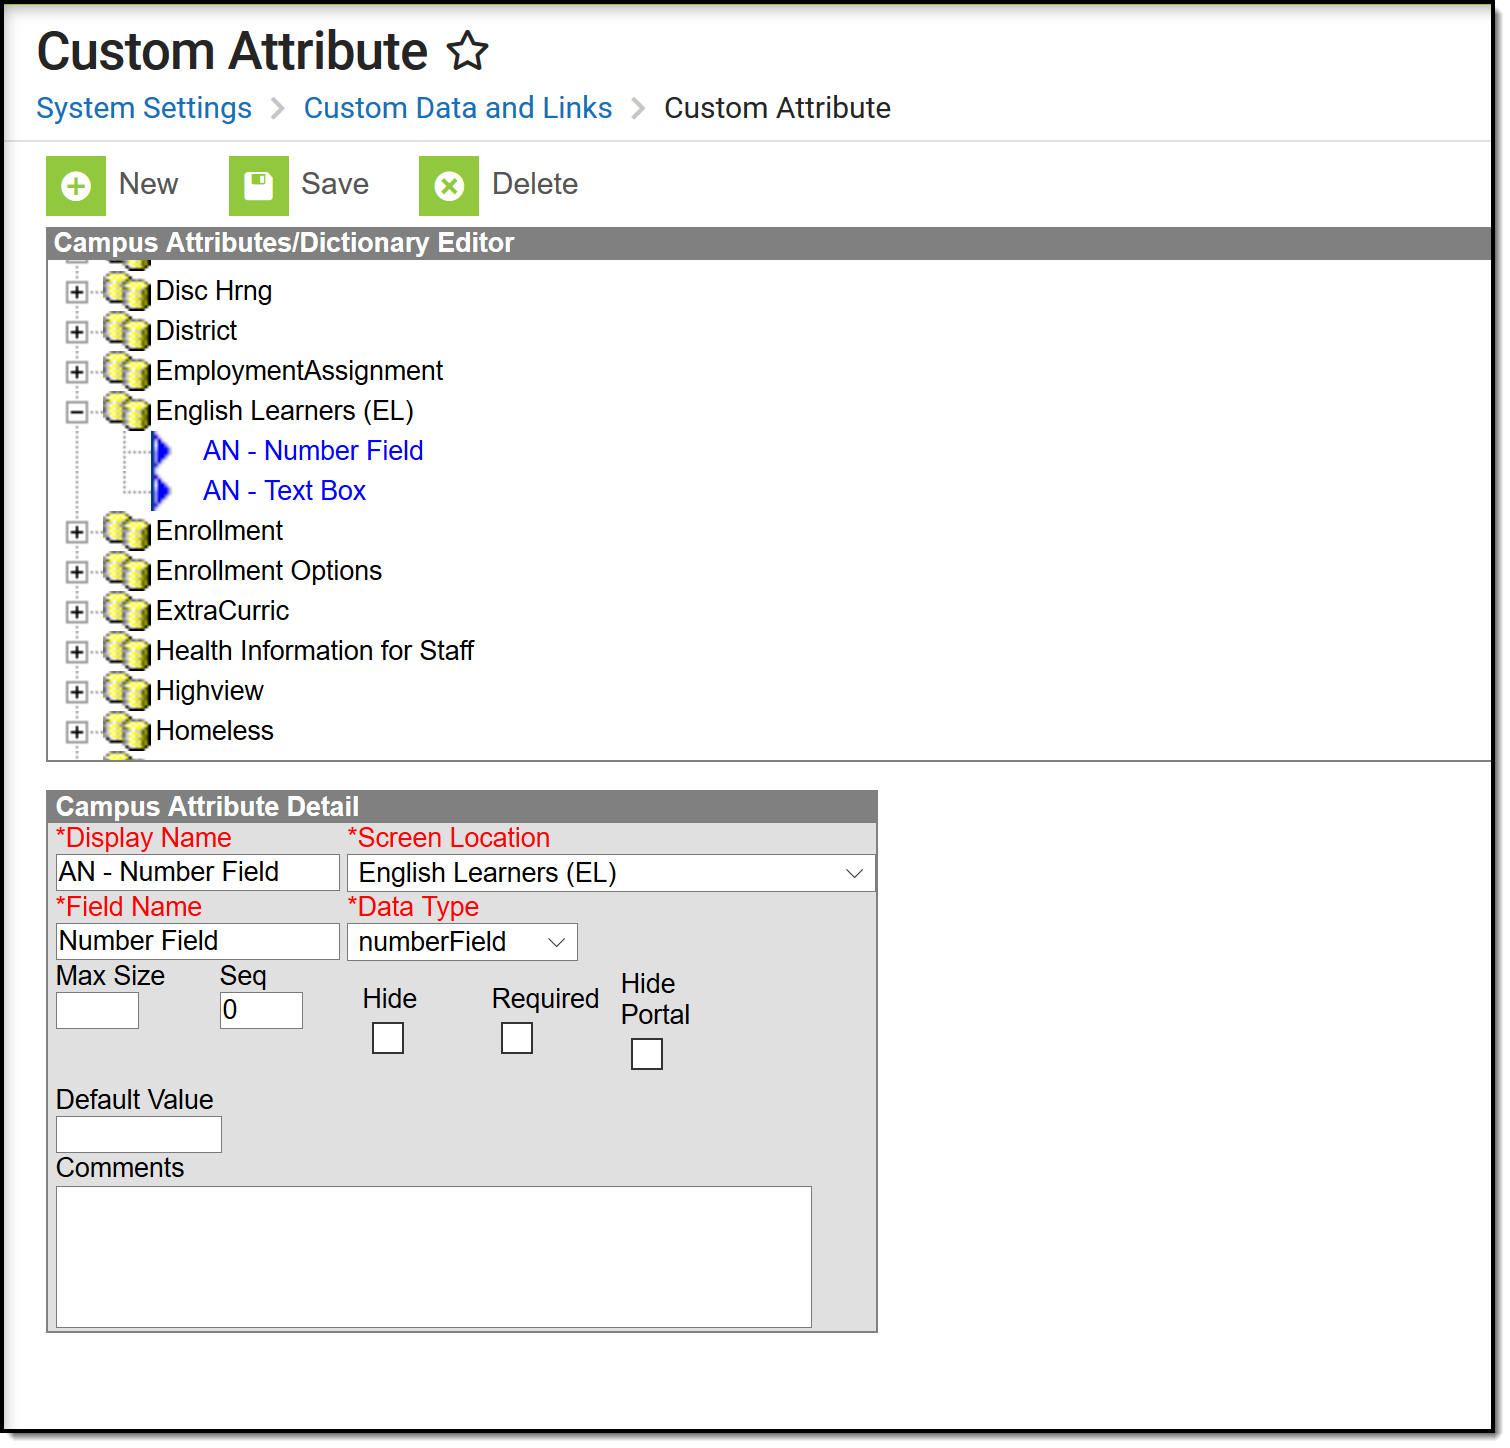
Create Custom EL Elements
When deciding to create custom EL elements, verify the element is not available elsewhere in Campus. Follow the instructions available on the Custom Attribute article.
These elements require the Screen Location, what determines where the element displays, to be EL.
 Custom EL Attributes
- Click the New icon on the Custom Attribute tool.
- Enter the Display Name.
- Select EL for the Screen Location.
- Enter a Field Name for this attribute.
- Select a Date Type from the dropdown list.
- Enter the Max Size for the new element.
- Enter the desired Sequence for the element.
- Mark the Hide, Required and Hide Portal checkboxes as needed.
- Enter a Default Value, if needed.
- Enter any Comments about this element.
- Click the Save icon when finished. The new attribute displays on the student's EL tool.
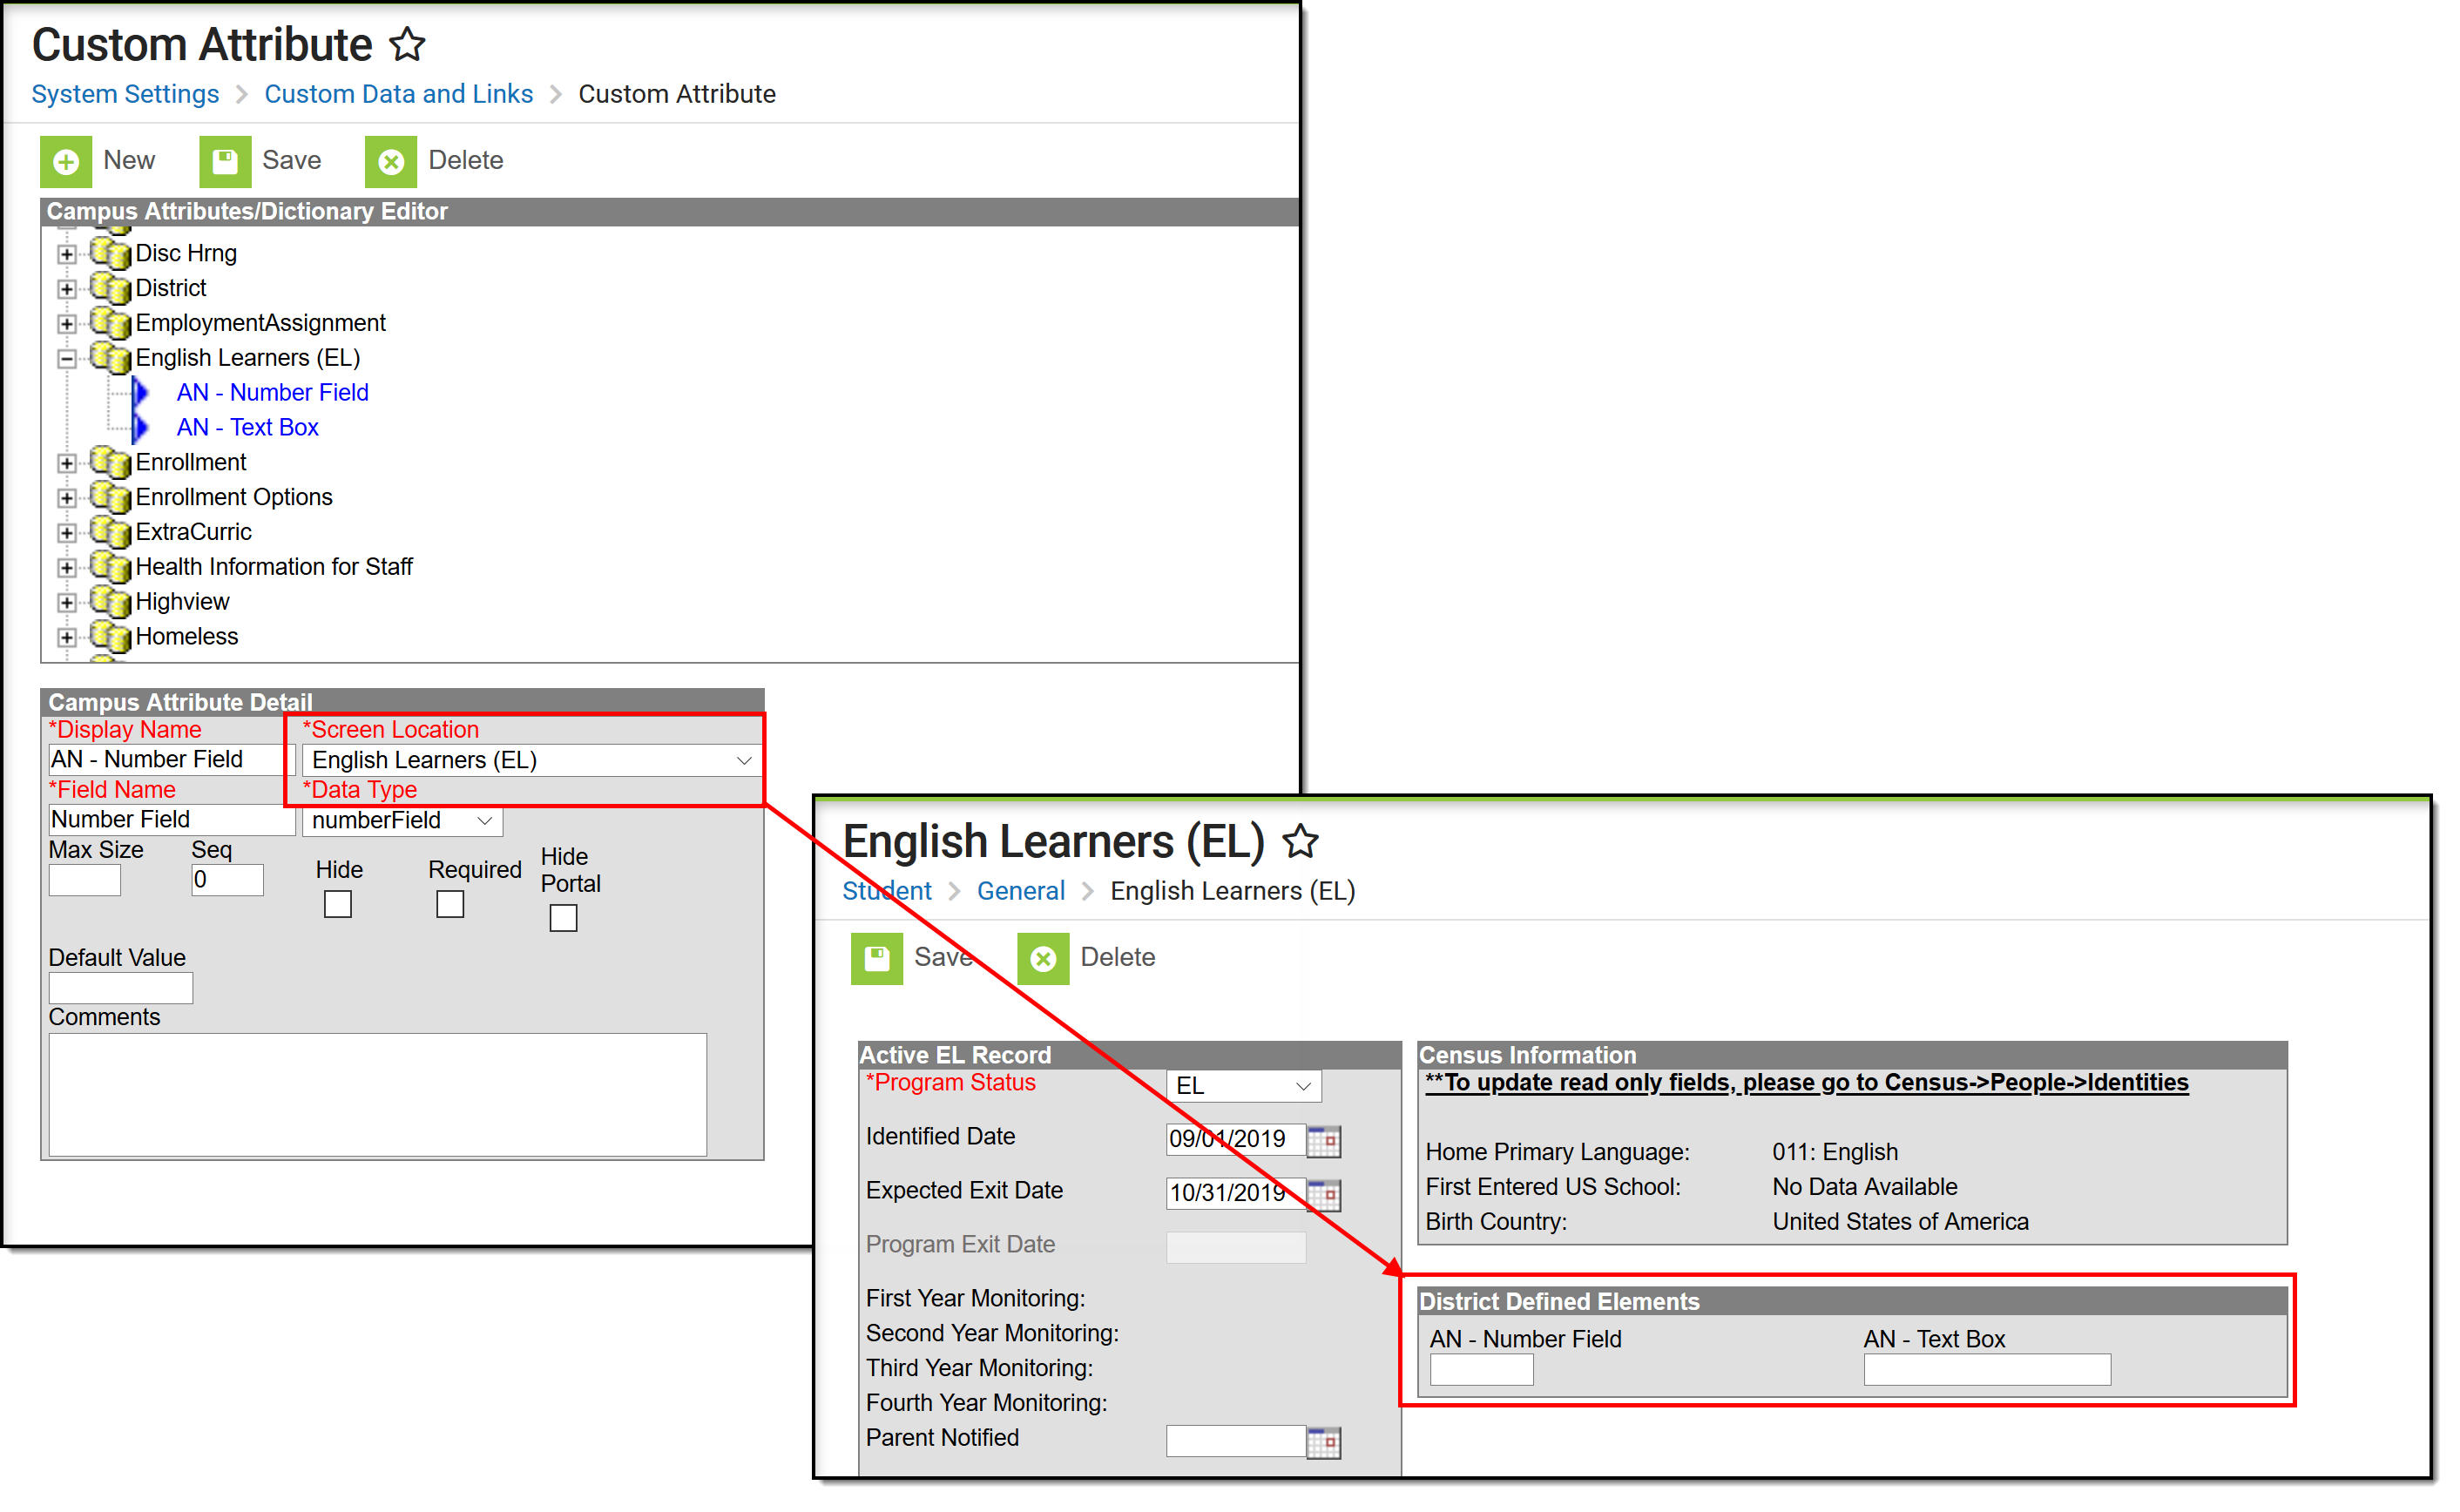 New Custom Attribute Display
Manage Documents
To view documents, click the Documents button on the action bar. Users with the appropriate tool rights may also complete the following tasks.
