Tool Search: Special Ed Documents
The Plan Copy Wizard allows users to copy a selected plan to a specific plan type and enter the start date of when the new plan will begin. Additional logic has been added to set preferences that determine how plans will be copied.
 Plan Copy Wizard
Learner Plan Copy Preferences
Tool Search: System Preferences
System Preferences needs to be set before a user copies plans. This setting determines how the copied plans will be locked. The following preferences are available:
Preference | Definition |
|---|---|
Leave the original plan’s locking as it was prior to copy | The newly copied plan will reflect the original plan’s settings, meaning it will be copied as locked or will copy as unlocked, depending on the original plan. This is the default setting. |
Lock the original plan after copy | The original plan will be locked after the plan has been copied. |
Only allow copy of a locked plan | Only locked plans will be allowed to be copied. |
Set Learner Planning Copy Preferences
- Determine the appropriate preference for the district in relation to Learner Planning Copy Plan functionality.
- Click the Save button. Logic tied to the selected plan will be implemented the next time the copy plan functionality is used.
Only system administrators should modify system preferences.
Plan Copy Wizard
The Plan Copy Wizard copies existing information from a plan and applies appropriate logic to the newly copied plan related to locked plans, services, and team members. The Copy Wizard appears after a user selects an existing plan and clicks the Copy button.
Only documents classified as plans will be copied using the Plan Copy Wizard. Other document types like Evaluations and Progress Reports can be copied, but there are no additional tools to be used when copying occurs.
When a plan is chosen for copying, a warning message displays explaining the plan is about to be copied. Users have the opportunity to continue with the copy process or cancel the process. Some warnings are dependent on the Learner Plan Copy Preferences selected. For example, if the preference to maintain the plan's lock status is set to Yes, the warning will alert the user of this logic.
Click OK to continue the copy process and view the wizard. If services are attached to the plan, that information will appear, along with the option to choose a new plan type and modify service information.
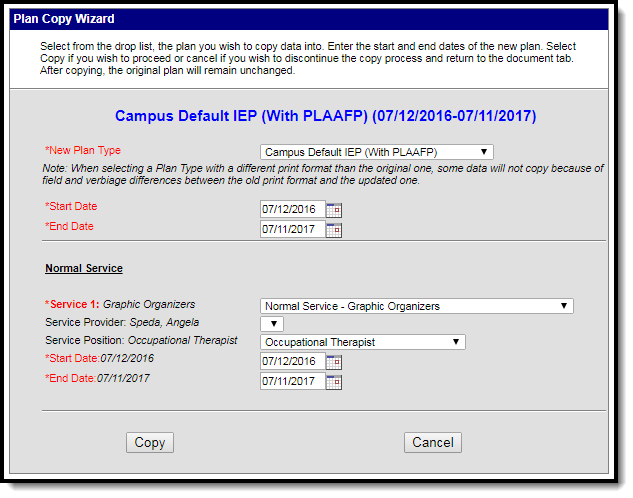 Plan Copy View
Using the Plan Copy Wizard
- Select the plan that should be copied from the Documents List.
- Select the Copy button. A warning message will appear, noting the education plan is about to be copied. Choose OK to continue. The Plan Copy Wizard appears.
- Select the New Plan Type from the dropdown list. This list displays all currently active plan types as entered in the Special Education Plan Type section in System Administration.
When selecting a Plan Type with a different print format than the original plan, some data will not copy because of field and verbiage differences between the old print format and the updated one.
- Modify the Start Date of the new plan that occurs after the existing start date by entering the date in mmddyy format, or use the calendar icon to select a date.
- Modify the End Date of the new plan that occurs after the existing end date by entering the date in mmddyy format, or use the calendar icon to select a date.
- If there are no services listed, continue to step 12. If there are services attached to the plan that is being copied, continue to the next step.
- Select the Service for the new plan. The existing service will appear in italics next to the field. This will be defaulted to the currently selected service.
- Select the Service Provider from the dropdown list.
- Select the Service Position from the dropdown list.
- Enter the new Start Date of the service that occurs after the existing start date. Existing dates will appear in italics next to the field and in the date fields. Modify the dates by typing in mmddyy format, or use the calendar icon to select a date.
- Enter the new End Date of the service that occurs after the existing end date. Existing dates will appear in italics next to the field and in the date fields. Modify the dates by typing in mmddyy format, or use the calendar icon to select a date.
Service End Dates automatically change to the Plan End Date, but can be modified as needed.
- Click the Copy button.
- Click OK to continue. After processing, the plan will be copied to the Documents List and will be ready for additional modification, if necessary.
