Tool Search: Survey Designer
The Survey Designer allows a user to create survey templates containing questions and responses. These templates can be saved and re-used if the survey is a recurring event. Surveys are accessed and filled out in the Parent/Student Portal.
See the Survey Designer Tool Rights article for information on available tool rights.
Create a New Survey Template
The steps below will guide you through the process of creating a new survey:
- Step 1. Enter Survey Details
- Step 2. Create the Survey
- Step 3. Modify Survey Logic
- Step 4. Test the Survey
- Step 5. Enter Language Translations
- Step 6. Add Respondents
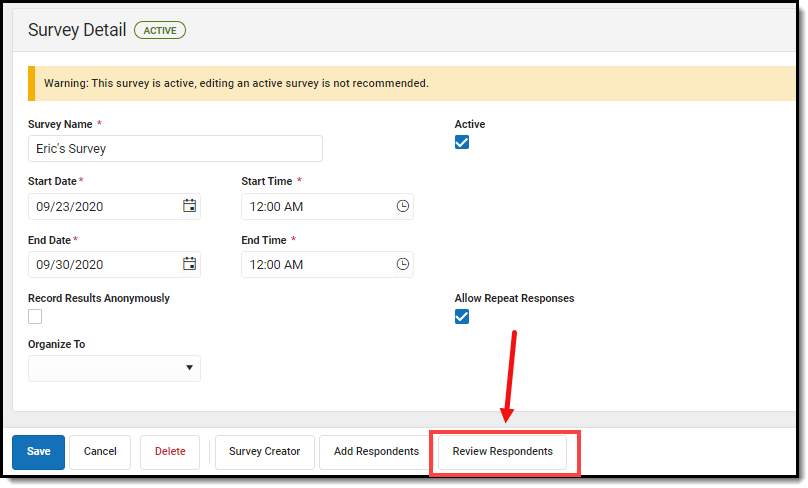
Step 1. Enter Survey Details
Click the New button. A Survey Detail editor displays.
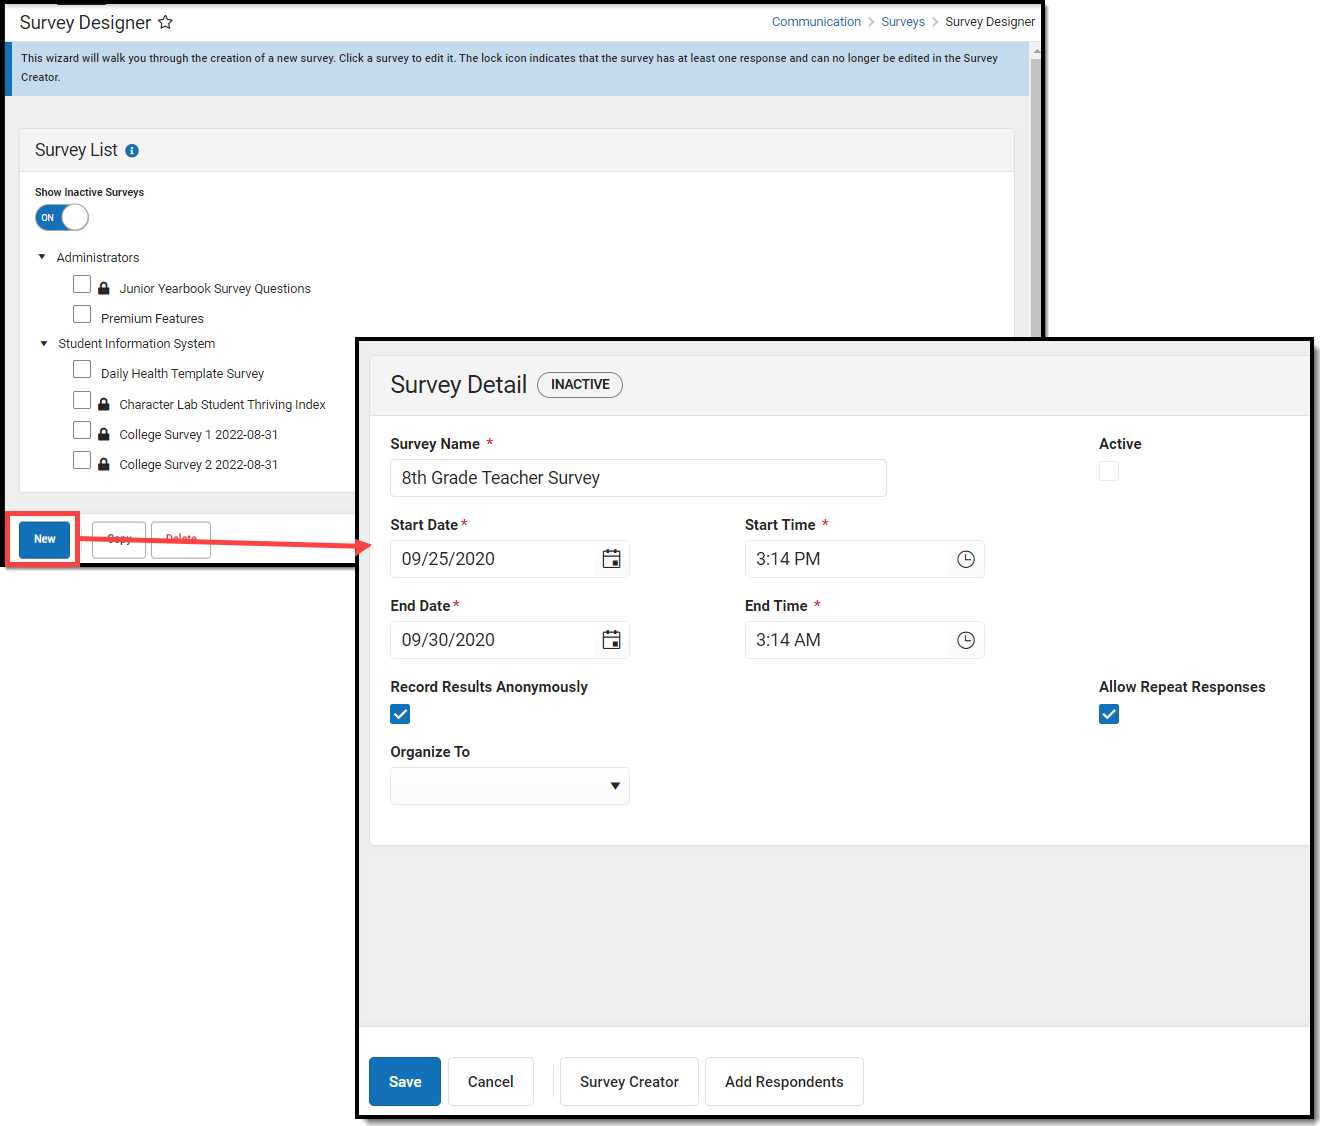
See the table below for information on these fields.
- Enter the Survey Name.
- Determine if the Survey is Active.
- Enter the Start Date/Time.
- Enter the End Date/Time.
- Mark the Record Results Anonymously, if desired.
- Mark the Allow Repeat Responses, if desired.
- In the Organize To dropdown field, select which user group has access to this survey template.
- Click the Save icon when finished. The Survey Detail will be saved. Move on to Step 2.
The table below describes each Survey Detail field:
Field | Description |
|---|---|
Survey Name | The name of the survey. This name is visible to those individuals taking the survey and is included in survey reports. |
Active | When marked, the survey is active. Respondents may access, complete and return the survey. |
Start Date/Time | The day and time the survey is available for respondents. Dates are entered in mmddyy format or can be entered using the calendar icon to select a date. Time is entered in HH:MM AM/PM format or in HH:MM Military format. |
End Date/Time | The day and time the survey is no longer available for respondents. Dates are entered in mmddyy format or can be entered using the calendar icon to select a date. Time is entered in HH:MM AM/PM format or in HH:MM Military format. |
Record Results Anonymously | When marked, surveys will be submitted anonymously, without any identifying respondent information (personID). Respondents are alerted when surveys are recording anonymous results. The option to Allow Repeat Responses is not available as no identifying person information is retained after the survey is completed. |
Allow Repeat Responses | When marked, the survey allows respondents to submit more than one response, should they decide to repeat the survey. Reports and extracts will display only the most recent submission. |
Organize To | The user account/user group(s) to which the survey is assigned. If a survey should only be accessible to the main survey staff member(s) and the district administration, this field should be set to User Account. |
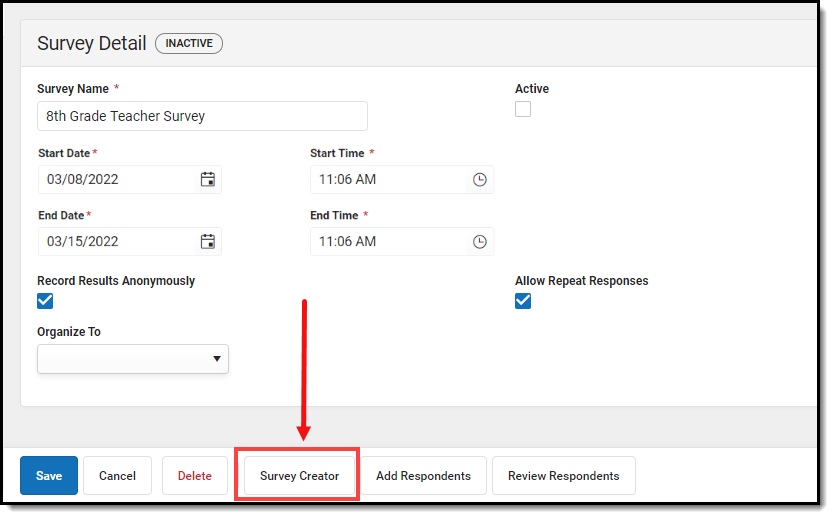
Step 2. Create the Survey
Once Survey Details have been entered, you now need to create the survey by clicking the Survey Creator button.
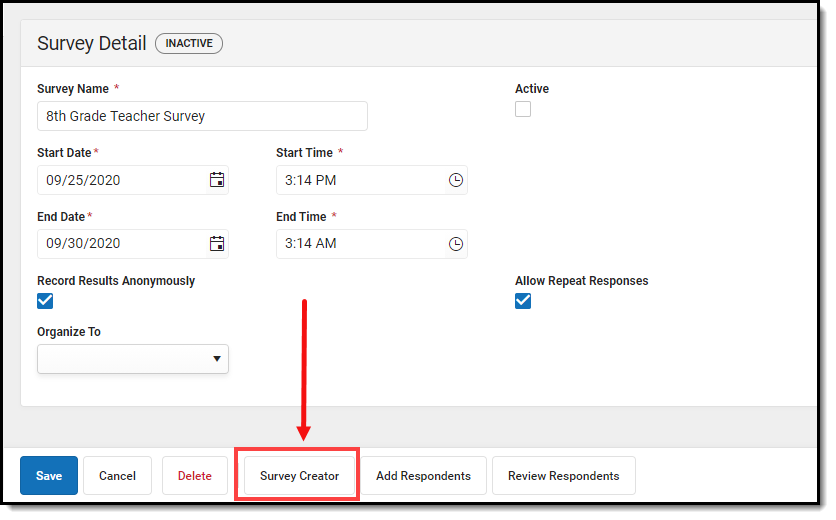
The Create a New Survey editor will appear, allowing you to begin adding in questions, modifying question properties, adding pages to the survey, and more.
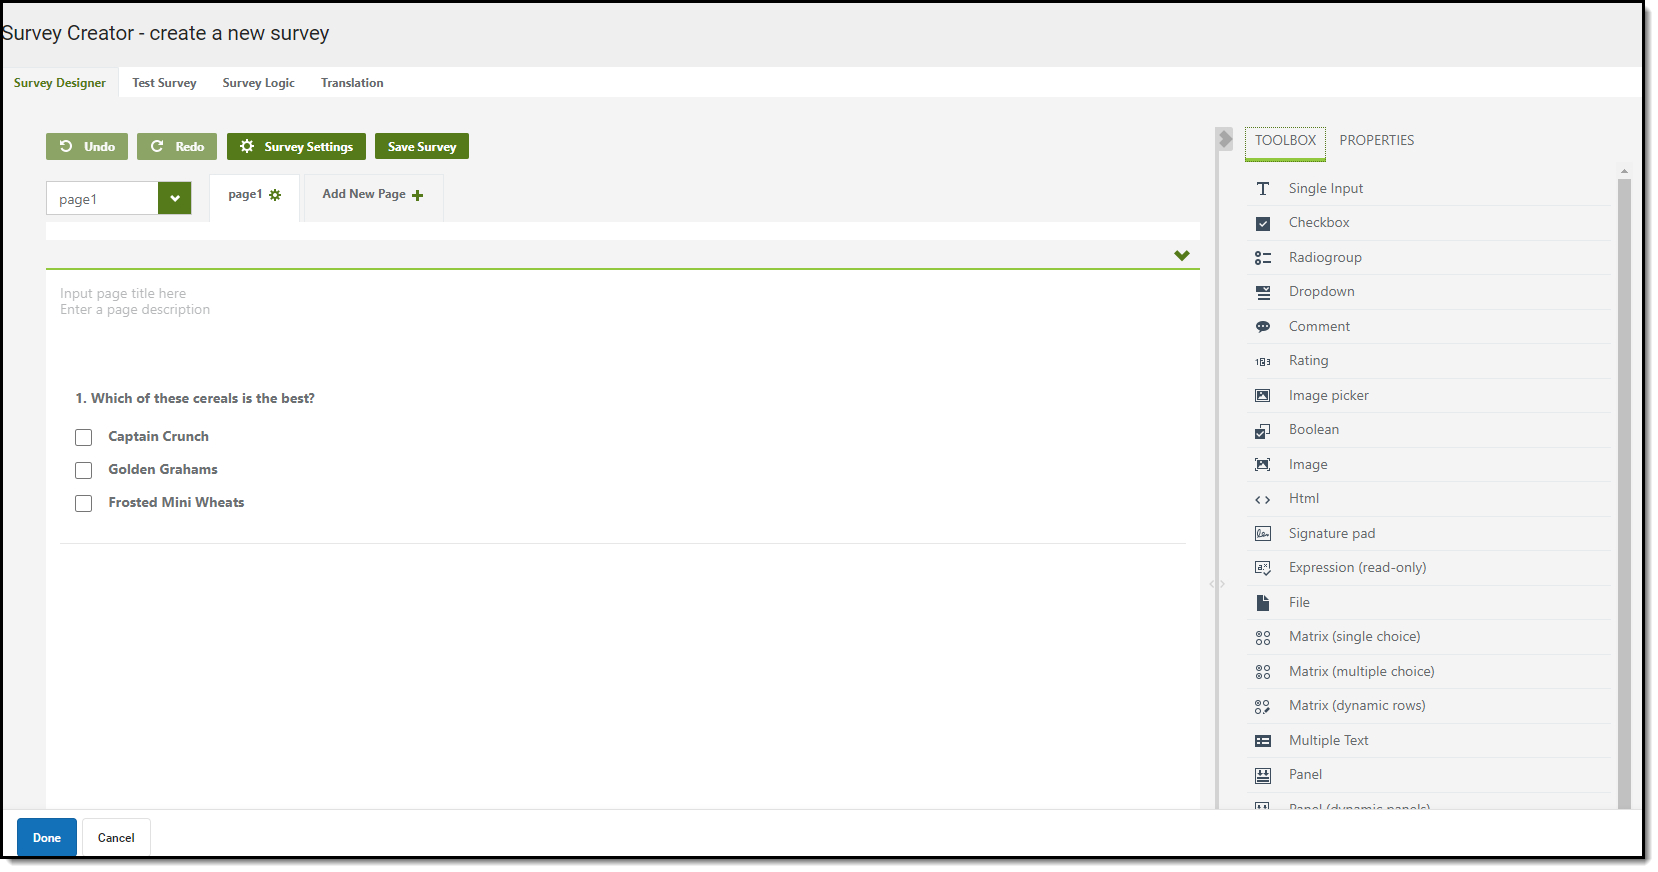
Add Questions to the Survey
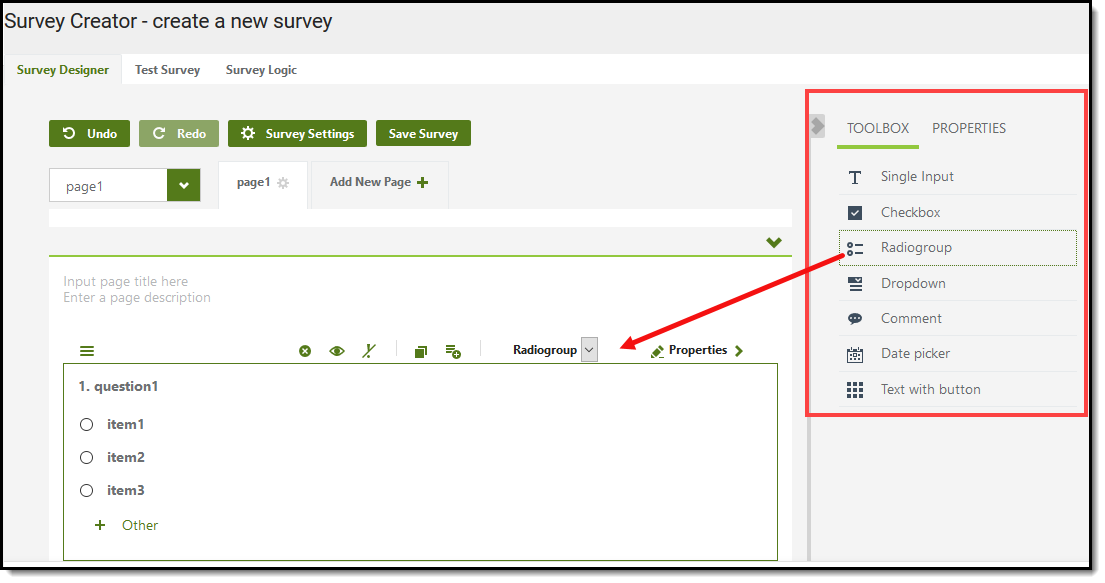
Begin creating your survey by selecting a question type in the Toolbox section on the right-hand side of the screen.
Once a question type is selected, it will appear in the editor in the middle of the screen where you can begin filling out question details.
For example in the image below, the Radiogroup option was selected which added the question to the editor and can now be filled out with question and answer details.
For more information about each Toolbox option, expand the section below.
| Question Type | Description and Example |
|---|---|
| Single Input | The Single Input option creates a question with a single allowed input such as text or a dropdown list. |
| Checkbox | The Checkbox option lets you to create a question with checkboxes used for marking responses.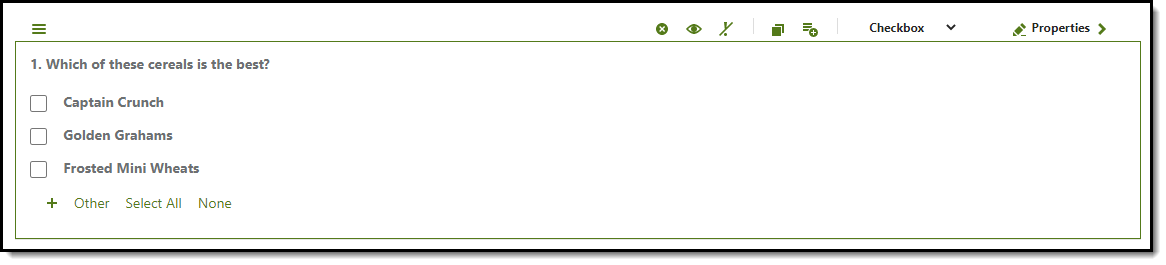 |
| Radiogroup | The Radiogroup option lets you to create a question with radio buttons to mark a response.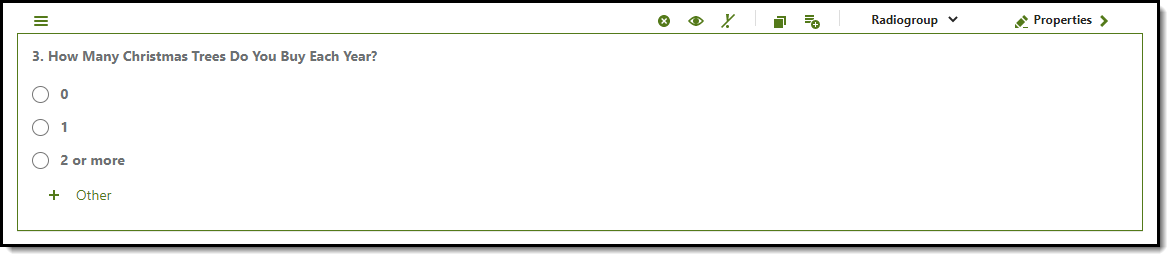 |
| Dropdown | The Dropdown option lets you to create a question where the user selects a response from a dropdown list. |
| Comment | The Comment option lets you to create a question where the response is a text field. |
| Date Picker | The Date Picker lets you create a question where the answer is selecting a date.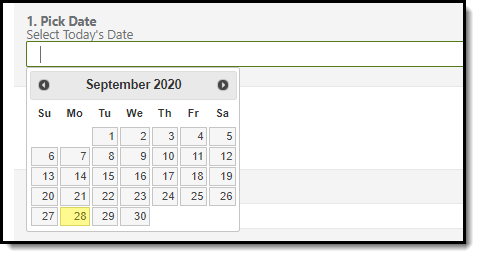 |
| Text with Button | The Text with Button option lets you create a question where the response is selecting a customized button. |
Premium Options - Only Available to Customers with the Campus Analytics Suite
| |
| Rating | The Rating option lets you add a star rating to the survey.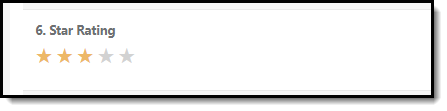 |
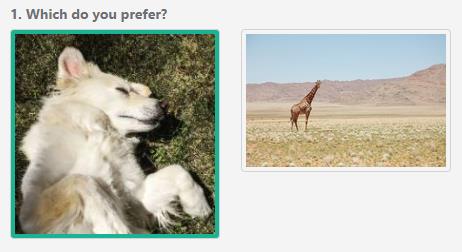
| Image Picker | The Image Picker option lets you create a question where the user has to select an image to answer.
This option requires use of the Campus Digital Repository (CDR) to function. If your district does not use CDR, this option is not available. |
| Boolean | The Boolean option lets you create a question where the user has to move a circle left or right to indicate their answer.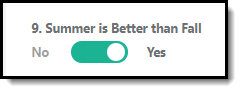 |
| Image | This option lets you insert an image as the question.
This option requires use of the Campus Digital Repository (CDR) to function. If your district does not use CDR, this option is not available. |
| HTML | This option lets you use HTML to format and display a question in the survey. |
| Signature Pad | The Signature Pad option lets you create a question where the user can use the mouse cursor to sign their name within the field. This option requires use of the Campus Digital Repository (CDR) to function. If your district does not use CDR, questions using this question type will not appear on external surveys. |
| Expression (Read-Only) | Allows the survey creator to perform a calculation in the survey. For example, 2+1 = 3 would display to the Survey Respondent. |
| File | This option lets you create a question that links to an uploaded file. Max file size of 5mb. This option requires use of the Campus Digital Repository (CDR) to function. If your district does not use CDR, questions using this question type will not appear on external surveys. |
| Matrix (single choice) | Allows respondents to evaluate one or more row items using a single set of column choices. |
| Matrix (multiple choice) | Allows respondents to evaluate one or more row items using multiple column choices. |
| Matrix (dynamic rows) | Allows respondents to dynamically add row items and select from multiple column choices. |
| Multiple Text | Allows respondents to input text for one or more rows of prompts. |
| Panel | This option lets you create a Panel container within the survey. This is not a question. Questions can be embedded into panels. The following questions cannot be imbedded into an Panel:
|
| Dynamic Panels | This option lets you create a Panel container within the survey that can be replicated or deleted by the respondent. This is not a question. Questions can be embedded into dynamic panels. The maximum number of Dynamic Panels that can be added to a survey is 5. The following questions cannot be embedded into a Dynamic Panel:
|
| Sortable List | This option lets you create a question where the answer can be sorted and ordered. 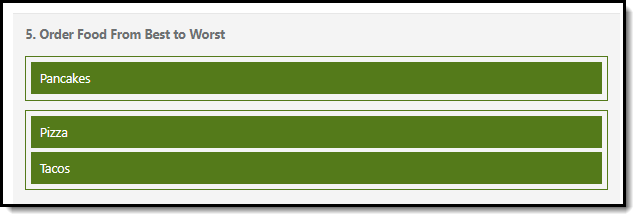 |
| Bar Rating | This option lets you create a question where the respondent answers by selecting a bar rating. |
| Emotions Ratings | This option lets you create a question where you ask the respondent to answer by selecting an emoticon indicating their satisfaction (or dissatisfaction). These types of questions are great for adding a condition where if the answer is dissatisfaction, another field appears asking the respondent to explain why.  |
| noUiSlider | This option lets you create a question where the respondent answers by moving a slider left or right.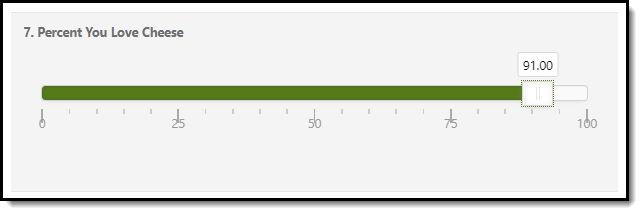 When the Stepped option is selected, slider values are rounded to smooth out where the pips appear. For example: When the Stepped option is selected, slider values are rounded to smooth out where the pips appear. For example: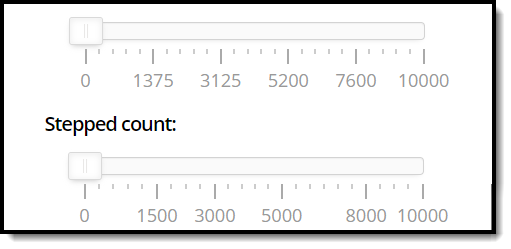 |
Modify Survey Settings
Survey Settings can be further modified by clicking the  button near the top of the screen and modifying setting throughout the
  tab.
tab.
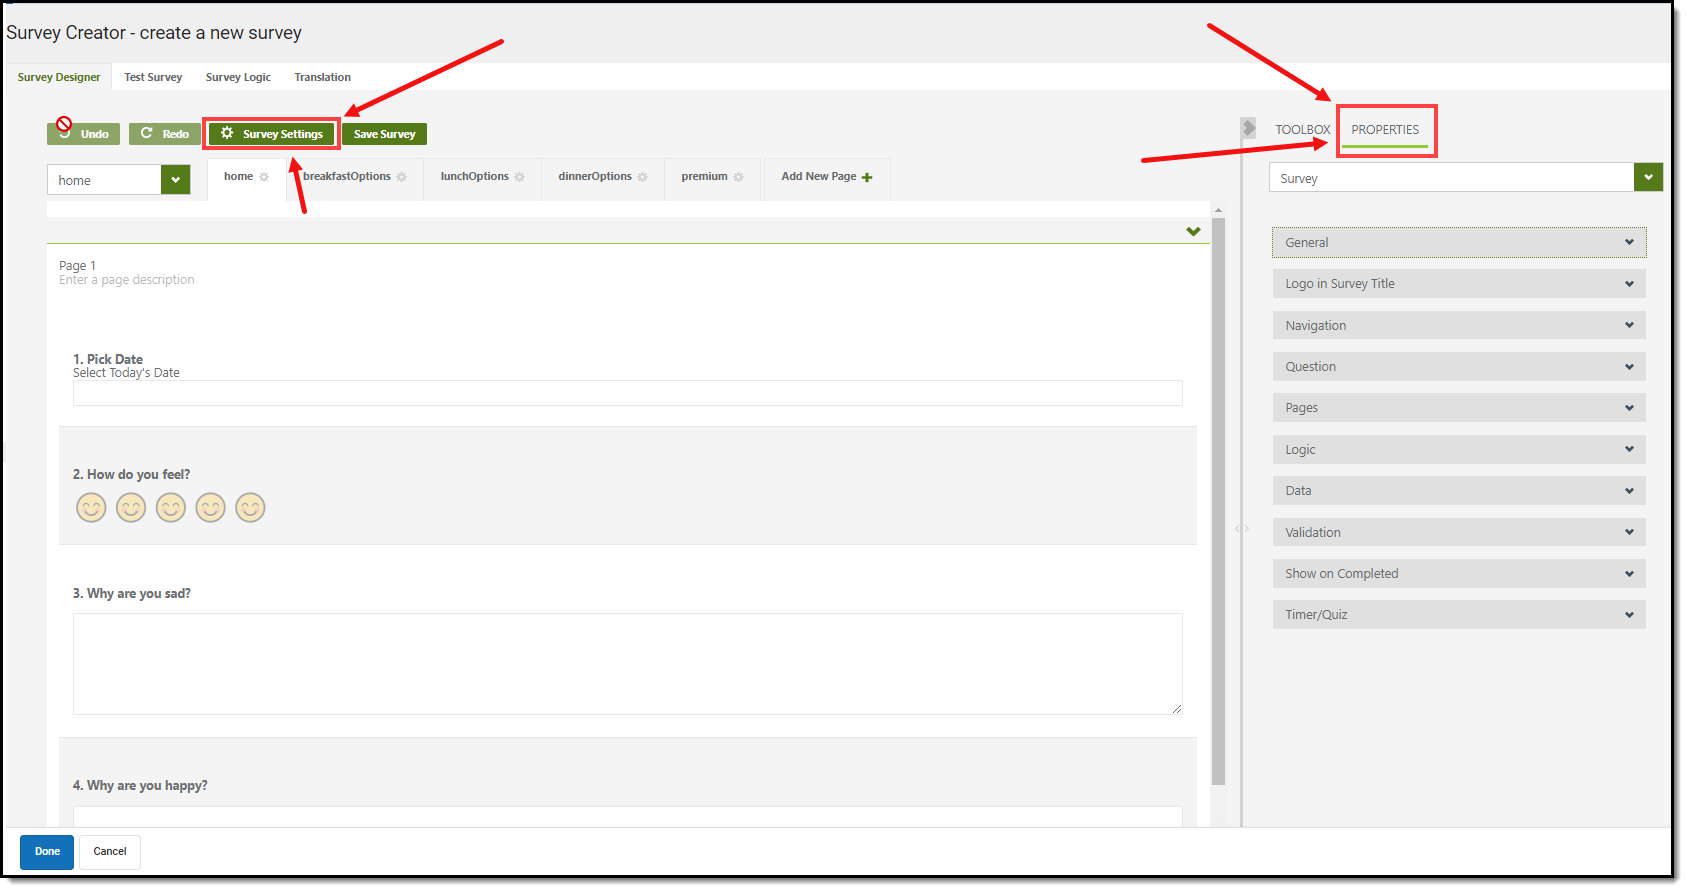
Expand the section below to learn more about each available property.
| Property | Description |
|---|---|
| General | General properties let you modify the survey title, description, whether or not the title appears in the survey, the default language of the survey, and whether the survey can be edited (answered by the user) or is read-only.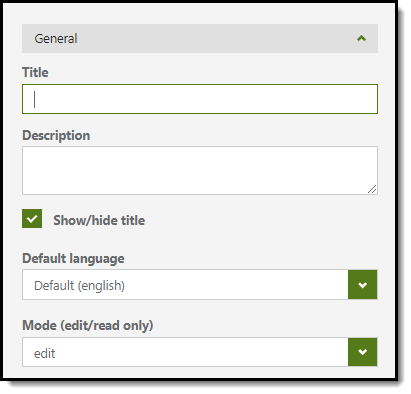 |
| Logo in Survey Title | This editor lets you add a logo to the title of the survey, modify the position of where the logo will appear as well as the size and width of the title logo.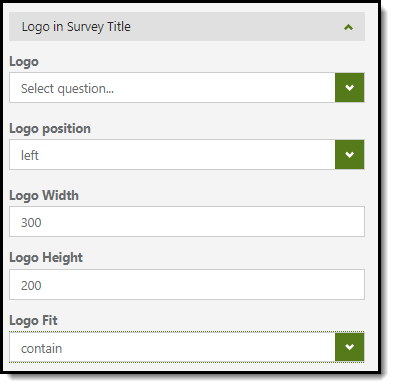 |
| Navigation | This editor lets you modify how the user is able to navigate within the survey. You can add customized previous, complete, preview, and start buttons, as well as define where these buttons will appear in the survey and if a survey progress bar is shown.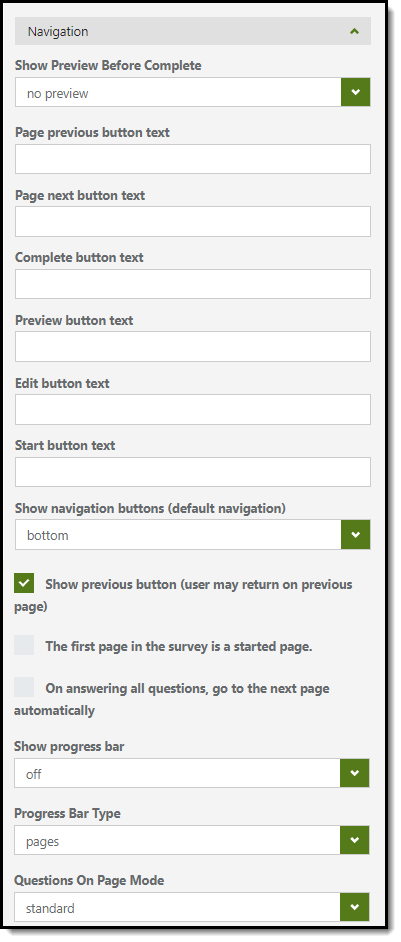 |
| Question | This editor allows you to modify how questions appear within the survey. You can indicate where the question title appears, there question description appears, if questions are numbered, the pattern of how questions are displayed, and the maximum amount of characters allowed for questions.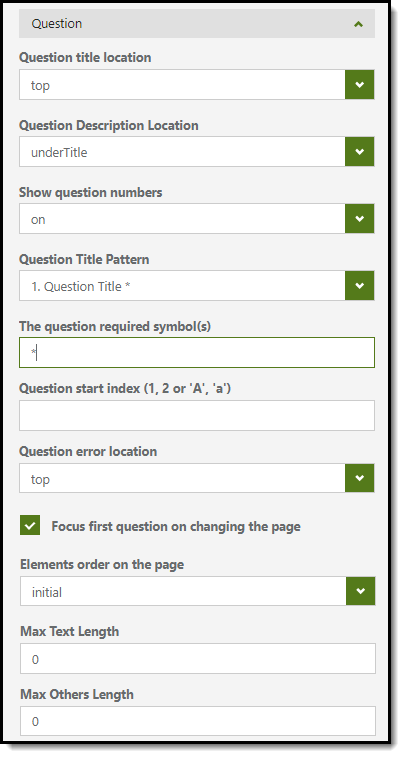 |
| Pages | This editor allows you to modify survey page names, the order of pages in the survey, add additional pages to the survey, and whether or not page titles and page numbers are displayed.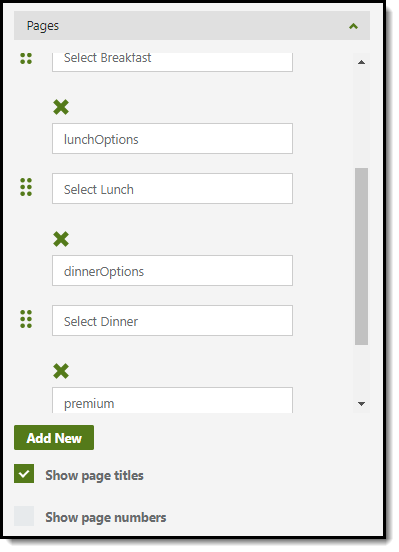 |
| Logic | This editor allows you to add logical expressions to your survey as well as question triggers. Triggers can be used to allow additional questions to become available depending on how the user answered a previous question (such as asking for clarification if the user indicated displeasure or confusion in a previous question).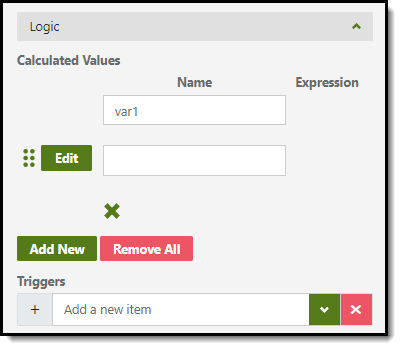 |
| Data | This editor allows you to determine how data is stored and updated within the tool.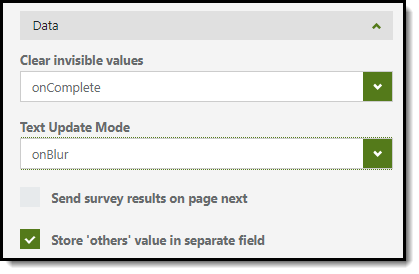 |
| Validation | This editor allows you to control how data validations are processed, whether it be when the user attempts to move to the next survey page or when the user attempts to complete the survey.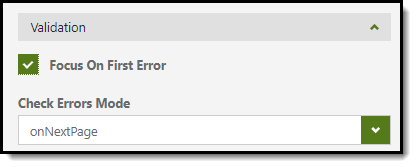 |
| Show on Completed | This editor allows you to add customized text and URLs to appear once the user has completed the survey. You can also set the survey to redirect the user to a URL or load specific HTML upon completion of the survey.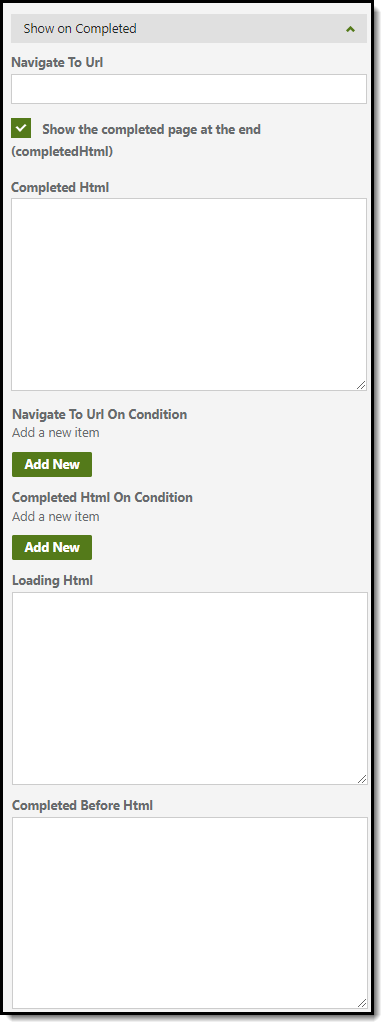 |
| Time/Quiz | This section allows you to determine how much time the user is given to complete the survey, the maximum amount of time allowed to finish a page in the survey, and if a timer is show in the survey to indicate to the user the survey time constraints.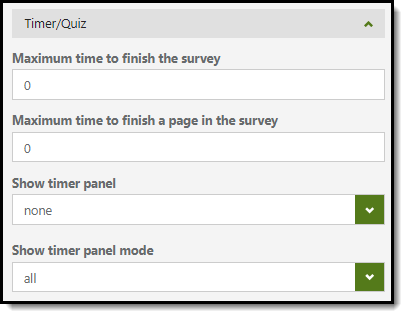 |
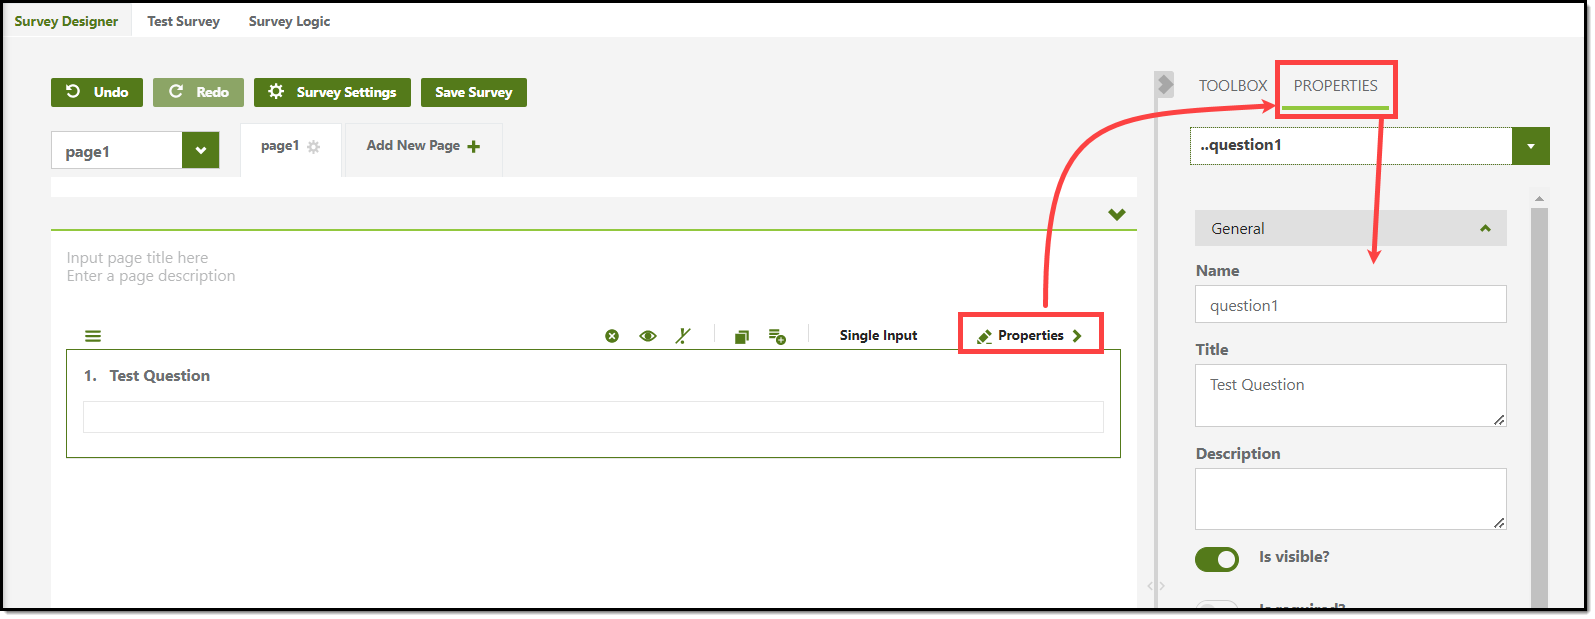
Modify Question Settings
Each question within a survey can be further modified using a number of available properties. To modify a question's properties:
- Select the question
- Click the Properties button
- Navigate to the Properties tab on the right-hand side and begin modifying each property accordingly.
Expand the section below to learn more about each available property.
| General | |
| Property | Description |
| Name | Name of the question within the Properties tab. The name helps you identify which question you are modifying when using the Properties tab. |
| Title | Title of the question. For example in the image above, the question is titled 'Test Question'. |
| Description | This field allows the user to explain (describe) the answer that they are looking for - may contain guidelines for length, format, examples, or clarifying text related to the question.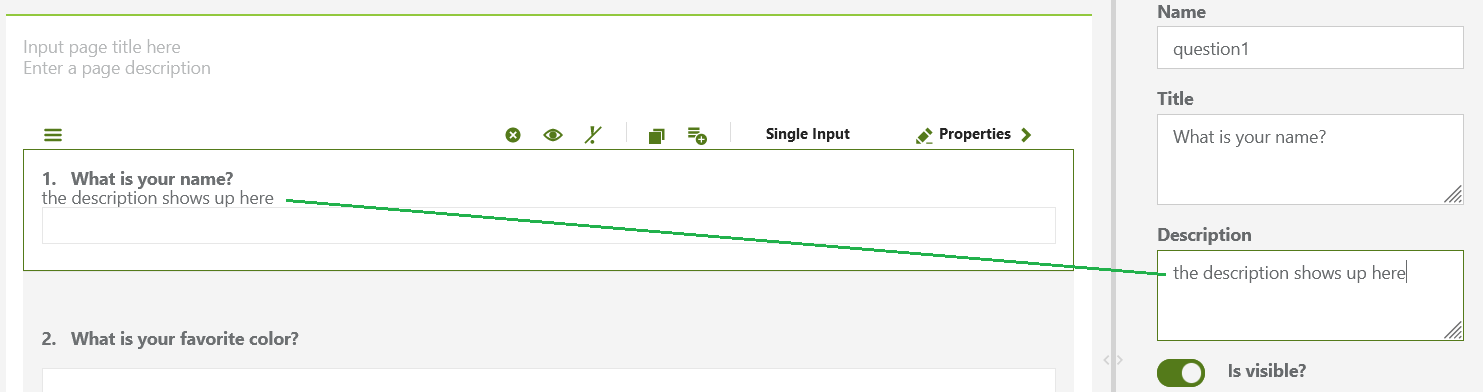
|
| Is visible? | Determines whether this field is automatically visible to the user. |
| Is required? | Determines if this question must be answered before the survey can be submitted. |
| Read only | Determines whether the question allows the user to edit it or if the values can only be read. |
| Input Type | This determines the type of values that the field expects. |
| Input place holder | This determines the placeholder text that is initially set before a user enters their own value. |
| Auto complete | This field engages the browser's auto-complete feature. The value entered in this field determines the type of information that can be auto-completed and what cache values the browser will look for when performing an auto-complete. For example, Street-address will look at your browser's cache to find stored address information. See this article for more information about autocomplete. |
| Data list | This field allows you to build a list of preferred auto-complete answers offered to the user when filling out the field. This field does not require an Auto complete value be entered however, this field and the Auto complete field can work in tandem. For example, if an auto complete value is entered, the question will auto-complete with associated browser-cached values along with all value entered in this field. Each item in this field must be entered on a new line (do not separate items by commas, semicolons, etc). |
| Clear incomplete | Incomplete survey answers which do not meet the input requirements are cleared out when the user attempts to complete the survey. |
| Show mask on hover | Hovering the cursor over the answer field displays a message indicating the input mask entered in the Input mask field below. |
| Input format | The allowed format for inputted values. For example, the question is set to 'datetime' and this field is set to mm/dd/yyyy as the input format. |
| Input mask | The type of input allowed for the question (i.e., decimal, email, datetime, etc). |
| Logic | |
| Property | Description |
| Visible if | Allows for conditions to be set in order for this question to be visible to submitters. |
| Enable if | Allows for conditions to be set in order for this question to be enabled for submitters. |
| Required if | Allows for conditions to be set in order for this question to be required for submitters. |
| Default value expression | Allows you to enter an expression to display a calculated default value. |
| Layout | |
| Property | Description |
| Is start with a new line? | Determines whether this question should be on its own line or if can be on the same line as other questions if space allows it. |
| Hide number | Hides the automatic question numbering for this question. |
| State | Allows you to control if the question is defaulted to being expanded or collapsed. This is especially useful for very long questions. |
| Title location | Sets where this question’s title will appear. |
| Description location | Sets where this question’s description will appear. |
| Indent | Sets the indentation for this question. |
| Width | Sets the initial width of the question. |
| Min width | Sets the minimum width of the question. |
| Max width | Sets the maximum width of the question. |
| Size | Sets the size of the question. |
| Data | |
| Property | Description |
| Value name | Allows the value of the answer to be saved under a different name than the question name. This is useful when multiple questions share the same name as each question name should be unique to keep answers aligned with the proper question. |
| Default value | This is the value that will initially be inserted into the field. |
| Correct Answer | This allows a correct answer to be set for the question. |
| Use display values in title | Enables display values within the title. |
| Text update mode | This determines when text will update. |
| Validation | |
| Property | Description |
| Required error text | This is the text that displays when a required field is not filled in. |
| Validators | These allow the entered values to be validated against the condition(s) inserted here. |
| Maximum length | Maximum length of the value that the question will accept. |
Add Additional Pages to the Survey
You can add additional pages to your survey by click the 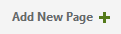 button.
Additional survey pages appear as tabs near the top of the editor (see image below).

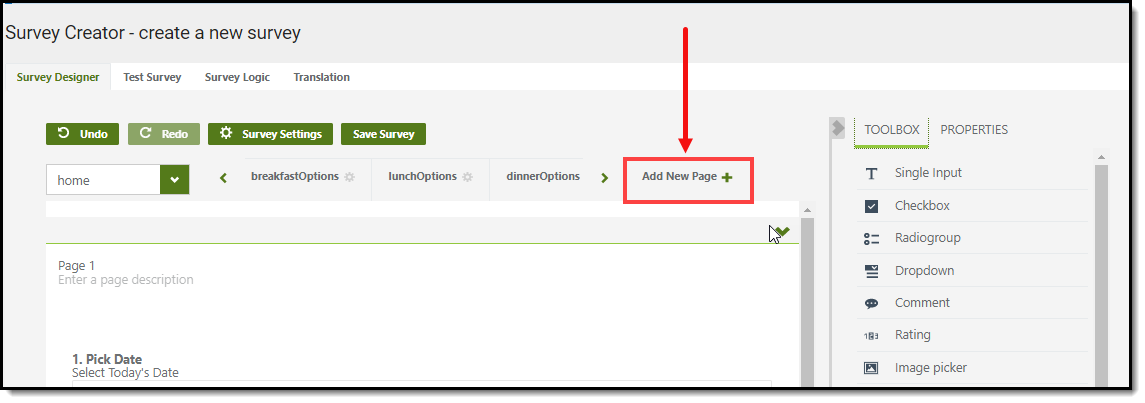
Step 3. Modify Survey Logic
Once questions have been added, you can customize conditional logic to be applied to each question and answer.
To add logic:
- Click the
 tab near the top of the screen.
 - Click the Add New button. An editor will appear where you can begin adding conditions and actions.
- Once complete, click Save or Save and Return.
 tab near the top of the screen.
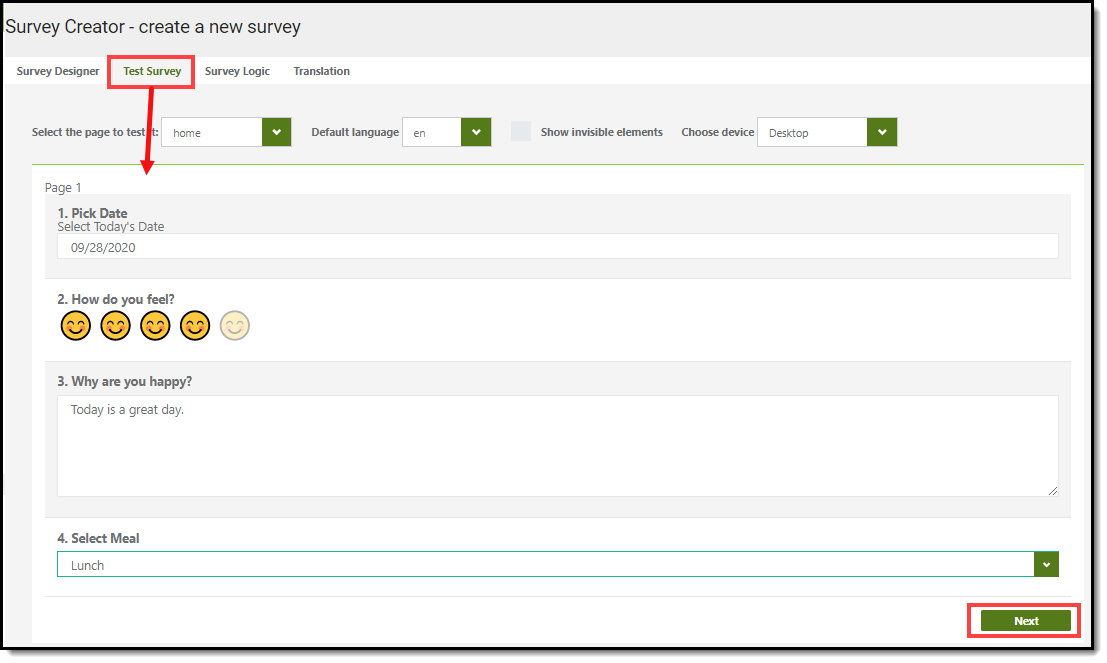
Step 4. Test the Survey
Once details, questions, properties, and logic have been entered, it is time to test the survey and ensure its functioning and appearing as intended. To test the survey, click the  tab found near the top of the screen.
Once selected, the survey will appear in the editor where you can interact with each question, simulating exactly how users would experience the survey.
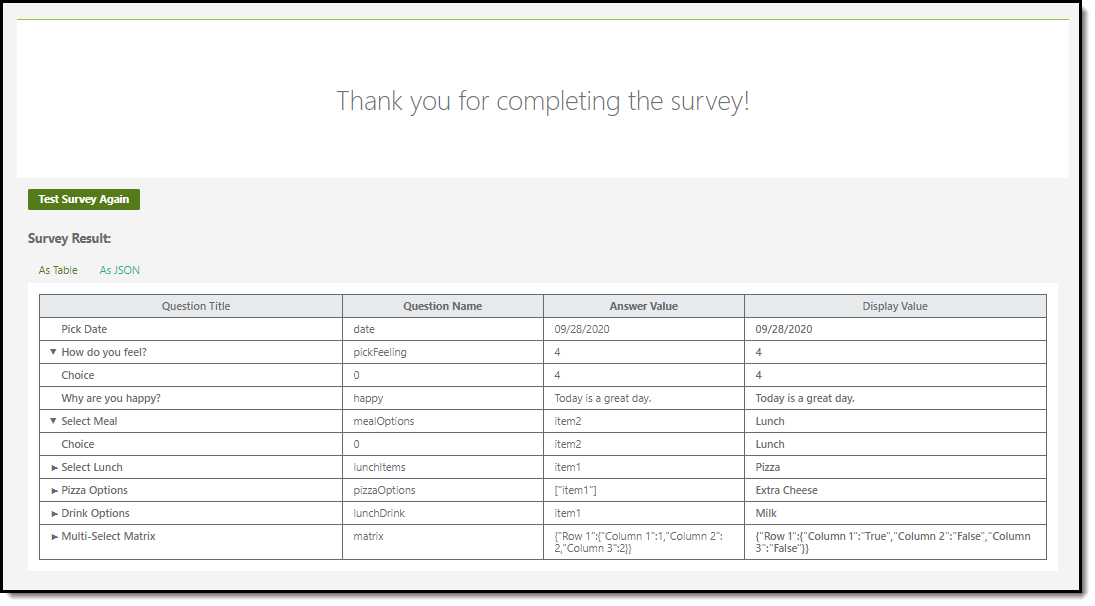
Once you finish the survey you will see your survey results. You can expand survey questions to see additional answers.
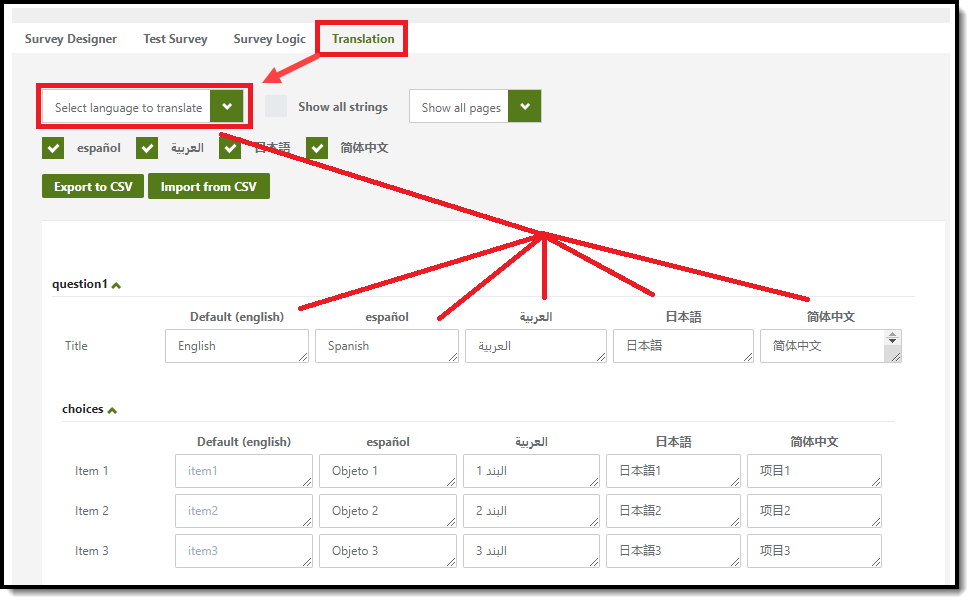
Step 5. Enter Language Translations
The Translations tab allows survey creators to enter language translations for each question (and responses) within a survey. Once translations are entered and saved, users taking the survey are able to select the language and translate survey content into this language.
If you prefer to modify your questions and answers in Microsoft Excel (or similar product), you can export your list of questions and answers via the Export to CSV button. Once you are ready to add your translations back into Infinite Campus, click the Import from CSV button and import the file.
This feature is only available for users who have purchased the Campus Analytics Suite.
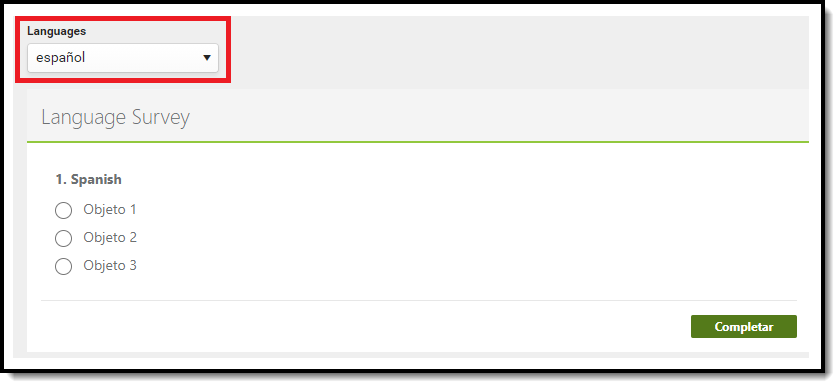
Using the Respondent's preferred language (Census > People > Demographics > Preferred Language), the Translate tab's logic tries to map the preferred language code to the survey's language code.
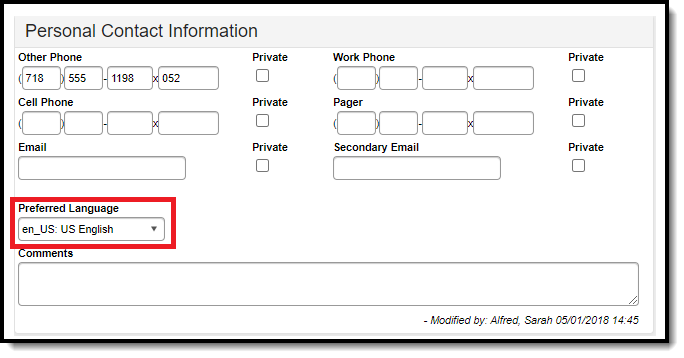
When the preferred language code matches with a survey translation, the survey will appear to the respondent in their preferred language. For example, if the survey has been translated to Spanish and a respondent's preferred language is Spanish, then the survey will appear in Spanish when the respondent takes the survey.
Preferred languages can be added to the Core Attribute Dictionary by selecting the Contact attribute and expanding the dictionary (System Settings > Custom Data and Links > Core Attribute/Dictionary > Contact > Preferred Language)
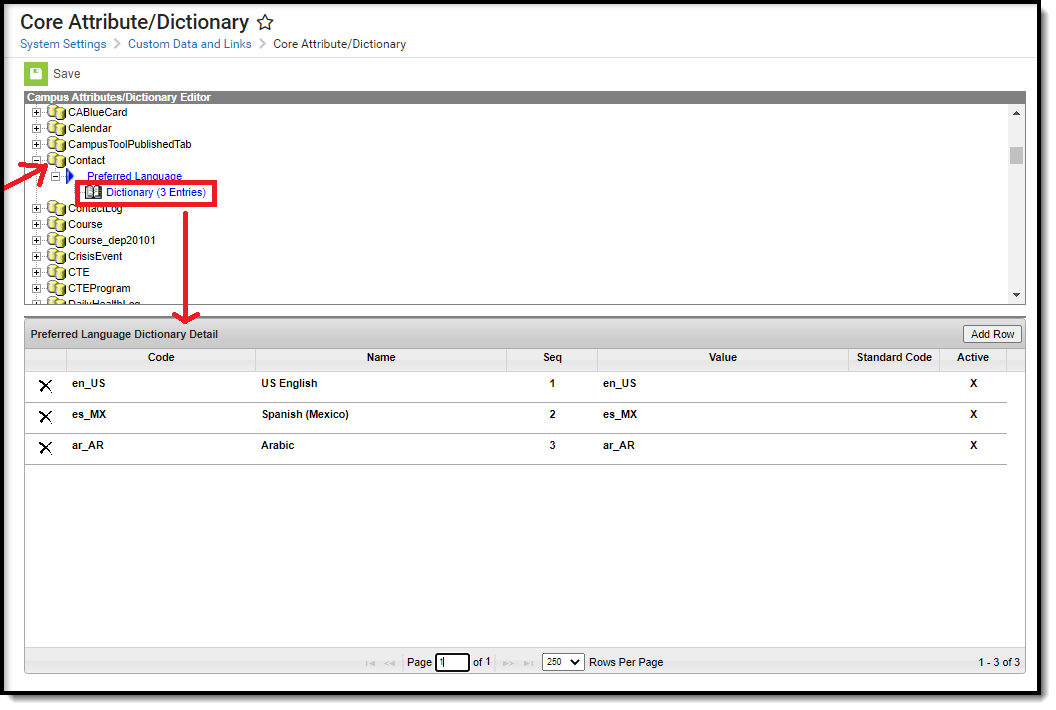
For the Survey tool to correctly map the preferred language to the survey language code, use the following naming convention:
- language code underscore US
For example, en_US for English or es_US for Spanish.
The Translation tab logic splits the Preferred Language code at the underscore, and then maps the first value to the appropriate survey language code. For example, "ar_US" becomes "ar" which matches to the survey language code "ar" for Arabic.
Available Language Translation Codes:
If the survey is English only, meaning no translations exist, the Languages dropdown will not appear when taking the survey. It only appears when the respondent has languages to choose from.
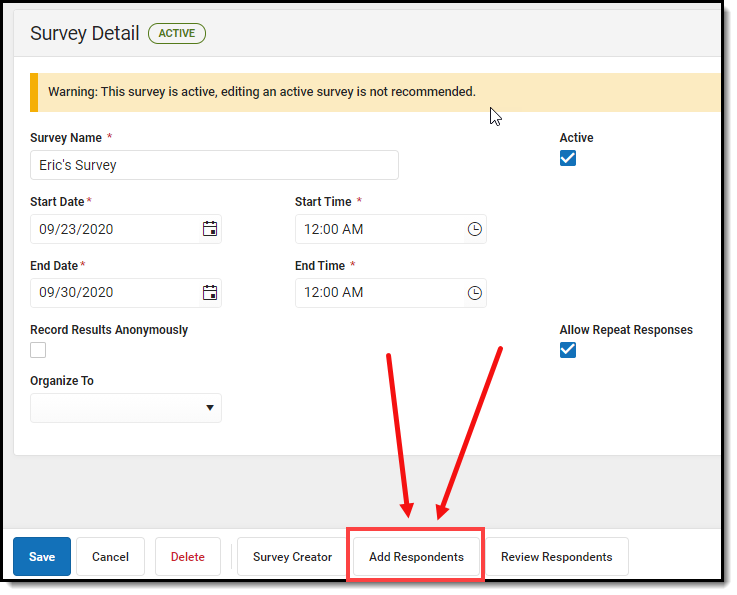
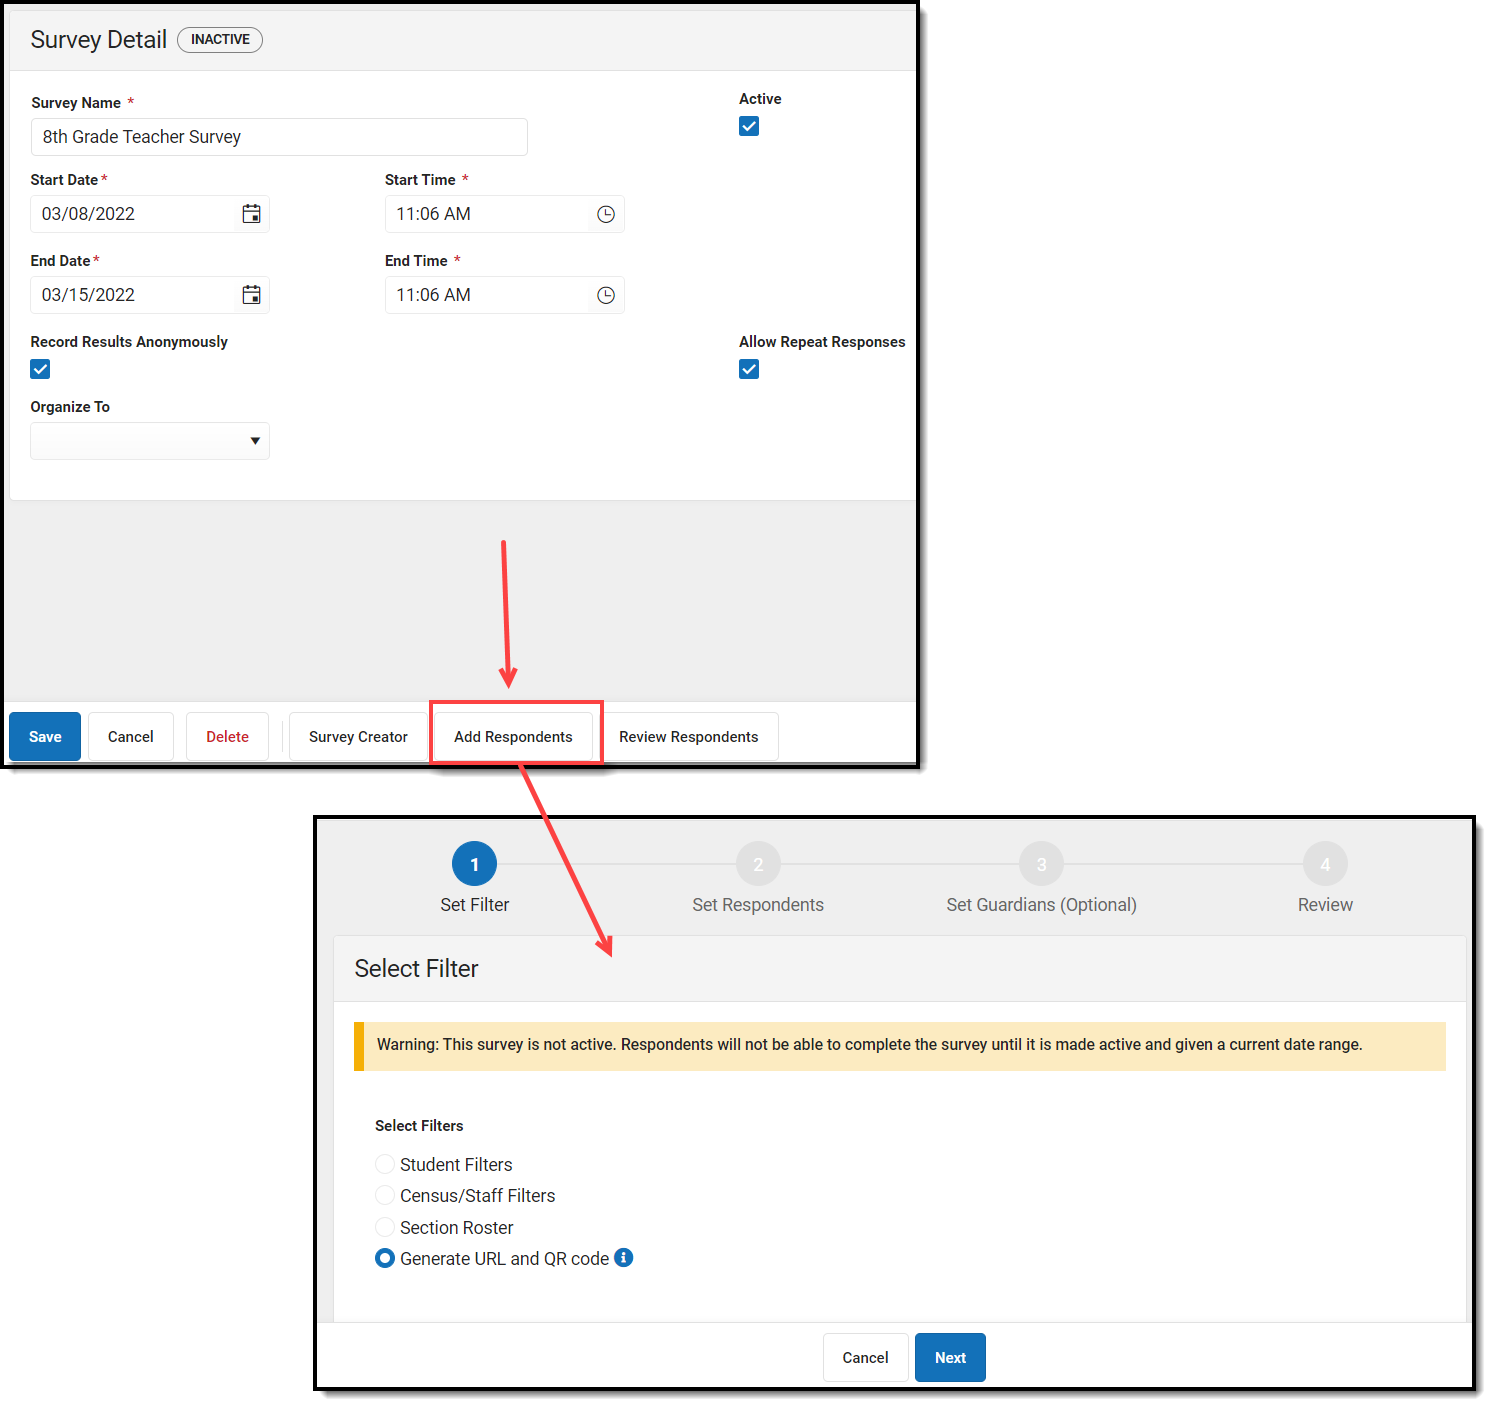
Step 6. Add Respondents
Now that the survey is ready, it is time to send it to parents, students, and/or staff. To add survey respondents, click the Add Respondents button (see image below).
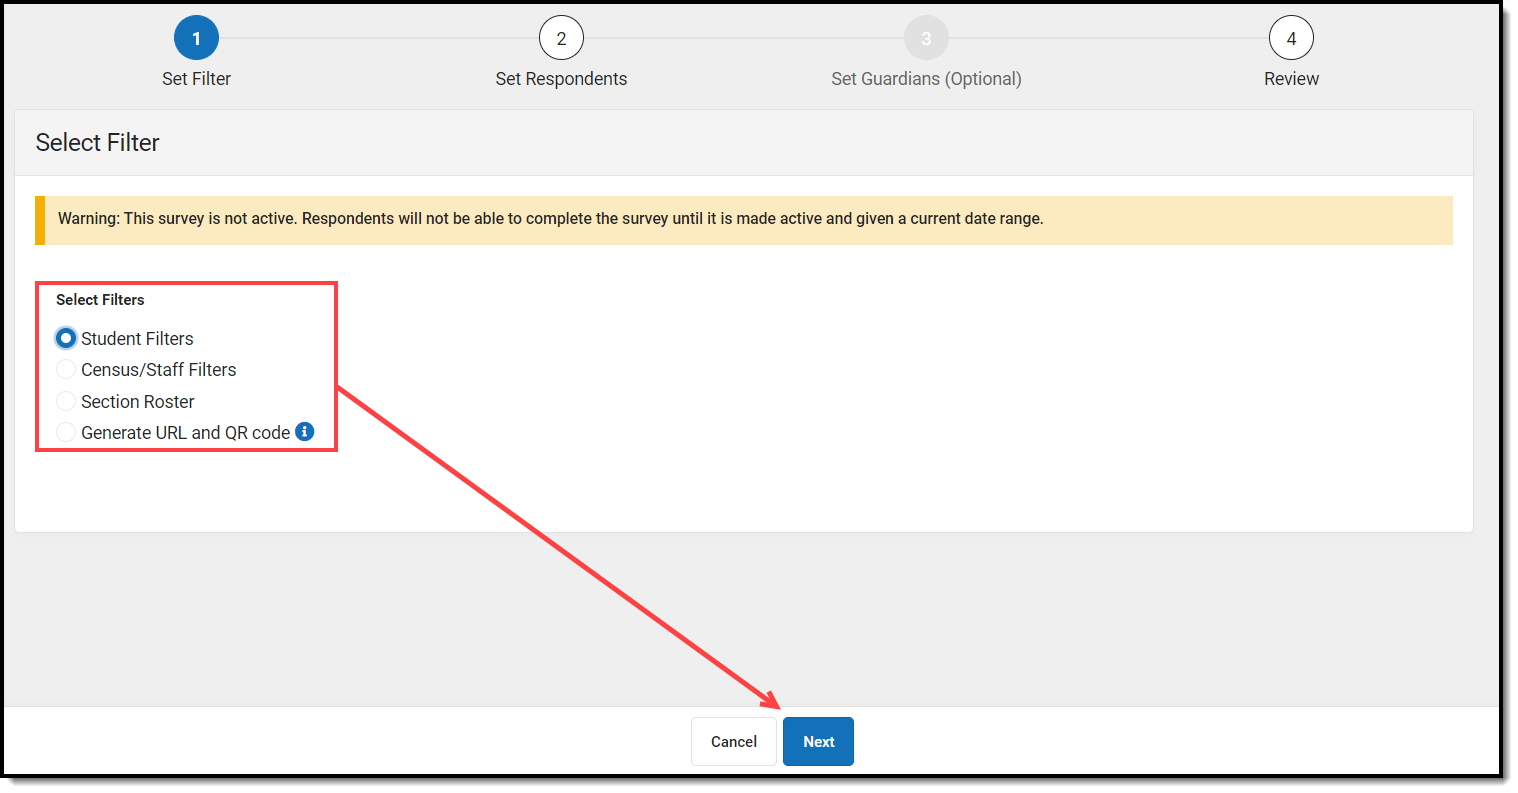
The Select Filter editor appears, asking if the respondent list will be comprised from a student or census/staff filter(s), a section roster, or if the survey will be sent to external users.
The Generate URL and QR Code option is only available for users who have purchased the Campus Analytics Suite. See the Create an External Survey section for more instructions on this option.
Ad hoc filters are created within the Filter Designer tool. For a guide on how to create filters, see the Filter Designer article.
Select the appropriate option and click Next.
The Add Respondents editor will appear, displaying a list of existing Ad Hoc filters in the Saved Filters window.
- If Student Filters was selected in the previous step, select which group of people will be invited to take the survey (Students, Student Guardians, Student Portal Contacts). Census/Staff filters do not have invite options as it is assumed all people in the selected filter(s) should receive the survey.
- Select which filter(s) should be used to determine the respondent list by selecting the filter in the Saved Filters window and clicking the
 button. The filter will now appear in the Selected Filters window.
 - Select the Operation:
- Union - All respondents in all filters selected (depending on the invite value) will receive the survey.
- Intersection - Only people who appear on all selected filters will receive the survey.
- To limit respondents to only those who have a user account within Infinite Campus, mark the Only add respondents with user accounts checkbox. Since surveys are accessed via the Portal and in order to have Portal access you must have a user account,
- For student filters, mark the Let guardians take the survey on behalf of the students checkbox if you would like to designate the legal guardian allowed to take the survey on behalf of a student. See the section below for more information about this process.
- Click Next.
 button. The filter will now appear in the Selected Filters window.
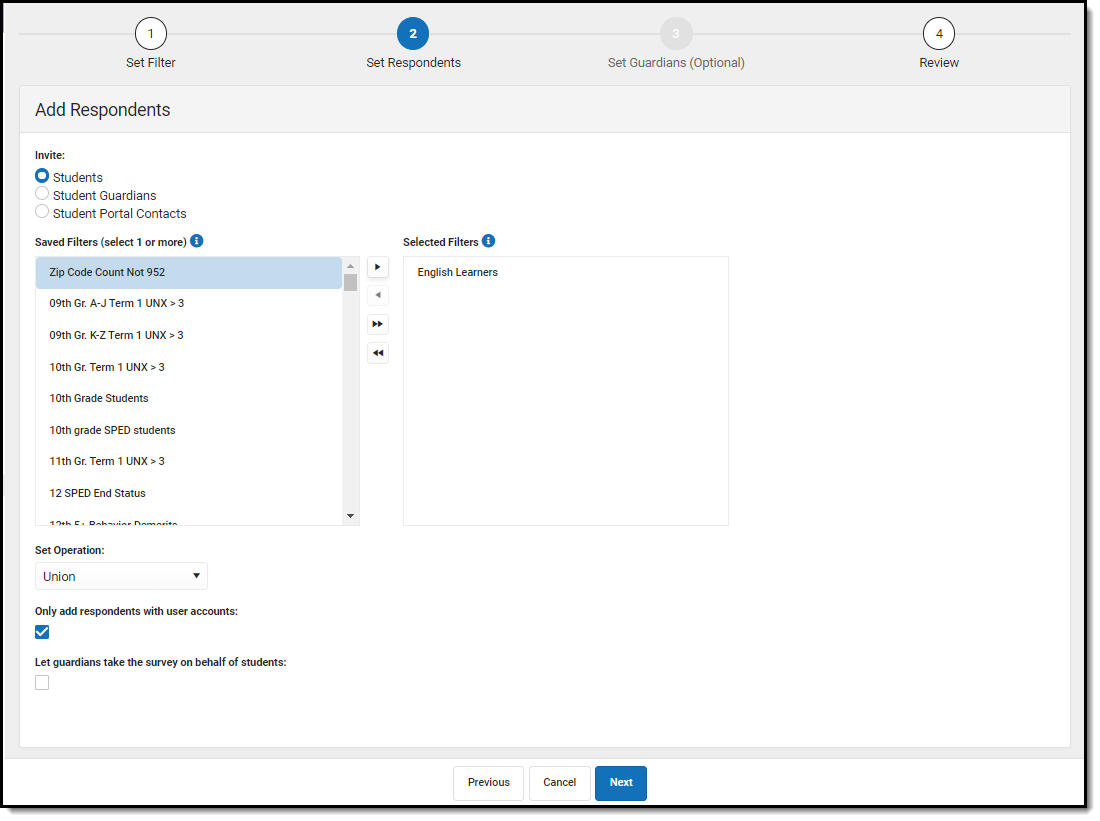
If the Let guardians take the survey on behalf of students checkbox is marked and you select Next, the Add Guardians editor will appear (see image below). Here, you can designate student by student which legal guardian is allowed to take the survey on behalf of the student.
Once guardians are selected, click Next. 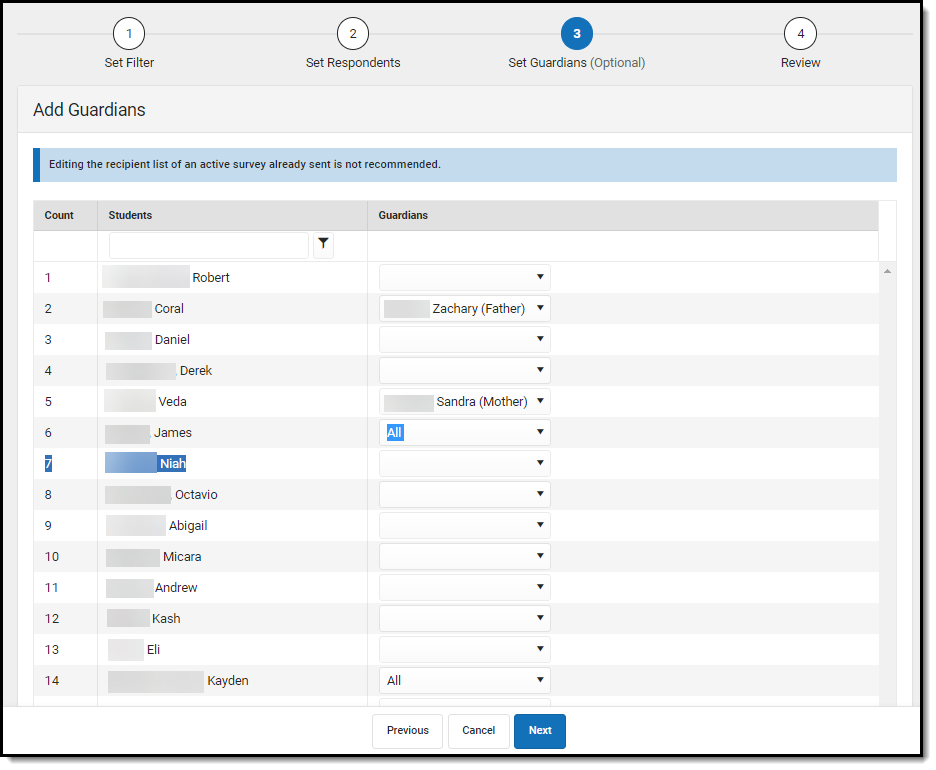
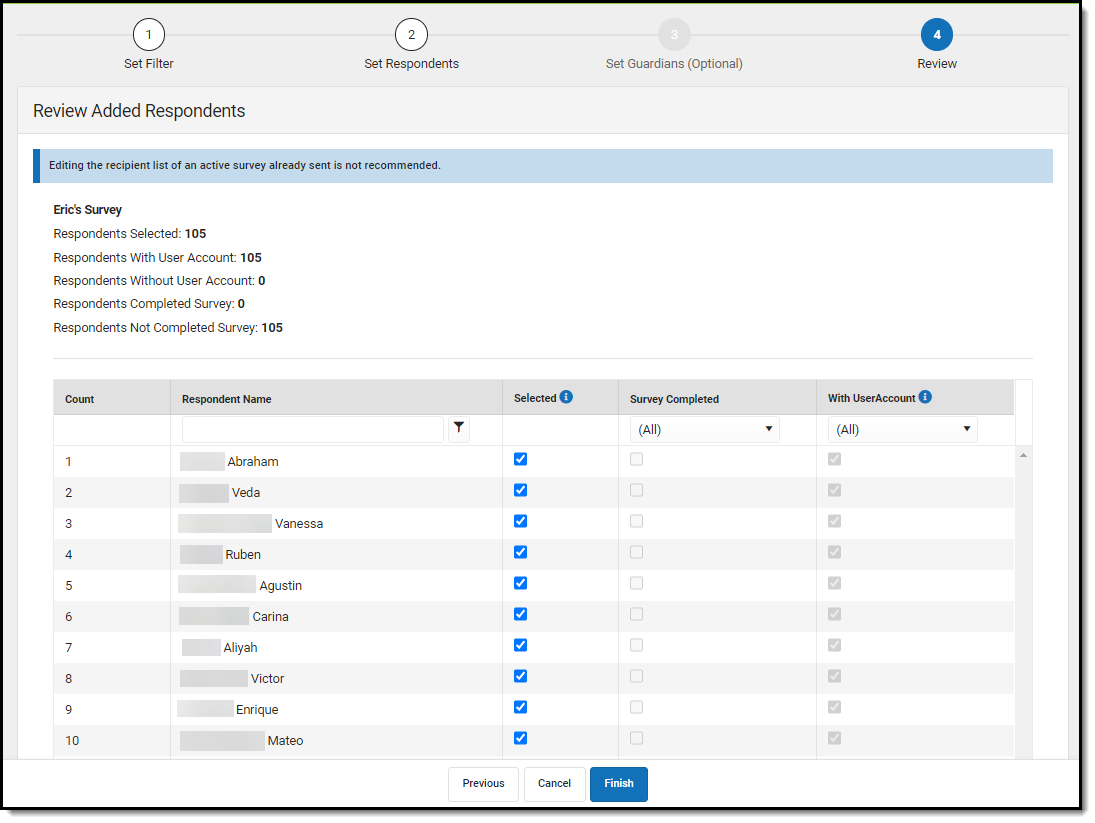
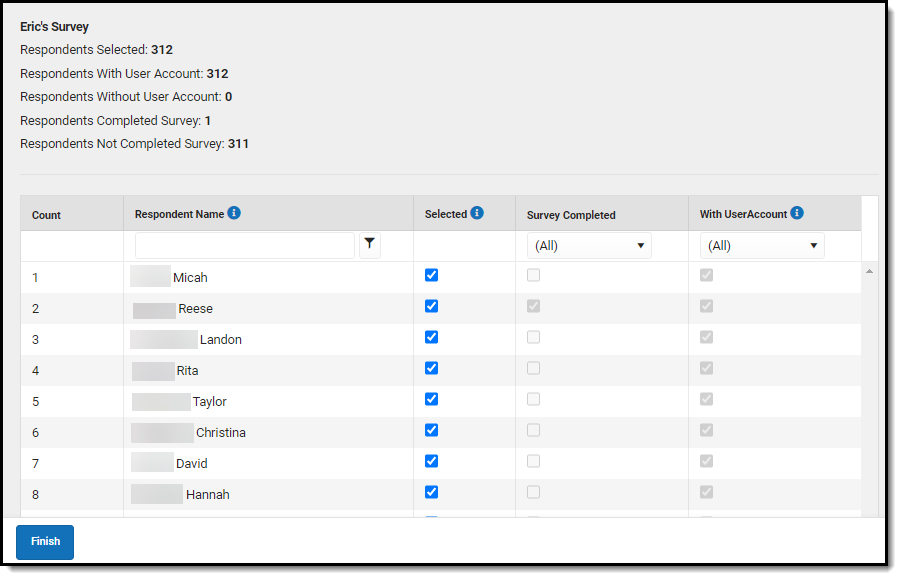
The Review Added Respondents editor appears, detailing now many respondents were selected, how many of them had a user account, how many did not have a user account, how many have already completed the survey, how many have yet to complete the survey, and a detailed breakdown of all people who received the survey.
If you have reviewed this information and feel the survey is ready to be sent out, click Finish. The survey has now been sent out to all respondents with a user account.
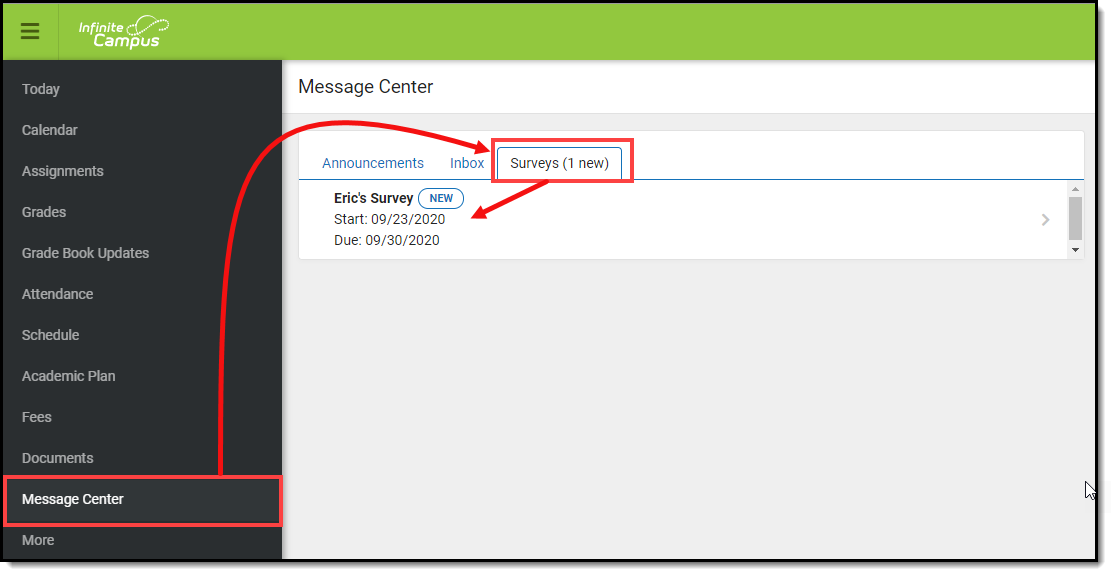
Respondents will receive a message about the survey in the Message Center under the Survey tab. From here, they can click on the survey and begin filling it out.
Review Respondents
Once a survey has been sent out, you can review who received the survey and how many have completed the survey by selecting the survey in the Survey List and clicking the Review Respondents button.
An editor will appear, detailing information about survey recipients and whether or not they have completed the survey.
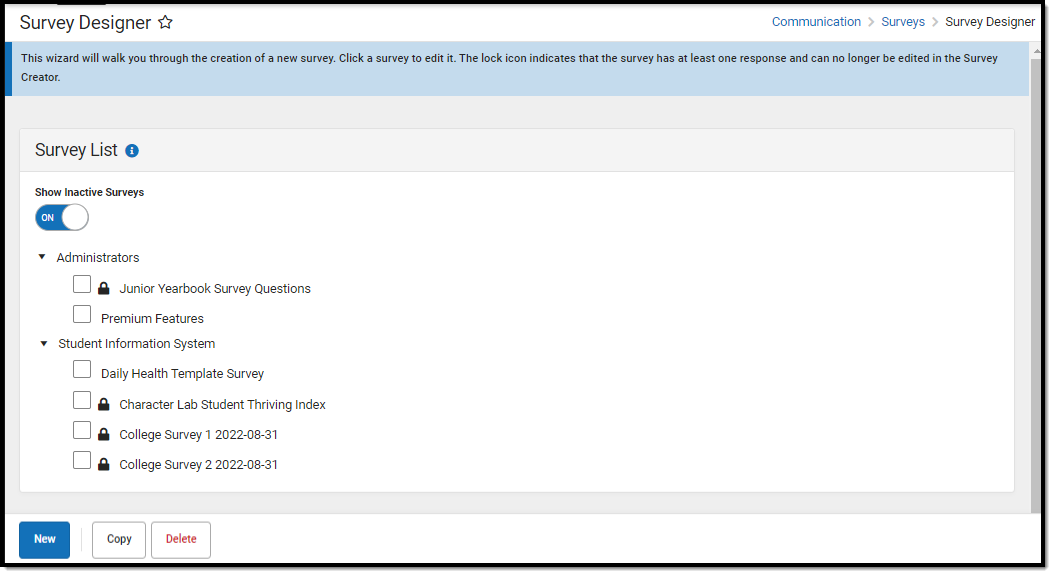
Modify an Existing Survey Template
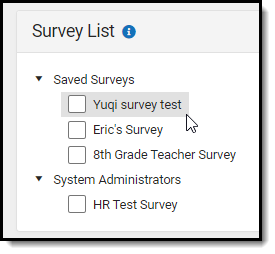
To modify an existing survey, select the survey's name in the Survey List. The Survey Details editor will appear, allowing you to work through the survey creation process.
You cannot modify a survey once a respondent completed the survey.
Copy a Survey Template
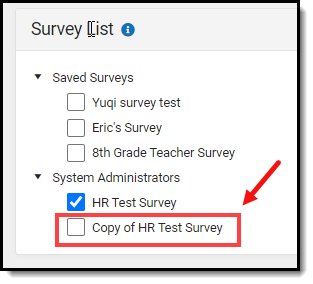
To copy a survey template, mark the checkbox next to the template's name and click Copy.
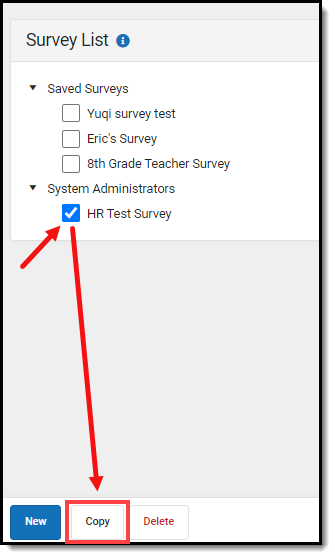
The survey template copy will appear below the original with 'Copy of' added to the survey template name.
Deactivate a Survey Template
To deactivate a template, select the survey's name in the Survey List, unmark the Active checkbox, and click Save.
The survey is no longer active within Infinite Campus and can no longer be accessed or used until it is made active again and the current date falls within the Start Date and End Date entered on Survey Details.

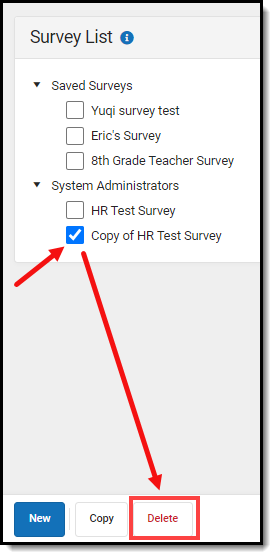
Delete a Survey Template
To delete a template, mark the checkbox next to the survey's name and click Delete. Users can no longer access or modify this survey.
Create an External Survey
Users who have purchased the Campus Analytics Suite can create external surveys. These surveys can be accessed and taken without a person needing to be logged into Infinite Campus or have an Infinite Campus account.
To create a new external survey, click the New button. The Survey Detail editor will appear.

See the table below for information on these fields.
- Enter the Survey Name.
- Determine if the Survey is Active.
- Enter the Start Date/Time.
- Enter the End Date/Time.
- Mark the Record Results Anonymously, if desired.
- Mark the Allow Repeat Responses, if desired.
- In the Organize To dropdown field, select which user group has access to this survey template.
- Click the Save icon when finished. The Survey Detail will be saved. Move on to Step 2.
Expand the link below to view a table describing each Survey Detail field:
Once Survey Details have been entered, you now need to create the survey by clicking the Survey Creator button.
The Create a New Survey editor will appear, allowing you to begin adding in questions, modifying question properties, adding pages to the survey, and more. For detailed instructions on this process, see the Create the Survey section.
External survey responses are recorded anonymously and allow for repeat responses. If you would like to capture information about the user taking the survey, please make these questions within the survey itself.
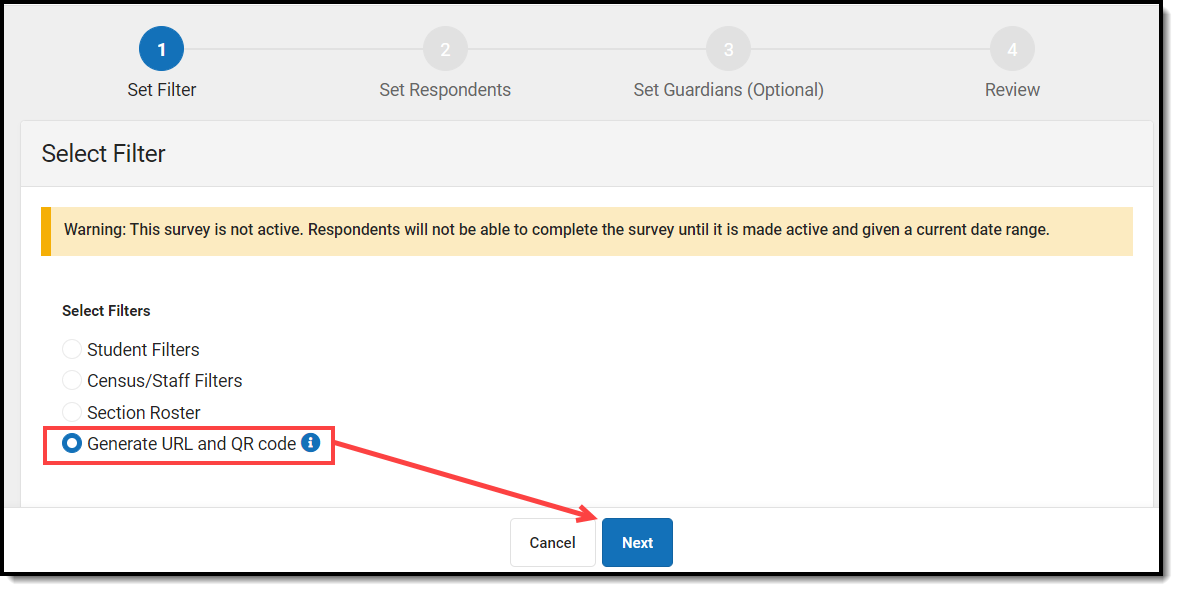
Once the survey has been created and saved, it is now time to add respondents, or in the case of external surveys, generate an external URL and QR code. To begin this process, click the Add Respondents button. The Select Filter editor will appear (see image below).
Select the Generate URL and QR Code radio button and select Next.
A message will appear, informing you that external surveys are only active for 90 days, certain question types are not available for external surveys, and external surveys cannot be modified once published.
If the time window entered on the survey detail editor extends beyond 90 days, a prompt will display allowing you to edit the start and end dates before publishing it so the dates are synced with the 90 day expiration. When a survey expires, the user that created it will receive a notification in their message center and the survey can be republished.
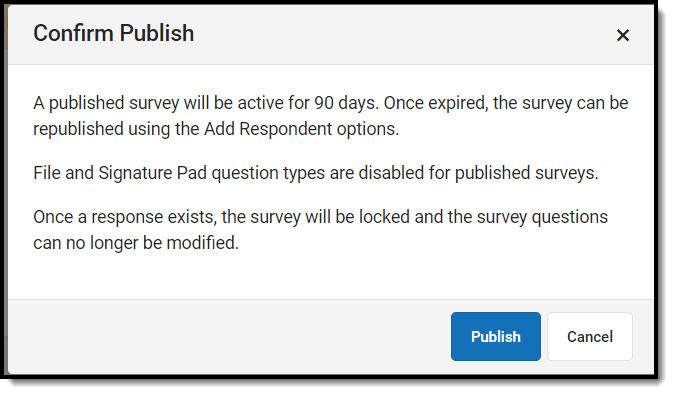
Click the Publish button. The Review Added Respondents editor will appear, containing the external Survey URL, Survey QR Code, and the ability to download this information into a PDF (Download PDF button).
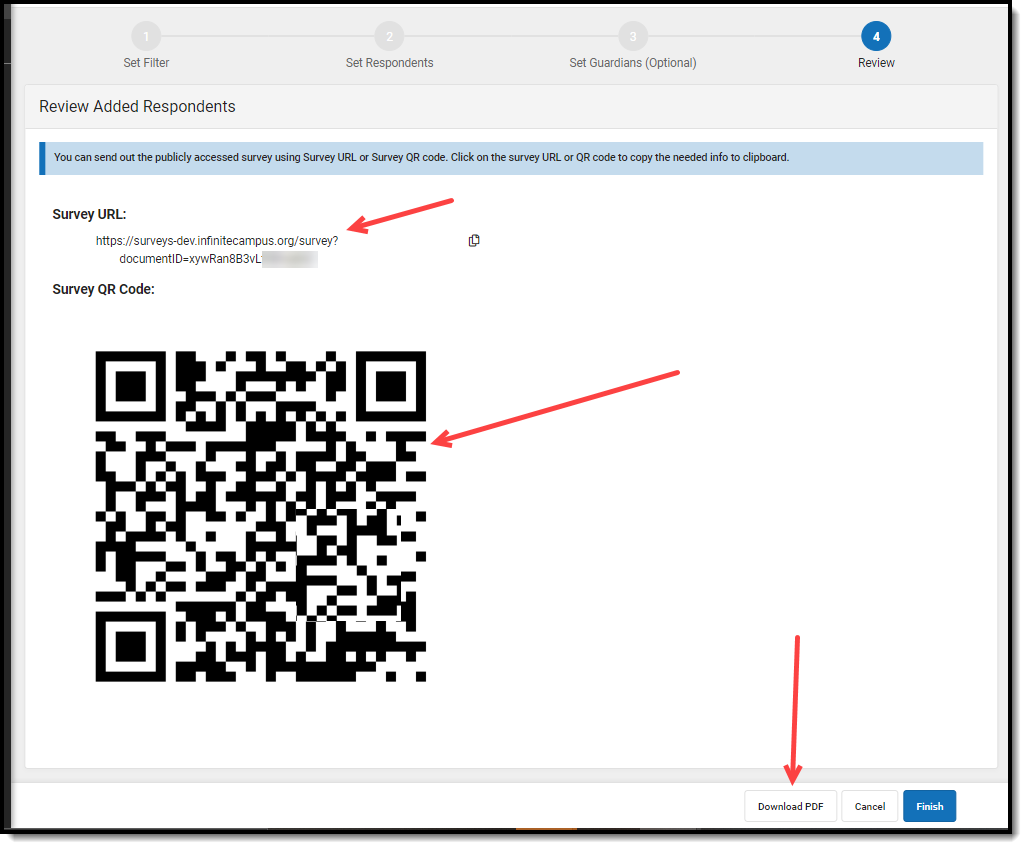
Clicking the URL or QR code with your cursor will copy it to your clipboard, allowing you to easily paste it into an email or other form of communication. You can also download the URL and QR code into a PDF by clicking the Download PDF button.
Once you are done, click Finish.
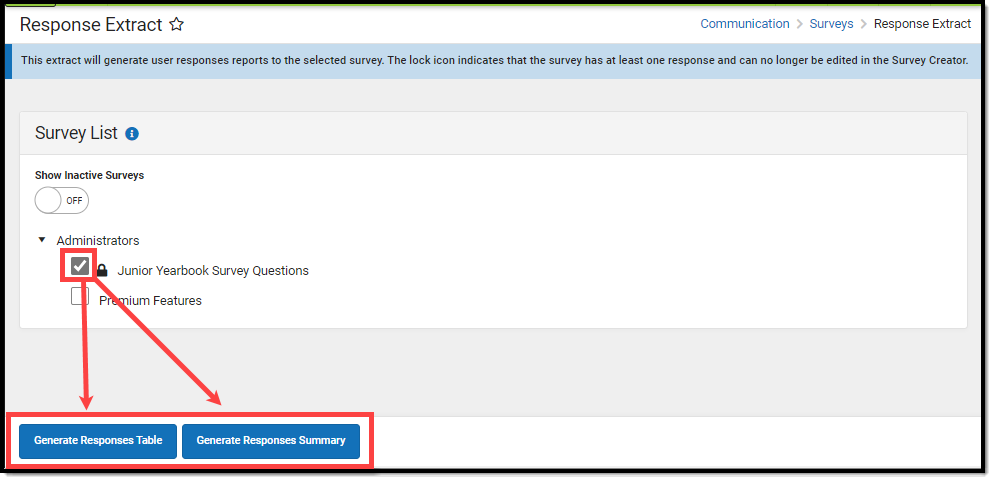
Review External Survey Results
To review results for your external survey, navigate to the Response Extract, mark the checkbox next to the survey and generate responses in a table or summary (see image below).
For detailed information on how to use and navigate Response Extract options, please see the Response Extract article.