Tool Search: Documents
The Documents tool is used to store supplemental documentation related to a person's record.
Documents List
The Documents List displays all documents created for the person. Documents are separated into different folders based on form type and calendar year. Form types can include Plans, Evaluations, Custom Forms, Uploaded Documents and Progress Reports.
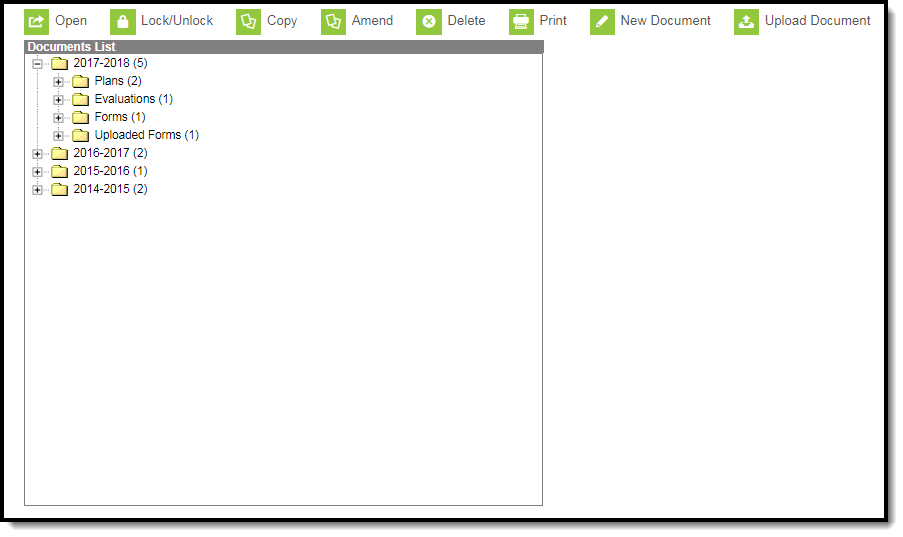 Image 1: Document List (Special Ed Example)
See the Special Education Document Tool Rights article for information about rights needed to use this tool.
Forms in draft status display with an exclamation mark (!) symbol next to the name. Draft forms are those that do not meet the requirements established by the form administrator, such as empty required fields.
 Image 2: Draft Forms
The Document Detail displays when a user selects a form from the Documents List. This editor describes the active date range, the creation date and user, the last modified date and user, and an indication of whether or not the form is locked.
 Image 3: Document Detail
Open
To open a document, double-click the document name in the Document List or select the document and then click Open.
Lock/Unlock
With the release of Campus.2028 (July 2020), users have the ability to request eSignature(s) from parent/guardians and/or students on the Campus Parent and/or Campus Student Portal. This function is only available using the Forms tool. See the Forms tool documentation for additional information.
Users can click the Lock/Unlock button to change the lock status of the document. A locked document indicates no additional changes can be made. If all documents within a folder are locked, the folder itself displays a locked icon.
Locked Special Ed Documents on Portal
Special Ed Documents can be set up to allow parents/guardians and students to view the student's Plan(s), Evaluation(s), Progress Report(s), and Prior Written Notice(s) (Ohio only) on the Campus Parent and Campus Student Portal. See the Special Ed Documents on Portal process article for additional information.
Locked Custom Forms on Portal
Certain Custom Forms will display on the Campus Parent and/or Campus Student Portal once the form is locked.
Note: Certain Custom Forms may have a Start Date and Time set on the Forms tool. Custom Forms on the Documents tool will display on the Campus Parent and/or Campus Student Portal as of the Start Date and Time.
Three conditions must happen in order for a Custom Form to display on the portal:
- The Display Custom Form on Portal option is marked at System Administration > Custom Forms on the Publish step (see the Custom Forms documentation for additional information).
-
The Portal Preference is marked for the module the form is in at System Administration > Portal > Preferences > Display Options on the Documents section.
Portal preferences are set by school. See the Portal Preferences Display Options documentation for additional information.
- The Custom Form is attached to a student and locked (either on the Forms tool or the Documents tool).
- Parent/Guardian(s) will receive the Custom Form when the Guardian, Mailing, and Portal checkboxes are marked on the Relationships tool for the student. The Parent/Guardian must have a valid Portal account in order to receive the Custom Form. The order of the Parent/Guardian(s) names is determined first by the Emergency Priority on the Relationships tool. If no Emergency Priority is entered, the names display in alphabetical order.
Hover over the locked icon within the form to view a message that the form is locked and published.
 Image 4: Locked Document Example
Lock a Document
Once a document is locked, teachers will be able to view that the student has an plan on the Roster while the plan is active. Teachers can click the icon to view the plan if they are members of the student's Team. Locking the document will send the document to the State upon syncing.
- Select a plan or evaluation from the Documents List.
- Select the Lock/Unlock icon from the action bar. A validation message displays, alerting the user to the logic associated with locking a plan.
- Click OK to continue. The document displays in the Documents list with a lock icon next to the name.
 Image 5: Locking Documents Warning
Unlock a Document
- Select the document to unlock from the Documents List.
- Click the Lock/Unlock button in the action bar. A warning message displays.
- Click OK to continue. The document will be unlocked and the lock icon will not display next to the document name.
 Image 6: Unlocking Documents Warning
Copy
The Copy function is not available in all states and all modules.
Plans, Evaluations, and Custom Forms can be copied by clicking the Copy button. A warning displays confirming the action. Progress Reports cannot be copied.
See the Plan Copy Wizard article for information on how to copy plans.
Amend
The Amend tool is only available for the PLP, Special Ed, and Response to Intervention modules.
See the Amend document for information pertaining to the Amend tool.
Delete
To permanently remove a document from a person's record, select the document and then click Delete. A warning displays confirming the action.
All documents found in the Documents List can be printed. Select the desired document from the Documents list and then click the Print button. This will generate the document in a PDF format. This print view is sent to the selected printer when the print icon is selected from the PDF document.
 Image 7: Printing Documents
New Document
To add a document to a person's record, click New Document or New Plan. The Create New Document Wizard displays.
 Image 8: Create New Document Wizard
Create New Document Wizard
- From the Documents tool, click New Document/Plan. The Create New Document Wizard displays.
- Mark the Document Type checkbox. The types available depend on the module.
- Click Create Document/Plan or Cancel.
Document Types
Document types depend on the module.
Each state has different requirements for Plans, Evaluations and other forms. State specific information is available in the State Specific Information area for some states. Plan Types and Eval Types are set up in System Administration.
| Document Type | Description |
|---|---|
|
Evaluation Special Ed only |
Evaluations are conducted after a student has been referred to special education. The goal of an evaluation is to determine if the student is eligible to receive special education services based on a disability that interferes with participation in regular education. |
| Plan |
Plans are used to summarize the proposed action needed for the student. For Special Education, a plan usually summarize the accommodations and modifications made to the student's education, services provided to the student related to special education, and goals reached with the student and parents' input regarding the student's progress and post-secondary plans. |
| Progress Report |
Progress reports describe student progress towards measurable goals defined in the person's plan. Progress reports are linked to enrollments. Multiple progress reports can be created per plan. When creating new Progress Reports, the report can be linked to a specific enrollment using the Link to Enrollment dropdown, as long as the enrollment does NOT have an end date. This includes future and current enrollments regardless of the selected Service Type. |
| Custom Form |
Custom forms are editable PDF documents used to supplement documents linked to a person's record. Custom forms can be linked to a specific person and prepopulated with student data on the person's Documents tool or accessed outside of the context of a person from the Blank Forms area of the index. Examples of custom forms include Notices, Consent forms, and service-specific Eligibility forms. Lists of custom forms are available for many states in the State Specific Information area. Use the Prepopulated Data from dropdown to designate which year to pull data from when prepopulating data on Custom Forms. See the Manage Custom Forms on the Documents tool document for details on how to manage custom forms attached to a person. Blank Forms and Custom Forms with eSignatures cannot be created from this tool. Custom Forms with eSignatures can only be created on the Forms tool. |
Upload Document
The Upload Document button allows users to add additional documents and forms to a student's Documents tool. All uploaded documents will appear under the Uploaded Forms folder.
Uploading a document may look different depending on the module. See the table below to view the different processes to upload a document.
|
Upload Document |
Document |
|---|---|
|
|


View and Edit Uploaded Documents
When a document is uploaded and accessed through the Documents tool, a unique identifier displays on the Document Detail editor indicating when the file was updated. The identifier includes the name of the document and the date and time the document was uploaded, such as:
Campus Sample IEP 513__2018-01-22-10-57-04.pdf
 Image 12: Uploaded Document Detail
Opening the uploaded document displays the Upload Document editor. Previously uploaded documents and selections made when uploading that document display, including a link to the uploaded file. Modifications can be made to any of the fields on this editor.
 Image 13: Upload Document File Editor
Publish or Remove Draft
This button is only available for the Special Ed module.
The Publish Draft or Remove Draft button publishes or removes a draft of the student's plan to the Campus Parent and Campus Student Portal. See the Special Ed Documents on Portal process document for additional information.
Documents Information in Ad hoc Query Wizard
Documents information is available in the Query Wizard for Student Data Types in the Learner Planning > Evaluations and Learner Planning > Learning Plans folders. Available fields vary by state.
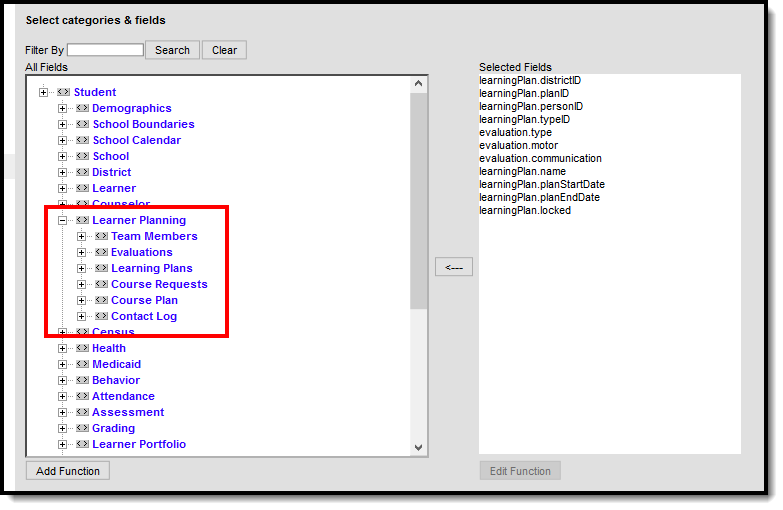 Image 14: Ad Hoc Field for Special Education Documents
Document Warnings
Document warnings appear as red exclamation points on documents that meet a set of defined characteristics. The same logic used for document warnings applies to the Process Compliance Report. These document warnings only apply to Special Ed documents.
 Image 15: Document Warnings
Warning Logic
Students must have a current active enrollment marked as Special Ed to appear. Documents must also be locked. Document warnings appear based on the following criteria.
- Dates on any Services within the Plan are outside of the Plan Start and End Dates.
- A new IEP, Evaluation, or Notice of Evaluation is due. Warnings will appear for dates as follows:
- 30 school days before student's 18th birthday.
- 46 days before the end date of the current IEP.
- 91 days before a new Annual Evaluation is due.
- 91 days before 3 years minus 1 day from the most recent 3-Year Evaluation Date.
- 59 days after a Notice of Evaluation if an Evaluation has not been completed.
Document warnings are not configurable; the logic is hard-coded. However, Process Alerts can be established in System Administration to send Process Alerts messages for specific special education events.
See the PLP (Personal Learning Plan) Tool Rights article for information about rights needed to use this tool.
