Tool Search: Patron Balance Report
The Patron Balance Report allows users to generate a report of account balances for student, staff and/or generic accounts as well as create and generate account balance letters for distribution to patron parents/guardians.
This article includes the following topics:
- Generating the Low Balance Report
- Low Balance Report Column Descriptions
- Generating Low Balance Letters
- Understanding Low Balance Letters
- Creating Low Balance Letter Templates
Low Balance Report
The Low Balance Report lists account balances for student, staff and/or generic accounts based on criteria selected on the report editor.
If any staff in the district have a District Employment record only, the School selected has to be District (All Schools) in order for them to be included within report results. If an account has only patron(s) without employment or enrollment records, they will only appear in the report when a Location School is set on the Account Info tool and the specific School is selected on the report editor. Location School cannot be set to Default and School criteria cannot be District (All Schools) when reporting results for generic accounts.
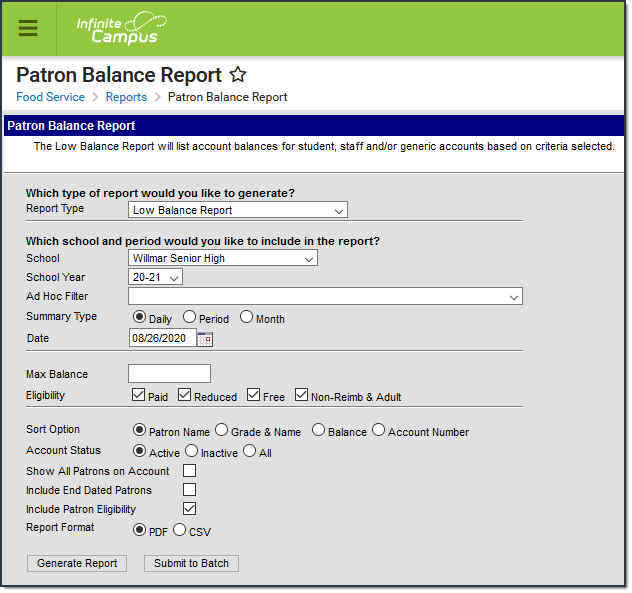
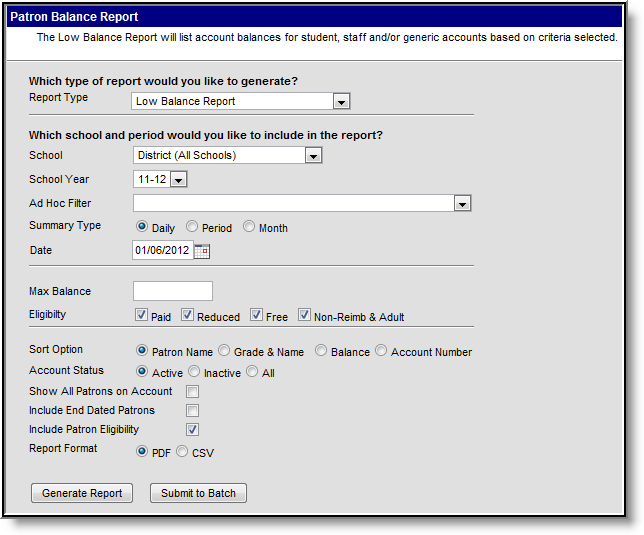
Low Balance Report Editor
Generating the Low Balance Report
- Select a Report Type of Low Balance Report.
- Select the School reporting data.
- Select the School Year.
- Select an Ad Hoc Filter. (optional)
- Select the Summary Type. See the toolle below for more information.
- Enter the Date in which to pull the posted balance and Eligibility selected.
- Enter a Max Balance (optional)
- Mark which patron Eligibility(s) are included within the report. See the toolle below for more information.
- Select a Sort Option.
- Limit results based on the patron's Account Status. See the toolle below for more information,
- Mark the Show All Patrons on Account checkbox to report all patrons on a multi-patron account when at least one patron on the account meets the report criteria selected.
- Mark the Include End Dated Patrons checkbox to include patrons with end dated enrollment or employment records.
- Mark the Include Patron Eligibility checkbox to include patron eligibility information within the report.
- Select the Report Format.
- Click the Generate Report button OR the Submit to Batch button.
Field | Description |
|---|---|
Report Type | The type of report being generated. Select "Low Balance Report". |
School | Limits the results to patrons with enrollment or employment records at the selected school(s), or patrons who have a Location School set on their account at the selected school(s). |
School Year | Limits the results to student patrons with enrollment in the school year chosen. |
Ad Hoc Filter | Filters results based on fields within the Ad hoc filter selected. (Optional) Ad hoc filters are created using the Filter Designer tool. |
Summary Type | Determines the Summary Type:
|
Date | Reports account balances based on the date transactions are posted to the account. |
Max Balance | Limits results to accounts with a balance equal to or less than the amount entered. |
Eligibility | Limits report results to patrons with the meal status(es) selected as of the School Year and Date entered on the report editor. |
Sort Option | Determines how report results are sorted. Options include:
|
Account Status | Limits results based on account status.
|
Show All Patrons on Account | When marked, the report will list all patrons in a multi-patron account when at least one patron on the account meets the report criteria selected. this includes patrons on the account without end dates on their enrollment or employment records. |
Include End Dated Patrons | When marked, patrons with end dates entered on their enrollment record in the School Year selected, or staff patrons with ended employment records will appear on the patron list. |
Include Patron Eligibility | When marked, patron eligibility is included within report results. |
Report Format | The format of the generated report. |
Generate Report Submit to Batch | Users have the option of submitting a report request to the batch queue by clicking Submit to Batch instead of Generate Report. This process allows larger reports to generate in the background, without disrupting the use of Campus. For more information about submitting a report to the batch queue, see the Batch Queue article. |
Low Balance Report Column Descriptions
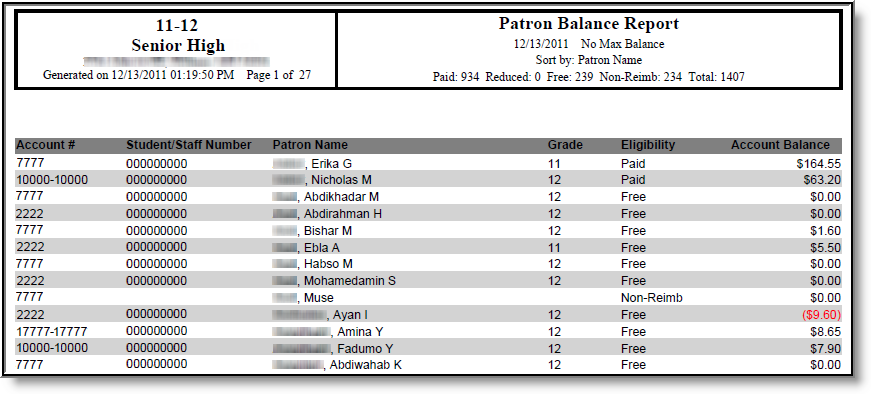
The following table describes each report column.
Column | Description |
|---|---|
Account# | The patron's account number. |
Student/Staff Number | The student or staff number of the patron. |
Patron Name | The name of the patron. |
Grade | The grade the patron is enrolled in as of date entered on the report editor. |
Eligibility | The patron's Food Service eligibility. This column is only reported if the Include Patron Eligibility checkbox is marked on the report editor. |
Account Balance | The patron's account balance as of the date entered on the report editor. Balances in red and parentheses indicate the amount is a negative value. |
Low Balance Letter
The Low Balance Letter report creates letters about student, staff and/or generic account balances for use in informing a parent(s), guardian(s) and/or other appropriate parties about specific patron account balances.
Low Balance Letter Logic
The following logic is used when generating Low Balance Letters:
- Letters will only include the current balance as of the date the letter is generated. The balance is based on the date and time transactions are posted to the account.
- A household must have the Mailing Flag checked on the Addresses tool. If no address is marked as Mailing for the household, the letter will print without an address.
- Within a household, a student must have at least one person marked with the Guardian and Mailing flag on the Relationships tool. If no adult has both checkboxes marked, the addressee will be the patron(s) on the account.
- If an account has patron(s) without employment or enrollment records, letters will only generate if a Location School is set on the Account Info tool and the specific School is selected on the letter editor. Location School cannot be set to Default and the School field on the letter editor cannot be set to District (All Schools).
- Letters will not be sent to anyone marked with a relationship of Guardian and Mailing who are not part of the student(s)' Primary or Secondary household.
- When printing letters, there is a limit of addresses that will report. Up to 6 addresses per household, 2 lines, 3 per line will report. If there are more than 6 adults in a household with the Guardian and Mailing checkboxes checked for a patron, the letter will not report all guardians.
- When printing generated letters, users should set Page Scaling settings to Fit to Printable Area or Shrink to Printable Area to ensure address will line up in a #10 window envelope.
- If a student is the guardian for children in the household and those children do not have enrollment records, the children may appear as addressees since Campus cannot distinguish between student and adult Guardian/Mailing relationships.
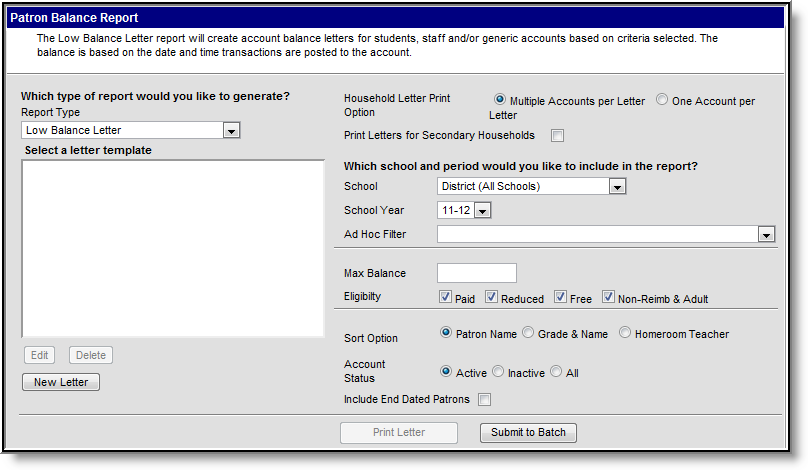
Generating Low Balance Letters
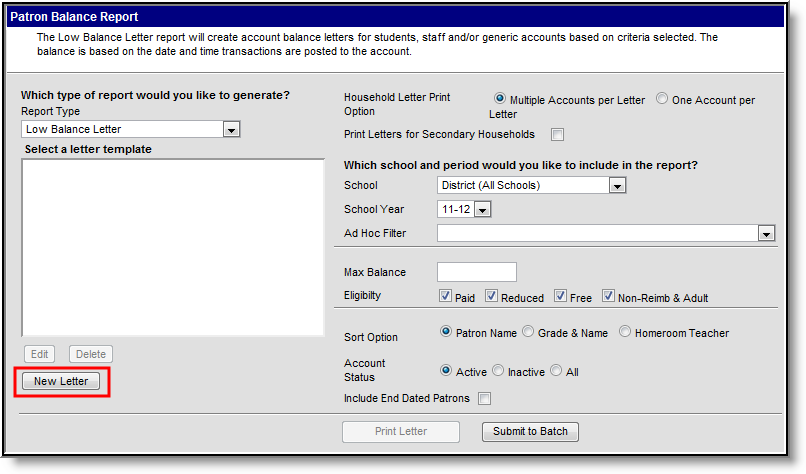
- Select a Report Type of Low Balance letter.
- Select a letter template. See the Creating a New Letter Template section below for more information about creating/editing letter templates.
- Select a Household Letter Print Option.
- Select the Multiple Accounts per Letter radio button to have all accounts associated with a household grouped into one letter. For family accounts, all patrons on an account will list in the letter, even if only one patron the account is associated with the household. See the toolle below for detailed information about scenarios which impact this option.
- Select the One Account per Letter radio button to have a separate letter generated for each account associated with the household.
- Mark the Print Letters for Secondary Household checkbox to generate letters for all appropriate guardians for accounts where at least one patron is marked as a Secondary Member on the Members tool.
- Select the School reporting data.
- Select the School Year.
- Select an Ad Hoc Filter. (optional)
- Enter a Max Balance. (optional) Patron accounts must have less than or equal to this amount in order to be included within generated letters.
- Mark which patron Eligibility(s) are included within the report.
- Select a Sort Option. See the toolle below for more information.
- Limit results based on the patron's Account Status. See the toolle below for more information
Mark the Include End Dated Patrons checkbox to include patrons with end dated enrollment or employment records as of the Summary Date entered.
Select the Print Letter button OR the Submit to Batch button.
Users have the option of submitting a report request to the batch queue by clicking Submit to Batch instead of Generate Report. This process allows larger reports to generate in the background, without disrupting the use of Campus. For more information about submitting a report to the batch queue, see the Batch Queue article.
When printing generated letters, users should set Page Scaling settings to Fit to Print Area or Shrink to Printable Area to ensure address will line up in a #10 window envelope.
Field | Description |
|---|---|
Report Type | The type of report being generated. Select "Low Balance Letter". |
Household Letter Print Option | Determines how accounts are displayed on the letter.
|
Print Letters for Secondary Households | If marked, letters will generate for appropriate guardians for accounts where at least one patron is marked as a Secondary Member on the Members tool. |
School | Limits the results to patrons with enrollment or employment records at the selected school(s), or patrons who have a Location School set on their account at the selected school(s). |
School Year | Limits the results to student patrons with enrollment in the school year chosen. |
Ad Hoc Filter | Filters results based on fields within the Ad hoc filter selected. (Optional) Ad hoc filters are created using the Filter Designer tool. |
Max Balance | Limits letters generated to accounts with a balance equal to or less than the amount entered in this field. |
Eligibility | Limits letters generated to accounts including any patrons with the meal status(es) selected as of the Summary Date. |
Sort Option | Determines how letter information is sorted.
|
Account Status | Limits results based on account status.
|
Include End Dated Patrons | When marked, patrons with end dates entered on their enrollment record in the School Year selected or staff patrons with ended employment records will appear on generated letters. |
Print Letter Submit to Batch | Users have the option of submitting a report request to the batch queue by clicking Submit to Batch instead of Generate Report. This process allows larger reports to generate in the background, without disrupting the use of Campus. For more information about submitting a report to the batch queue, see the Batch Queue article. |
Understanding Low Balance Letters
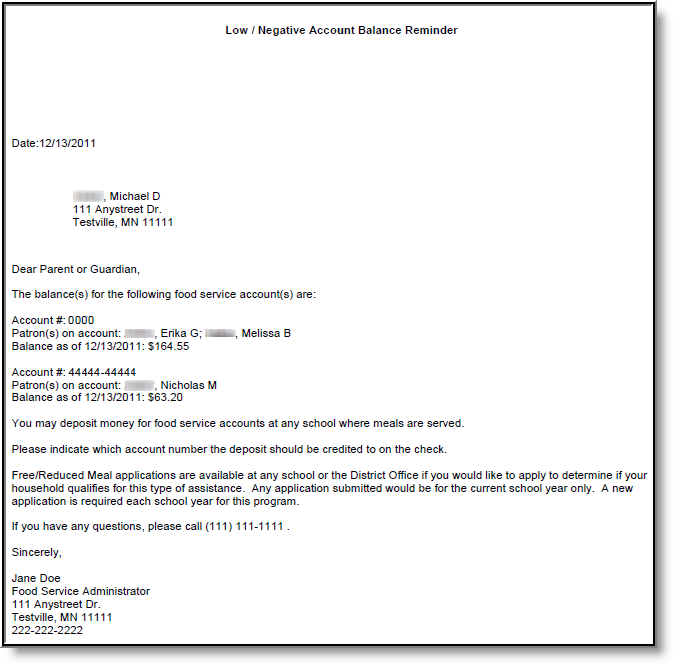
Low Balance Letters are displayed based on the letter template selected. The image below is an example of a generated letter.
Creating Low Balance Letter Templates
Before Low Balance Letters can be generated, letter templates must be created. Letter templates serve as the framework for each letter generated where criteria entered on the Low Balance Letter editor determines the data populated within each letter section. Once a template is created, users can continue to generate the same letter while reporting different data based on criteria entered on the letter editor.
To create a new letter template, select the New Letter button. The Letter Detail and Letter Format editors will appear.
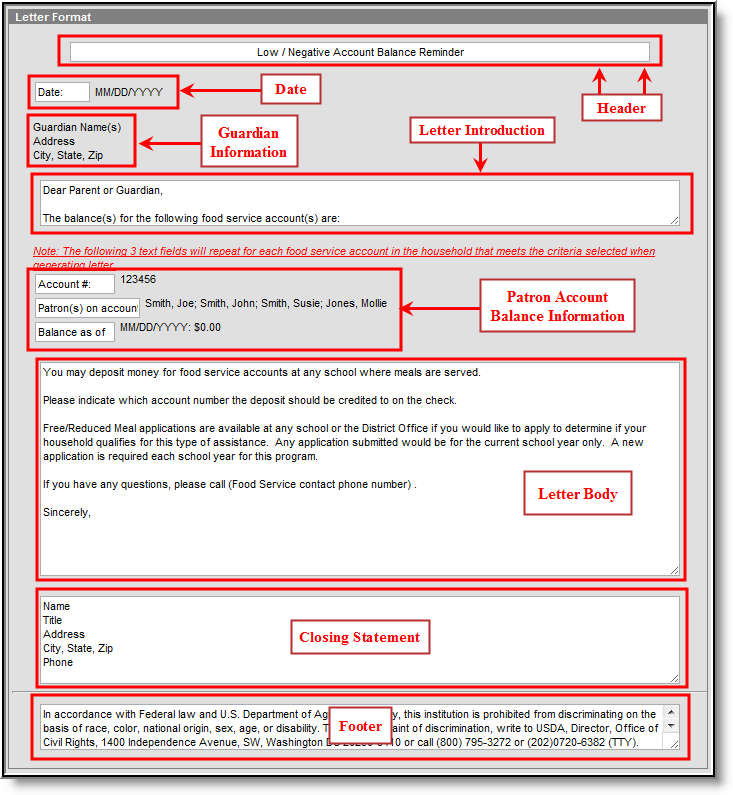
Enter the Letter Name and select the Font Type (Arial or Times New Roman). To include an additional 1" header margin, mark the Allow Margin for Letter Head checkbox.
Each field within the Letter Format editor contains pre-populated information. This information was included to provide a common letter structure and may be deleted/edited.
- Enter a Header for the letter.
- Enter text that appears before the Date. You cannot remove the date from populating in this section, only determine what text displays before it.
- Guardian Information cannot be modified.
- Enter the Letter Introduction.
- Enter what text is displayed before the patron account number(s), patron account names and account balance fields in the Patron Account Balance Information section.
- Enter the Letter Body.
- Enter a Closing Statement.
- Enter a Footer for the letter.
The footer automatically includes the USDA non-discrimination clause as of December 2011. Users are responsible for maintaining this clause to match changes and updates made by the USDA.
- Select the Save icon. The letter template is now saved.
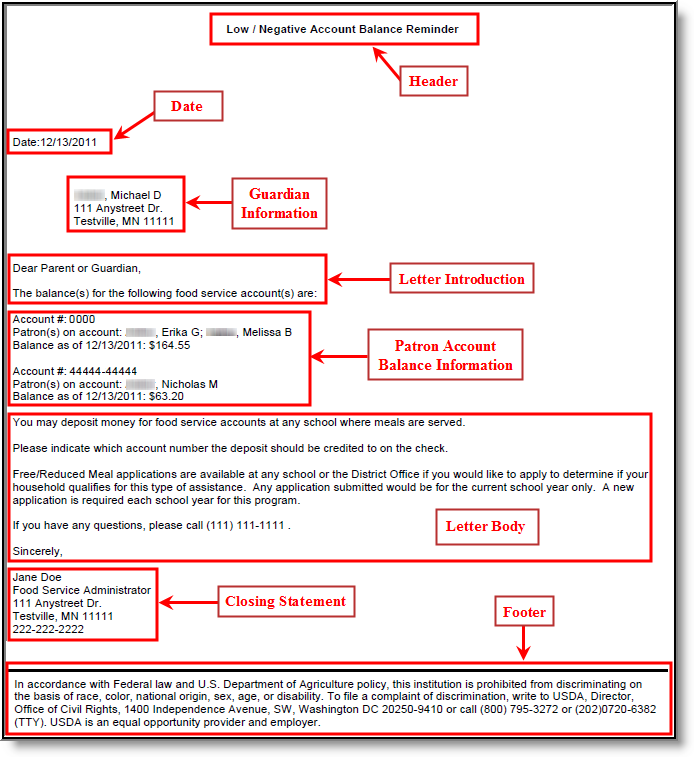
The image above is an example of a generated Low Balance Letter. Users should match each section of the Letter Format editor to each section in this example for a better understanding of how and where each field is displayed on generated letters.
