The Census module tracks every person entry in Infinite Campus - parents, staff, students, emergency contacts, doctors, etc. It is within Census that all people, addresses and households are added. Once these key items have been added, they can be linked together using the Census Wizard.
Census - New Person/Family Set Up
Add a New Person
When adding a new family in Campus, the first step is to add each member using the Add Person Wizard.
Tool Search: Add Person
The Add Person tool allows the creation of new persons - staff members, students, parents/guardians, etc. - in Infinite Campus.
- When creating a new person as part of a census record, use the Census Wizard.
- When reviewing or modifying an existing person's information, use Demographics or Identities.
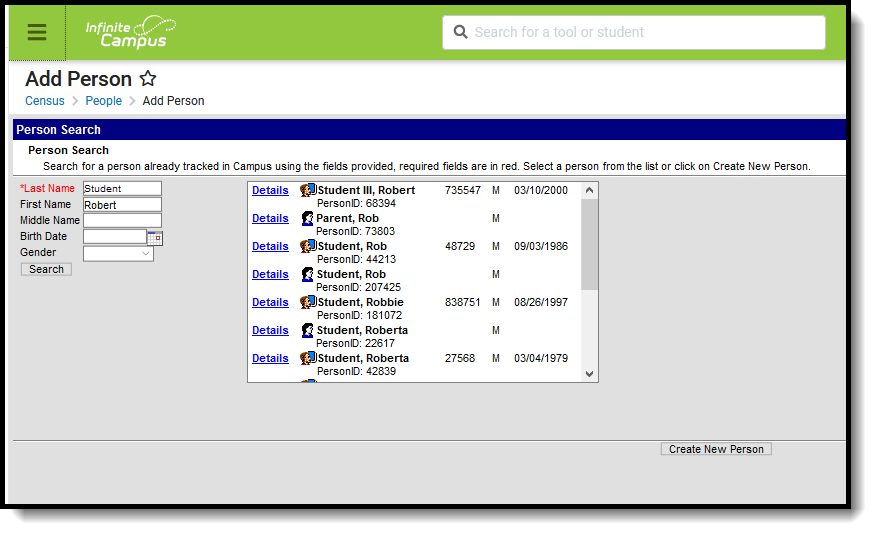 Add Person Tool
See the Add Person Tool Rights article for information about rights needed to use this tool.
Like students and parents/guardians, staff members are entered in Campus as a person record. That person record does not become a staff record until a District Employment record is created and they have a Staff ID number.
Staff members can be created by using the Add Person tool or by using the Staff Locator tool. The Staff Locator find staff members already entered into Campus throughout the state (in State Edition installations) or the district (in District Edition installations). With both tools, a search needs to be done before the user can create a new person or a new district staff member.
To eliminate the possibility of duplicate persons, this tool forces the user to search prior to adding new persons. The last name must be entered before the Search button becomes active.
Use the Add Person Wizard to Create a New Person
When entering Information in the Last Name, First Name or Middle Name fields, double quotation marks and parentheses are NOT allowed.
- Enter the Last Name of the person who needs to be entered into Campus. This is a required field. Additional search criteria may be entered – First Name, Middle Name, Birth Date and Gender.
- Click the Search button. Matching search results, if any, display in the box to the right. It is recommended that the results be thoroughly reviewed before creating a new person. To review in more detail the search results of the persons, click the Details link next to the person’s name. This displays a Person Summary Report of that person’s demographic data, contact information and relational information.
- If the search results do not match the information that needs to be entered, select the Create New Person button. The Person Creation and Person Identifiers editor screen displays. Enter as much of the information that is known at this time.
- In the Person Creation fields, enter the Last Name, First Name and Gender of the person. These are required fields. There may be district specifications for entering this information.
- Enter additional person information where known and follow recommended district procedures for creating new persons.
- In the Person Identifiers area, enter the Staff State ID and Staff Number, if applicable. Sites tied to a State Edition may have Staff State ID generation enabled. In that case, the Staff State ID field is not available for editing and an ID automatically generates when the person is given an employment record.
- Click the Save button at the bottom of the screen. Once the information is saved, the tool displays the new person entered in a search box. To review or to enter additional Census items (household memberships, relationships, enrollments), select the person’s name.
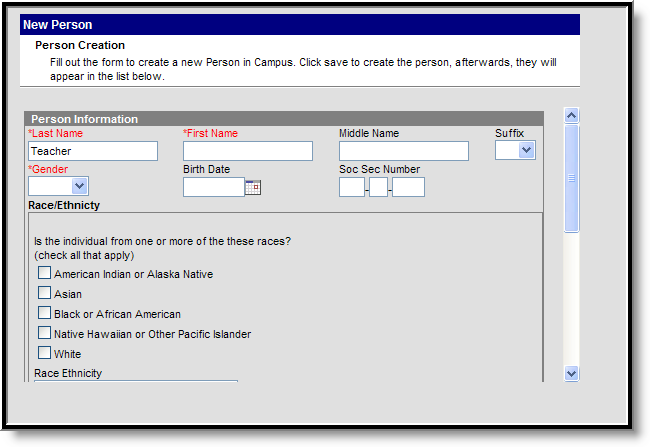 Create New Person Editor
To create another person, click the Add Another Person button. This returns the user to the search fields where another person can be created following the steps above.
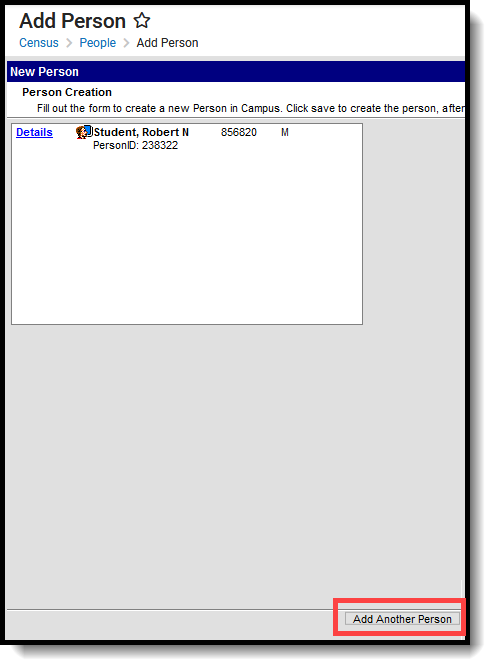 Add Another Person
Use the Add Person Wizard to Find a Person
When entering Information in the Last Name, First Name or Middle Name fields, apostrophes and parentheses are NOT allowed.
- Enter the Last Name. This is a required field. Additional search criteria may be entered – First Name, Middle Name, Birth Date and Gender.
- Click the Search button when finished entering criteria. Matching search results, if any, display in the box to the right. To review in more detail the search results of the persons, click the Details link next to the person’s name. This displays a Person Summary Report of that person’s demographic data, contact information and relationship information. It is recommended that the results be thoroughly reviewed before creating a new person.
- Select the correct person from the list of results by clicking on the Person icon, the name or the person ID. The Demographics tool displays.
- Review the entered information for accuracy and district policy for entering Census information.
- Click the Save button at the bottom of the screen. The person information updates accordingly.
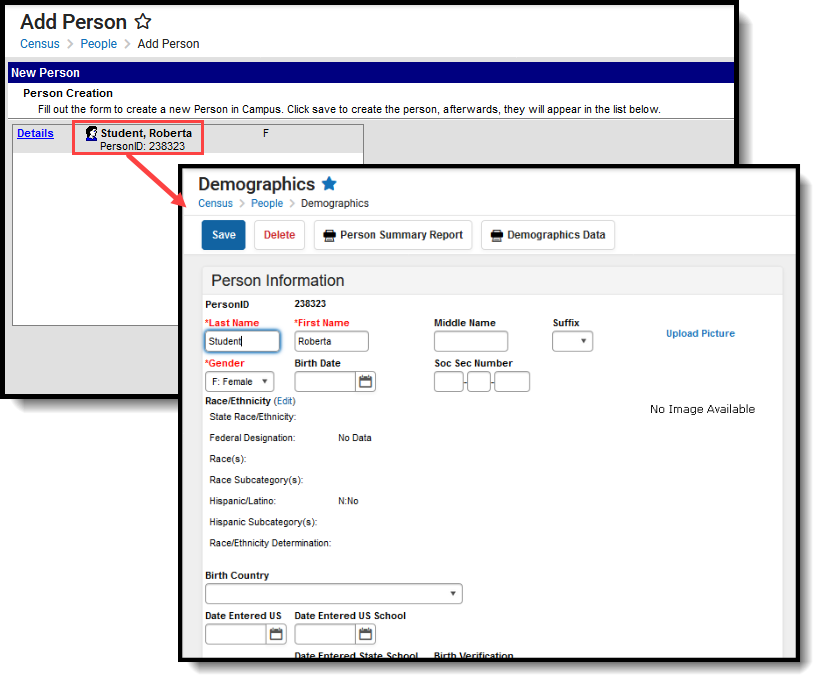 Add Person, Demographics Editor
Use the Add Person tool to create a record for an individual for whom data will be tracked in Campus.
Add a New Address
Now that all members of the family have been added to Campus, their address(es) may now be added using the Add Address Wizard tool. Please note that addresses can be within the district boundaries or outside the district boundaries.
Tool Search: Add Address
The Add Address Wizard allows users to add addresses to the product with the intent of attaching those addresses to households. These addresses can be within the district boundaries or outside the district boundaries.
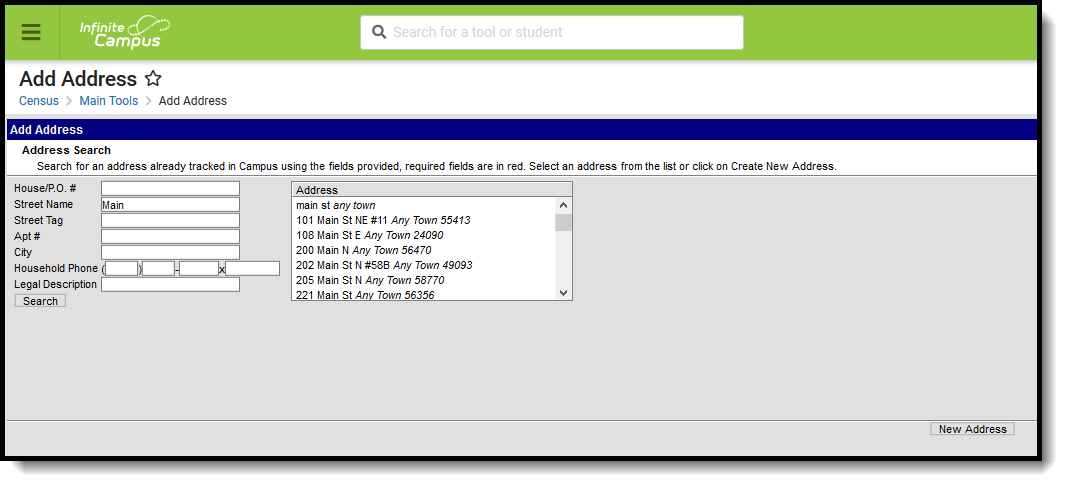 Add Address
See the Add Addresses Tool Rights article for information about rights needed to use this tool.
Address Search
The Census module is designed with built-in checks to eliminate the creation of multiple households with identical members and contact information. If search criteria is entered with the same information as an existing household, those existing results display.
The following provides definitions of the available Address Search Fields.
Field | Description |
|---|---|
House/P.O. # | The street location or the Post Office box number of the address. |
Street Name | The name of the street on which the house or building exists. |
Street Tag | Type of street (Avenue, Street, etc.). |
Apt # | Apartment Number of the address. |
City | Town or city where the address is located. |
Home Phone | Household phone number attached to the address. |
| Legal Description | Provides a definition of the address used in Impact Aid reporting when a street location is not available. Each county determines what a legal description is (lot and block data). See the Impact Aid section for more information. |
Search for Addresses
- Enter the search criteria for finding the address.
- Click the Search button. Matching results will appear to the right of the search fields.
- If one of the results matches the desired address, select that address to view details about that address. This changes the view of the interface from the Add Address Wizard to the Address Info tab.
- If results were not returned or the returned results are not the appropriate address, click the New Address button in the bottom right corner of the screen.
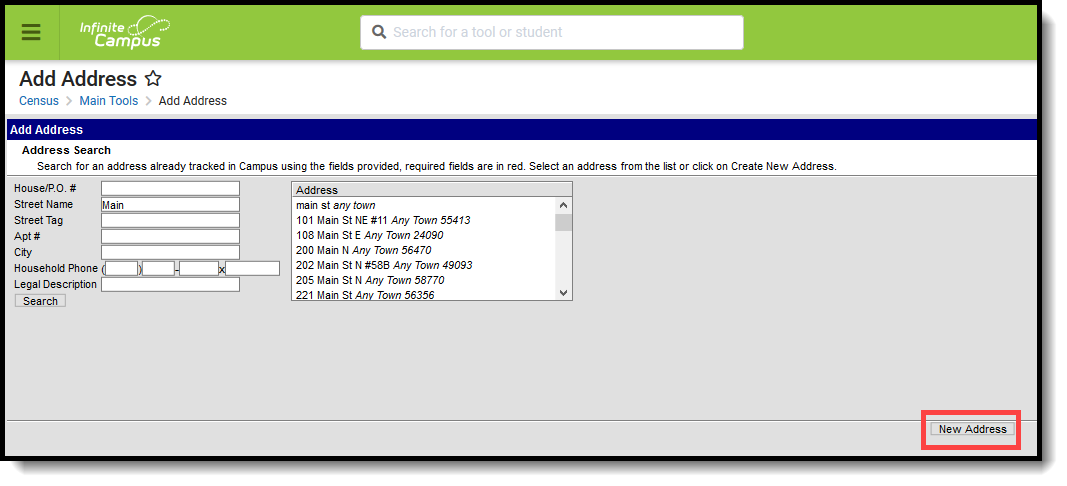 New Address Creation
Add a New Address
After selecting the New Address button, an Address Information screen displays.
- Enter the address fields in the appropriate areas. See the Address Fields definition for guidance.
- Select the District for where students attend school when living at this address.
- If this new address is on a federal site and the Impact Aid reporting preference is set to yes, enter the Legal Description of the address and select the Impact Aid Site option.
- Click the Save icon when finished.
Upon saving, the interface will change to the Address Info tab where additional details about the address can be added.
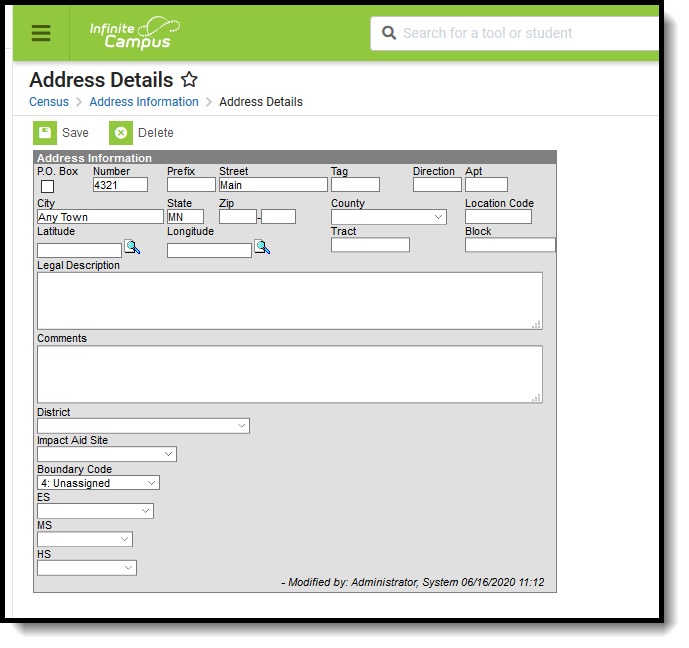 Newly Saved Address
Address Info Definitions
The following table defines the fields available on the Address Info tab.
Field | Definition |
|---|---|
Post Office Box | Indicates the address is not a physical location but a mailing location. |
Number | House Number of the address, or Box number if the address is a P.O. Box address. |
Prefix | Direction of the street in the address. |
Street | Name of the street. |
Tag | Label of the entered street - Avenue, Street, Blvd., etc. |
Direction | Direction indicating the placement of the street within the city limits. |
Apt | Apartment number if this address is for an apartment building location. |
City | Postal city for the address. |
State | Two-digit state code for the address. |
Zip Code | Postal zip code (plus 4 if available). |
County | County in which the address is located. |
Other Address Fields | |
| Location Code | Numeric representation number to accurately locate the address. |
| Latitude | Numeric representation of the address based on north and south placement, generally imported from a district GIS application. Use the magnifying glass to locate the latitude of the address (also referred to as the Geocode). The house number and street name must be populated in order to populate the address latitude. It is also recommended that one or all of the following also be entered:
This field allows for a 10-digit number - 4 digits before the decimal point, 6 digits after the decimal point. The total Geocode value may be up to 14 digits, but only 10 digits saves. If an error message displays, verify the entered values for the address are correct. You may need to change the street name or add a direction. For example, Lexington Ave may need to be entered as County Road 17. |
| Longitude | Numeric representation of the address based on east and west placement, generally imported from a district GIS application. Use the magnifying glass to locate the longitude of the address by clicking the icon next to the Longitude field. The house number and street name must be populated in order to populate the address longitude. It is also recommended that one or all of the following also be entered:
This field allows for a 10-digit number - 4 digits before the decimal point, 6 digits after the decimal point. The total Geocode value may be up to 14 digits, but only 10 digits saves. If an error message displays, verify the entered values for the address are correct. You may need to change the street name or add a direction. For example, Lexington Ave may need to be entered as County Road 17. |
| Tract | Provides a general placement of the address if specific address fields are not available. |
| Block | Provides a general placement of the address if specific address fields are not available. |
| Legal Description | Provides a definition of the address used in Impact Aid reporting when a street location is not available. Each county determines what a legal description is (lot and block data). This field only shows when the Impact Aid System Preference is turned on. See the Impact Aid section for more information. |
| Comments | Provides any additional notes on the address and are for internal reference only. |
| District | Indicates the school district to which students at the address attend. This is often used in school choice settings. |
| Impact Aid Site | Lists any Impact Aid Site associated with the address. When this field is populated, the Impact Aid tool displays the address is part of federal land. See the Impact Aid section for more information. |
Campus provides several tools for districts to use to add and maintain addresses. Use the Add Address tool to add NEW addresses to the Campus database.
Add a New Household
After all family members and their addresses have been added to Campus, the household may be created using the Add Household Wizard tool. Please note that households may also be created using the Census Wizard.
Tool Search: Add Household
The Add Household wizard allows users to search for, select and create new households.
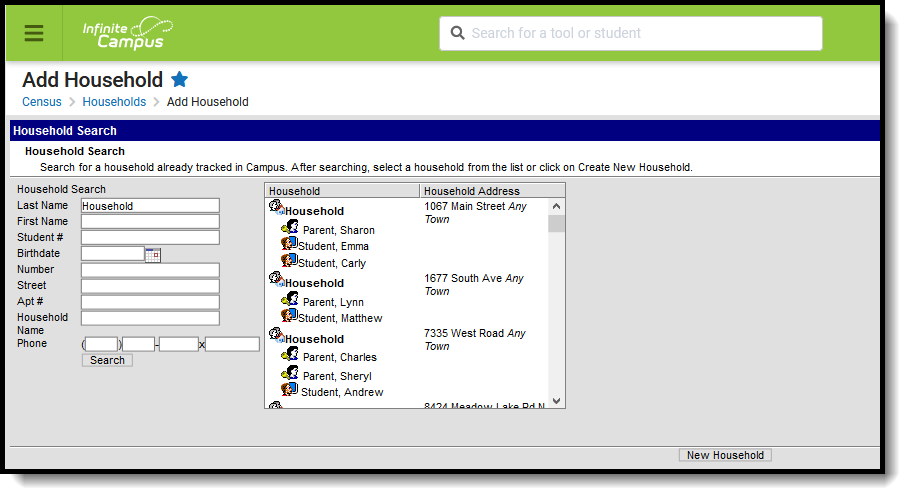 Add Household Editor
See the Add Household Tool Rights article for information about rights needed to use this tool.
Household Search
The Census module is designed with built-in checks to eliminate the creation of multiple households with identical members and contact information. If search criteria is entered with the same information as an existing household, those existing results will appear.
The following provides definitions of the available Household Search fields:
Field | Description |
|---|---|
Last Name | Last name of the individual that is being searched. |
First Name | First name of the individual that is being searched. |
Student Number | Local identification number assigned to a student. |
Birth Date | Birth date of the person being searched, in mmddyy format. |
Number | Street number of the household address. |
Street | Street name of the household address. |
Apartment Number | Apartment number assigned to the household address. |
Household Name | Name of the household being searched. |
Phone | Household phone number being searched. |
Search for Households
- Enter search criteria using one or more of the available search criteria.
- Click the Search button. Matching results will appear to the right of the search fields.
- If one of the results matches the desired household, select it to view details about this household. This changes the view of the interface from the Add Household wizard to the Household Information tool.
- If results were not returned or the returned results are not the appropriate household, click the New Household button in the bottom right corner of the screen.
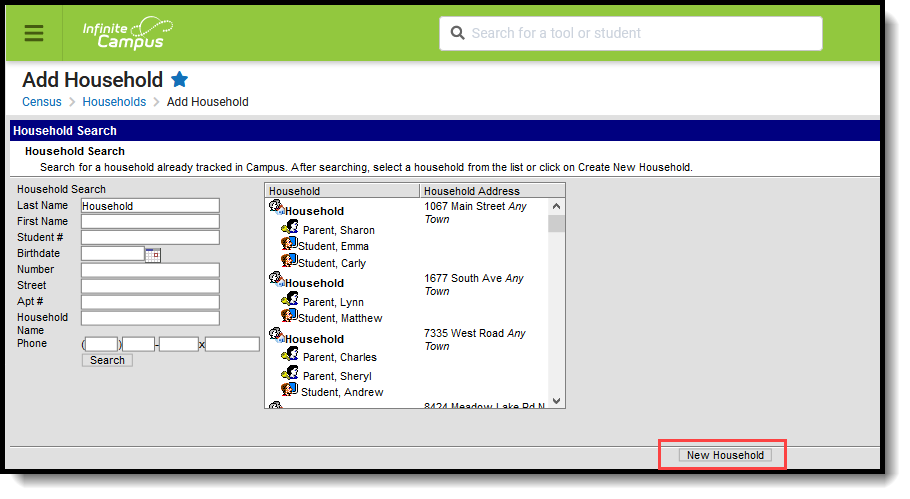 New Household Creation
Add a New Household
After selecting the New Household button, a Household Information editor will display.
- Enter the Name of the Household.
- Enter the Household Phone Number.
- Enter any additional Comments about the Household.
- Mark if this household should be considered Private.
- Click the Save icon when finished. The Household Information toolset displays. Additional information can now be added to the household - address, members, fees, payments.
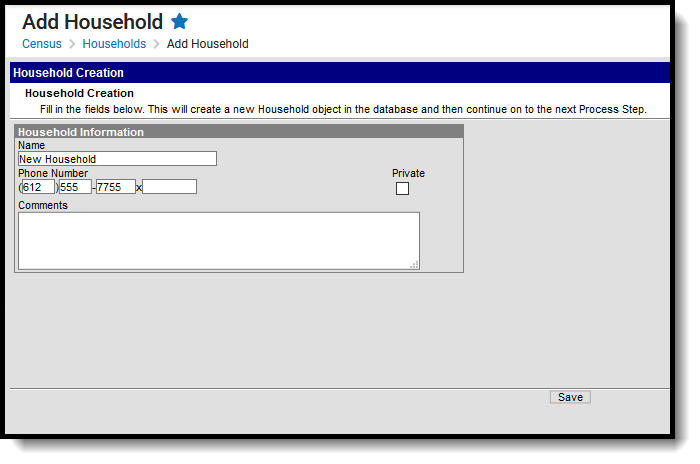 Enter and Save New Household
The Add Household wizard allows users to search for, select and create new households in Campus. This video explains how to create a new household using the Add Household wizard.
Assemble a New Household
After all of the family members, address(es) and household(s) have been added to Campus, you can begin linking this information using the Census Wizard.
Tool Search: Census Wizard
The Census Wizard is a three-step process that allows the user to assemble the household, add persons as members to that household and modify relationships.
- Step 1: Enter Search Criteria
- Step 2: Assemble New or Select Existing Household
- Step 3: Edit Membership and Mailing Information
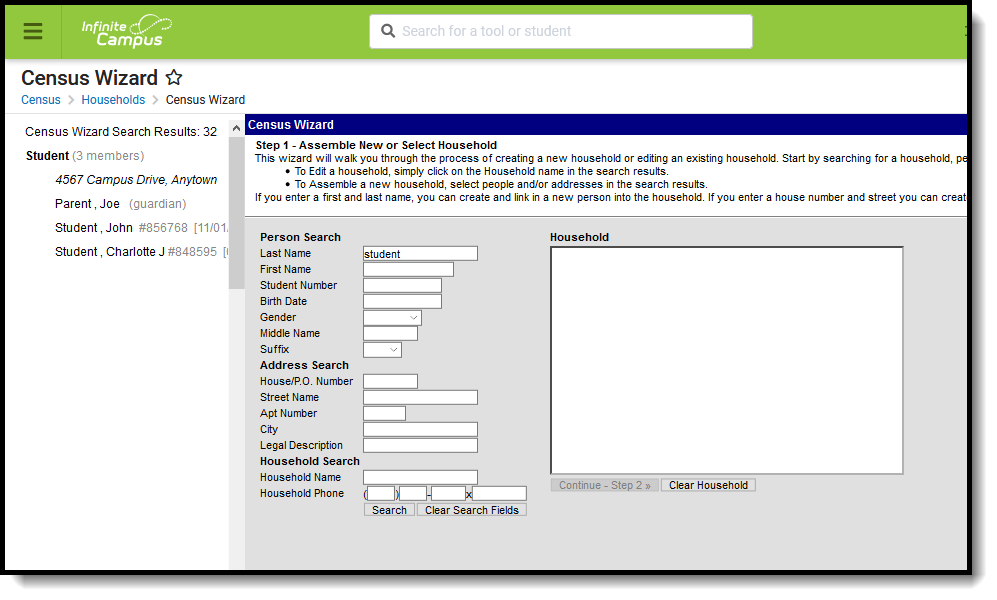 Census Wizard
See the Census Wizard Tool Rights article for information about rights needed to use this tool.
Additional modifications to data may need to be done after completion of the Census Wizard (i.e., enrollment records and non-household relationships may need to be modified).
Certain items in Campus can be marked Private. This means the address details or relationship details should be kept within school settings. Marking this checkbox does not remove the information from reports. See the Private Checkbox Information article for more details.
NOTE: Any changes made in Step 1 of the Census Wizard CANNOT BE SAVED with only Read rights. Write rights are needed for saving.
Also note that the ability to REMOVE information from a household and save those changes is possible with Read and Write tool rights assigned.
Search for Census Data
Census data can be searched for by entering person information, address information or household information. At least one field needs to be entered in order to search. The following defines the available search options.
- Searching for Census data does not require the selection of a school, calendar or year.
- All individuals who exist in Campus are searched. This includes past students, present students, former and current staff members and parents.
Person Search
Data Element | Definition |
|---|---|
Last Name | Individual's last name |
First Name | Individual's first name |
Student Number | Student's locally assigned identification number |
Birth Date | Individual's date of birth |
Gender | Selection of individual's gender |
Middle Name | Individual's middle name |
Suffix | Generational determinant of the individual (Jr., III, etc.) |
Address Search
Address elements are located on the Census Address toolset. Data entered in these fields can include special characters.
Data Element | Definition |
|---|---|
House/P.O. Number | Number assigned to the dwelling place or post office number assigned to an individual |
Street Name | Name of the street on which the dwelling place is located. |
Apt Number | Number assigned to the apartment. |
City | City in which the dwelling place is located. |
| Legal Description | Provides a definition of the address used in Impact Aid reporting when a street location is not available. Each county determines what a legal description is (lot and block data). See the Impact Aid section for more information. |
Household Search
Household data is located in Census Household.
Data Element | Definition |
|---|---|
Household Name | Name assigned to the household |
Home/Other Phone | Phone number assigned to the household |
Enter Search Criteria
- Determine which type of search to perform - Person, Address or Household - and enter the appropriate search elements.
- Click the Search button at the bottom of the Census Wizard page. Matching results appear in the Search to the left.
- Select the desired search result. This places the selected information from the Search into the Assembling a New Household window.
- Click the Continue to Step 2 button.
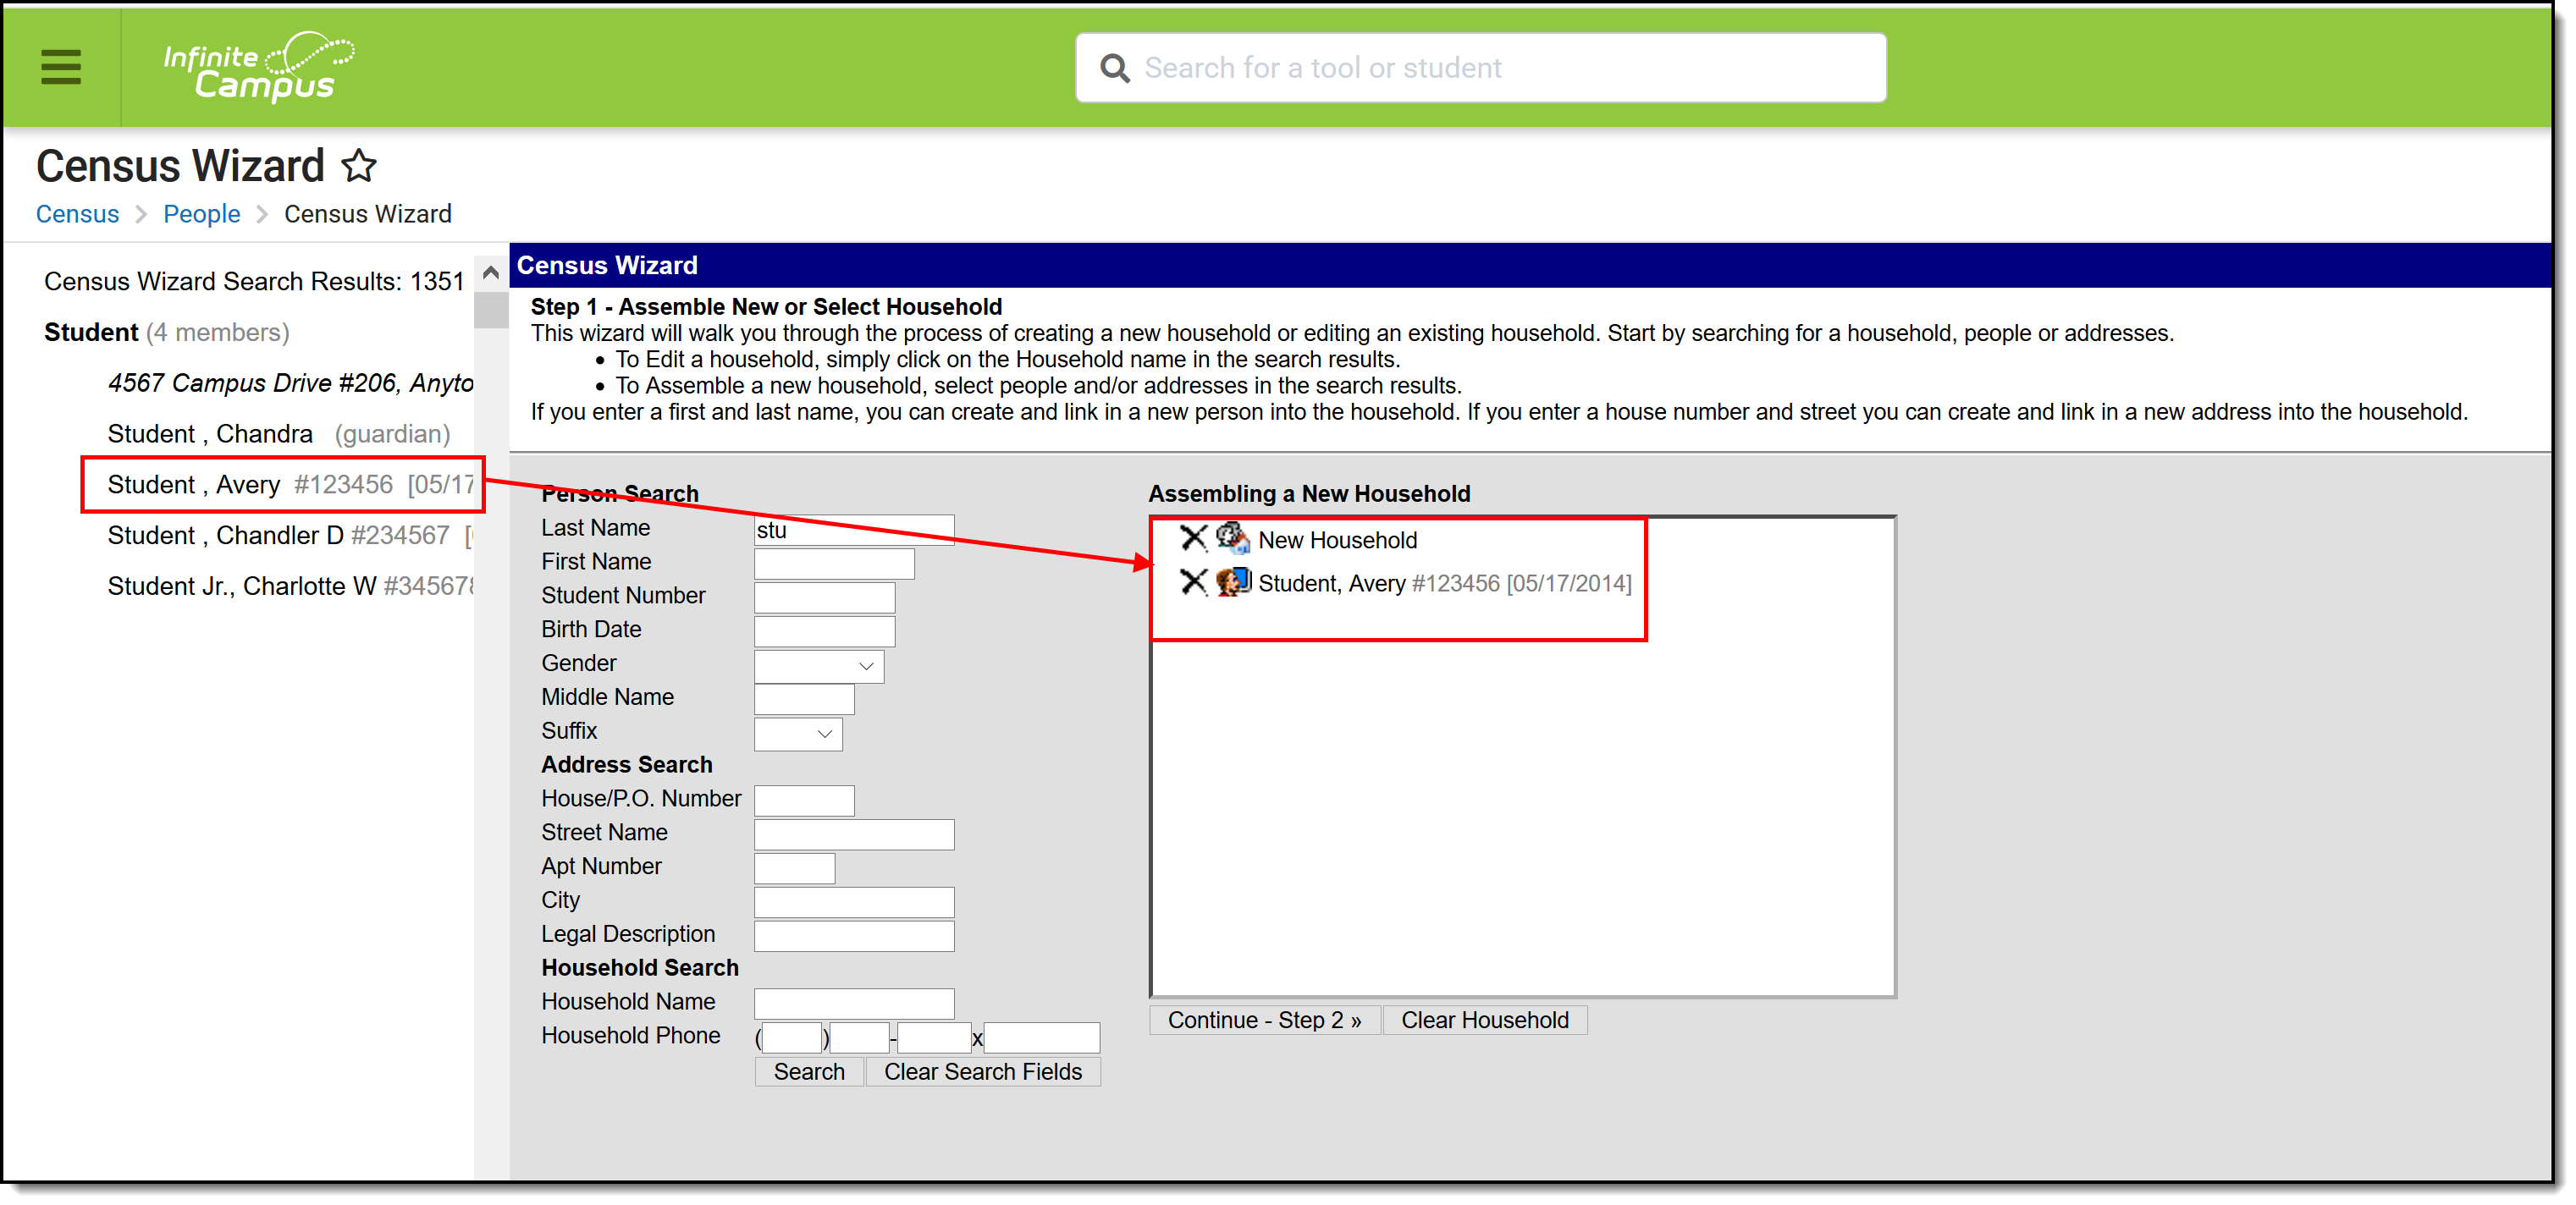 Search Results
Assemble a New or Select an Existing Household
Household
- Enter the Household Name, if not already entered.
- Enter the Household Phone Number.
- If desired, mark the Private checkbox.
- Enter any Comments related to this household.
Household Locations
- Enter the Address information, as appropriate.
- Enter Start and End Date information for the address.
- Mark the Private checkbox as needed.
- Indicate if the address is a Secondary location.
- Indicate if this is a Mailing address for the household.
- Indicate if this is a Physical location for the household.
Household Members
- Enter the Start and End Date for the household members.
- Indicate if this is a Secondary location for the household member.
- Mark the Private checkbox as needed.
Continue or Start Again
- When finished, click the Save & Continue - Step 3 button.
- To start the process over, click the Step 1: Start Over link in the Search Results to begin again.
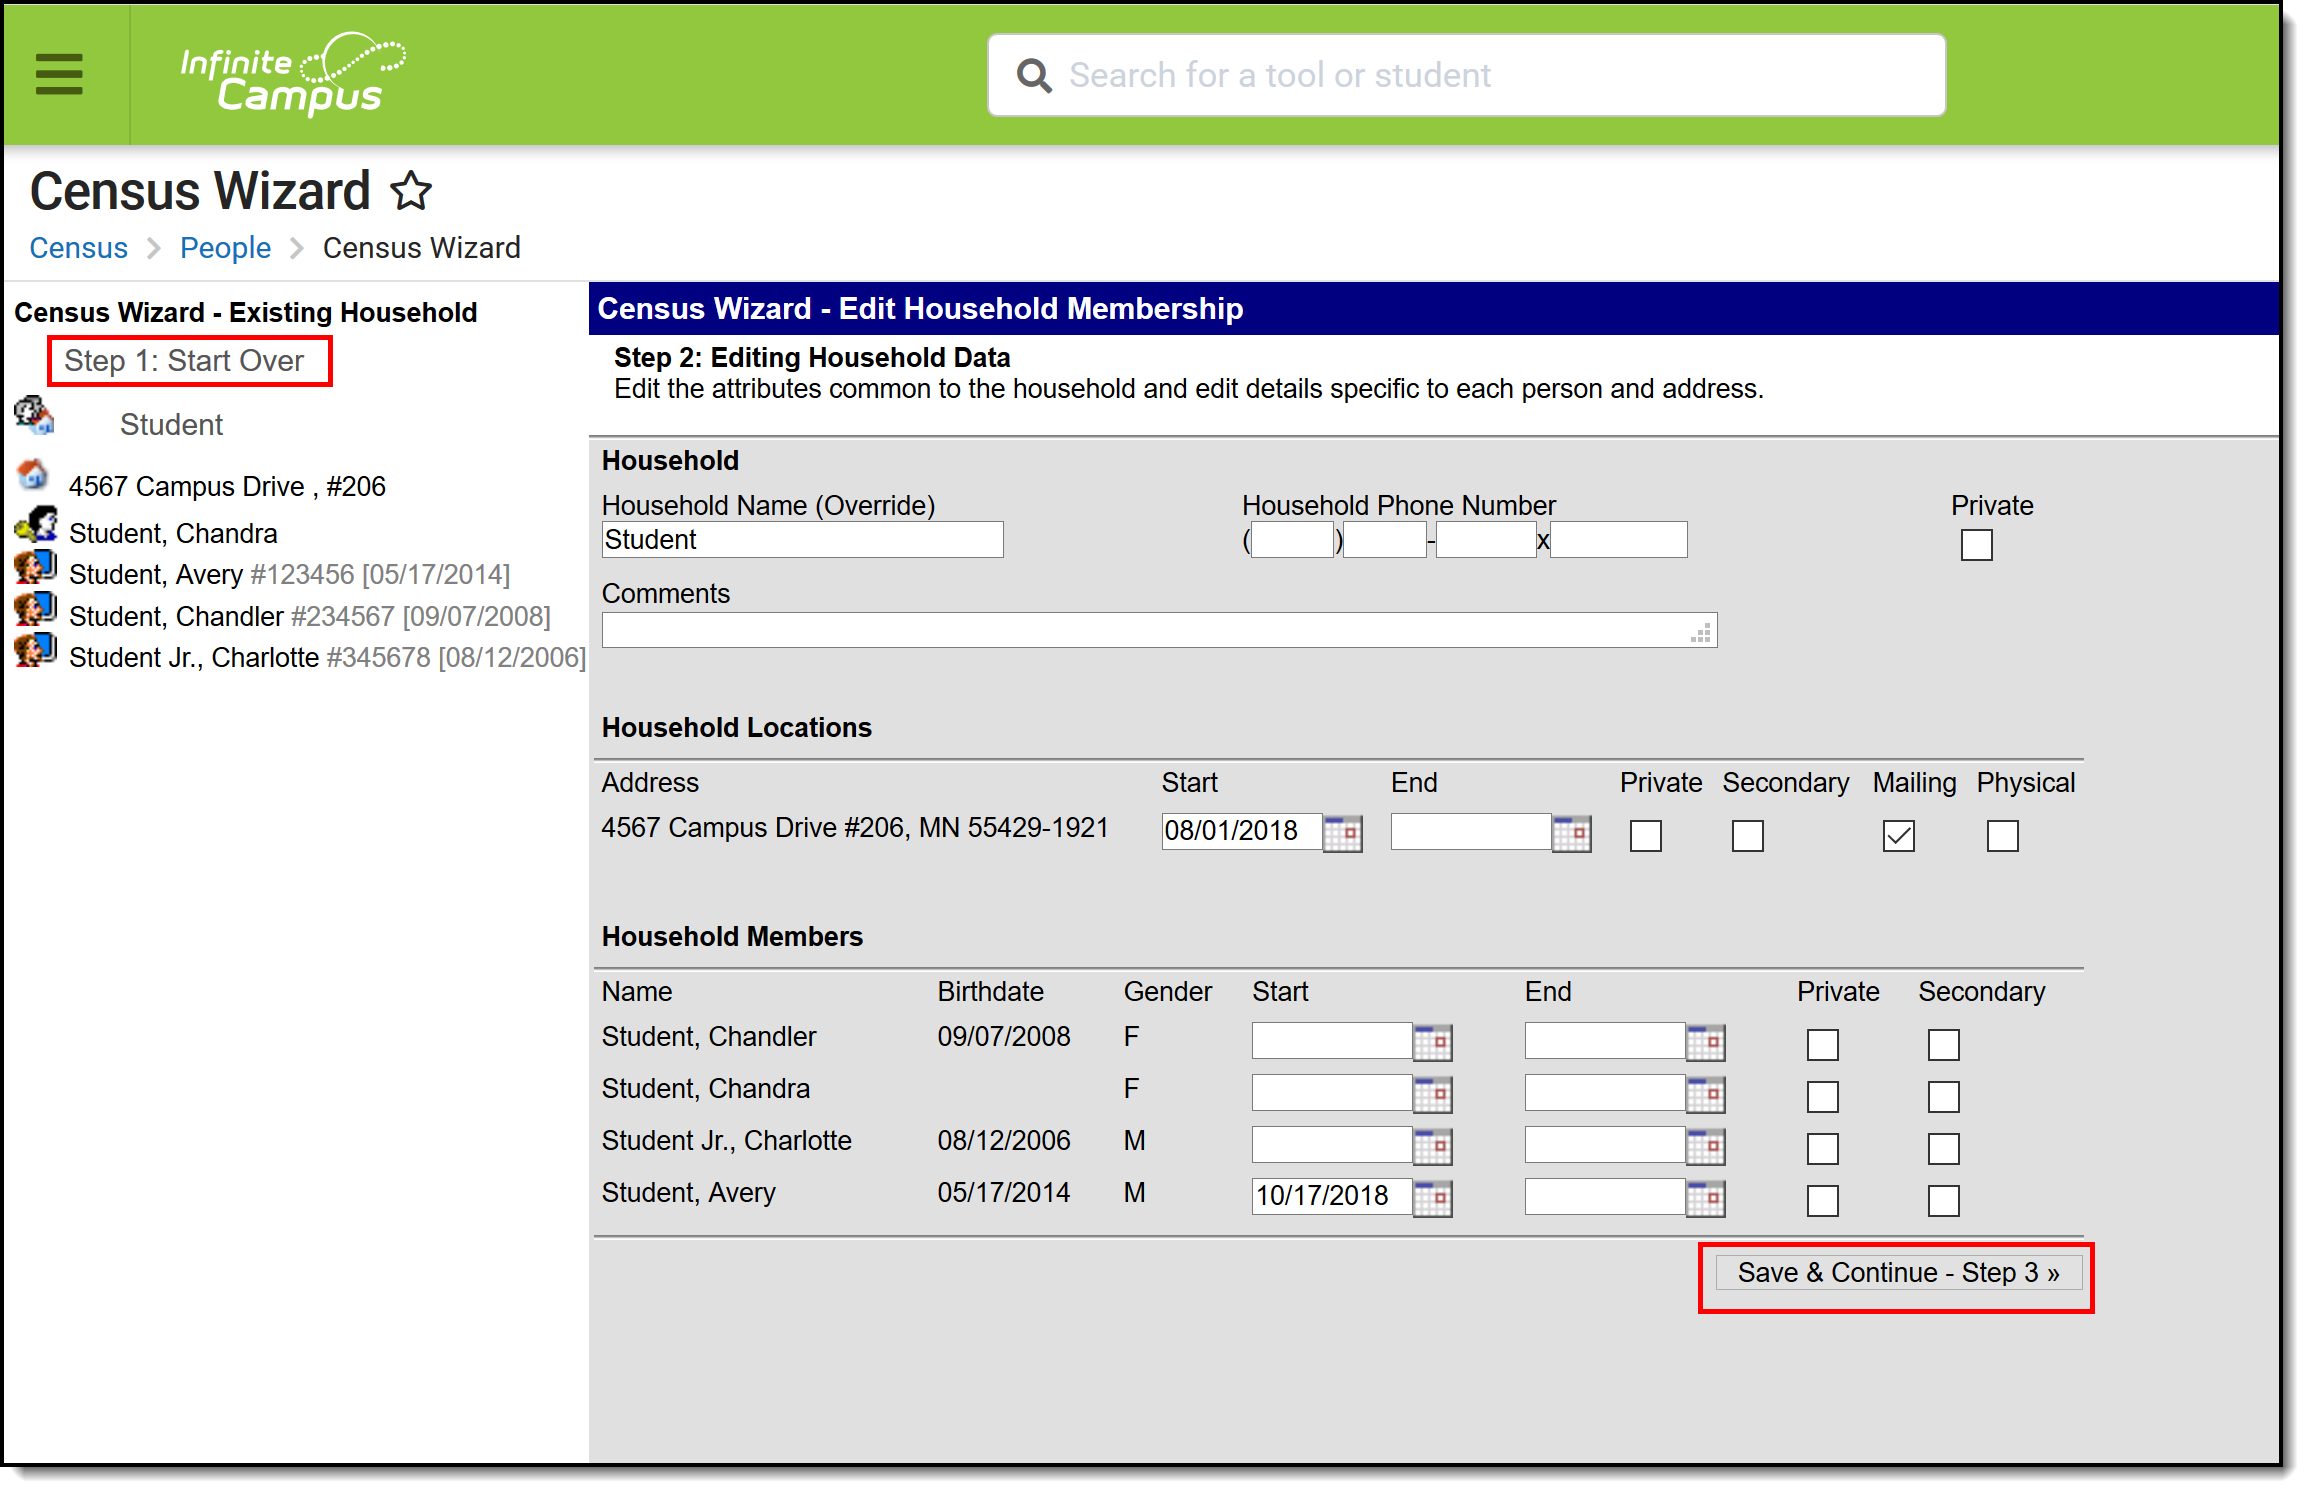 Household Information
Edit Relationships
- Select the Relationship one of the individuals has to the other individual.
- Enter a Start Date, if appropriate.
- Mark the Guardian, Mailing, Portal, Messenger and Private checkboxes for the individual as desired.
- Click the Save & Done button when finished.
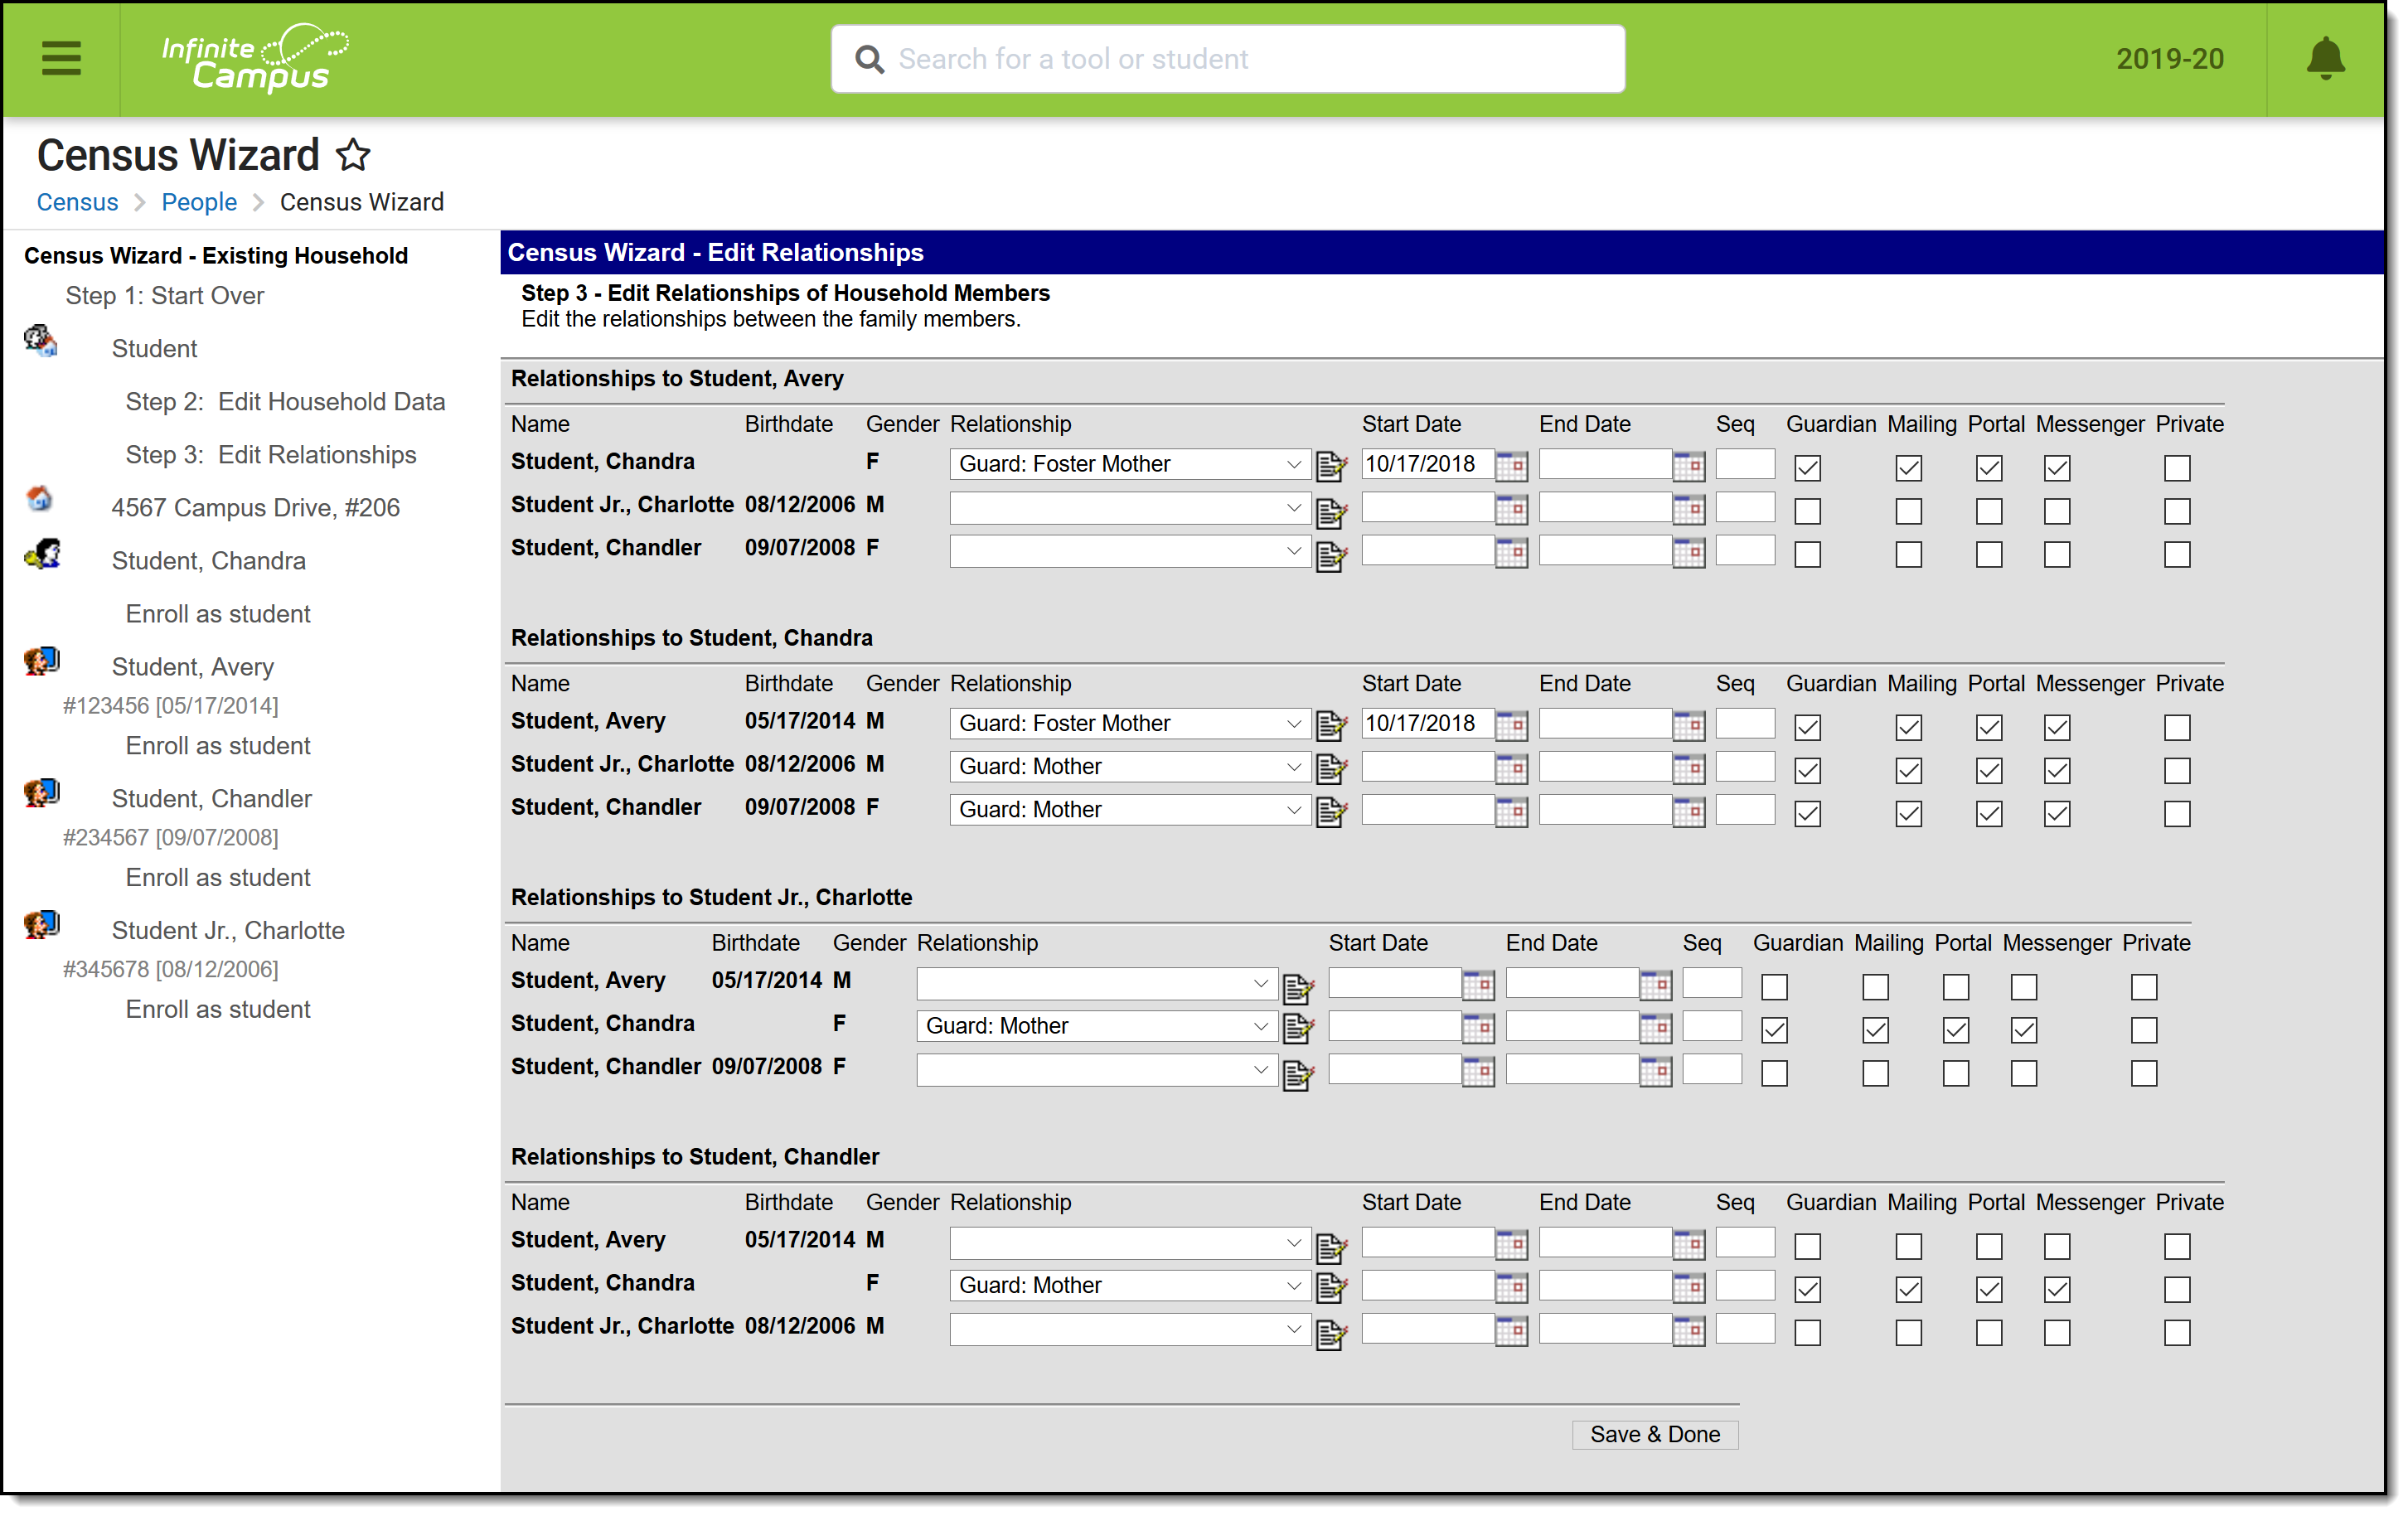 Relationship Information
At this time, the process is complete. Please note that choosing a person from the list to modify additional information, a warning message says displays indicating you are leaving the Census Wizard. Click OK to continue. Since the Save & Done option has been selected, your data is saved and you can safely navigate to other areas of the product.
Add Existing Persons to a Household
An individual can be available in Campus without being a household. This might be staff who do not use Campus, or Emergency Contacts, or other types of person records. When searching in the Census Wizard, those individuals display at the end of the Search results.
To add such a person to a household, select their name from the Search Results. This places them in the Assembling a Household window, and follow the steps for using the Census Wizard. To verify this is the correct person to add to the household, click the Details link above the name. This displays the Person Summary Report.
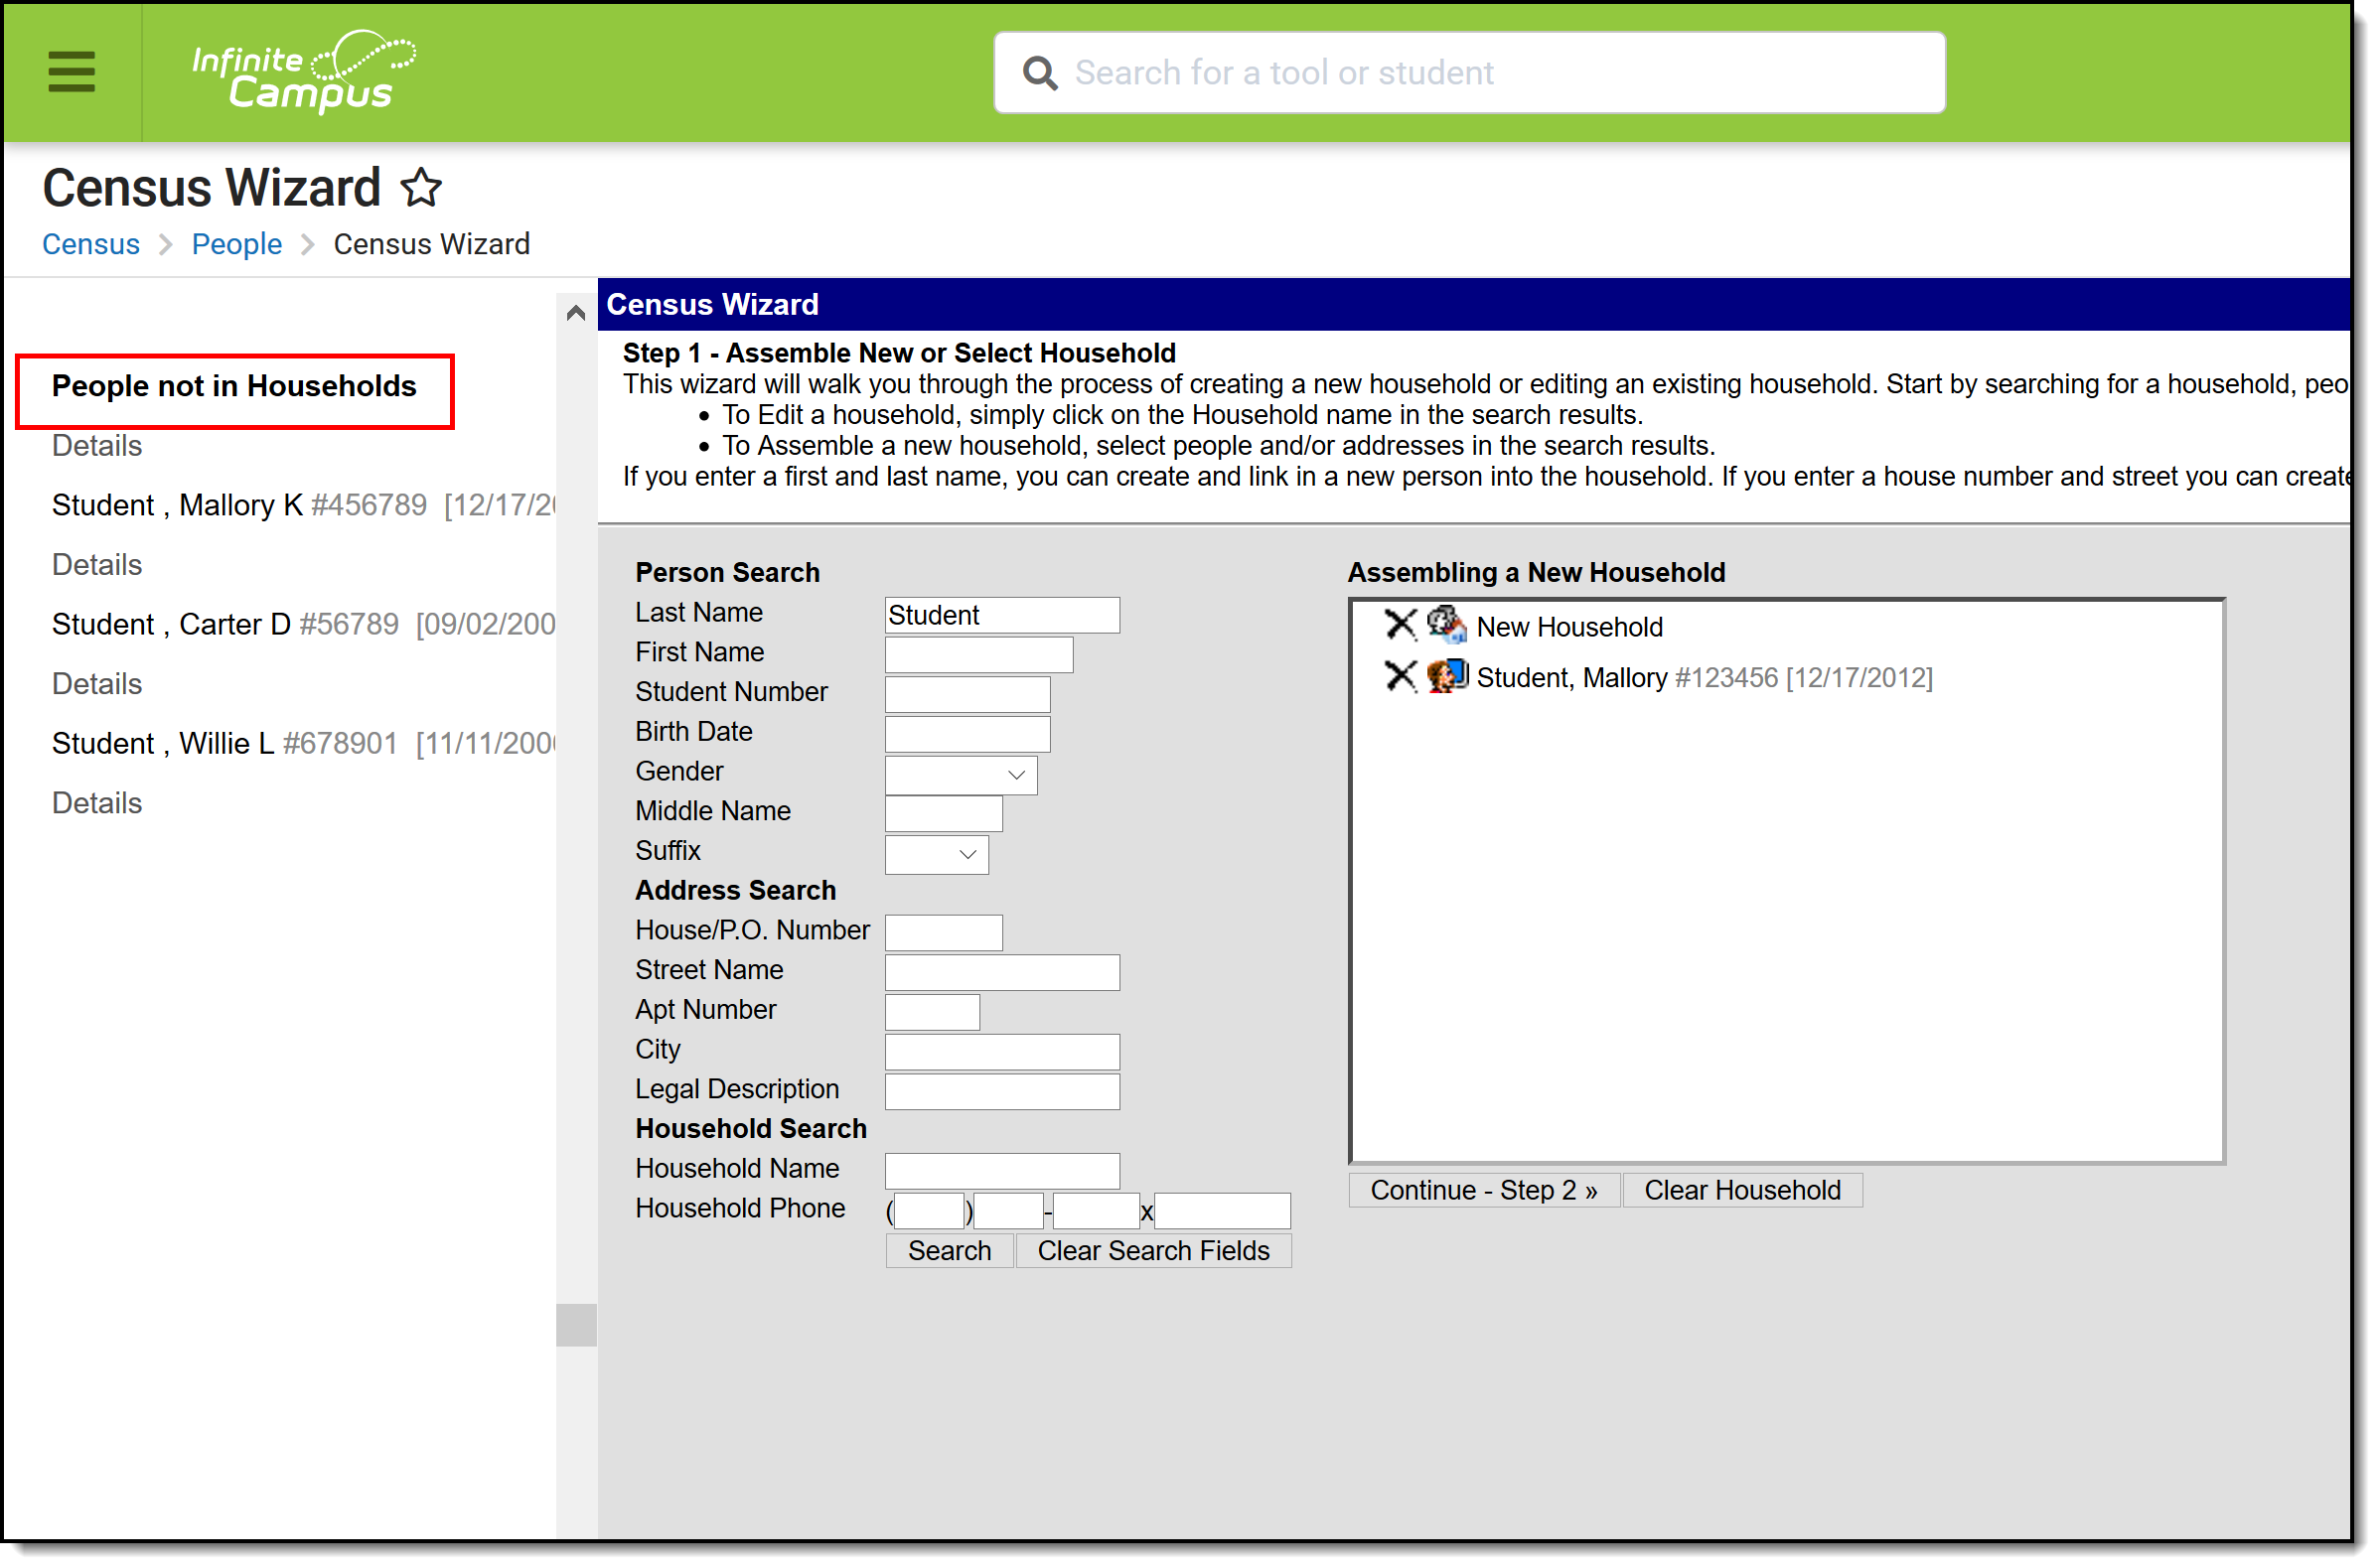 People not in Household Results
The Add Household wizard allows users to search for, select and create new households in Campus. This video explains how to create a new household using the Add Household wizard.
Add a Student Using the Student Locator (Participating Districts Only)
The Student Locator can be used to locate a student that may currently be or previously has been enrolled in another school within the district. This allows for a request of student records to be released from the student's previous school.
Tool Search: Student Locator
The Student Locator Wizard provides a way to search for existing students across the district, and when necessary, create new students. This tool can also be used to locate and update information for a specific student.
The Student Locator searches ALL people in order to prevent duplicates.
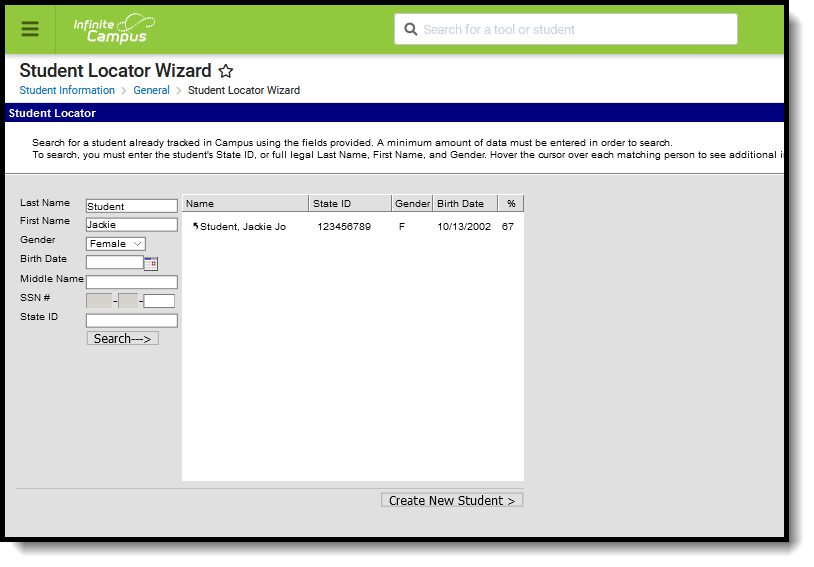 Student Locator
See the Student Locator Tool Rights article for information about rights needed to use this tool.
Student Locator System Preference
The Birth Date Required for Student Locator System Preference, called Birth Date Required for Student Locator, determines whether the Birth Date field is required before searching for and locating students.
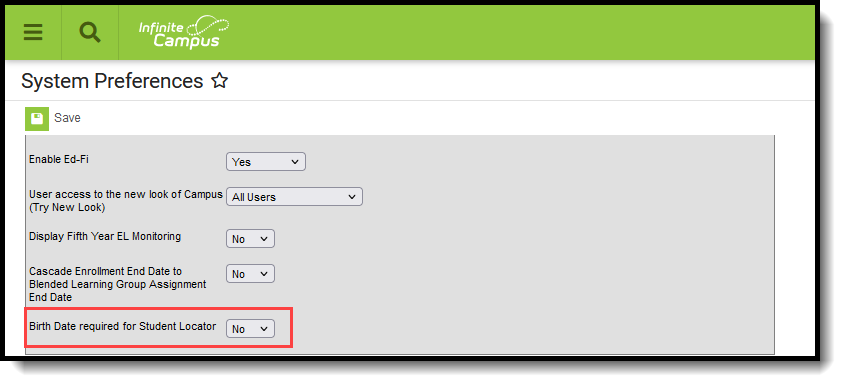 Student Locator Birth Date Preference
When set to No, the Search field is available on the Student Locator when the Last Name, First Name, and Gender fields are populated, OR when the State ID field is populated.
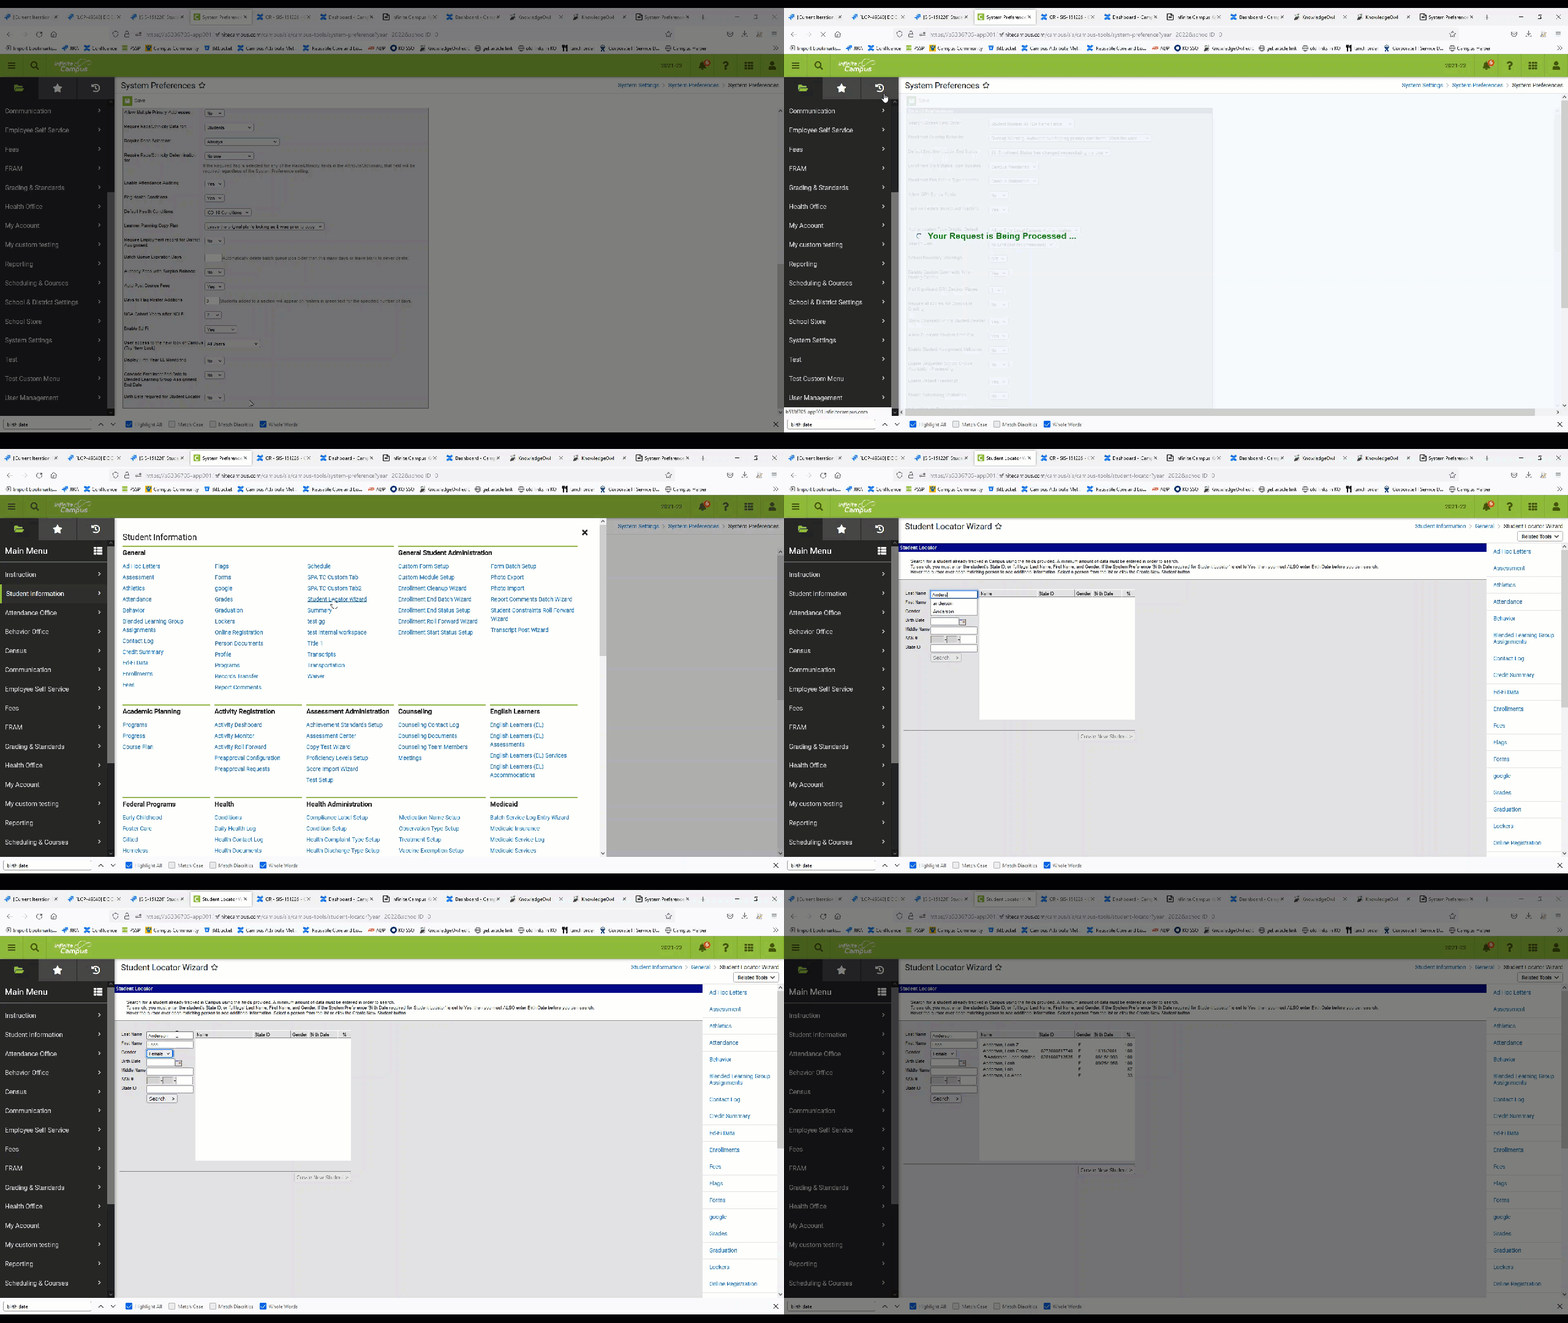 Student Locator Preference Set to No
When set to Yes, the Search field is available on the Student Locator when the Last Name, First Name, Gender AND Birth Date fields are populated, OR when the State ID field is populated. For Kentucky districts, this preference is always set to Yes.
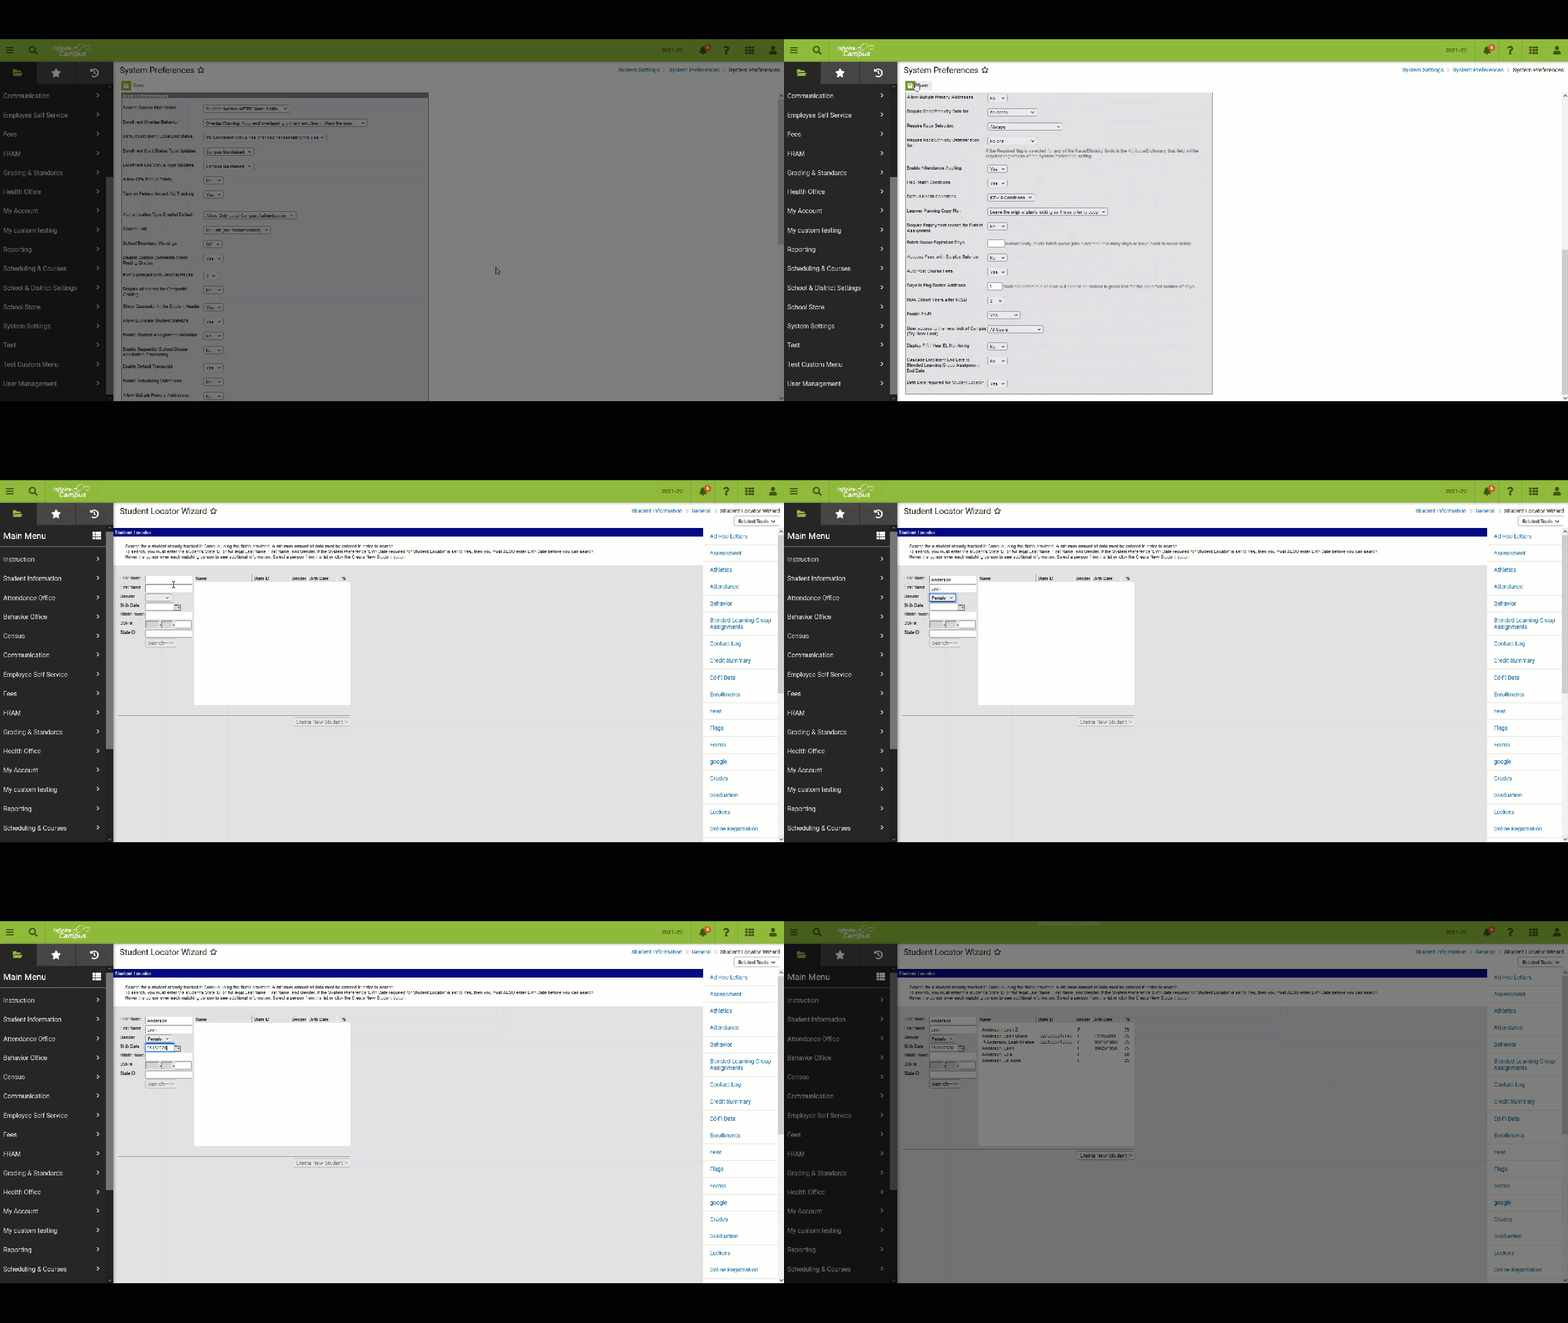 Student Locator Preference Set to Yes
Locate a Student
Searching for a student indicates whether or not the student (or person) already exists in Campus, and when that student does not exist in Campus, a new student can be created. This avoids duplicate student records within Campus and provides a simple way to convert an existing person into a student.
Enter search criteria for locating a student. Depending on the selected System Preference settings, a Last Name, First Name, and Gender, or State ID (preference set to No), or a Last Name, First Name, Gender, and Birth Date, or State ID (preference set to Yes) must be entered in order to activate the Search button. Additional search criteria can also be entered. Hover over the results to see enrollment information for the student. The hover shows the dates of the student's most recent enrollment, the school and grade level of that enrollment, and the student's guardians. When a student's most current enrollment is marked as No Show, the hover displays the student's previous district's enrollment.
BIE users can search for students based on NASIS ID. For security reasons, this tool only uses the last 4 digits of a student's Social Security number (SSN).
Click the Search button. Matching results display. On state-linked district editions, both the state and district databases are queried to find matching results. When the state database cannot be reached, a warning message displays indicating only the district database is being queried.
Select a Student from the Search Results
- Select a student from the search results. The screen changes to the Student Information toolset. The arrow next to the student's name indicates the student is locally enrolled
- Navigate to the appropriate student tool to verify student information.
The percentage listed indicates how closely an existing student matches the entered search values. The Percent (%) column is calculated as Match % = (X/Y) * 100, where:
- X = Number of fields that matched the person and any associated identities. A single field value matching identities only provides a single point.
- Y = Number of fields populated for the search
For example, a user enters search criteria of (1) Last Name, (2) First Name, (3) Gender, (4) State ID, and (5) Birth Date. Y = 5
The actual person record has two identities:
- First name matches on one identity (+1)
- Gender matches on two identities (+1)
- Last Name matches on two identities (+1)
- Birth Date matches on two identities (+1)
- State ID does not match on person (+0)
X = 1+1+1+1+0 = 4
Match = (4/5) * 100 = 80%
Ranking comes after match filtering. When the State ID and or Gender fields are used for searching, records that do not match are excluded from the list. For all other fields, results display as long as at least one of those field values match.
Once a student is selected from the search results, the Identity Information fields - Last Name, First Name, Middle Name, Suffix, Gender, Birth Date and Social Security Number - cannot be modified. These fields are READ ONLY and are not editable.
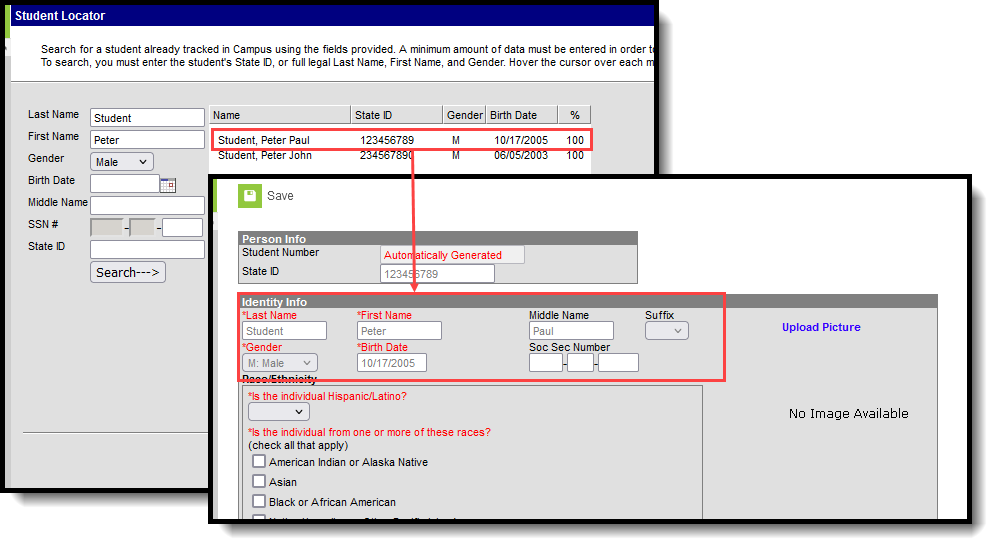 Identity Information Fields Not Editable
Create a New Student
- When the student is not found, click the Create New Student button.
- When this creation is occurring in a State Edition state, a warning message displays indicating a new state ID is created for the student. Click OK to acknowledge this message.
- A page that mimics the Census Demographics tool displays. Enter at least the required information.
See the Student Locator Data Entry Fields for definitions of the available fields.
A school must be selected in the Campus toolbar to create the student.
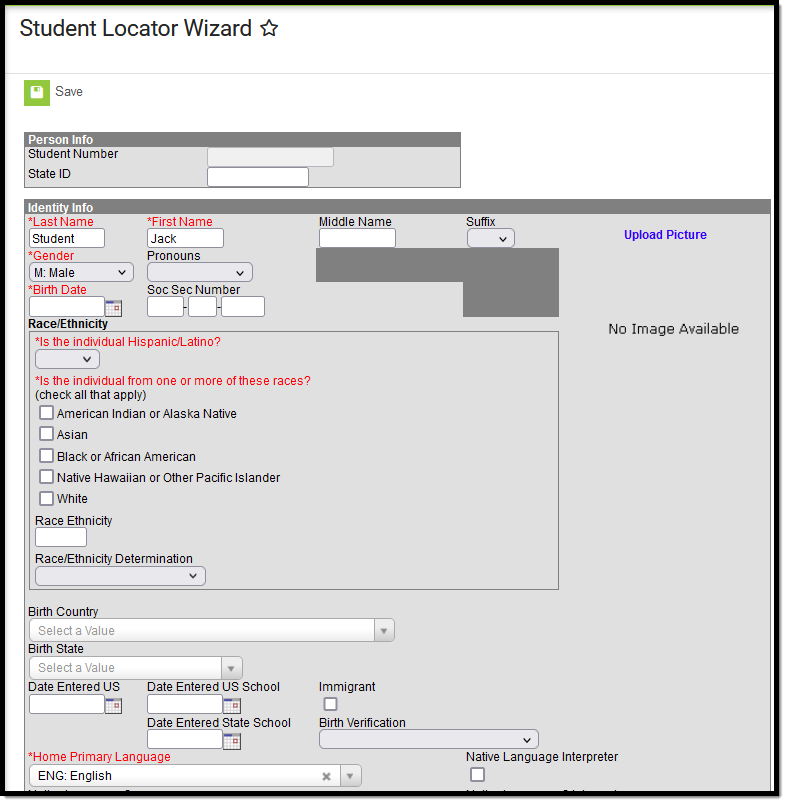 Student Locator Editor
Student Locator Data Entry Fields
Included below are the accompanying fields that are available in the Query Wizard when building reports. These fields can be found when creating Student Data Type Filters in the following locations:
- Student > Demographics
- Student > Demographics > Identity History
- Student > Learner
Person Information Field Descriptions
Field | Description | Ad hoc Fields |
|---|---|---|
Student Number | Student's district identification number, used within school/district. Student Number Format System Preferences determine the behavior of this field. When the Student Number Format is set to No Auto Numbering, a user can enter a specific student ID number. When the Student Number Format is set to any of the other options:
| student.studentNumber |
State ID | Student's identification number, as assigned by the state Department of Education. Generation of this field may depend on district/state System Preferences. Verify selections for the Student State ID Method. This is available for State Edition installations and State Edition linked District Editions. | student.stateID |
| NASIS ID | Only applicable for BIE users. New BIE students are automatically assigned a NASIS ID. | student.otherID |
Identity Information Field Descriptions
Protected Identity Information is available on the Identities tool.
Field | Description | Ad hoc Fields |
|---|---|---|
| Last Name | The individual's last name. | student.lastName |
First Name | The individual's first name. | student.firstName |
Middle Name | The individual's middle name. | student.middleName |
Suffix | The generational assignment as part of his/her name (i.e., Jr, III). | student.suffix |
Gender | The indication of whether the person is male, female, or non-binary. Gender options may vary by state. | student.Gender |
| Pronouns | The indication of the person's preferred pronouns. For additional information please refer to Pronoun Setup. When defined, pronouns are available in Pronoun drop lists throughout Campus. | ident.pronounID |
Birth Date | Person's date of birth. | student.birthDate |
Social Security Number | The Federally-assigned Social Security number (SSN). Please see additional information on Social Security Number Tool Rights. | student.ssn |
Race/Ethnicity | Person's race/ethnicity determination. Please see additional information on the Race/Ethnicity tool. | student.raceEthnicityFed |
Birth Country | Indicates in what country the person was born. This is a required entry for some states. | student.birthCountry |
Birth State | Indicates in which state the person was born. | student.birthState |
Date Entered US | Indicates the date the person moved to or entered the United States. | ident.dateEnteredUS |
Date Entered US School | Indicates the date the person began attending school in the United States. | ident.dateEnteredUSSchool |
Birth Verification | Proof of the person's existence, usually in the form of a birth certificate. Options may vary by state; the following are possible selections:
| ident.birthVerification |
Home Primary Language | Indicates the language most frequently and fluently spoken in the student's household. | student.homePrimary Language |
Nickname | Nickname preferred by person. This field may not appear for all states. | student.alias |
Comments | Additional comments about the person. | ident.comments |
Enrollment fields may vary by state. Please see the Enrollments article for more information about state-specific Enrollment fields.
Users who do not have calendar rights to the calendar in which they are enrolling a student are allowed to enroll the student; however, they are prevented from accessing any other Student Information tools during this process.
The same System Preferences are enforced when enrolling students from the Student Locator.
Field | Description | Ad hoc Fields |
|---|---|---|
Calendar | Lists the name of the school and school year the student is enrolled. | student.calendarName |
Schedule | Displays the schedule structure of the calendar into which the student is enrolled. | schedStructure.name |
Grade | Indicates the grade level of the enrollment record. Grade levels should be mapped to state grade levels for proper reporting. When Grade Level Age settings are in effect, a warning message displays if a grade level is selected and the student is not of the appropriate age for the selected grade level. | student.grade activeEnrollment.grade |
Class Rank Exclude | Indicates this enrollment record is not included in class rank calculations. This is often selected for foreign exchange students or special education students. | activeEnrollment.class RankExclude |
Start Date | Lists the first day of instruction for this enrollment record. | student.startDate activeEnrollment.startDate |
No Show | Indicates the student did not attend the school during the allotted time period determined by the district. | N/A |
End Date | Lists the last day of instruction for this enrollment record. | student.endDate activeEnrollment.endDate |
End Action | Indicates the selection of promoting, retaining or demoting a student to the next, previous or same grade level for the next school year. See the End Action section for more information. | activeEnrollment.endAction |
Service Type | Indicates the type of enrollment and the intended service the student receives. Service types are Primary, Partial (Supplemental) or Special Education. | student.serviceType activeEnrollment.serviceType |
Local Start Status | Lists the local enrollment start code for the student. The mapped State Start Status code displays below this field. | activeEnrollment.startStatus |
Local End Status | Lists the local enrollment end code for the student. The mapped State End Status code displays below this field | activeEnrollment.endStatus |
Start Comments | Displays any comments about the start of the enrollment - who entered the enrollment, verified information, etc. | activeEnrollment.startComments |
End Comments | Displays any comments about the end of the enrollment. | activeEnrollment.endComments |
Logic exists upon saving the enrollment that verifies the correct Structure ID (visible on the Schedule Structure Detail editor) is associated with the selected Calendar ID (visible on the Calendar Information editor).
When there is a mismatch, an error message displays indicating the two IDs do not match. When this occurs, the enrollment cannot be saved and Campus Support needs to be contacted to correct the issue.
Troubleshooting Errors
This section describes potential errors you may encounter when using the Student Locator.
No Response from State Server
When a state-linked (DIS-enabled) district has trouble connecting to the state database, the Student Locator only queries the district's local database when searching for and producing search results. When users encounter this error, an error displays (shown in the image below).
Users can still move forward in creating new students in their district, however, the record may not sync to the DIS-linked state edition or be assigned a State ID until the underlying DIS issues are resolved.
The district should report this issue to Campus via their authorized support contacts.
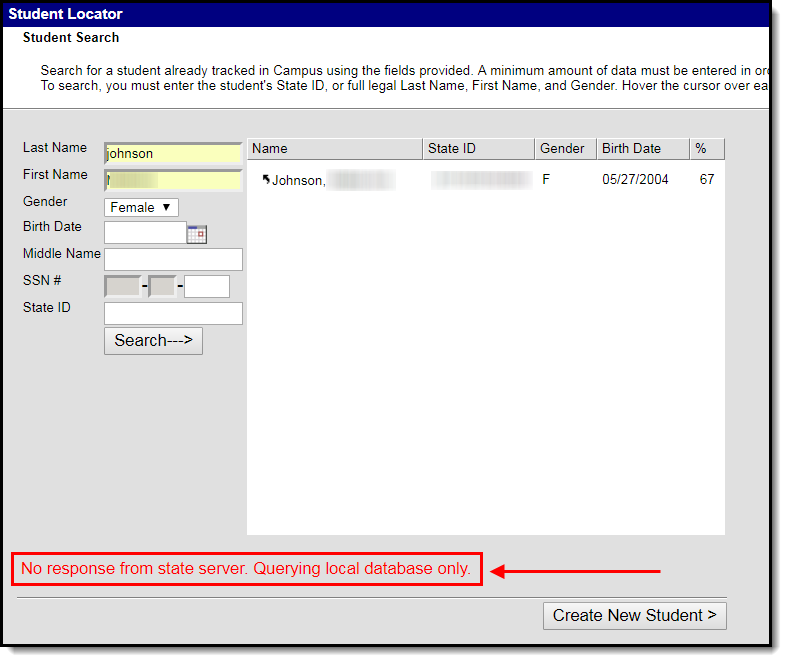 No Server Response Error
Advanced State Search Failed
When a state-linked (DIS-enabled) district has trouble connecting to the state, a warning message displays (shown in the image below).
Although this error message means first name synonym search results cannot be utilized at this time, you can still move forward in creating new students in your district. However, you should be extra vigilant in performing multiple searches using variations of a student's first name.
Districts should report this issue to Campus via their authorized support contacts.
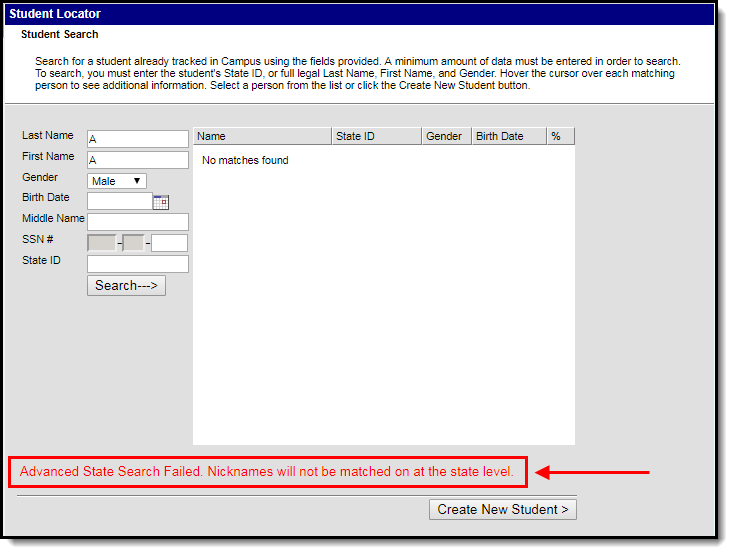 Advanced State Search Failure
The Student Locator is used to search for existing students and may be used to create new students. This video demonstrates how to create an enrollment for a student that is new to the district using the student locator.

