Tool Search: Course Plan Administration
The Course Plan Administration tool performs operations to lock and unlock course plans, clear parent/guardian approval, calculate program on-track status, post diplomas and planned courses to Course Requests for scheduling for multiple students at once, post certifications and seals, and update student status. Minnesota districts also see a mode to calculate direct post secondary admission tier. Use this tool after students have entered Course Plans and counselors have reviewed course plans.
In the Context Switcher, select a specific calendar to update Course Plans for just that school, or select All Schools to update Course Plans for all modifiable calendars to which you have access in the district.
Choose different options by selecting the appropriate mode from the Select Mode dropdown list.
 Course Plan Administration
See the Course Plan Admin Tool Rights article for information on available tool rights.
Calculate On-Track Status
This mode calculates each student's status towards successful completion of the assigned Academic Program. This process looks at each student's Progress or Course Plan tab and caches the calculation each time those tools are viewed or saved. This allows the status and corresponding error messages to be available in Ad hoc Reporting.
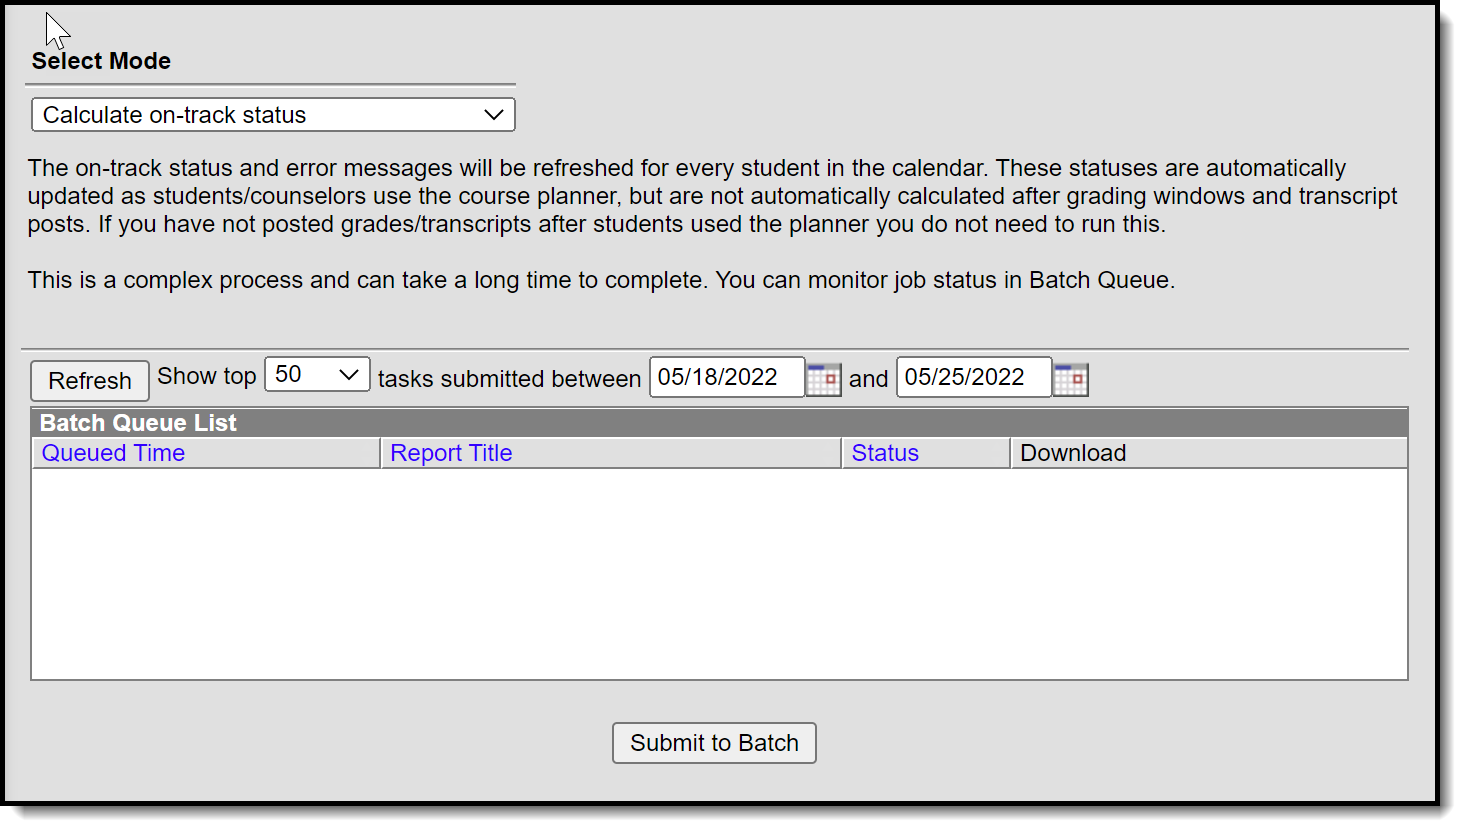 Calculate on-track status Mode
- Select the Calculate on-track status mode from the dropdown list.
- Click the Submit to Batch button. A Batch Queue Reporting Options window displays.
- Select the desired options of High Priority or Keep Until I Delete, and indicate the Start Date/Time.
- Click OK when finished.
- When the report has completed, click the Get the report link in the Batch Queue List. The report displays in PDF format, listing the operation performed, the calendar ID from the calendar selected in the Campus toolbar, and the number of calculations performed.
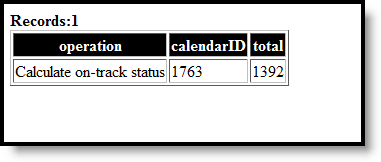 Results
Clear All Parent and Legal Guardian Approvals
The Course Plan tool contains a checkbox that indicates the parent/guardian approved the student’s plan based on the parent’s selection of the Approved by parent/legal guardian checkbox on the Portal Academic Planner screen.
Choosing the Clear all parent/legal guardian approvals mode removes these marks, allowing an annual review to be performed. This action should be done before course plans are modified for the next school year.
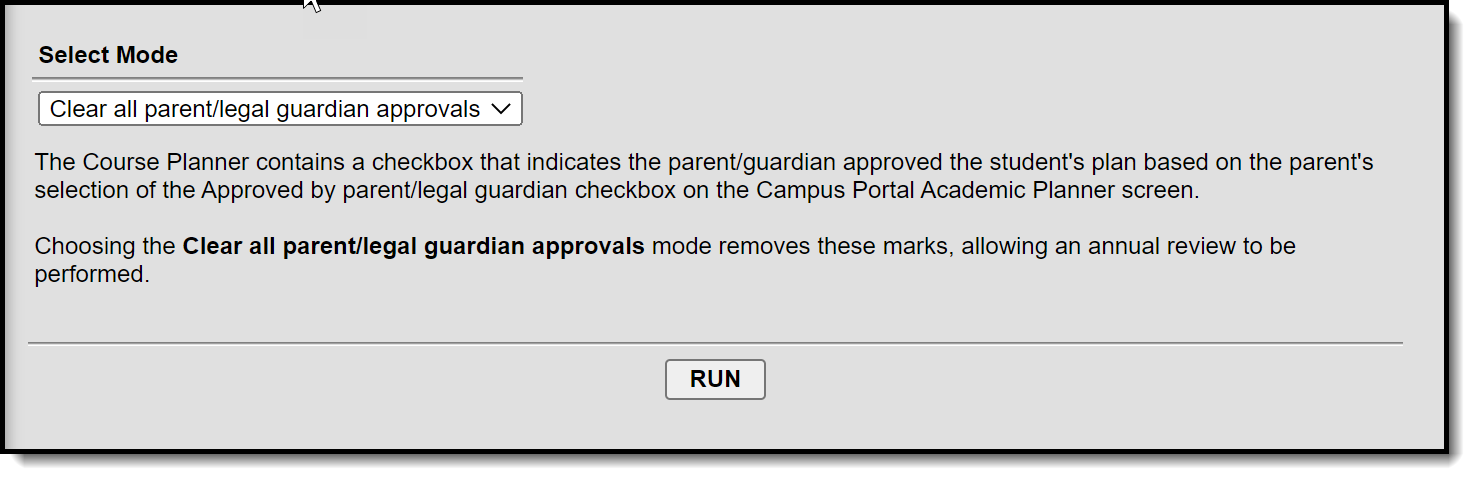 Clear all parent/legal guardian approvals Mode
- Select the Clear all parent/legal guardian approvals mode from the dropdown list.
- Click the Run button when finished.
- A pop-up message indicating approvals have been cleared displays. Click OK to acknowledge this.
Create Course Requests
This mode takes the courses selected in the students' course plan for the next grade level and creates them as scheduling course requests. This should be done after calendars and enrollments are rolled forward for the next school year, and teachers have entered Course Recommendations for students.
Once planned courses have been created as course requests, those courses are considered a priority and display in bold on the Request Batch Report .
- Courses from a course plan replace all previously created course requests for that student.
- Students without a course plan will leave their existing course requests unchanged.
- Changes to course plans will not automatically update course requests.
Ensure that you are creating requests in the future calendar that you are planning to schedule.
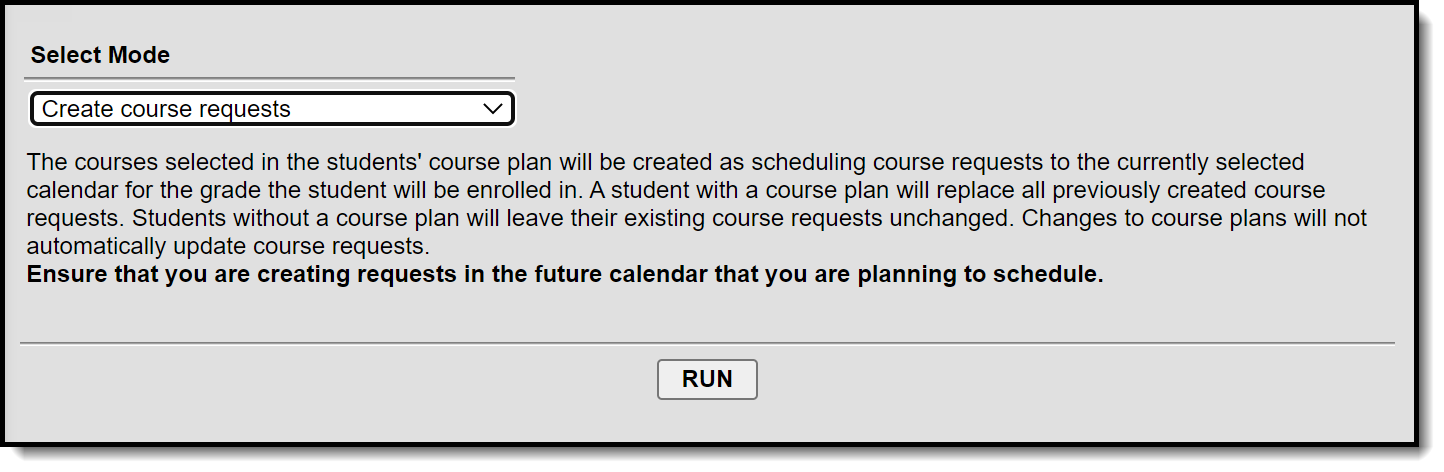 Create course requests Mode
- Select the Create Course Requests mode from the dropdown list.
- Click the Run button.
- A pop-up message indicating course requests were saved displays. Click OK to acknowledge this.
Lock Course Plans
This mode locks courses in the student's Course Plan for the selected calendar for the grade level in which they will be enrolled. Locked course plans can only be modified by a counselor. Future years will remain unlocked.
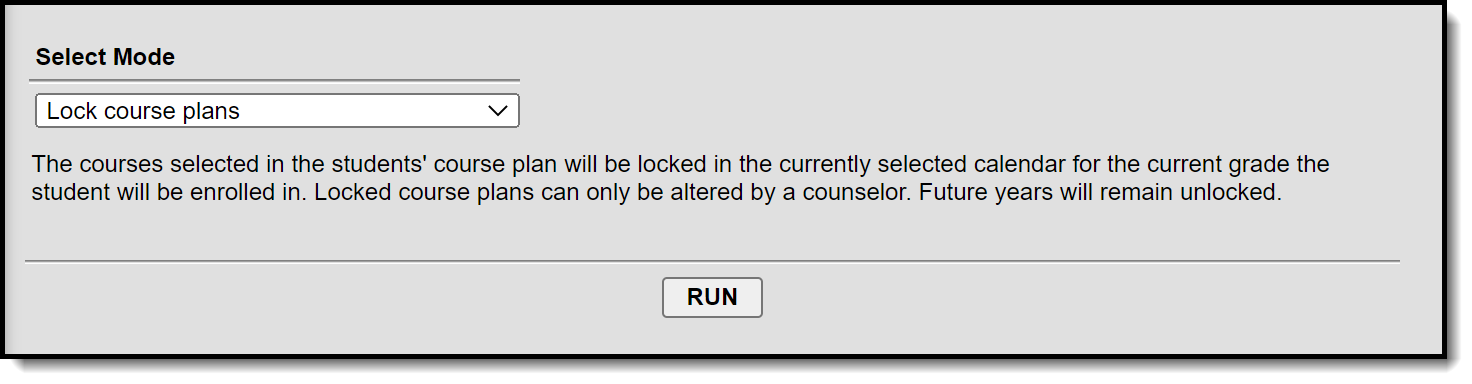 Lock course plans Mode
- Select the Lock Course Plans mode from the dropdown list.
- Click the Run button.
- A pop-up message indicating course plans have been locked. Click OK to acknowledge this.
Unlock Course Plans
This mode unlocks courses in the student's Course Plan for the selected calendar for the grade level in which the student is currently enrolled. When courses on a course plan are not locked, students have the ability to make changes using the Academic Planner tool in the Portal.
Plans that are locked can only be modified by a counselor.
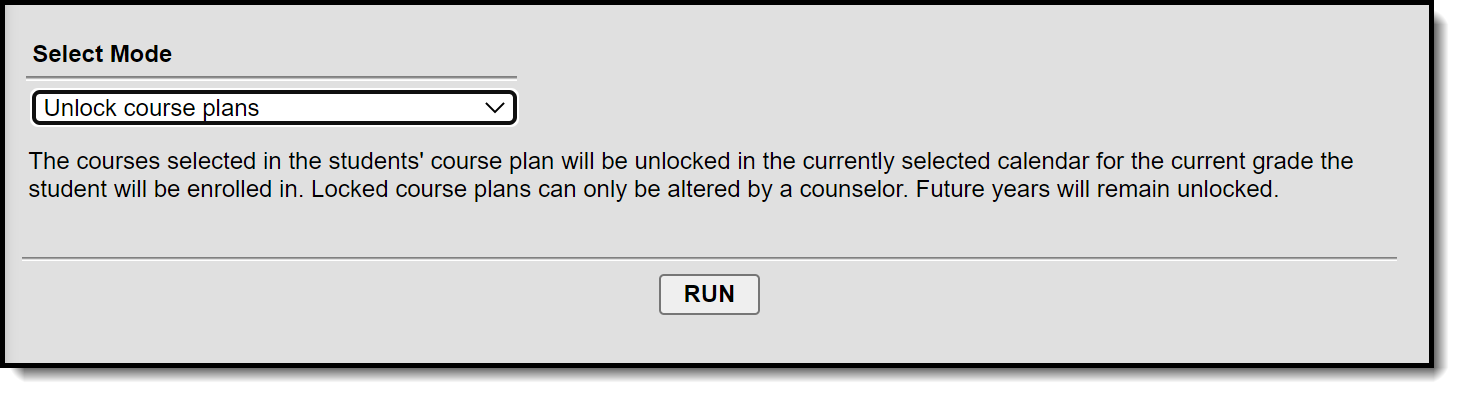 Unlock course plans Mode
- Select the Unlock Course Plans mode from the dropdown list.
- Click the Run button.
- A pop-up message indicating course plans have been unlocked. Click OK to acknowledge this.
Post Certifications
This mode will post certifications for students who have met the criteria previously set for an Academic Program.
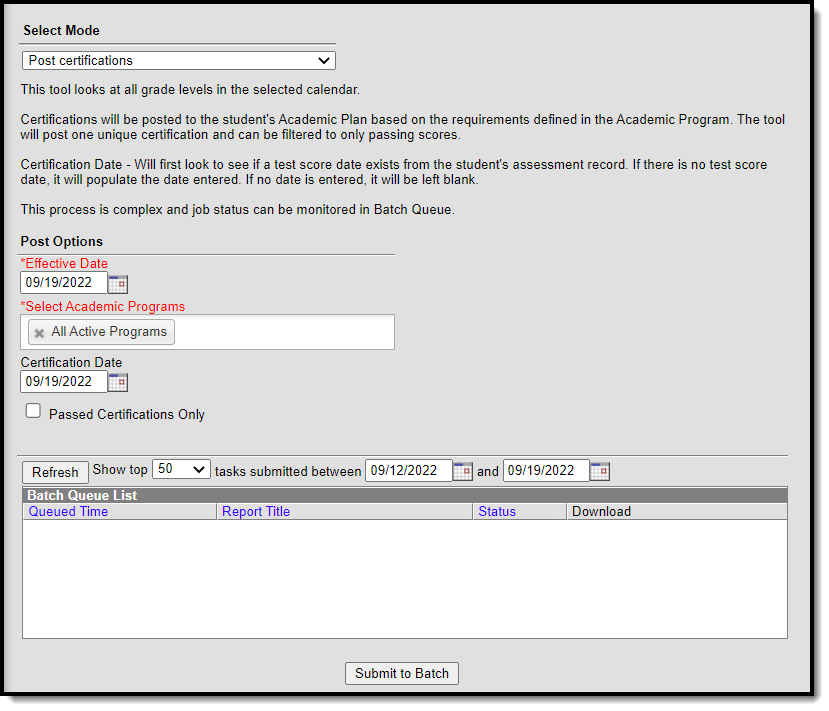 Post certifications mode
- Select the Post certifications mode from the dropdown list.
- Change the Effective Date if needed. It defaults to the current date.
- Choose program(s) to post certifications for from the Select Academic Programs options. You will only see programs listed here that have certification criteria defined for them in Academic Program Setup.
- Add a Certification Date if desired. This is not a required field. If a date is entered here, it will only be added for assessments that do not already have a date associated with them.
- Mark the Passed Certifications Only checkbox if you do not want to record attempted certifications.
- Click the Submit to Batch button. A Batch Queue Reporting Options window displays.
- Select the desired options of High Priority or Keep Until I Delete, and indicate the Start Date/Time.
- Click OK when finished.
- When the report has completed, click the Get the report link in the Batch Queue List. The report displays in PDF format, listing student number, student name, program name, certification name and passed status.
Post Diplomas
This option ONLY evaluates graduation plans for twelfth grade students.
This mode recalculates a 12th grade student's on-track status, and for those students who meet the requirements of their assigned graduation program, a diploma associated with their program is awarded to them.
- If a student's Graduation Diploma Type is already populated, the other Diploma fields and Enrollment fields will NOT be updated.
- If the student's on-track status is Yes and Diploma Type is empty, the Diploma Type field populates, along with the Diploma Date and Diploma Period (fall, spring, etc.).
- If the student's on-track status is No, none of the diploma fields will be updated.
To update the Enrollment End Date and End Status on the Enrollment record, the Enrollment End Date and End Status values must be entered on this tool. A student's enrollment record will only be updated if both of the enrollment fields are empty.
To end enrollments without populating the Diploma Type field on the Graduation record, use the Enrollment End Batch tool.
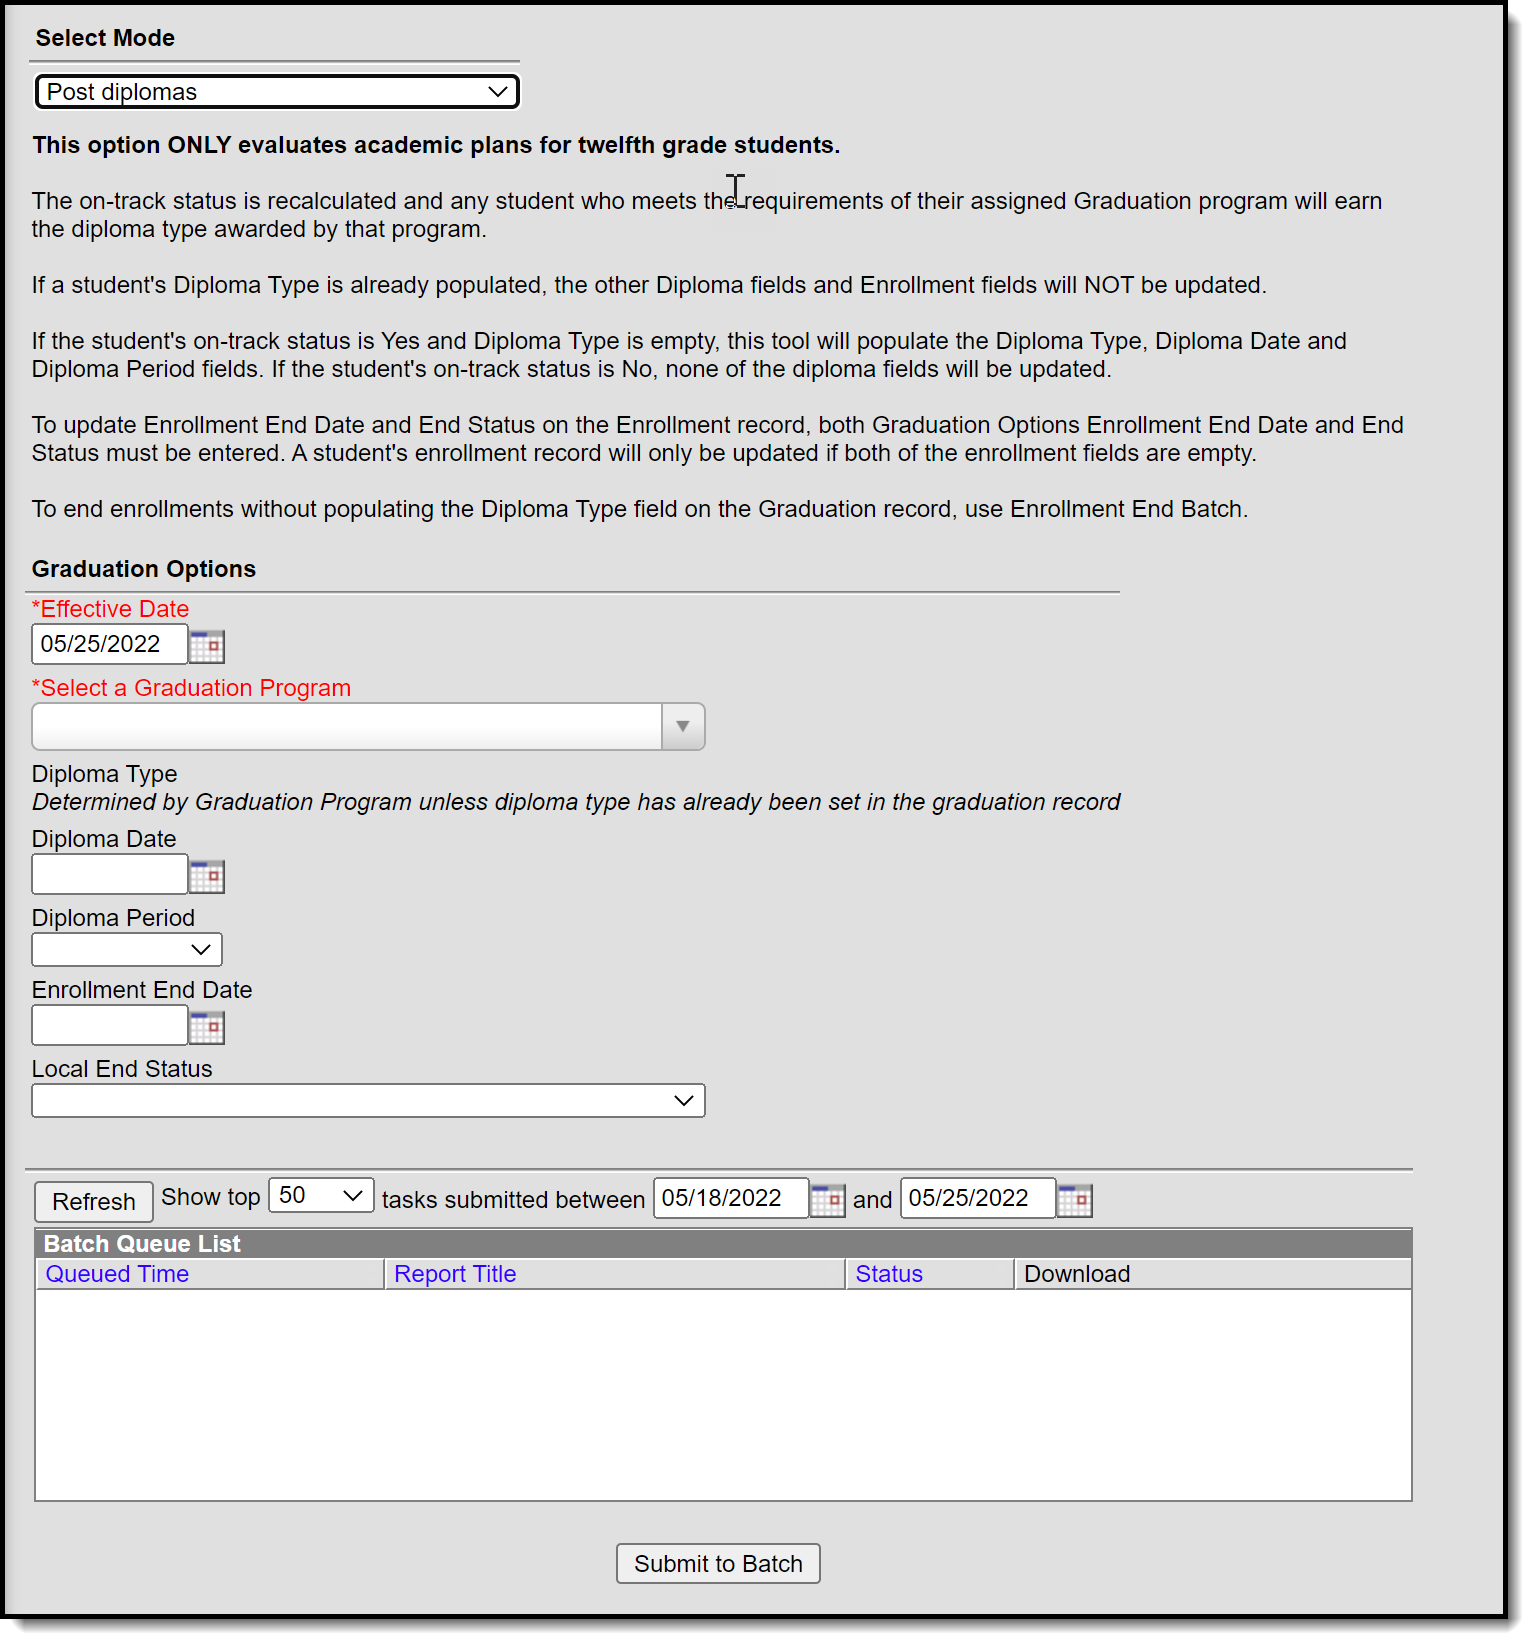 Post diplomas Mode
Graduation Options
The Post Diplomas mode contains the following fields that need to be populated before this mode is completed.
| Field | Description |
|---|---|
| Effective Date | Defaults to the current date. Students who do not have an active enrollment on the date entered will not have diplomas posted. |
| Select a Graduation Program | Selection indicates the program for which diplomas will be posted. All active graduation programs are available for selection. There is no logic associated with program hierarchy, meaning any program can be selected without adverse affects, as long as twelfth grade students are assigned to that program. |
| Diploma Type | The Diploma Type set on the Graduation Program is populated for the student on his graduation tab, unless this value has already been populated there. |
| Diploma Date | Indicates the date the diploma was received, usually the last day of school. This date is populated on the graduation tab. |
| Diploma Period | Indicates the time of year the student received the diploma. This date is populated on the graduation tab. |
| Enrollment End Date | Indicates the date the student's enrollment ended. This may be the same date the diploma was received or it could be a different date. It officially ends the student's enrollment, so ensure all grades and reporting have been completed before populating this information. |
| Local End Status | Indicates the reason the student's enrollment ended. For this purposes, use the reason most closely linked to student graduated. This value populates the student's Local End Status and State End Status fields on the enrollment record. |
- Do not run Post diplomas prior to final grading.
- Updating diploma fields and enrollment fields when the enrollment end date is before grading functions are completed will end each roster record before students have been graded. This causes the in-progress courses to be removed from the Grad Progress logic, and the Academic Plan Progress Report will show the student as not being on-track.
- Select the Post Diplomas mode from the dropdown list.
- Update the Effective Date if needed.
- Select a Graduation Program from the dropdown list.
- If necessary, enter a Diploma Date and Diploma Period.
- If necessary, enter an Enrollment End Date and Local End Status.
- Click the Submit to Batch button. A Batch Queue Reporting Options window displays.
- Select the desired options of High Priority or Keep Until I Delete, and indicate the Start Date/Time.
- Click OK when finished.
- When the report has completed, click the Get the report link in the Batch Queue List. The report displays in a new browser window, listing the operation performed, the calendar ID from the calendar selected in the Campus toolbar, and the number of diploma posted.
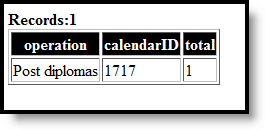 Post Diplomas Result
Post Seals
The Post Seals mode is used to post seals for students who have met the requirements set for an academic program. A student must have a graduation record in order for seals to post. Seals will be posted to the Graduation tool.
 Post Seals Mode
In order for seals to post for an academic program to the graduation tool, Seal must be selected as the Program Type when the academic program is created in Academic Program Setup.
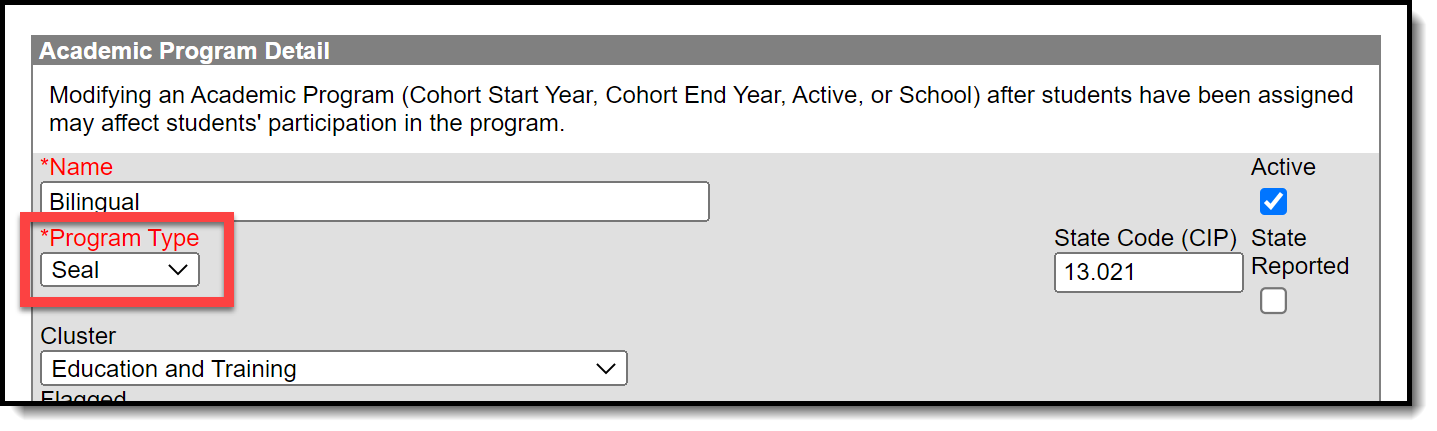 Academic Program Detail
- Select the Post Seals mode from the dropdown list.
- Update the Effective Date if needed.
- Select the Academic Program(s) to post seals for.
- Enter a date in the Date Earned field.
- Click the Submit to Batch button. A Batch Queue Reporting Options window displays.
- Select the desired options of High Priority or Keep Until I Delete, and indicate the Start Date/Time.
- Click OK when finished.
- When the report has completed, click the Get the report link in the Batch Queue List. The report displays in a new browser window.
Calculate Direct Post Secondary Admission Tier (MN & WI)
This mode will calculate a student's highest tier attained for Direct Post Secondary Admissions (DPSA). This Calculation will cycle through GRAD Programs that have been identified lowest to highest for use in DPSA calculation. This process will then post the highest calculated on track Grad Program to each 12th grade students enrollment for the following fields DPSA calculated Tier & DPSA Reported Tier. This calculation will be run on demand and write or overwrite the calculated value each time the process is run. Upon completion of the calculation there will be a detail report displaying each student and the tier they were set to.
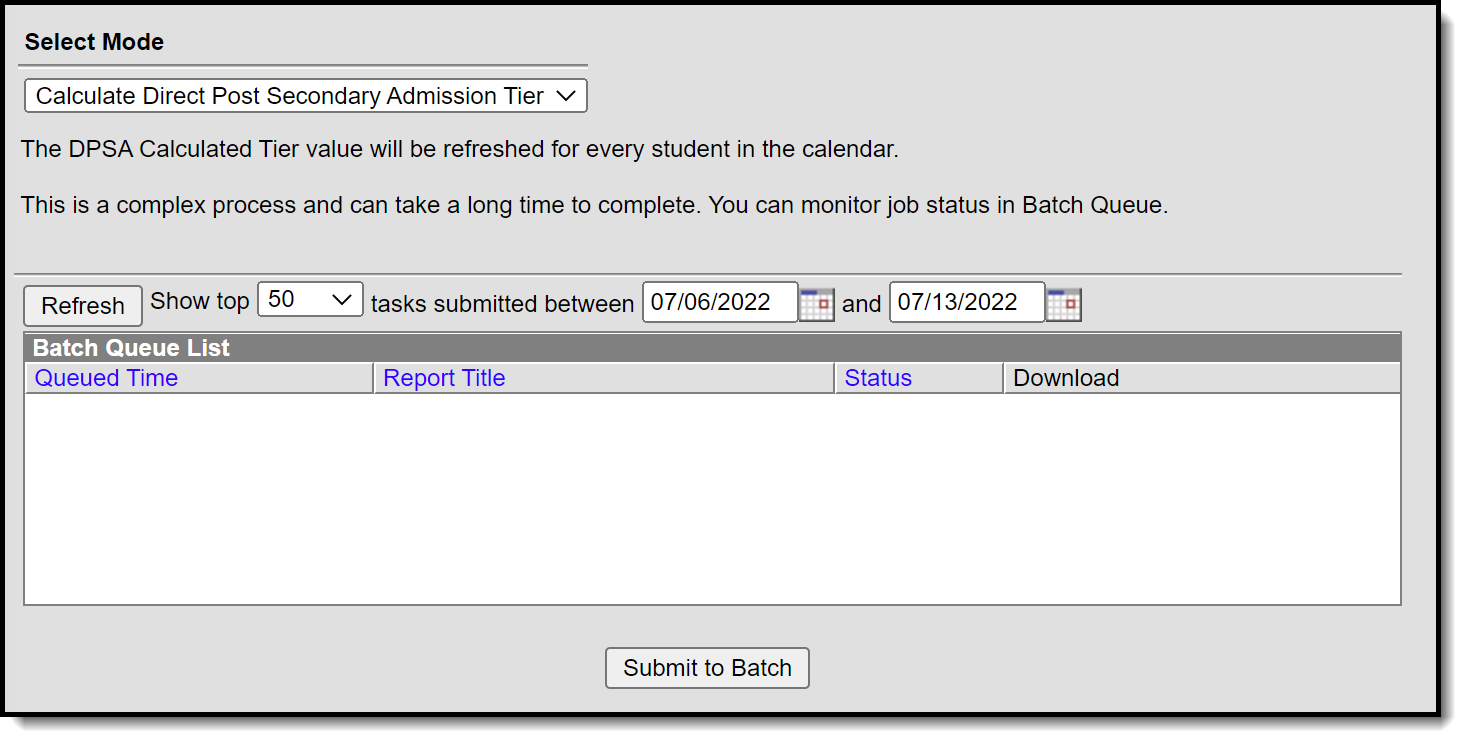 Calculate Direct Post Secondary Admission Tier Mode
- Select the Calculate Direct Post Secondary Admission Tier mode from the dropdown list.
- Click the Submit to Batch button. A Batch Queue Reporting Options window displays.
- Select the desired options of High Priority or Keep Until I Delete, and indicate the Start Date/Time.
- Click OK when finished.
- When the report has completed, click the Get the report link in the Batch Queue List. The report displays in a new browser window, listing the student name, student number, calendar name, and tier status.
If no graduation program has the DPSA Tier field set, the report will display an error message indicating 'No active Graduation Program has DPSA Tier value set.
For Minnesota users, please see the Minnesota Direct Admissions Extract article for more information.
Update Student Status
This mode updates student status based on requirements set in academic plans. Updates to status are dependent on completion of the requirements that have been defined in the Compound Requirements tool for an academic program.
 Update Student Status Mode
- Select the Update Student Status mode from the dropdown list.
- Mark Include inactive Students if you wish to include students with an end date on their enrollment in the update.
- Mark Include end dated programs if you wish to include students who are no longer active in their assigned Academic Programs in the update.
- Click the Submit to Batch button. A Batch Queue Reporting Options window displays.
- Select the desired options of High Priority or Keep Until I Delete, and indicate the Start Date/Time.
- Click OK when finished.
- When the report has completed, click the Get the report link in the Batch Queue List. The report displays in a new browser window indicating the number of students whose status has been updated. For information related to which students are assigned which status, use the Ad hoc filter designer.
