Tool Search: Custom Attribute/Dictionary
The Custom Attribute/Dictionary is used to view and create new custom fields for the user interface.
Custom attributes are custom interface fields that can be created at the district/state level for storing localized information not otherwise tracked by an existing Campus field. Custom attributes can be added to certain core tools or to any custom tools created via Custom Tool Setup.

The Custom Attribute tool creates user interface fields that are stored as database attributes within the campusAttribute table.
Information to be contained in a custom field should NOT already have a designated area in the Campus product. Campus recommends conducting a thorough review of existing Campus functionality and schema and/or contacting a Campus Support representative before creating custom fields.
Custom Attributes vs. Core Attribute/Dictionary
The Custom Attribute tool allows a district/state to view, create, and manage its own localized custom fields.
The purpose of the Core Attribute Dictionary tool is to view all core elements within the application, organized by state and district. Locally created elements can be created, viewed, and modified in the Custom Attribute tools. Locally created elements are only viewable within the Custom Attribute tool and do not display within the Core Attribute/Dictionary tool.
Refer to the Custom Data and Links Tool Rights article for details on tool rights for this and related tools.
Create a Custom Field
A custom field contains data not otherwise tracked in Campus. The field's details, format, size, and associated codes/values are configured through this tool.
Note the following:
- Custom fields added to core tools appear in the District Defined Elements editor for that tool.
- If the custom field resides on a custom tool, the tool must be created before proceeding with the following steps.
- Any custom attribute that contains the word "time" cannot be queried in Ad hoc tools if it is not an actual time field.
- Click the New icon. The Campus Attribute Detail editor will appear below.
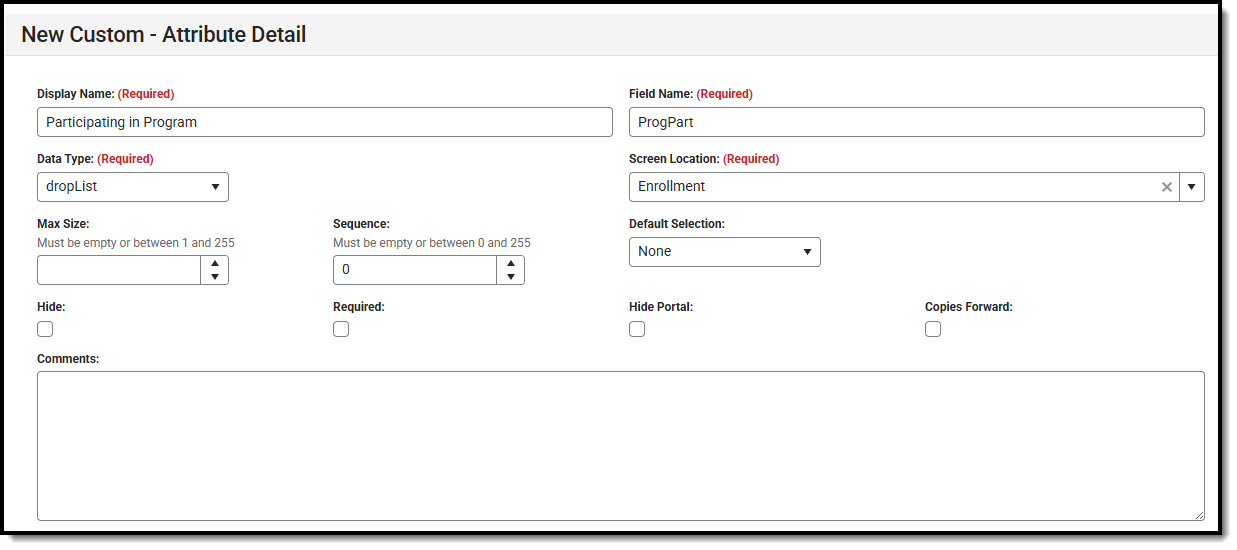
- Enter the Display Name of the field you would like to add. This is the name that appears in the UI for the field.
- Enter the Field Name. This is the name used to identify the field in the database.
- Select the Data Type. This determines the type of field presented to users. Refer to the table below for additional information.
- Select the Screen Location. This is where users will interact with this field.
- Enter any additional information. Refer to the table below for more information on these fields.
Fields Description Max Size The maximum number of characters allowed for entry in the field. Sequence The order of the field within the tool.
For example, Field A has a seq of 1 and Field B has a Seq of 2. Field 1 will be listed first followed by Field 2.
If no sequence is indicated, fields display in numeric or alphabetic order.Default Value/Text The default value that auto-populates the field when a new record is created.
Note that default values are NOT saved in the database tables.
Hide If marked, this custom field will not display within the UI for any users. This is useful for hiding a previously active field from being used. Required If marked, this checkbox indicates that the field must be filled out (or checked) for the user to save a record in the custom tool. The field name appears in red (instead of black) and is followed by an asterisk (*) to indicate it is required. Hide Portal If marked, this checkbox indicates the custom field will not be displayed in the Student or Parent Portal.
This field does not apply or appear to state-level users.
Copies Forward When marked, the data associated with the attribute is copied forward into the calendar for the next school year.
This option applies to things that are cloned or rolled forward from year to year. For example, calendars are carried over from one year to the next, courses are carried forward, and enrollments are carried forward.
People are not tied to a calendar; therefore, attributes associated with people are not copied forward, even when this checkbox is marked.
This option is not available for data fields assigned to a custom tab.
Comments Any comments related to the custom field. These comments do not display for users interacting with the field.
- If the field you added requires a value, such as a dropdown, you need to define the values it can display. Click Add new to begin adding these values.
- Enter the necessary information for the value and save each value by clicking Done. Repeat this process for all values that should populate your new field.

- Enter all required field values, and then click Save once you are finished. Your custom field is now available in the designated tool, and its values are available within it.


Correlation Between Custom Tools and Custom Attributes
Custom Tool Setup allows you to create custom tools for tracking local or state-level information. You can also use this tool to embed hyperlinks to appear as a tool within the Infinite Campus navigation and have these links open in a new tab or within the workspace. When a custom tool is created, it still requires custom attributes to be defined, as these are the custom fields and field values that will populate the custom tool. The easiest way to think of this is:
- The custom tool is created via Custom Tool Setup.
- Once created, you need to use the Custom Attribute/Dictionary to create the fields and field values that will appear in this tool.
- Once the custom tool has been created and fields added, district users can begin entering data and creating new records in this tool.
For a step-by-step walkthrough of this process, please see the Custom Tool Setup article.
Custom Fields (Database-Only)
The following fields of the campusAttribute table relate to creating/modifying custom fields. These fields are only available in the database; they do not appear in the user interface. This is not a complete list of database fields.
Database Column |
Description |
|---|---|
attributeID |
Internal database identifier used as a reference in other tables. |
coreLock |
This column no longer impacts the function of an attribute. Controls whether a user may modify the settings of an attribute field through the user interface.
|
custom |
Indicates whether the attribute was created by a Campus user or is a core field.
|
dated |
Retains historical information of custom fields by setting the date on each entry and creating a new entry for each change.
|
lock |
Controls whether a user may add/change/delete dictionary values (codes) for the custom attributes within the user interface.
|
statusData |
Controls whether the values of the custom field are stored in one of the custom tables named as “custom” followed by the object (e.g., customStudent).
This flag and the stateTable flag are mutually exclusive. Only one should be set at a time. |
stateTable |
Controls whether or not values of the custom field are stored in a state-specific table named as the custom object followed by the state abbreviation appended (e.g., EnrollmentME).
This flag and the statusData flag are mutually exclusive. Only one should be set at a time. |
Custom Dropdown List Fields
The following fields are displayed in the Dictionary Detail editor when creating codes/values associated with a custom dropdown list field in the user interface. This data is stored in the campusDictionary table.
Field |
Description |
Database Location |
|---|---|---|
Code |
An abbreviated version of the value that displays directly before the value entered in the Name field when displayed for selection within the custom field.
|
CampusDictionary.
|
Name |
Text descriptor of the code value as it should display in the custom field dropdown list. This directly follows the value entered in the Code field when displayed for selection within the custom field.
|
CampusDictionary.
|
Seq |
The order of the custom field on the tab, as related to the other fields on the tab. |
CampusDictionary.
|
Value |
Used to store additional, localized data related to the value (mapping a local value to state values) and/or for state-reporting purposes. This text is not displayed to end users as part of the visible dropdown list value. |
CampusDictionary.
|
StandardCode |
Used for SIF naming purposes. This text is not displayed to end users as part of the visible dropdown list value. |
CampusDictionary.
|
Active |
If marked, the checkbox indicates the value should be actively available for selection from the dropdown custom field to which it is assigned. If this checkbox is not marked, the dictionary item does not display in the dropdown field. |
CampusDictionary.
|
Database-Only Fields The following fields of the campusDictionary table relate to creating codes/values for custom dropdown list fields. These fields are only available in the database; they do not appear in the user interface. | ||
| dictionaryID | Internal database identifier that can be referenced by other tables. | |
| attributeID | Internal database identifier – foreign key from the campusAttribute table. | |
When the total number of dictionary items is greater than or equal to 50, the dropdown list on the tool becomes an auto-search field, allowing the user to type the first few letters of the item and the available choices filter to those matching the entered text.
Sorting Logic
Depending on the type of Data Type selected for a Custom Attribute, the attributes assigned to that data type sort differently.
| Data Type | Sorting Hierarchy |
|---|---|
| Single Screen Editor |
|
| Table Editor |
|
| Dropdown Lists |
|
| List Editor |
|
When these custom tabs/attributes are available on the Campus Portal, the following hierarchy applies.
| Data Type | Sorting Hierarchy |
|---|---|
| Single Screen Editor |
|
| List Editor |
|
| Table Editor |
|
