Tool Search: Grading Tasks
The Grading Tasks tool lists the items the teachers grade as part of the grading process. These tasks include mid-term grades, quarter grades, semester grades, etc. These grading tasks are created in the Grading Tasks tool in the Grading and Standards area.
Review the Course Masters Overview article for information on Course Masters best practices and a Course Master Workflow.
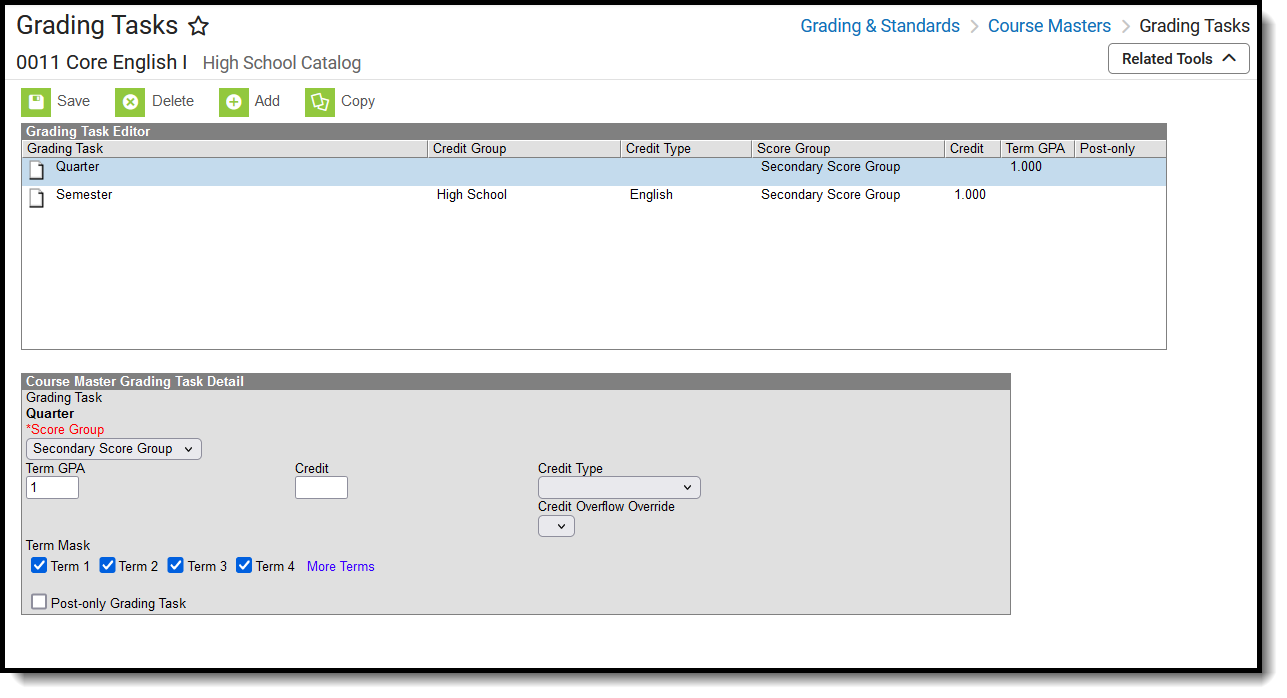 Course Masters Grading Tasks Editor
Visit the Course Status tool to view a list of all courses associated with a given course master, see the status of grading setup for each course, and relink courses as needed.
See the Grading Tasks Tool Rights article to learn about rights needed to use this tool.
Grading Task Information in Ad hoc Query Wizard
Course Grading Task fields are available in the Query Wizard when using the Course/Section Data type in the Course > Course Information > Grading Task Credit folder.
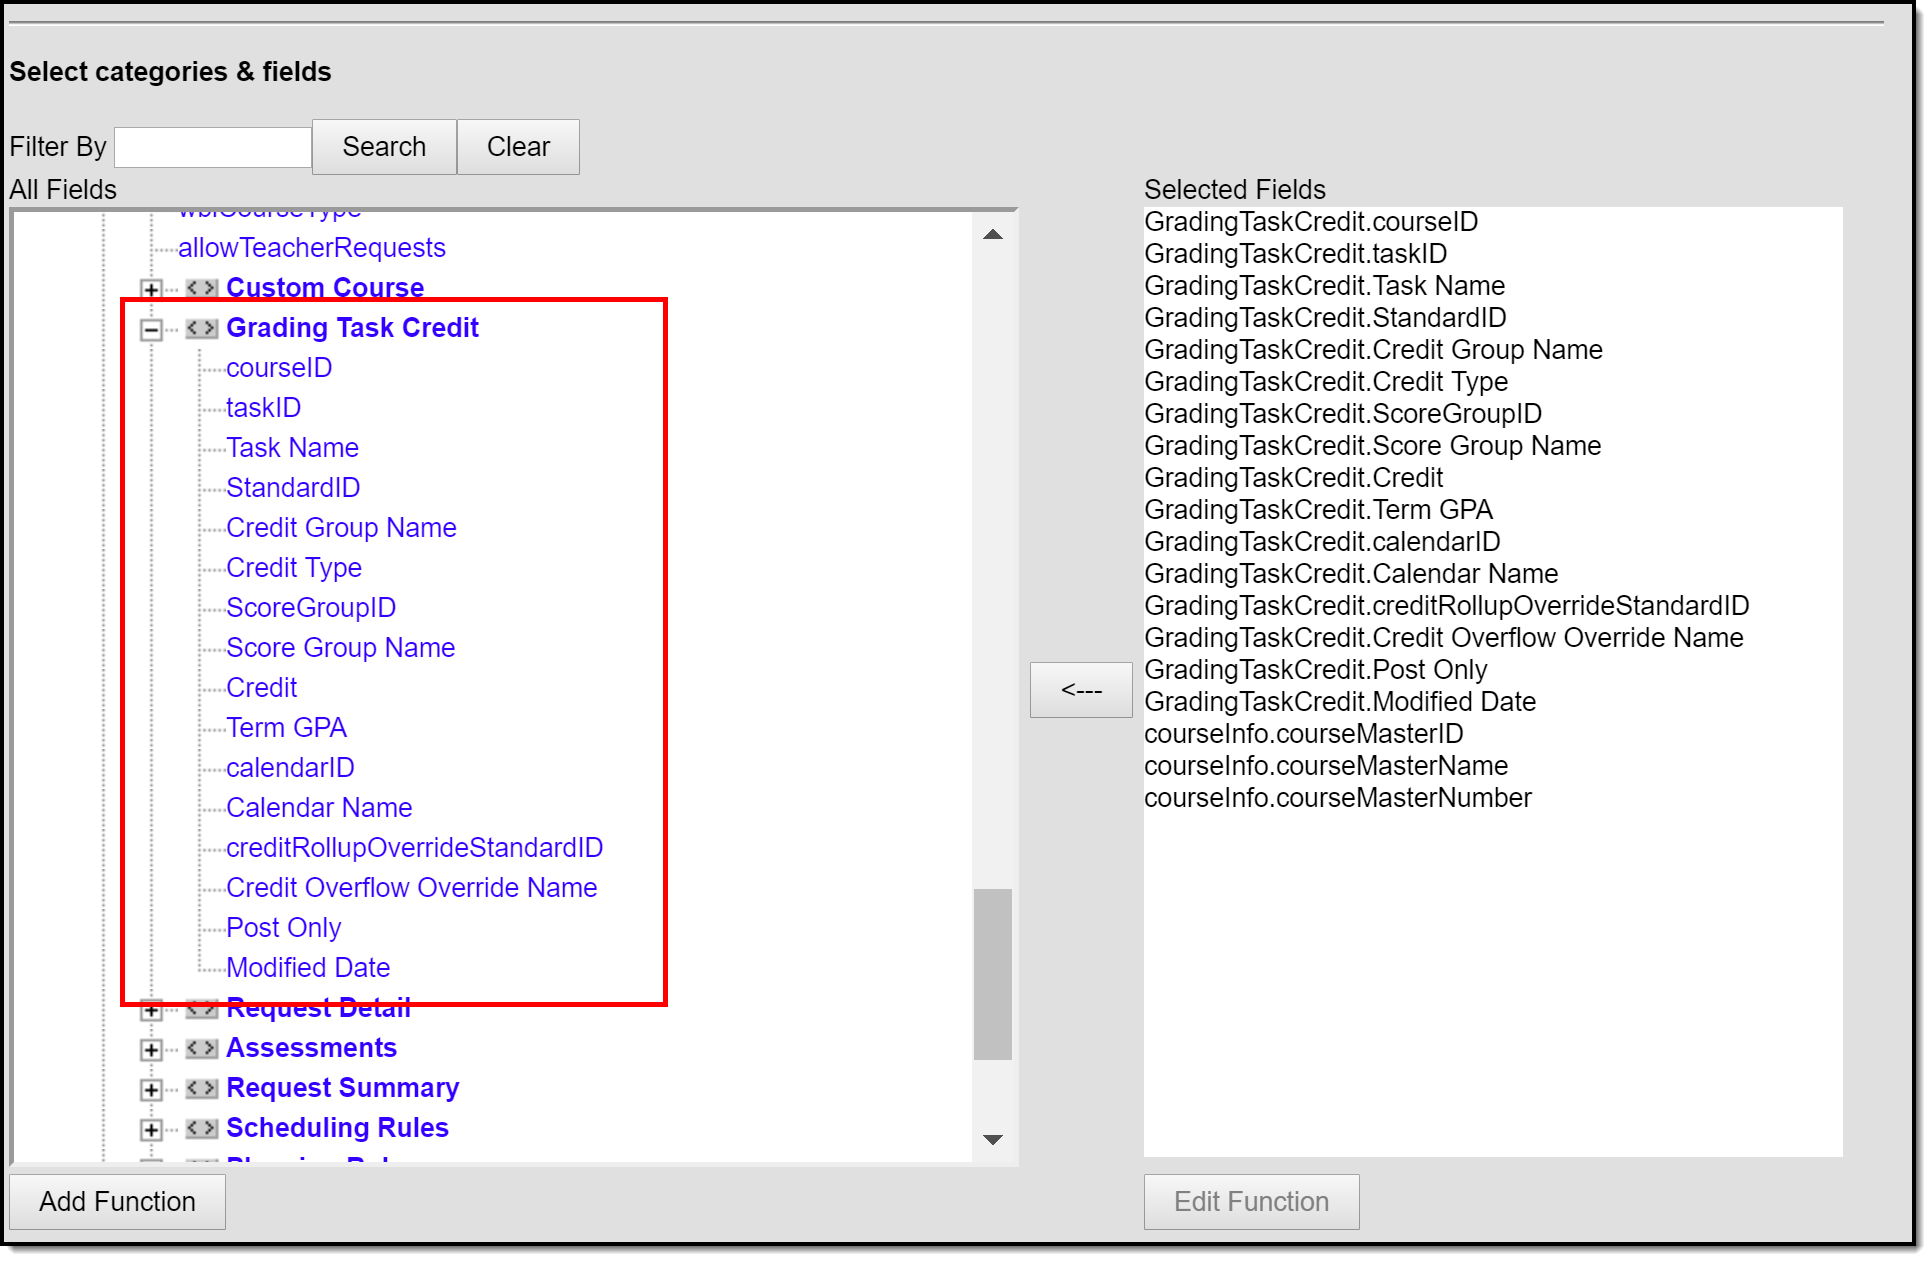 Grading Task Ad hoc Fields
Course Master Grading Task Editor
Before assigning grading tasks to courses, verify the following:
- Grading Tasks have been created in the Grading and Standards area.
- Score Groups have been created in the Grading and Standards area.
- Credit Types have been created in the Grading and Standards area.
The Grading Task editor provides a list of grading tasks and a detail editor showing specific elements of the selected grading task. The following provides a description of the fields on the Course Master Grading Task editor.
|
Field |
Description |
Ad hoc Fields |
|---|---|---|
|
Score Group |
Determines the points and/or letter grades that will be used when scoring the grading task. |
GradingTaskCredit.ScoreGroupName |
|
Term GPA |
Indicates the weight used when calculating the grade of the student. Refer to the GPA Calculations in Campus article for detailed explanations. |
GradingTaskCredit.TermGPA |
|
Credit |
Indicates the amount of credit the student receives upon completion of the course or when the course is posted on a transcript. This value depends on the setup of courses. This is usually only populated on those tasks that are posted to transcripts. |
GradingTaskCredit.Credit |
|
Credit Type |
Indicates the group of credit the student receives when credit is given. This is used in Academic Planning when tracking the progress of the student towards graduation. |
GradingTaskCredit.CreditType |
| Credit Overflow Override |
This field is set for a single course Grading Task and is used to roll credits when the current credit type has met its credit requirements.
The credits from the course will first try to roll up to the override credit type. If that credit type has met its requirements, it will then look at the overflow setup for the course's credit type.
A particular course may be able to count towards more than one credit type. For example a particular CTE course may fulfill a science credit or a math credit. This course would be set up with its default credit type of Math and an override rollup credit type of Science. If the student has completed their math requirement, this course would then be counted as a science credit (only if a science credit was still needed). If both credit requirements were met, then the default rollup would occur, likely going from math to elective credit. |
GradingTaskCredit.CreditOverflowName |
|
Term Mask |
Selection indicates when the task is graded. Term masks are always selected when the task is needing to be graded.
|
This field is not available in Ad hoc Reporting. |
| Post-only Grading Task |
Indicates a grading task cannot be aligned to assignments and categories in the teacher's Grade Book. Post-only Grading Tasks are for posting grades only, not for aligning student work. |
GradingTaskCredit.PostOnly
Reports a value of 1 if the checkbox is marked; reports a value of 0 if the checkbox is not mark. |
Add Grading Tasks to Course Masters
- Click the Add icon. A Course Master Grading Task Detail will display.
- Select the Grading Task to add to the Course Masters from the dropdown list.
- Select the Score Group from the dropdown list.
- Enter the Term GPA weight the student receives.
- Enter the Credit value the student receives.
- If desired, select the appropriate Credit Overflow Override option from the dropdown list.
- Select the Credit Type from the dropdown list.
- Mark the appropriate Term Mask for the grading task.
- If desired, mark the Post-only Grading Task checkbox.
- Click the Save icon when finished.
Any changes made to the Grading Tasks or any other Course Master tab require a push process to the courses. This option is available on the Course Master Info tab.
Delete a Grading Task from a Course Master
- Select the Grading Task to delete from a course from the Grading Task table.
- Click the Delete icon. A warning message will appear indicating the Grading Task is about to be deleted. If the Grading Task is used in a composite grade calculation, that calculation must be edited to not use the Grading Task that's being deleted.
- Click OK to continue or click Cancel.
Copy a Grading Task to Another Course Master
The entire Course Master can be copied from one school to another using the Copy button on the Course Master Info tab.
Use the Copy icon to easily add the Grading Tasks associated with one Course Master (called the Source Course Master) to one or more other Course Masters in the same Course Catalog (called Destination Course Masters). The Copy icon displays when proper tool rights are assigned.
When copying a grading task from one course master to another:
- The Course Catalogs must be the same for the source course master and the destination course master.
- Grading tasks that already exist in the destination course master will not be copied again. This means when five grading tasks are selected to be copied in the source course master, but three of those already exist in the destination course master, only the two that do not exist in the course master will be copied.
- When a Course Catalog is locked for grading tasks, the copy process pushes the grading task to destination courses.
 Copy Grading Tasks
- Select a specific grading task to copy or just click the Copy icon without selecting a grading task. When a specific grading task is selected to copy, that grading task is the only one selected to copy; when no grading tasks are selected to copy, all of the grading tasks in that Course Master are automatically selected to copy.
- Select the Source Course Master from the dropdown list. This displays the currently selected course master. To change this selection, begin typing in the dropdown field.
- Mark the Grading Tasks to Copy. Or, clear the selections by clicking the checkbox in the gray Grading Task Name header.
- Select the Destination Course Master:
- All Course Masters: copies task(s) to all course masters in the course catalog.
- Active Course Masters: copies task(s) to all course masters in the course catalog that currently have the Active flag marked.
- Select Course Masters: copies task(s) to the selected course masters. To select a master, type the Number or Name in the search field. Multiple masters can be selected. Click Clear to remove all masters from the list.
- Click the Save button to copy the selected grading tasks to the destination course master. This action saves the selection; the grading tasks are not copied until a school year is selected (see the information below).
When the copy is complete, and the catalog is locked, an alert displays asking to which calendar years the information should be pushed. Select the school year from the dropdown and click OK.
A confirmation displays indicating the selected grading tasks from the Source Course Master have been copied to the Destination Course Masters. At this point, the grading tasks are copied and are displayed on the Course Master Grading Task tab of the Destination Course Master.
If there are no grading tasks to copy, an alert displays indicating all selected grading tasks already exist in the destination course master.
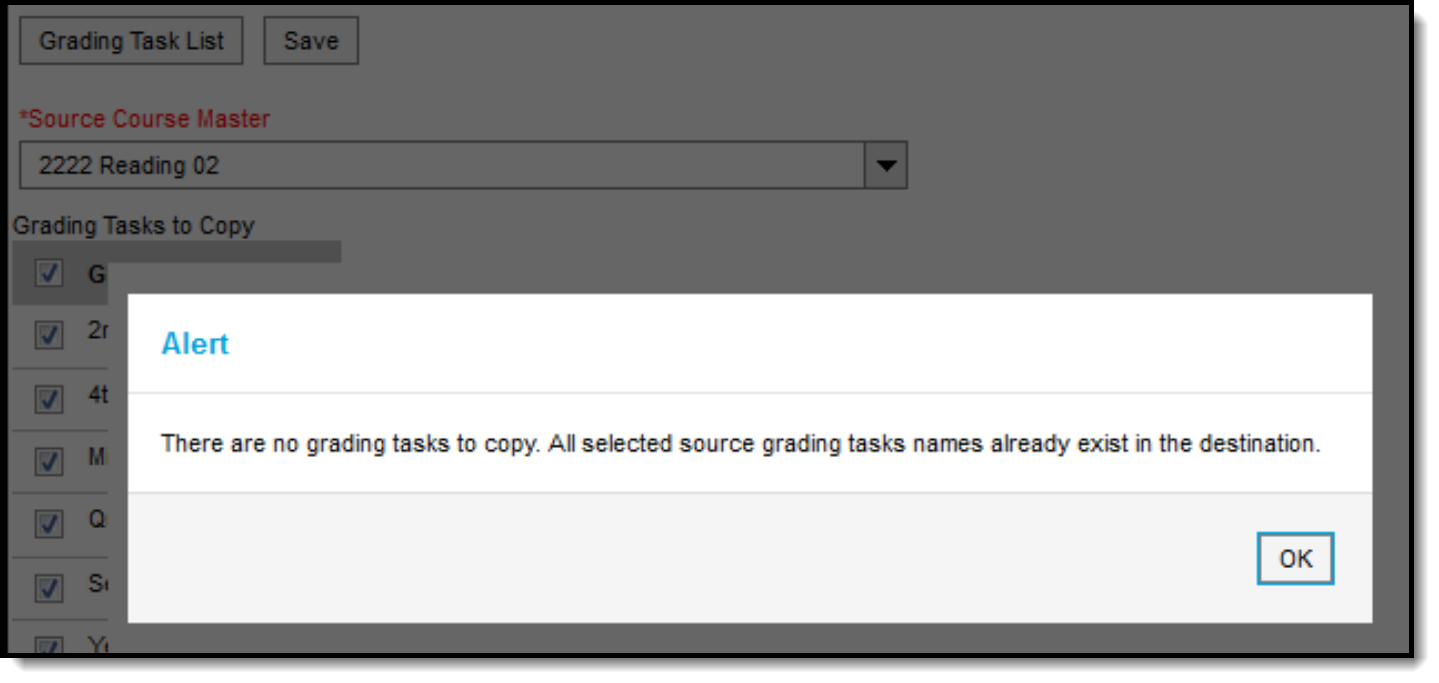 Alert Indicating No Grading Tasks were Copied
To return to the main view of Course Master Grading Task, click the Grading Task List button.
