Tool Search: Schedule
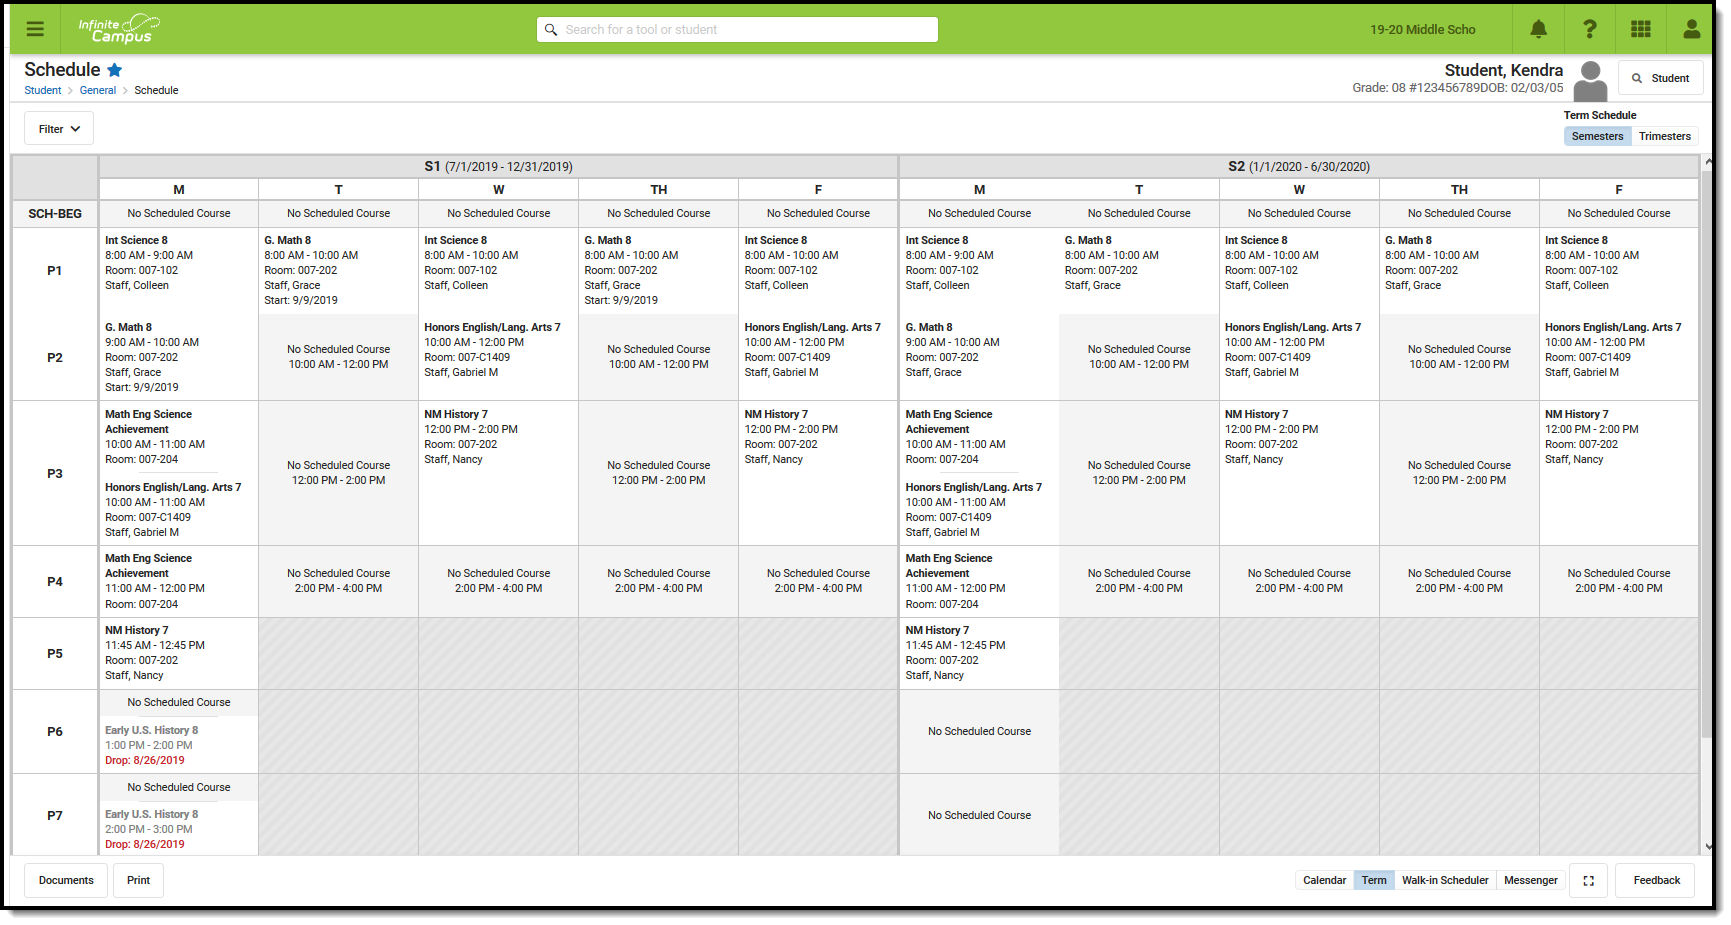
The Student Schedule allows users to view and print the student's scheduled courses in multiple formats. The student's schedule can be used to find where the student is during the day, to determine which courses the student should be taking in future years and to print the student's schedule.
 Student Schedule
See the Schedule (Student) Tool Rights article for information about rights needed to use this tool.
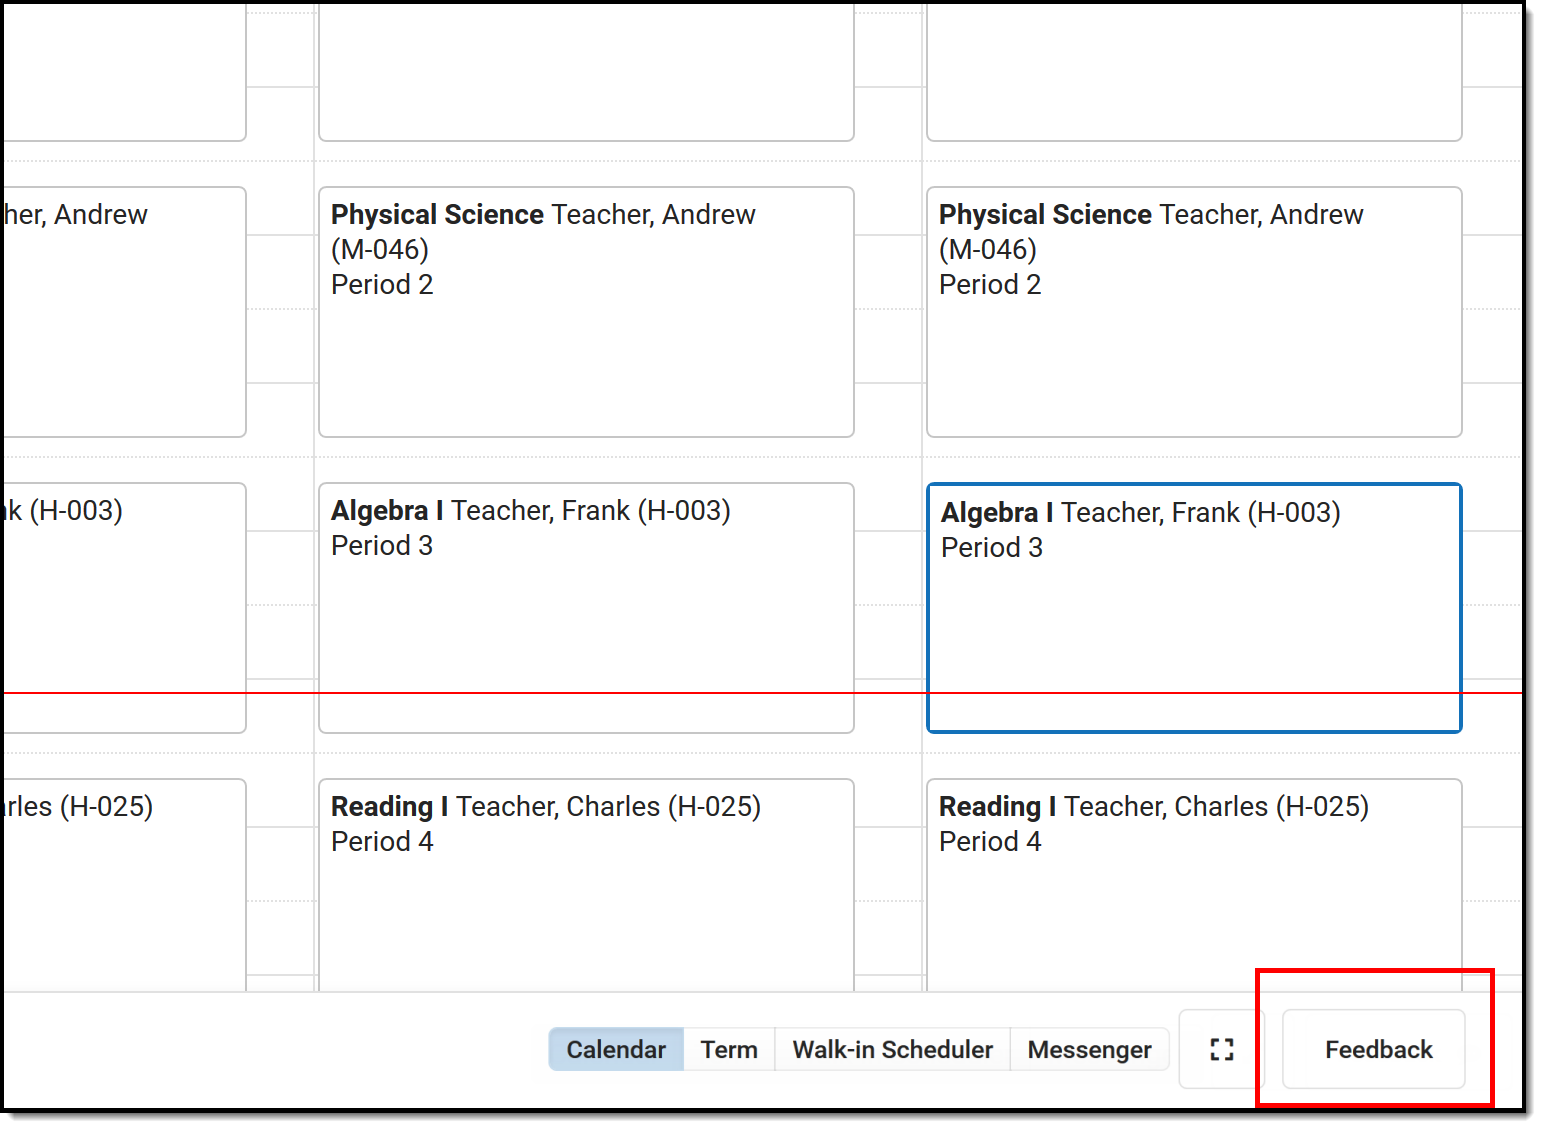
Submit feedback for the Schedule using the Feedback button in the bottom right hand corner. This takes you to the Campus Community Schedule forum topic where you can add your concerns or suggestions for potential future development related to the Student Schedule.
 Student Schedule Feedback
The Schedule does not load if Calendar Days have not been reset for the selected calendar.
Navigation of Student Schedule
Review the following information for a summary on features of the schedule and how to manage the Student Schedule. This new Student Schedule allows access using keyboard shortcuts when in the Calendar View. See the Keyboard Shortcuts section for navigation tips.
Note that when a user chooses to the view the student's Schedule in a certain way, by choosing one of the options of the Calendar View or by choosing the Term View, and then navigates away to a different tab within Campus, the next time the user accesses the student's Schedule, the same view option that was previously chosen displays again.
A calendar must be selected in the Campus toolbar to display schedule information.
| Feature | Image |
|---|---|
| General Navigation | |
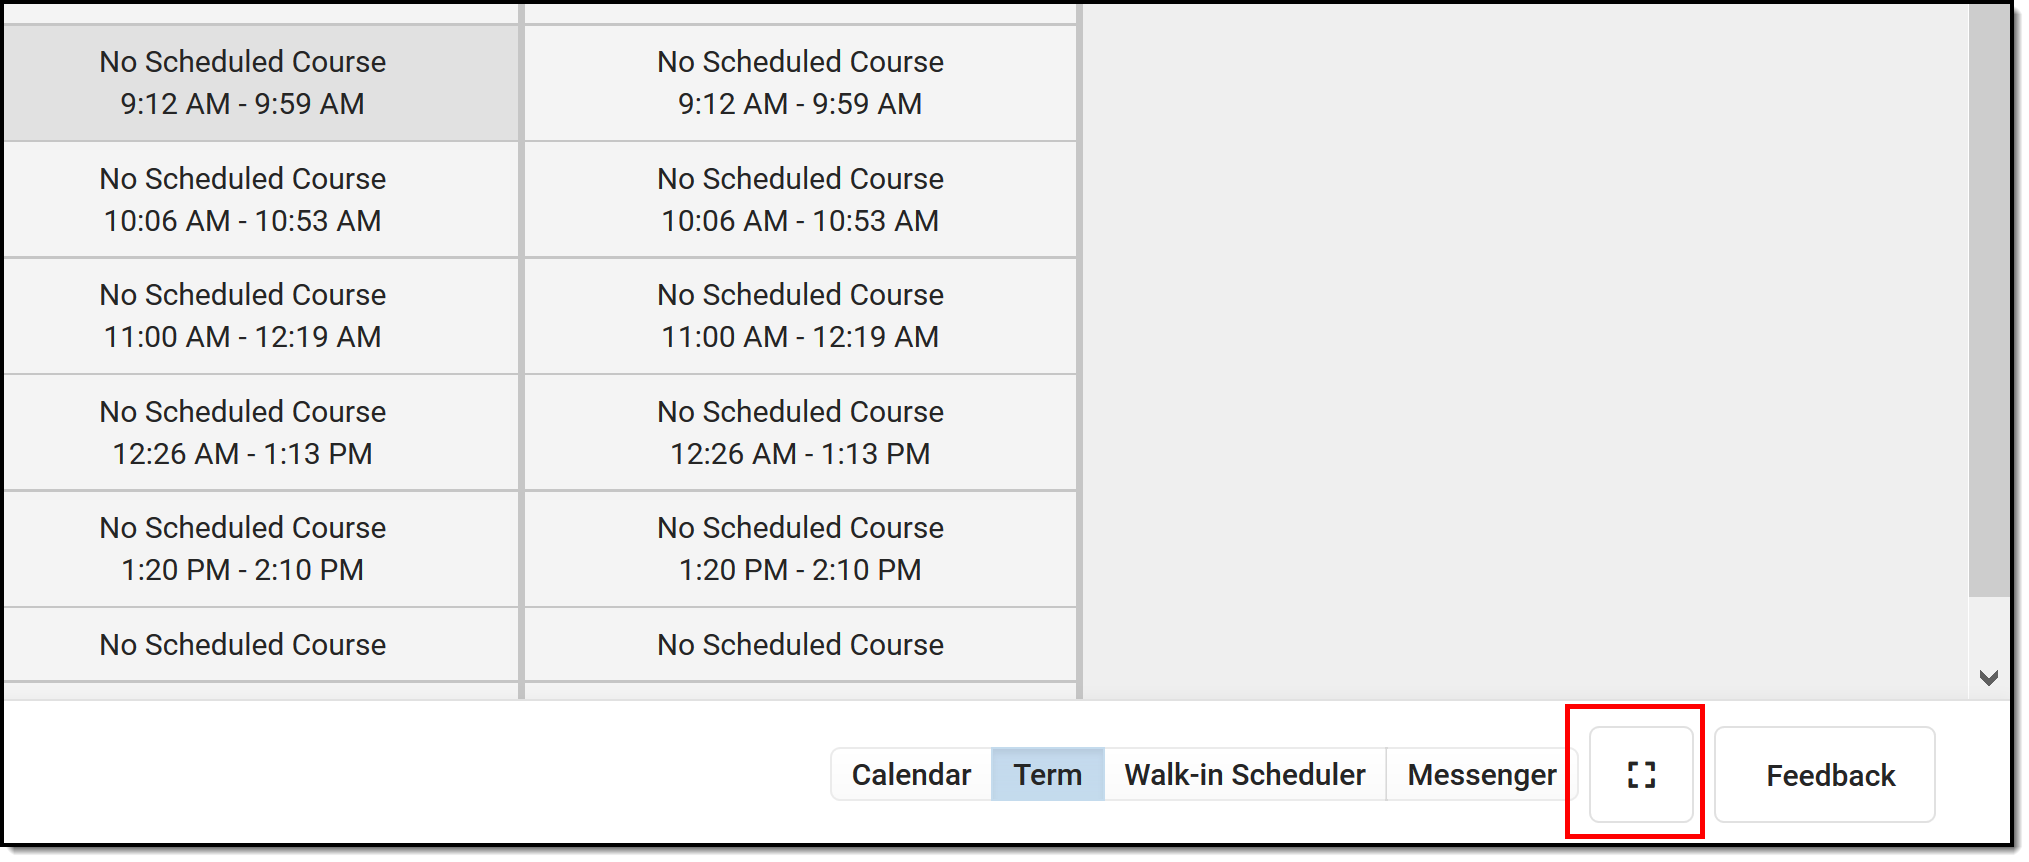
Use the Full Screen icon to display just the schedule in the entire browser window. This removes all tabs, all indexes, all headers, and just displays the schedule. This can be done in either the Calendar View or Term View. Click the icon again or click the ESC key to return to a non-full screen view. |
|
Access Schedule Reports by choosing the Print button from the bottom of the page. Available reports display in the side panel. A report can also be printed for courses scheduled into periods without times by selecting the Current View or the Periods without Times print options (if there are periods without times) while in the Calendar View. Any scheduled Responsive courses are included in the reports. Any courses that are dropped in the future are included in the reports. |
|
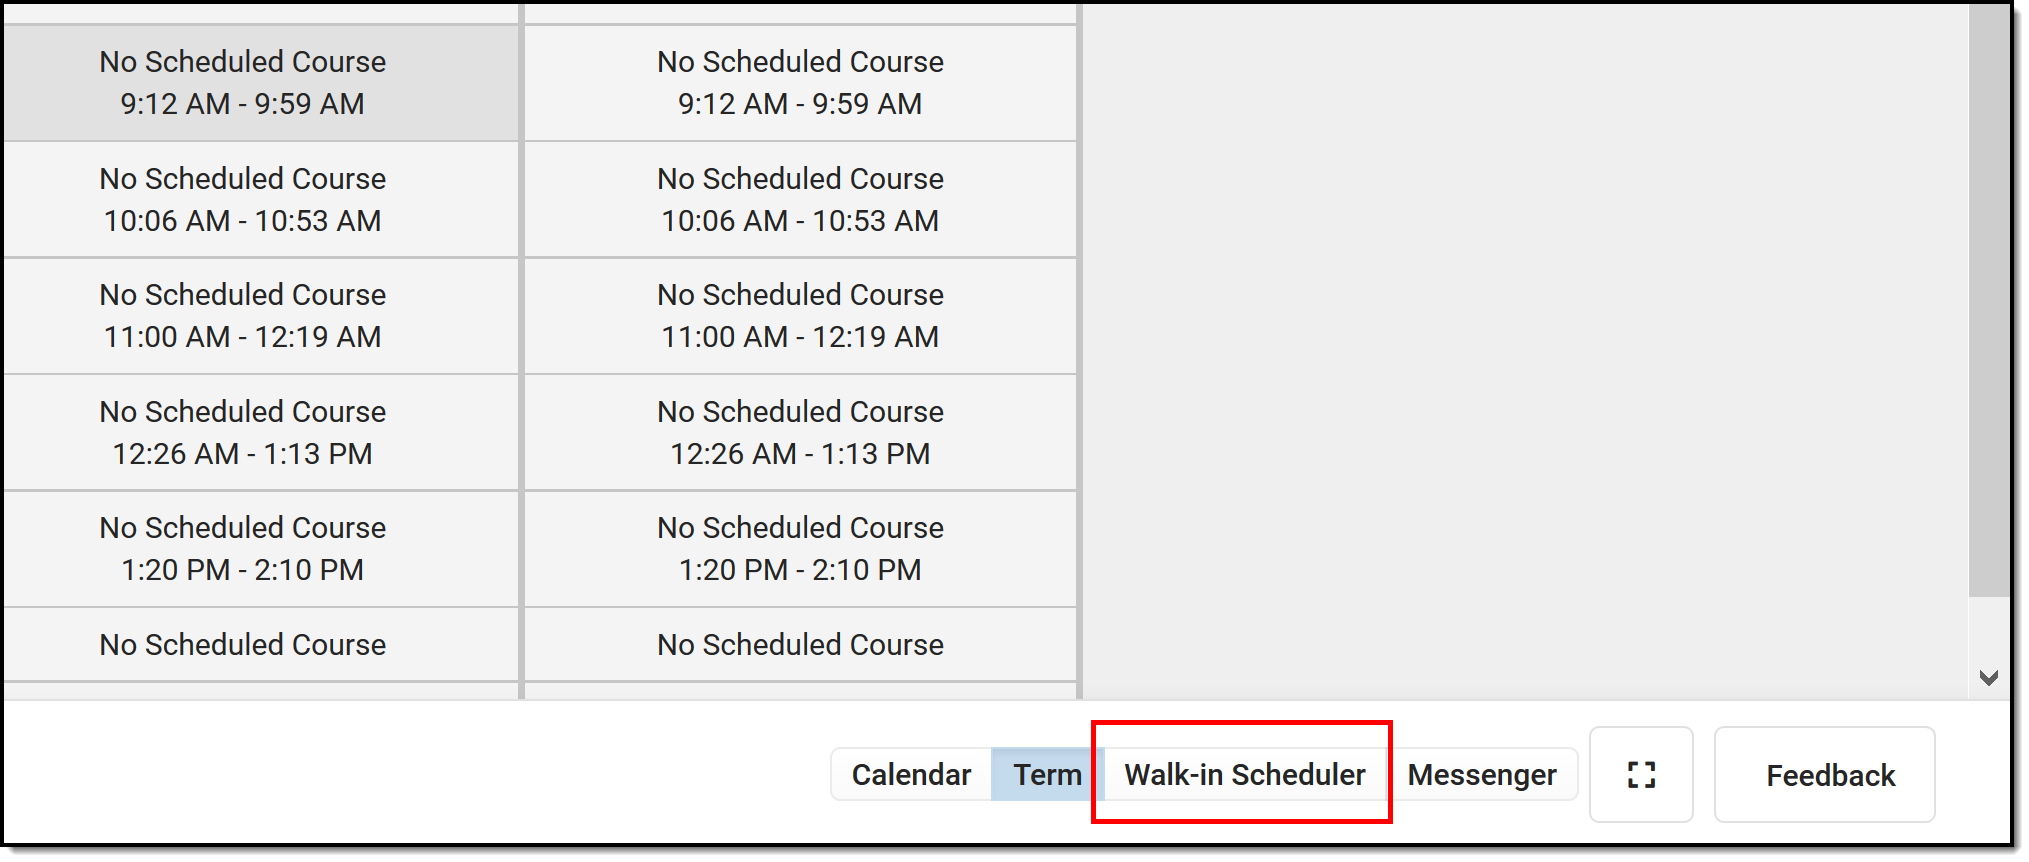
Use the Walk-In Scheduler to modify the student's Schedule. The Walk-In Scheduler button can be selected from either the Term View or Calendar View; modifications to the student's schedule (course requests, drop/add courses, etc.) can only be made in the Walk-In Scheduler. |
|
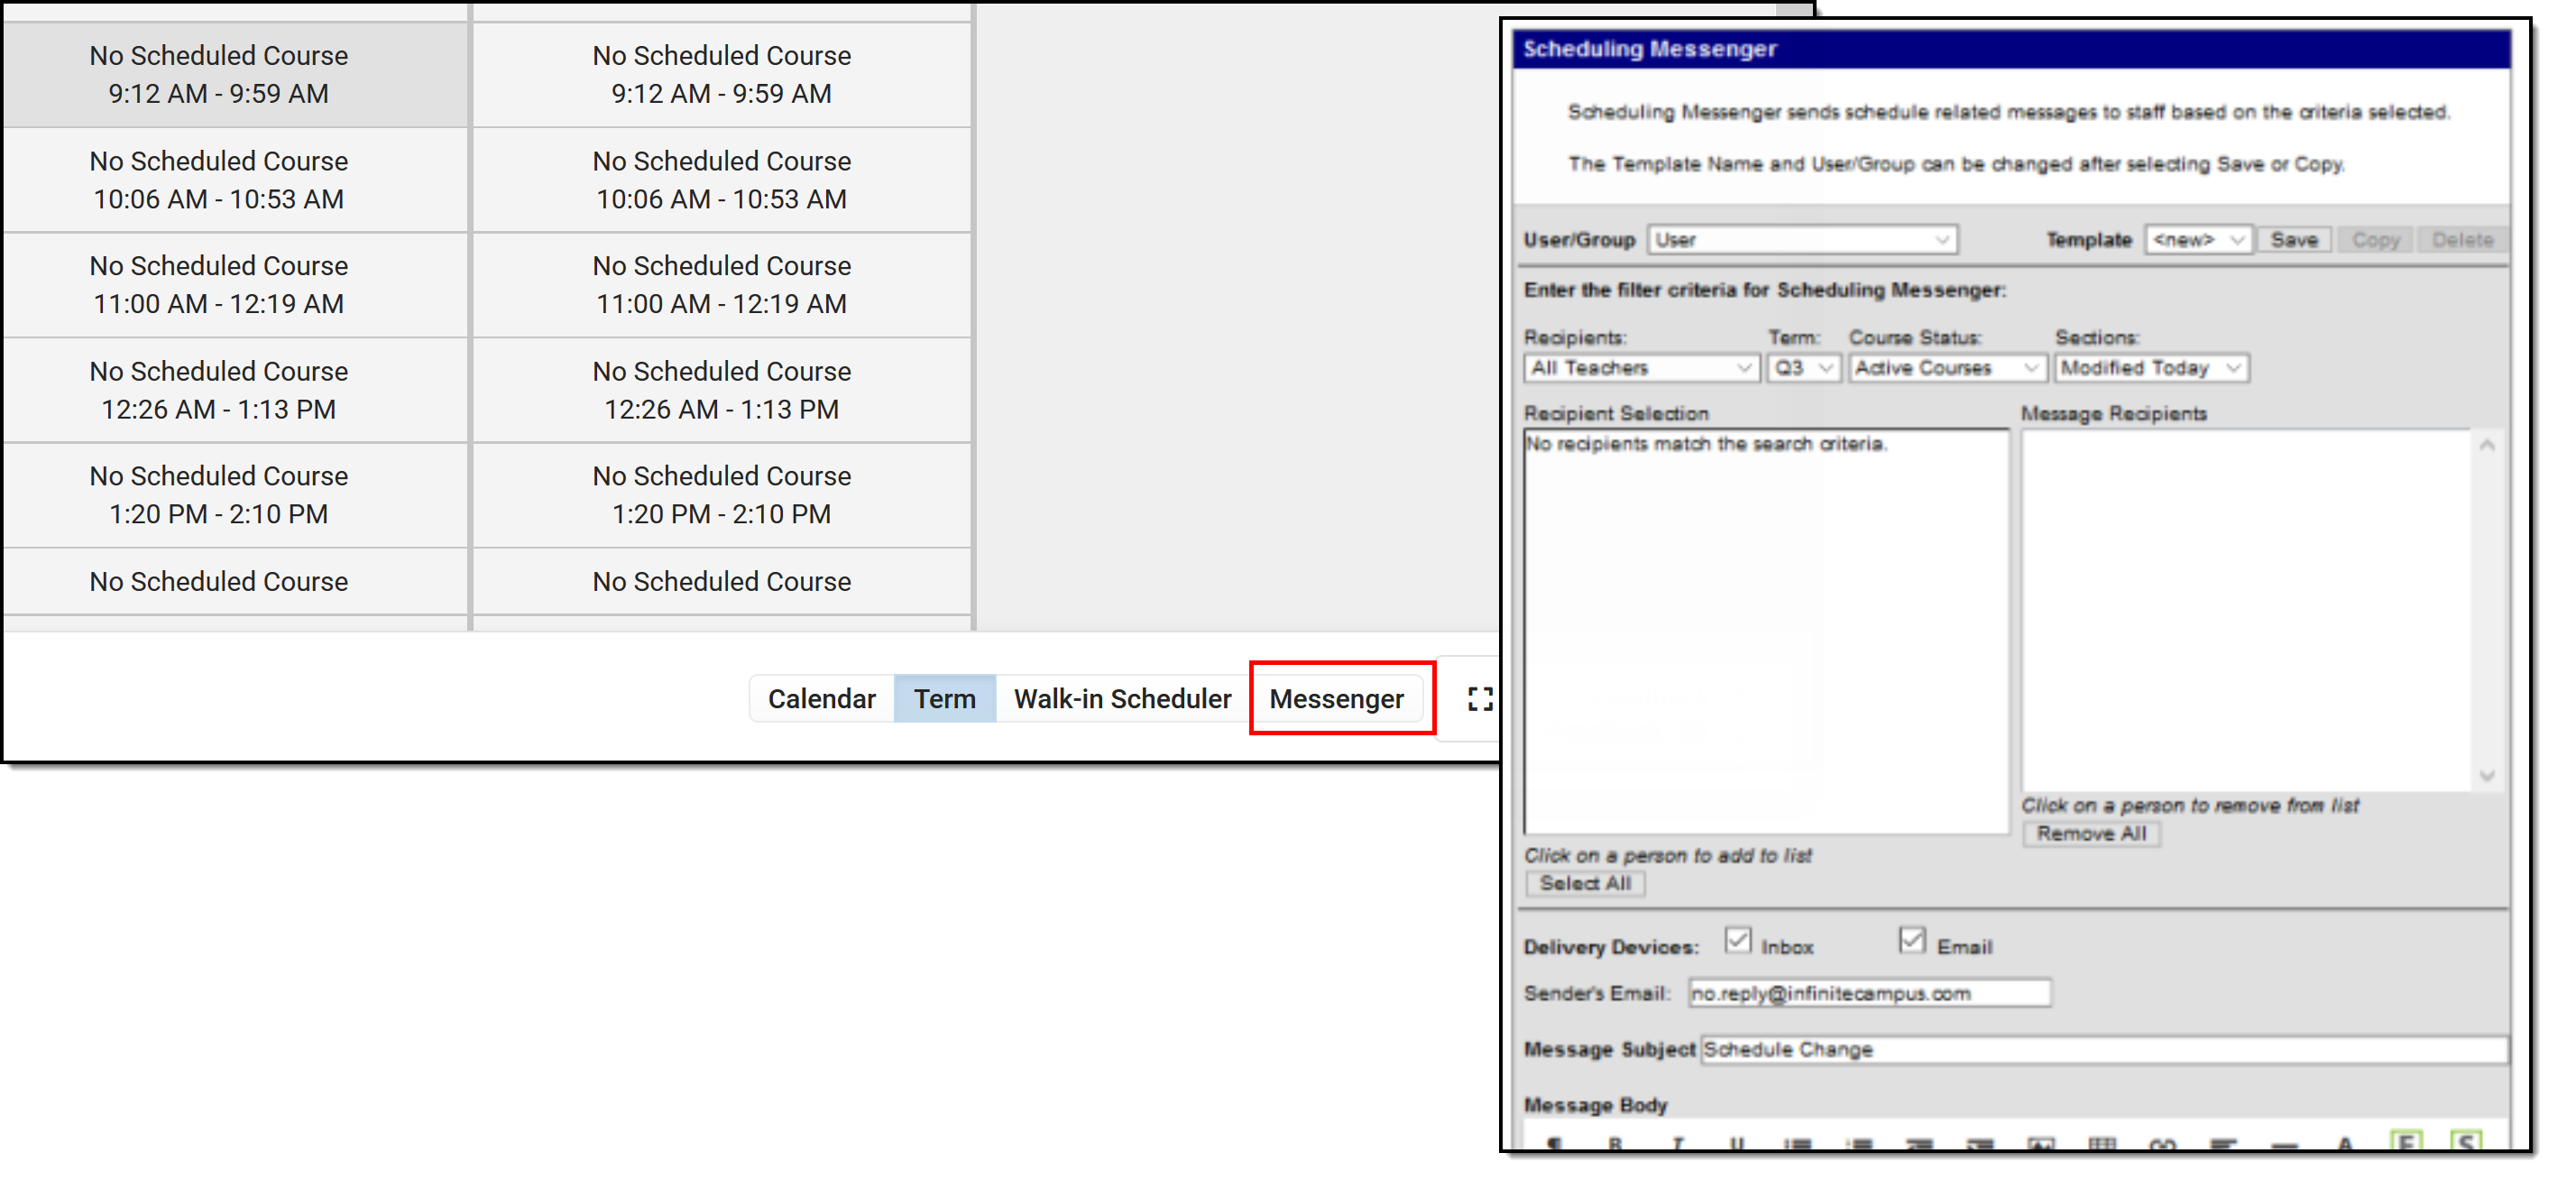
Use the Scheduling Messenger to send messages to the student's current teachers by choosing the Messenger button. |
|
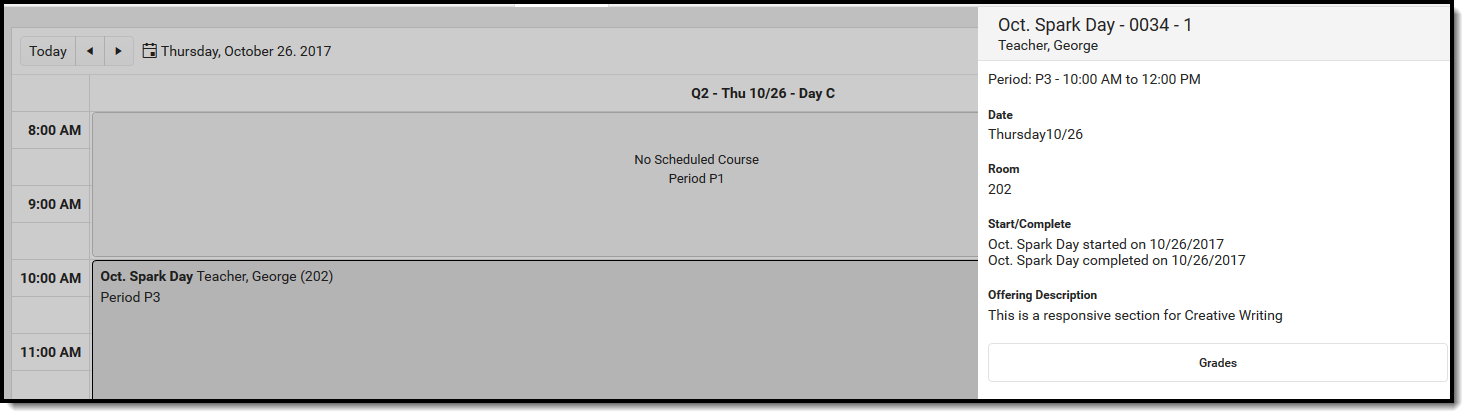
View any Responsive Course Sections from either the Calendar view or the Term view. Past responsive course sections display as other dropped courses would display. |
|
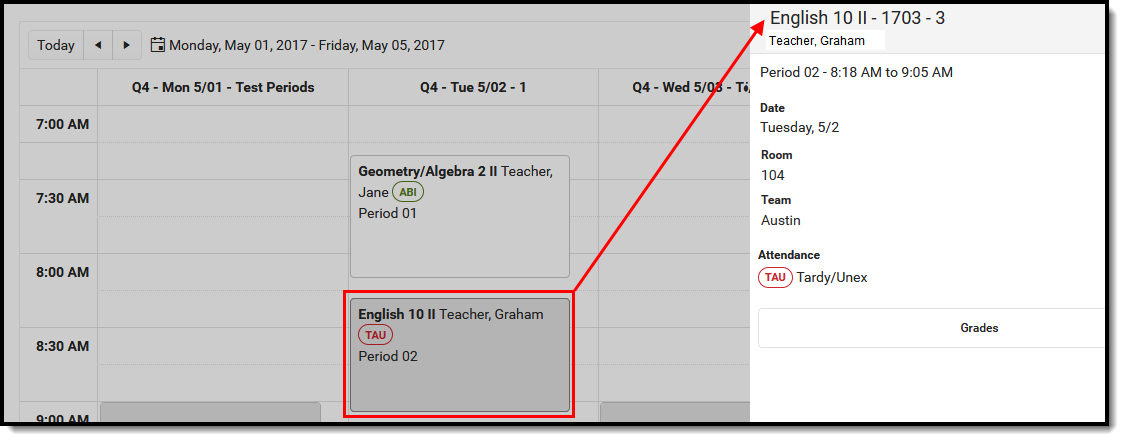
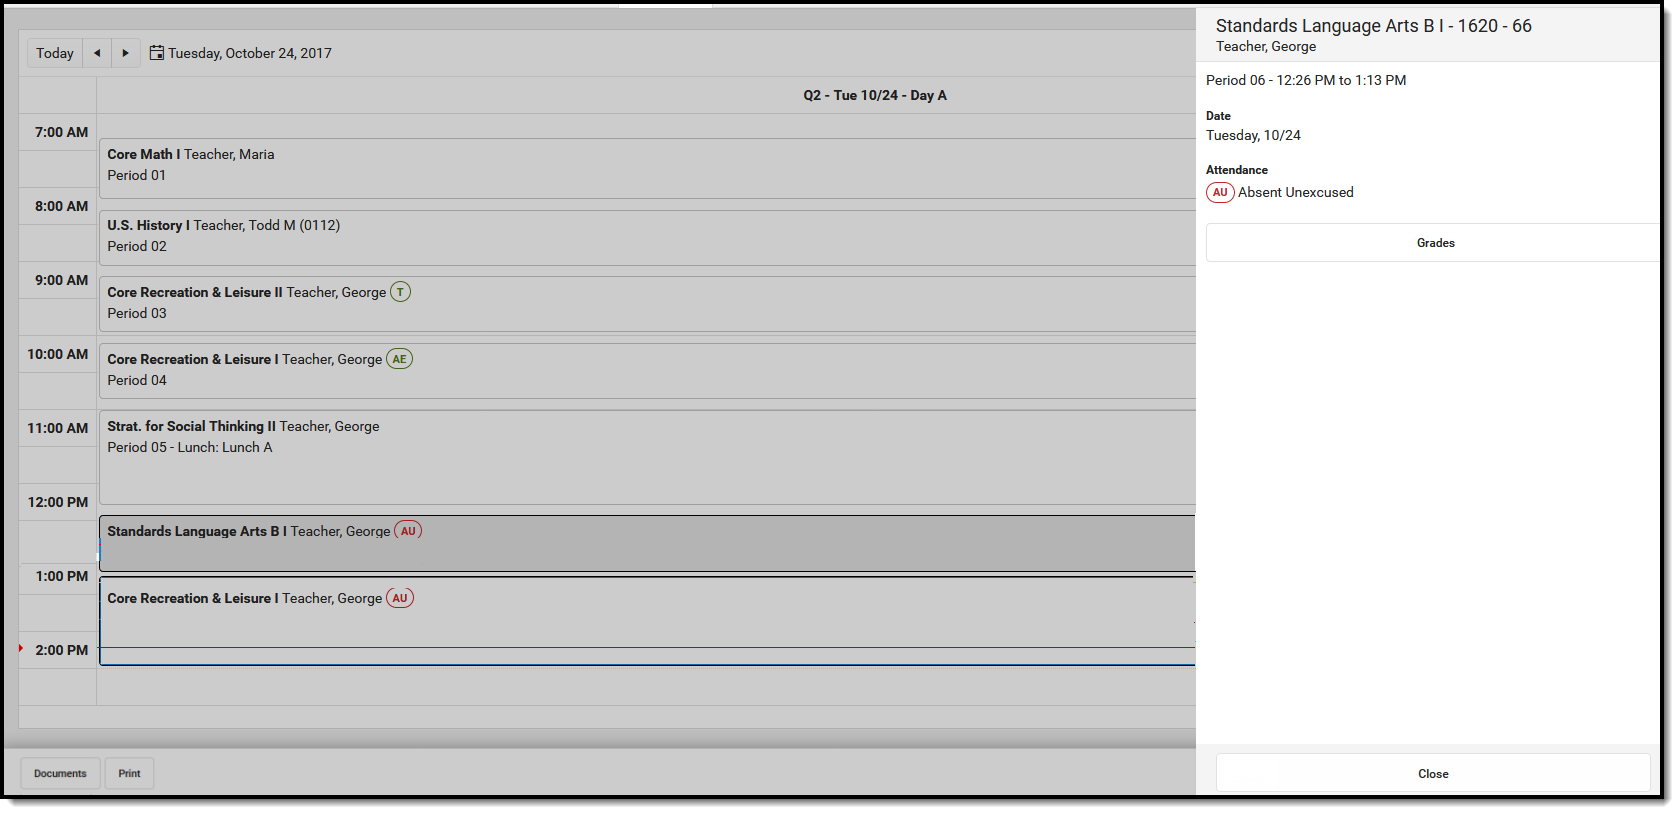
To see more information about a course (assignment scores, attendance data, etc.), select that course from the grid. A side panel opens that includes the course information, section information, any recorded attendance for that day, assigned scheduling teams and access to view posted grades. This can be done from the Calendar view in the Day or Week displays, and in the Term view (the Term View does NOT display attendance information). |
|
| If a student does not have a scheduled course during a particular period, the period displays as such. |
|
| Calendar View Navigation | |
When displaying the schedule in the Calendar view, the student's schedule can be displayed for the Day, for the Week, or in an Agenda layout. See the Calendar View section for more information on each of these options. Automatic scrolling to the current time of day occurs when viewing the schedule. If a counselor is looking for a specific student at 10:15, opening the schedule tab lets the counselor see which class that student is in and where. |
|
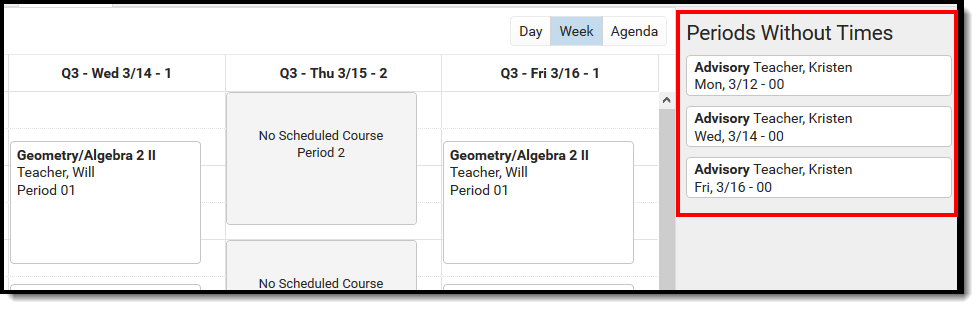
See courses that are not assigned a time to the far right (or below the schedule, depending on your screen size). These could be advisory periods or homeroom classes, or after-school sporting events or after-school club meetings. |
|
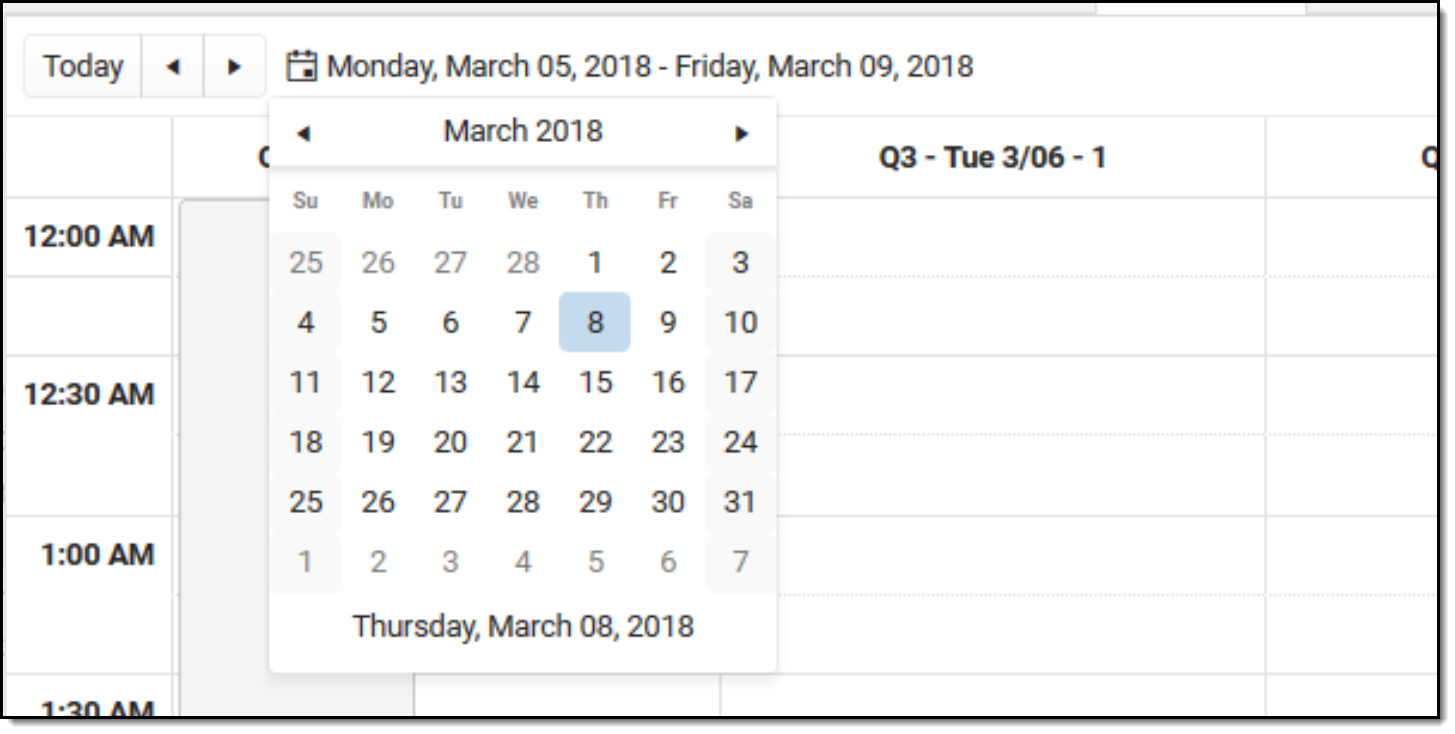
When in the Calendar view, the selected date always displays the current date. Use the left or right arrow keys to navigate to future dates or past dates. If viewing a future or past date, click the Today icon to return to the current date. To choose a day in a different month, click the current date and navigate through the pop-up calendar. |
|
| Term View Navigation | |
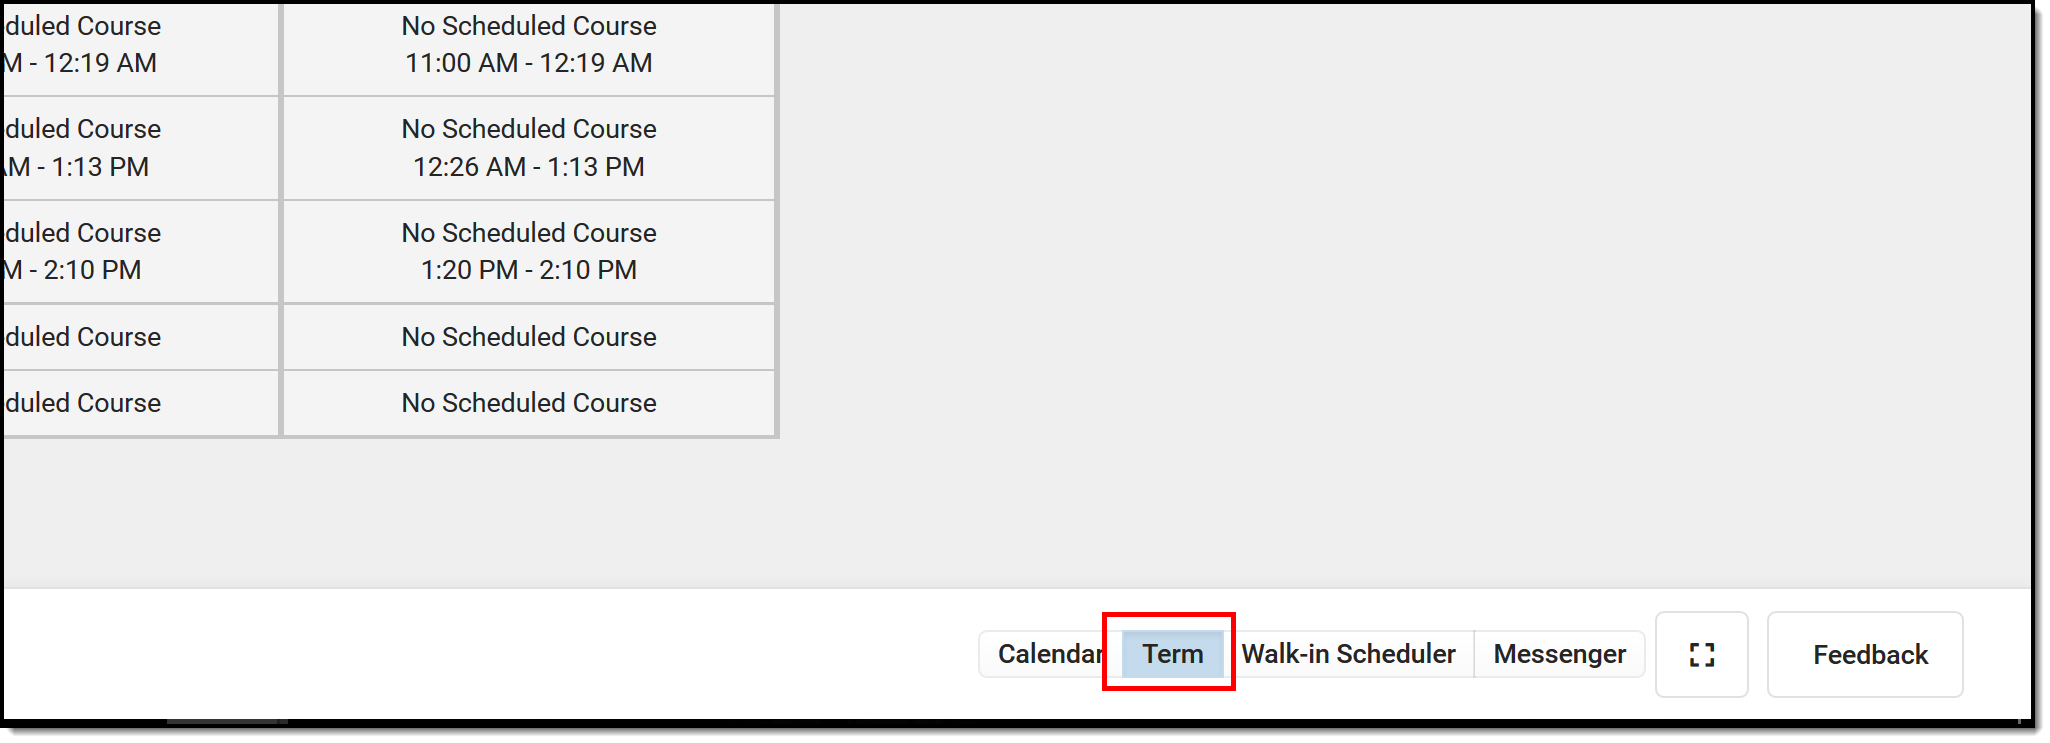
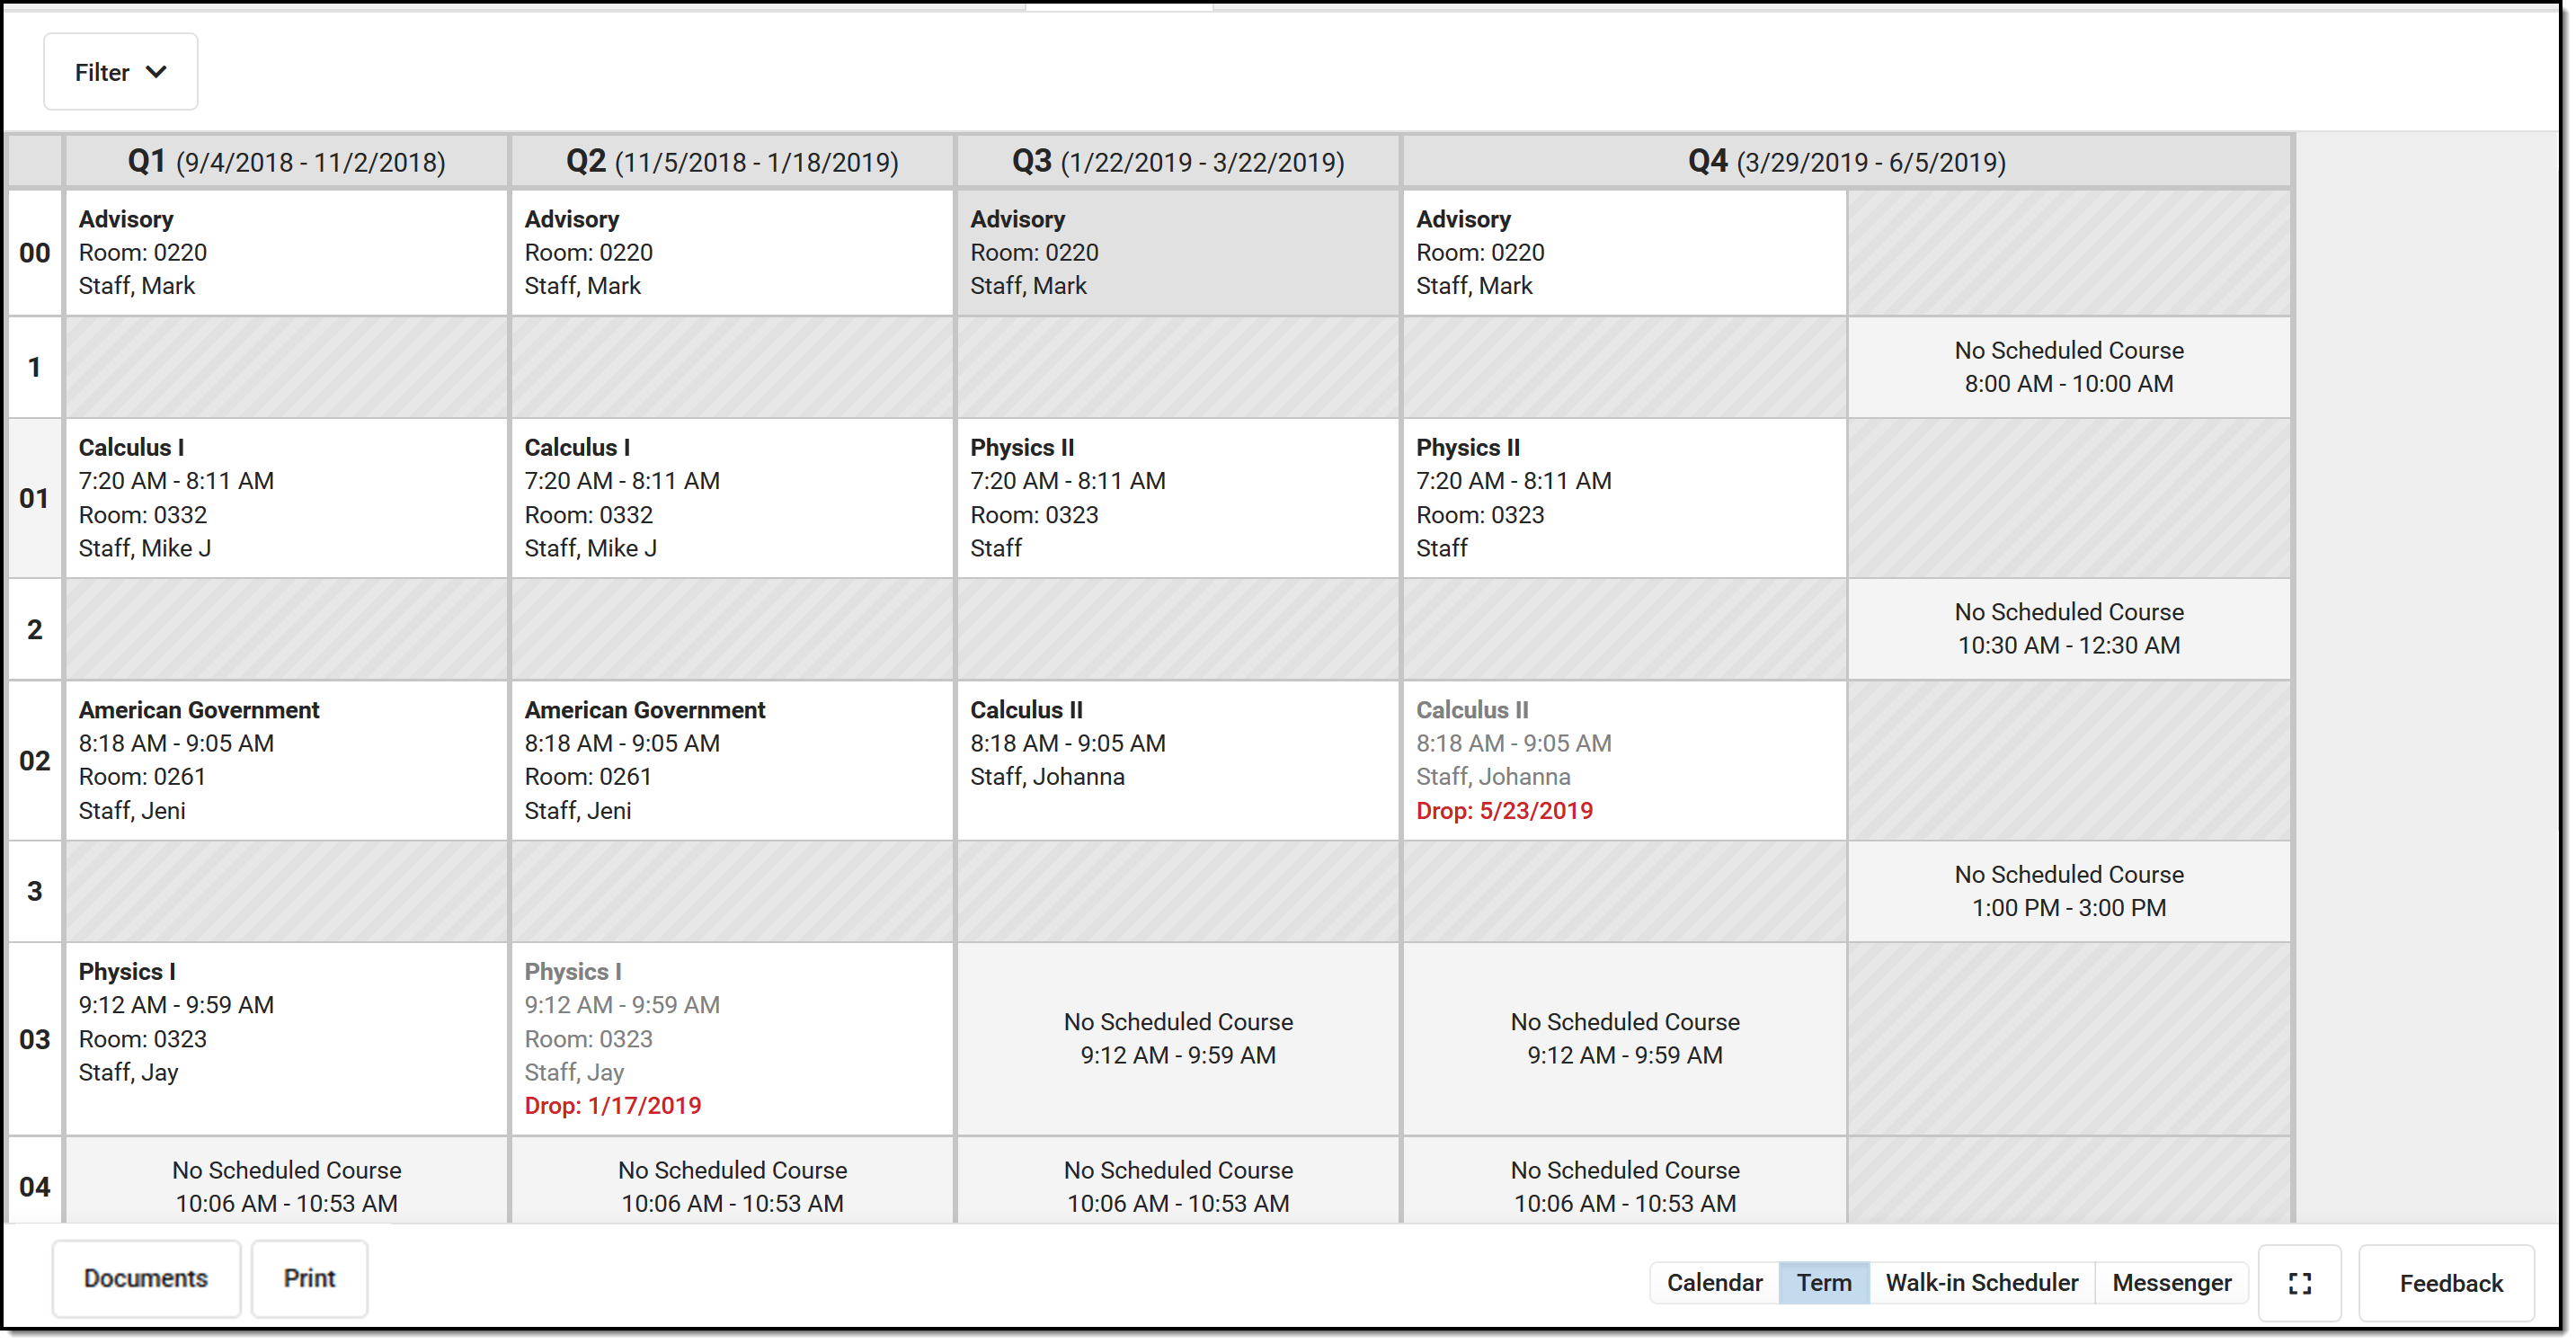
Choose the Term View button to display the Schedule organized by the term (Quarters, Trimesters, etc.).
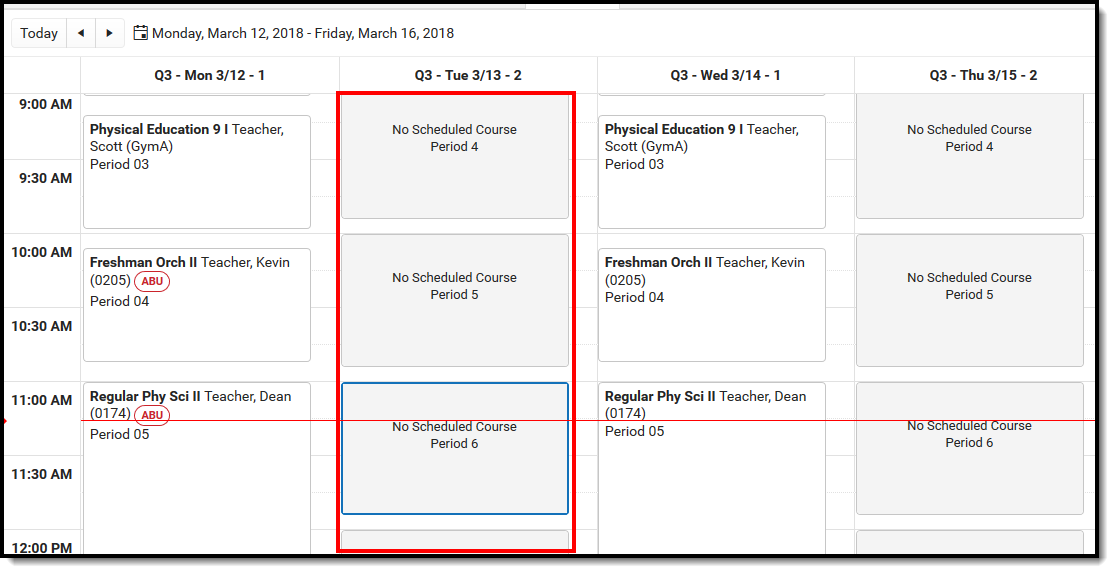
Periods where the student is not scheduled into a course section are gray and the field displays No Scheduled Course. Periods where the scheduled course section does not meet (school holiday or other non-instruction day) are gray and the field displays No Scheduled Course. Diagonal gray bars indicate the calendar does not contain courses in those periods for those days. |
|
| Determine what displays in the schedule grid by turning on or off certain Settings. |
|
Select which Terms and Period Schedules to display by expanding the Filter dropdown and removing the Terms from the Term list and removing the selection of the period schedules from the Period Schedule list. The green checkmark to the left indicates the term or period schedule is selected and displays in the schedule; thos without a checkmark do not display. All terms and all period schedules are automatically selected. The Filter only displays when there is more than one term and/or one period schedule. |
|
In the Term view, see dropped courses in the date in which they were dropped. The currently active course displays at the top of the period. This requires Dropped Courses to be selected in the Filter. In this example, for Term S2, Period 3, the student dropped the Homeschool course on March 26 (last course listed), enrolled in Photography starting March 27 and dropped on April 2, then added Modern Literature on April 3. The student must have dropped courses in order for this option to display. The Calendar view only displays actively enrolled courses. An Active Course is defined as a course that is not yet dropped, which has one of three impacts, depending on the context of the course:
|
|

| I want to... | Action |
|---|---|
| Change the Schedule Format | Choose the Calendar button in the lower right corner, then select the Day, Week, or Agenda buttons in the upper left corner. Or, choose the Term button from the lower right corner. |
| See only the courses into which the student is currently enrolled | In the Term view, use the Filter options to turn off the Dropped Courses setting (only displays when a student has a dropped course). Dropped courses display in the order in which they were dropped. An Active Course is defined as a course that is not yet dropped, which has one of three impacts, depending on the context of the course:
|
| Print the student's schedule | Click the Print button to see the available reports from the side panel. |
| See the period times. | Use the Calendar Day view to see the current period highlighted in blue. The schedule automatically moves to the current time, indicated by a red line. |
| Access the Walk-In Scheduler | Click the Walk-In Scheduler button at the bottom of the screen. |
| Send a schedule related message to a student's teacher. | Click the Messenger icon at the bottom of the screen. |
| View the student's current course grades | Click the course name. In the Side Panel, click the Grades button. |
Calendar View
Staff can view the student's schedule by the current Day (standard view), the current Week, or by an Agenda view.
- The Day view displays the student's courses for the selected day.
- The Week view displays the student's courses for the selected week.
- The Agenda view displays the student's courses in a planner view, with the date, time and courses.
Lunch assignment (when selected on the Course editor) and any scheduled Responsive Scheduling courses (when using Responsive Scheduling tools) display.
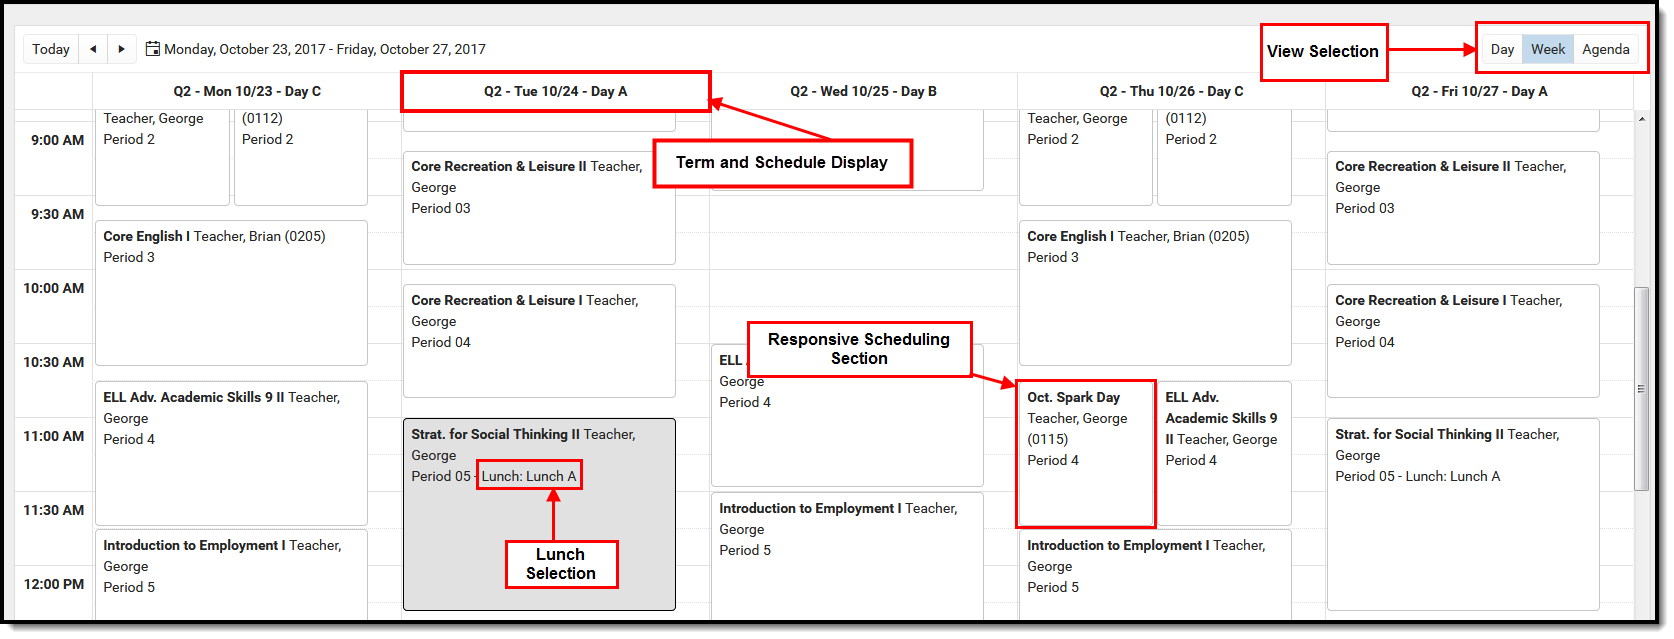 Calendar View
When a student is assigned to a Blended Learning Group that meets on the day that is being viewed (Blended Learning Groups are assigned to Calendar Days), a label of Virtual displays in the Day, Week and Agenda views.
 Virtual Learning Group Display
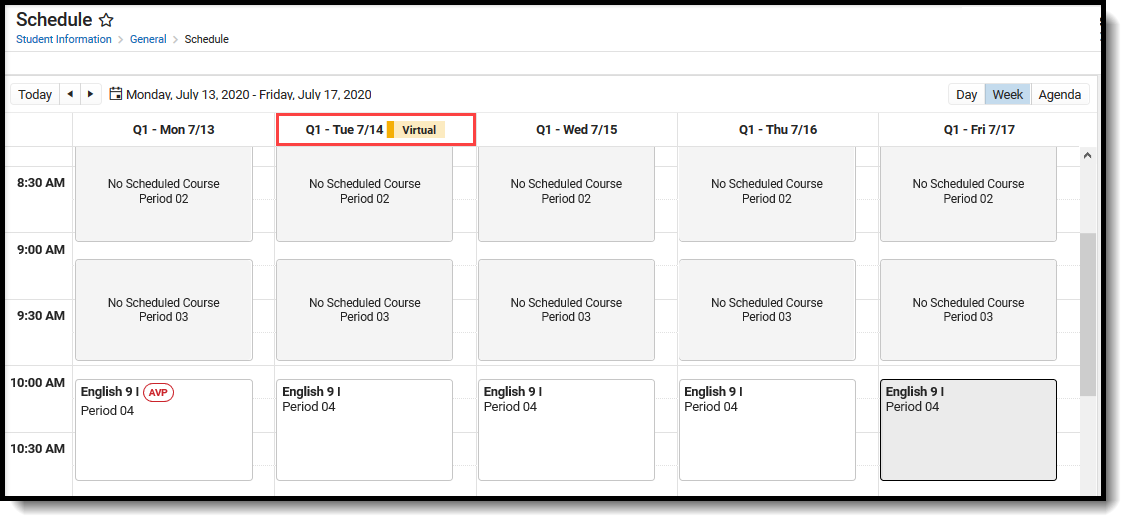 Week - Blended Learning Group Display
 Blended Learning Group Display in Agenda View
Blended Learning Groups are optional. See the Blended Learning Groups article for more information.
Keyboard Shortcuts
The following shortcuts can be used when accessing the Student Schedule in the Calendar View:
- Arrow through the time slots. Use all four directional arrow keys to highlight time slot cells and scroll through the courses.
- Press enter to open courses. Highlight a course using the tab key and press the Enter key to open the Course Side bar.
- Tab through the courses and non-timed activities. Use the Tab key to move through the courses and click Enter to open the Course Side panel (shows the course name, teacher, period name and time).
- Arrow to next and previous. Use the arrow keys in the Day and Week view to navigate to the next or previous day/week.
- Escape to close side panels. Click the ESC key to close open side panels.
- Switch between calendar views. Use 1, 2, 3 numbers across the top (not the number pad) to move between the Day, Week, and Agenda views.
- Switch between term views. Use 1, 2 numbers across the top (not the number pad) to move between the Term views.
Certain browser settings (like spell check) may interfere with the use of keyboard shortcuts.
Day View
The Day view lists the student's courses for the selected day. The name of the Period, assigned Room Number, Course Name and Assigned Teacher and any recorded attendance for that period display. The current period is highlighted in a blue outline to easily determine where the student is. A red line indicates the current time.
- Click the course block to see the course information in the side panel.
- Click the Grades button in the side panel to view the student's Grades tab.
 Calendar Day View
If a student is scheduled into multiple sections of the same course, both of those sections display.
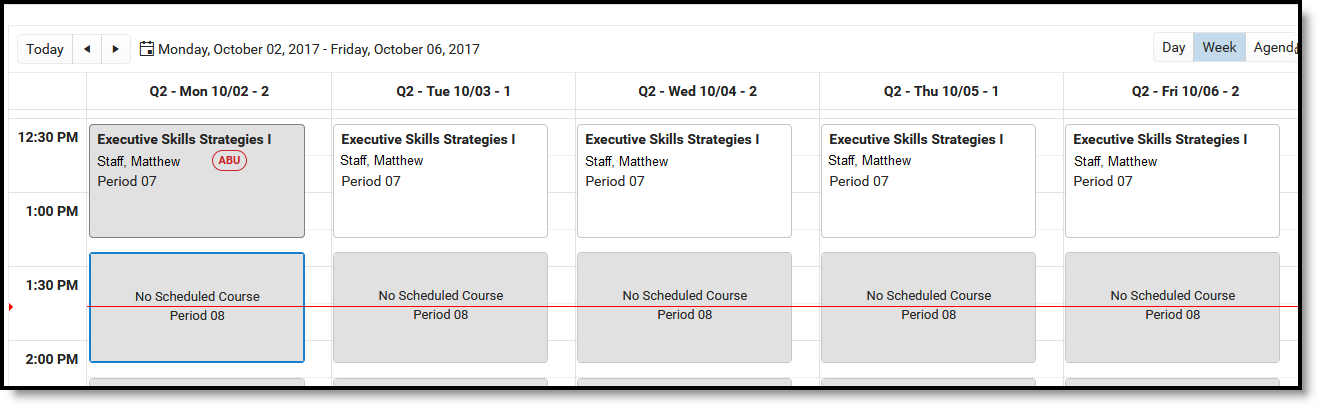
Week View
The Week view lists the student's courses for the selected week. Similar to the Day view, the name of the Period, Course Name and Assigned Teacher and any recorded attendance for that period displays. The side panel shows the same information as he Day view.
The Week view is helpful if student courses change on a daily basis.
 Week View
Certain calendar formats, particularly at elementary schools, do not display well in the Week view, because of the amount of schedules, periods and classes. Consider using the Day or Agenda views instead.
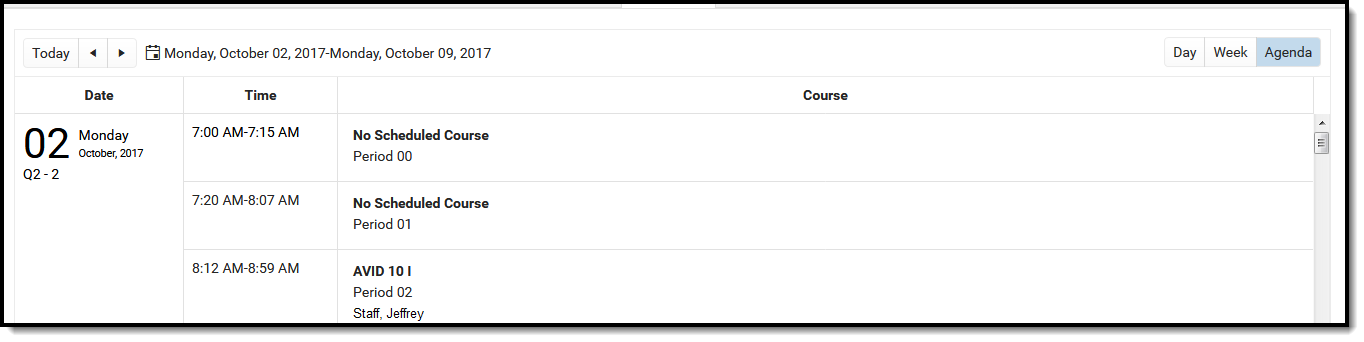
Agenda View
The Agenda view lists the student's courses in a planner type of view, with the date, time and course. The current time and course is not highlighted in this view, but recorded attendance does display for course in which it was recorded.
 Agenda View
The Term View displays the student's courses for selected Term and each selected Period Schedule. Choose the Filter to select which terms and periods display.
When first accessing this view, all terms and all period schedules are selected. For a school using more unique formats for student schedules, like middle schools who are experimenting with the best learning for students, this view could get rather large.
Lunch assignment (when selected on the Course editor) and any scheduled Responsive Scheduling courses (when using Responsive Scheduling tools) display.
Responsive courses can be viewed for Future courses or Past courses.
 Term View
Filter Options and Settings
The Filter and Settings allows users to choose what displays in the schedule grid and how it displays. At the beginning of a school year, it might be useful to see all terms and period schedules, but as the year progresses and Term 1 is over, this term can be removed, so only the current and future terms display. Or, a user doesn't want to the see course numbers and section numbers in the schedule grid, just the name of the course. All of these can be set per user and changed as often as needed.
 Filter Options and Settings
Both the Filter options and the Settings panel remember selections made, meaning once a selection is made (filter) and saved (settings), the options remain even when navigating away or logging out of Campus, and is remembered the next the user logs in.
Filter Options
When first accessing the Filter, the schedule grid displays all terms and period schedules, both active and dropped courses, and any special days marked on the Calendar Days tab, like Responsive Scheduling Days.
Some filter options may affect the searching and placing of courses on the grid. Messages display when these options may need to be changed or to remind the user that not all items may be shown in the grid due to filter selections.
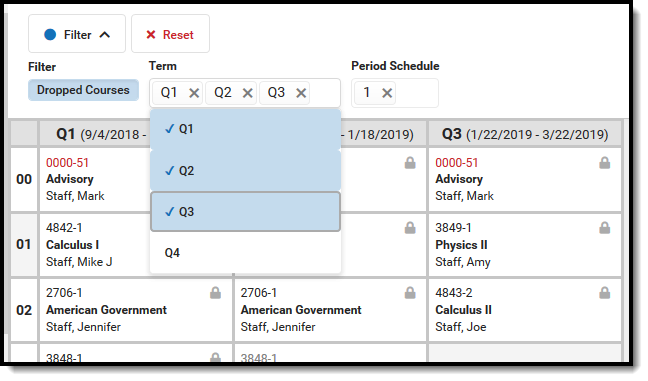
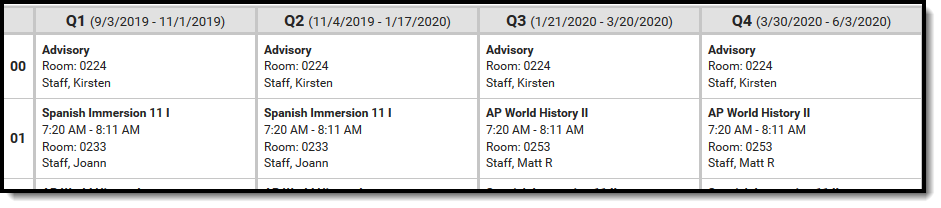
Remove the selected terms by clicking which Term or Period Schedule to not show in the Schedule. Terms and Period Schedules without a checkmark DO NOT display in the schedule. In the example below, terms Q1, Q2, and Q3 are selected to display. Q4 is not selected and courses scheduled into that term do not display.
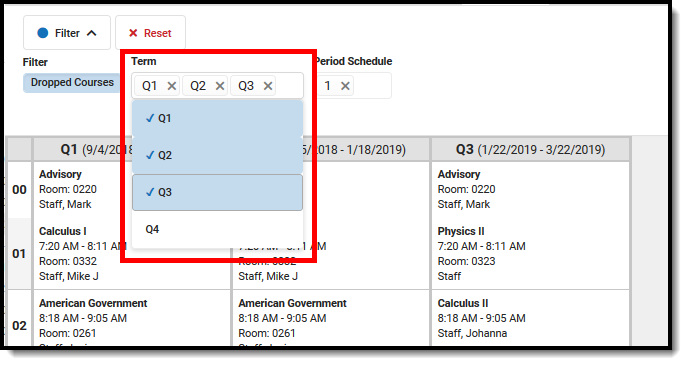 Term and Period Schedule Selection
If changes are made, a Reset button displays. Click this to return all filter options to the original display.
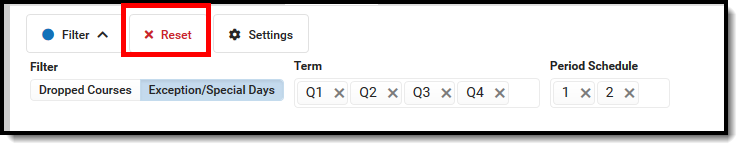 Filter Reset
| Option | Image |
|---|---|
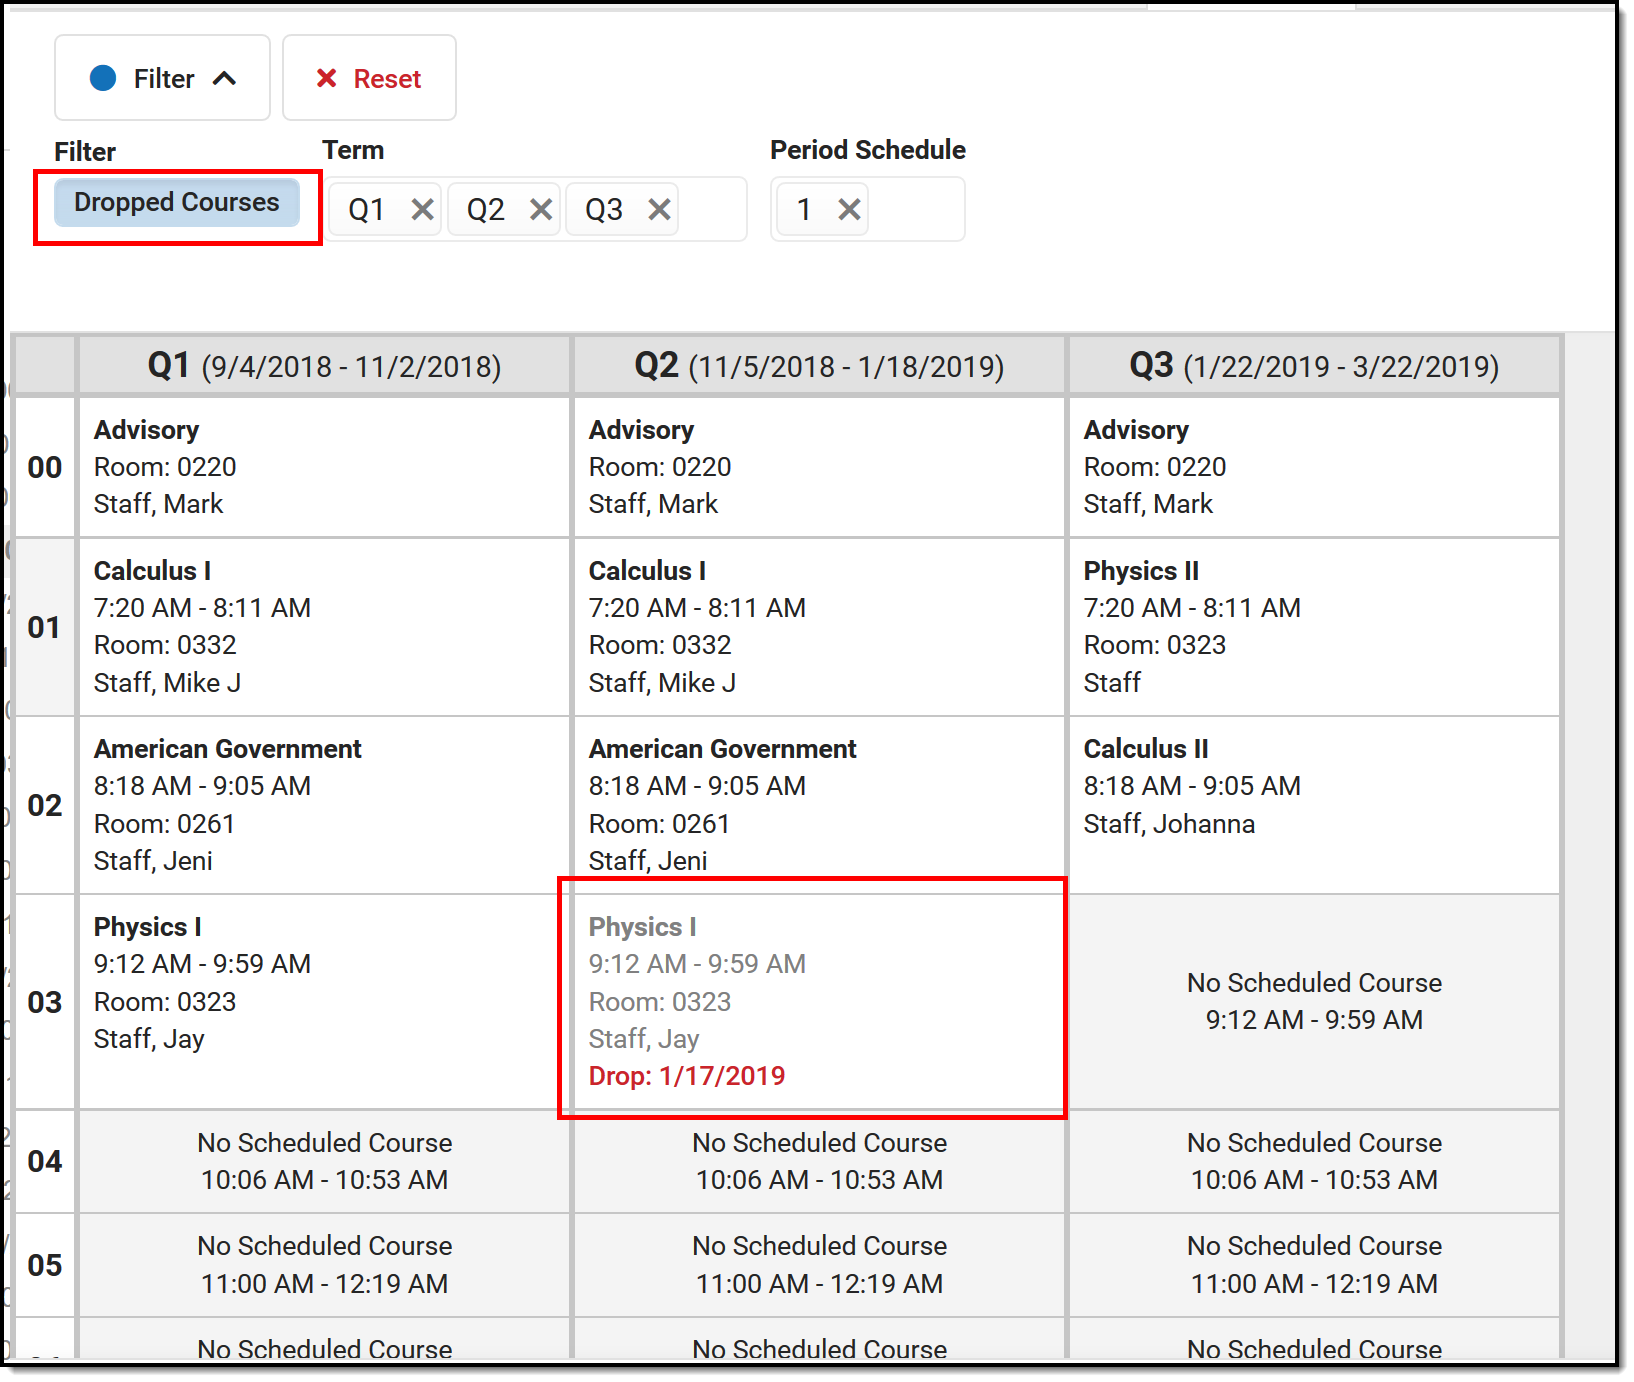
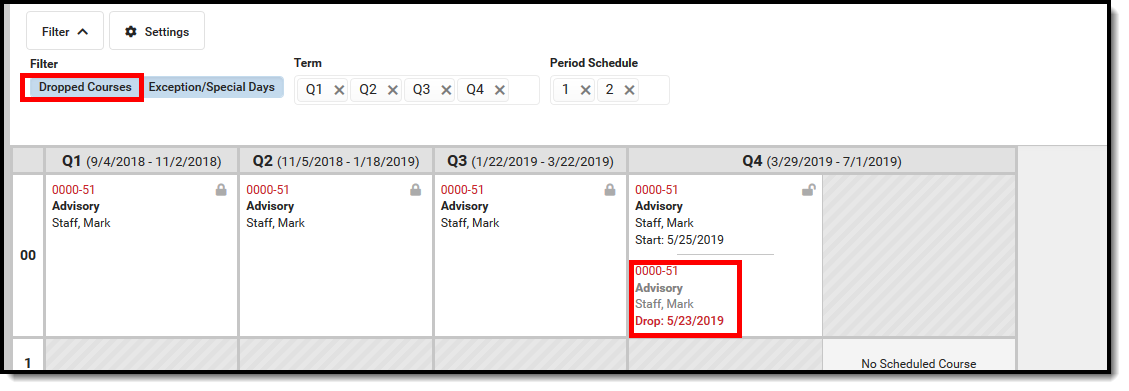
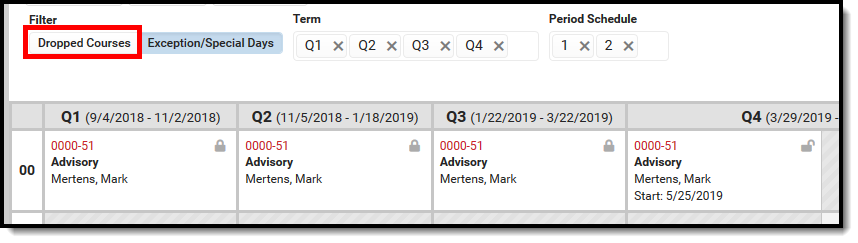
Show only active courses by clicking the Dropped Courses option.This removed any courses from the grid that the student has dropped (ended enrollment in the section). The first image to the right shows the Dropped Courses option selected (highlighted), and the dropped Advisory course in Term 4. The second image shows the Dropped Courses option not selected, and the dropped Advisory course no longer displays. |
|
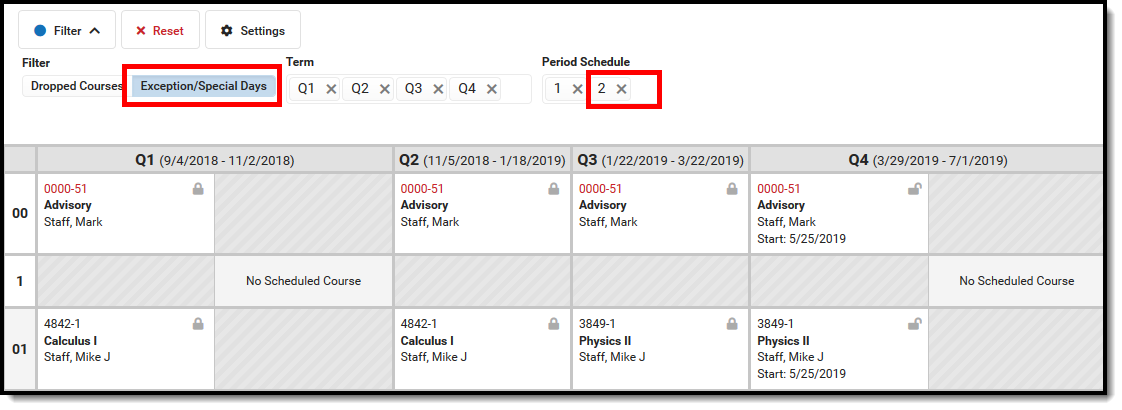
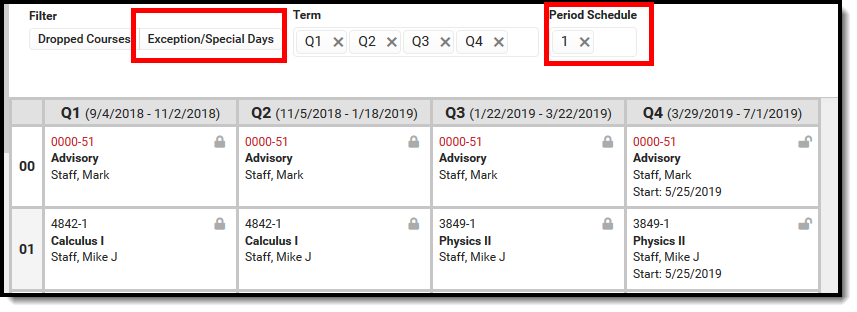
Hide any Exception/Special Days (final schedules, responsive scheduling) from the grid. In this calendar, all exception/special days are scheduled in the Period Schedule 2.
|
|
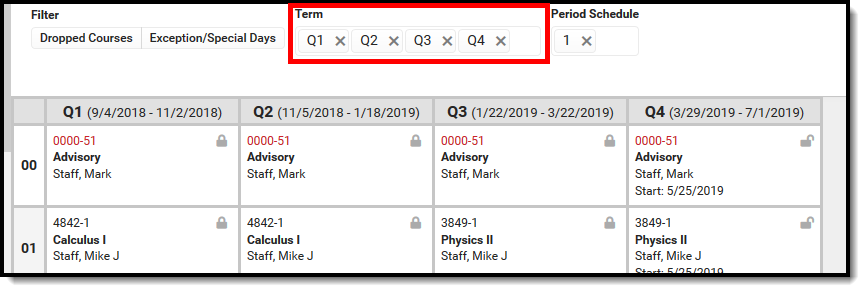
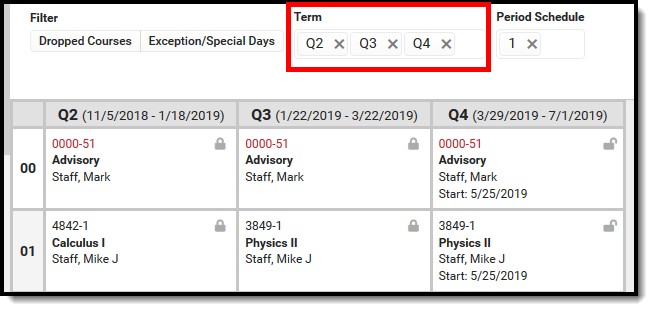
Only show specific terms. Click the X next to the Term name to not have courses scheduled in that term display in the grid. Since Term 1 has passed and no more schedule changes can be made for that term, Q1 can be removed. The first image shows the complete school year with all four terms displaying. The second image shows the schedule grid with the first term removed. |
|
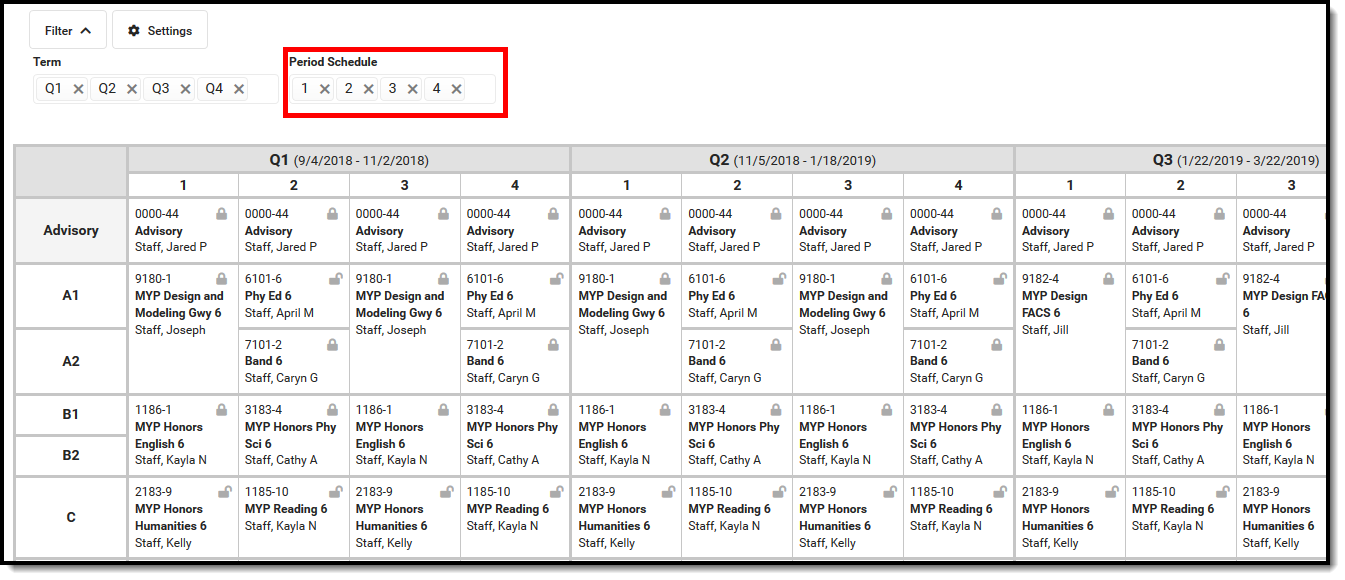
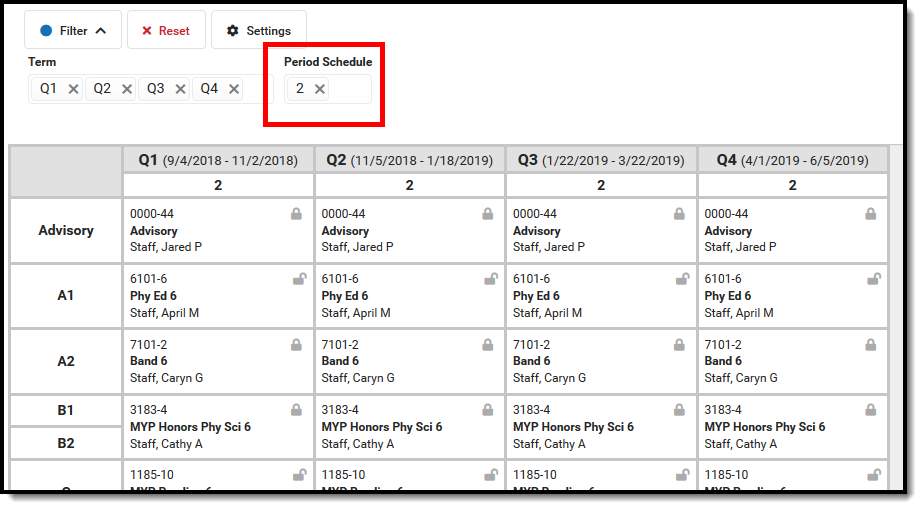
Show only courses in the main Period Schedule. Removing period schedules from view is helpful when there are many responsive or special days (see the previous information on this option) or when there are several rotating schedules for a school in a middle or elementary school, for example. In this example, the calendar has four terms and four period schedules. The first image shows all of these options selected. Notice that Term 4 doesn't display without scrolling and there is no way to determine which periods are connected to which period schedule. The second image shows all but one period schedule selected. This makes viewing the courses for that period schedule manageable, and all terms display without scrolling. |
|
Settings
There is one setting that can be turned on or off when viewing the student schedule in Term view. A short description of that setting displays when clicking the info icon in the Settings side panel. Note that turning this setting on may increase the overall height of the grid, which could limit the amount of data that displays. This image shows the default settings.
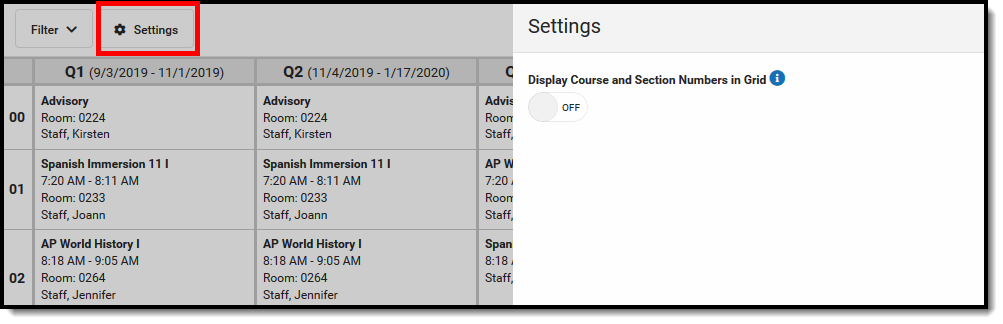 Term View Settings - Default Selections
Changes automatically save (i.e., there's no need to click a save icon).
| Option | Setting On | Setting Off |
|---|---|---|
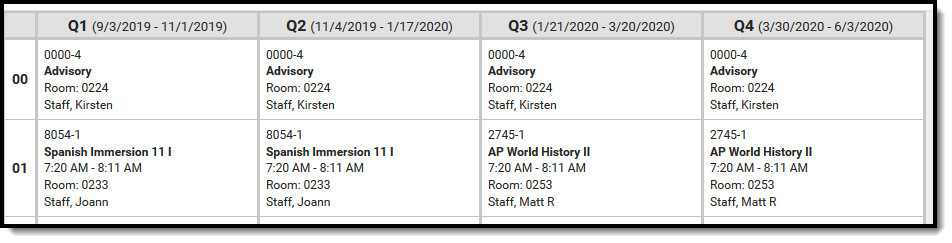
Display Course and Section Numbers in Active Grid With the setting on, the course number and section for the currently placed course displays. With the setting off, the course number and section for the currently placed course does not display, and only the name of the course displays. | The Advisory course includes the course number and section number.
| The Advisory course only includes the course name, not the number or section.
|
Documents
Upload previous student schedule reports from other schools, or other schedule-related information, for a particular student. This uses the Digital Repository features. There is no limit to the amount of documents uploaded here, but be aware your district may have set a maximum file size value.
Only documents uploaded from the Schedule tool and Walk-In Scheduler tool display here. Other type of uploaded documents do not display. To see other types of uploaded documents, view them on the Person Documents tab.
Mark the Consent statement (files cannot be saved if this is not marked), and click the Select File button to locate and upload documents. File names must be unique. Click the Save button when finished. A successful upload displays a Done checkmark next to the Select Files button. Close the side panel by clicking the Cancel button.
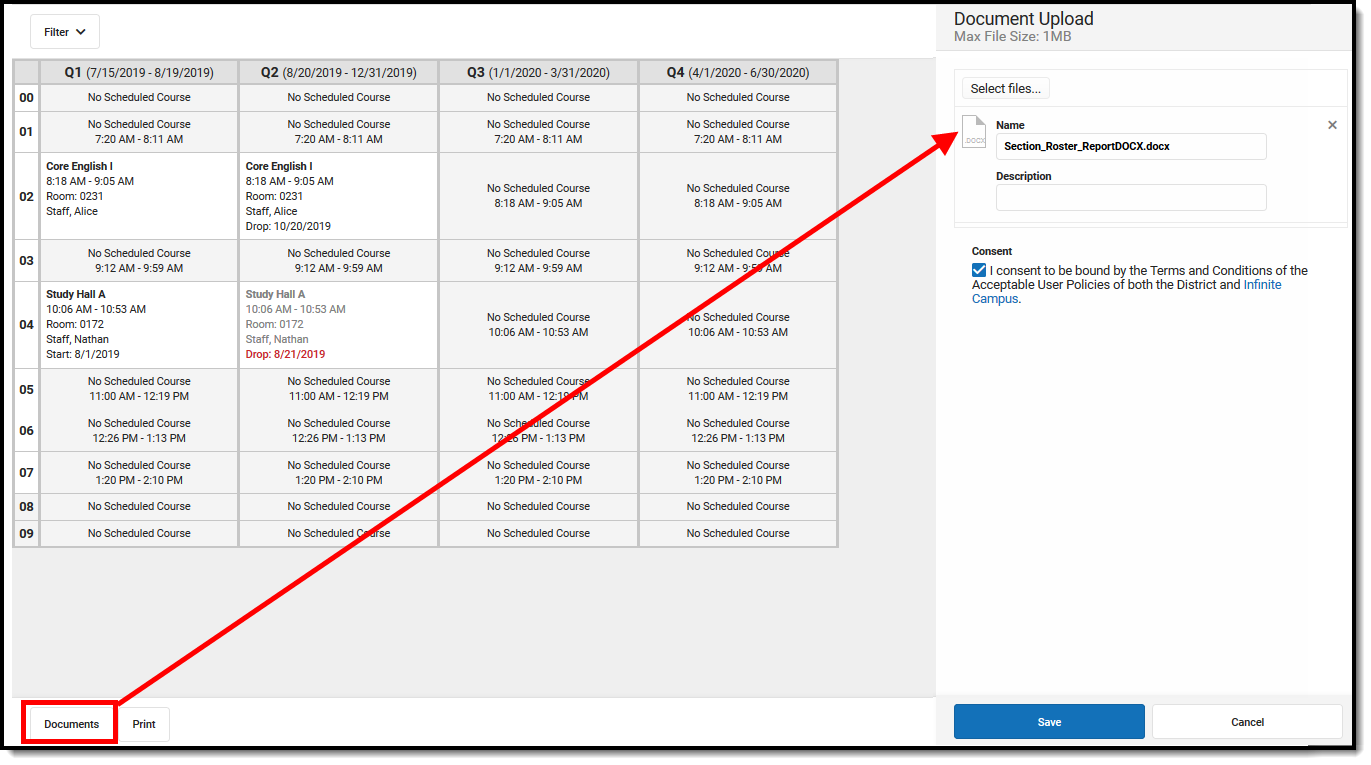 Schedule Document Upload
Uploaded files can be sorted by Newest (most recently uploaded) or Oldest. To remove an uploaded document, click the red X next to the file name.
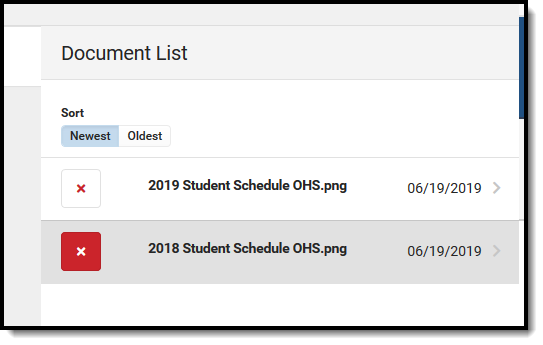 Delete Uploaded Documents
For more information on document upload, see the Manage Document Attachments article.
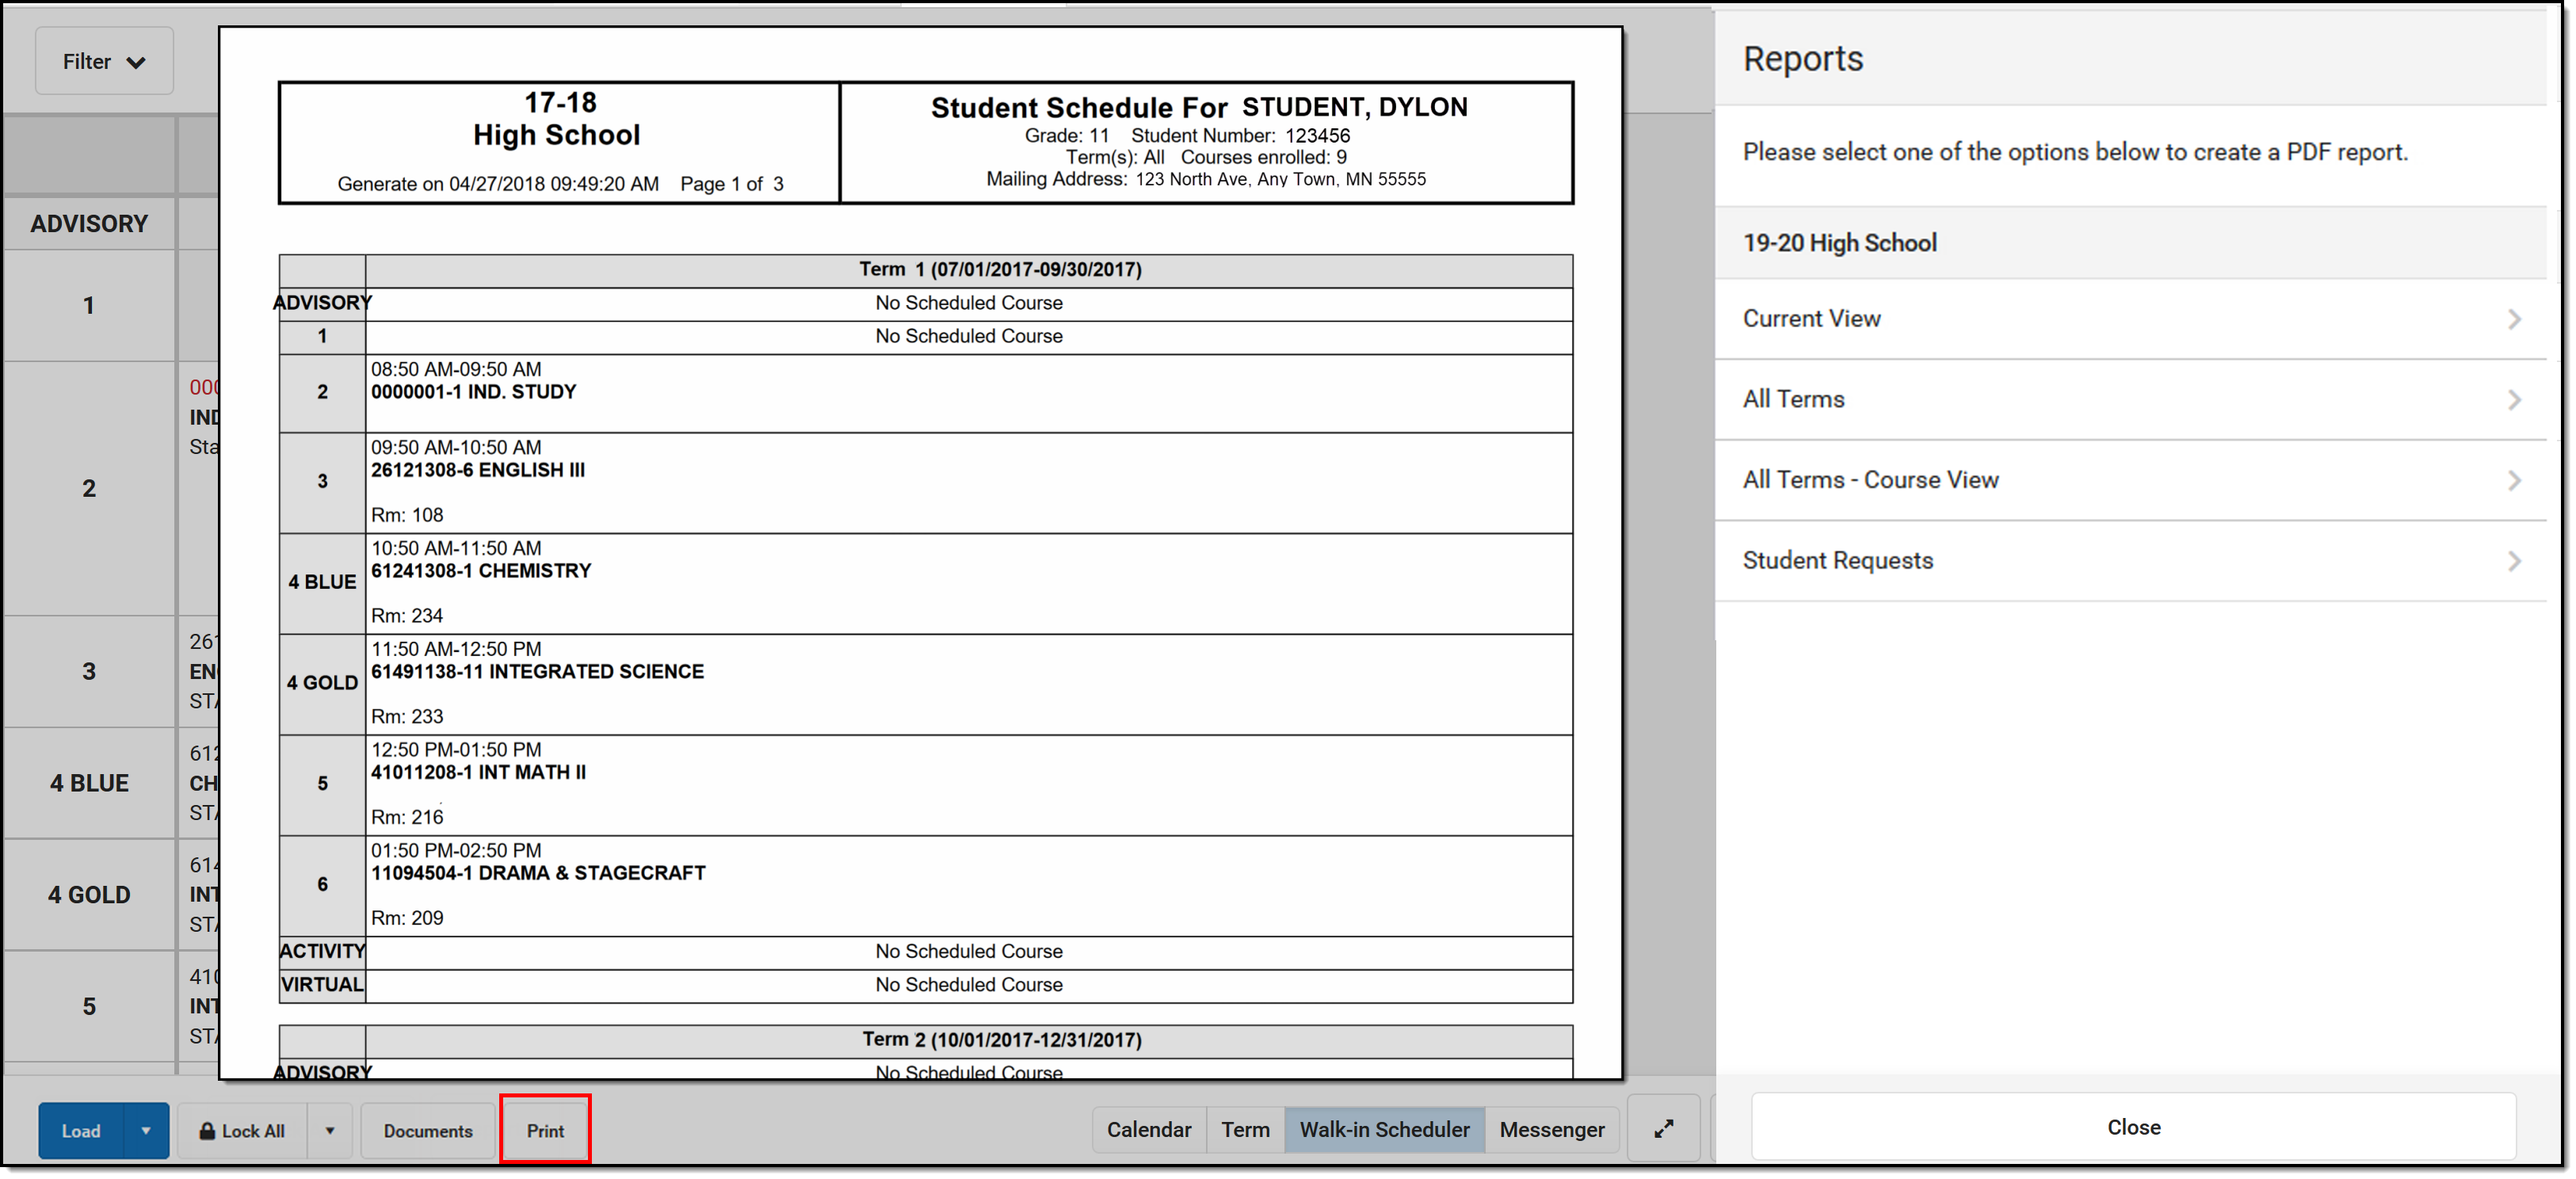
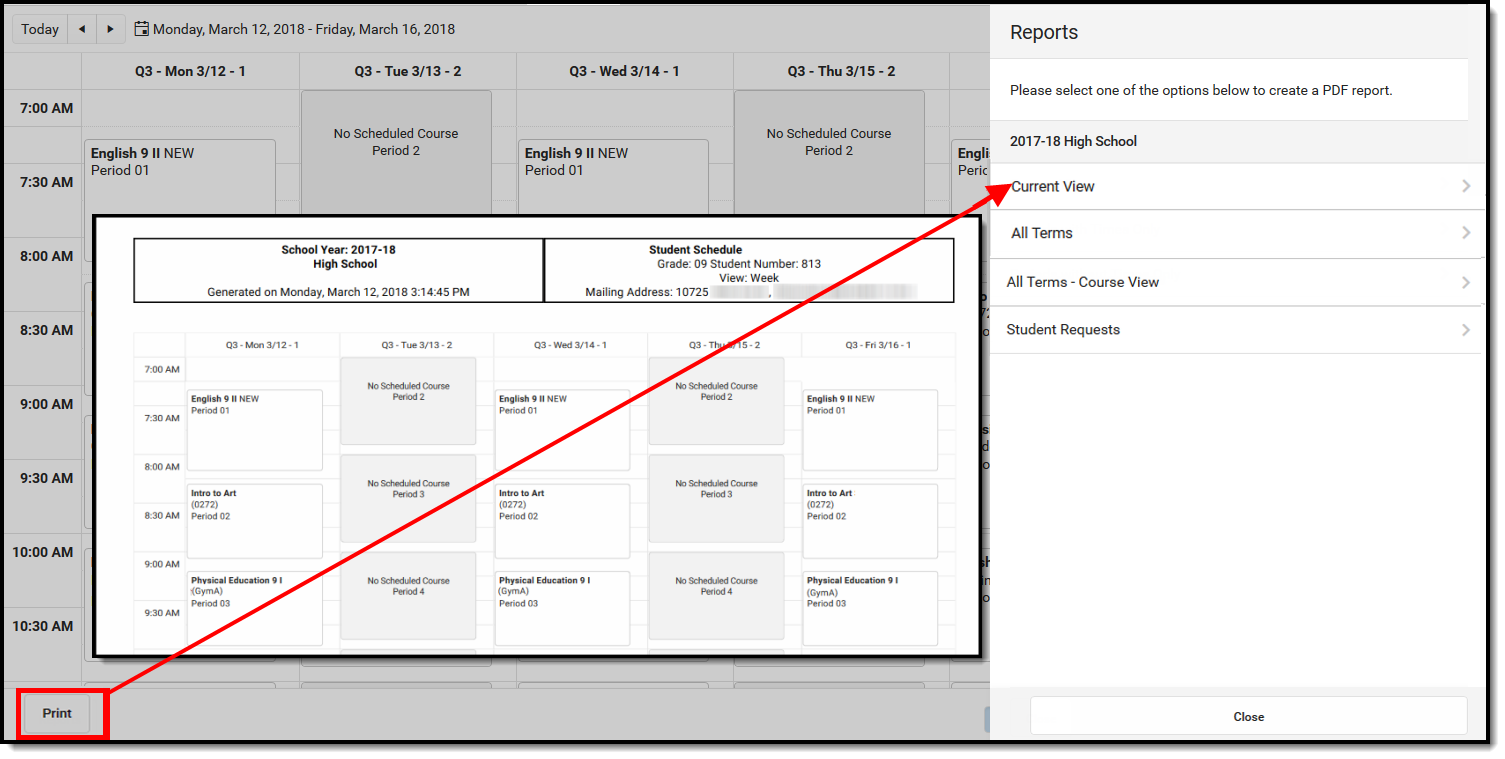
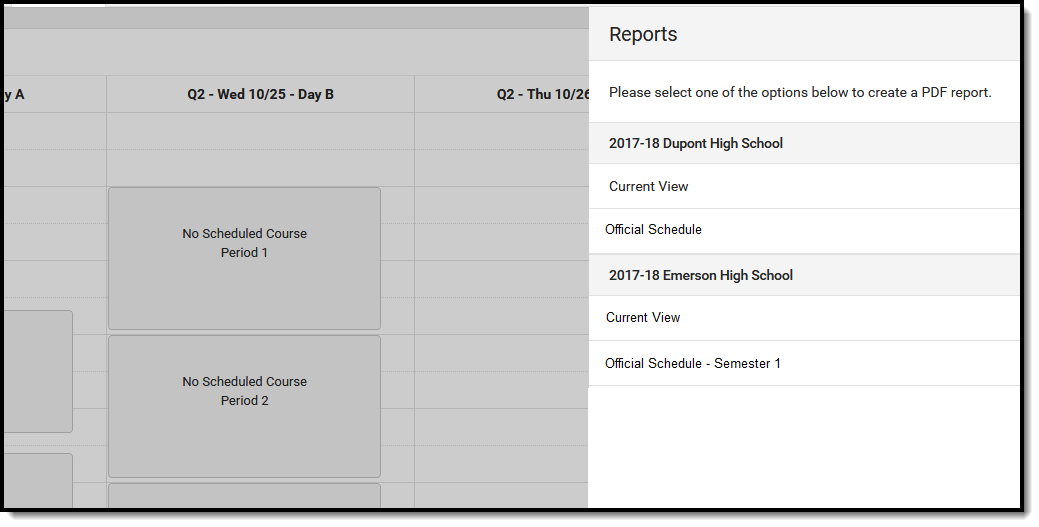
Print the student's schedule in any selected view by choosing the Print button at the bottom of the page.
- The Current View prints the student's schedule in the selected view (Day, Week, Agenda, Term).
- The All Terms view prints the courses on the student's schedule for all terms.
- The All Terms Course View prints all of the student's courses on one page.
- The Student Requests prints a list of the courses the student requested.
Reports print in PDF Format and include identifying information about the student (name, grade level and student number), which terms are included in the print, and the total unique number of courses into which the student is scheduled. Unique courses are defined by the course number; a student scheduled in two different sections of the same course (e.g., Study Hall with a Course Number of 123 but two different sections 123-1 and 123-2) counts as one course.
If a user has removed certain terms by modifying the Filter bar selections (for example, printing the schedule report for only Term 4), only those options selected in the Filter bar are included in the print.
 Print View of Default Schedule Report
A report can also be printed for Periods without Times Only and Periods with Time Only. If there are no periods without times in the Schedule, the Periods without Time Only print option does not display. These periods can be left without assigned times, or if there should be times assigned to these periods, modify the Period Schedule to add the correct period times.
Other reports that display here for printing are created using the Preferences Reports tool in System Administration. See the Schedule Report Preferences article for more information.
There could be several schedule reports listed, including those for other schools if the student has multiple enrollments. These display if the user has rights to the other calendars.
There are certain schedule setups that may not print correctly:
- In Week view, up to three skinny courses print for one day.
- In Day view, up to six skinny courses print for one day.
 Print Schedule Reports
Schedule Information in Ad hoc Query Wizard
Student Schedule information is available in the Query Wizard for Student data types. When building Student data type filters, the fields are available in the Learner > Schedule folder.
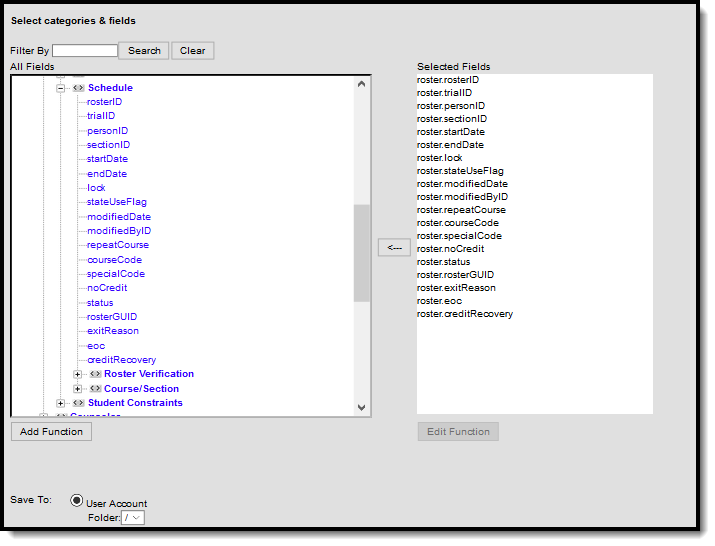 Student Schedule Ad hoc Fields
If you are creating filters that return schedule information, also include student identifiers (like last name and first name) and course identifiers (like course name).
For schools that have a more complex calendar setup, use the available filter views to report information. All of the fields available within a selected view should be chosen.
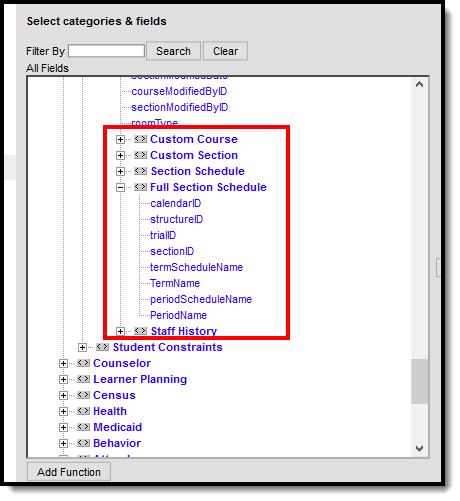 Other Scheduling Fields in Ad hoc