Tool Search: Health Medications
The Medications tool allows users the ability to store medication information for students. Saved medications will appear in the Medications editor where they can be viewed, modified, and/or deleted.
The Campus Medications tool is meant for inventory management. What is entered may differ from how the medication is prescribed and/or administered.
 Medications Tool
See the Medications Tool Rights article for information about rights needed to use this tool.
Enter a Student's Medication Information
The Medication Detail consists of two sets of information: Medication, Strength and Dosage Information and Prescription Information.
Medication, Strength and Dosage Information
The medication detail includes the name of the medication, strength, form, and dosage detail information.
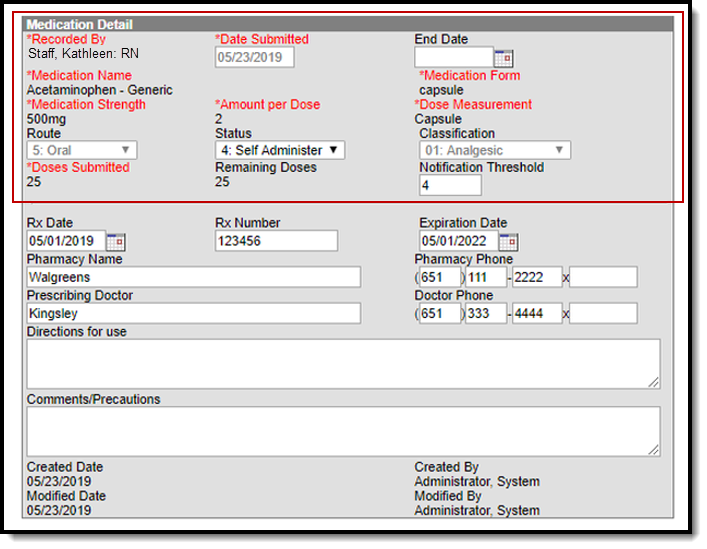 Medication Detail - Medication Entry
Medication Field Descriptions
Field |
Description |
|---|---|
Recorded By |
Selection indicates the staff person who entered the medication. The default setting is the current user if the current user has an active Health District Assignment. Only staff with an Active district assignment and a Health checkmark on their District Assignments tab display in the dropdown. If the staff person has a Health License designation on the District Assignment tool, this title also displays at the end of the person's name (i.e. Smith, Joe: RN).
|
Date Submitted |
Entered date (defaults to current date) indicates when the medication was given to the school. |
| End Date | The last date on which the medication is available for selection by health staff for a Health Office Visit. This field is not required. |
Medication Name |
Name of the medication that the student receives. Medication names must first be created in the Medication Name editor in System Administration > Health. |
Medication Form |
Format of the medication (cream, tablet, capsule, drops, etc.) Medication forms must first be created in the Medication Form editor in System Administration > Health. |
Medication Strength |
Strength of one unit of the medication. For example, one pill is 200 mg, so the Strength is entered as 200 mg even if the prescribed dosage is 800 mg. |
Amount per Dose |
Total number of the medication given to the student for one dosage. If the prescribed dosage is 800 mg and one pill is 200 mg, the student will be given 4 pills in a dose. The Amount per Dose is entered as 4. In a situation where the prescribed dosage can vary (give 400-800 mg as needed), the smallest Amount per Dose should be entered (2 pills in this example). |
Dose Measurement |
The unit(s) of the medication dose, associated with the Amount per Dose. For example, if the prescribed dosage is 800 mg and the medication comes in 200 mg pills, the Dose Measurement would be "pills". Other measurements could be ml, puffs, or drops, depending on the form of the medication. Medication Form and Dose Measurement are not always the same. For example, a liquid Medication Form could have a Dose Measurement in teaspoons (tsp). |
| Route | The route field is used to describe the route of administration for medication. Options available in this dropdown can be added or edited from the Attribute/Dictionary. This field remains editable until there is a value entered. Once a value is entered and saved, this field becomes read-only. |
| Status | The status field indicates the administration status or frequency of the medication. For example, a medication's status could be Daily, PRN, or Self-Administer. Options available in this dropdown can be added or edited from the Attribute/Dictionary. |
| Classification | The category of the medication. This is a read-only field and is set up in System Administration using the Medication Name tool. |
Doses Submitted |
Total number of doses submitted, which is not necessarily the total number of units in the medication container.
Doses Submitted can be calculated by dividing the count of pills in the bottle by the Amount per Dose. For example, if the prescribed dosage or Amount per Dose is 4 pills, a bottle containing 100 pills would be entered as 25 doses. 100 pills divided by 4 pills per dose= 25 doses submitted.
In the situation where a dosage can vary, the smallest Amount per Dose should be used to calculate the number of doses submitted. Using the above example with 200 mg pills, a prescribed dosage of 400-800 mg would be 2-4 pills. The Amount per Dose should be 2 pills, so a bottle containing 100 pills is 50 doses. If the student gets 800 mg at a visit, this is entered as 2 doses. |
Remaining Doses |
Number of remaining doses. This number is auto-calculated when the student receives a medication or if the medication count is reduced for some other reason, dropping by the number of doses given/reduced. The number is increased when a refill is entered. |
Notification Threshold |
If the medication is an ongoing treatment and will need to be resupplied as the quantity runs out, enter a value in the Notification Threshold that provides a sufficient cushion as to allow the parent or guardian to bring in additional doses.
When the number of doses remaining for the medication has been reached, the medication entry will turn red on the list editor as a visual alert to the health staff to notify the parent or guardian that more doses are needed. |
Enter Medication Information
- Click the New button at the top of the Medications tab. A Medication Detail editor will display.
- Indicate who is entering the medication record in the Recorded By dropdown list.
- The Date Submitted field will auto-populate with the current date. To change the date, enter the date in mmddyy format or click the calendar icon and select the date.
- Select an End Date for the medication, if applicable.
- Select the medication name from the Medication Name dropdown list.
- Select the medication form from the Medication Form dropdown list.
- Enter the Medication Strength amount.
- Enter the Amount Per Dose.
- Enter a Dose Measurement.
- Enter a Route.
- Select a Status.
- Enter the number of doses of medication provided to the school within the Doses Submitted field.
- If the medication is one that will need to be resupplied as the quantity runs out, enter a value in the Notification Threshold that provides a sufficient cushion as to allow the parent or guardian to bring in additional doses.
- Click Save when finished.
Prescription Information
The prescription details are entered after the details of the medication are entered.
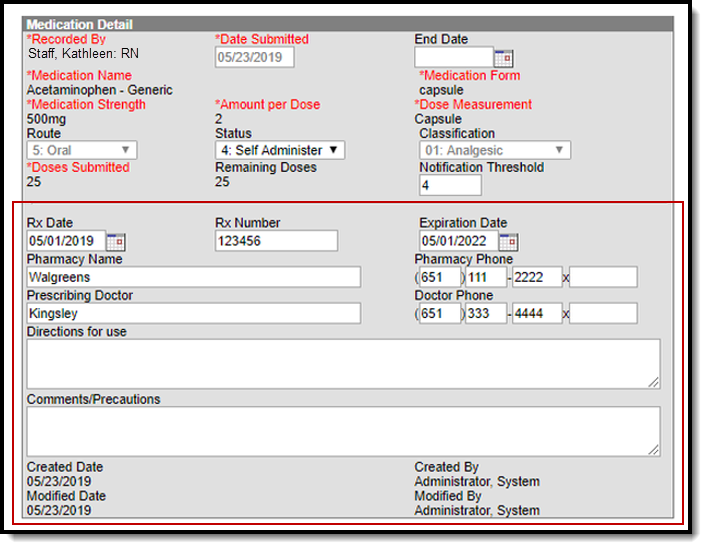 Medication Detail - Prescription Entry
Prescription Field Descriptions
Field |
Description |
|---|---|
Rx Date |
The date the prescription was assigned. This date defaults to the current date, but can be changed by entering the date in mmddyy format or by clicking the calendar icon to enter a new date. |
Rx Number |
Prescription number assigned usually by the filling pharmacy. |
Expiration Date |
Date the prescription expires, based on doctor information. |
Pharmacy Name |
Name of the pharmacy that filled the prescription or name of the pharmacist. |
Pharmacy Phone |
Phone number of the pharmacy. |
Prescribing Doctor |
Name of the doctor who prescribed the medication. |
Doctor Phone |
Phone number of the doctor or clinic. |
Directions for Use |
Instructions for giving the medication. These directions display when the medication is selected in a Health Office Visit |
Comments/Precautions |
Additional comments for the medication. |
Created Date/Created By |
Indicates when the medication entry was created and which user created it. |
Modified Date/Modified By |
Indicates the date the medication entry was modified and which user modified it. |
Enter Prescription Details
- Enter an Rx Date.
- Enter the Rx Number of the prescription.
- Enter an Expiration Date for the prescription.
- Enter the Pharmacy Name of the location where the prescription was filled.
- Enter the Pharmacy Phone number.
- Enter the name of the Prescribing Doctor.
- Enter the Doctor Phone number.
- Enter any needed Directions for use.
- Click Save when finished.
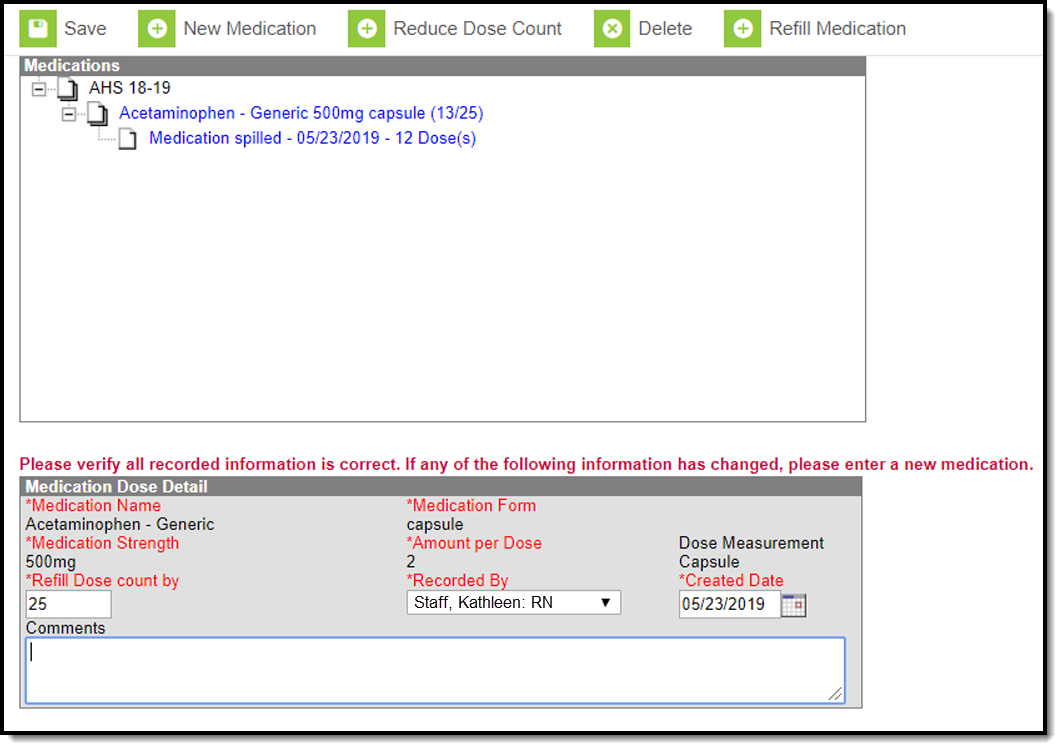
Reduce Medication Dose Count
Once a medication has been saved and appears within the Medications editor, a user can reduce the doses on hand by using the Reduce Dose tool. This tool should only be used when the dose count is reduced because of spillage, expiration, etc. When a dose is administered to a student, enter the reduction using the Health Office Visits tool.
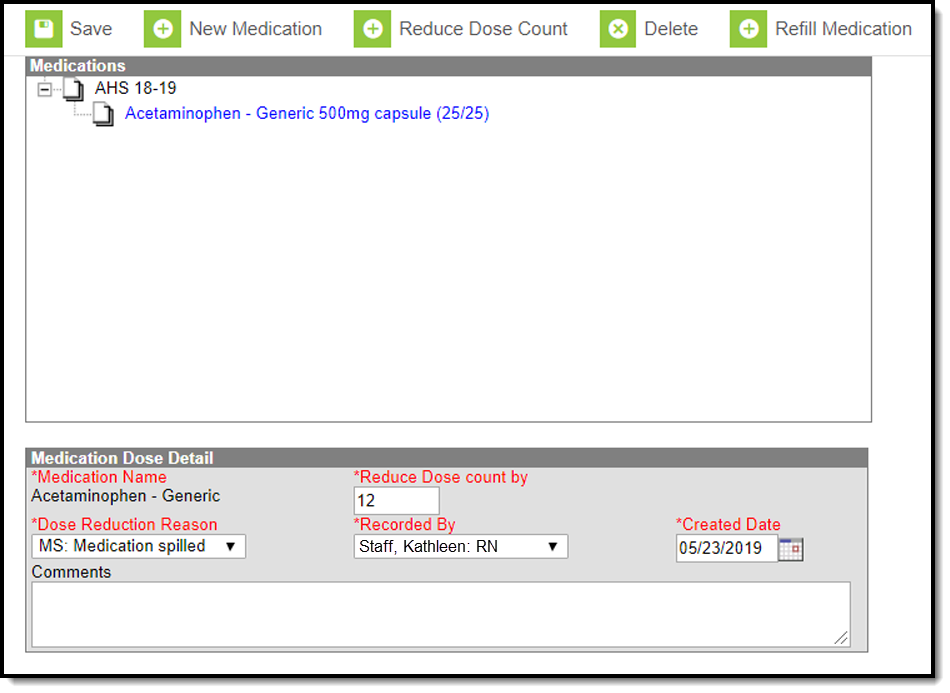 Reduce Dose Count Tool
- The reduction record displays when the Medication name is expanded in the Medications list. The total dose count will decrease for the medication by the number of reduction doses submitted. Select the Medication(s) to reduce.
- Click the Reduce Dose Count button. The Medication Dose Detail displays.
- Enter the Reduce Dose Count By value.
- Enter the Dose Reduction Reason from the dropdown. Options available in this dropdown can be added or edited from the Attribute/Dictionary.
- Select the staff person who recorded this entry in the Recorded By dropdown. Only staff with an Active district assignment and a Health checkmark on their District Assignments tab display in the dropdown.
If the staff person has a Health License designation on the District Assignment tool, this title also displays at the end of the person's name (i.e. Smith, Joe: RN).
- Enter the Date when the reduction occurred. This field defaults to the current date, but a different date can be entered.
- Click Save when finished. A warning message will display saying the refill information has been saved and to verify the Prescription Date and the Expiration Date are still accurate.
- Make any necessary comments within the Comments field.
- Click Save when finished. Changed dosage amounts will appear in the Medications editor and reflect the removed dosage from the overall amount of doses remaining.
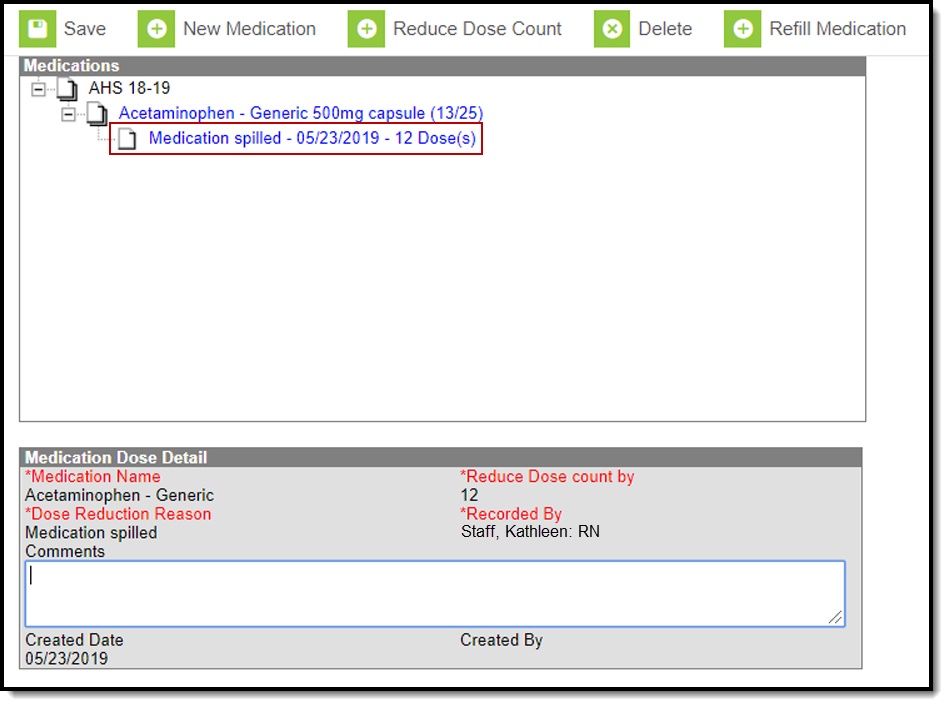 Reduced Medication Example
Refill Medications
When the health office has run out of a student's medication and the parent/guardian has given additional medicine for the same prescription, use the Refill Medication option. This allows the same medicine strength and dosage to be given to the student without having to enter a new medication.
 Refill Medication Tool
- Select the Medications to refill.
- Click the Refill Medication button. The Medication Dose Detail displays.
- Enter the Refill Dose Count By value.
- Select the staff person who recorded this entry in the Recorded By dropdown. Only staff with an Active district assignment and a Health checkmark on their District Assignments tab display in the dropdown.
If the staff person has a Health License designation on the District Assignment tool, this title also displays at the end of the person's name (i.e. Smith, Joe: RN).
- Enter the Date when the refill was given to the Health Office. This field defaults to the current date, but a different date can be entered.
- Click Save when finished. A warning message displays saying the refill information has been saved and to verify the Prescription date and the Expiration Date are still accurate.
The refill record displays when the Medication name is expanded in the Medications list. The total dose count will increase for the medication by the number of refill doses submitted.
Any appointment scheduled with the initial medication dosage will reflect the refill value.
 Medication Refill Example
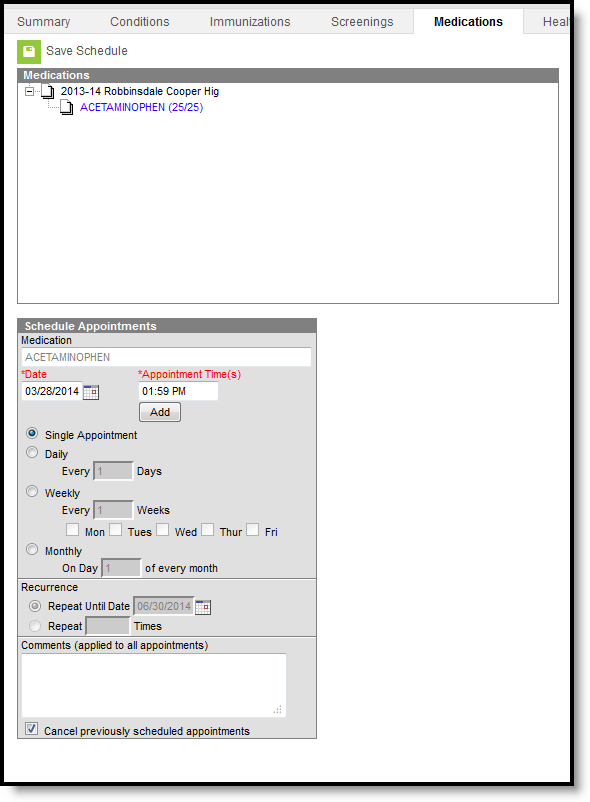
Schedule Medication Appointments
Users can also schedule appointments for administering medication. From here, users can set up daily, weekly or monthly appointments for a student to receive their medication(s).
Users must have calendar rights to the calendar selected to schedule Health Office appointments.
 Schedule Medication Appointments
Schedule a Health Office Appointment
- Select a Medication from the Medications editor.
- Select Schedule Appointments.
- The Date field will auto-populate with the current date. If this is incorrect, enter the correct date in mmddyy format or click the calendar icon and select the date.
- Enter the Appointment Time and click the Add button to attach the appointment time to the date. To add multiple appointment times to a scheduled appointment, enter in the appointment time and press the Add button. Users may also delete specific appointment times by selecting the black X located to the right of the appointment time(s).
- Select the occurrence of the Scheduled Appointment (i.e., single appointment, daily, weekly, monthly).
- Place an end date on the recurring appointment by selecting the Repeat Until Date radio button and entering the date in mmddyy format or by using the calendar icon and selecting the date.
- To limit the number of times the appointment should occur, select the Repeat Times radio button and enter the desired number.
- Enter any additional information within the Comments field.
- Select the Save Schedule button when finished.
The Health Office Visit Scheduler displays a warning message when users schedule appointments that fall on a non-instructional and non-attendance day if the scheduling frequency is Weekly or Monthly. The warning message allows users to view the date(s) of the appointment(s) that could not be scheduled.
Users cannot create medication appointments that extend past the End Date of the Medication. See the Medication Field Descriptions section above for additional information about the Medication End Date field.
Cancel a Health Office Appointment
- Select the treatment in blue within the Medications window.
- Select Cancel Future Appointments near the top of the Medications tab. This will cancel all future appointments linked to this medication. Future appointments are unsaved appointments on the cancel date and later. Previously scheduled appointments can also be canceled by selecting the checkbox at the bottom of the Schedule Appointments editor when creating new appointments.
- Enter the date in mmddyy format or by clicking the calendar icon and selecting the date.
- Select the Save icon when finished. This will cancel all unsaved appointments scheduled on or following the date entered.
Future appointments are not automatically cancelled when a student’s enrollment ends.
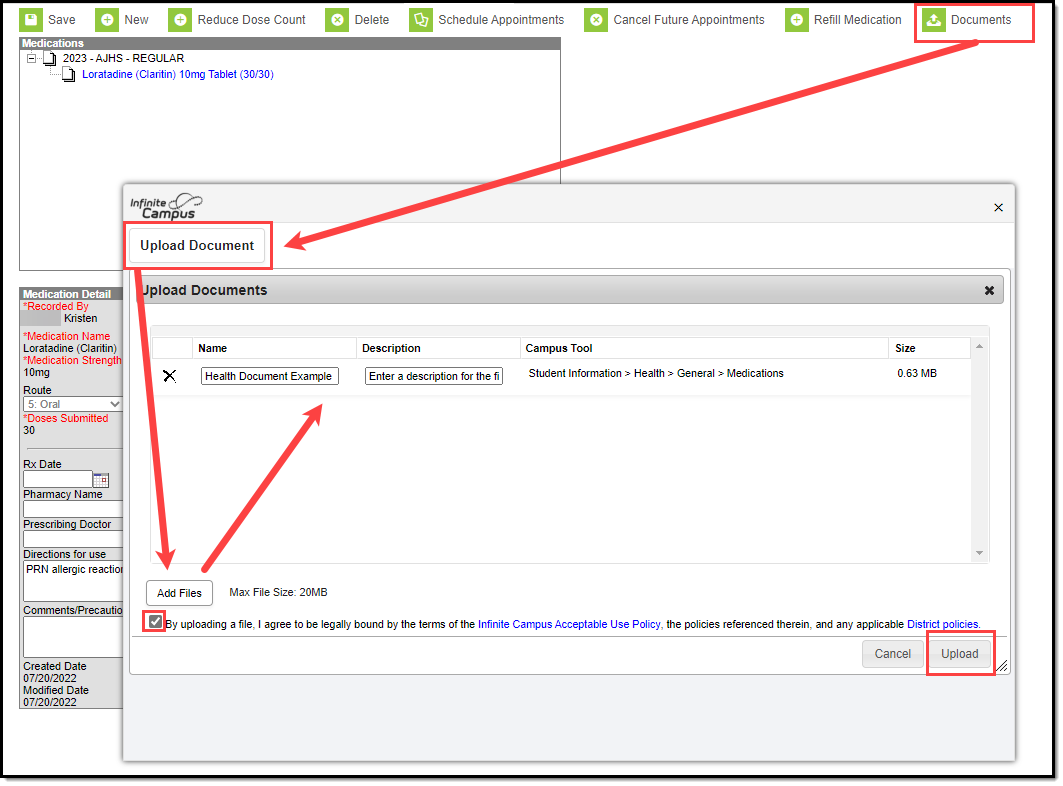
Upload and Manage Medication Documents
The Medications tool allows you to store, manage, and view all medication-related documents associated with the selected person.
To upload a new condition document(s):
- Click the Documents button. A separate window will appear, containing an Upload Document button and the Documents List.
- To begin uploading a new document, click the Upload Document button and select Add Files.
- Locate the file on your local hard drive or network and click OK.
- The file will appear in the Upload Documents list. From here you can add a Description (optional), see what tool will be associated with the file, and the size of the file.
- Mark the checkbox in the left-hand corner to agree to the terms of the Infinite Campus Acceptable Use Policy (as well as any district-mandated policies).
- Click Upload. The file is now uploaded and attached to the student where it can be accessed at any time.
 Upload Documents
Delete or Edit an Existing File
If you need to delete the file, click the next to the file needing deletion.
If you need to edit file details, click the  icon next to the file. The Edit Document editor will appear, allowing you to edit the file name, description, or replace the file.
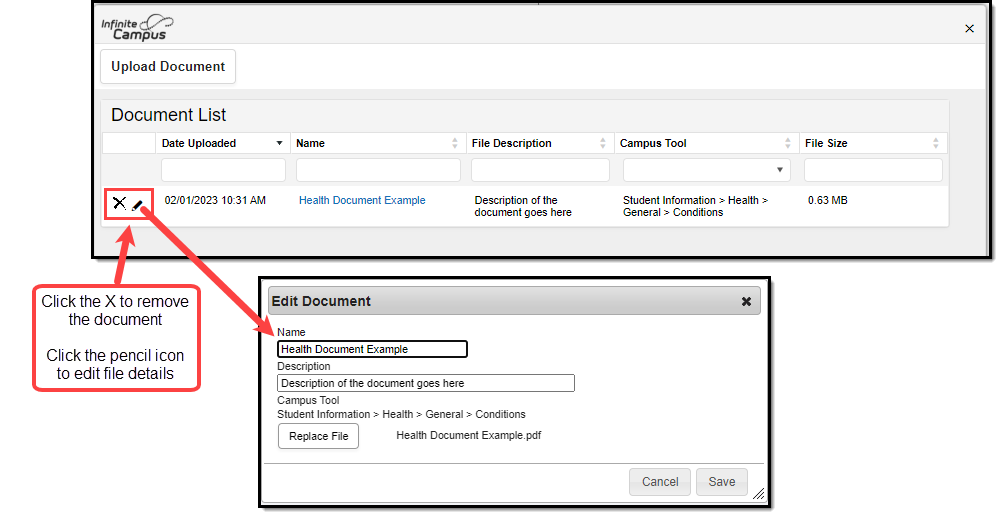 Edit Document
