The Census module tracks every person, household and address entry in Infinite Campus. There are times when this data needs to be updated due to change in family relationships, address changes and name changes.
Individual Updates
Update Demographic & Contact Information
Personal contact information can be updated on the Demographics tab. Upon saving, the contact information will be updated throughout Campus.
Tool Search: Demographics
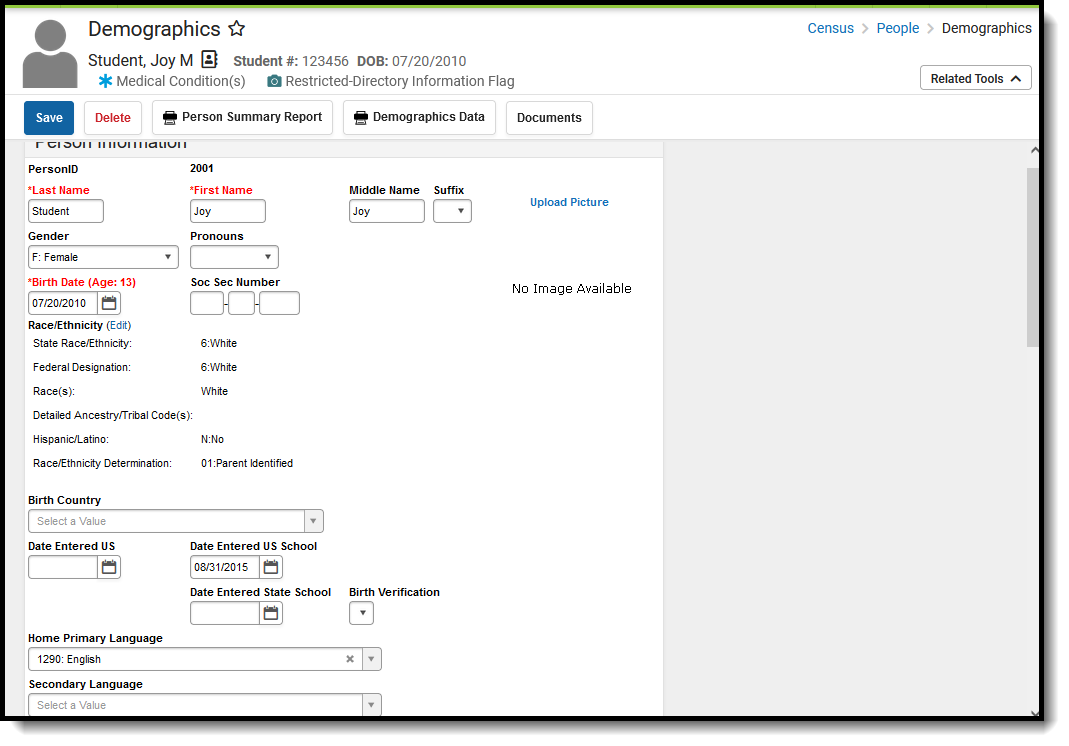
The Demographics tool lists the individual's general person information within the Campus system. All people for whom data is tracked, including students, staff, parents/guardians, household members, etc., have a Demographics record that includes the following information:
- Person Information(standard)
- Person Identifiers (standard)
- Personal Contact Information(standard)
- District Defined Elements (localized / may not display)
State Edition Users
Multiple districts may have the same person in their Census data, but with differing information. All data will sync to the state, but the record that displays in State Edition on the Demographics tool will be from the district that "owns" the person's current identity.
Changes to a person’s Demographics record may erase historical information. When changes to a person's name, Social Security number, gender or birth date are necessary, create a new Identities record rather than updating information on this tool. Deleting a Demographics record is not recommended.
See the Demographics Tool Rights article for information about rights needed to use this tool.
Person Information
The Person Information editor provides basic information about the person being viewed. Users can view a person's relevant background/identification data.
Fields on this editor are often used in state reporting and other areas of the Campus application. For example, pictures uploaded in this editor can be displayed in other modules (Grade Book, POS).
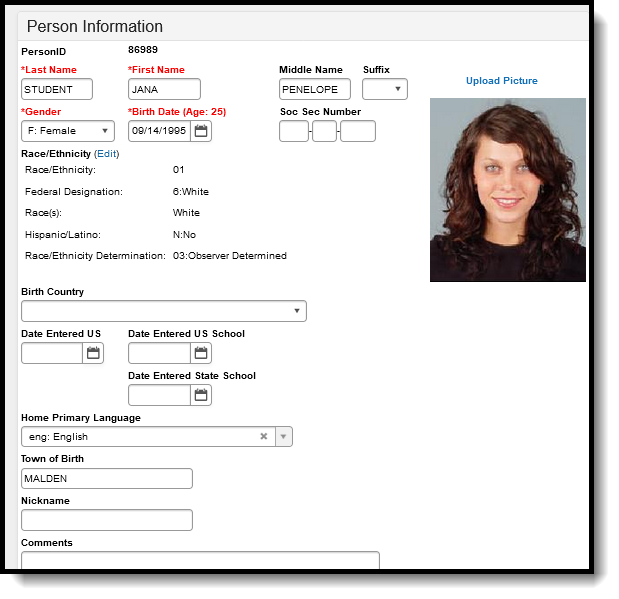 Demographics - Person Information
When entering Information in the Last Name, First Name or Middle Name fields, double quotation marks and parentheses are NOT allowed.
|
Data Element |
Definition |
Ad hoc Field Name |
|---|---|---|
|
Last Name |
The individual's last name.
|
individual.lastName individual.legalLastName student.lastName student.legalLastName |
|
First Name |
The individual's first name. |
individual.firstName individual.legalFirstName student.firstName student.legalFirstName |
|
Middle Name |
The individual's middle name. |
individual.middleName student.middleName |
|
Suffix |
The generational assignment as part of his/her name (i.e., Jr, III) by which the person is referred. |
individual.suffix individual.legalSuffix student.suffix student.legalSuffix |
|
Gender |
The indication of whether an individual is male, female or other (non-male, non-female). Other Gender is only included when a state has chosen to include additional gender option(s). |
individual.gender individual.legalGender student.gender individual.legalGender |
|
Birth Date |
Person's date of birth.
Access to see this information for staff is controlled by a tool right. See the Tool Rights section for more information. |
individual.birthDate student.birthDate |
|
Social Security Number |
Social Security Number (SSN) assigned to the person. Please see additional information on Social Security Number Tool Rights. |
individual.ssn student.ssn |
|
Race/Ethnicity |
Person's/ethnicity determination. Please see additional information on the Race/Ethnicity Wizard. |
individual.raceEthnicity student.raceEthnicity
Other race/ethnicity fields are available. Any race sub categories that may be used by the state are also available.
|
|
Birth Country |
Country in which person was born. |
individual.birthCountry student.birthCountry |
|
Date Entered US |
Date the person entered the United States.
The entered date must be on or before the current date; future dates cannot be entered. |
ident.dateEnteredUS This field is in the Identity History folder. |
|
Date Entered US School |
Date the person began attending school in the United States. |
ident.dateEnteredUSSchool This field is in the Identity History folder. |
|
Birth Verification |
Indicates the legal document used to verify person's birth. |
ident.birthVerification The code assigned to the selected verification type reports. This field is in the Identity History folder. |
| Home Primary Language | The name of the specific language the individual uses to communicate at home. |
individual.homePrimaryLanguage student.homePrimaryLanguage |
| Secondary Language |
The name of another language the individual uses to communicate at home. This field may not be available for all districts. |
individual.langugeAlt student.languageAlt |
| Other Spoken Languages - Q7
(New Mexico Only) |
Records any languages submitted on question 7 of the Language Use Survey. |
|
|
Nickname |
Nickname preferred by person. This field may not display for all states. |
individual.alias student.alias |
|
Comments |
Additional comments about the person. |
ident.comments |
|
Upload Picture
|
When selected, users can browse to a saved file where this student's picture is stored. The picture is viewable in other parts of Campus - Seating Charts, Point of Sale Terminals, etc. Use the Photo Import tool to upload pictures for multiple students. |
N/A |
Protected Identity Information is available on the Identities tool.
Person Identifiers
The Person Identifiers editor contains unique person identifying information. The fields in this editor are used to identify a person throughout the Campus system - for state reporting purposes, person searches, person records, etc.
For settings related to the generation and format of identification numbers, please see the Student Number Formats, System Preference (District) and System Preferences (State) articles.
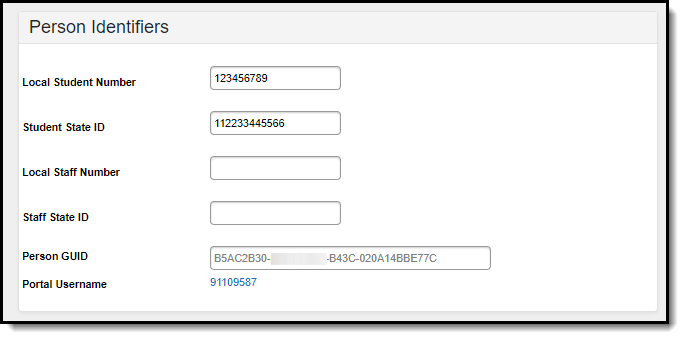 Person Identifiers
|
Data Element |
Definition |
Ad hoc Field Names |
|---|---|---|
|
Local Student Number |
Student's district identification number, used within school/district. Tool rights (noted above) are necessary to modify the student number. |
student.studentNumber individual.studentNumber |
|
NASIS ID |
Student's NASIS identification number, as assigned by the Bureau of Indian Education (BIE). This field only appears to BIE users. |
student.otherID individual.otherID |
|
Generate Number / Generate Number (System Preference Disabled) |
Mark this checkbox to generate a Local Student Number. If the Local Student Number is filled, the 'Generate Number' checkbox will not appear. This checkbox may not display or may not be usable, depending on the settings of the Student Number Format tool. |
student.studentNumber individual.studentNumber |
| Student State ID |
Student's identification number, as assigned by the state Department of Education.
Tool rights are needed to see this value. When no tool rights are assigned, NO ACCESS displays in the field. Generation of this field may depend on district/state System Preferences. Massachusetts Users Only: This field may be updated with the SASID received via SIF from the State as specified in the SIF StudentPersonalRefID. Tool rights (noted above) are necessary to view the State ID. |
student.stateID
|
|
Local Staff Number |
Staff member's district identification number, used within school/district. Tool rights (noted above) are necessary to modify the staff number. |
individual.staffNumber |
|
Staff State ID |
Staff member's identification number, as assigned by the state Department of Education.
Tool rights are needed to see this value. When no tool rights are assigned, NO ACCESS displays in the field. Generation of this field may depend on district/state System Preferences. Tool rights (noted above) are necessary to view the State ID. |
individual.staffStateID |
| MCI Number | Indicates the Master Client Index (MCI) Number, a health-associated ID that ties individuals to their health information.
This field displays for Delaware users only. |
|
|
Person GUID |
Unique identifier assigned to each person entered into Infinite Campus. This is a database identifier field and cannot be modified.
Tool rights (noted above) are necessary to view the GUID. |
student,personGUID individual.personGUID |
| Portal Username |
Indicates the person's Campus Portal username.
For users with proper tool rights to the User Account tool or who have an SIS Product Security role, the displayed Portal Username becomes a hyperlink that when selected, redirects you to the user's User Account.
|
usage.username |
|
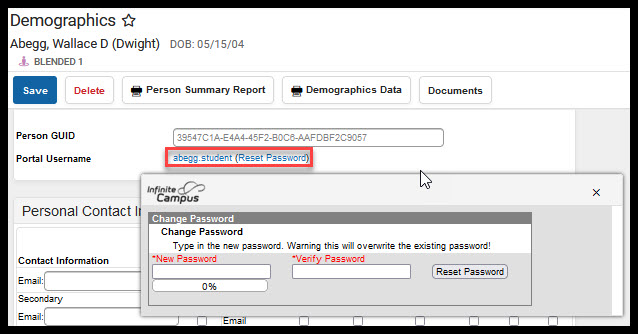
Staff members who have proper calendar rights and the 'Reset Portal Password' sub-right assigned have the ability to reset a parent or student's account by selecting a Reset Password hyperlink found to the right of the Portal Username.
Once selected, create a new password for the person. Create a new password and then inform this person of their new password. Using the password you provided, the next time this person logs into Infinite Campus they are forced to create a new account password for themselves.  When this option does not display for users who do not have proper calendar rights (rights to the calendar the student is actively enrolled in) and the 'Reset Portal Password' sub-right assigned (see below). When this option does not display for users who do not have proper calendar rights (rights to the calendar the student is actively enrolled in) and the 'Reset Portal Password' sub-right assigned (see below). | ||
| Ed-Fi ID |
A unique identifier used to tie the person's records within Campus to their Ed-Fi record within the Ed-Fi system. See the Enter an Ed-Fi ID article for more information.
This field and its functionality is not available for all Campus users.
|
student.edFiID individual.edFiID |
Update Former Student to Staff Member
When a former student becomes a staff member within the school district, update the Person Identifiers.
- Search for the person.
- In the Person Identifiers editor, remove the Local Student Number. The Student State ID number remains.
- Enter a Local Staff Number for the individual.
- For states using Ed-Fi, click the Get Ed-FI ID in the Staff State ID field for the individual.
- Click Save.
 Person Identifiers
 -
When the Date of Birth and Race/Ethnicity elements are not being reported by a district for staff, navigate to the Identities record and edit/remove the information entered in the Date of Birth and Race/Ethnicity fields that were entered when the individual was a student.
Personal Contact Information
The Personal Contact Information editor contains phone numbers, messaging preferences and the language preferred for receiving messages. Voice preferences only display when the district is using Campus Messenger with Voice.
In order for contacts to receive Emergency messages, they must have the Emergency checkbox marked on the phones designated to receive these calls.
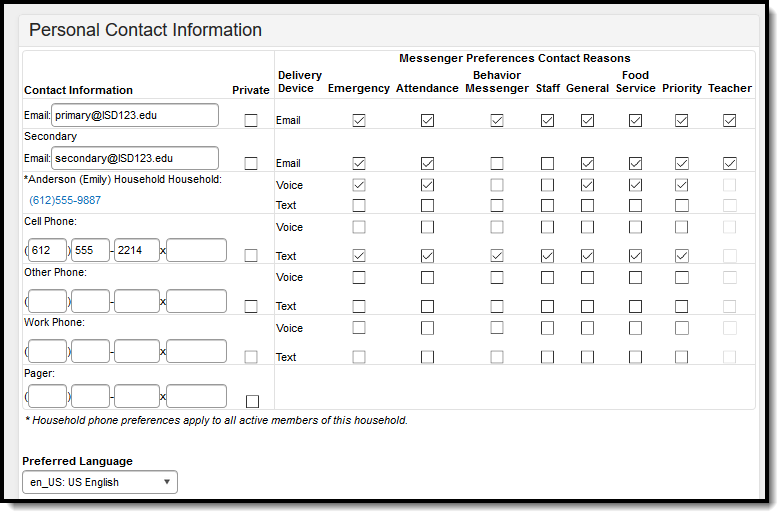 Personal Contact Information
|
Data Element |
Definition |
Ad hoc Field Names |
|---|---|---|
|
Email/Secondary Email
|
Lists the person's email addresses. The primary Email address displays in the following areas:
The Secondary Email address does NOT display in these areas, but is included on the Person Summary Report. |
pcontact.email pcontact.emailMessenger |
|
Cell Phone |
The person's cell phone number. |
pcontact.cellPhone |
|
Other Phone |
Additional phone number (not applicable to the Cell Phone, Work Phone or Pager fields). |
pcontact.homePhone contacts.homePhone |
|
Private |
When the Private checkbox is marked, indicates the details should be kept within school settings. See the Private Checkbox Information section for more details. Marking this checkbox does not have any effect on any Messenger settings. |
pcontact.homePhonePrivate pcontact.workPhonePrivate pcontact.cellPhonePrivate pcontact.emailPrivate pcontact.secondaryEmailPrivate |
|
Work Phone |
The person's work phone number. |
pcontact.workPhone |
|
Pager |
The person's pager number. |
pcontact.pager |
|
Preferred Language |
Indicates the language in which the person prefers to be contacted. This field is used in Messenger tools and in letter wizards (Attendance Letters, Behavior Letters, POS Letters, Account Letters, Letter Designer) sent in languages other than English. Languages can be added in the Attribute/Dictionary. |
pcontact.communication Language |
|
Comments |
Details related to the person's contact information. |
pcontact.comments |
Messenger Preference Contact Reasons
| Data Element | Definition |
|---|---|
| Delivery Device | The device for which message preferences are being set: email, voice or text. |
| Emergency | Indicates Emergency messages should be sent to the delivery device. |
| Attendance | Indicates Attendance messages should be sent to the delivery device. Attendance messages notify guardians when students are absent or tardy from class. |
| Behavior Messenger |
Indicates Behavior messages should be sent to the delivery device. Behavior messages notify guardians when a student is involved in a behavior incident. |
| Staff |
This column only displays when the person has a District Assignment or District Employment record.
For users who have a District Assignment record and are also parents of students enrolled in the district, the Staff checkbox will be displayed on the Contact Preferences list as well. This checkbox does not indicate a staff person receives Staff Messenger-related messages.
The staff contact preference checkbox, when marked, allows:
|
| General |
Indicates that messages marked as General Notification and sent from the Scheduling Messenger, Behavior Messenger, Staff Messenger, Survey Messenger or Message Builder should be sent to the delivery device. School Choice Messenger also uses this option. |
| Food Service | Indicates POS Account Messenger messages should be sent to to the delivery device. POS Account Messenger messages notify guardians of current account balances and when food service accounts have low or negative balances. |
| Priority |
Indicates that messages marked as Priority Notification and sent from the Staff Messenger, Survey Messenger or Message Builder should be sent to the delivery device. |
| Teacher | Indicates that messages sent from any of the Instruction Messenger tools (Grades Messages, Missing Assignment Messages, Class Messages, Failing Assignment Scheduler and Missing Assignment Scheduler) should be sent to the delivery device. When given rights by the district or school, teachers can send messages to guardians regarding failing grades and missing assignments. They can also send general announcements.
Users must have this checkbox to receive Process Alerts. |
The section below shows a representation of the marked checkboxes for an individual when included in a Filter Designer.
When these checkboxes are marked, that information is stored as bit values in the database, and each one has a different value. These values are also displayed in the Filter Designer. When multiple checkboxes are marked for one person, a total value is calculated, as well as a Binary Total.
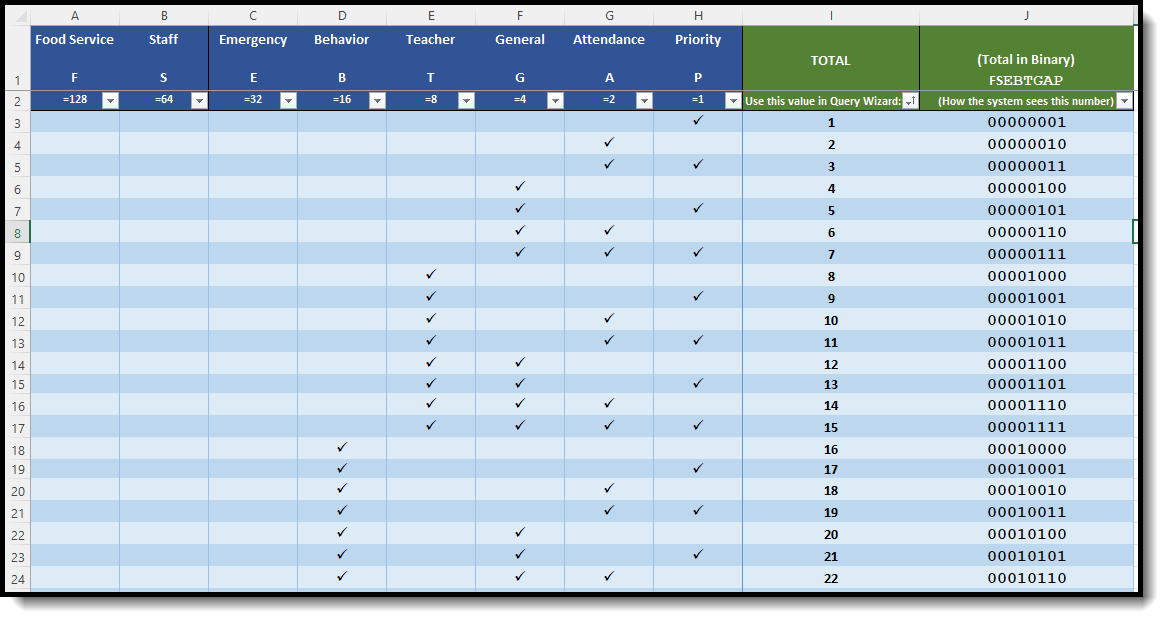 Messenger Contact Preferences - Binary Values Totals from the Filter Designer
The combination of checkboxes a user has marked totals up to a single number value. That number value, when written out in binary, becomes a visual showing which of 8 checkboxes are checked, with '1' meaning marked and '0' meaning not marked. (Note the Staff checkbox only displays in the UI for people who are staff members.)
The Ad hoc fields can be selected here:
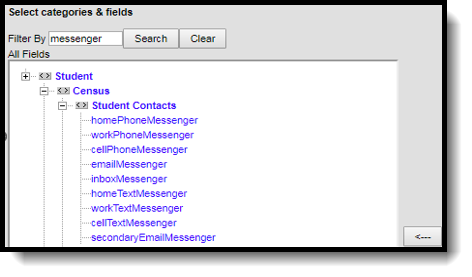 Messenger Contact Preferences Ad hoc Fields
Establish Messenger Preferences
Messenger preferences are used to designate which email and/or phone numbers should be used to contact people associated with Campus (i.e., guardians, students, staff).
Any person who has a relationship with a student can be designated as a messenger contact for that student, as long as the Messenger checkbox is marked for that relationship on the Relationships tool. All voice, email, text and survey messages sent from the system generate a Process Alert (for staff members only) or Portal Inbox (for parents and/or students with Portal accounts) message to the recipient, regardless of the preferences set in this area.
The messenger preferences can be established and/or updated through one of the following methods:
- Batch setting/updating preferences for all contacts through the Contact Preferences Batch tool - System administrators can set preferences for all messenger contacts en masse.
- Manual setting/updating of preferences for individual contacts on the Demographics tool - Users with rights to the Demographics tool can modify messenger preferences of individual contacts.
- Guardian and/or student contacts set/update their own preferences in the Campus Portal - Messenger contacts with Portal accounts can set/update their own preferences for receiving messages, when the school allows them to do so. This ability is granted to Portal users only when the Contact Information checkbox is marked in the Portal Options .
- Staff contacts set/update their own preferences throughMy Data (My Demographics) - Staff members can request modifications to their contact information, including phone numbers/email address and messenger contact preferences.
When a selection is made for a particular contact type in the Messenger Preferences area, the contact receives a phone call/email/text for the specific type of message, when applicable. When the message applies to students, the contact receives one message per student to which he/she has a messenger relationship (as indicated by the Messenger checkbox on the Relationships tool). Any phone number/email address that is marked to receive a message receives one message per applicable student.
Campus Messenger with Voice Preferences
Each type of phone message listed (i.e., Emergency, Attendance, Behavior, General, Priority and Teacher) can be assigned to a listed contact phone number (i.e., Household, Other Phone, Work Phone, Cell Phone). When more than one phone number is indicated for the same type of message (e.g., the Work Phone, Cell Phone and Household Phone numbers are marked to receive High Priority messages), multiple calls are made. This means that a person marked as a messenger contact for more than one student may receive the same message multiple times on multiple phone numbers.
Emergency Voice Messages
The Emergency Messenger dials all contact phone numbers marked to receive Emergency messages.
When no phone numbers are marked for communication, emergency voice messages are not be delivered to the contact.
When an emergency message is sent from the district, only one message is delivered to a phone number, regardless of how many students are assigned to the messenger contact. Redials are attempted as set on the Voice Settings tool (System Administration > Messenger > Messenger Preferences > Voice Settings).
When the emergency message is sent for more than one school (rather than as one message from the district level), a contact may receive multiple messages, when that messenger contact has been assigned to more than one student.
Text Messaging Preferences
The Text checkbox only appears in districts that use both the Text Messaging and Voice Messaging add-on features.
The Text Delivery Devices checkbox allows text messaging as a contact method for household, other phone, cell and/or work phone numbers.
Emergency Text Messages
Emergency Messenger text messages are only delivered to a recipient as a final attempt at contact. They are ONLY sent when all initial emergency phone calls and the scheduled number of redials have been attempted for the number without receipt confirmation from the recipient. Should the recipient confirm receipt of the message (by pressing "0" after listening), all text messages scheduled for delivery to any non-shared phone numbers for the recipients are canceled. Additional phone calls and/or redials to non-shared phone numbers are also canceled. Shared phone numbers must be confirmed separately to cancel additional calls to the number. However, shared Text numbers are not canceled.
District Defined Elements
This editor may not display to all users.
When displayed, the District Defined Elements editor contains district-localized fields. (Screenshot for example purposes only)
 District Defined Elements
Modification Alerts
The Demographics tool contains sensitive information related to a person’s basic identifying information. Because of this, specific tool rights have been added to control which staff person has the ability to see those data-sensitive fields. In addition to user security rights, a notification is available that indicates which user modified which information about a person (student, staff or other person).
Changes to a person’s Demographics record may erase historical information. When changes to a person's name, Social Security Number, gender or birth date are necessary, create a new Identities record rather than updating information on this tool. Deleting a Demographics record is not recommended - it may delete the person.
When demographic data is modified, a record of the change is available at the bottom of the Person Information editor and the Personal Contact Information area. This change alert displays the user who made the modification, the date of the modification and the time.
 Demographic Modification Notice
Report Options
The Print icons, located in the action bar, allow a user to generate a report for the currently viewed person by choosing either the Person Summary print icon or the Demographic Data print icon. Both of these reports can be printed in either PDF format or DOCX format.
Person Summary Report
The Person Summary report includes household, address and relationship information, and contact information. To not print the individual's preferred gender, remove the selection of the Display Gender Identity on Report checkbox. Gender Identity reports from the Gender field on the Identities record (not the the Legal Gender field in the Protected Identity Information section).
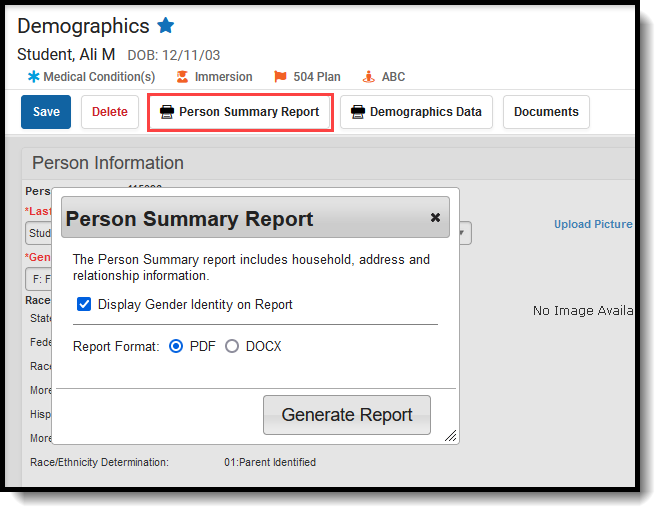 Person Summary Report
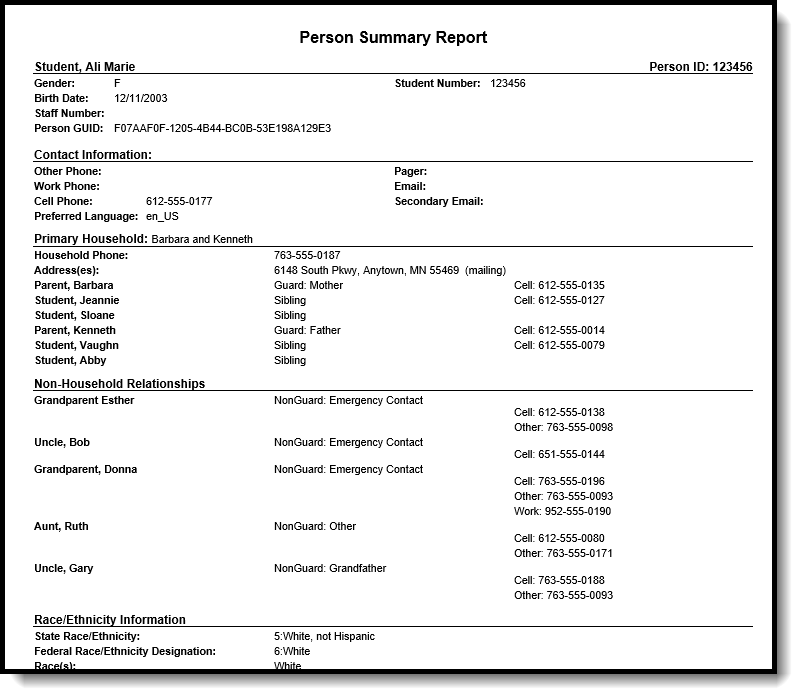 Person Summary Report (includes Gender Identity) - PDF Format
Demographics Data
The Demographics Data report includes all information stored on the Demographics tool, including contact phone numbers/email/ secondary email, Messenger contact preferences and preferred contact language. To not print the individual's preferred gender, remove the selection of the Display Gender Identity on Report checkbox. Gender Identity reports from the Gender field on the Identities record (not the the Legal Gender field in the Protected Identity Information section).
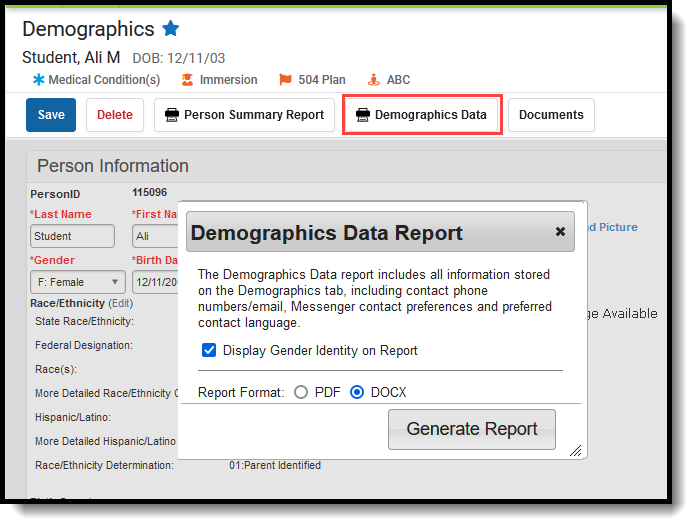 Demographics Data Report
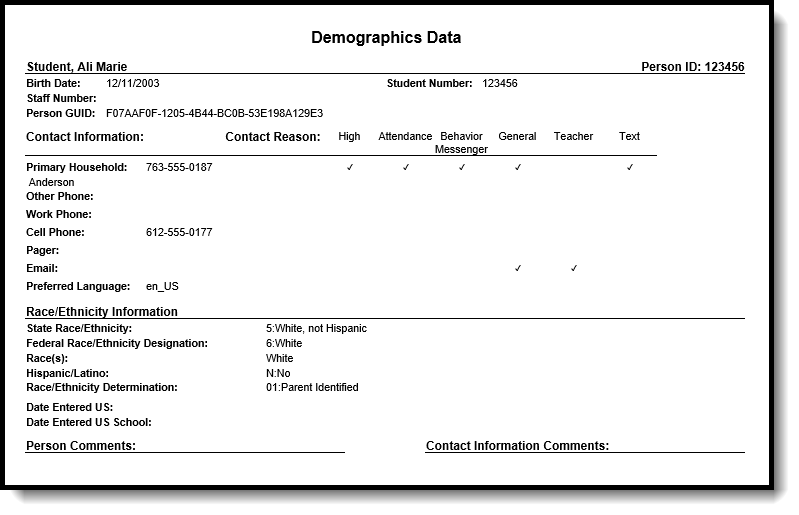 Demographics Data Report (no Gender Identity) - PDF Format
Active Address information is based on the End Date entered on the address. This end date is inclusive of the last day. For example, when the address is ended for a household as of September 19, that address is considered active until the next day (September 20), at which point the new address is active and prints on reports and displays on the Summary page.
Manage Documents
To view documents, click the Documents button on the action bar. Users with the appropriate tool rights may also complete the following tasks.
- Upload Documents
- Delete Documents
- Replace Documents
- Edit a Document Name or File Description
- Download Documents
Additional Demographics Information
Demographics Information in Ad hoc Query Wizard
Demographics information is available in the Query Wizard for Student Data Type filters and Census/Staff filters. Fields can be selected from the following folders:
- Student > Demographics
- Person > Demographics
Additional fields are also available in the Student > Demographics > Identity History and Person > Demographics > Identity History folders.
Fields available on Demographics are noted in the table of field definitions below.
Notice that when creating a Census filter, the field names begin with individual; when creating a Student filter, the field names begin with student. Fields from the Identify History folder begin with ident.
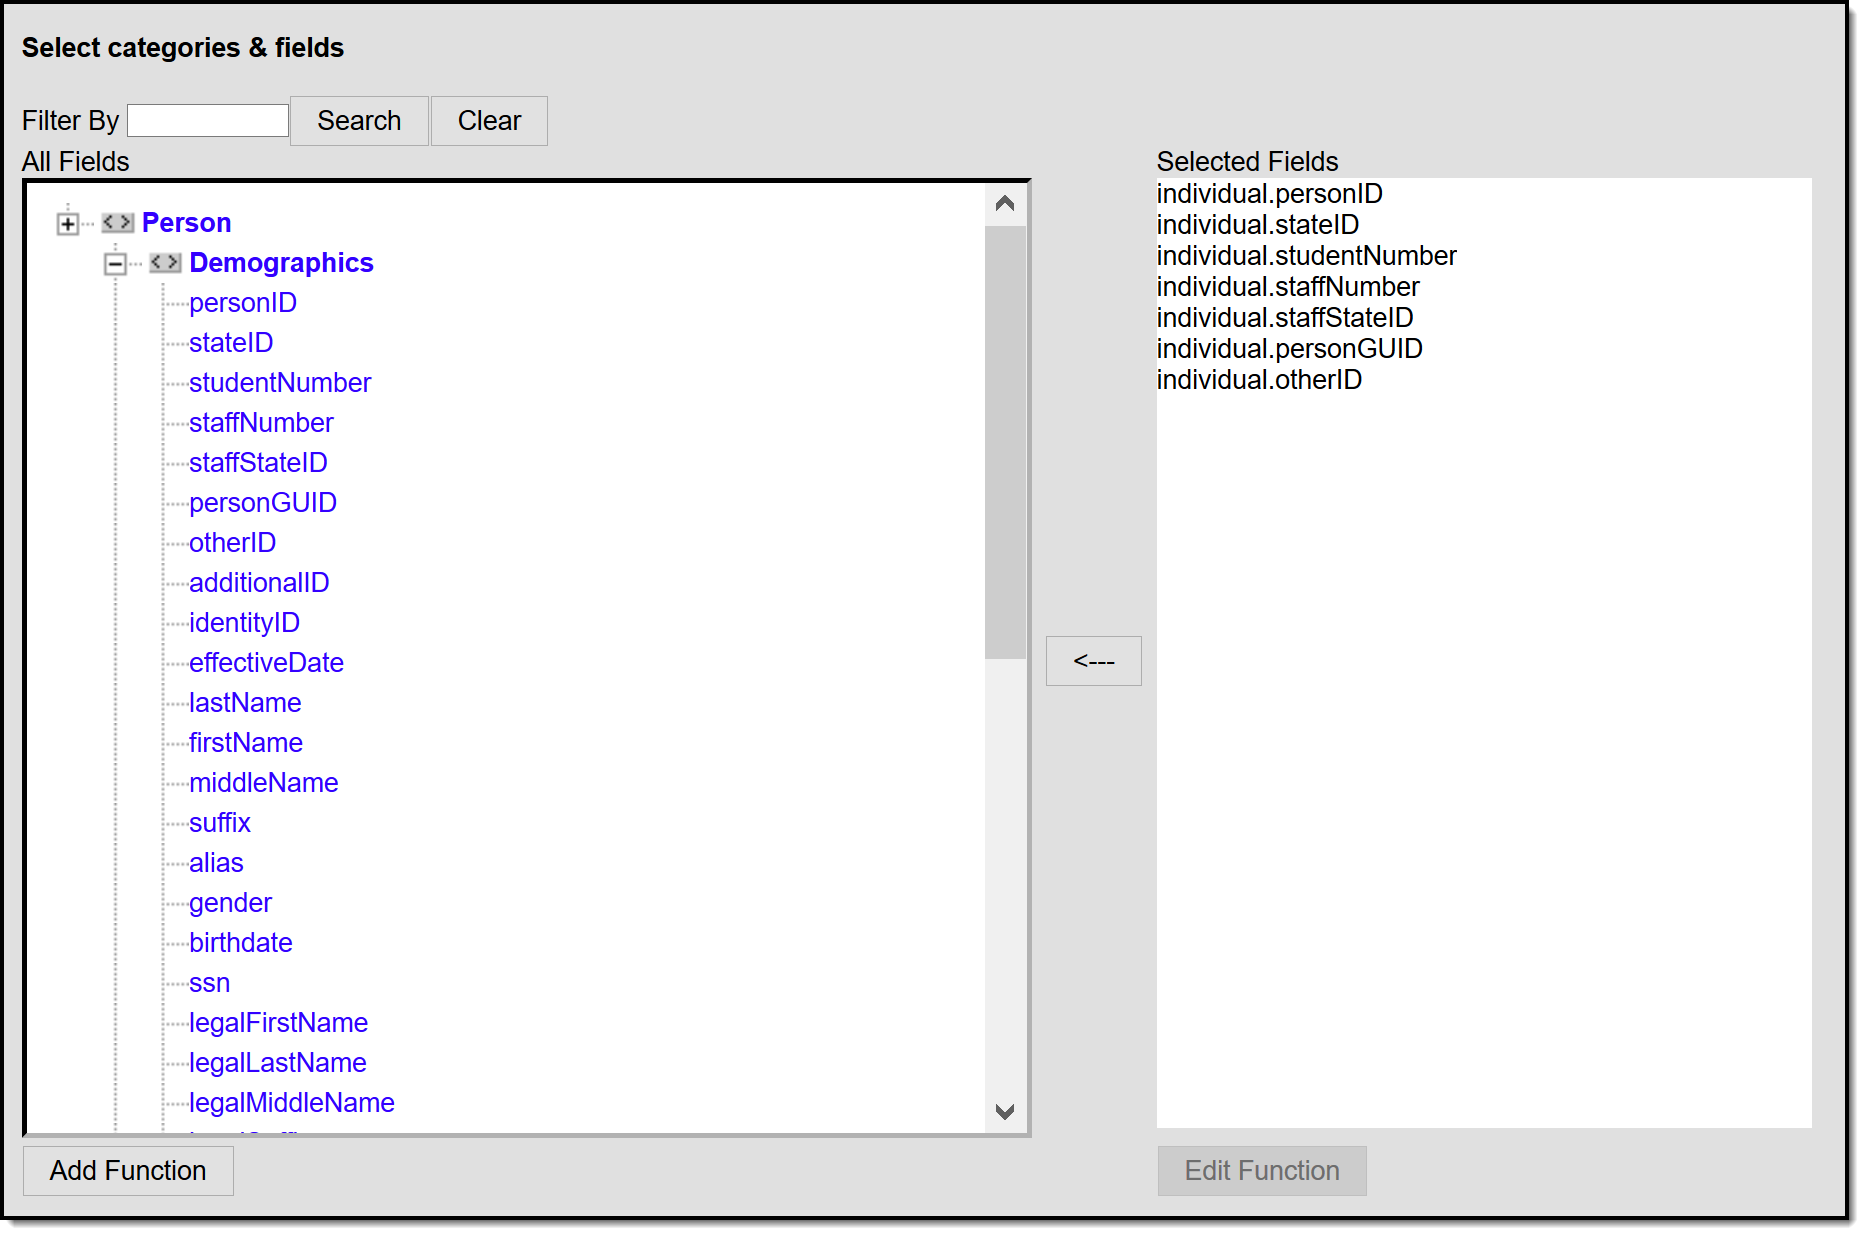 Census/Staff Demographic Ad hoc Fields
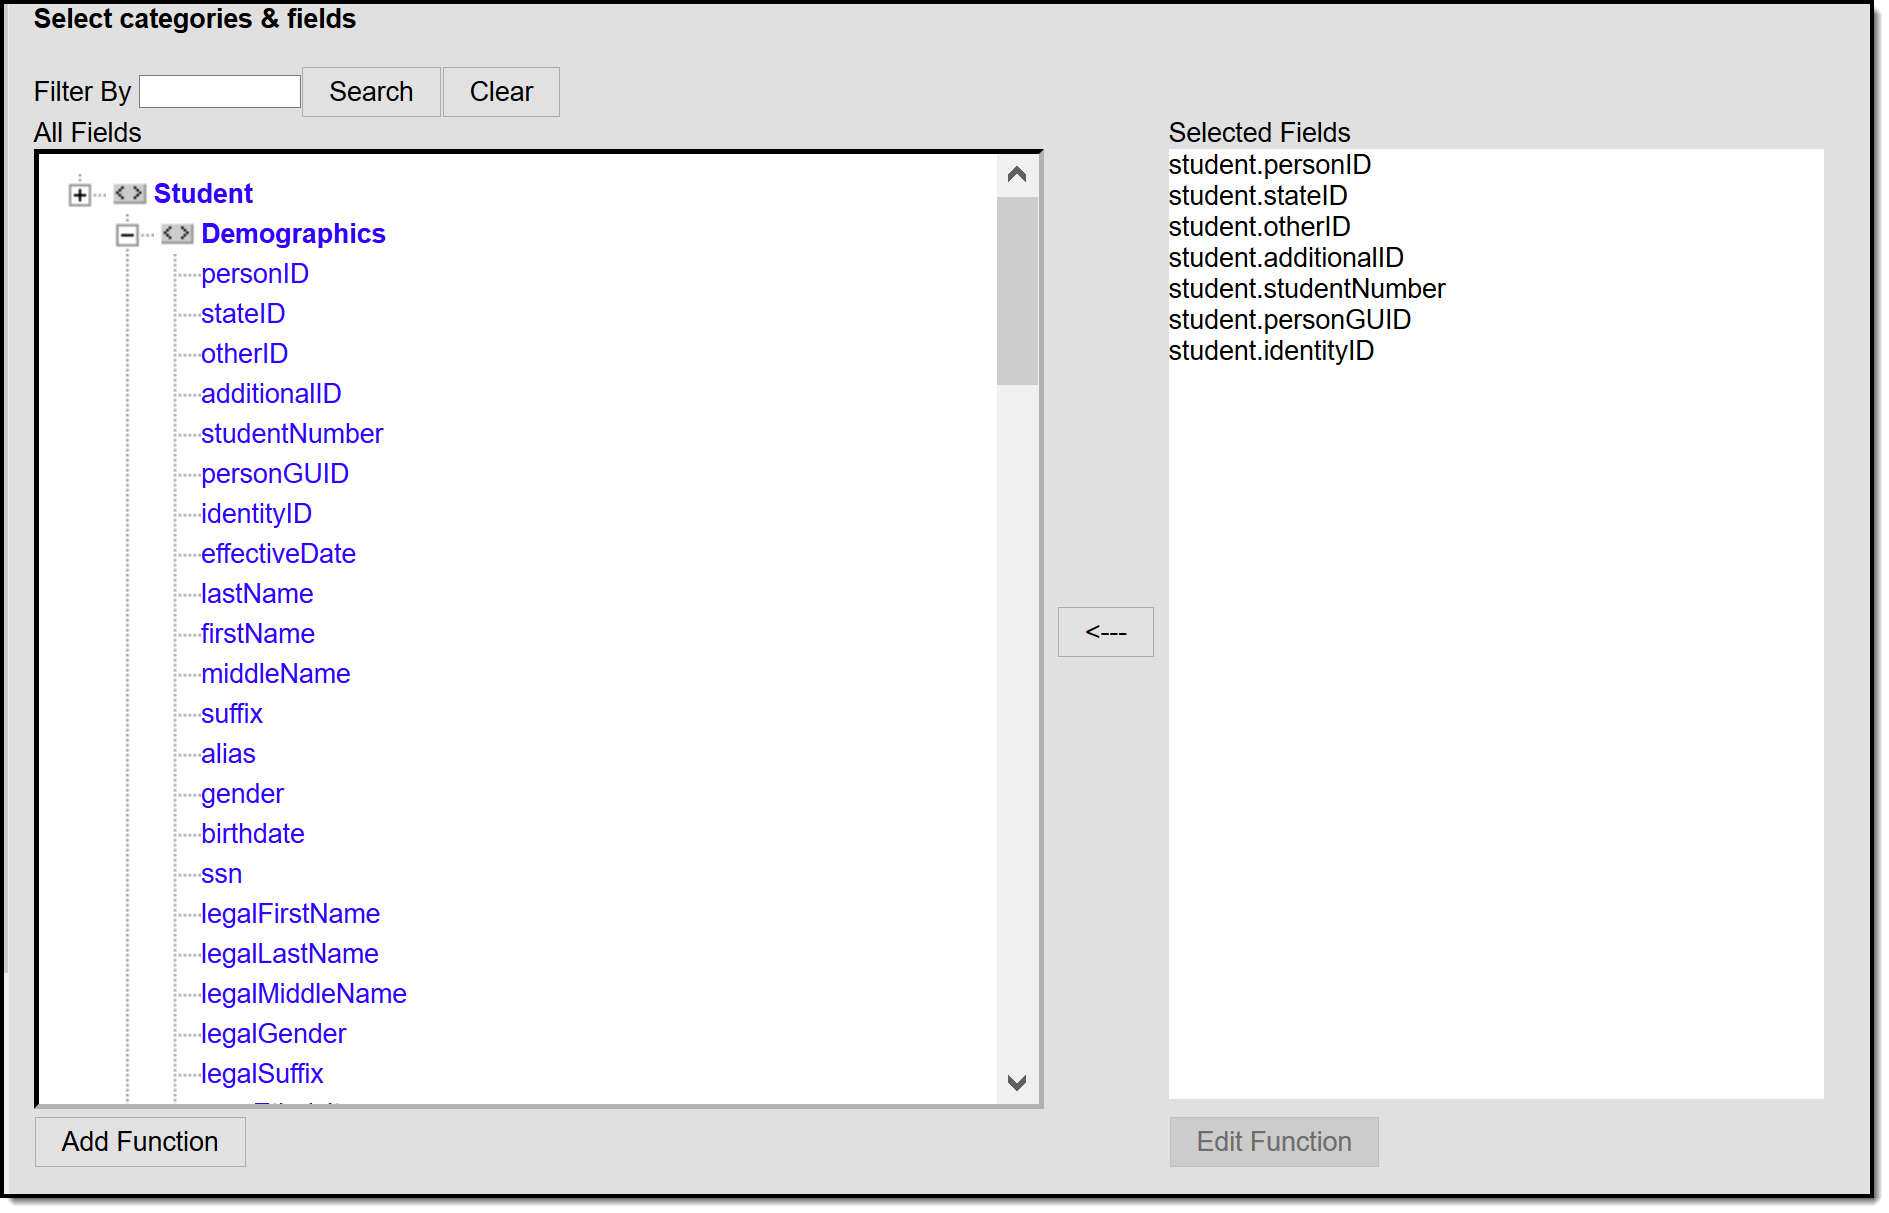 Student Demographic Ad hoc Fields
State-Specific Information
Fields vary by state. Follow the link to view Census/Demographics information for your state. Linked articles open in a new browser tab.
|
|
|
Demographic and contact information is entered and maintained for each individual person record in Campus. This information is used by other tools and reports throughout Campus.
NOTE: Users with rights to do so can reset passwords for users with Portal accounts.
Name Changes
There may be times when a person that has been entered in Campus has changed his/her name, gender, social security number, or race/ethnicity. These changes should be made on the Identities tab in order to maintain a historical record of the demographic data.
Tool Search: Identities
The Identities record acts as an historical record of the person's demographic information. While the information on the Demographics tool is displayed on the Identities record, changes should be made here.
Types of changes include:
- Name and Legal Name
- Gender and Legal Gender
- Social Security number
- Race/Ethnicity
- Nickname
Previous identity information is not lost when it is modified. An effective date is entered for a new identity. Once the effective date is reached, the previous record will no longer be marked current.
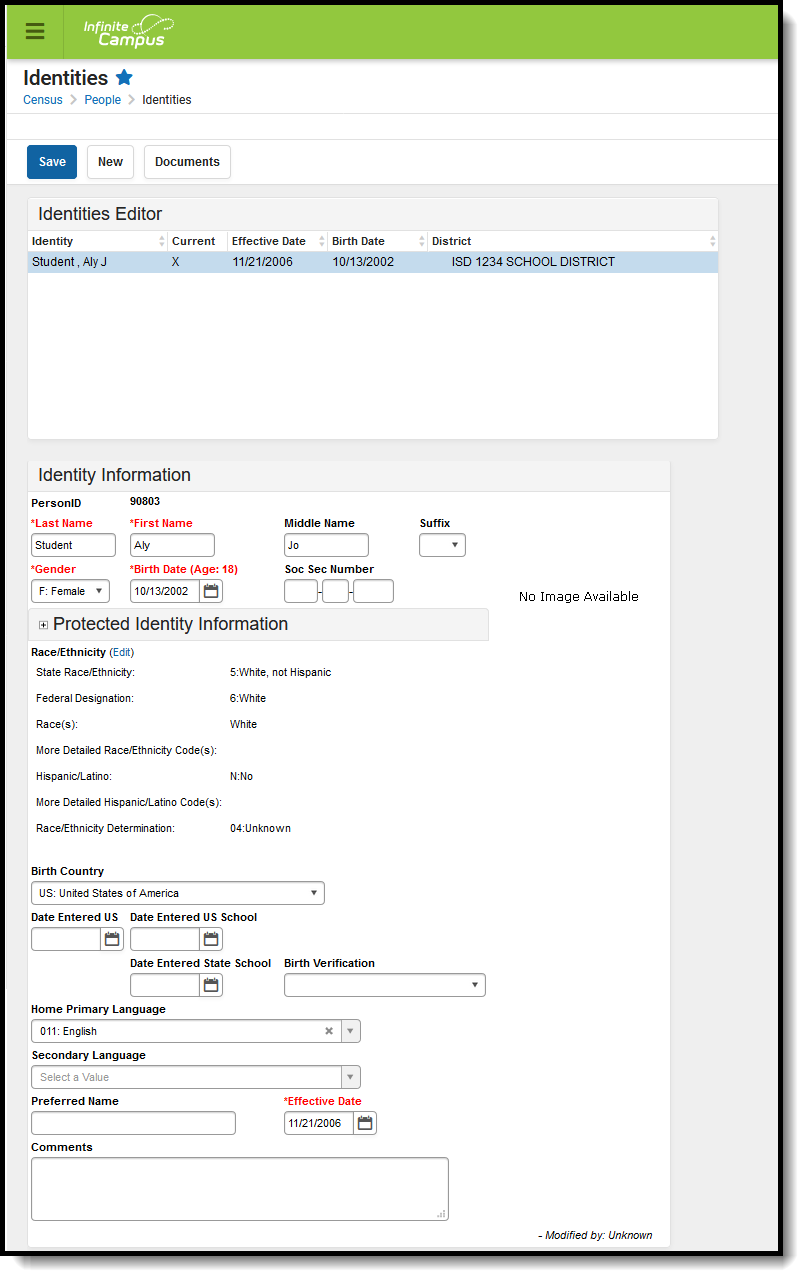 Identities Editor
See the Identities Tool Rights article for information about rights needed to use this tool.
This tool lists only the names the person with which the student may have been enrolled, and any defining information related to that. Information displayed here is first entered when creating a new person.
When this information needs to be altered due to legal reasons, modify the information on this tool. DO NOT create a new person.
The entered effective date on the Identity record determines the information that displays throughout Campus - on course section rosters, on attendance reports and state reporting extracts.
Identity Information Fields
When entering Information in the Last Name, First Name or Middle Name fields, double quotation marks and parentheses are NOT allowed.
Data Element | Definition | |
|---|---|---|
Last Name | The individual's last name. | |
First Name | The individual's first name. | |
Middle Name | The individual's middle name. | |
The generational assignment as part of their name (i.e., Jr, III) by which the person is referred. | ||
Gender | Indication whether a person identifies as male, female or an additional classification of gender. Certain states have the ability to update the Gender Attribute Dictionary at the district level. See the Legal Name and Gender Fields section for more information. | |
Birth Date | Person's date of birth When this person is a staff member, the ability to view this field is controlled by the View Staff Birth and Age tool right. | |
Social Security Number | Federally-assigned Social Security number. This field may be hidden depending on user tool rights. See the Social Security Number Tool Rights for more information. | |
Protected Identity Information Tool rights are required to see these fields. | Legal Last Name | Person's legal last name. |
| Legal First Name | Person's legal first name. | |
| Legal Middle Name | Person's legal middle name. | |
| Legal Suffix | Legal generational assignment as part of their name (i.e., Jr, III). | |
| Legal Gender *Required | Legal indication of whether person is male or female. States may allow for additional classification of gender, allowing a selection of Non-Binary or Intersex, for example. Consult your state's list of state reporting or your state's department of education for more information. See the Legal Name and Gender Fields section for more information. *When the student's gender does not match the state defined gender list, Legal Gender is required. | |
Race/Ethnicity | The person's race/ethnicity. See information about the Race/Ethnicity Wizard. | |
Birth Country | Indicates in what country the person was born. | |
Birth State | This field is not used in all states and options can be localized to fit individual state needs. | |
Date Entered US | Date noting when the person moved to or entered the United States | |
Date Entered US School | Indicates the date on which the student began attending school in the United States. | |
The name of the specific language the individual uses to communicate at home. | ||
Birth Verification | Proof of the person's existence, usually in the form of a birth certificate. Options may vary by state; the following are possible selections:
| |
Nickname | Indication of the name by which the person prefers to be called. This field may not appear for all states. | |
Effective Date | Represents the date the identity became active. An X displays in the Current column in the Identities Editor table. When there is more than one identity record with the same effective date (either the same date as the current date/today or after the current date), tie break logic using the identityID determines which identity record is the current identity record. A future date can be entered into this field, but the new identity is effective immediately. | |
Comments | Any additional comments about the identity record - who entered it, why information was changed, etc. | |
Legal Name and Gender Fields
The legal name and gender fields are available to differentiate from names by which the person wants to be referred (not a nickname) and their legal name and gender record. For example, persons who are transgender may prefer to keep that information as private as possible. District and school staff need to know this information, maybe even teachers; but for the most part, the majority of the school staff and students would not have any reason to know a transgender person is enrolled at the school.
When adding data into these fields, note that when any legal field is populated, the legal first name, legal last name and legal gender fields must also be populated. These fields are outlined in red indicating data is needed. When the record is saved and these fields are still not populated, a warning message displays.
When the student's gender does not match the state defined gender list, Legal Gender is also required. Not all states allow modification of the Identity Gender list in the Attribute Dictionary and this logic may not apply to your state.
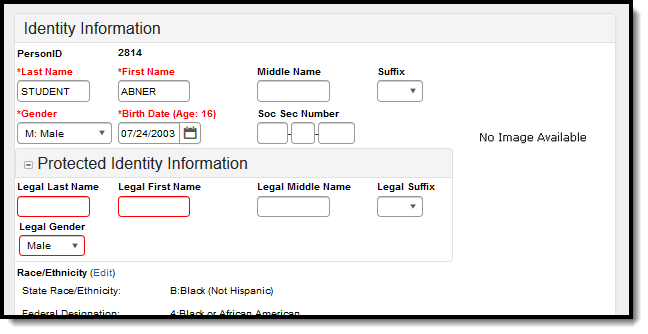 Protected Identity Information - Conditional Highlight
Legal Gender Ad hoc Filter Examples
Tool Search: Filter Designer
Users can create Ad hoc filters to find students with no legal gender OR a gender outside the allowed legal gender values available by the state.
These are just some examples of how to query student gender information in Ad hoc. This guide is in no way comprehensive or the only method of finding student gender information.
- Navigate to the Ad hoc Filter Designer tool.
- Select Query Wizard and Student, then click Create. The Field Selection screen displays.
- Navigate the Ad hoc tree hierarchy to Demographics, then Identity History. From here, select which fields needed to find either students with no legal gender OR students with a gender that is no allowed.
| No Legal Gender Example Filter | Gender Not Allowed Example Filter |
|---|---|
| 4. Select ident.legalGender. Add other identifying information about the student, such as individual.personID, individual.lastName, individual.firstName. 5. Click Next. The Filter Parameters screen displays. 6. For the Operator, select IS NULL. When this filter is run, student with no legal gender display. 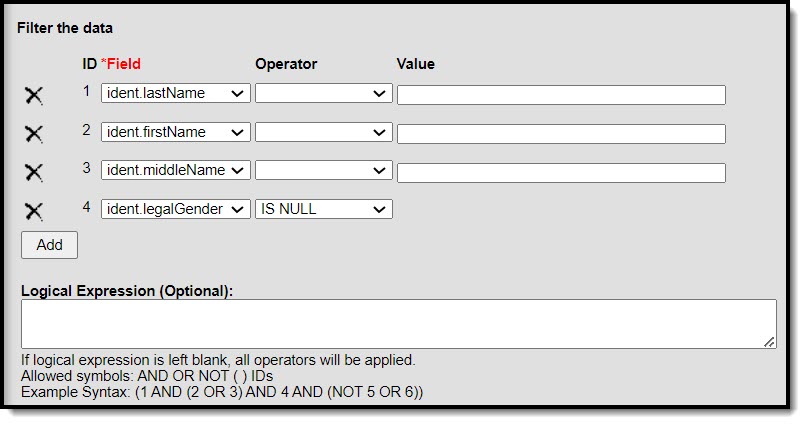 Legal Gender is Null Filter Example Legal Gender is Null Filter Example | 4. Select ident.gender. Add other identifying information about the student, such as individual.personID, individual.lastName, individual.firstName. 5. Click Next. The Filter Parameters screen displays. 6. Click Add to add another ident.gender parameter. 7. For the Operator, select NOT LIKE. 8. For the value, enter M for one ident.gender and F for the other. Optional Step 9. Users can add another ident.gender field to find students who have a gender of N: Non-Binary. In this instance, the Operator would be LIKE and the Value would be N. When this filter is run, students who do NOT have a gender of M or F display. 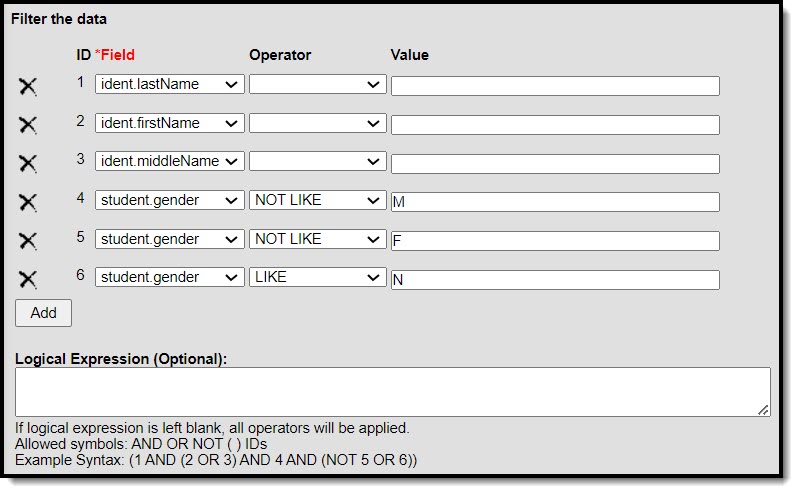 Example Gender Filter Example Gender Filter |
Scenarios for Populating Legal Name and Gender
| Scenario | Process | |
|---|---|---|
| Student's legal name and gender is the preferred name and gender that should be visible throughout the product. | There is no need to populate the legal fields under Protected Identity Information. Enter the legal name and gender in the First Name, Middle Name, Last Name, Suffix, and Gender fields following the normal process for adding person information at your district. | |
| Student's legal name and gender should be protected and only the preferred name and gender should be visible throughout the product. | When searches on either the legal or preferred values should return the student with the preferred name in the search results, then ensure that there are multiple identities. | The historical identity contains the legal name and gender in the First Name, Middle Name, Last Name, Suffix, and Gender fields. Nothing needs to be populated in the legal fields under Protected Identity Information for the historical identity. |
| Current identity contains the preferred name and gender in the First Name, Middle Name, Last Name, Suffix, and Gender fields. Legal name and gender is populated in the legal fields under Protected Identity Information for the current identity. | ||
| When searches on ONLY the preferred name and NOT the legal name should return the student, ensure that all Identity records (current and preexisting Historical) contain preferred values in the core fields. | Preferred name is entered in the First Name, Middle Name, Last Name, Suffix, and Gender fields for all Identity records. | |
| Legal name and gender is populated in the legal fields under Protected Identity Information for the current identity. | ||
| When the student only has one Identity, then there is no need to create multiple identities | ||
Modification Alerts
The Identities tool contains sensitive information related to a person’s identity. Because of this, specific tool rights have been added to control which staff person has the ability to see those data-sensitive fields. In addition to user security rights, a notification is available that indicates which user modified which information about a person (student, staff or other person).
When a person's identity is modified, a record of the change is available by hovering over the saved identity. This hover alert displays the user who made the modification, the date of the modification and the time.
 Identities Modifications Alert
The modification notice will also appear at the bottom of the Identities editor.
 Identities Modifications Alerts
Suffix
The Suffix list is maintained in the Custom Attribute Dictionary with a hard-coded list. Users cannot edit this list. The suffix field is viewable on the Demographics, Identities and Summary tools and is used in several census-based reports.
See the Attribute Dictionary for more information.
These suffix options may vary depending on your state.
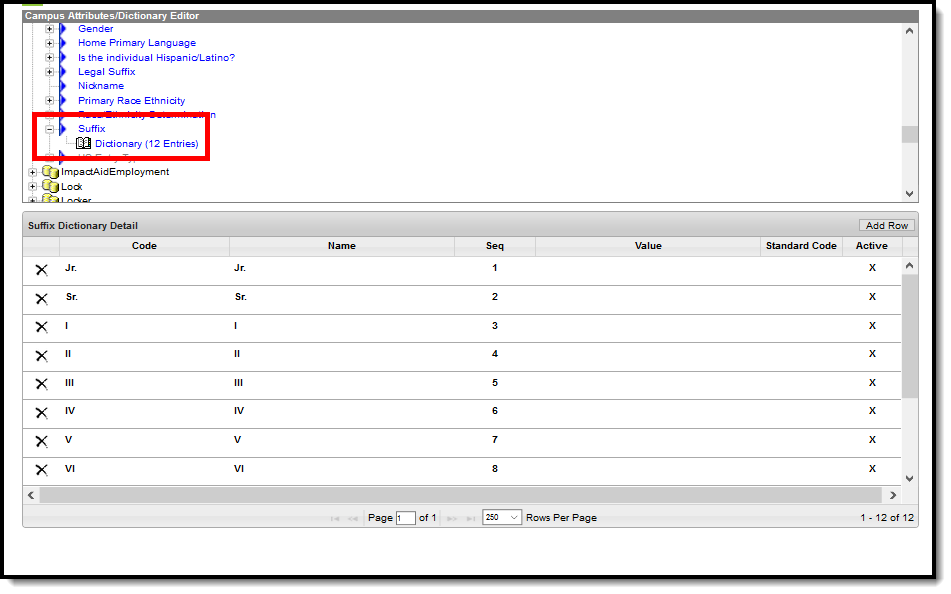 Suffix List in Custom Attribute/Dictionary
Home Primary Language
The Home Primary Language field notes the name of the specific language the person (staff, student, etc.) uses to communicate at home. This field can be used in state reporting with a localized list of language codes from the applicable state, and displays on the following editors:
Manage Documents
To view documents, click the Documents button on the action bar. Users with the appropriate tool rights may also complete the following tasks.
- Upload Documents
- Delete Documents
- Replace Documents
- Edit a Document Name or File Description
- Download Documents
Previous Versions
The Identities tool allows districts to update key information for an individual while retaining a historical record of the changes made.
Manage Person-to Person Relationships
Relationships (household and non-household) between people can be updated when needed on the Relationships tab in Census > People.
Tool Search: Relationships
The Relationships tool displays established relationships between people existing in Campus. Relationships include the other individuals residing in the same household as the selected individual and those individuals who may reside in other households but have an association with the selected person (emergency contacts, divorced parents, etc.).
This requires relationships to first be defined by an administrator on the Relationship Type tool. New household relationships are established through the Census Wizard and cannot be added through this tool.
 Relationships
See the Relationships Tool Rights article for information about the rights needed to use this tool.
Relationship Fields
Clicking on the link of a listed person's name in the Name column will switch to his/her Relationships record. Changes made to any Relationship field will automatically update the other person to whom the relationship applies.
- The person selected in the Search Results and whose name displays at the top of the page is the type of relationship.
- The person for whom the relationship is being selected is the second relationship type.
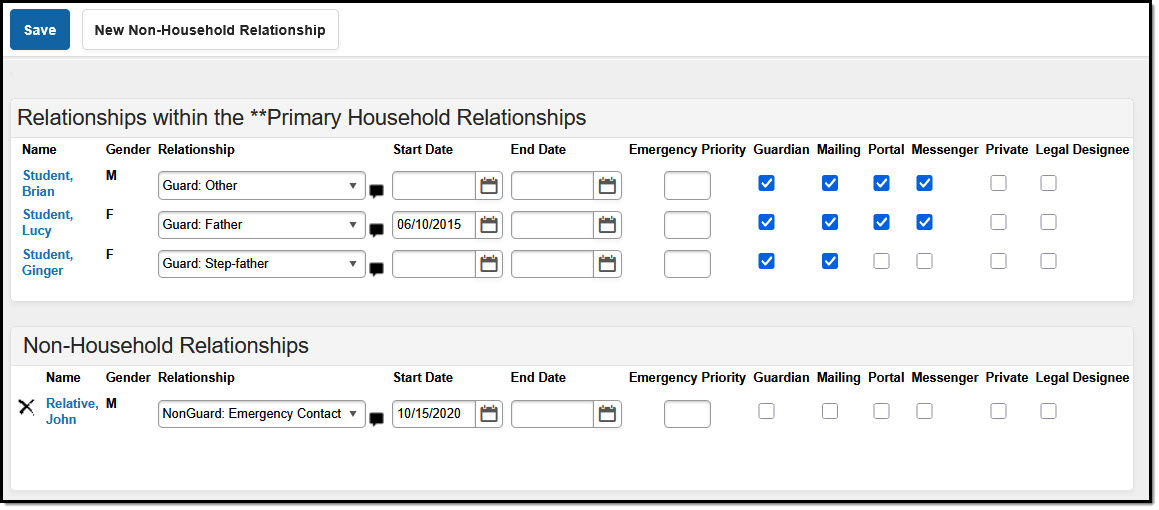 Frank Parent Relationship Display
In the image above, Frank Parent is the father of Lucy Student, the stepfather of Ginger Student, and the guardian of Brian Student. When viewing Lucy's relationships (for example), Frank Parent is displayed as her Father, as shown in the image below.
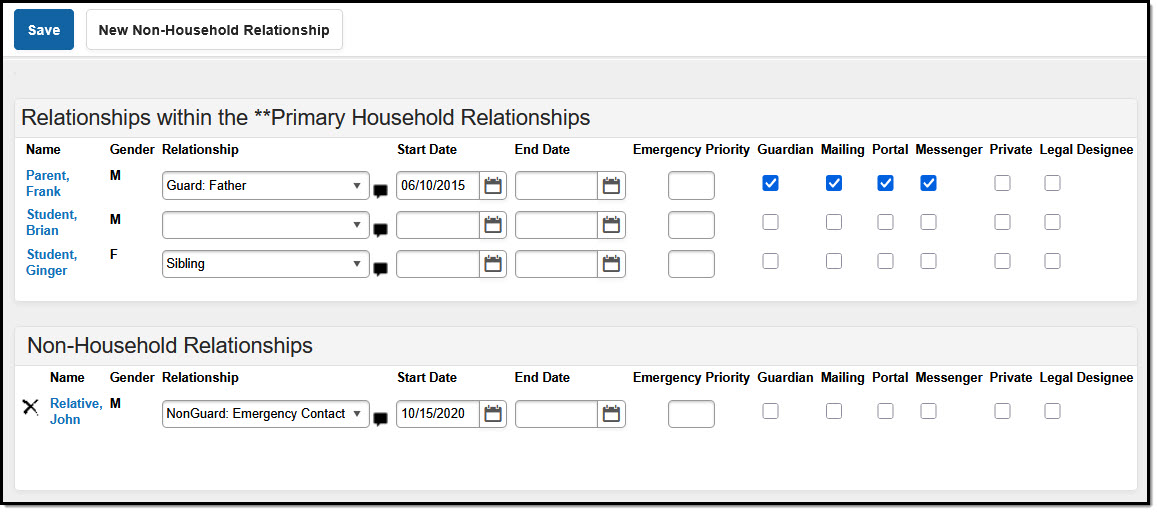 Lucy Student Relationship Display
The following fields define the relationship.
Field |
Description |
|---|---|
Relationship |
Designates the type of relationship between two people. Both people - the selected individual and the name of the person in the row - are affected by the selected. Relationship types are defined for the district in the Relationship Type tool. |
Start Date |
Date on which the relationship started.
This date is not required to save a relationship. But, if a relationship is removed due to a clerical error, and the start date is not removed, a blank entry displays on the student's Summary record. If a relationship ends (emergency contact changes, etc.), an end date should be entered rather than removing the assigned relationship type.
In the case where the relationship ends but the person should still display on the reports and summary information, create a Not Applicable or Undefined Relationship Type. |
End Date |
Date on which the relationship ceased to apply. An End Date does not delete a relationship, just ends it. |
Emergency Priority |
Provides a visual indication of the listed person's priority for contact in an emergency situation. This is a numeric value. The person that should be notified first should have a 1. If there is no entered priority, the school uses discretion when contacting individuals. Messaging tools do not use this tool when sending mass emails or voice messages. |
Guardian |
When checked, indicates which person has authority when making decisions on behalf of the student. |
Mailing |
When marked, indicates that person will receive addressed reports to his/her attention. |
Portal |
This checkbox should be marked if the listed person should have access to the Portal information of the person currently being viewed. |
Messenger |
This checkbox should be marked if the listed person is considered a messenger contact for the person currently being viewed. If marked, the listed person will receive phone, email, process inbox and/or Portal inbox notifications regarding the person currently being viewed. In order to receive messages, a person must have phone numbers and/or email addresses entered for them in Census > Demographics, along with contact preferences. |
Private |
Indicates the details should be kept within school settings. Marking this checkbox does not remove the information from reports. See the Private Checkbox Information article for more details. |
| Legal Designee | Indicates the contact has been assigned the legal authority to make decisions regarding the student's health, education, or welfare. For example, a student may be assigned a legal designee during a child custody case or when transitioning into the foster care system. The checkbox defaults to unmarked. |
Create Relationships
The Relationships tool lists connections between the selected person and other people, either within a household or outside of a household. The district can list emergency contacts, grandparents, daycare providers, etc.
Modifying information for one member of the relationship also modifies the information for the other member of the relationship. For example, if a relationship to a new non-household guardian is added with a specific start date for a student, that selected guardian will be assigned a non-household relationship with the student using the same start date.
Household relationships should be added on the Households editor.
Establish Relationships in the Primary or Secondary Household
Before establishing relationships, verify the primary household is complete to the best of your knowledge.
The names of people who are currently members of the same household as the selected person appear as relationships in the Primary Household or Secondary Household. The following procedures are needed to complete the setup of relationships.
- Select the appropriate Relationship from the dropdown list.
- Add any Comments about the relationship by clicking the note icon next to the dropdown field.
- Enter a Start Date in mmddyy format or use the calendar icon to select a date.
- Enter the Emergency Priority value.
- Mark the checkboxes for the relationship as appropriate.
- Click the Save icon when finished.
Add New Non-Household Relationships for Persons Currently in Census
A non-household relationship is defined as anyone with whom a person has a purposeful relationship but who does not live in the same dwelling space. Examples include extended family members, emergency contacts, neighbors, health care professionals, etc.
Emancipated Students require a non-household relationship to themselves.
- Select the New Non-Household Relationship icon. A Person Search screen displays.
- Enter at least the Last Name in the Search Fields. Enter additional search criteria as needed. Results display in the box to the right.
- Locate the desired person and select their name from the search results or click the Details link to review their information. Selecting the Details link displays a Person Summary Report in a new PDF window.
- Select as many individuals as necessary. Their names display in the Non-Household Relationships table.
- Click the red X in the Person Search window.
- Select the Relationship for the newly added non-household relationship.
- Add any Comments about the relationship by clicking the note icon next to the dropdown field.
- Enter a Start Date in mmddyy format or use the calendar icon to select a date.
- Enter the Emergency Priority value.
- Mark the checkboxes for the relationship as appropriate.
- Click the Save icon when finished.
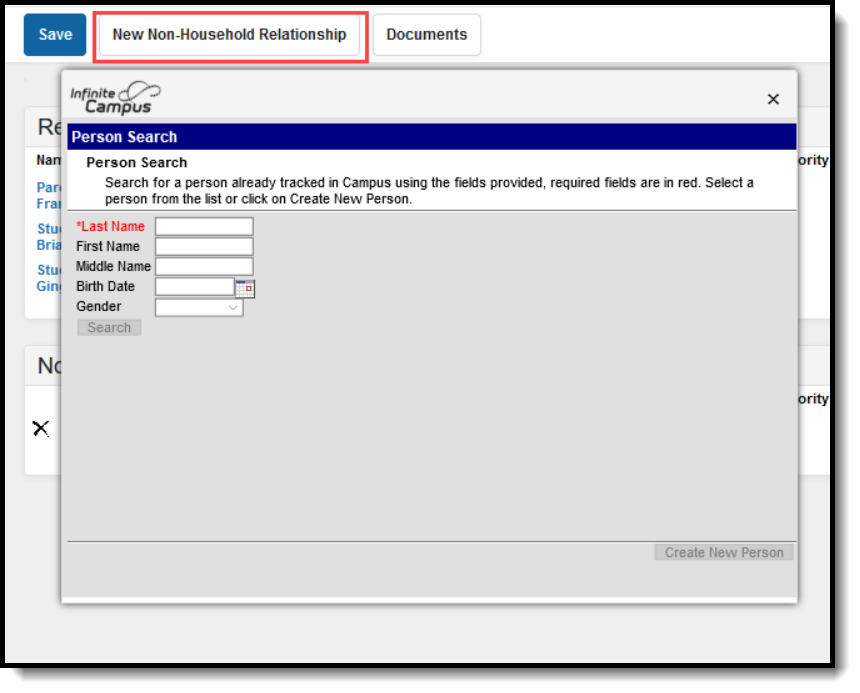 Non-Household Relationships
Add New Non-Household Relationships for Persons Not in Census
- Select the New Non-Household Relationship icon. A Person Search screen displays.
- Enter at least the Last Name in the Search Fields. Enter additional search criteria as needed. Results display in the box to the right.
- If the desired person does not appear in the search results, or if no person matches were found, click the Create New Person button. A Person Creation form displays.
- Enter at least the required information (Last Name, First Name, Gender and Race/Ethnicity).
- Click the Save button. The new person will be created.
- Select that new person from the Person Creation window. The name displays in the Non-Household Relationships table.
- Click the red X in the Person Search window.
- Select the Relationship for the newly added non-household relationship.
- Add any Comments about the relationship by clicking the note icon next to the dropdown field.
- Enter a Start Date in mmddyy format or use the calendar icon to select a date.
- Enter the Emergency Priority value.
- Mark the checkboxes for the relationship as appropriate.
- Click the Save icon when finished.
Edit Relationships
When a relationship needs to be modified, meaning contact guidelines need to be modified, the relationship needs to be ended or the relationship type is wrong, make the necessary changes and save the information.
Deleting a relationship should only be done if the original instance of the record was completely incorrect.
Use the End Date fields to modify the date range of when the relationship was in effect. This goes for any contact guidelines as well. If a guardian relationship is no longer due to custody activities, end date the existing relationship where the guardian is considered the student's guardian and create a new record for the person (if needed) where he/she is not considered the guardian.
Manage Documents
To view documents, click the Documents button on the action bar. Users with the appropriate tool rights may also complete the following tasks.
- Upload Documents
- Delete Documents
- Replace Documents
- Edit a Document Name or File Description
- Download Documents
Household Updates
Change Household Name & Phone Number
The Household Information tab lists the assigned household name, phone number, and related comments. This information may be changed by overwriting the existing data. There are no start and end dates associated with the tab.
Tool Search: Household Information
The Household Information lists the phone number, the address and any members who may be in the home. Household information is used to view individuals tied together under one house name. Like other areas in the Census module, this information becomes vital when assigning guardians and generating household mailings and locating other student data.
The creation of households is done in the Add Household wizard. Modifying the original household information is done on the Household Info tab.
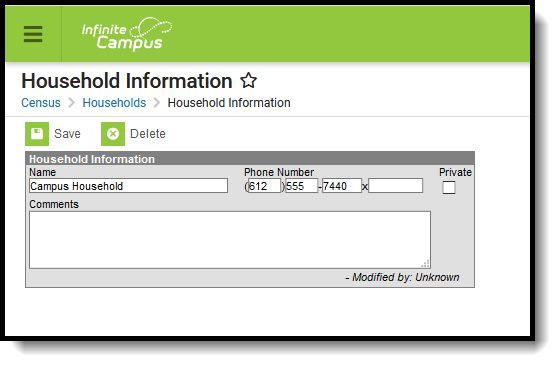 Household Information
Household Information Data Elements
The following fields are located on the Household Info tab.
Data Element | Definition |
|---|---|
Name | Household name - often in the form of a guardian's last name and first name. The format used is determined by district policy. |
Phone Number | Phone number associated with the household (not necessarily the home phone number). |
Private | Indicates the address details should be kept within school settings. Marking this checkbox does not remove the address from reports. See the Private Checkbox Information article for more details. |
Comments | Additional information about the household. |
Important information when using Ad hoc Reporting: The contact.householdName and address.householdName fields in the Filter Designer do NOT pull the household name from the household information if there is no value there. If there is no household name, it defaults to the guardians of the household's last names. This is the intended logic. The Filter Designer looks for a stored database value. The household name default displayed is a calculated value.
Modify Household Information
- Enter the name of the household in the Name field. Review district policy for proper guidelines on entering household names.
- Enter the household's Phone Number in the appropriate format, listing area code first (i.e., (XXX)-XXX-XXXX x XXXX). The last phone number field is used for extensions.
- Determine if the Private checkbox should be marked.
- Enter additional Comments about this field, if necessary.
- Click the Save icon when finished. The modified data will now appear in the editor.
Modification Alerts
The Household Information tool contains sensitive information about students and where they may live. In addition, the altering of this data by district staff members should be controlled by user tool rights. A notification appears at the bottom of this editor that indicates which user modified the information and when.
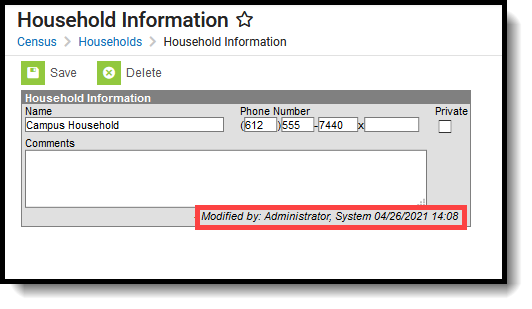 Household Information Modification
Household Address Change
The Addresses tab lists additional information about the selected address. Any changes made to an address will also affect historical data for any family that has ever lived there.
Forms on the original activity that are no longer active based on the registration dates display below the Add Form button.
Tool Search: Household Addresses
The Household Addresses tool within the household displays all addresses in which the family has resided. For legacy purposes, addresses should not be deleted, only ended, when a family moves. Like the household information to which it is tied, the addresses are used in generating reports that are sent home and in location extracts.
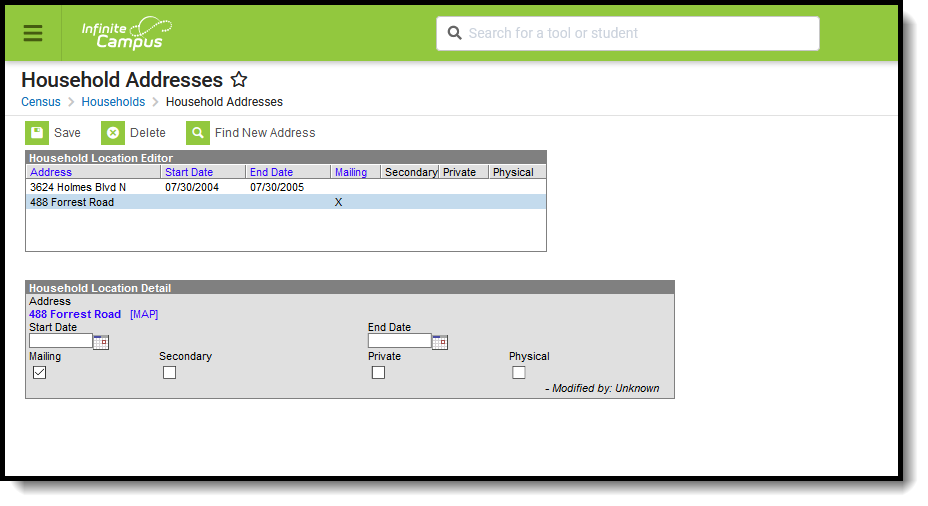 Household Addresses
See the Household Addresses Tool Rights article for information about rights needed to use this tool.
Address Information in Ad hoc Query Wizard
Address information is available in the Query Wizard for Census/Staff data types and Student data types.
- For Census/Staff data types, use the Addresses and Mailing Addresses folders in Person > Census.
- For Student data types, use the Addresses and Mailing Addresses folders in Student > Census.
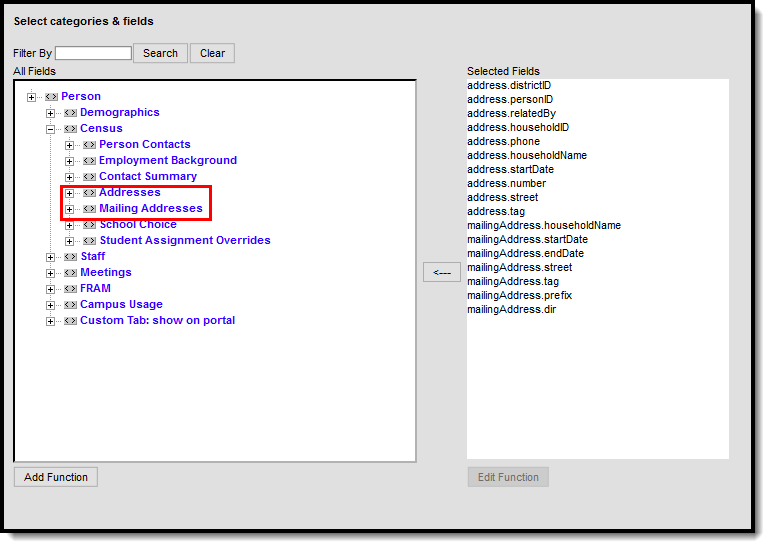 Addresses and Mailing Address Fields
Address Data Element Definitions
Data Elements | Definitions | Ad hoc Field Name |
|---|---|---|
Address | Lists the household address. This is a combination of all of the individual address fields that would be printed in the first line of a label - house number, street name, prefix, direction and apartment number. | address.addessLine 1 mailingAddress.addressLine1 |
Map | Opens a web browser that provides a visual representation of the address. | N/A |
Start Date | Date on which the household began residing at the address. Start dates are effective as of 12:00am on the entered date. | address.startDate mailingAddress.startDate |
End Date | Date on which the household stopped residing at the address. End dates are effective through 11:59pm on the entered date. | address.endDate mailingAddress.endDate |
Mailing | This is considered the Primary address and indicates the household receives mail at the designated address. Only one address for a household can be marked as Mailing. If the household has multiple addresses - a PO Box and a street address, the PO Box is marked as Mailing and secondary, and the street address is marked as Physical. See the Addresses with PO Boxes section for more details. | N/A |
Secondary | Indicates it is a secondary address for the household. A household can only have one primary physical address at any given time unless System Preferences are changed to allow multiple primary addresses. | address.secondary malingAddress.secondary |
Private | Indicates the address information should remain at the school (not given to third party mailings). See the Private Checkbox Information article for more details. | address.privateAddress mailingAddress.privateAddress |
| Physical | Indicates the address is the household's physical location. | address.physicalAddress malingAddress.physicalAddress |
Manage Household Address Information
A household may have multiple addresses listed, and more than one address can be active, but only one is allowed to be marked as Mailing (the primary address) at any given time unless the System Preference for allowing multiple primary addresses has been set.
The mailing address can be a PO Box separate from the physical location. Multiple Primary addresses are not allowed unless the System Preference is changed to Yes, which means if there are multiple addresses one of the addresses needs to be marked as a secondary location and one needs to be marked as Mailing. When adding a second address to a household, if it is not marked as secondary, a warning message displays stating the addition of the new address ends the current address.
If a primary address is not defined, a message indicating such displays in the editor.
Note that when there is no primary address, reports that include addresses do not include information for that individual (like report cards, mailing addresses, attendance letters, etc.).
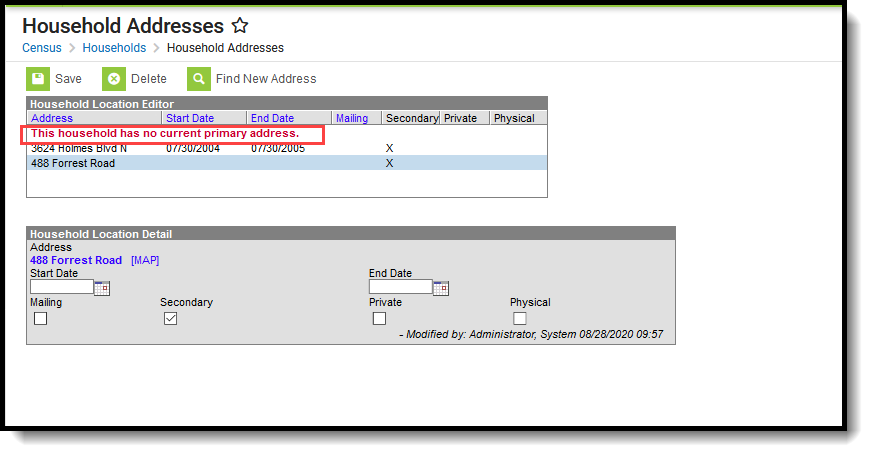 Household with no Primary Address
Manage Address Information
- Select the Address from the Household Location Editor. A Household Location Detail table displays below the editor view.
- Enter the Start Date of the family living in this home.
- If the family is moving away from this address, enter the End Date. If a moving date is known for the family, it can be entered at any time without adversely affecting the mailing properties of the address.
- Mark the address for Mailing if this is the address where mail for the household should be sent. When the mailing flag is marked on the household, all members of that household receive mailings to that address. See the Addresses with PO Boxes section for more details.
- Mark the Secondary box if this address is not the primary address for this household.
- Mark the Private box if this address should remain off of third party mailing lists. See the Private Checkbox Information article for more details.
- Mark the Physical checkbox if this address is the household's physical location.
- Click the Save icon when finished. The address is now listed with a start or end date in the Editor table.
To view a map of the address, click the Map link. This displays the Google Maps website.
Addresses with PO Boxes
A P.O. Box checkbox exists on the Address Information editor. When marked, it is assumed that mail is sent to the P.O Box. When such an address is assigned to a household, two addresses should be assigned - the P.O. Box address, which would be marked as Mailing and is considered the Secondary address, and the actual street address which would be marked as Physical.
Modification Alerts
Because a student's address is sensitive information, user tool rights should be closely monitored to this area. In addition to the tool rights, visual alerts display on the Address screen indicating a change was made to an address. A notification displays at the bottom of this editor that indicates which user modified the information and when. These display when hovering over the modified address in the Household Location Editor and on the Household Location Detail at the bottom.
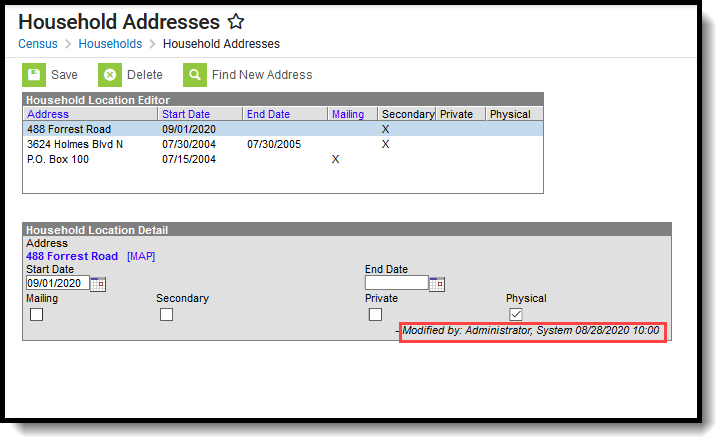 Address Modifications
Find a New Address
The process for adding an address to a household varies depending on the existence of the address in Campus.
When searching for households, note that addresses associated with a household that have been ended (end date is before today) or that begin in the future (start date is after today) display in red in the search results.
- Click the Find New Address icon in the action bar. An Add Address search screen displays.
- Enter appropriate search criteria for the new address. Matching results displays in the Address box to the right. If the selected address is already associated with the household, a warning message displays indicating such.
- When the Address Already Exists in Campus:
- Scroll through the results to find the correct option and select that address. The address is added to the Household Location Detail editor.
- Enter appropriate Start Dates for the new address.
- Mark the appropriate checkboxes for Mailing, Secondary, Private and Physical settings. See the Private Checkbox Information article for more details.
- Click the Save icon when finished. The new address displays in the Household Location editor. The old address is also still displayed in the editor.
- When the Address Does Not Exist in Campus:
- Click the New Address button. An Address Information editor displays.
- Enter appropriate details for the new address - number, street, etc.
- Enter the Start Date for the new address.
- Mark the appropriate checkboxes for Mailing, Secondary,Private, and Physical settings. See the Private Checkbox Information section for more details.
- Click the Save icon when finished. The new address displays in the Household Location editor. The old address is also still displayed in the editor.
Note that the New Address button requires tool rights to the Add Addresses tool.
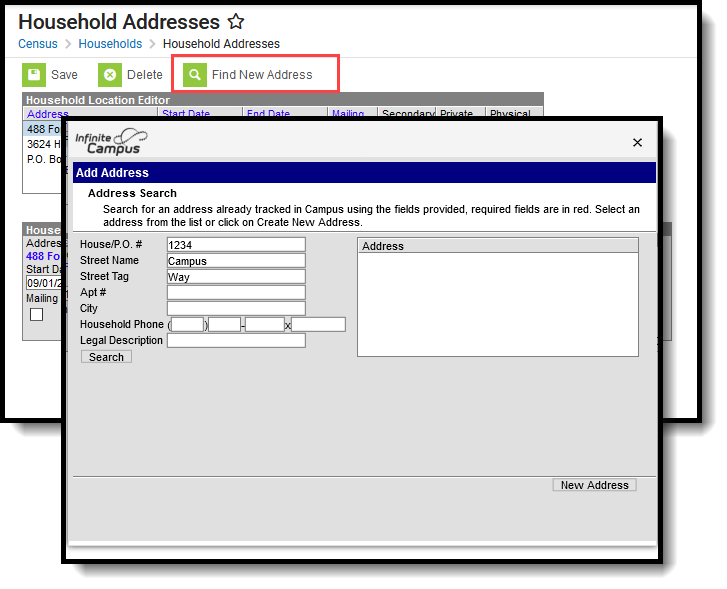 Find New Address
Manage Household Memberships
Household memberships are managed on the Members tab in Census > Households. This tab is where a historical record is maintained of all household members. This is also where members are added and end dated.
Tool Search: Household Members
The Household Members tool lists all persons who have ever lived in the selected household. Due to legacy issues, it is recommended that members be not deleted from the household but rather ended. Information on a particular member can be viewed by selecting that member from the Household Member Editor table.
 Household Members
See the Household Members Tool Rights article for information about rights needed to use this tool.
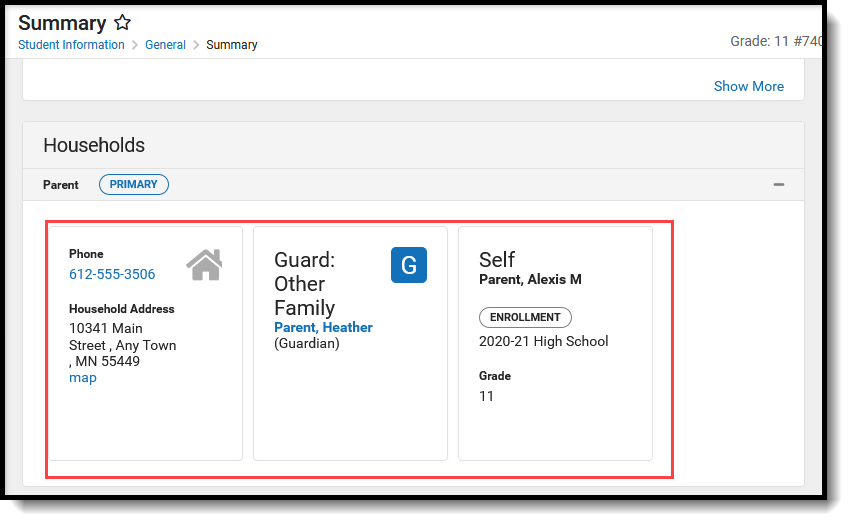 Household Information on Student Summary
Household Members Data Elements
Data Elements | Definitions |
|---|---|
Name | Lists the individual who is a member of the household. |
Start Date | Indicates the date on which the person became a member of the household. |
End Date | Indicates the date on which the person was no longer a member of the household. |
Secondary | Indicates the household is a secondary residence for the selected person (i.e., child who lives part time at this address and another address). |
Private | Indicates the address details should be kept within school settings. Marking this checkbox does not remove the address from reports. See the Private Checkbox Information article for more details. Marking the Private checkbox also prevents the household member's information from appearing on FRAM Online Applications. |
Find and Add a New Member Entered in Infinite Campus to add to the Household
- Select the Find New Member icon from the action bar. A Person Search screen displays.
- Enter the Last Name of the individual who should be added to this household. Only the Last Name field is required; add additional information for a more focused search.
- Click the Search button. Matching Search results displays in the box to the right.
- Verify the correct person has been returned by selecting the Details link in the search results. This displays the Person Summary Report.
- Select the appropriate person from the search results to add to the household by clicking on their name.
- Enter a Start Date for the person.
- If appropriate, enter an End Date for the person.
- If this is a secondary household for that member, mark the Secondary checkbox.
- If information about this individual should remain private to school officials only, mark the Private checkbox, which indicates the information should be kept within school settings. Marking this checkbox does not remove data from reports. See the Private Checkbox Information article for more details.
- Click the Save icon when finished.
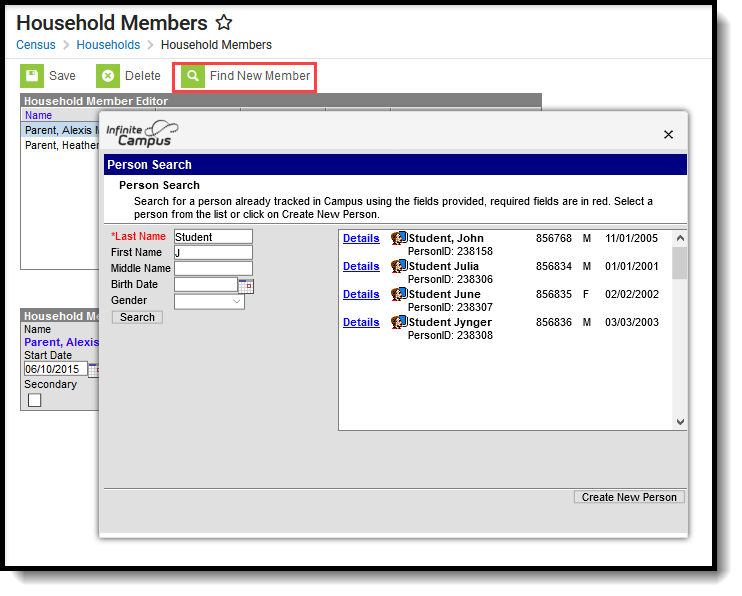 Find New Member
Find and Add a New Member Not Entered in Infinite Campus to add to the Household
- Select the Find New Member icon from the action bar. A Person Search screen displays.
- Enter the Last Name of the individual who should be added to this household. Only the Last Name field is required; add additional information for a more focused search.
- Click the Search button. Matching Search results display in the box to the right.
- If none of the results are for the desired person, or if no results display, click the Create New Person button.
- Enter in the appropriate information for the new person, following district policy.
- Click the Save button when finished. The new person displays in the New Person window.
- Select the person from the New Person window. The new person is displayed in the Household Member Detail editor.
- Enter a Start Date for the person.
- If appropriate, enter an End Date for the person.
- If this is a secondary household for that member, mark the Secondary checkbox.
- If information about this individual should remain private to school officials only, mark the Private checkbox, which indicates the information should be kept within school settings. Marking this checkbox does not remove data from reports. See the Private Checkbox Information article for more details.
- Click the Save icon when finished. The new person is listed in the Household Member Editor.
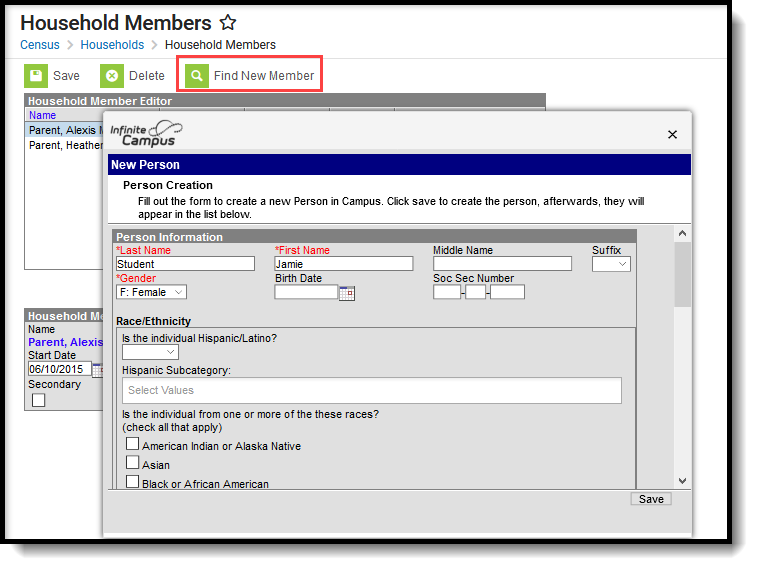 Add New Person to Campus and Household
End Household Membership
- Select the appropriate member of the household to modify from the Household Member Editor. Information displays in the Household Member Detail editor.
- Enter a Start Date for the household member.
- If appropriate, enter an End Date for the household member.
- If this is a secondary household for that member, mark the Secondary checkbox.
- If information about this individual should remain private to school officials only, mark the Private checkbox, which indicates the information should be kept within school settings. Marking this checkbox does not remove data from reports. See the Private Checkbox Information article for more details.
- Click the Save icon when finished.
This video demonstrates how to use the Household Members tools to add and remove household members.
Address Updates
Correct an Address
There may be times when an address needs to be edited due to an omitted apartment/unit number, incorrect tag, misspellings, etc. The Address Info tab in Census > Addresses can be used to make these minor changes.
Tool Search: Address Information
The Address Info tab lists information about the selected address. The address provides a location for the household, and ties the students to the address. Addresses are listed on several reports, reviewed as part of the Enrollment processes and several other areas of Infinite Campus.
Districts can choose to work with their city's planning committee or utility company to import all district addresses.
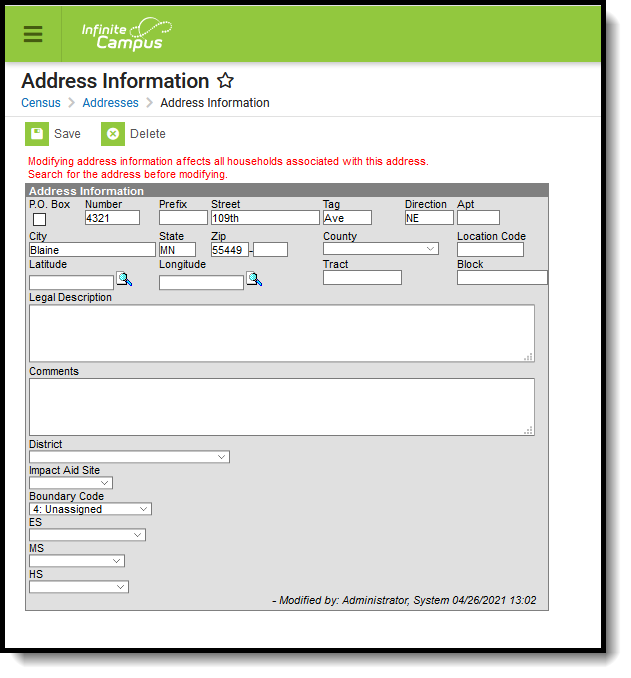 Address Information
See the Address Information Tool RIghts article for information about rights needed to use this tool.
The Address Information tool is displayed when searching for Households and selecting the Address item from the Household Search Results or by searching for Addresses and selecting a search result.
Addresses can be added to Campus from the Address Info tab, but it is recommended that the Add Address wizard is used to add multiple addresses to Campus.
Address Info Definitions
The following table defines the fields available on the Address Info tab. Some fields on this editor are localized by states or district, and may not appear.
Field | Definition |
|---|---|
Post Office Box | Indicates the address is not a physical location but a mailing location. |
Number | House Number of the address, or Box number if the address is a P.O. Box address. |
Prefix | A one-character compass point preceding a street name that indicates a direction - N, S, E, W. |
Street | Name of the street. Only the street name is entered into this field. Labels like Avenue, Road, Drive, etc. are considered an Address Tab. |
Tag | Label of the entered street - Avenue, Street, Blvd., etc. |
Direction | Direction indicating the placement of the street within the city limits. |
Apt | Apartment number if this address is for an apartment building location. |
City | Postal city for the address. |
State | Two-digit state code for the address. |
Zip Code | Postal zip code (plus 4 if available). |
County | County in which the address is located. |
Other Address Fields | |
| Location Code | Numeric representation number to accurately locate the address. |
| Latitude | Numeric representation of the address based on north and south placement, generally imported from a district GIS application. Use the magnifying glass to locate the latitude of the address. The house number and street name must be populated in order to populate the address latitude. It is also recommended that one or all of the following also be entered:
This field allows for a 10-digit number - 4 digits before the decimal point, 6 digits after the decimal point. The total Geocode value may be up to 14 digits, but only 10 digits saves. If an error message displays, verify the entered values for the address are correct. You may need to change the street name or add a direction. For example, Lexington Ave may need to be entered as County Road 17. |
| Longitude | Numeric representation of the address based on east and west placement, generally imported from a district GIS application. Use the magnifying glass to locate the longitude of the address by clicking the icon next to the Longitude field. The house number and street name must be populated in order to populate the address longitude. It is also recommended that one or all of the following also be entered:
This field allows for a 10-digit number - 4 digits before the decimal point, 6 digits after the decimal point. The total Geocode value may be up to 14 digits, but only 10 digits saves. If an error message displays, verify the entered values for the address are correct. You may need to change the street name or add a direction. For example, Lexington Ave may need to be entered as County Road 17. |
| Tract | A small, relatively permanent statistical subdivision of a county, averaging about 4,000 inhabitants, depicted with a unique numeric code within each county. Used by the US Census Bureau to compare data from decade to decade. |
| Block | The smallest statistical area used in the US Census Bureau’s data collection, depicted with a four-digit number. Multiple blocks can exist within a Tract. |
| Legal Description | Provides a definition of the address used in Impact Aid reporting when a street location is not available. Each county determines what a legal description is (lot and block data). This field only shows when the Impact Aid System Preference is turned on. See the Impact Aid section for more information. |
| Comments | Provides any additional notes on the address and are for internal reference only. |
| District | Indicates the school district to which students at the address attend. This is often used in school choice settings. |
| Impact Aid Site | Lists any Impact Aid Site associated with the address. When this field is populated, the Impact Aid tool displays the address is part of federal land. See the Impact Aid section for more information. |
Edit Address Information
- Select the appropriate address from the SearchResults.
- Enter data into the appropriate fields.
- Select the District in which the address is located from the dropdown list. This helps with planning and busing.
- If the address is considered part of federal land, select the Impact Aid Site from the dropdown list.
- Click the Save icon when finished.
Modification Alerts
Because address information is sensitive data, tool rights to modify and view address information should be closely monitored. In addition to tool rights, visual notification is displayed on the Address Info tab when changes are made to the address. This appears at the bottom of the Address Information editor and notes who made the modification and when.
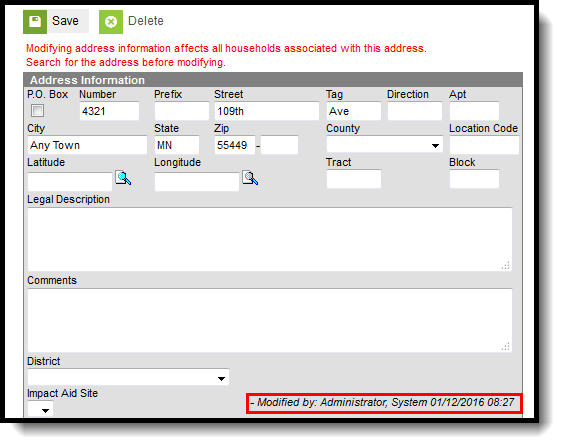 Address Modification Notice
Impact Aid
Impact Aid funding is designed to assist local education agencies that are affected by federal activities in their school districts (like reservation land or military bases). For more information on the Impact Aid program, see the Office of Impact Aid website.
Impact Aid Workflow
Follow these steps to track Impact Aid information in Campus.
Done | Task |
|---|---|
| Create Impact Aid Sites. |
| Turn on the System Preference for tracking Federal Impact Aid. |
| Assign Impact Aid Sites to household guardians on the Impact Aid tab. |
| Assign Impact Aid Sites to Addresses within the district. |
| Generate the Impact Aid Site Report to find students who live on Federal installations. |
| Generate the Impact Aid Employment Report to find guardians who are employed by the government. |
Impact Aid Address Fields
As stated above, each county determines what the legal description is for a housing unit when a physical address of that unit is not available or does not exist. An example of a legal description would be the following:
- Lot 1, Block 2, Tract A
- NE 1/4, Section 12, T1N, T2W
It is assumed that a housing unit that uses the legal description does not necessarily have a P.O. Box as a mailing address.
An address can be added using the Add Address tool that does not contain standard address fields (number, street, tab, etc.). When an address is saved without this information, it cannot be searched in Campus. When a legal description is used in place of an address (when a household does not have an address), the legal description is searchable, and returns in the search results in the following areas:
The Legal Description is also included in the Person Summary Report.
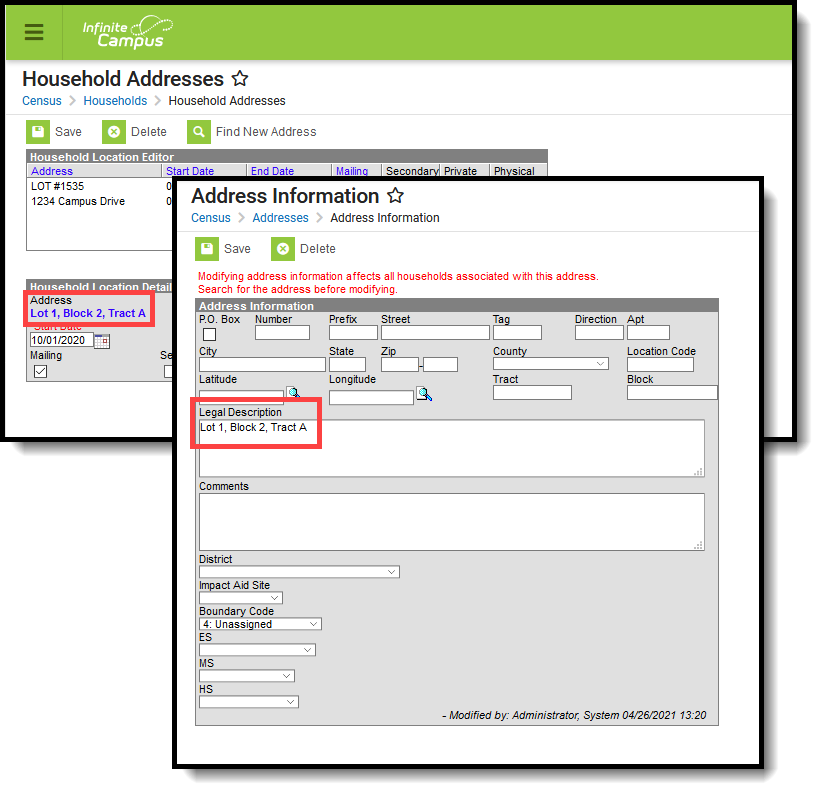 Address - Legal Description
Impact Aid Address Information
When a person's household address is part of an Impact Aid Site (the Impact Aid Site and Indian Land Type fields are populated on the Address Info tab), a message displays at the top of the Impact Aid tab.
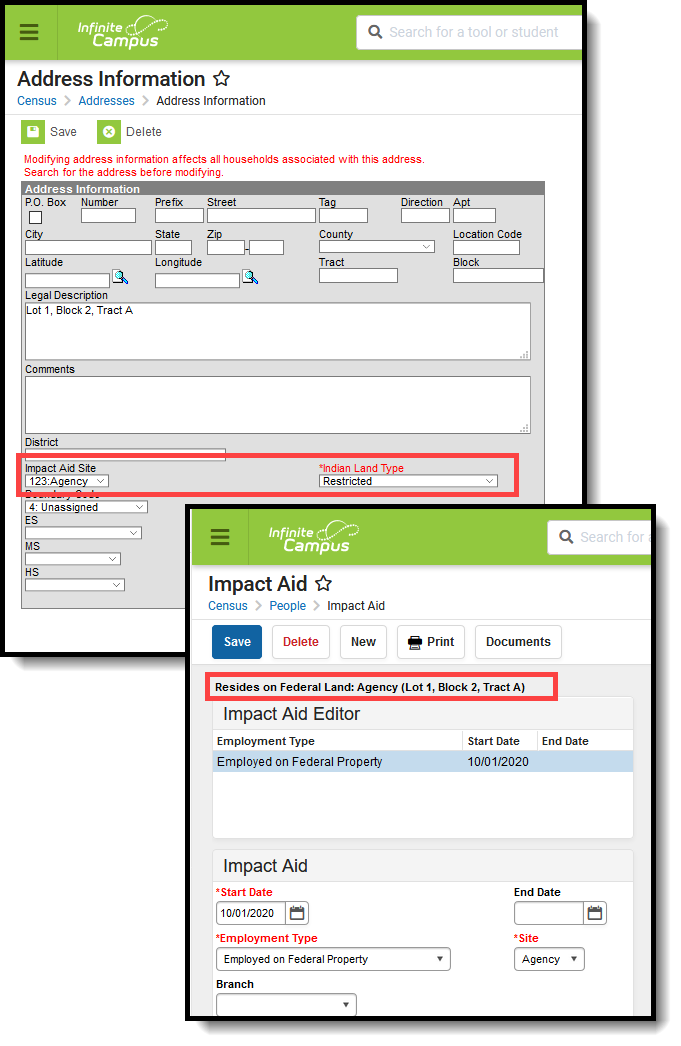 Address Display on Impact Aid Tool
Add a School to an Address
The Schools tab in Census > Addresses can be used to manually associate schools with the address based on geographic boundaries.
Tool Search: School Boundaries
The Schools Boundaries tool provides a manual association of an address with a school or multiple schools. Each school district has geographic boundaries that determine which students will attend their school. If the address is not currently associated with a school district or if this address is the household of students who attend a school outside of their address default school, that information should be noted here.

See the School Boundaries Tool Rights article for information about rights needed to use this tool.
System Preferences
A School Boundary Warnings preference can be turned On. When enrolling a student into a school, if that school is not listed on this Schools tool, a warning message displays indicating such.
 School Boundary Warning
Schools Data Elements
The following table lists the data elements available on the School Boundary editor.
Data Element | Definition |
|---|---|
School | Selection of school to which this boundary applies. This list is pulled from the School editor in System Administration. |
Start Date | Effective start date that this address began residing inside the school's boundary. |
End Date | Effective end date that this address is no longer inside the school's boundary. |
Resides | Indicates this is the main selection of schools. When marked, this provides a visual indication that a school falls within the physical boundary for this address. When using the Enrollment Roll Forward tool, students living at this address will be enrolled into the noted school for the next school year based on these boundaries. Students enrolled in a non-assignment school for the current school year roll to the next available grade level in the non-assignment school; or, if moving between elementary and secondary levels, students roll to the school that supports the next grade level and is marked as Resides on the student's household address. |
Add School Information for an Address
- Select the New icon. A School Boundary Info table will appear to the right of the School Boundary Editor.
- Select from the dropdown list what school the students should attend if living at this address.
- Enter a Start Date for when this address’s household members became eligible for attending the selected school.
- Click the Save icon when finished. The new school will be listed in the School Boundary Editor table.
Perform this process for all of the addresses in the district and for each school level. This tab should have an entry for the elementary school, the junior high/middle school and the high school.
End School Information for an Address
When boundaries change, the schools assigned to an address should be reviewed for accuracy and modified as needed.
- If a listed school is no longer assigned to the address, select that school name from the Boundary Editor and enter an End Date.
- If a school is not listed, follow the procedures for adding a school.


