Tool Search: Dependent Care
View a Session
Once the appropriate timeframe is selected, a user may select a specific session for which to view information. Each session lists the start and end dates for session registration, the start and end dates for the session, and a quick reference to registration status.
The session also displays the number of students approved for care, the number of students pending approval, and the number of sites at which the session is offered.
Session Statuses
| Session Status | Definition |
|---|---|
| Registration Open Displays in green | The session has not started; session enrollment is open. These registrations appear in the Current timeframe. |
| Registration Closed Displays in black | The session has not yet started; session enrollment is no longer open. These registrations appear in the Current timeframe. |
| Active - Registration Open Displays in green | The session has started; session enrollment is closed. These registrations appear in the Current timeframe. |
| Active - Registration Closed Displays in blue | The session has started; session enrollment remains open. These registrations appear in the Current timeframe. |
| Complete Displays in black | The last day of the session has passed. Both enrollment and the session are closed. These registrations appear in the Previous timeframe. |
| Ready Displays in black | The start date for registration is after the system date; enrollment is not yet open. These registrations appear in the Upcoming timeframe. |
| Draft Displays in black | Session setup is not complete; enrollment is not open. These registrations appear in the Draft timeframe. |
Session Rosters
The Roster button allows users to view all students registered for the session. Users are able to: add pending registrations to sessions, view/edit dependent details, registration status, and form status.
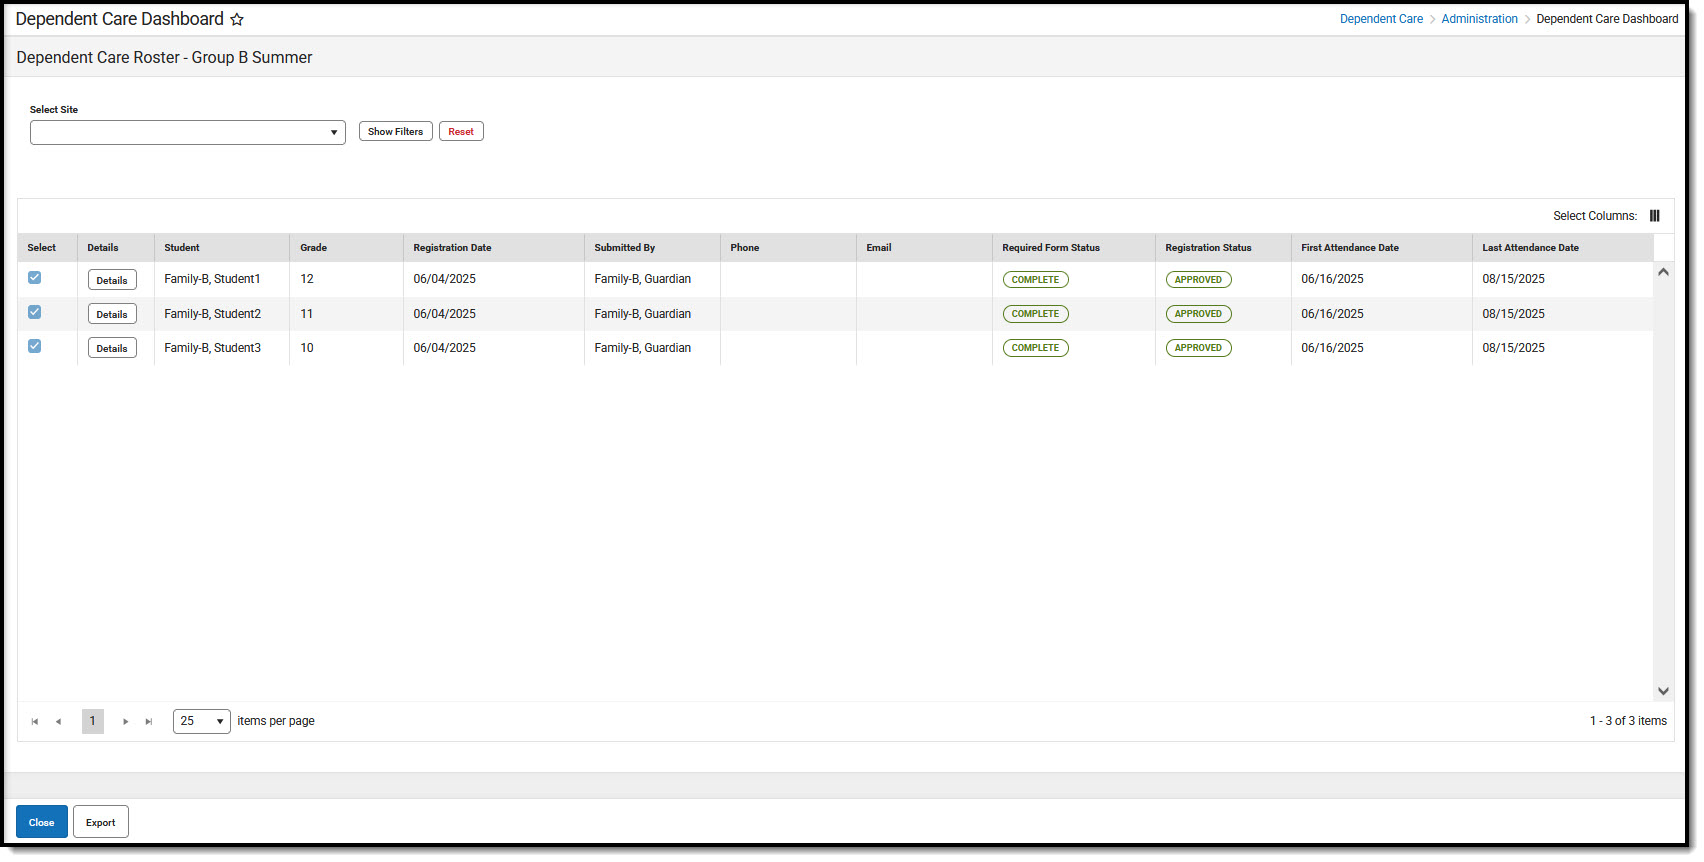 Dependent Care Session Roster
- Use the Select Site drop-list to select the site for which to view the roster.
- To view session roster information for all sites in the session, do not make a selection.
NOTE: Selecting a site allows users to view more roster details, such as a dependent's scheduled attendance days, the number of students approved for attendance each day of the session, and the ability to add students to the session schedule.
Use Session Roster Filters
Users can further filter the roster view through filters.

- Users may filter the roster by: Student Name, Grade, Required Form Status, by whom the request was Submitted, the session Registration Date, and the Registration Status.
- Users may apply as many or as few filters as desired. Once the desired filters are selected, press Apply Filters. Any registrations matching the entered filters display.
- To clear the filter(s), press Reset. All students again display.
Filter Fields
| Field | Description | ||||||||
|---|---|---|---|---|---|---|---|---|---|
| Filter by Student | To Filter by Student, enter the name of the student(s) for which you are searching. Enter as much information as desired. All students matching the entered information display. | ||||||||
| Filter by Grade | To Filter by Grade, enter the grade(s) for which you are searching. | ||||||||
| Filter by Required Form Status | If filtering by Required Form Status, use the drop-list to select Complete or Awaiting Review.
| ||||||||
| Filter by Submitted By | To Filter by Submitted By, enter the name of the person(s) for which you are searching. Enter as much information as desired. All persons matching the entered information who submitted a registration request display. | ||||||||
| Filter by Registration Date | To Filter by Registration Date, use the calendar icon to select the appropriate date. Any registrations submitted on this date display. Only one date may be used to filter. | ||||||||
| Filter by Registration Status | Use the drop-list to Filter by Registration Status: Approved, Pending, or Withdrew.
| ||||||||
| Apply Filters | Applies the set filters. | ||||||||
| Show/Hide Filters | Press Show Filters to view the available filtering options. Press Hide Filters to hide filter options. | ||||||||
| Reset | Press Reset to remove any applied filters. |
NOTE: Roster views are read-only for students approved for a session's dependent care. For students whose registration is pending, roster information may still be edited.
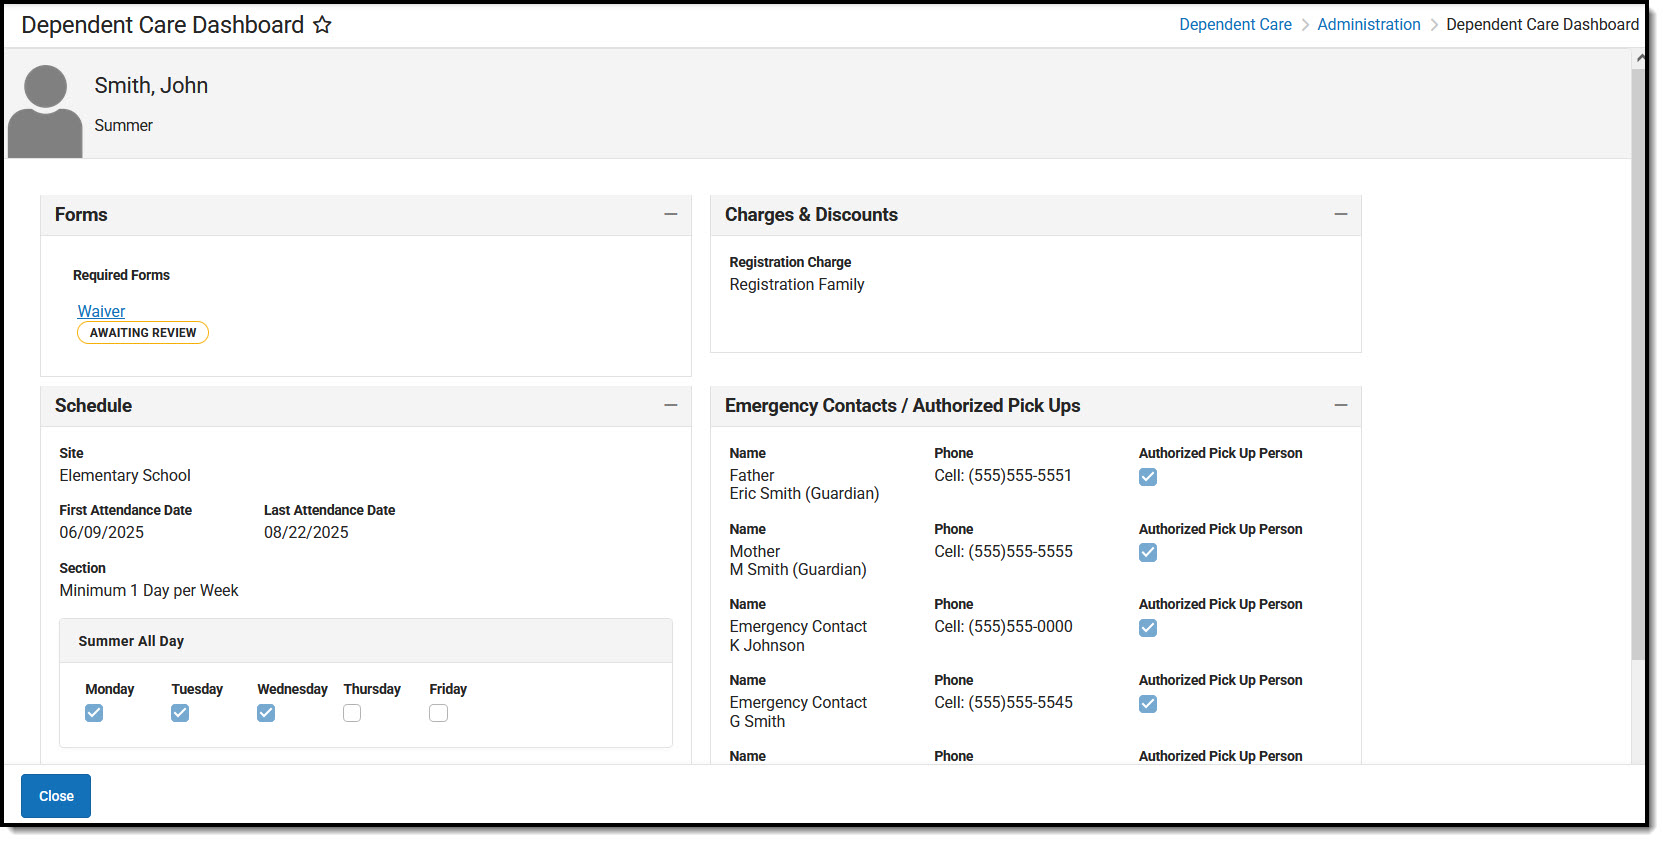
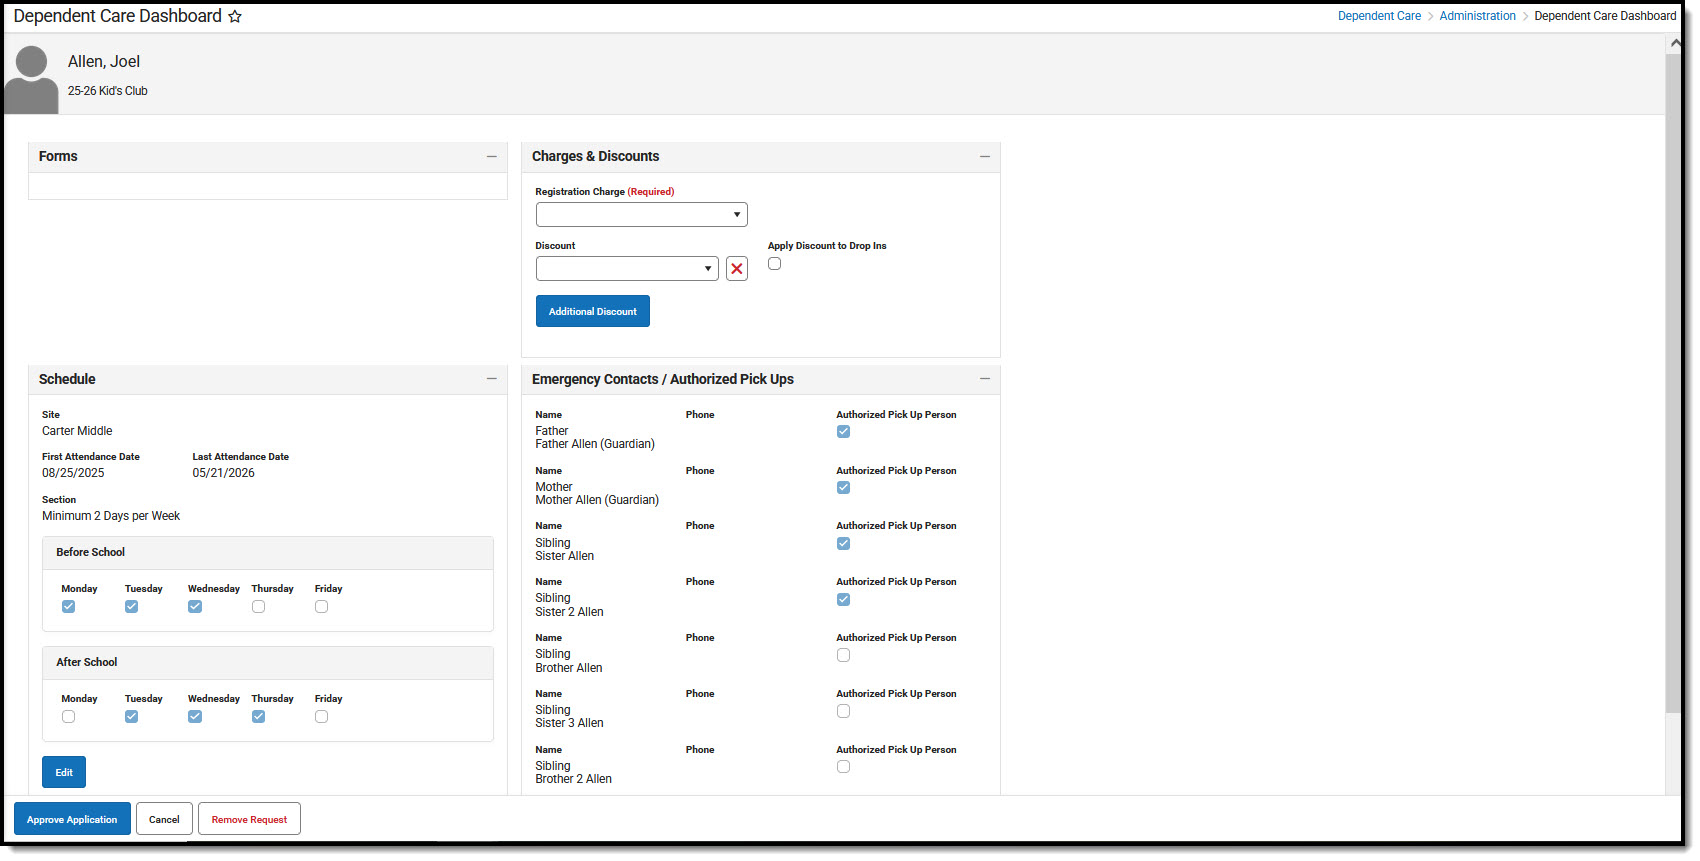
View Dependent Details
Users may use this screen to view details for the dependent such as session forms, charges and discounts, dependent care schedules, and emergency contact information. This is a read-only screen for students with an approved registration. Users may edit some fields if the student's registration is pending.
 Dependent Care Registered Dependent Details
Edit Dependent Details for Pending Registrations
If a student's Registration status is still Pending, users may make changes to the student's details. Once the request is approved, users are no longer allowed to make changes.
- Press Details for the student for whom you'd like to make changes. Details for the student are displayed.

Student Forms
In the Forms section, user can review and approve any required forms parents have filled out in relation to the session for which they're registering. Forms are added when the session is created. See the Adding Portal Information to a New Session article for more information.

- To review a form, click on the appropriate form. The selected form displays for the user to review.
- Press Form Complete to approve the form. The status of the form changes from Awaiting Review to Complete.
- Use the Print button to print out the form.
- Press Cancel to exit without approving the form.
Charges & Discounts
This section allows the user to apply a registration fee to the account. Users may also enter any desired discounts to the account. Charges and Discounts are setup when the session is created. See the Adding Charges and Discounts to a New Session article for more information.

- Use the Registration Charge drop-list to select the registration fee to apply to the student.
- To apply a discount to the account, use the Discount drop-list to select the appropriate discount.
- To apply this discount to the student's drop-in care as well, mark the Apply Discount to Drop Ins checkbox.
- Users may add as many additional discounts, as desired, to the student by pressing the Additional Discount button.
- To remove a discount from the student account, simply press the red X button for the appropriate discount.
Schedule
The Schedule section allows users to view the student's desired site for care and dates of attendance. Users can also view and edit the desired attendance schedule.

- To edit the student's schedule, press Edit. The Edit Schedule screen displays in the right screen.
- Use the Site drop-list to change the selected site of attendance. Do not change this setting if the appropriate site is selected.
- If necessary, use the First and Last Attendance Date fields to alter the dates of attendance.
- The Section area is used to edit the student's days of attendance.
- Each section for the session at the selected site and student's days of attendance are displayed.
- Chose the section for which you want to make changes and mark the Select this Section checkbox. If this box is not marked, you may not make changes to the student's days of attendance.
- Mark/Unmark the appropriate days of attendance for the student.
- When finished, press Save to save the changes to the student's schedule or press Cancel to exit without saving the changes.
Emergency Contacts/Authorized Pick Ups
Use the Emergency Contacts/Authorized Pick Ups section to review emergency contacts, edit authorized pick up status, or add any additional emergency contacts.

- Any Emergency Contacts submitted with the registration my not be edited or removed. You can, however, update their Authorized Pick Up status by marking, or unmarking, the Authorized Pick Up Person checkbox.
- To add additional emergency contacts, press Add.
- Use the Name field to enter the name of the emergency contact.
- In the Phone field, enter the person's phone number.
- If this contact is approved for student pickup from dependent care, mark the Authorized Pick Up Person checkbox.
- To remove a contact, find their name in the list and press Remove. The person is remove from the list.
- When finished, press Save to save the changes or Cancel to exit without saving the changes.
- After reviewing the forms and application information, you can press Approve Application to complete the student's registration for the session. Once approved, the student's Registration Status changes from Pending to Approved.
- To exit without approving the application, press Cancel. All changes made to the Student Details are saved, but the registration status remains as Pending.
- To remove the application request, press Remove Request.
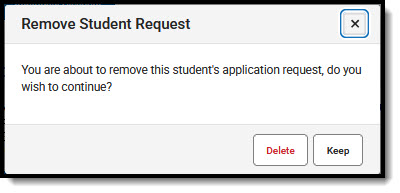
- At the prompt, confirm you want to remove the request and press Delete. Press Keep to cancel to removal of the request. If the request is removed, the student is removed from the session roster.

Review Registration Requests
Registrations are approved or denied through a session's roster. For more information on processing registration requests, see the Reviewing Registration Requests article.
