Once a user exists as a person in Campus, a user account can be created to allow access to the Campus Application, Parent Portal, or Student Portal. This guide walks through the necessary tools to create and maintain user accounts in Campus.
Creating and Managing Individual User Accounts
Add User Account
Once a user account is created for a user, they can be assigned user groups, tool rights, and calendar rights. This content describes how to create an individual user account.
Documentation
Tool Search: User Account
A person's user account controls all aspects of their tool, calendar, and Infinite Campus access. A person can exist within Infinite Campus without a user account, but they cannot log in to Infinite Campus or the Student/Parent Portals or access functionality without a user account.
Users are highly advised to create user accounts for students and staff en masse via the User Account Batch Wizard.
Only users with a Product Security Role can assign tool rights, calendar rights, and user groups. If you cannot see or access these areas of a user account, you do not have permission to view or change them.
Create a User Account for a Person
For a person to be assigned tool and calendar rights, join user groups, and have access to the SIS, Student Portal, or Parent Portal, they must first have a user account created for them.
Before a user account can be created for someone, they must first exist as a person within Infinite Campus (click here for more information on adding a person to Infinite Campus).
To create a user account:
Search for and select the person within the User search.
Click the New button. The User Account Detail editor will appear.
Use the table below to best fill out the User Credential fields:
Field
Description
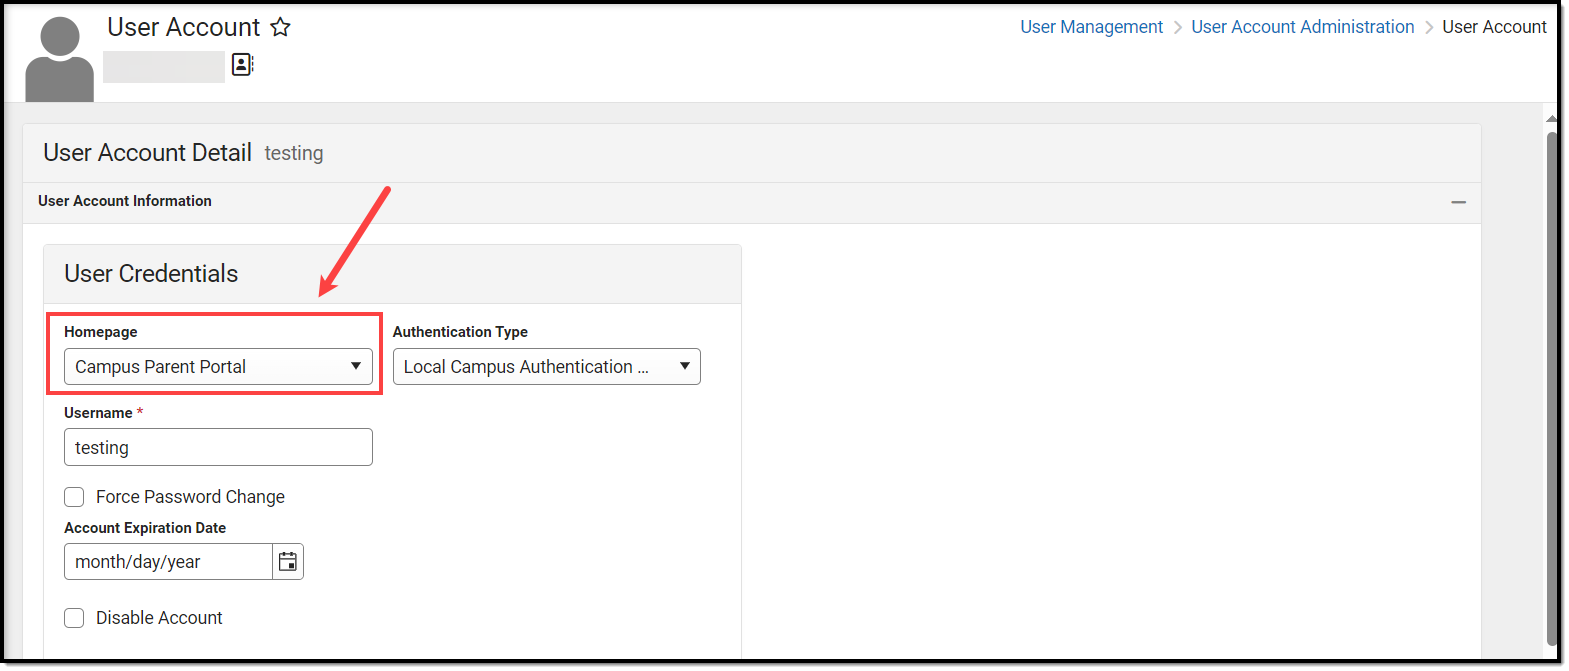
Homepage
This field indicates which interface the user name and password allow access to:
Campus Application - for district employees
Campus Parent Portal - for parents
Campus Instruction - for teachers and staff
Campus Student Portal - for students (enhanced features and optimized for mobile devices and tablets)
Public Store - for Public Store customers who are not district employees, students, or staff. Infinite Campus does not recommend manually creating this type of account. When someone creates an account on the Public Store, their name and email address are saved in Campus in the Demographics tool and Campus creates and assigns the Public Store Homepage to their user account.
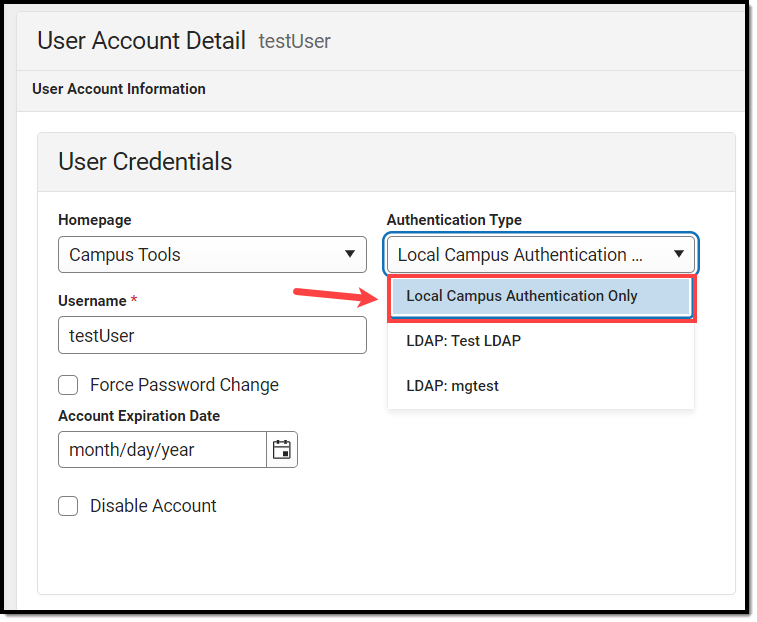
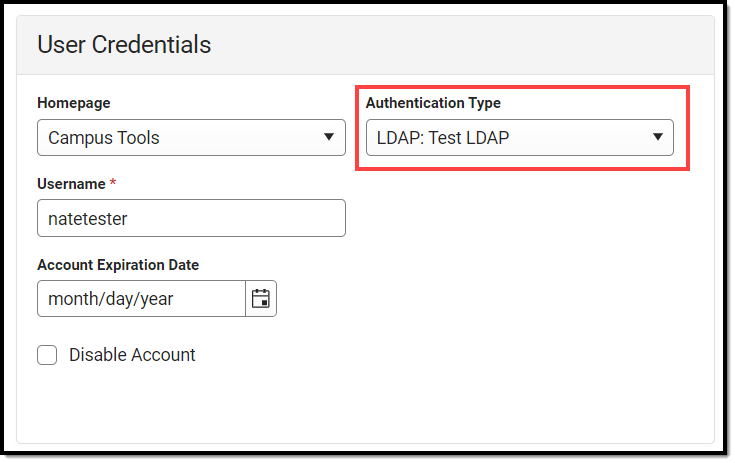
Authentication Type
This field determines how the user is required to authenticate and log into Infinite Campus.
Users are forced to log in using the following:
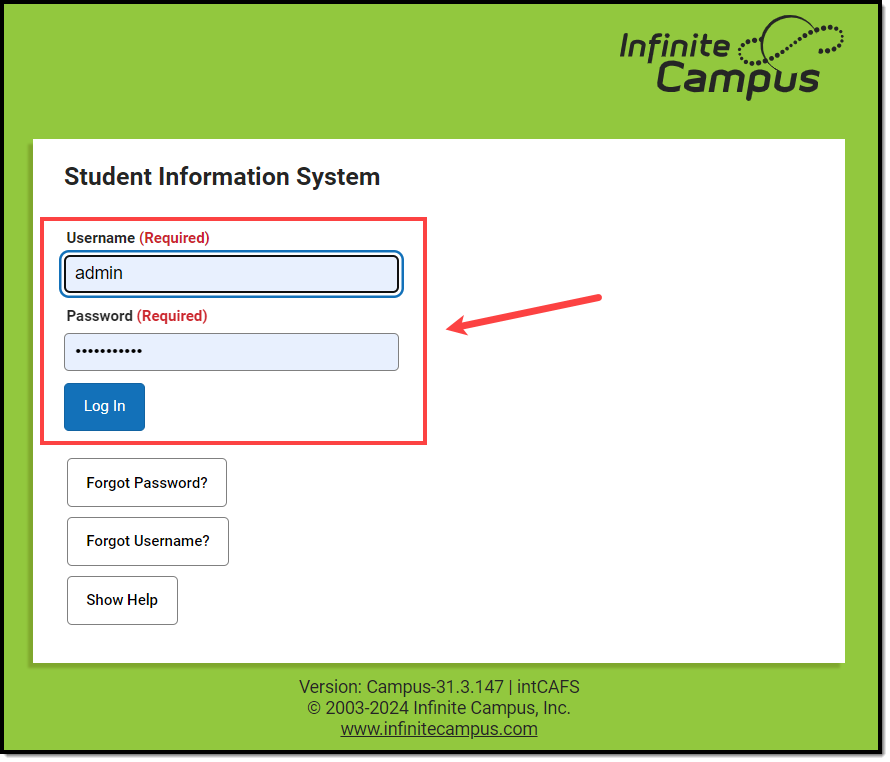
Their Campus ID and password (Allow Only Local Campus Authentication)
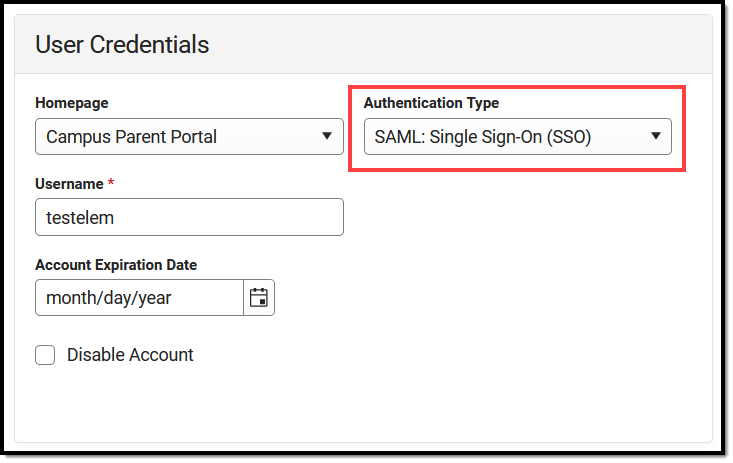
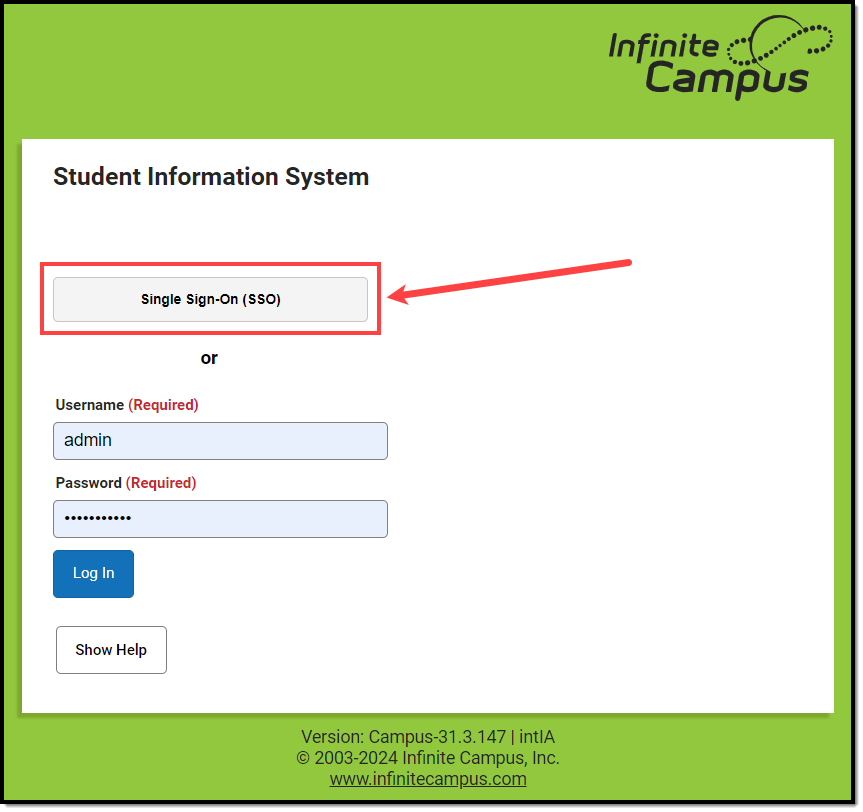
Their SSO username and password (Allow Only SAML Authentication)
Or their LDAP username and password (Allow Only LDAP Authentication)
The default value in this field is set via the Authentication Type Droplist Default preference found in System Preferences.
This field is only available if SAML SSO authentication and/or LDAP is enabled for your district. Please note that when setting a User Account to "Allow Only SAML Authentication", Cafeteria Serve only authenticates with a local Campus or LDAP account.
For more information about SAML SSO functionality, see the SAML Management article. For more information about LDAP, see the LDAP Authentication article.
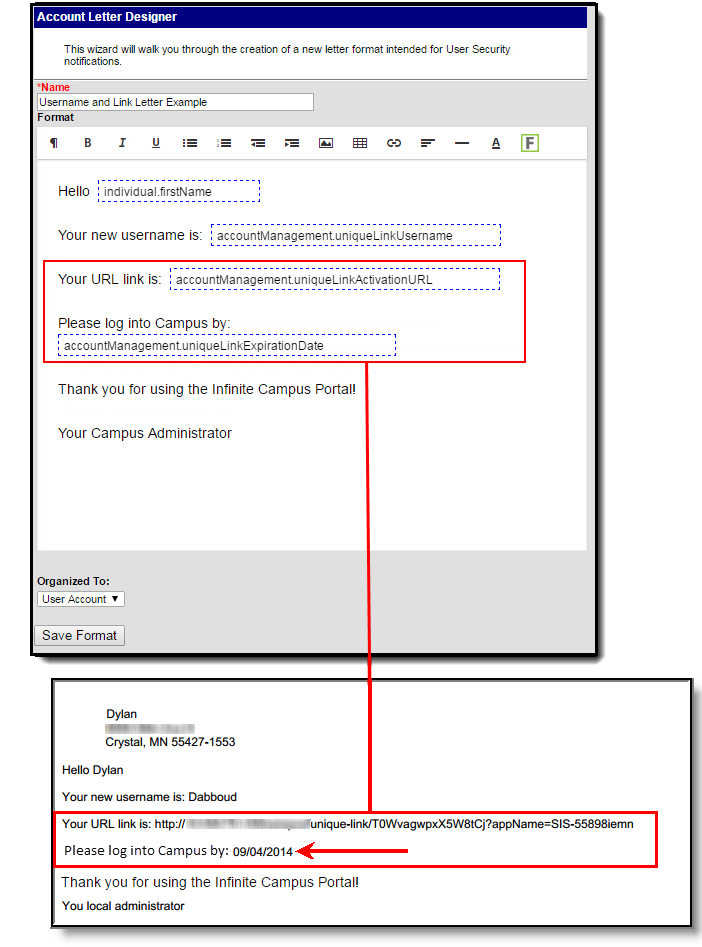
The value set in this field determines the method the user uses to log into Infinite Campus (click the image below).
Username
The name they will use as their username when logging into Infinite Campus.
Password
The password the individual will use to log into Infinite Campus.
The user must re-enter their password to ensure it matches the password entered in the Password field. This helps to catch typos or other issues the user didn't mean to enter in the Password field.
Password Strength
A visual indication of the password strength. A password must show green in order for it to be accepted.
When creating a password, consider the following:
Content - Use a short two or three-word sentence as your password.
Length - Make your passwords long (8-10 characters minimum is usually sufficient).
Combination - Include letters, punctuation, symbols, and numbers.
Uniqueness - Do not use your username or words found in the dictionary.
Generate Password
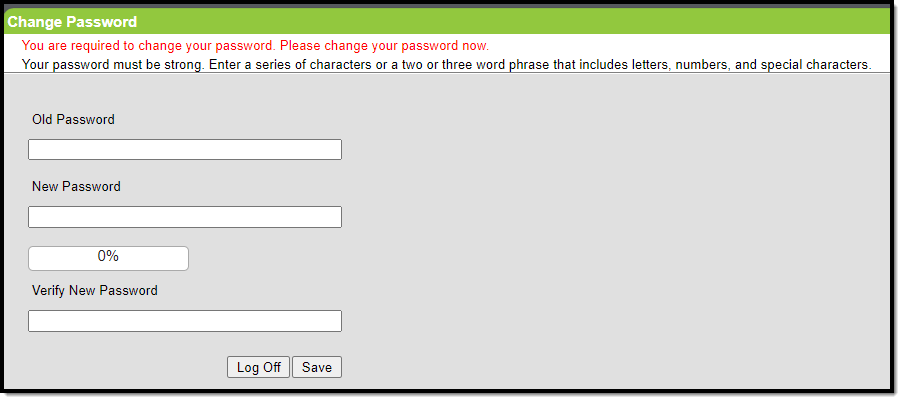
Automatically generates a password for the user account. This password is temporary and the user will be required to update it with a password of their own the first time they log into Infinite Campus.
Show Password
Shows the password in the Password field in plain text.
Review the following sections for more information on assigning authentication information, user groups, tool rights, etc:
Once all user account values have been selected, click Save. The user account is now active within Infinite Campus and the user can log in and access functionality based on the permissions granted.
Authentication Information
The table below explains the Authentication Information fields and how they impact a user account.
Field
Description
Exclude from Multi-Factor Authentication and new device notifications
This preference allows you to exclude individual user accounts from requiring time-based multi-factor authentication from a third-party app (when enabled) and prevents users from receiving notifications when logging in using a new device.
This option should only be used when necessary and only applied to the least amount of necessary accounts.
This setting is not available for user accounts set with a Homepage of Campus Parent Portal, Campus Student Portal, or School Store as it does not apply to these types of accounts.
Time-based Multi-Factor Authentication
As an increased layer of protection for Infinite Campus accounts, all non-Campus Portal user accounts can be enabled with time-based multi-factor authentication from a third party app. When enabled, users are provided a unique QR code and Text Code, which requires them to authenticate their account using a device and an authenticator application (such as Google Authenticator, Authy, LastPass, etc).
This setting is not available for user accounts set with a Homepage of Campus Parent Portal, Campus Student Portal, or School Store as it does not apply to these types of accounts.
If you experience any issues authenticating, know that your device must be in sync with the actual time in order to authenticate. Compare the time showing on your device to the actual time (https://www.time.gov). If the time on your device is out of sync, you can correct this in your device's Date & Time settings. In your device settings, you will likely have the option to enable your device to sync the date and time automatically.
Mark the Time-based Multi-factor Authentication checkbox
Select the frequency in which the user must use an authenticator app when logging into Infinite Campus (30 minutes, Day, Week, Month).
For example, if a user logs in using an authenticator and this field is set to 30 minutes, after 30 minutes have passed, the next time the user attempts to log into Infinite Campus they will be required to go through the authenticator process.
Click Save
Time-based multi-factor authentication from a third-party app is now enabled for this user account.
Once enabled, the next time the user attempts to log into Infinite Campus, they will see a screen displaying a unique QR Code and Text Code.
Using a device (such as a cell phone), the user must download an authenticator app (such as Google Authenticator, Authy, LastPass, etc) and use the app to scan the QR Code or enter the Text Code. This will register the device and tie it to their Campus account.
Once they have scanned the QR Code or entered the Text Code in the authenticator app, the app will display a code. Enter the code from the authenticator app into the field on the Campus login screen, mark the Recognize this device in the future checkbox, and click Continue (see image below). The user will be logged into Campus.
Based on the frequency of when they need to authenticate (30 minutes, Day, Week, Month), the user must access their authenticator app on their registered device and enter the code displayed in the authenticator app into the field on the Infinite Campus login screen. Users should mark the Recognize this device in the future checkbox and click Continue. If the code they entered is correct, they will be logged into Campus.
PIV Card Authentication
The Enable PIV Authentication field enables or disables the ability for the user to register and use a PIV card to log into Infinite Campus.
This setting is not available for user accounts set with a Homepage of Campus Parent Portal, Campus Student Portal, or School Store as it does not apply to these types of accounts.
Note: This field is only available if the Enable PIV Authentication field in Login Security Settings is set to Yes.
For a walkthrough of the PIV Authentication registration process, see the following articles:
Product Security Roles grant system administrative-level access to Infinite Campus and well as access to specific premium products and functionality such as the ability to login in as other users.
For a detailed explanation of each role, see the following articles.
Access Information details failed login attempts, the last time the account password was changed, the last time the user account logged into Infinite Campus, who was the last person to modify user account data, and the date and time the user account was created.
Field
Description
Failed Login Attempts
This field indicates the number of consecutive times the user has failed to log into Infinite Campus.
Once a user successfully logs into their account, this count goes back to 0.
Reset Login Attempts
This allows you to reset the failed login attempts count. Resetting this value also resets the need for the user to log in via Captcha (which occurs at 5 consecutive failed login attempts).
Password Last Changed By
This field indicates who the last user was to change this user's password and the exact date and time in which the password change occurred.
Last Login Timestamp
This field indicates the exact date and time the user last logged into Infinite Campus.
This field is not impacted by Login as User functionality. It only registers when the user themselves log into Infinite Campus.
Modified By
This indicates the last person to modify the user's account and the date and time in which the change occurred.
Created Timestamp
This indicates when the user account was created. This date is populated by any method used to create the user account (e.g., student/staff automation, imported new user, Quartz job, etc).
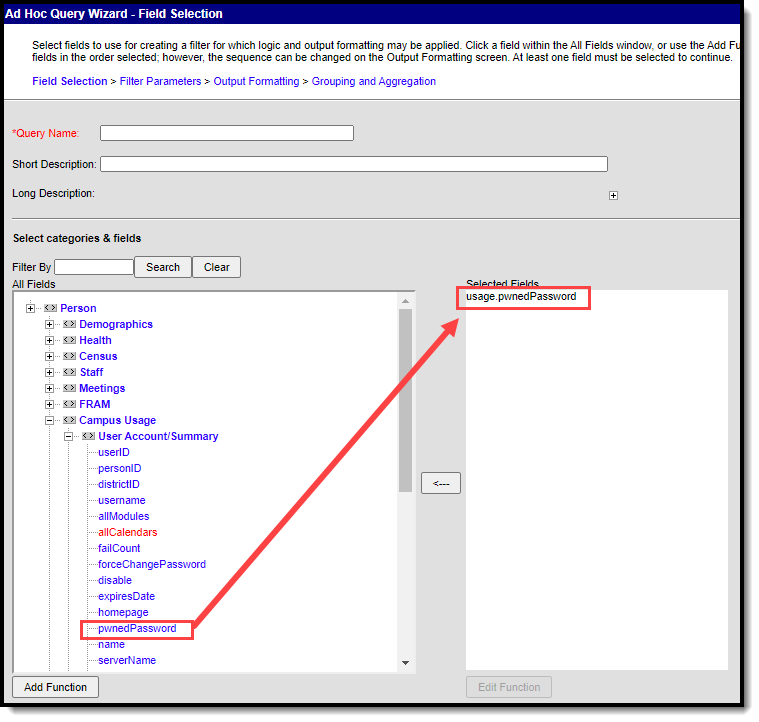
This field is also available within Ad Hoc Reporting.
User Groups
User groups are an efficient and effective way to manage an individual's tool and calendar rights by assigning specific tool and calendar rights to a user group and then assigning people to the group. People assigned to a user group inherit the rights assigned to the group which greatly speeds up the process of assigning rights to each individual and provides an efficient way to modify these rights and have this change impact a large set of users.
For example, creating a user group for primary teachers would allow you to easily assign this group to a new teacher user account and skip the need to go through and individually assign the account specific tool and calendar rights. Later on, if it's decided primary teachers should be able to see and access a new tool, the administrator would simply need to add tool rights to the user group and all teachers assigned to the group would be given rights to the tool.
Users working with many user groups (in the thousands) may experience some system performance slow down when searching for and adding user groups.
To assign the user to a user group(s):
Locate and select the user group within the Search and Add User Groups column on the left. You can narrow the user group list by entering search criteria within the search box. The field will continue to refine results as you enter more characters. Each user group selected will appear in the user group will appear in the Current Group Membership window.
Once all user groups have been selected, click the Save icon. The user is now a member of the selected user group(s) and has access to all of the tools assigned to said user groups.
If you are unsure of what calendar and tool rights were granted to a user via user groups, you can review a summary of a user account's calendar and tool rights in the Log and Summaries area.
Individual Tool Rights
Tool Rights determine the level of access users have to tools throughout Infinite Campus.
Only users assigned a Product Security Role may assign tool rights to users.
Due to the wide range of school-specific duties and policies, this article cannot make recommendations on how to assign tool rights to particular types of users. District administrators will need to determine the appropriate amount of access for each user/group based on that user/group’s needs.
To assign tool rights:
Click the Modify Tool Rights button. The User Tool Rights Editor will appear.
Navigate to each tool you wish to grant the user rights to access and determine the level of access they should receive (Read, Write, Add, Delete). See the section below for more information about these levels of access and how they impact using Infinite Campus.
Once all tool rights have been selected, click Update. The user will now have access to the tools marked.
Understand Tool Rights Access Levels
This section will explain the four different access levels that can be assigned for each tool within Infinite Campus.
A partially checked indicator has been added to the New Look of Infinite Campus, appearing in the RWAD checkboxes of tools/menu items where the user does not have tool rights to the tool/menu item but does have rights to tools or sub-rights contained within the tool/menu-item.
Expand the link below for an example of this indication.
Read
Read indicates the user may view the information in the applicable interface area. When only R rights are applied, the user cannot access the action bar's Save, Add, or Delete icons. Reports need only the R right for full access to viewing and generating results. In addition, R rights allow the printing of information, when applicable. Many wizards require only the R right to have complete access.
Write
Write indicates that the information on the applicable interface area may be viewed and modified by the user. When this right is applied, the Save icon in the action bar will be functional. This right allows the user to modify only existing data in the area (adding new data is controlled by the A right). This right includes the ability to modify data from a specific field.
Add
Add indicates the information on the applicable interface area may be viewed, modified, and added to. When this right is applied, the New or Add icons in the action bar will be functional. This right allows the user to add new data/records.
Delete
Delete indicates the information on the applicable interface area may be deleted. When this right is applied, the Delete icon in the action bar will be functional. This right provides the ability to completely remove an existing record, including all data contained within the record. The ability to change/remove data from a field is controlled through Write. A user generally has RWA rights if he/she has D rights.
Users should assign this right with caution.
Campus Instruction Tool Rights
Compared to the RWAD rights structure for Campus Tools, rights to Campus Instruction are currently all or nothing. Each Instruction tool can have All rights for a tool or not.
Identifying Sub-Rights
Sub-rights are used to control specific functions or gatekeep certain data within a tool. Sub-rights are also found under the tool it applies to and have a | to the left of the sub-right, delineating it as a sub-right.
Example of Tool Rights
The following are examples of how tool rights affect how users are able to view and access tools throughout Campus.
Limited Tool Rights (Read Only)
Limiting a user's tool rights affects how they are able to interact with a tool. In the example below, the user is given only Read rights to the Student Information module. Because the user only has Read rights, all of the fields within each Student Information tool are read-only and the Save, Delete, and New buttons are unable to be used.
Full Tool Rights (RWAD)
Providing RWAD tool rights to a user means the user has full access to modifying data with the tool. In the example below, a user with RWAD tool rights to the Student Information module is able to modify all data within any Student Information tool.
Compare this example with the example above for a better understanding of how user groups are provided different tool access based on tool rights.
Privacy Law Compliance
To ensure that unauthorized users do not violate federal FERPA and HIPAA privacy laws, unauthorized users should NOT be allowed access to certain, federally protected areas in Infinite Campus.
The following fields/areas of student data are federally protected:
FRAM > Eligibility > Eligibility
Enrollments > State Reporting > Ward of State
Demographics > Enrollments > State Reporting > Ward of State
Enrollments > State Reporting > Homeless
Enrollments > State Reporting > Migrant
Enrollments > Special Ed > Service Hours
Enrollments > Special Ed > Service Hrs Percent Reported
Program Participation > English Learners (EL)
Enrollments > Enrollment History
Census > People > Demographics > Enrollments > Enrollment History
Health Office > Conditions
This is not a comprehensive list. System Administrators should use caution and follow district guidelines for what users and user groups should be given access to Federally protected data. System Administrators must specifically deny unauthorized users and user groups access to these fields; otherwise, these users may be able to access this data when pulling Ad hoc filters.
Individual Calendar Rights
Calendar Rights determine what school(s), year(s), and calendar(s) the user has access to view and modify. Calendar rights work in tandem with Tool Rights, where Tool Rights determine which tools the user can access and Calendar Rights determine which calendars the user is allowed to view and modify via tools.
System administrators are highly encouraged to provide calendar rights to users by assigning them to an appropriate user group(s). Providing individual calendar rights is not recommended.
District system administrators should be the ONLY members with full rights to access all calendars and all tools. District system administrator rights should not be assigned on this tab.
To assign calendar rights:
Select the Add Row button.
Select the Year, School, and Calendar the user is allowed to access.
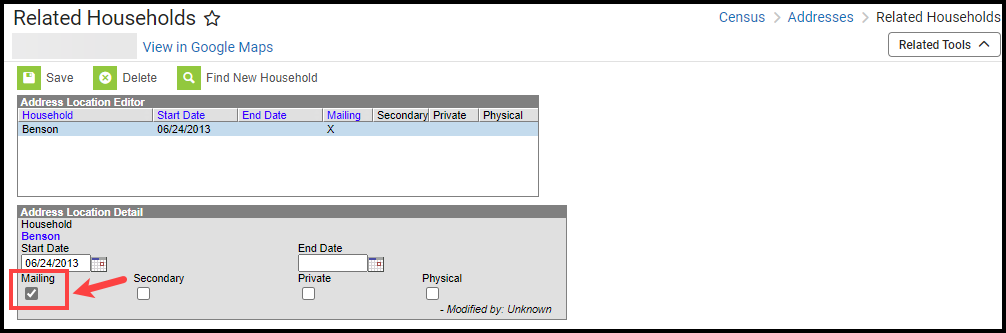
If the user should be allowed to modify data in the selected Calendar, mark the Modify Rights checkbox.
Assigning Modify Rights to historical calendars is not recommended.
Marking the Modify Rights checkbox means the user is allowed to modify data within the calendar (in conjunction with their assigned tool rights).
If the Modify Rights checkbox is not marked, the calendar will be read-only. This user will not be allowed to modify any data, regardless of whether or not the user has specific tool rights to modify tools.
If the user should be allowed to modify attendance data for closed school months, mark the Close School Months checkbox.
School Months are only used in some states and are assigned the System Administration > Calendar area. If your state does not use school months, this tab is not displayed in Calendar and this field should not be used.
Select the Save icon. The user is now allowed to modify data within the year, school, and calendar selected. If the user should have calendar rights to additional years, school, and/or calendars, repeat steps 1-5.
Calendar Rights Scenarios
Expand the section below to view examples of different ways to set up calendar rights.
All Calendars/All Schools with Data Modification Rights
To assign a user the ability to view and modify all data within all schools and all calendars in the district:
This will grant Calendar Rights that match the rights granted via the now-retired All Calendars checkbox.
Set School to 'All Schools'
Set Year to 'All Years'
Set Calendar to 'All Calendars'
Mark the Modify Rights checkbox.
Click the Save icon
All Schools/All Calendars with Read-Only Data Access Rights
To assign a user read-only data access rights to all calendars and schools within a district:
Set the School to 'All Schools'
Set the Year to 'All Years'
Set the Calendar to 'All Calendars'
Leave the Modify Rights checkbox unchecked.
Select the Save icon. Once saved, the calendar rights will appear with 'Read-Only' next to it in the Rights Editor window.
Select Schools/Calendars with Data Modification Rights
To assign a user data modification rights for a specific calendar within a specific school:
Select a school within the School dropdown list.
Select a calendar within the Calendar dropdown list.
Mark the Modify Rights checkbox.
Select the Save icon.
Select Schools/Calendars with Read-Only Data Access Rights
To assign a user read-only data access rights for a specific calendar in a school:
Select a school within the School dropdown list.
Select a calendar within the Calendar dropdown list.
Leave the Modify Rights checkbox unchecked.
Select the Save icon. Once saved, the calendar rights will appear with 'Read-Only' next to it in the Rights Editor window.
Read-Only Rights for a Previous Year
To assign a user read-only rights to a previous year's calendar:
Select a school within the School dropdown list.
Select the Year.
Select the Calendar.
Leave the Modify Rights checkbox unmarked.
Login as User
The Login As User button only appears for users who have equivalent or greater tool rights than the user they want to log in to, and it is only available with an SIS or Login as User Product Security role. When logging in as another user, users cannot gain access to tools for which they currently do not have tool rights.
Expand the link below to learn more.
This feature is unavailable for users only assigned the Student Information System - Group Assignment role.
The Student Information System - Login As User role is prohibited from logging in as another user with the Student Information System - Login As User role. Users assigned this role are only allowed to log in as another user once per Campus session. This behavior was put in place to ensure users do not jump from one user account to another.
The Administrator selecting this button MUST have calendar rights for the school listed on the other user's (person being logged into) District Assignment page.
A system preference called Restrict Login As User Feature On Users With Product Security Role controls whether Product Security users may log in as another user with a Product Security role. This preference is found within the Account Security Preferences tool. The default value for this preference is No which allows Product Security roles to log on as each other.
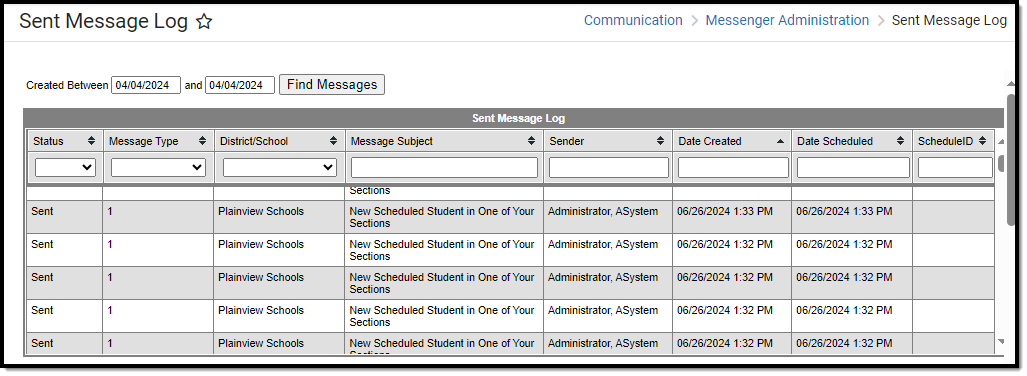
Every Campus login is stored by the system on the user's Access Log. The Third Party Admin column indicates that another user has used the Login As User button to log into Campus as this user. This column reports the other user's name, user ID and username.
Reset Password
To change the user account password, select the Reset Password button, enter a New Password, and Verify the Password. The box beneath the first password field indicates the new password's strength with red meaning weak, yellow meaning medium, and green meaning strong. Users will not be allowed to save weak or medium passwords.
Please see the Managing User Account Passwords article for detailed information about passwords and ways to manage them within Infinite Campus.
Reset Account Settings
Selecting the Reset Account Settings button will clear all trusted devices tied to the person's account, requiring the user to re-establish each device as a trusted device when logging into Infinite Campus.
For districts using multi-factor authentication, selecting this button will reset the user's multi-factor authentication configuration, requiring them to establish a new trusted device and log in using an Authentication app. For information about multi-factor authentication, see the Login Security Settings article.
This button will also reset the user's account recovery email address, requiring them to enter a new recovery email address the first time they log into Campus after selecting this button.
This button will only appear for user accounts that have an Account Security Email address established in Infinite Campus and/or the Parent Portal.
A person's Account Security Email is used to recover a forgotten username or reset their password via the Forgot password? or Forgot username? options on the Infinite Campus login screen.
Log and Summaries
The Log and Summaries area contains reports for reviewing user account access, tool rights, and calendar rights.
Access Log
Every attempt to log into a specific user's Infinite Campus account is stored and displayed in the user's Access Log. You will only see login information for the account you are currently logged into and using to access this tool.
Data captured for each user login attempt is as follows:
Field
Description
Timestamp
Login date and time.
You can filter this column by a specific date or see all data before or after a specific date.
Success
Indicates whether or not the user was successful in logging into their account.
Remote IP
Source IP address.
Balancer Header
Indicates the load balancer the user used to log into Campus.
Remote Browser
Operating system and browser combination used.
App Server
The application server of the login attempt.
Third Party Admin
Indicates that another user (with equivalent or greater administrative rights) has used the Login As User button to log into Campus as this user. This column reports the other user's name, user ID, and username.
Calendar Rights Summary
The Calendar Rights Summary details which calendars in which years a specific user has rights to access and how this access was granted.
A single-person icon indicates access to that calendar was granted via individual user Calendar Rights.
A group icon indicates calendar access was granted by the user being a part of a specific user group. Hovering your cursor over the group icon will indicate which user group(s) granted the user rights to the calendar.
Tool Rights Summary
To access a comprehensive view of the user's tool rights within Infinite Campus (including tool rights granted via User Groups), click the User Rights Summary button. You can also view this information in a report by clicking Generate Report.
You can expand tools to view additional tool rights and sub-rights. You can also hover the mouse cursor over a tool to see exactly how the user was granted rights to the tool (granted by tool rights or granted by a group).
Account Expiration Date
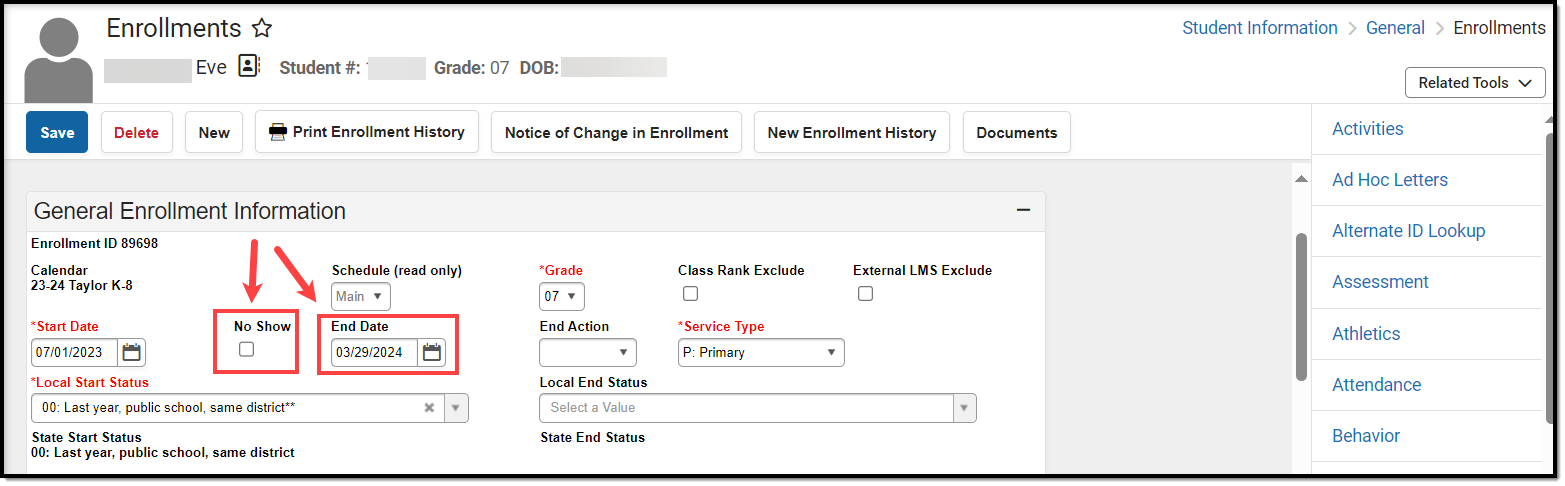
The Account Expiration Date field is the date on which (at 12:01 A.M.) the account will be disabled. This is useful when setting up an account for a person you know should not have access to Infinite Campus after a specific date (such as the day after their last day of working in the district). The User Account Batch Import Tool may have automatically populated this date if set during the import process.
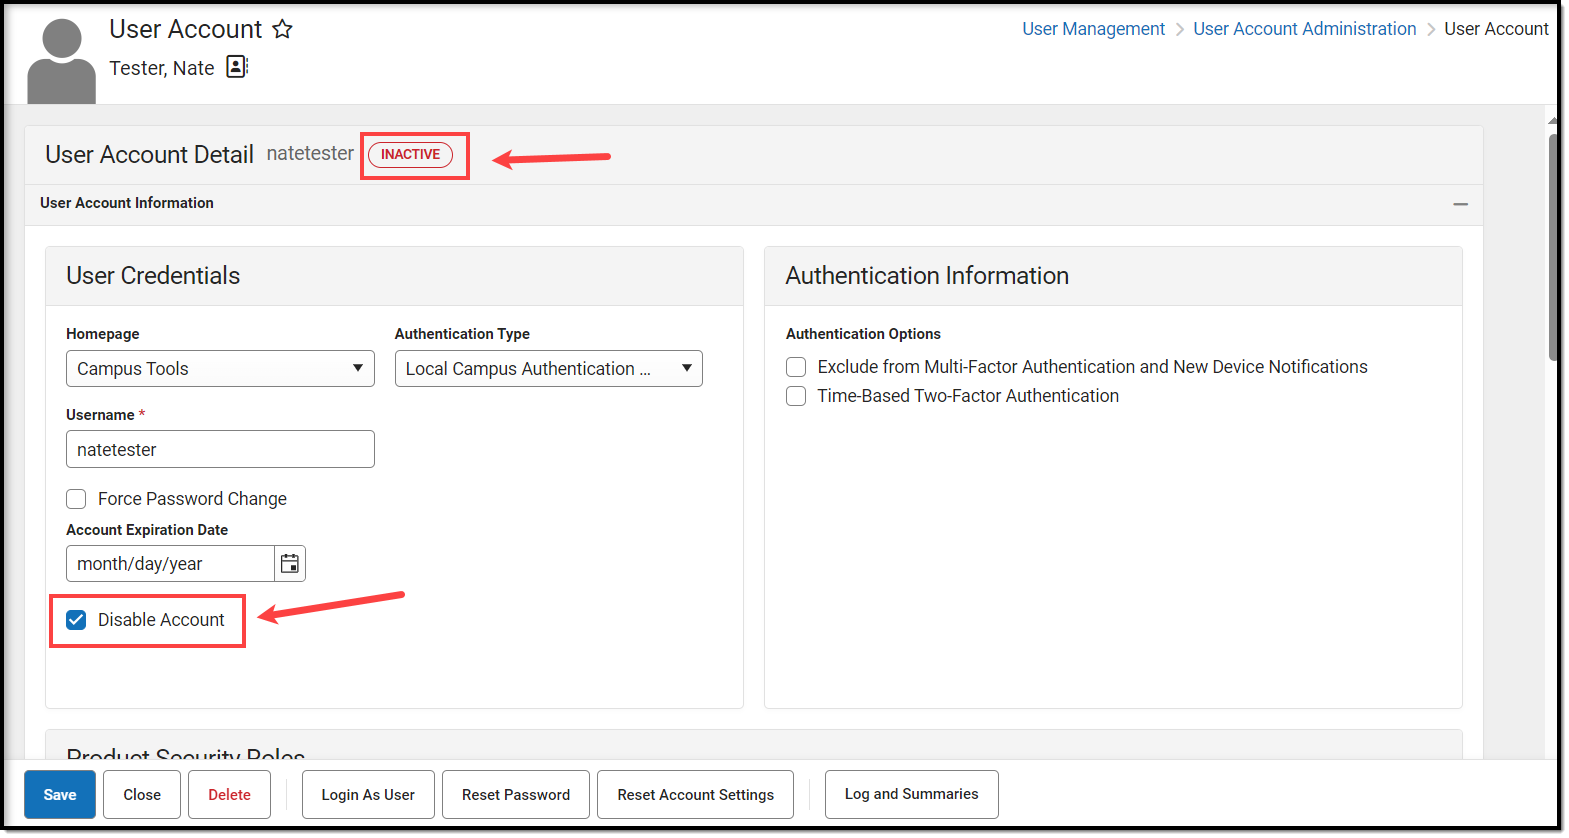
Disable an Account
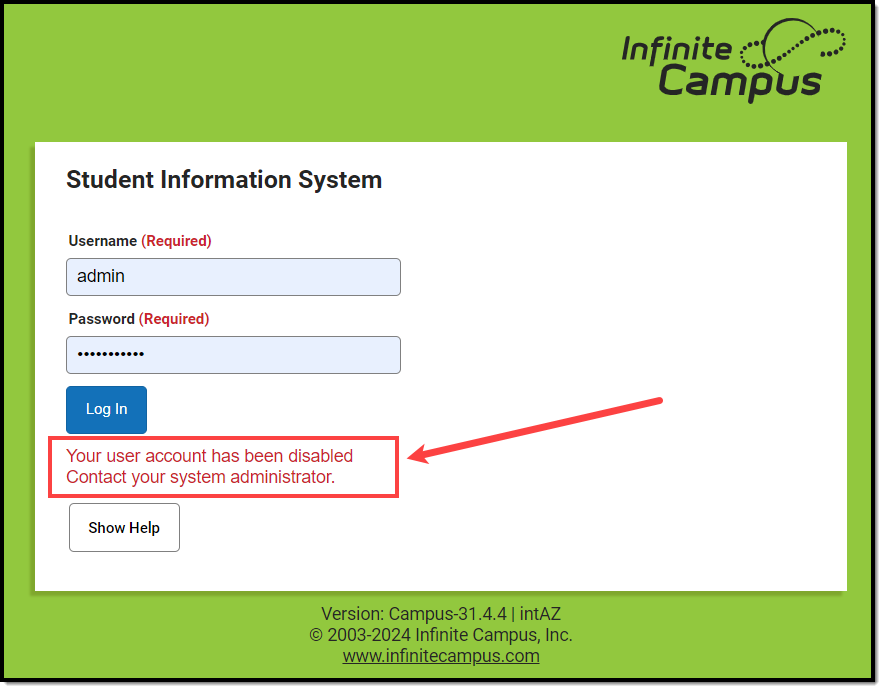
You can disable a person's user account by marking the Disable Account checkbox and clicking Save. The user will no longer be able to log into their Infinite Campus account but will remain within the system (including all associated records and data).
Identifying a Person's Campus Portal Username
You can look up a person's Campus Portal username by going to Census > Person > Demographics > Person Identifiers > Portal Username. This may help troubleshoot issues such as assisting someone who forgot their username.
Best Practice for Users Who Are Staff and Parents
For a person who is both a staff member and a parent to a student(s) in the district, Infinite Campus recommends you create 2 user accounts for them. One user account serves as their staff account and has a Homepage set to Campus Application or Campus Instruction. The second user account serves as their parent account and has a Homepage set to Parent Portal.
Although this requires the person to log into Infinite Campus using two different usernames, it allows Infinite Campus to keep this data separate and ensure the user can successfully log into the proper product they are trying to access (the Campus Application or their Parent Portal).
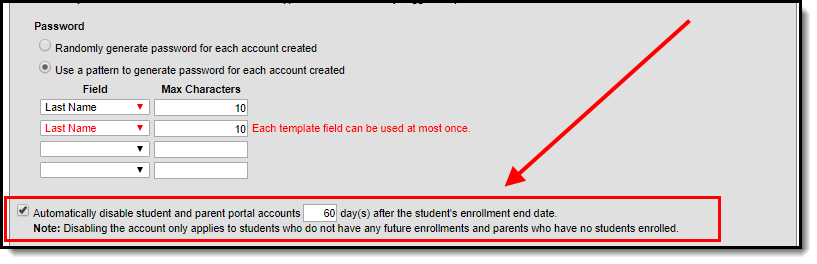
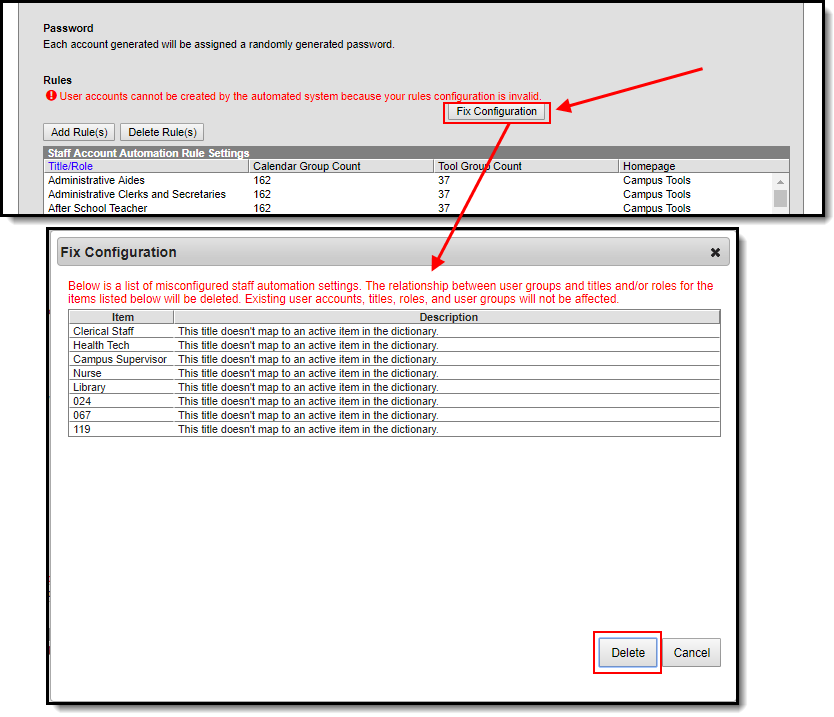
This tool allows you to control various functionalities, such as resetting passwords, restricting the ability of Product Security Users to log in as other people, auditing users, and automatically creating/disabling student and staff accounts.
This tool allows you to batch-create student and staff user accounts using the census email address or a username pattern, enable student and staff user accounts, disable student and staff user accounts, or force a password reset for student and staff user accounts.
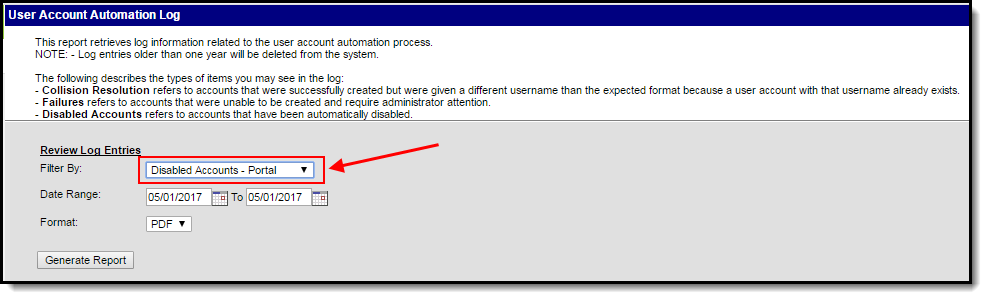
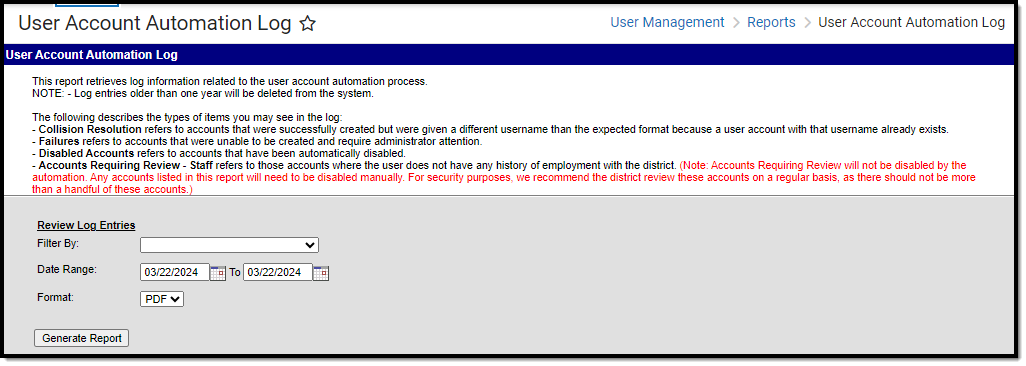
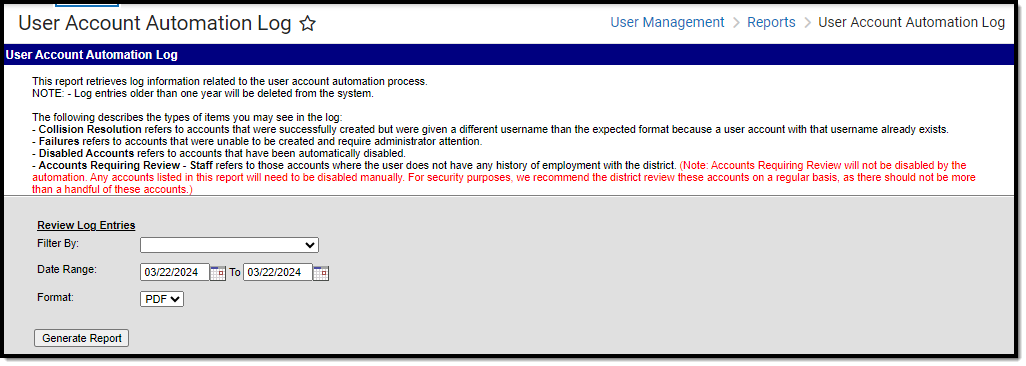
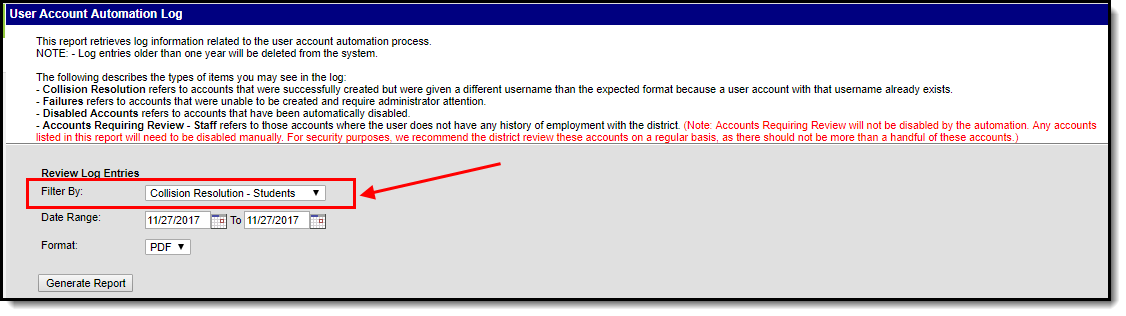
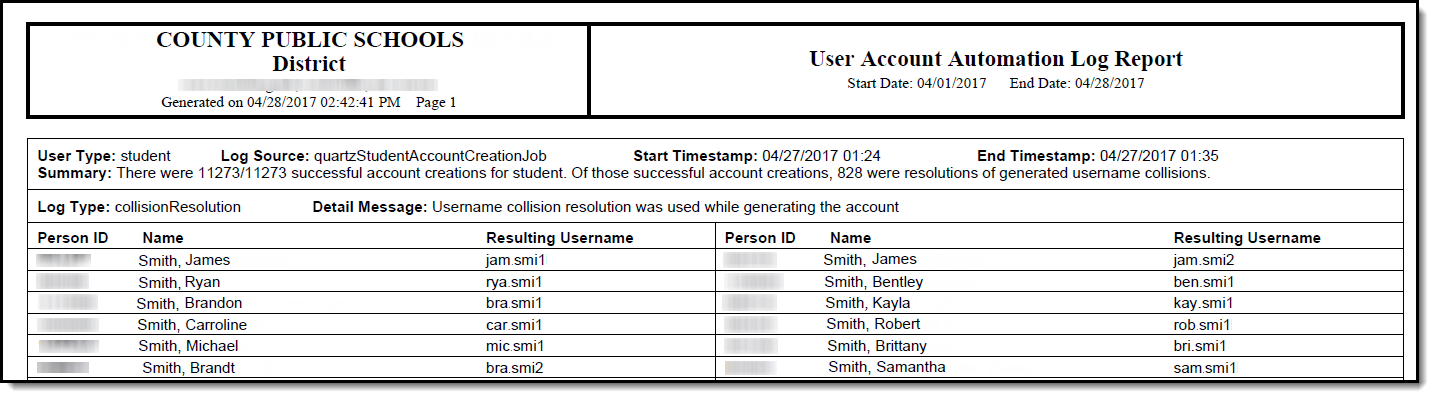
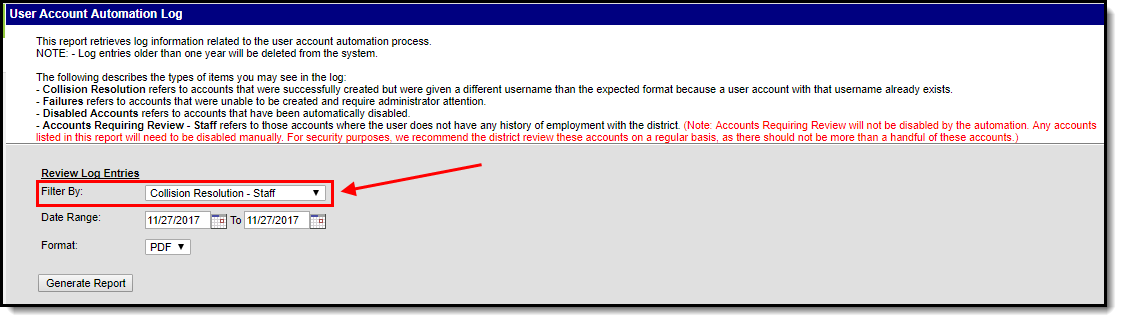
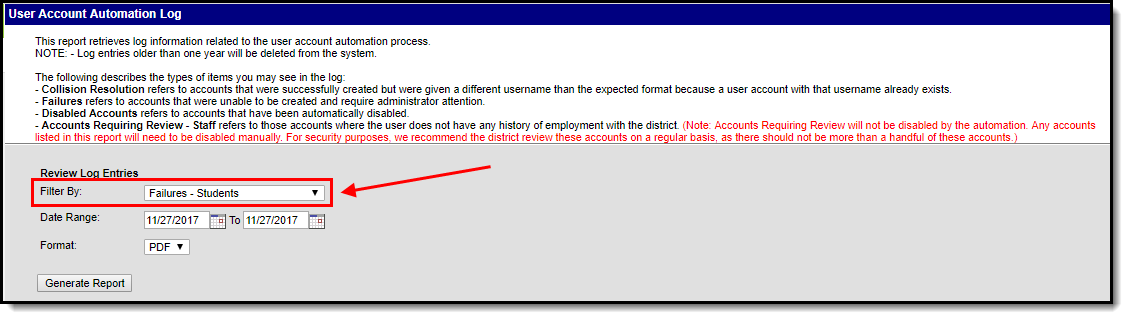
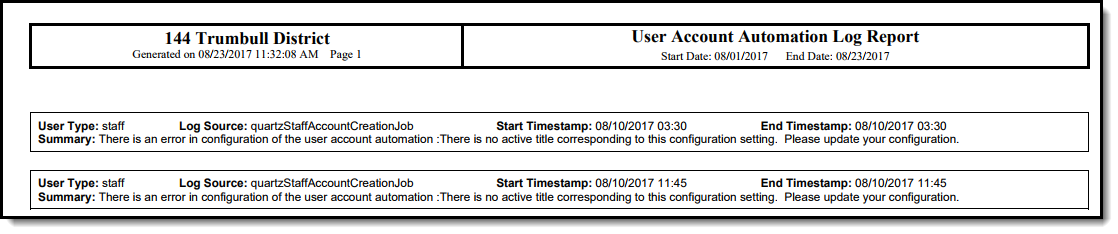
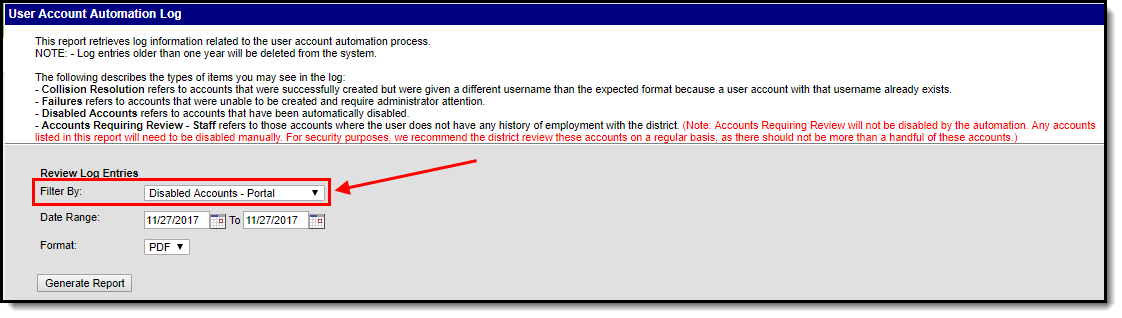
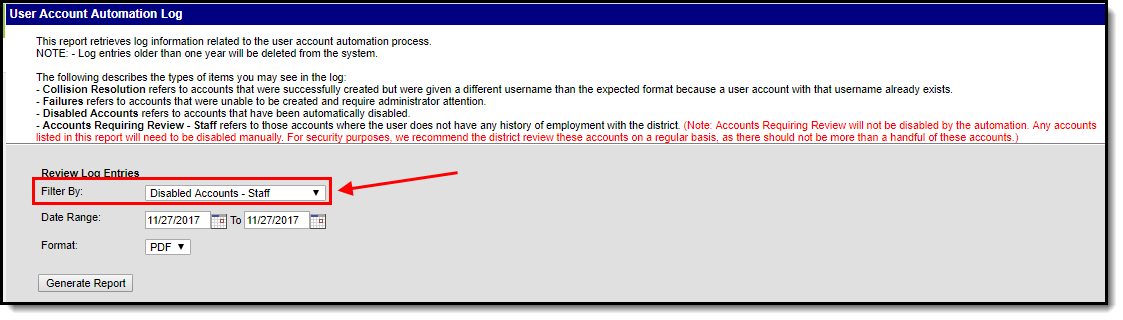
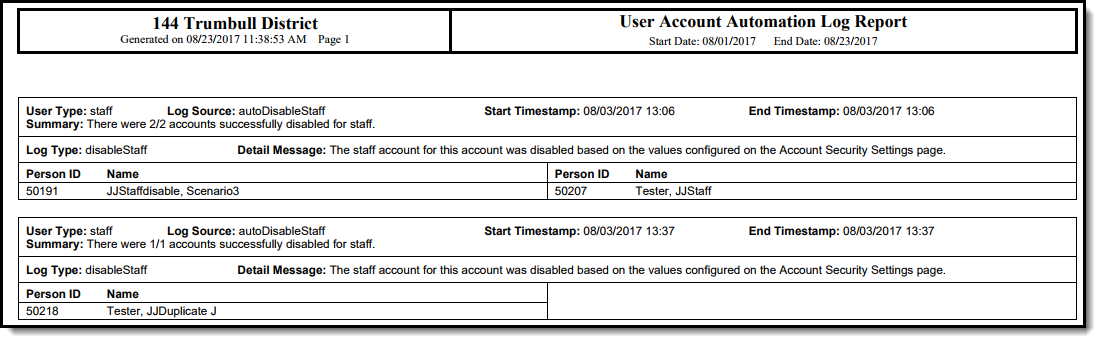
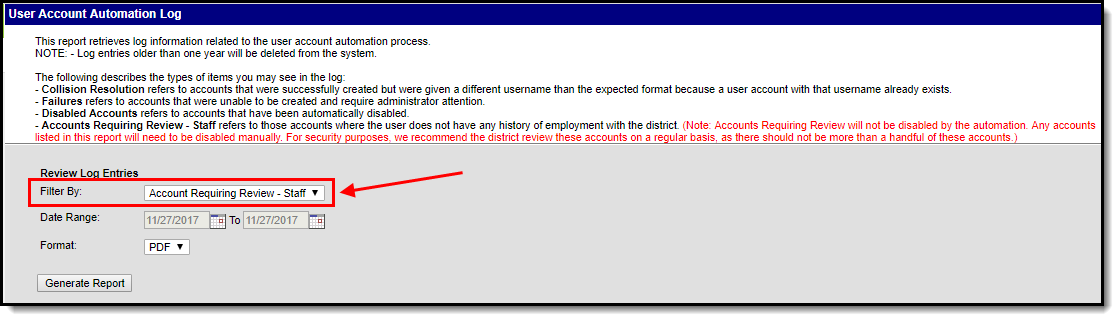
This tool lets you view detailed information about user account username modifications, user account creation failures, and accounts automatically disabled via preferences set in the Account Security Preferences tool.
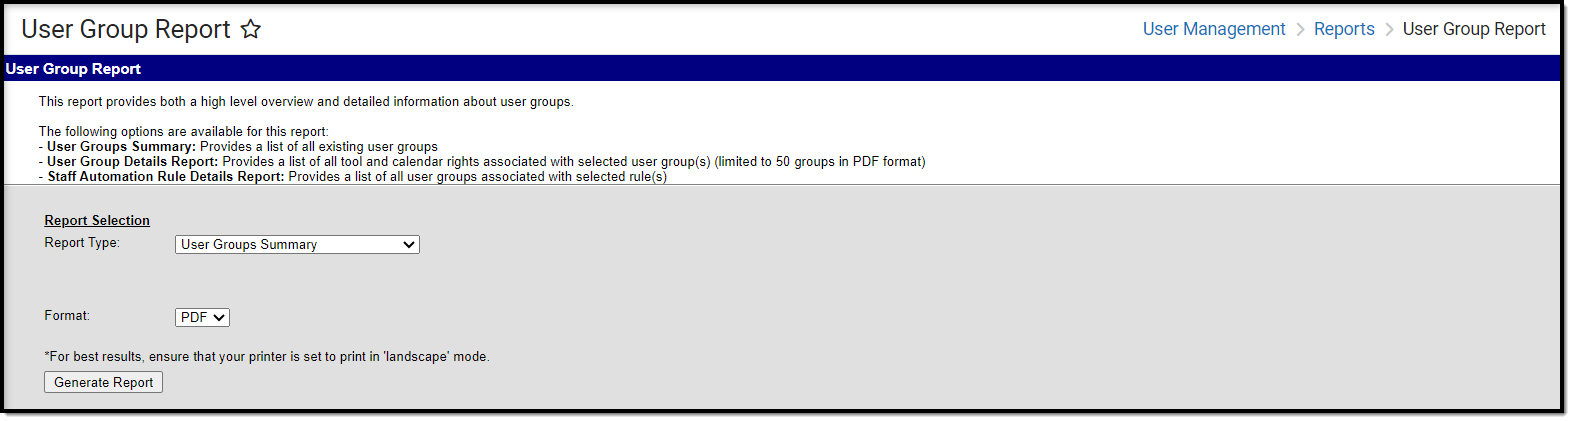
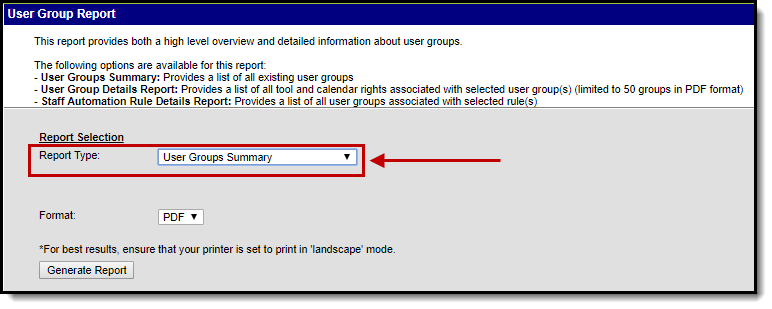
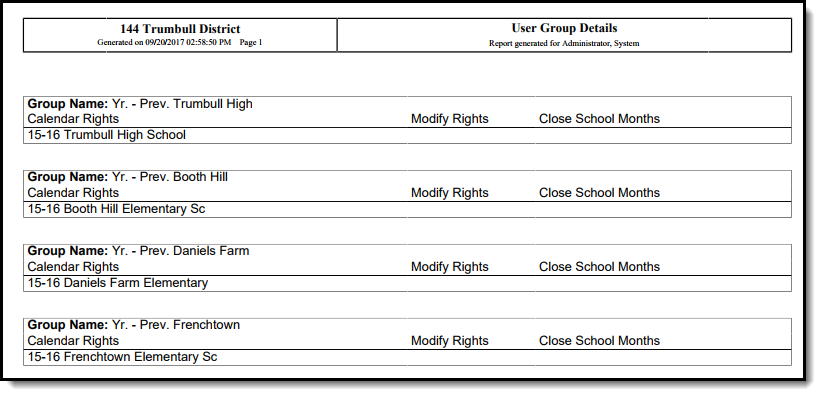
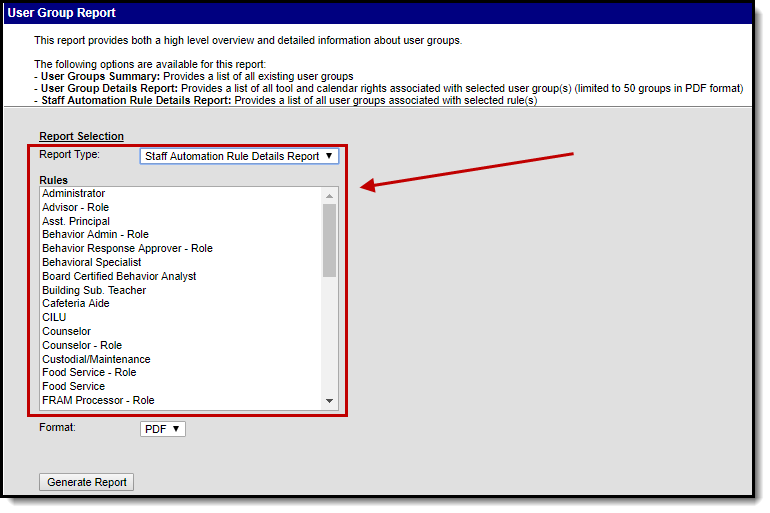
This tool provides high-level and detailed information about which user groups exist, all tool rights and calendar rights assigned to each user group, and which user groups are assigned to which Staff Account Automation rules.
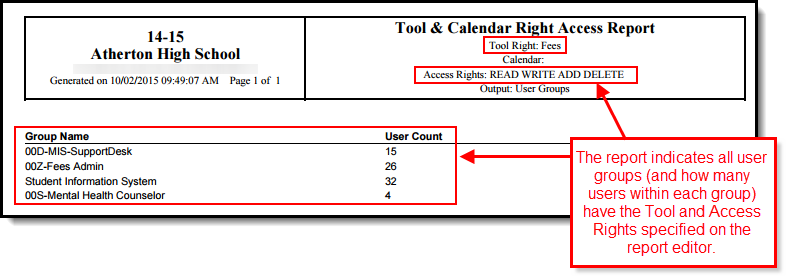
The Product Security Role Report provides a list of all users who have been granted specific Product Security Roles.
Video
Membership in User Groups
Once a user account is created, the user should be assigned to appropriate user groups. User groups are a collection of tool and/or calendar rights. When a user is assigned to a user group, they will inherit all tool and calendar rights assigned to the group.
By managing tool and calendar rights via user group membership, administrators will not need to manage rights for each user. Campus highly recommends keeping tool and calendar rights in separate user groups. For more information on creating user groups, see the Tool Rights User Groups and Calendar Rights User Groups study guides.
Documentation
As of Campus.2415, this tool was incorporated into the User Account tool. An individual's user group memberships are now set up and managed in their user account.
Tool Search: User Groups
The User Groups tab lists the user groups to which the selected person is assigned. User groups eliminate the need to individually assign tool rights to each person who needs the same access.
See the User Groups article for information about establishing user groups.
System administrators are highly encouraged to assign users to user groups as opposed to individual tool rights. This allows admins to easily remove a group of tool rights for a person by removing them from the corresponding user group, or assign tool rights to users without having to go through and individually assign each tool right per necessary tool.
Users working with many user groups (in the thousands) may experience some system performance slow down when searching for and adding user groups.
User Groups
Assigning User Groups to a User
To assign the user to a user group(s):
Locate and select the user group within the Search and Add User Group column on the left. You can narrow the user group list by entering search criteria within the search box. The field will continue to refine results as you enter more characters. Each user group selected will appear in the user group will appear in the Current Group Membership window.
Assign User Groups
Once all user groups have been selected, click the Save icon. The user is now a member of the selected user group(s) and now has access to all of the tools assigned said user groups.
Viewing the Tool Rights Summary
To access a comprehensive view of all tool rights the user has been granted within Campus (between Tool Rights and User Groups), click the User Tool Rights Summary button. The Tool Rights Summary will appear in a separate window (Image 2).
You can expand tools to view additional tool rights and sub-rights. You can also hover the mouse cursor over a tool to see exactly how the user was granted rights to the tool (granted by tool rights or granted by a group).
You will only see tools for which the user has been granted access within Campus.
Tool Rights Summary
Viewing the Calendar Rights Summary
Select the User Calendar Rights Summary button to view which calendars in which years a specific user has rights to access and how this access was granted.
A single person icon indicates access to that calendar was granted via individual user Calendar Rights (via the Calendar Rights tab).
A group icon indicates calendar access was granted by the user being a part of a specific user group. Hovering your cursor over the group icon will indicate which user group(s) granted the user rights to the calendar.
This tool allows users to batch create student and staff user accounts using the census email address or a username patterns, enable student and staff user accounts, disable student and staff user accounts, force a password reset for student and staff user accounts, and add or remove user groups for user accounts en masse.
This tool provides high-level and detailed information about which user groups exist, all tool rights and calendar rights assigned to each user group, and which user groups are assigned to which Staff Account Automation rules.
Video
Tool Rights
Tool rights determine the level of access users have to tools throughout Campus. It is highly encouraged to provide tool rights to users by assigning them to a user group. However, tool rights can be assigned to individual users if necessary.
Documentation
Tool Search: User Account
Tool Rights determine the level of access users have to tools throughout Infinite Campus.
Due to the wide range of school-specific duties and policies, this article cannot recommend how to assign tool rights to particular types of users. District administrators must determine the appropriate amount of access for each user/group based on that user/group’s needs.
Assign Tool Rights
Only users assigned a Product Security Role may assign tool rights to users.
Navigate to a person's User Account (User Management > User Account Information > User Account)
Click the Modify Tool Rights button. The User Tool Rights Editor will appear.
Navigate to each tool you wish to grant the user rights to access and determine the level of access they should receive (Read, Write, Add, Delete). See the section below for more information about these levels of access and how they impact using Infinite Campus.
Once all tool rights have been selected, click Update. The user will now have access to the tools marked.
Tool Rights Access Levels
This sectionexplain the four different access levels that can be assigned for each tool within Infinite Campus.
A partially checked indicator has been added to the New Look of Infinite Campus, appearing in the RWAD checkboxes of tools/menu items where the user does not have tool rights to the tool/menu item but does have rights to tools or sub-rights contained within the tool/menu-item.
Expand the link below for an example of this indication.
Read
Read indicates the user may view the information in the applicable interface area. When only R rights are applied, the user cannot access the action bar's Save, Add, or Delete icons. Reports need only the R right for full access to viewing and generating results. In addition, R rights allow the printing of information, when applicable. Many wizards require only the R right to have complete access.
Write
Write indicates that the information on the applicable interface area may be viewed and modified by the user. When this right is applied, the Save icon in the action bar will be functional. This right allows the user to modify only existing data in the area (adding new data is controlled by the A right). This right includes the ability to modify data from a specific field.
Add
Add indicates the information on the applicable interface area may be viewed, modified, and added to. When this right is applied, the New or Add icons in the action bar will be functional. This right allows the user to add new data/records.
Delete
Delete indicates the information on the applicable interface area may be deleted. When this right is applied, the Delete icon in the action bar will be functional. This right provides the ability to completely remove an existing record, including all data contained within the record. The ability to change/remove data from a field is controlled through Write. A user generally has RWA rights if he/she has D rights.
Users should assign this right with caution.
Campus Instruction Tool Rights
Compared to the RWAD rights structure for Campus Tools, rights to Campus Instruction are ON or OFF. Each Instruction tool can have All rights for a tool or not.
Sub-Rights
Sub-rights are used to control specific functions or gatekeep certain data within a tool. Sub-rights are also found under the tool it applies to and have a | to the left of the sub-right, delineating it as a sub-right.
Example of Tool Rights
The following are examples of how tool rights affect how users are able to view and access tools throughout Campus.
Limited Tool Rights (Read Only)
Limiting a user's tool rights affects how they are able to interact with a tool. In the example below, the user is given only Read rights to the Student Information module. Because the user only has Read rights, all of the fields within each Student Information tool are read-only and the Save, Delete, and New buttons are unable to be used.
Full Tool Rights (RWAD)
Providing RWAD tool rights to a user means the user has full access to modifying data with the tool. In the example below, a user with RWAD tool rights to the Student Information module is able to modify all data within any Student Information tool.
Compare this example with the example above for a better understanding of how user groups are provided different tool access based on tool rights.
Manage User Accounts
See the User Account article to learn more about managing user accounts, including tool rights, calendar rights, authentication options, and more.
Video
Calendar Rights
Calendar rights determine the schools, years, and calendars a user can view and modify. It is highly encouraged to manage calendar rights via user group membership. However, calendar rights can be assigned to individual users if necessary.
Documentation
As of Campus.2415, this tool was incorporated into the User Account tool. Individual user calendar rights are now set up and managed in their user account.
Tool Search: Calendar Rights
Calendar Rights determine what school, year and calendar the user has access to view and modify. Calendar rights work in tandem with Tool Rights, where Tool Rights determine which tools the user can access and Calendar Rights determine which calendars the user is allowed to view and modify via Campus tools.
System administrators are highly encouraged to provide calendar rights to users by assigning them to an appropriate user group(s). Providing individual calendar rights is not recommended.
District system administrators should be the ONLY members with full rights to access all calendars and all tools. District system administrator rights should not be assigned on this tab.
Assigning Calendar Rights
Calendar Rights provide users access to specific schools, years, and calendars.
A district system administrator should be the only person who sets up and modifies calendar rights. Multiple sets of calendar rights may be added to a user.
To assign calendar rights to the user group:
Select the New button. The School Year Rights editor will appear on the right.
Select the School, Year, and Calendar the user is allowed to access.
If the user should be allowed to modify data in the selected Calendar, mark the Modify Rights checkbox.
Assigning Modify Rights to historical calendars is not recommended.
Marking the Modify Rights checkbox means the user can modify data within the calendar (in conjunction with their assigned tool rights).
The calendar will be read-only if the Modify Rights checkbox is not marked. This user will not be allowed to modify any data, regardless of whether or not the user has specific tool rights to modify Campus tools.
If the user is allowed to modify attendance data for closed school months, mark the Close School Months checkbox.
School Months are only used in some states and are assigned the System Administration > Calendar area. If your state does not use school months, this tab is not displayed in Calendar and this field should not be used.
Select the Save icon. The calendar rights will appear in the Rights Editor window.
Calendar Rights Summary
Select the Calendar Rights Summary button to view which calendars in which years a specific user has rights to access and how this access was granted.
A single person icon indicates access to that calendar was granted via individual user Calendar Rights (via the Calendar Rights tab).
A group icon indicates calendar access was granted by the user being a part of a specific user group. Hovering your cursor over the group icon will indicate which user group(s) granted the user rights to the calendar.
Calendar Rights Scenarios
This section will describe different scenarios for setting up calendar rights.
All Calendars/All Schools with Data Modification Rights
To assign a user the ability to view and modify all data within all schools and all calendars in the district:
This will grant Calendar Rights which match the same rights granted via the now-retired All Calendars checkbox found on the User Account tab.
Set School to 'All Schools'
Set Year to 'All Years'
Set Calendar to 'All Calendars'
Mark the Modify Rights checkbox (Image 3).
Click the Save icon.
All Schools/All Calendars with Read-Only Data Access Rights
To assign a user read-only data access rights to all calendars and schools within a district:
Set the School to 'All Schools'
Set the Year to 'All Years'
Set the Calendar to 'All Calendars'
Leave the Modify Rights checkbox unchecked.
Select the Save icon. Once saved, the calendar rights will appear with 'Read-Only' next to it in the Rights Editor window (see Image 4).
Select Schools/Calendars with Data Modification Rights
To assign a user data modification rights for a specific calendar within a specific school:
Select a school within the School dropdown list.
Select a calendar within the Calendar dropdown list.
Mark the Modify Rights checkbox.
Select the Save icon.
Select Schools/Calendars with Read-Only Data Access Rights
To assign a user read-only data access rights for a specific calendar in a school:
Select a school within the School dropdown list.
Select a calendar within the Calendar dropdown list.
Leave the Modify Rights checkbox unchecked.
Select the Save icon. Once saved, the calendar rights will appear with 'Read-Only' next to it in the Rights Editor window (see Image 6).
Read-Only Rights for a Previous Year
To assign a user read-only rights to a previous year's calendar:
Select a school within the School dropdown list.
Select the Year.
Select the Calendar.
Leave the Modify Rights checkbox unmarked.
Select the Save icon. Once saved, the calendar rights will appear with 'Read-Only' next to it in the Rights Editor window (see Image 7).
Video
Access Log
The Access Log details every login attempt made by a specific user.
Documentation
Tool Search: Access Log
Every attempt to log into a specific user's Infinite Campus account is stored and displayed in the user's Access Log. You will only see login information for the account you are currently logged into and using to access this tool.
A user must have at least Read tool rights assigned for the Access Log to access and view it.
Understand the Access Log
Data captured for each user login attempt is as follows:
Field
Description
Timestamp
Login date and time.
You can filter this column by a specific date or see all data before or after a particular date.
Success
Indicates whether or not the user was successful in logging into their account.
Remote IP
Source IP address.
Balancer Header
Indicates the load balancer the user used to log into Campus.
Remote Browser
Operating system and browser combination used.
App Server
The application server of the login attempt.
Authentication Type
This column indicates the authentication type used by the account attempting the login, whether it was local Campus Authentication, an LDAP configuration, or a SAML SSO configuration.
Third Party Admin
This column indicates that another user (with equivalent or greater administrative rights) has used the Login As User button to log into Campus as this user. It reports the other user's name, user ID, and username.
Video
Mass Creating User Accounts
User Account Batch Wizard
Student and staff accounts can be created en masse with the User Account Batch Wizard. Users accounts can be created for all students/staff in a selected school or for specific students/staff.
Documentation
Tool Search: User Account Batch Wizard
The User Account Batch Wizard allows users to batch create student and staff user accounts using the census email address or a username pattern, enable student and staff user accounts, disable student and staff user accounts, force a password reset for student and staff user accounts, and add or remove user groups for user accounts en masse.
Accounts can be modified for all students or staff within a selected school(s) or for specific users. You can also preview the changes that will be made prior to initiating modifications within Campus.
This tool does not feature the ability to delete user accounts en masse. This option is not available due to the dangers mass deleting user accounts can introduce throughout Campus. Instead of deleting accounts, users are encouraged to disable them. If users have forgotten their account usernames and/or passwords, they are encouraged to use the Forgot Your Username? and Forgot Your Password? recovery options found on the Campus login page.
Image 1: User Account Batch Wizard
In order to access the User Account Batch Wizard, you must be granted the Student Information System Product Security Role.
Enabling Student and Staff Accounts
The Enable Account option allows you to enable user accounts for all students or staff within a school(s) or for specific set of users. See the following sections below for more information.
Image 3: Enabling Accounts
Enable User Accounts for All Students or Staff in a Selected School(s)
To enable all user accounts for all students or staff within a selected school(s):
Select an Account Type.
Students - Select this option to enable student accounts within the selected school(s).
Staff - Select this option to enable staff accounts within the selected school(s).
Select a Change Type of 'Enable Account'.
Mark the Enable user accounts for all students in the selected school(s) OR Enable user accounts for all staff in the selected school(s) radio button.
Select which school(s) will have user accounts enabled. To select multiple schools, hold the CTRL button while selecting each school.
To preview a list of all user accounts that will be enabled, click the Preview Changes button. A report will appear in CSV format.
To initiate the enabling of student or staff user accounts, click the Save Changes button. A report will appear in CSV format, detailing all user accounts enabled (see Image 6).
Student Accounts - Accounts will be enabled for students who currently have a disabled user account and have a current or future enrollment record in the selected school(s).
Staff Accounts - Accounts will be enabled for staff members who currently have a disabled user account and have a current district assignment record in the selected school(s).
Student Accounts
Staff Accounts
Enable User Accounts for Selected Students or Staff
To enable user accounts for a specific student or staff:
Select an Account Type.
Students - Select this option to enable specific student accounts within the selected school(s).
Staff - Select this option to enable specific staff accounts within the selected school(s).
Select a Change Type of 'Enable Account'.
Mark the Enable user accounts for selected students OR Enable user accounts for selected staff radio button.
Enter search criteria for the student or staff member (e.g., Last Name, First Name, Gender, Grade) or staff (e.g., Last Name, First Name, Title, Role) and click the Search button. Users matching search criteria will appear in the window on the right.
Search results are district-wide.
In the B. Select a person to add to edit list window, select the name of each person who will have their user account enabled. When a person is selected, their name will appear in the C. Click on a person to remove from list window.
To preview a list of all user accounts that will be enabled, click the Preview Changes button. A report will appear in CSV format.
To initiate the enabling of student or staff user accounts, click the Save Changes button. A report will appear in CSV format, detailing all user accounts enabled (see Image 6).
Student Accounts - Accounts will be enabled for selected students who currently have a disabled user account and have a current or future enrollment record.
Staff Accounts - Accounts will be enabled for selected staff members who currently have a disabled user account and have a current district assignment record in the selected school(s).
Student Accounts
Staff Accounts
Below is an example of the CSV report that will generate once the Save Changes button is selected (Image 4).
Image 4: Example of the Enabled Accounts Report
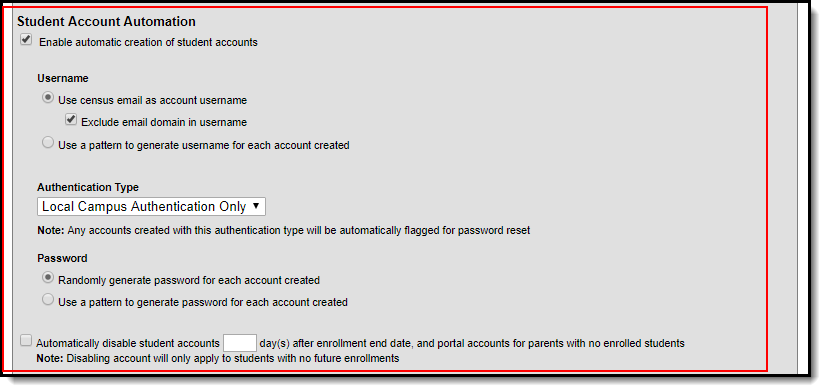
Creating Student Accounts
The Create Account option allows you to create user accounts for all students within a school(s) or for specific students. Options are available for determining how usernames and passwords are automatically created, as well as the default homepage (Campus Portal, Campus Student).
When using the Create Account option, accounts will only be created for students with a current or future enrollment record who do not have an existing user account within the district. If the student transfers between schools in the same Campus district, they will retain the same student account.
Image 5: Creating Student Accounts
Username
Usernames are generated from two sources: the student's email address (available in the Demographics tool) or a predefined pattern for each account. The table below describes each option.
Field
Description
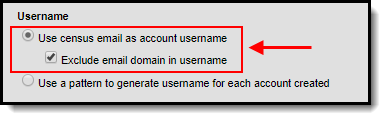
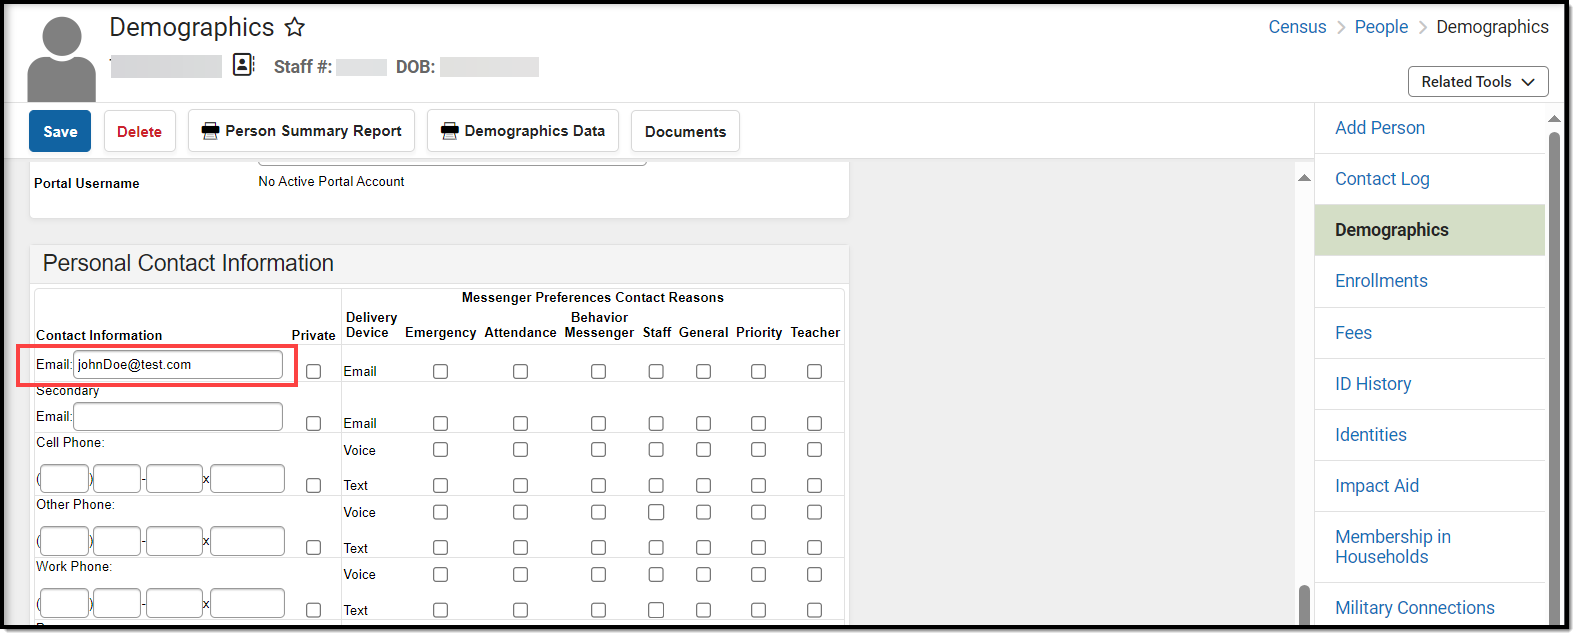
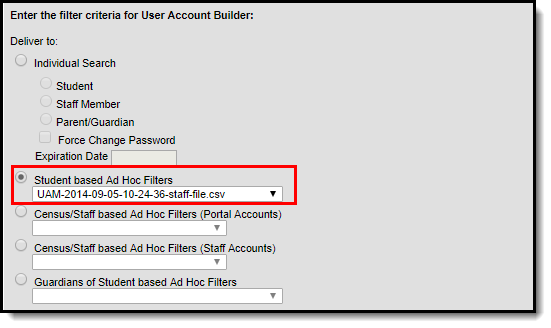
Use census email as account username
Selecting this option means usernames will be generated to match the email address listed in the Email field in the student's Demographics tool (see below).
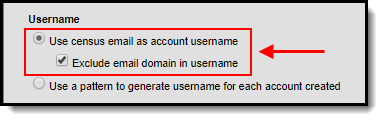
If you would like to remove the domain from usernames generated from a student's census email address, mark the Exclude email domain in username checkbox. For example, if the user's email address is 'joetester@email.com', their generated Campus username would be 'joetester'.
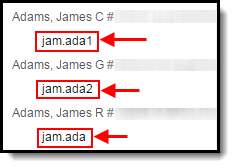
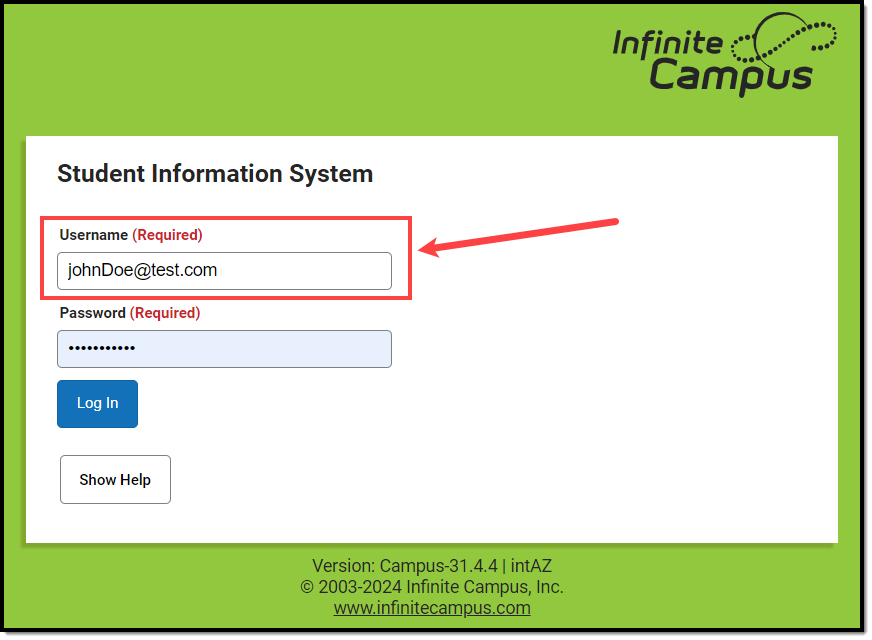
Usernames created via email account do not qualify for collision resolution. If the email address is missing or is already taken by an existing user account, the user account will not be created.
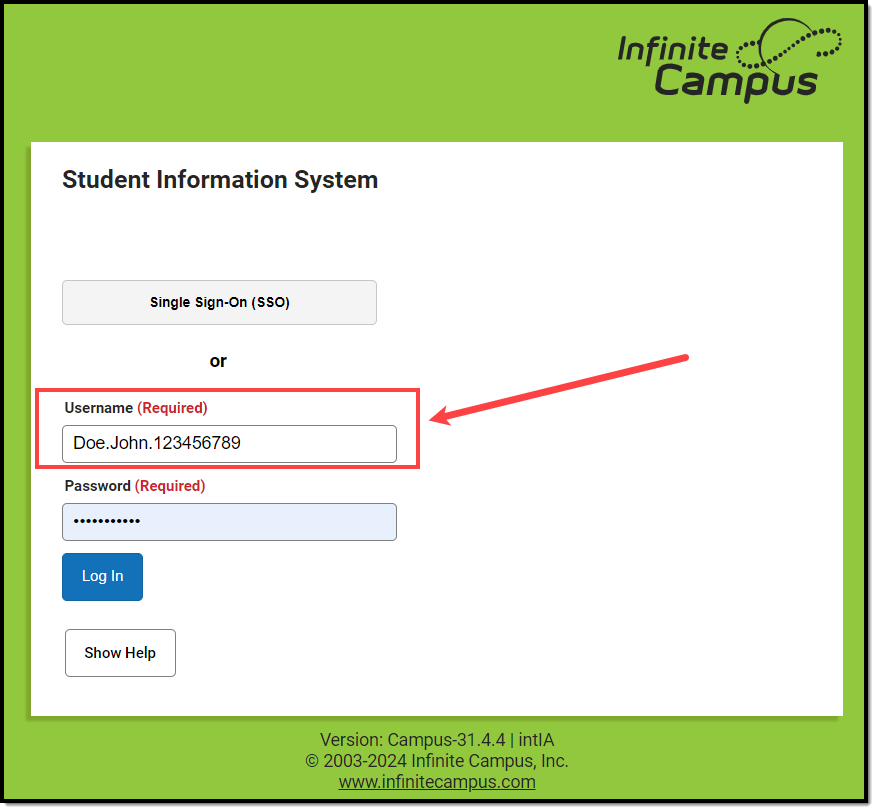
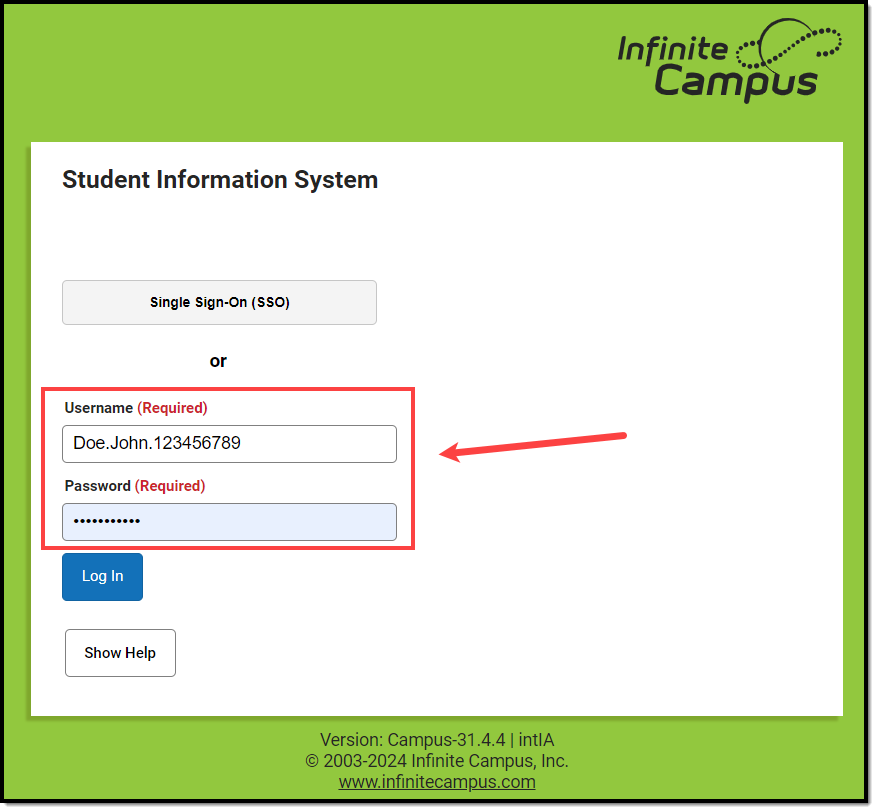
Once the user account has been created, the user will enter their email address as their username to log in to Campus on the Campus login screen (see below).
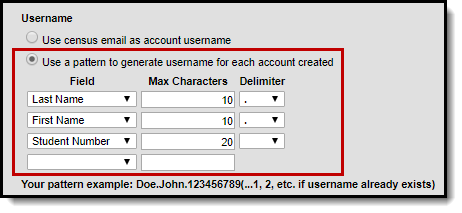
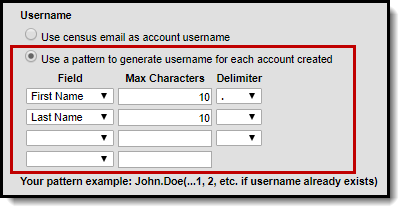
Use a pattern to generate username for each account created
Selecting this option lets you specify a pattern for generating usernames for each account.
For example, using the criteria shown in the picture to the left (Last Name, First Name, Student Number), if the student's name is John Doe and his student number is 123456789, he would log in with a username of Doe.John.123456789
Authentication Type
The Authentication Type determines how users of the generated accounts will log into Campus.
This option will only appear if LDAP or SAML are configured in Campus. If hidden, the default authentication type is Local Campus Authentication.
Local Campus Authentication Only - This option means users will use their Campus username and password to log into Campus.
LDAP Authentication - This option means users will log into Campus using their LDAP username and password (controlled and maintained by their school/district's IDP). See the LDAP Authentication article for more information.
SAML Authentication - This means users will log into Campus using their SAML username and password (controlled and maintained by their school/district's IDP). See the SSO Service Provider Configuration article for more information.
Password
When determining how user account passwords are created, you have the following two options:
This section is not available if the Authentication Type is set to LDAP or SAML as account passwords are controlled and managed via your IDP.
Field
Description
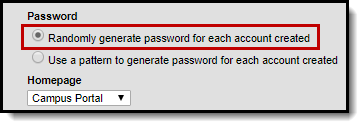
Randomly generate password for each account created
Selecting this option means Campus will randomly generate a unique password for each account created.
For more information about communicating usernames and helping users log into their new account, please see the following articles:
If generating random passwords for users, it is critical you follow the steps detailed in the article linked above. This is the only way to properly have a users log in and set their own password if a random password was established by Campus.
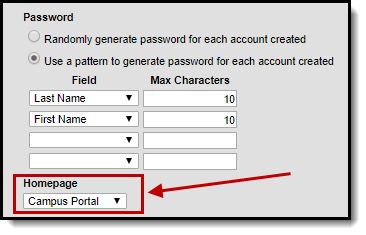
Use a pattern to generate password for each account created
Selecting this option allows you to designate a pattern for how passwords are generated for each user account created.
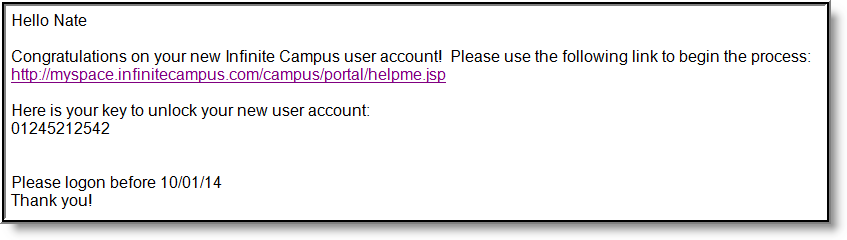
In the example to the left, based on the criteria (Last Name, First Name, 10 characters), a user named Nate Student would have a password of 'studentnate'.
When automatically creating new student user account passwords containing portions or a combination of a student's PII (Personally Identifiable Information), you do so at your own risk. Often much of a student's common PII attributes are public knowledge and can be easily ascertained. Please ensure the utmost due diligence when distributing communication of a password containing portions or combinations of student PII to the applicable student(s).
Homepage
Once Username and Password criteria has been established, determine the Homepage of the accounts. The Homepage indicates whether the student will have access to Campus Student or the Campus Parent Portal. Select Campus Student.
Image 6: Setting the Campus Homepage
For example, if the Homepage is set to 'Campus Student', each generated student account defaults to 'Campus Student Portal' as the Homepage, meaning they will be sent to Campus Student when logging into Campus. This value is set on the student's User Account.
Image 7: Example of Where the Homepage Value is Set Within Campus
Create User Accounts for All Students in a School or Select Students
Once the Username, Password, and Homepage criteria are set, you must determine which students will have user accounts created. User accounts can be created for all students within a selected school(s) or for a specific set of students. See the following sections below for more information about these two options.
All accounts created require a password change upon first login.
To create user accounts for all students within a selected school(s):
Select an Account Type of 'Students'.
Select a Change Type of 'Create Account'.
Set Username, Authentication Type, Password, and Homepage criteria (as described in the sections above).
Select which school(s) will have all student user accounts created. To select multiple schools, hold the CTRL button while selecting each school.
To preview a list of all user accounts that will be created, click the Preview Changes button. A report will appear in CSV format.
To create student user accounts, click the Save Changes button. A report will appear in CSV format, detailing all user accounts created.
Image 8: Creating Accounts for All Students in a School
To create user accounts for a specific student or set of students:
Select an Account Type of 'Students'.
Select a Change Type of 'Create Account'.
Mark the Create user accounts for selected students radio button.
Enter search criteria for the student (e.g., Last Name, First Name, Gender, Grade) and click the Search button. Students matching the search criteria will appear in the window on the right.
Search results are district-wide.
In the B. Select a person to add to the edit list window, select the name of each student whose user account will be created. When a student is selected, their name will appear in the C. Click on a person to remove from list window.
To preview a list of all user accounts that will be created, click the Preview Changes button. A report will appear in CSV format.
To create student user accounts, click the Save Changes button. A report will appear in CSV format, detailing all user accounts created.
Image 9: Creating Accounts for Specific Students
Below is an example of the CSV report generated when the Save Changes button is selected (Image 10).
Image 10: Example of the CSV Report Detailing Created Accounts
Creating Staff Accounts
The Create Account option also allows you to create user accounts for all staff within a school(s) or for specific staff members. Options are available to determine how usernames are automatically created and the default homepage (Campus Tools or Campus Instruction).
When using the Create Account option, accounts will only be created for staff members with a current district assignment who do not have an existing user account within the district.
Image 11: Create Staff User Accounts Option
User Groups
User Groups can be automatically assigned to all newly created staff user accounts within a school or for a specific set of staff members. This functionality is useful for assigning tool and calendar rights to new user accounts via user groups, eliminating the need to manage and assign these rights on a person-by-person basis.
User Groups are broken into the following three categories:
Tool Rights Groups - These groups only contain tool rights and do not assign calendar rights.
Calendar Group - These groups only contain calendar rights and do not assign tool rights.
Mixed or Empty Group - These groups assign a combination of tool and calendar rights or they are blank and contain no calendar or tool rights at the moment.
By separating user groups into these categories, users have a better understanding of what types of rights will be assigned and can easily identify and sort through different user groups when assigning.
Image 12: Adding User Groups to Created User Accounts
To select user groups for staff accounts being created:
Select an Account Type of 'Staff'.
Select a Change Type of 'Create Account'.
Search for a User Group by first selecting the Group Type. Only user groups of this type will appear in search results.
Enter the Group Name being searched. Only user groups of the selected type that match the group name entered will appear in search results.
Click the Search button. Search results will appear in the Click on a group to add to the list window on the right.
Select which groups will be assigned to these new accounts. Selected groups will appear in the Click on a group to remove from list window.
Repeat steps 1-6 If additional tool rights groups, calendar groups, or mix user groups should be added.
Once all groups have been selected, move on to the Username section below.
Username
Usernames are generated from two sources: the staff member's email address (on the Demographics tab) or a predefined pattern for each account. The table below describes each option.
Field
Description
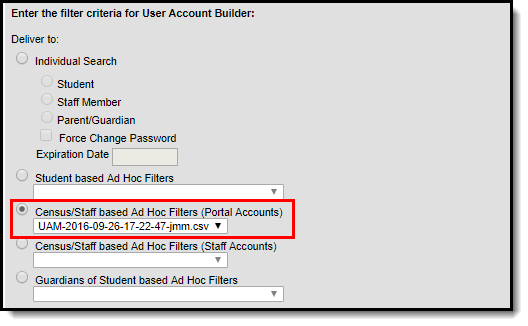
Use census email as account username
Selecting this option means usernames will be generated to match the email address listed in the Email field on the staff member's Demographics tab (see below).
If you would like to remove the domain from usernames generated from a staff member's census email address, mark the Exclude email domain in username checkbox. For example, if the user's email address is 'joetester@email.com', his generated Campus username would be 'joetester'.
Usernames created via email account do not qualify for collision resolution. If the email address is missing or is already taken by an existing user account, the user account will not be created.
Once the user account has been created, the user will enter their email address as their username for logging into Campus via the Campus login screen (see below).
Use a pattern to generate username for each account created
Selecting this option allows you to designate a pattern for how usernames are generated for each account.
For example, using the criteria entered in the picture to the left (Last Name, First Name, Staff Number), if the staff member's name is John Doe with a staff number of 123456789, he would log in with a username of Doe.John.123456789
Authentication Type
The Authentication Type determines how users of the generated accounts will log into Campus.
This option will only appear if LDAP or SAML are configured in Campus. If hidden, the default authentication type is Local Campus Authentication.
Local Campus Authentication Only - This option means users will use their Campus username and password to log into Campus.
LDAP Authentication - This option means users will log into Campus using their LDAP username and password (controlled and maintained by their school/district's IDP). See the LDAP Authentication article for more information.
SAML Authentication - This means users will log into Campus using their SAML username and password (controlled and maintained by their school/district's IDP). See the SSO Service Provider Configuration article for more information.
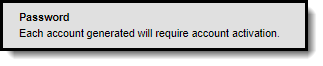
Password
Each account created will require the staff member go through the account activation process. During this process, their password will be established.
This section is not available if the Authentication Type is set to LDAP or SAML as account passwords are controlled and managed via your IDP.
If generating random passwords for users, it is critical you follow the steps detailed in the article linked above. This is the only way to properly have a users log in and set their own password if a random password was established by Campus.
Homepage
Once the User Group and Username criteria have been established, determine the Homepage of the accounts. The Homepage indicates whether the staff will default to Campus Tools or Campus Instruction when logging in.
Image 14: Setting the Homepage
For example, if the Homepage is set to 'Campus Instruction', each generated staff account is defaulted to 'Campus Instruction', meaning they will be sent to Campus Instruction when logging in to Campus. This value is set on the user's User Account tab.
Image 15: Example of Where the Homepage Value is Set Within Campus
Create User Accounts for All Staff in a School or Select Staff Members
Once the User Group, Username, Password, and Homepage criteria are set, you must determine which staff members will have user accounts created. User accounts can be created for all staff within a selected school(s) or for a specific set of staff members. See the following sections below for more information about these two options.
All accounts created require a password change upon first login.
To create user accounts for all staff within a selected school(s):
Select an Account Type of 'Staff'.
Select a Change Type of 'Create Account'.
Set User Group, Username, Authentication Type, Password, and Homepage criteria (as described in the sections above).
Select the Create user accounts for all staff in the selected school(s) radio button.
Select which school(s) will have all staff user accounts created. To select multiple schools, hold the CTRL button while selecting each school.
To preview a list of all user accounts that will be created, click the Preview Changes button. A report will appear in CSV format.
To initiate the creation of staff user accounts, click the Save Changes button. A report will appear in CSV format, detailing all user accounts created.
Image 16: Creating Accounts for All Staff Members in a School
To create user accounts for a specific staff members:
Select an Account Type of 'Staff'.
Select a Change Type of 'Create Account'.
Set User Group, Username, Password, and Homepage criteria (as described in the sections above).
Select the Create user accounts for all selected staff radio button.
Enter search criteria for the staff member (e.g., Last Name, First Name, Gender, Title, etc) and click the Search button. Staff members matching the search criteria will appear in the window on the right.
Search results are district-wide.
In the Select a person to add to edit list window, select the name of each staff member whose user account will be created. When a staff member is selected, their name will appear in the Click on a person to remove from list window.
To preview a list of all user accounts that will be created, click the Preview Changes button. A report will appear in CSV format.
To create staff user accounts, click the Save Changes button. A report will appear in CSV format, detailing all user accounts created.
Image 17: Creating Accounts for Specific Staff
Below is an example of the CSV report that will be generated when the Save Changes button is selected (Image 18).
Image 18: Example of the CSV Report Detailing Created Accounts
Disabling Student and Staff Accounts
The Disable Account option allows you to disable user accounts for all students or staff within a calendar(s) or for a specific set of users. See the following sections below for more information.
Image 19: Disable Account Option
Disable User Accounts for All Students or Staff in a Selected Calendar(s)
To disable all user accounts for all students or staff within a selected calendar(s):
Select an Account Type
Students - Select this option to disable all students within a selected calendar(s).
Staff - Select this option to disable all staff within a selected calendar(s).
Select a Change Type of 'Disable Account'.
Mark the Disable user accounts for all students in the selected calendar(s) OR Disable user accounts for all staff in the selected calendar(s) radio button.
Select which calendar(s) will have user accounts disabled. To select multiple calendars, hold the CTRL button while selecting each calendar.
To preview a list of all user accounts that will be disabled, click the Preview Changes button. A report will appear in CSV format.
To initiate disabling a student or staff user account, click the Save Changes button. A report will appear in CSV format, listing all disabled user accounts.
Student Accounts
Staff Accounts
Disable User Accounts for All Selected Students or Staff
To disable user accounts for a specific student or set of students:
Select an Account Type
Students - Select this option to disable specific students within a selected calendar(s).
Staff - Select this option to disable specific staff within a selected calendar(s).
Select a Change Type of 'Disable Account'.
Mark the Disable user accounts for selected students OR Disable user accounts for all selected staff radio button.
Enter search criteria for the student (e.g., Last Name, First Name, Gender, Grade) or staff (e.g., Last Name, First Name, Title, Role) and click the Search button. Users matching the search criteria will appear in the window on the right.
Search results are district-wide.
In the B. Select a person to add to the edit list window, select the name of each person whose user account will be disabled. When a person is selected, their name will appear in the C. Click on a person to remove from list window.
To preview a list of all user accounts that will be disabled, click the Preview Changes button. A report will appear in CSV format.
To initiate disabling a student or staff user account, click the Save Changes button. A report will appear in CSV format, listing all disabled user accounts.
Student Accounts
Staff Accounts
Below is an example of the CSV report that will be generated when the Save Changes button is selected (Image 20).
Image 20: Example of the CSV Report Detailing Disabled Accounts
Forcing a Password Change
The Force Password Change option allows you to force a password change for all student or staff user accounts in a school(s) or for a specific set students or staff.
Only students with a student user account that is enabled and does not already have the Force Password Change field selected will be forced to change their password.
Image 21: Force Password Change Option
Force a Password Change for All Students or Staff in a Selected School(s)
To force a password change for all student or staff accounts in a selected school(s):
Select an Account Type
Student - Selecting this option means that all students in the selected school(s) will be forced to change their passwords.
Staff - Selecting this option forces all staff within the selected school(s) to change their passwords. Staff are identified based on the presence of a District Assignment record.
When forcing a password change for staff, the tool omits staff members with the following Product Security Roles: Application Security, Finance, Human Resources, Open Market Food Service, Payroll, Student Information System, Campus Learning.
Select a Change Type of 'Force Password Change'.
Mark the Force password change for all student accounts in the selected school(s) OR Force password change for all staff accounts in the selected school(s) radio button.
Select which schools will have all student or staff accounts forced to change their password.
To preview a list of all user accounts that will be impacted, click the Preview Changes button. A report will appear in CSV format.
To initiate a password change for student or staff user accounts in the selected school(s), click the Save Changes button. A report will appear in CSV format, detailing all user accounts impacted.
Only students with an active user account, an active or future enrollment record in the selected school(s), and who do not already have the Force Password Change field selected will be required to change their user account password.
Student Accounts
Staff Accounts
Force a Password Change for All Selected Students or Staff
To force a password change for specific students or staff:
Select an Account Type.
Student - Select this option to force a password change for specific students.
Staff - Select this option to force a password change for a specific staff member. Logic identifies staff members by looking for user accounts set with a Homepage of 'Campus Application' and then excluding some users based on their user group/product security roles.
When forcing a password change for staff, the tool omits staff members with the following Product Security Roles: Application Security, Finance, Human Resources, Open Market Food Service, Payroll, Student Information System, Campus Learning.
Select a Change Type of 'Force Password Change'.
Mark the Force password change for all selected students or Force password change for all selected staff radio button.
Enter search criteria for the student (e.g., Last Name, First Name, Gender, Grade) or staff (e.g., Last Name, First Name, Title, Role) and click the Search button. Users matching the search criteria will appear in the window on the right.
Search results are district-wide.
In the B. Select a person to add to edit list window, select the name of each person who will be forced to change their password. When a person is selected, their name will appear in the C. Click on a person to remove from list window.
To preview a list of all user accounts that will be impacted, click the Preview Changes button. A report will appear in CSV format.
To initiate a password change for all selected students or staff, click the Save Changes button. A report will appear in CSV format, detailing all user accounts impacted.
Only selected students with an active user account, an active or future enrollment record in the selected school(s), and does not already have the Force Password Change field selected will be required to change their user account password.
Student Accounts
Staff Accounts
Below is an example of the CSV report that will generate once the Save Changes button is selected (Image 20).
Image 22: Example of the CSV Report Detailing User Accounts Forced to Change Their Password
Adding User Groups to Staff Accounts
User Groups can be assigned to all staff user accounts within a school or for a specific set of staff members. This functionality is useful in mass applying calendar rights and tool rights for all staff members in a school or for a specific set of staff members (e.g., all teachers, specific counselors, etc).
User Groups are broken into the following three categories:
Tool Rights Groups - These groups only contain tool rights and do not assign calendar rights.
Calendar Group - These groups only contain calendar rights and do not assign tool rights.
Mixed or Empty Group - These groups assign a combination of tool and calendar rights or they are blank and contain no calendar or tool rights at the moment.
By separating user groups into these categories, users have more control over which rights are assigned and can easily identify and sort through different user groups when assigning.
User groups containing all schools and all calendars cannot be added to staff accounts via the User Account Batch Wizard. User accounts requiring all schools/all calendars must be handled manually.
Image 23: Add User Groups Option
Add User Groups for All Staff in a Selected School(s)
To add user groups for all staff within a selected school(s):
Select an Account Type of 'Staff'
Select a Change Type of 'Add User Groups'.
Search for a User Group by first selecting the Group Type. Only user groups of this type will appear in search results.
Enter the Group Name being searched. Only user groups of the selected type that match the group name entered will appear in search results.
Click the Search button. Search results will appear in the Click on a group to add to the list window on the right.
Select which groups will be assigned to these user accounts. Selected groups will appear in the Click on a group to remove from list window.
Repeat steps 1-6 If additional tool rights groups, calendar groups, or mix user groups should be added.
Select the Add User Groups to all staff in the selected school(s) radio button.
Select which school(s) will have selected user groups assigned to all staff members. To select multiple schools, hold the CTRL button while selecting each school.
To preview a list of all user accounts and what user groups will be added, click the Preview Changes button. A report will appear in CSV format.
Select the Save Changes button. Specified User Groups have now been added to all staff members in the selected schools.
Image 24: Adding User Groups for All Staff in a School(s)
Add User Groups for Specific Staff Members
To add user groups for specific staff members:
Select an Account Type of 'Staff'
Select a Change Type of 'Add User Groups'.
Search for a User Group by first selecting the Group Type. Only user groups of this type will appear in search results.
Enter the Group Name being searched. Only user groups of the selected type that match the group name entered will appear in search results.
Click the Search button. Search results will appear in the Click on a group to add to the list window on the right.
Select which groups will be assigned to these user accounts. Selected groups will appear in the Click on a group to remove from list window.
Repeat steps 1-6 If additional tool rights groups, calendar groups, or mix user groups should be added.
Select the Add User Groups for selected staff radio button.
Search for a person by entering identifying criteria (e.g., Last Name, First Name, Gender, Title, etc) and click the Search button. Search results will appear in the window to the right.
Search results are district-wide.
Select which users will have user groups added by clicking on their name in the Select a person to add to edit list window. Once a person is selected, they will appear in the Click on a person to remove from list window.
To preview a list of what user groups will be added for which people, click the Preview Changes button. A report will appear in CSV format.
Once read,y initiate the addition of the user groups, select the Save Changes button. Specified User Groups have now been added to the selected users.
Image 25: Adding User Groups for Specific Staff Members
Below is an example of the report generated after user groups are added.
Image 26: Example of the User Group Report
Removing User Groups from Staff Accounts
User Groups can also be removed from all staff user accounts within a school or for a specific set of staff members. This functionality is useful for mass-removing calendar and tool rights for all staff members in a school, or for a specific set of staff members (e.g., all teachers, specific counselors, etc.).
Image 27: Remove User Groups Option
Remove User Groups for All Staff in a Selected School(s)
To remove user groups for all staff within a selected school(s):
Select an Account Type of 'Staff'
Select a Change Type of 'Remove User Groups'.
Search for a User Group by first selecting the Group Type. Only user groups of this type will appear in search results.
Enter the Group Name being searched. Only user groups of the selected type which matches the group name entered will appear in search results.
Click the Search button. Search results will appear in the Click on a group to add to the list window on the right.
Select which groups will be removed from these user accounts. Selected groups will appear in the Click on a group to remove from list window.
Repeat steps 1-6 If additional tool rights groups, calendar groups, or mix user groups should be added for removal.
Select the Remove User Groups to all staff in the selected school(s) radio button.
Select which school(s) will have selected user groups removed for all staff members. To select multiple schools, hold the CTRL button while selecting each school.
To preview a list of all user accounts that will have user groups removed, click the Preview Changes button. A report will appear in CSV format.
Select the Save Changes button. Specified User Groups have now been removed to all staff members in the selected schools.
Image 28: Removing User Groups for All Staff in a School(s)
Remove User Groups for Specific Staff Members
To remove user groups for specific staff members:
Select an Account Type of 'Staff'
Select a Change Type of 'Remove User Groups'.
Search for a User Group by first selecting the Group Type. Only user groups of this type will appear in search results.
Enter the Group Name being searched. Only user groups of the selected type that match the group name entered will appear in search results.
Click the Search button. Search results will appear in the Click on a group to add to the list window on the right.
Select which groups will be removed from these user accounts. Selected groups will appear in the Click on a group to remove from list window.
Repeat steps 1-6 If additional tool rights groups, calendar groups, or mix user groups should be added for removal.
Select the Remove User Groups for selected staff radio button.
Search for a person by entering identifying criteria (e.g., Last Name, First Name, Gender, Title, etc) and click the Search button. Search results will appear in the window to the right.
Search results are district-wide.
Select which users will have user groups removed by clicking on their name in the Select a person to add to edit list window. Once a person is selected, they will appear in the Click on a person to remove from list window.
To preview a list of what user groups will be removed for which people, click the Preview Changes button. A report will appear in CSV format.
Once read,y initiate the removal of the user groups, select the Save Changes button. Specified User Groups have now been removed for the selected users.
Image 29: Removing User Groups for Specific Staff Members
Below is an example of the report that appears when the Save Changes button is selected.
Image 30: Example of the Remove User Groups Report
Creating an Email Message to Inform Users of Their New User Account
Tool Search: User Account Messenger
You can use the User Account Messenger to send an email for users to follow and access their new user account.
Image 31: User Account Messenger
In the example below, an Ad hoc filter was created that includes the total login count (usage.totalLoginCount) and if the account is flagged to require a password change (usage.forceChangePassword). These fields are important as they can be combined with Filter Parameters to identify only those users who have a Campus user account who have never logged into their account and need to change their password (which will be the case for any accounts auto-generated via Account Security Preferences).
Use the following values to ensure a proper list is generated (see Image 32):
usage.totalLoginCount
Operator: =
Value: 0
usage.forceChangePassword
Operator: =TRUE
Image 32: Filter of Users Who Need to Log into their User Account
Once this filter is created, use the User Account Messenger to send a message to each user.
This message should include the following Campus fields:
The accountManagement.username field.
The accountManagement.uniqueLinkActivationURL field.
The accountManagmeent.uniqueLinkExpirationDate field.
You should also enter an Account Activation URL Expiration Date (see Image 33). This is the date the unique activation URL contained in the message will expire. Users will need to select this URL prior to this date.
Filter criteria is important when sending this message. Only users who match the filter criteria selected (e.g., Student based Ad Hoc Filters, Census/Staff based Ad hoc Filters (Staff Accounts, etc) will receive the message and be able to activate their accounts.
For notifying Staff, please consider the following:
If notifying staff of their newly created Campus Application accounts (System Administration > User Security > Users > User Account > Homepage = Campus Instruction OR Campus Application), use the Census/Staff based Ad Hoc Filters (Staff Accounts) filter option.
Image 33: Informing Users who Need to Log into Their User Account
Establishing a Recurring User Account Activation Message
Tool Search: User Account Messenger Scheduler
Once you have created and saved a user account activation message in the User Account Messenger tool (see the steps mentioned in the section above), you can establish a daily, weekly, or monthly recurring message event using theUser Account Messenger Scheduler.
Image 34: User Account Message Scheduler
For example, using a user account activation message template and setting to a frequency of daily, you can set the User Account Messenger Scheduler to email the user account activation email to any user accounts created in the last 24 hours and repeat this process every day within a certain timeframe.
Creating Letters to Inform Users of Newly Created User Accounts
Tool Search: User Account Letter Builder
You can use the User Account Letter Builder to all users who have a newly created user account or who have never logged into their user account to log into their account and update their account password.
Image 35: Account Letter Builder
In the example below, an Ad hoc filter was created that includes the total login count (usage.totalLoginCount) and if the account is flagged to require a password change (usage.forceChangePassword). These fields are important as they can be combined with Filter Parameters to identify only those users who have a Campus user account who have never logged into their account and need to change their password (which will be the case for any accounts auto-generated via Account Security Preferences).
Use the following values to ensure a proper list is generated (see Image 35):
usage.totalLoginCount
Operator: =
Value: 0
usage.forceChangePassword
Operator: =TRUE
Image 36: Filter of Users Who Need to Log into their User Account
Once this filter is created, use the Account Letter Designer to design a letter that will be generated for each one of these users.
This letter should include the following Campus fields (see Image 36):
The accountManagement.username field.
The accountManagement.uniqueLinkActivationURL field.
The accountManagmeent.uniqueLinkExpirationDate field.
Image 37: Building a Letter to Inform Users who Need to Log Into Their Account
Once the filter has been created and the account activation letter has been built:
Select a Filter Type.
Filter criteria is important when generating this letter. Only users who match the filter criteria selected (e.g., Student based Ad Hoc Filters, Census/Staff based Ad hoc Filters (Portal Accounts), etc) will have a letter generated.
For notifying Staff, please consider the following:
If notifying staff of their newly created staff Portal accounts (System Administration > User Security > Users > User Account > Homepage = Campus Portal), use the Census/Staff based Ad Hoc Filters (Portal Accounts) filter option.
If notifying staff of their newly created Campus Application accounts (System Administration > User Security > Users > User Account > Homepage = Campus Instruction OR Campus Application), use the Census/Staff based Ad Hoc Filters (Staff Accounts) filter option.
Select the filter from the Saved Filters window.
Select the letter from the Saved Account Activation Letters window.
Enter an Account Activation URL Expiration Date. This is the date the unique activation URL contained in the message will expire (see Image 37). Users will need to select this URL prior to this date.
Click the Build Letters button. The letters will appear in a separate window.
Image 38: Generating a Letter
Below is an example of a generated letter using this scenario (Image 38).
Image 39: Example of a Letter
Video
The User Account Batch Wizard allows system administrators to batch enable, create, disable, and/or force password changes on user accounts for students.
User Account Batch Import Tool
The User Account Batch Import Tool allows student and staff accounts to be created en masse by importing a CSV or tab-delimited text file.
Documentation
Tool Search: User Account Batch Import Tool
The User Account Batch Import Tool allows schools and districts to import a file which creates Campus user accounts en masse.
Image 1: User Account Batch Import Tool
Importing User Accounts
In order to properly import and create user accounts, the following steps should be taken:
The first step is create the file you will use to import and create Campus user accounts. See the File Specifications area for details on file format requirements or click the Import File Format hyperlink on the right-hand side of the tool (see Image 2).
In order to prevent any potential errors, it is important to create the import file in the order defined in the Import File Format (see Image 2).
Data is not required in each column however, each column defined in the File Specifications must be present in the import file.
Image 2: Viewing the Import File Format
Step 2. Identify the Context of the Import File
The second step is to identify the Context or type of users who will receive user accounts. When creating user accounts, tool logic looks at information entered in the import file and based on the Columns to Match selected, identifies and matches a person to the user account.
The following describes the requirements necessary for a user to be included per Context option:
Student - A student must have a current enrollment record or have had an enrollment record in the active school year.
Staff - Staff members must have an active District Assignment record.
Parent - Parents must be marked as Guardian within a student's household
Image 3: Selecting a Context
For example, the table below shows the matching criteria available based on the Context selected.
Student
Staff
Parent
Step 3. Enter Matching Criteria
Once a Context has been selected, enter matching criteria. Use the table below as guidance.
Match criteria is available based on the Context selected. See the images below Image 3 for examples of available options per Context selected.
Image 4: Entering Matching Criteria
Field
Description
What is the file type?
Indicates if the import file was formatted as comma or tab delimited.
See the File Specifications section for more information on how to build the import file.
Source File Includes header
If the import file includes a header, mark this checkbox.
Columns to Match
PersonID - If selected, import logic will use personID to match import file data to people within Campus.
This is an option in the specification, meaning the personID as it exists within Campus. This field is only relevant if data entered is Campus personID data.
Student Number - If selected, import logic will use Student Number to match import file data to people within Campus. (Only available for a Context of Student)
Staff Number - If selected, import logic will use Staff Number to match import file data to people within Campus. (Only available for a Context of Staff)
State ID - If selected, import logic will use Student State ID to match import file data to people within Campus. (Only available for a Context of Student)
Staff State ID - If selected, import logic will use Staff State ID to match import file data to people within Campus. (Only available for a Context of Staff)
First and Last Name, Gender - If selected, import logic will use a combination of first name, last name and gender to match import file data to people within Campus.
Other Combinations - More than one combination value can be selected.
First Name, Last Name - If selected, import logic will use a combination of first name and last name (and any other combination value selected) to match import file data to people within Campus.
Gender - If selected, import logic will use gender (and any other combination value selected) to match import file data to people within Campus.
Birth Date - If selected, import logic will use birth date (and any other combination value selected) to match import file data to people within Campus.
Grade Level - If selected, import logic will use grade level (and any other combination value selected) to match import file data to students within Campus.
School Number - If selected, import logic will use school number (and any other combination value selected) to match import file data to staff within Campus.
File Upload Path
Choose File - Select this button and locate the import file.
Upload & Continue - Once the file has been added, select this button to import the file into the tool and begin review of file data.
Step 4. Review and Test Import Data
The fourth step is to review the import data to ensure it's correct and test the file to ensure user accounts were created appropriately.
Import the file by selecting the Choose File field and selecting the file on your hard drive or network storage. Once selected, click Upload & Continue. The Review Import Data table will populate with data from the import file (see Image 5). Review data by searching per column or reviewing data per page.
File headings will differ based on the Context selected.
For the Student context - column three becomes Student Number and column nine becomes Grade Level.
For the Staff context - column three becomes Staff Number and column nine becomes School Number.
For the Parent context - columns three, four and nine disappear.
Image 5: Uploading and Reviewing File Data
Once data has been reviewed, click the Test File button. The tool will perform a test import and display results (including errors) in a separate window (see Image 6).
No data is written to the database when performing a test of the file.
If errors are reported, correct these errors within the file and test the file again. Once you are satisfied with test results, move on to Step 5.
Image 6: Reviewing Test Results
Step 5. Import File Data
Once file data has been reviewed and deemed ready for importing, consider the following options before selecting the Import File button:
Field
Description
Upload email to Census record
Selecting the Yes radio button means all email addresses within the file will overwrite each person's existing email addresses currently stored within the Census module of Campus. Only email addresses matching new Campus accounts being added will have email addresses uploaded and overwritten within Campus. Email addresses of existing users will not be modified.
Account Expiration Date
If you would like to set an expiration date for all user accounts created after the file is imported, enter the date in this field.
Authentication Type (if SAML SSO or LDAP is enabled)
If SAML SSO or LDAP authentication is enabled, select whether to use Local Campus Authentication (Campus username and password), SAML SSO Authentication, or LDAP Authentication when creating each account
Once options have been determined and you are ready to import, select the Import File button.
Importing a file does NOT update existing information within the Campus database. This tool creates Campus user accounts for all users within the file if they do not currently have a Campus user account. Data within the import file is used to match existing Campus users to the Campus user account created.
There is one exception to this rule: If the Upload email to census record option is set to Yes, all email addresses in the file will be imported into the Campus database, overwriting existing data.
Also, if the username in the import file differs from the one in Campus, a new username will be created and made active for the corresponding user account.
Authentication Type is available only to users with SAML SSO and/or LDAP enabled.
Image 7: Importing File Data
The User Account Batch Import Results window will appear, indicating how many user accounts were created and the Ad hoc filter created (Image 8). The Ad hoc filter created includes all people who just had a user account created and should now be alerted to activate their accounts, as mentioned in Step 6.
Image 8: Import Results
Step 6. Send Activation Emails and/or Letters to Users
Once user accounts have been created, emails and/or letters MUST be sent to each user informing them of their Campus account username and activation URL. This process can be completed via the Account Letter Builder and User Account Messenger tools.
Failure to send activation emails and/or letters to these users will result in them not knowing their credentials and thus being unable to log in to their Campus account.
File Specifications
The following file specifications should be used when creating the import file.
Data is not required in each column; however, each column defined in the File Specifications must be present in the import file.
Column Name
Column Type
Column Size
Required
Required Value
Default Value
personID
integer
No
NULL
studentNumber
varchar
15
No
NULL
stateID
varchar
20
No
NULL
lastName
varchar
40
No
Variant String
NULL
firstName
varchar
35
No
Variant String
NULL
gender
varchar
1
No
F / M
NULL
birthDate
smalldatetime
No
MM/DD/YYYY
NULL
gradeLevel
varchar
4
No
Variant String
NULL
username
varchar
50
Yes
NOT NULL
email
varchar
200
No
NULL
For parent data to import properly, the parent must have a relationship to a student with the Guardian checkbox marked in the Relationships tool in Campus.
The image below is an example of a comma-delimited import file (created in Microsoft Excel):
Image 9: Example of a Comma-Delimited Import File
Video
The User Account Batch Import Tool is used to mass create user accounts for students, staff, or parents from a CSV or tab-delimited text file.
Automatically Create User Accounts
Account Security Preferences
The Account Security Preferences tool provides districts the ability to automatically generate user accounts for students and staff.
Documentation
Tool Search: Account Security Preferences
Account Security Preferences allow you to control various functionality such as resetting of passwords, restricting the ability for Product Security Users to log in as other people, auditing users, and the automatic creation/disabling of student and staff accounts.
BIE USERS: To meet Federal security guidelines, the following default Account Security Preference values have been set for Staff accounts (this does not impact BIE Student or BIE Parent Portal accounts):
Default Value
Description
60-day refreshes for all passwords
This means all users are required to create a new Campus password every 60 days.
12-character minimum for all new passwords
This means all new passwords must be at least 12 characters in length.
1-day minimum lifetime for all passwords
This means a user must wait at least 24 hours between each time they change their password.
No re-use of the last 24 passwords
This means a user cannot reuse the last 24 previous passwords when creating a new password.
Password Reset
A value of 'On' means Password Reset functionality is enabled. This functionality allows Campus users to reset their own Campus account password.
Note: After a password is reset, creating a new 8-character password must include at least one letter, one number, and either a special character or a capitalized letter. If the password contains only letters and numbers (no capitals or special characters), it must be at least 9 characters long. The Minimum Password Character and Password History Length and Expiration Time preferences will also impact new passwords after a reset.
This preference is read-only based on whether or not Password Reset functionality has been enabled via the Password Reset Configuration tool. This value cannot be changed once set. See the Managing User Account Passwords article for more information.
Restrict 'Login As User' Feature On Users with Product Security Role
The Restrict 'Login As User' Feature On Users With Product Security Role preference controls whether Product Security users may log in as another user with a Product Security role.
This feature is not available for users only assigned the Student Information System - Group Assignment security role.
See this article (Single-Product Environment) or this article (Multi-Product Environment) for more information on how this feature functions for users only assigned the Student Information System - Login as User security role.
The Login As User button only appears for users who have equivalent or greater tool rights than the user they want to log in as and is only available with the Product Security role (all products) and the Student Information System - Login As User role. When logging in as another user, users cannot gain access to tools for which they currently do not have tool rights.
The Student Information System - Login As User role is prohibited from logging in as another Student Information System - Login As User role regardless of this preference. Users assigned this role are only allowed to log in as another user once per Campus session. This behavior was put in place to ensure users do not jump from one user account to another.
Audit Users
The Audit Users preference allows a district to enable/disable auditing of several user security tools in Infinite Campus. This preference controls which data updates (i.e., additions, modifications, and deletions of data) are tracked by the View Audit Log tool.
The Audit Users preference has two options. This preference may be enabled (set to "Yes") or disabled (set to "No") at any time.
Yes - When this field is set to a value of "Yes," full functionality of the View Audit Log tool is enabled. The View Audit Log tool will track additions, modifications, and deletions made to data on the following tools:
No - When this field is set to a value of "No," the View Audit Log tool will only track changes made to the System Preferences tool. Auditing of the System Preferences tool is ALWAYS enabled.
Prohibit Passwords That Have Been Previously Disclosed in a Data Breach
Infinite Campus can read and use a global database that tracks passwords and accounts affected by data breaches of non-Infinite Campus systems. When this preference is enabled, if Infinite Campus detects a user's password matches a password found in a publicly known data breach, it will automatically notify the user and recommend that they update it.
This preference is applicable to Campus and LDAP authenticated accounts.
This preference is set to a default of 'Yes'. Infinite Campus HIGHLY recommends leaving this setting set to Yes.
Notification of a breached password DOES NOT mean your Infinite Campus account has been breached. It means your password matches one in a global database of breached passwords from third-party systems that have experienced a data breach.
If a user's password is identified as breached, they will receive a notification of this issue in the bellMessages area (see image below).
You can create an Ad hoc filter of all identified breached passwords by including the ‘usage.pwnedPassword' field (Campus Usage > User Account/Summary > pwnedPassword) within a filter in the Filter Designer tool (see image below).
For more information on how this functionality works and how we discover breached passwords, see this page.
Campus DOES NOT send any credentials to a third party for use of this functionality.
Password History Length and Expiration Time
The Password History Length field determines the number of previous passwords a user cannot use when changing their password.
The Password Expiration Time field allows administrators to determine how long a password is valid before the user is required to change it. The expiration time is based on the last time the user has reset their password. For example, if this field is set to 120 days, once 119 days have passed since a user has reset their password, on day 120 they are asked and required to change their password. This field impacts all accounts (staff, parents, students).
Password Reset Disallowed Time
The Password Reset Disallowed Time field allows you to set the minimum amount of hours that must pass between password reset requests for a user. If left blank, this preference is disabled.
Minimum Password Characters
The Minimum Password Characters preference allows districts to set the minimum number of characters required for Infinite Campus account passwords. If the preference is left blank, a default value of 8 characters is used.
Administrators can create user account passwords with fewer characters than the minimum required; however, upon initial login, all user accounts with a password below the minimum will be forced to change it to one that meets the minimum value set in this preference.
New 8-character password must include at least one letter, one number, and either a special character or a capitalized letter. If the password contains only letters and numbers (no capitals or special characters), it must be at least 9 characters long. The Password History Length and Expiration Time preferences will also impact newly created passwords..
Student Account Automation
Student Account Automation allows you to enable the automatic creation of student accounts and control how usernames, passwords, and the default homepage are established for each account created.
See the following sections below for more information about setting up this preference:
Marking the Enable automatic creation of student accounts checkbox will turn on student account automation functionality within Campus.
This preference will automatically create a student account for students who are given an enrollment record (active or future) and do not currently have a student account within Campus. Students who already have enrollment records but no student account will automatically have student accounts created 24 hours after the preference is enabled (a nightly job is run to generate these accounts).
Please consider the following:
You must opt-in to this preference. It is not automatically turned on by default.
A student account username and password are generated for each student missing an existing student account.
This preference is district-wide. It cannot be enabled at the school level.
Each night a job is run to identify any students who have active or future enrollment records without student accounts and automatically generates an account for each of these students.
A notification is generated if any conflicts or failures occur during the creation of accounts. This notification does not generate if accounts were created successfully.
Once this preference is enabled, at the time an enrollment record is created for a student who does not have a student account, a student account is automatically generated for them.
If duplicate account usernames are generated (such as two students named John Doe), a number is appended to the username (i.e., John.doe and John.doe1). These situations are described in the Collision Resolution - Students option of the User Account Automation Log.
Students are required to change their password the first time they log into their student account.
This preference does not re-enable or re-activate any existing deactivated accounts.
Automatically created student accounts will indicate they were Created By the person who initially created the student within Campus.
Username (Student Accounts)
Usernames are generated based on two available options: the email address of the student or a pattern used to create usernames for each account. The table below describes each option.
Field
Description
Use census email as account username
Selecting this option means usernames will be generated to match the email address listed in the Email field on the student's Demographics tab (see below).
If you would like to remove the domain from usernames generated from a student's census email address, mark the Exclude email domain in username checkbox. For example, if the user's email address is 'joetester@email.com', his generated Campus username would be 'joetester'.
Usernames created via email account do not qualify for collision resolution. If the email address is missing or has already been taken by an existing user account, the user account will not be created.
Once the user account has been created, the user will enter their email address as their username for logging into Campus via the Campus login screen (see below).
Use a pattern to generate username for each account created
Selecting this option allows you to designate a pattern for how usernames are generated for each account.
For example, using the criteria entered in the picture to the left (Last Name, First Name, Student Number), if the student's name is John Doe with a student number of 123456789, he would log in with a username of Doe.John.123456789
Authentication Type (Student Accounts)
The Authentication Type determines how users of the generated accounts will log into Campus.
This option will only appear if LDAP or SAML are configured in Infinite Campus. If hidden, the default authentication type is Local Campus Authentication.
Local Campus Authentication Only - This option means users will use their Campus username and password to log into Campus.
LDAP Authentication - This option means users will log into Campus using their LDAP username and password (controlled and maintained by their school/district's IDP). See the LDAP Authentication article for more information.
SAML Authentication - This means users will log into Campus using their SAML username and password (controlled and maintained by their school/district's IDP). See the SSO Service Provider Configuration article for more information.
Password (Student Accounts)
When determining how user account passwords are created, you have the following two options:
This section is not available if the Authentication Type is set to LDAP or SAML as account passwords are controlled and managed via your IDP.
Field
Description
Randomly generate password for each account created
Selecting this option means Campus will randomly generate a unique password for each account created.
For more information about communicating usernames and helping users log into their new account, please see the following articles:
If generating random passwords for users, it is critical you follow the steps detailed in the article linked above. This is the only way to properly have a user log in and set their own password if a random password was established by Campus.
Use a pattern to generate password for each account created
Selecting this option allows you to designate a pattern for how passwords are generated for each user account created.
In the example to the left, based on the criteria (Last Name, First Name, 10 characters), a user named Nate Student would have a password of 'studentnate'.
When automatically creating new student user account passwords containing portions or a combination of a student's PII (Personally Identifiable Information), you do so at your own risk. Often, a student's common PII attributes are public knowledge and can be easily ascertained. Please ensure the utmost due diligence when distributing communication of a password containing portions or combinations of student PII to the applicable student(s).
Homepage (Student Accounts)
Once Username and Password criteria have been established, determine the Homepage of the accounts. The Homepage indicates whether the student will have access to Campus Student or the Campus Parent Portal.
For example, if the Homepage is set to 'Campus Portal', each generated student account is defaulted to a Homepage value of 'Campus Portal', meaning they will be sent to the Campus Portal when logging into Campus. This value is set on the student's User Account tab.
Automatically Disable Student Accounts
Marking the Automatically Disable Student Accounts checkbox means all student accounts tied to enrollment records with an End Date will be disabled a specified number of days after the End Date.
Please consider the following:
You must opt-in to this preference. It is not automatically turned on by default.
The disable process is not immediate and occurs during an overnight job that is run. Students are not disabled the moment an End Date is entered on their enrollment record. Students who are given an End Date and should have their accounts disabled will have them disabled the following day.
If you need to disable a user account immediately, go to that student's User Account tab and mark the Disable checkbox.
If the student has other existing and active enrollment records, their account will not be disabled.
If the student has a future enrollment record entered within Campus their account will not be disabled.
This preference is district-wide. This preference affects all students within a district and cannot be turned on or off at the school level.
Disabled accounts are not stripped of their credentials. If an account is enabled after being disabled, the student can continue to use the same username and password.
Students who have No Show marked on their enrollment record are automatically disabled the day after the No Show checkbox is marked. These accounts are NOT subject to the specified days grace period and are disabled regardless of the value entered in this field.
Users are allowed to enter a range of 1 to 365 days.
All parent accounts tied to the student are disabled the same day the student account is disabled unless the parent has other students tied to them who have an active or future enrollment record in the district. For example, if the district enters 60 days as the value for this field and the student is given an enrollment end date of 8/29/2019, the student and all associated parent account(s) will be disabled on 10/29/2019 (60 days after the enrollment end date).
If a Parent has a Guardian Relationship with a Student with a current or future enrollment, but they do not have the "Portal" checkbox checked on their Relationships, then the parent's Portal Account will be disabled, but only the Parent Portal Account will be disabled, not the student's.
Accounts are also disabled if No Show is marked on a student's enrollment record (see below). Students who have No Show marked on their enrollment record are automatically disabled the day after the No Show checkbox is marked. These accounts are NOT subject to the specified days' grace period and are disabled regardless of the value entered in this field.
Each time accounts are disabled a notification will appear in the Notifications area, describing how many accounts were successfully disabled. You can click on this notification to be sent to the User Account Automation Log.
To view detailed information about each account that was disabled, select the Disabled Accounts - Portal option of the User Account Automation Log (see below).
Once an account is disabled, users who attempt to log into their account will receive a message indicating their account is disabled (see image below).
The student's account will have the Disabled checkbox marked on their User Account and an icon indicating the account is Inactive.
To enable the account, unmark this checkbox and click Save. The user will now be able to log into their student account using the same username and password as before.
Additional Information About Generating Student Accounts
Once a new user account has been created for a student and the student logs into Campus for the first time, they will be asked to create a new account password (see image below).
If usernames get duplicated because students share the same first and last name (or the same series of characters), Campus will automatically append a number to the end of the duplicate username to ensure each username is unique (e.g., If three students are named James Adams, the first username would be 'jam.ada and the second would be 'jam.ada1' and the third would be 'jam.ada2').
Duplicate usernames that are corrected are called Collisions within Campus. Any collision resolutions (duplicate usernames) will be indicated in the Process Alerts area, and detailed information about these events can be accessed via the User Account Automation Log.
If you would like to include the student's username on printed schedules, you can mark the Student Username option when setting up a schedule template via the Report tool (see below).
The student username will appear in the header of printed schedules (see below).
Schedules can be generated/printed for a student via the Schedule tab or en masse via the Schedule Batch tool.
Automatically created student accounts will indicate they were Created By the person who initially created the student within Campus.
Communicating New User Accounts to Students
For more information about communicating usernames and helping students log into their new accounts, please see the following articles:
If generating random passwords for users, it is critical you follow the steps detailed in the articles linked above. This is the only way to properly have a user log in and set their own password if a random password was established by Campus.
Campus highly recommends you establish a recurring user account activation message. Please see theUser Account Messenger Schedulerarticle for more information about this process.
Staff Account Automation
Staff Account Automation allows you to enable the automatic creation of staff accounts and control how usernames, passwords, and the default homepage are established for each account created.
See the following sections below for more information about setting up this preference:
Marking the Enable automatic creation of staff accounts checkbox will turn on staff account automation functionality within Campus.
This preference will automatically create a user account for staff members who are given an active district assignment. Staff who already have a district assignment record but no user account will automatically have user accounts created 24 hours after the preference is enabled (a nightly job is run to generate these accounts).
Once this preference is enabled, people who are given a district assignment record with at least a School, Start Date, Title and/or a role checkbox (e.g., Teacher, Special Ed, Program, etc) entered and saved will have a user account generated.
This preference does not re-enable or re-activate any existing deactivated accounts.
NOTE - If a user has a Parent Portal Account and a District Assignment/Employment record but does not have a Staff Account, the Staff Account Automation Job will not create an account for them; an account must be created manually.
(Staff Accounts)
Usernames are generated based on two available options: the email address of the staff member or a pattern used to create usernames for each account. The table below describes each option.
Field
Description
Use census email as account username
Selecting this option means usernames will be generated to match the email address listed in the Email field on the staff member's Demographics tab (see below).
If you would like to remove the domain from usernames generated from a staff member's census email address, mark the Exclude email domain in username checkbox. For example, if the user's email address is 'johnDoe@email.com', his generated Campus username would be 'johnDoe'.
Once the user account has been created, the user will enter their email address as their username for logging into Campus via the Campus login screen (see below).
Use a pattern to generate username for each account created
Selecting this option allows you to designate a pattern for how usernames are generated for each account.
For example, using the criteria entered in the picture to the left (First Name, Last Name, 10 characters, Delimiter of .), if the staff member's name is John Doe, he would log in with a username of John.Doe
Authentication Type (Staff Accounts)
The Authentication Type determines how users of the generated accounts will log into Campus.
This option will only appear if LDAP or SAML are configured in Campus. If hidden, the default authentication type is Local Campus Authentication.
Local Campus Authentication Only - This option means users will use their Campus username and password to log into Campus.
LDAP Authentication - This option means users will log into Campus using their LDAP username and password (controlled and maintained by their school/district's IDP). See the LDAP Authentication article for more information.
SAML Authentication - This means users will log into Campus using their SAML username and password (controlled and maintained by their school/district's IDP). See the SSO Service Provider Configuration article for more information.
Password (Staff Accounts)
Each account created will require the staff member to go through the account activation process. During this process, their password will be established.
You can also establish a recurring message to send to any new users about activating their user account via the User Account Messenger Scheduler tool. See this article for more information: Scheduling a Recurring User Account Message
Rules
Rules designate what calendar rights, tool rights, and homepage settings are automatically applied to user accounts based on the Title and/or Role(s) designated on their District Assignment.
You must designate at least 1 rule in order to generate staff accounts via this tool.
The calendar rights, tool rights, and homepage set for an automatically created staff account via a rule is a one-time process. Once an account is created, changing a staff member's Title DOES NOT initiate an update or change to their values. You must update calendar rights, tool rights, and the homepage value manually.
Title/Role values are entered on the District Assignment tab (Census > People > District Assignment) (select image below).
To view or modify an existing rule, select the rule from the Staff Account Automation Rule Settings window. Once a rule is selected, a pop-up will appear, displaying all selected Calendar User Groups and Tool User Groups with the ability to assign additional calendar and tool user groups (see the image below).
Tool User Groups not assigned tool rights will not appear in the Assignable Tool User Groups window.
To create a new rule, click the Add Rule(s) button. The Staff Account Automation Setup window will appear (see below).
First, select the Homepage. This will determine if users will be automatically sent to Campus tools or Campus Instruction upon login.
Select which Titles are tied to this rule. Users who have this title selected on their District Assignment will be granted the calendar and tool rights assigned within this rule.
Select which Roles are tied to this rule. Users who have this role selected on their District Assignment will be granted the calendar and tool rights assigned within this rule.
Click the Next button.
Once titles and roles have been selected, you now need to determine which calendar user groups will be assigned to the rule. This step is optional.
If no calendar or tool rights groups are assigned to the rule, users tied to the titles/roles selected in the rule will not receive tool rights or calendar rights during account creation.
In this scenario, users will have to be granted tool rights and calendar rights manually via their User Account.
Calendar User Groups contain permissions for accessing all calendars assigned to the selected user group.
Calendars are assigned to User Groups via the Calendar Rights tab (System Administration > User Security > User Group > Calendar Rights)
Select which Calendar User Groups to assign and once selected, click the Next button.
Please consider the following:
Only User Groups containing only calendar rights will appear for selection within the Calendar User Groups window. User Groups containing a combination of tool rights and calendar rights ARE NOT available for selection.
Rule functionality requires calendar rights to be assigned only to Calendar User Groups and tool rights only be assigned to Tool User Groups.
Calendar User Groups must be assigned to a single school. User groups containing calendar rights for 2 or more schools will not appear in the Calendar User Groups window.
Users who need calendar rights to more than one school will need to be granted these rights either by adding additional Calendar User Groups to the rule or manually assigning calendar rights to a user via their User Account.
Calendar rights are assigned based on the person's District Assignment record. If a user is given rights based on a Rule, even if the rule contains several Calendar User Groups, the user will only receive calendar rights for schools matching their existing District Assignment record(s).
The Tool Rights tool will prevent users from adding tool rights to calendar user groups.
User groups containing all schools/all calendars are not available for use in the Staff Account Automation tool. Each user account requiring access to all schools/all calendars must be handled manually.
Select which Tool User Groups should be assigned to the rule. All tool rights assigned to the user group selected will be applied to user accounts tied to the rule.
Tool rights are assigned to User Groups via the User Group Tool Rights tool (User Management > User Groups > Tool Rights)
Select user groups from the Tool User Groups window. Each selected user group will appear in the Selected Groups window. Once all groups have been selected, click the Finish button. The Rule has been created, and the selected user group calendar and tool rights will now be assigned to users who have matching District Assignment Role and/or Title values.
Please consider the following:
Only User Groups containing only tool rights will appear for selection within the Tool User Groups window. User Groups containing a combination of tool rights and calendar rights ARE NOT available for selection.
Rule functionality requires calendar rights to be assigned only to Calendar User Groups and tool rights only be assigned to Tool User Groups.
The Calendar Rights tool will prevent users from adding calendar rights to tool user groups.
To delete an existing rule, click the Delete Rule(s) button. The Delete Titles And/Or Rules window will appear. From the Current Titles and Roles window, select which titles or roles (Rules) should be deleted, and once they have been selected, click the Delete button.
You can also delete a rule by selecting the rule from the Staff Account Automation Rule Settings window and selecting the Delete button.
The selected Rules have been deleted from Campus and will no longer be applied to generated staff user accounts.
Deleting a rule has no effect on already created user accounts.
Automatically Disable Accounts After Staff Member is No Longer Employed by the District
Marking this checkbox means all staff accounts will be disabled based on the following logic:
If an End Date is entered on a person's district assignment record but they have an active district employment record, the user will be disabled as of the End Date entered on their district employment record.
If an End Date is entered on a person's district employment record but they have an active district assignment record, the user will be disabled as of the End Date entered on their district assignment record.
In order for a user to be disabled, they must no longer have an active district employment or district assignment record. If an End Date is entered on both a user's district employment and district assignment record, logic uses the latest date of the two dates as the account disable date.
Please consider the following:
You must opt-in to this preference. It is not automatically turned on by default.
The disable process is not immediate and occurs during an overnight job that is run. Staff are not disabled the moment an End Date is entered on their district assignment/district employment record (based on the logic mentioned above).
If you need to immediately disable a user account, go to that user's User Account tab and mark the Disable checkbox.
If the staff member has other existing and active District Assignment records, their account will not be disabled.
If the staff member has a future District Assignment record entered within Campus their account will not be disabled.
This preference is district-wide. This preference affects all staff within a district and cannot be turned on or off at the school level.
Disabled accounts are not stripped of their credentials. If an account is enabled after being disabled, the staff member can continue to use the same username and password.
Users with a Product Security Role will have their account disabled when their District Assignment and District Employment records expire.
This preference DOES NOT disable user accounts that have no employment records (district employment or district assignment records). These accounts must be manually disabled via the Disabled checkbox on the User Account tab.
To view a list of all user accounts that do not have employment records, please see the 'Accounts Requiring Review - Staff' option of the User Account Automation Log.
Help! The Rules Editor is Saying There is an Invalid Configuration
If incorrect modifications were made to the attribute dictionaries for Titles or Roles or if calendar rights or other items were modified in the back-end of Campus, this may cause existing Rules to become corrupt and thus cause your automation configuration to no longer be valid. If this occurs, an error message will appear in the Staff Account Automation area stating "User accounts cannot be created by the automated system because your rules configuration is invalid" (see image below).
Staff account automation is disabled until the configuration is corrected. Once corrected, any users added during the down period will have a user account automatically created and the user can access their new user account the day following the day the configuration was corrected (user accounts are created during an overnight job).
To view a list of the misconfigured data and to potentially delete the data from the system, click the Fix Configuration button (see below). The Fix Configuration window will appear, displaying all misconfigured data and the reason the data is considered invalid.
To correct this issue, you can either modify/update these items one by one within Campus and set them to their correct values or you can have the Fix Configuration tool delete them from the system by clicking the Delete button.
Once all items have been corrected and/or deleted, the error message will go away and staff account automation will resume working within Infinite Campus.
Communicating New User Accounts to Staff Members
For more information about communicating usernames and helping staff members log into their new accounts, please see the following articles:
If generating random passwords for users, it is critical you follow the steps detailed in the articles linked above. This is the only way to properly have a user log in and set their own password if a random password was established by Campus.
Campus highly recommends you establish a recurring user account activation message. Please see theUser Account Messenger Schedulerarticle for more information about this process.
This section is not available if the Authentication Type is set to LDAP or SAML as account passwords are controlled and managed via your IDP.
Reviewing User Group Calendar/Tool Rights and Associated Rules
Tool Search: User Group Report
Users can generate the User Group Report to assist in creating and modifying Rules. This report details all existing user groups, tool and calendar rights associated with specific user groups, and user groups associated with specific Rules.
For more information about this report, please see the User Group Report article.
This tool allows users to batch-create student and staff user accounts using the census email address or a username pattern, enable student and staff user accounts, disable student and staff user accounts, force a password reset for student and staff user accounts, and add or remove user groups for user accounts en masse.
This tool allows you to view detailed information about user account username modifications, user account creation failures, accounts automatically disabled via preferences set in the Account Security Preferences tool, and staff accounts not automatically disabled by Account Security Preferences.
This tool provides high-level and detailed information about which user groups exist, all tool rights and calendar rights assigned to each user group, and which user groups are assigned to which Staff Account Automation rules.
The User Account Messenger Scheduler allows you to establish recurring user account messages which can be sent daily, weekly, or monthly to users who meet message template criteria.
Video
The Account Security Preferences tool provides districts the ability to automatically generate user accounts for students and staff. This tool also houses several preferences related to user account security, which will be covered in this video.
User Account Automation Log
The User Account Automation Log reports information related to the user account automation process.
Documentation
Tool Search: User Account Automation Log
The User Account Automation Log allows users to view detailed information about user account username modifications, user account creation failures, and accounts automatically disabled via preferences set in the Account Security Preferences tool.
Image 1: User Account Automation Log
In order to access the User Account Automation Log, you must be granted the Student Information System Product Security Role.
Prerequisites
In order for data to properly populate the User Account Automation Log, the following preferences must be enabled:
The Enable automatic creation of student accounts preference via the Account Security Preferences tool must be enabled in order for data to populate the log based on Student Collision Resolutions and Failures.
The Automatically disable student accounts _ day(s) after enrollment end date preference via the Account Security Preferences tool must be enabled in order for data to populate the log based on Student Disabled Accounts.
The Enable automatic creation of staff accounts preference via the Account Security Preferences tool must be enabled in order for data to populate the log based on Staff Collision Resolutions and Failures.
The Automatically disable accounts after staff member is no longer employed by the district preference via the Account Security Preferences tool must be enabled in order for data to populate the log based on Staff Disabled Accounts.
Generating the User Account Automation Log
This section will describe how to generate the User Account Automation Log.
Image 3: Generate the User Account Automation Log
Select a Filter Byoption to determine what type of log entry is reported:
Collision Resolution - Student - Indicates which students were given an account username that was modified in order to prevent duplicate usernames within Campus.
Collision Resolution - Staff - Indicates which staff were given an account username that was modified in order to prevent duplicate usernames within Campus.
Failures - Student - Indicates which student accounts failed to be automatically created.
Failures - Staff - Indicates which staff accounts failed to be automatically created.
Disabled Accounts - Portal - Indicates which student accounts were automatically disabled via the criteria set in Account Security Preferences.
Disabled Accounts - Staff - Indicates which staff accounts were automatically disabled via the criteria set in Account Security Preferences.
Select a Date Range. Only account activity related to the Filter By criteria selected during the defined date range is reported.
Select the report Format.
In order to prevent time-out errors or performance issues, Campus highly suggests using the CSV format for result sets greater than 10k.
Click Generate Report. The report will appear in a separate window in the designated format.
Understanding the User Account Automation Log
The following sections describe each Filter By option:
Information presented in the User Account Automation Log is only available within Campus for a year past its event date. Attempting to generate the log for data that has occurred over a year past the date in which it happened will result in the data not appearing in the log.
Collision Resolution - Students
The Collision Resolution - Students log details all students who automatically had student accounts created but had a number appended to their username to prevent duplicate usernames.
Image 4: Collision Resolution - Students
For example, the students listed in Image 5 all had a number added to their username because the system attempted to generate a username that was already taken. In cases where multiple students have duplicate usernames, the number added to the username is incremented by 1 per student to ensure no duplication.
In the image below, two students named James Smith are given modified usernames (jam.smi1, jam.smi2) because another student already had a username of 'jam.smi'.
Image 5: Example of the Collision Resolution - Student Log
Collision Resolution - Staff
The Collision Resolution - Students log details all staff members who automatically had staff accounts created but had a number appended to their username to prevent duplicate usernames.
Image 6: Collision Resolution - Staff
For example, the staff listed in Image 7 all had a number added to their username because the system attempted to generate a username that was already taken. In cases where multiple staff have duplicate usernames, the number added to the username is incremented by 1 per staff to ensure no duplication.
When resolving collisions, the system will fill in missing numbers instead of adding additional numbers to user account names.
For example, if JohnDoe3 exists and JohnDoe1 gets deleted within Campus, if another John Doe is entered into Campus and has a username generated, the new John Doe would recieve JohnDoe1 instead of the system incrementing it by one to JohnDoe4.
In the image below, two staff members are given modified usernames (testerjj1, testerjj2) because another staff member already has a username of 'testerjj'.
Image 7: Example of the Collision Resolution - Staff Log
Failures - Students
The Failures - Students log details all student accounts which failed to automatically be created due to network/system interruptions or other system failures occurring at the time student accounts were being created.
Image 8: Failures - Students
Failures - Staff
The Failures - Staff log details all staff accounts which failed to automatically be created due to network/system interruptions, users failing to have an email address saved within Campus, users who have the same email address as another user within Campus, or other system failures occurring at the time staff accounts were being created.
Image 9: Failures - Staff
In the example below (Image 10), issues with the Campus configuration resulted on account creation failures.
Image 10 - Example of Staff Failures
Disabled Accounts - Portal
The Disabled Accounts - Portal log details all student accounts that were automatically disabled via the criteria set in the Automatically disabled student accounts _ day(s) after enrollment end date preference.
Disabled accounts are not stripped of their credentials. If an account is enabled after being disabled, the student can continue to use their same username and password.
The disable process is not immediate and occurs overnight. In order to accurately view disabled accounts, please generate the log the day after disabling an account.
Disabled accounts have the Disabled checkbox marked on there User Account tab. To enable the account, unmark this checkbox.
Once a student's enrollment record is given an End Date, all parent accounts tied to the student are disabled as of the End Date unless the parent has other students tied to them who have an active or future enrollment record.
Image 11: Disabled Accounts - Portal
Disabled Accounts - Staff
The Disabled Accounts - Staff log details all student accounts that were automatically disabled via the Automatically disable accounts after staff member is no longer employed by the district preference.
Disabled accounts are not stripped of their credentials. If an account is enabled after being disabled, the staff member can continue to use their same username and password.
The disable process is not immediate and occurs overnight. In order to accurately view disabled accounts, please generate the log the day after disabling an account.
Disabled accounts have the Disabled checkbox marked on there User Account tab. To enable the account, unmark this checkbox.
Image 12: Disabled Accounts - Staff
Below is an example of the log displaying recently disabled staff accounts.
Image 13: Example of Disabled Accounts
Account Requiring Review - Staff
The Account Requiring Review - Staff log details all staff user accounts which have no employment records (district employment or district assignment records). Because user accounts with no employment records are not disabled via the Automatically disable accounts after staff member is no longer employed by the district preference, it is important users regularly review this log to ensure the right accounts are active and manually deactivate any accounts found to be erroneous or in need of deactivation.
To manually disable a user account, mark the Disabled checkbox on the User Account tab.
Disabled accounts are not stripped of their credentials. If an account is enabled after being disabled, the staff member can continue to use their same username and password.
Image 15: Example of Staff Accounts Requiring Review
Video
The User Account Automation log provides information about the user account automation process.
Sending User Account Notifications
Account Letter Designer
The Account Letter Designer allows you to create custom letter formats using a WYSIWYG editor. Letter formats are used by the Account Letter Builder to print and send user account-related notifications.
Documentation
Tool Search: User Account Letter Designer
The User Account Letter Designer allows you to create custom letters using a WYSIWYG editor. Letter formats created within the Account Letter Designer can be used by the Account Letter Builder to print and send Campus Portal and user account information, including username, and Portal account activation URLs.
Creating a New Letter Format
To create a new letter format, click the New Format button. You will be directed to the WYSIWYG editor.
Creating a New Letter Format
Use the WYSIWYG editorto build the letter format. This editor behaves similarly to other text editors, allowing you to format text, insert URL links, insert pictures and tables, and modify font properties. An important aspect of the WYSIWYG editor is its ability to insert Campus fields within the text. These fields will dynamically insert information for each letter recipient.
Please review the Understanding Campus Field Options section for more information about inserting Campus fields.
Enter a Name. This will identify the letter within the Account Letter Designer and Account Letter Builder tools.
Select the Font, Size, Font Color, and any other formatting options within the text format bar.
Begin writing the letter within the text field. To include dynamic Campus Field options and sub-reports, select the two buttons on the far right side of the text format bar. For more information, see the Understanding Campus Field Options section below.
Select a user group in the Organized To field. This field allows users to designate which user group has rights to view and generate this letter format.
Select the Save Format button. The report format has been saved and is now available for use in the Letter Builder tool.
Understanding Campus Field Options
One important aspect of the Letter Designer tool is its ability to include Campus fields within letter formats. These options allow reports to dynamically pull and display specific student and person data for each letter recipient.
Any fields displaying in red text have been deactivated. Use the Element Replacement tool to replace them with updated fields.
To include Campus fields within a letter, select the small icon on the right-hand side of the text format bar (Image 4).
Inserting Campus Field Options
Once the Campus field options icon is selected, users are presented with the Insert/Edit Campus Field editor. As with other Ad hoc field editors, users can select Campus fields related to student/person data.
Select the field from the editor to insert the field within the letter. The selected field will appear within a dotted blue-lined box in the text field.
In the example below, a letter was created that began with the recipient's first name (individual.firstName) and explained that they need to unlock their account by following the provided URL and entering their personGUID (individual.personGUID).
Once this letter is built within the Account Letter Builder, the individual.firstName field will generate the first name for each individual letter recipient as well as their personGUID in the individual.personGUID field.
Identifying Inserted Campus Fields
A letter is still generated for students without a mailing address. Like in the Preview of the attendance letters, the student's name is listed on the summary of who receives a letter, but instead of an address, the words NO MAILING ADDRESS display where the address would otherwise display. Letters are printed for the student with the same NO MAILING ADDRESS indication.
No Mailing Address Displayed on Letter Print
No Mailing Address is determined by the Mailing checkbox marked on the Related Household associated with the Address.
Address Location Detail - Mailing Checkbox
Best Practices for Designing Account Letters
Whenever you include the uniqueLinkActivationURL field within a letter, you should include the UniqueLinkExpirationDate field. By default, Unique Activation URLs expire after 48 hours of being created (for security reasons), thus it is important to include the Unique Link Expiration Date field to indicate to the user when the Unique Activation URL will expire.
Example Letter Defining URL and Activation Expiration Date
The 48-hour Unique Activation URL expiration window can be modified via the Account Activation URL Expiration Date field found on the Account Letter Builder. The UniqueLinkExpirationDate field will display the value set in this field.
Whenever you include the uniqueLinkActivationURL field in a letter, include a line instructing users what to do if the URL expires and they can no longer activate their account.
The Unique Link Activation URL will only work for a user the first time they select it. If they select the URL but do not complete the process, they will need a new URL sent to them via a new letter or email using the User Account Messenger tool.
Expired Link Notification
You can provide these users with a new Activation URL by running the same filter within the Account Letter Builder. Original recipients who have activated their account via the URL will not reappear within filter results.
Preferred Language Setup
This format screen allows the entry of the letter's body. Letters can be created in several languages (see the Preferred Language Letter Setup section below). A school can create an Attendance letter in as many languages as needed, but it must first be entered in the selected Default Value.
Infinite Campus does not provide translation services.
Districts must use their own resources when communicating in another language with parents/guardians, students, staff, etc.
Letters must exist in the assigned default language (see Step 1). Text can be entered for additional languages for the district's population. Two things must be done:
A language must be assigned as the Preferred Language on the Personal Contact Information editor on the Demographics tab.
Existing language codes should not be modified. Access to letters is lost until the original code is recreated. If that language code is assigned to any person, that assignment is lost as well.
Step 1. Enter the Preferred Language Default Value
Tool Search: Attribute Dictionary
Enter the desired Default Value for the Preferred Language. This value shows the Default Language Preview when creating letters in other languages. If no Preferred Language has been assigned to an individual (Step 3), letters are generated in this default language.
Expand the Contact object.
Click on the Preferred Language element. A Campus Attribute Detail editor displays.
Enter the appropriate Default Value. This could be en_US, es_MX, or another abbreviation that matches the Code assigned to the Languages entered in the Dictionary list. The entered value must match the Dictionary Code for that language.
Preferred Language Default Value
Step 2. Add Language To Attribute/Dictionary
Languages available here are used in the Preferred Language Selector to control the list of languages.
Expand the Preferred Language attribute and select Dictionary. A Preferred Language Dictionary Detail editor displays.
Click the Add Row button in the far right corner of the Detail editor.
Enter a Code, Name, and Sequence for the language.
Mark the language as Active.
To add more languages, click the Add Row in the right-hand corner and repeat steps 3 and 4.
Click the Save icon when finished.
The Language Code can be up to 15 characters in length.
Attribute Dictionary - Preferred Language
All languages except en_US and the language identified in the Default Value field can be added or removed. When an individual does not have a Preferred Language assigned, the default preferred language is assumed. If this language is removed, letters do not generate at all. The Code entered in the Dictionary must match the Default Value.
Default Value Matches Dictionary Code
Because of a configuration with Email Messenger settings, en_US should never be removed from the Preferred Language Dictionary.
Step 3. Assign Preferred Language to Parent/Guardian
Tool Search: Demographics
Assign the Preferred Language to the parent/guardian who receives an attendance letter. This field can also be assigned to all people in Infinite Campus. It's used to send other messages to parents/guardians, staff, and students.
Parents/guardians can also select the Preferred Contact Language on the Contact Preferences editor in the Campus Portal.
Preferred Language Assignment
Step 4. Create the Letter in the Default Language
Create the letter in the Default Language.
Preferred Language Display
Default Language: English
In the following example, en_US: US English is the Default Language. The Attribute/Dictionary has been entered as follows:
Preferred Language Default Value: en_US
Preferred Language Dictionary Value Code: en_US
The English version displays as the Preview when the same letter is created in another language.
Default Language: es_MX
In the following example, es_MX: Spanish (Mexico) is the Default Language. The Attribute/Dictionary has been entered as follows:
Preferred Language Default Value: es_MX
Preferred Language Dictionary Value Code: es:_MX
Spanish Default Language Setup
When the same letter is created in another language, the Spanish version displays as the Preview.
Preferred Language in Spanish Letter Preview
When finished, select the appropriate Organized To: option, then click the Save Format button. Follow your district's standard procedure to print and generate attendance letters. Letters in English and letters in non-English generate in the same collection of letters. When a parent/guardian is assigned a Preferred Contact Language that is not English, the letter prints in that language.
Step 5. Create the Letter in Additional Languages
After creating the letter in the Default Language, enter text for this same letter in a different language by selecting the language in the Preferred Language list and typing/pasting the translated text into the WYSIWYG editor. That language becomes bold, and an Active checkbox becomes available. A language version of the letter is only a draft until the Active checkbox is marked.
When it is determined that the draft letter can be sent, mark the Active checkbox to indicate the letter is now ready to print for those individuals assigned that Preferred Language.
Letter in Spanish
Repeat these steps for the other languages that require letters.
Please adhere to any district policy that may exist for what needs to be included in the letters.
Step 6. Send the Letters
A letter is sent for each distinct Preferred Language associated with the parents/guardians in the household marked to receive mailings. In the example below, one of the student's guardians receives a letter in Spanish because that is the Preferred Contact Language for that guardian, while another guardian at a different mailing address receives the same letter in English. If two parents/guardians in the household are assigned the same Preferred Language, only one letter is generated for the household.
Letters in Multiple Languages
Certain foreign-language characters may not line up properly with other text when using the Campus Fields or when fonts are mixed (e.g., phone numbers alongside non-English characters). Try adding additional returns between lines.
Account Letter Examples and Scenarios
The following are some examples of ways to use the Account Letter Designer to build useful letters.
Sending Portal Activation Letters to Parents/Students
Using Account Management fields, you can create a letter that provides each parent and student (identified by the Ad hoc filter selected in the Account Letter Builder) with a unique Portal account activation URL. This URL is unique to each letter recipient and, once entered into a web browser, guides each user through the steps to activate their new Campus Portal account.
Activation Letter Example
Reminding Parents/Students of their Campus Portal Account Expiration Date
Using the User Account/Summary fields, you can create a letter to be sent to all Portal users, informing them when their Campus Portal account will expire.
Account Expiration Date Example
Video
The Account Letter Designer allows districts to create custom letter templates for sending user account information, such as usernames and account activation information.
Account Letter Builder
The Account Letter Builder generates user account-related letters by merging an Ad hoc filter with an existing letter format.
Documentation
Tool Search: User Account Letter Builder
The User Account Letter Builder allows you to generate user account-based letters for specific Campus users based on filter criteria.
Census/Staff based Ad Hoc Filters (Portal Accounts) - Filters saved filters to only those containing census/staff fields. When building a letter, only active staff members with a Homepage = 'Campus Portal' (System Administration > User Security > Users > User Account > Homepage) will have a letter generated.
Census/Staff based Ad Hoc Filters (Staff Accounts) - Filters saved filters to only those containing census/staff fields. When building a letter, only active staff members with a Homepage = 'Campus Instruction' OR 'Campus Application' (System Administration > User Security > Users > User Account > Homepage) will have a letter generated.
Student based Ad Hoc Filters - Filters saved filters to only those containing student fields.
Guardians of Student based Ad Hoc Filters - Filters saved filters to only those containing guardian fields.
Mark the Filter for persons without a user account checkbox to limit letter recipients to persons without a Campus user account.
If more than one Saved Filter is selected, determine how the letter will filter data by selecting the Set Operation. For more information about this field, see the Filter Operations section below.
Select the Sort Option.
Click the Build Letters button. The letter will appear in a separate window in PDF format.
The following table describes each field and its functionality:
Field
Description
Saved Filters
This field contains all Ad hoc filters created within the Filter Designer. You can select more than one filter to use when generating letters.
Census/Staff based Ad Hoc Filters (Portal Accounts) - Only active staff members with a Homepage = 'Campus Portal' (System Administration > User Security > Users > User Account > Homepage) will have a letter generated.
Census/Staff based Ad Hoc Filters (Staff Accounts) - Only active staff members with a Homepage = 'Campus Instruction' OR 'Campus Application' (System Administration > User Security > Users > User Account > Homepage) will have a letter generated.
Student based Ad Hoc Filters - Only students will have a letter generated.
Guardians of Student based Ad Hoc Filters - Only users established as guardians of active students will have a letter generated.
Filter for persons without a user account
When marked, only people identified by the selected Ad hoc filter(s) who do not currently have a Campus user account will generate a letter.
Set Operation
If multiple filters are selected, this field determines how Campus combines the filters when reporting data. See the Filter Operations section below for more information.
Sort Options
Sort options are defined as follows:
Alpha - Data is sorted alphabetically by recipient last names.
Zip - Data is sorted by address zip code (used for bulk mail rates).
Account Activation URL Expiration Date
This date determines when the Unique Link Activation URL indicated in the letter expires. If the Unique Link Expiration Date field is included in the letter, it will report the date entered in this field. If this date is not modified, it defaults to 48 hours after generating the letter.
This field only appears if the Saved Account Activation Letter selected includes the accountManagement.uniqueLinkActivationURL and accountManagement.uniqueLinkExpirationDate fields.
Build Letter
Initiates generation of the letter.
Filter Operations
When two or more Saved Filters (Ad hoc filters) are selected on the Account Letter Builder editor, users must determine how Campus will combine these filters when reporting data. Users must select one of two Set Operations:
Union Operation - This operation combines two or more filters by appending one to the other. An example of this would be all Baseball Team members and all 10th grade male students. The following diagram explains this union:
Image 2: Union Operation
Intersection Operation - This operation is used to find data that one or more filters have in common. An example of this would be all baseball team members who are also 10th grade male students. The following diagram explains this union.
Image 3: Intersection Operation
Account Letter Builder Examples/Scenarios
The following are examples of useful ways to use the Account Letter Builder.
Build Activation Letters for Newly Imported/Created Campus Portal Accounts
Once user accounts are imported and created via the User Account Batch Import Tool, a filter is automatically created within Campus. This allows users to easily send letters and/or emails to these users, informing them of their new account and asking them to activate the account.
Step 1. Design an Activation Letter
The first step in this scenario is to design an activation letter within the Account Letter Designer. This letter should include the following:
The accountManagement.username field.
The accountManagement.uniqueLinkActivationURL field.
The accountManagmeent.uniqueLinkExpirationDate field.
A line about what the person should do if they fail to activate their account before the URL expiration date.
For example, in the image below (Image 4), a letter was built including these items, and an example of how this letter will look once generated is shown.
Image 4: Example of Activation Letter
Step 2. Build Activation Letters Using the Import Ad Hoc Filter
The next step is to build letters using the Ad hoc filter created when accounts were imported via the User Account Batch Import Tool and the letter format created in Step 1. The filter will contain all users who had accounts generated via the import.
Filters created via an import are saved as UAM - the date and time the import was generated - the file name. For example, UAM-2014-08-13-12-35-23-file20.csv (see Image 5).
Upon import of a file, the Import Results Summary will list the newly created Ad hoc filter (see below).
Image 5: Building Letters for the Import Filter and Activation Letter Format
Select the import filter within the Saved Filters window (see image above).
Locate and select the activation letter created in Step 1 within the Saved Account Activation Letters window.
Select the Filter Type. This determines whether the letter will be built for students, staff, or guardians.
Click the Build Letters button. The letter will appear in a separate window and is ready for printing and/or sending to users.
Remind Staff their Campus Portal Account is About to Expire
Another useful scenario is generating a letter for all staff whose Campus Portal accounts are about to expire.
In the example below, an Ad hoc filter was created finding active staff members with user accounts about to expire and a letter was created containing the username and account expiration date (Image 6).
Image 6: Creating User Account Expiring Filter and Letter
Once the filter and letter have been created, select a Filter Type of 'Census/Staff based Ad Hoc Filters (Portal Accounts)', locate these within the Account Letter Builder, and generate letters by selecting the Build Letters button (Image 7).
Image 7: Generating Expiring Account Letters
Informing Users of Newly Created User Accounts
You can inform all users who have a newly created user account or who have never logged into their user account to log into their account and update their account password. This scenario is especially useful for user accounts created automatically via Account Security Preferences.
In the example below, an Ad hoc filter was created which includes the total login count (usage.totalLoginCount) and if the account is flagged to require a password change (usage.forceChangePassword). These fields are important as they can be combined with Filter Parameters to identify only users with a Campus user account who have never logged into their account and need to change their password (which will be the case for any accounts auto-generated via Account Security Preferences).
Use the following values to ensure a proper list is generated (see Image 8):
usage.totalLoginCount
Operator: =
Value: 0
usage.forceChangePassword
Operator: =TRUE
Image 8: Filter of Users Who Need to Log into their User Account
Once this filter is created, use the Account Letter Designer to design a letter which will generate for each one of these users.
This letter should include the following Campus fields (see Image 9):
The accountManagement.username field.
The accountManagement.uniqueLinkActivationURL field.
The accountManagmeent.uniqueLinkExpirationDate field.
Image 9: Building a Letter to Inform Users who Need to Log Into Their Account
Once the filter has been created and the account activation letter has been build:
Select the Filter Type.
Filter criteria is important when generating this letter. Only users who match the filter criteria selected (e.g., Student based Ad Hoc Filters, Census/Staff based Ad hoc Filters (Portal Accounts), etc) will have a letter generated.
For notifying Staff, please consider the following:
If notifying staff of their newly created staff Portal accounts (System Administration > User Security > Users > User Account > Homepage = Campus Portal), use the Census/Staff based Ad Hoc Filters (Portal Accounts) filter option.
If notifying staff of their newly created Campus Application accounts (System Administration > User Security > Users > User Account > Homepage = Campus Instruction OR Campus Application), use the Census/Staff based Ad Hoc Filters (Staff Accounts) filter option.
Select the filter from the Saved Filters window.
Select the letter from the Saved Account Activation Letters window.
Enter an Account Activation URL Expiration Date. This is the date the unique activation URL contained in the message will expire (see Image 10). Users will need to select this URL prior to this date.
Click the Build Letters button. The letters will appear in a separate window.
Image 10: Generating a Letter
Below is an example of a generated letter using this scenario (Image 11).
Image 11: Example of a Letter
Video
The Account Letter Builder merges an Ad hoc filter and a letter template to generate letters related to user account information.
User Account Messenger
The User Account Messenger is used to send user account-related emails to students, staff, or parents/guardians who meet the selected filter criteria. This tool is primarily used to send activation messages to users without Portal accounts or to inform users who have had an account created by the User Account Batch Import tool.
Documentation
Tool Search: User Account Messenger
The User Account Messenger tool allows you to send Campus user account-related emails to a specific set of people based on search criteria or Ad hoc filter.
A primary function of this tool is its ability to email user account activation messages to users without Campus Portal accounts or who have recently had a user account created via the User Account Batch Import Tool or Account Security Preferences.
For staff accounts created via the User Account Batch Import Tool or Account Security Preferences, this tool may be used to email notifications by using a staff member's individual search or a Census/Staff based Ad Hoc filter and bypassing the activation URL and expiration date.
If sending Campus account activation messages using an import file Ad hoc filter, a file must first be imported via the User Account Batch Import Tool.
The first step in this process is to select an existing user account messenger template or create a new template (see Image 2).
If an existing template is selected, review Steps 2-4 and begin Step 5.
If a new template is being created, select <new> from the Template field and proceed to Step 2.
Image 2: Selecting a Template
Step 2. Enter Filter Criteria
The next step is enter filter criteria. This will determine which Campus users will receive the email message. Use the table below for help in understanding each option.
Image 3: Entering Filter Criteria
Field
Description
Individual Search
Student - If selected, email messages will be sent to all students within the calendar selected in the Campus toolbar.
Staff Member - If selected, email messages will be sent to all staff members within the calendar selected in the Campus toolbar.
Parent/Guardian - If selected, email messages will be sent to all guardians of students with a current or future enrollment record in the selected calendar.
Force Change Password - If marked, only students, staff members or parent/guardians who have not completed a pending change password request will be sent an email. This option is especially useful for routinely sending out email reminders to these users.
Expiration Date - Only users whose accounts are expiring on this date will be sent the message. This is useful for sending reminder emails to these users.
Student based Ad Hoc Filters
Only students meeting this filter's criteria will be sent the message.
You can build effective user account-related filters using the Ad Hoc Reporting Query Wizard .
Census/Staff based Ad Hoc Filters (Portal Accounts)
Only staff members with a Homepage set to 'Portal' will be sent the message.
You can build effective user account-related filters using the Ad Hoc Reporting Query Wizard.
Selecting this option when building Activation URL messages means the messages will only go to users with a Homepage set to 'Portal' (System Administration > Users > User Account > Homepage) and only staff Portal accounts will be activated.
Census/Staff based Ad Hoc Filters (Staff Accounts)
Only staff members with a Homepage set to 'Campus Application' or 'Campus Instruction' will be sent the message.
You can build effective user account-related filters using the Ad Hoc Reporting Query Wizard.
Selecting this option when building Activation URL messages means the messages will only go to users with a Homepage set to 'Campus Application' or 'Campus Instruction' (System Administration > Users > User Account > Homepage) and only staff Campus Application accounts will be activated.
Guardians of Student based Ad Hoc Filters
Only guardians of students meeting this filter's criteria will be send the message.
You can build effective user account-related filters using the Ad Hoc Reporting Query Wizard.
Step 3. Enter an Account Activation URL Expiration Date
Once filter criteria has been entered, determine if the message you are creating will contain the accountManagement.uniqueLinkActivationURL campus field. If so, the date entered in this field will determine when the unique URL generated within the message will expire. This field will automatically default to 5 days from the current date unless modified.
The accountManagement.uniqueLinkActivationURL field generates a unique Campus Portal user account activation URL which email recipients can select to activate their newly created Campus Portal user account. This is especially useful for sending out messages to all users who have had Portal accounts recently created via the User Account Batch Wizard.
Image 4: Entering an Account Activation URL Expiration Date
Step 4. Create the Message
Now it is time to create the message being sent. First, enter the Sender's Email address and Message Subject. This is the email address and email subject that will appear for each recipient.
This field will default to the value entered in the Default Sender Email Address field found on the Email Settings tab. This field will be read-only unless the Allow Custom Sender's Email Address checkbox is marked on the Email Settings tab.
Image 5: Creating the Message
Begin to write your message in the Message Body. The message body is a WYSIWYG editor which provides standard text formatting as well as the ability to enter Campus Fields. Campus fields are accessed by selecting the small icon in the upper right-hand corner allow you to generate specific Campus data within the message which will report uniquely for each message recipient (see Image 6).
Image 6: Inserting Campus Fields
For example, in the image below, Campus fields individual.firstName, individual.personGUID and accountManagement.uniqueLinkExpirationDate are inserted into the message.
When this message is generated, the individual.firstName field will state the recipient's first name, the individual.personGUID will state the recipient's GUID and the accountManagement.uniqueLinkExpirationDate field will indicate when the account activation window will expire (see Image 7).
Image 7: Example of Inserted Campus Fields
If you like to attach a file to the message, click the Choose File button and locate the file on your hard drive or network. Once selected, click the Upload button (see Image 8)
If you need to attach multiple files, attach a Zip file.
Image 8: Attaching a File to the Message
Step 5. Test the Message
Now that filter criteria has been established and the message has been created, it's time to test the message before sending it out to users. To test the message, click the Test icon. The Send Test Message window will appear, asking you to designate a Destination Email, or where you'd like the test message to be sent so that you can ensure it appears correctly and click the Send Test button (Image 9).
Image 9: Testing the Message
Below is an example of a test message received using the message created in Image 7.
Image 10: Example of a Test Message
Step 6. Preview and Send the Message
If the test message appears correctly and you are ready to send the message, determine the Delivery Date (the date the emails will be sent) and the time during the delivery date in which the message should be sent (Send Emails at).
Click the Preview/Send button. The Preview Message window will appear, describing the amount of email recipients and providing you with the ability to review these recipients by clicking Review Recipients (see Image 11).
Image 11: Reviewing Message Recipients
Once Review Recipients is selected, an editor will appear listing each recipient and allowing you to unmark specific people you do not want to receive the message. You may also preview a specific person's message by clicking the small icon in the Preview column (see Image 12).
Image 12: Previewing a Message
Once recipients have been reviewed and you are ready to send the message, click the Send Message button. The Preview Message window will appear, detailing the count of emails sent (see Image 13).
Image 13: Sending the Message
To review the status of this message request, see the Sent Message Log (Image 14).
Image 14: Viewing the Sent Message Log
User Account Messenger Examples/Scenarios
The following are examples of useful ways to use the User Account Messenger.
Build Activation Messages for Newly Imported/Created Campus Portal Accounts
Once user accounts are imported and created via the User Account Batch Import Tool, messages should be sent to these users directing them to activate their accounts.
Step 1. Design an Activation Message
The first step in this scenario is to design an activation message. This message should include the following Campus fields:
The accountManagement.uniqueLinkActivationURL field.
The accountManagmeent.uniqueLinkExpirationDate field.
A line about what the person should do if they fail to activate their account before the URL expiration date.
For example, in the image below (Image 15), a message was built including these items and an example of how this message will look once generated is shown.
Image 15: Example of an Account Activation Message
Step 2. Send Email Messages Using the Import Ad Hoc Filter
The next step is to send messages using the Ad hoc filter created when accounts were imported via the User Account Batch Import Tool and the message format created in Step 1. The filter will contain all users who had accounts generated via the import.
Filters created via an import are saved as UAM - the date and time the import was generated - the file name. For example, UAM-2014-08-13-12-35-23-file20.csv (see Image 16).
Upon import of a file, the Import Results Summary will list the newly created Ad hoc filter (see below).
Student Portal Accounts
Staff Portal Accounts
If the accounts imported were student accounts, select the filter in the Student based Ad Hoc Filters field.
If the accounts imported were staff Portal accounts, select the filter in the Census/Staff based Ad Hoc Filters (Portal Accounts) field.
Image 16: Example of an Import File Ad Hoc Filter
Remind Staff their Campus Portal Account is About to Expire
Another useful scenario is generating a message for all staff whose Campus Portal accounts are about to expire.
In the example below, an Ad hoc filter was created, finding active staff members with user accounts about to expire, and a letter was created containing the username and account expiration date (Image 17).
Image 17: Creating an Account Expiring Filter and Message
Once the filter and message have been created, find the filter within the Census/Staff based Ad Hoc Filters (Portal Accounts) field and send the message (Image 18).
Image 18: Selecting the Filter within the User Account Messenger Tool
Informing Users of Newly Created User Accounts
You can inform all users who have a newly created user account or who have never logged into their user account to log into their account and update their account password. This scenario is especially useful for user accounts created automatically via Account Security Preferences or the User Account Batch Wizard.
In the example below, an Ad hoc filter was created which includes the total login count (usage.totalLoginCount) and if the account is flagged to require a password change (usage.forceChangePassword). These fields are important as can be combined with Filter Parameters to identify only those users who have a Campus user account who have never logged into their account and need to change their password (which will be the case for any accounts auto-generated via Account Security Preferences).
Use the following values to ensure a proper list is generated (see Image 19):
usage.totalLoginCount
Operator: =
Value: 0
usage.forceChangePassword
Operator: =TRUE
Image 19: Filter of Users Who Need to Log into their User Account
Once this filter is created, use the User Account Messenger to send a message to each one of these users.
This message should include the following Campus fields:
The accountManagement.uniqueLinkActivationURL field.
The accountManagmeent.uniqueLinkExpirationDate field.
You should also enter an Account Activation URL Expiration Date (see Image 20). This is the date the unique activation URL contained in the message will expire. Users will need to select this URL prior to this date.
Filter criteria is important when sending this message. Only users who match the filter criteria selected (e.g., Student based Ad Hoc Filters, Census/Staff based Ad hoc Filters (Portal Accounts), etc) will receive the message and be able to activate their accounts.
For notifying Staff, please consider the following:
If notifying staff of their newly created staff Portal accounts (System Administration > User Security > Users > User Account > Homepage = Campus Portal), use the Census/Staff based Ad Hoc Filters (Portal Accounts) filter option.
If notifying staff of their newly created Campus Application accounts (System Administration > User Security > Users > User Account > Homepage = Campus Instruction OR Campus Application), use the Census/Staff based Ad Hoc Filters (Staff Accounts) filter option.
Image 20: Informing Users who Need to Log into Their User Account
Establishing a Recurring User Account Activation Message
Once you have created and saved a user account activation message in the User Account Messenger tool (meaning you hit Save in the upper right-hand corner to save the message as a template), you can establish a daily, weekly, or monthly recurring message event using theUser Account Messenger Scheduler.
Image 21: Establishing a Recurring User Account Activation Letter
For example, using a user account activation message template and setting to a frequency of daily, you can set theUser Account Messenger Schedulerto send the user account activation email to any user accounts created in the last 24 hours and repeat this process every day within a certain timeframe.
This article also explains how users can log into the Campus Student/Campus Portal App, how to log in using a web browser, and how parents can turn on notifications.
Save
Video
The User Account Messenger allows user-account related messages to be sent to students, staff, and/or parents and guardians.
User Account Messenger Scheduler
The User Account Messenger Scheduler is used to establish recurring user account-related messages to be sent on a daily, weekly, or monthly schedule. This tool is useful in establishing recurring account activation emails for accounts created via the Account Security Preferences tool and the User Account Batch Wizard.
Documentation
Tool Search: User Account Messenger Scheduler
The User Account Messenger Scheduler lets you set recurring user account messages that can be sent daily, weekly, or monthly to users who meet the message template criteria.
This tool is especially useful for automatically establishing recurring account activation emails for user accounts created via the Student and Staff Account Automation functionality within the Account Security Preferences tool, and for user accounts created en masse via the User Account Batch Wizard.
Image 1: User Account Messenger Scheduler
Only users assigned a Product Security Role of Student Information System (SIS) are allowed to use this tool.
Prerequisites
Before using this tool to schedule user account messages, user account message templates must first be created and saved within the User Account Messenger tool. To do this, complete the following steps.
Click Save in the upper right-hand corner of the screen.
Give the template a User/Group and Template name.
Click OK.The template is now available for use within the User Account Messenger Scheduler tool.
Please see the Building and Sending an Account Message section for more information about how to build a message and this section for detailed information on how to build a message template for users with newly created user accounts.
Scheduling a Recurring User Account Message
Once user account messenger templates have been created within the User Account Messenger tool, these templates can be used to schedule a one-time or recurring message. This is especially useful for scheduling recurring user account activation emails for any and all user accounts automatically generated via Student and Staff Account Automation functionality within the Account Security Preferences tool and user accounts created en masse via the User Account Batch Wizard.
The unique URL generated within this recurring message will automatically expire 5 days after the message is delivered.
Click a user account messenger template from the User Account Messenger Schedules window. Three editors pertaining to the template will appear below.
Enter the Schedule Name. This describes the scheduled message.
Select which Calendar will be used to identify which users will receive the message (filtered by values selected in the template).
Enter the Start Date and Start Time of the message. This is the first date and time the message will be sent.
Select the Recurring Frequency - 1 time only, Daily, Weekly, or Monthly. The message will be scheduled to be sent in this frequency using the Start Date set in the previous step as guidance for the start of the frequency.
Enter the Reply to Email. This is the email address users who receive the email will see if they attempt to reply to the message.
If you would like confirmation the message was sent successfully, mark the Send confirmation email checkbox.
Review the message template data in the Message Builder Filter Criteria Detail and Message Delivery Detail. If everything looks good, click Save. The newly scheduled message will appear below the message template.
For detailed steps on scheduling Campus Parent Portal account creation emails, see this article.
Review Sent Messages and Recipients
If you would like to review which messages have been sent and their recipients, please see the Sent Message Log and Recipient Log tools.
Sent Message Log
Recipient Log
Video
The User Account Messenger Scheduler allows user account related messages to be scheduled to be sent one time, daily, weekly, or monthly.
Updating Existing User Accounts
User Account Type Wizard
For existing user accounts, the User Account Type Wizard allows you to convert accounts from using Local Campus Authentication to SAML SSO or LDAP authentication.
Documentation
Tool Search: User Account Type Wizard
The Account Type Wizard allows you to convert existing Campus user accounts from local Campus login authentication to SAML SSO or LDAP authentication. You can search for and convert a specific user account(s) or a large group of accounts using an ad hoc filter.
You may also use this tool to convert Campus accounts from SAML SSO or LDAP authentication to local Campus authentication.
If Using LDAP Authentication: LDAP authentication must be enabled via the LDAP Authentication tool.
Only users assigned a Product Security Role of Student Information System (SIS) are allowed to use this tool.
Step 1. Search for User Accounts
The first step in configuring Campus accounts is to search for and identify which accounts will be converted. Accounts can be identified by generating a list based on an Ad hoc Filter or by searching for accounts using Username, Last Name, First Name, their homepage, or their account type information.
In the example below (Image 2), the user identified the user accounts by selecting an existing Adhoc Filter, selecting the User Account Type of LDAP, and clicking the Search Users & Add to Search Results button.
The identified accounts (Christopher, Kelly, etc) are then placed in the Search Results window where they can be individually selected and added to the list of people who will have their authentication converted.
Image 2: Identifying Accounts via Adhoc Filter
Step 2. Determine Which Users to Convert
Once user account search results have been generated and user accounts are identified, you must add the appropriate accounts to the Selected Users window. These users will have their authentication converted to the value selected in the Set AccountAuthentication Type To field.
Select the user account from the Search Result window and click the right arrow button (—>). The user name and account will move from the Search Results window to the Selected Users window (see Image 3).
To remove a user account from the Selected User window, select the user account name and press the left arrow button (<—). The user name and account will move from the Selected Users window to the Search Results window.
If multiple results are returned in the Search Results window and you want to convert all of the results, click on the Select All —> button to move all of the results to the Selected Users window. To remove all users from the Selected Results window and back to the Search Results window, click the <— Move All button.
Image 3: Selecting Users for Conversion
Step 3. Determine the Authentication Method
Once all accounts have been identified and properly added to the Selected Users window, a SetAccountAuthentication Type To value (Image 4) must be selected. See the table below for more information about field values.
Image 4: Authentication Type Field
Allow Only Local Campus Authentication
Selecting this option means all identified user accounts will use their local Campus District ID and password to log into Campus. The account password is also managed within Campus and can be reset via the Reset Password button in the User Account tab.
The User Account tab will allow Administrators with proper tool rights to initiate a password reset via the Reset Password button, and the Authentication Type field will show a value of 'Allow Only Local Campus Authentication' (see image below).
Account users will log into Campus by entering their local Campus ID and password (select image below).
Allow Only SAML Authentication
Selecting this option means all identified user accounts will use their SSO username and password to log into Campus. This also means account passwords are managed outside of Infinite Campus, and your network administrator must make any modifications to credentials.
Locked user accounts with a Local Authentication type are not converted to SAML during the conversion process but remain with a Local Campus Authentication type.
The User Account tool will not allow users to initiate a password reset (all password credentials are managed by the network administrator outside of Infinite Campus) and the Authentication Type field will show a value of 'SAML: Single Sign-On (SSO).
Account users will log into Campus by clicking the Single Sign On button and entering their SSO username and password (select image below).
Selecting this option means all identified user accounts will use their LDAP username and password to log into Campus. This also means account passwords are managed outside of Infinite Campus and your network administrator must make any modifications that need to be made to credentials.
Locked user accounts with a Local Authentication type are not converted to LDAP during the conversion process but remain with a Local Campus Authentication type.
The User Account tool will not allow users to initiate a password reset (all password credentials are managed by the network administrator outside of Campus) and the Authentication Type field will show a value of 'LDAP Authentication' (or whatever your LDAP instance was named when setup).
If your environment has more than one LDAP instance configured, you will also need to select the LDAP Configuration. This is the LDAP server to which the user's account is tied.
Account users will log into Campus by entering their LDAP credentials into the local username and password fields. (select image below).
Step 4. Convert User Accounts
Once user accounts have been added to the Selected Users window and a Set Account Authentication Type To value has been set, convert the accounts by selecting the Convert User Accounts Authentication Type button (see Image 5).
A pop-up message will appear, indicating how many user accounts were successfully converted.
The User Account Type Wizard can convert up to 9000 accounts at a time it is run. If you need to convert more than 9000 accounts, run the tool multiple times until all accounts are converted (assuming you allow for conversion to complete between each tool run).
Image 5: Convert User Accounts
Converting User Accounts Back to Campus Authentication Accounts
Converting user accounts back to a Campus-authenticated account requires using the User Account Batch and Import Wizards to reset passwords to use local Campus account credentials. When local Campus accounts are converted to third-party authentication or uploaded as third-party authentication records, the password will either be forgotten or non-existent since user accounts can be uploaded without a password. Because of this, when a selection of SSO or LDAP user accounts is converted to Campus accounts, an Ad hoc filter containing the list of person IDs will be created by default, so the User Account Batch Management workflow can be used to reset the passwords.
The Ad Hoc filter will have the naming convention "UATW_PersonList_" followed by the date and time of ad hoc creation (YYYY-MM-DD-HH-MM-SS).
Generating a List of LDAP-Enabled Students/Staff
Tool Search: Filter Designer
You can filter and report which students and staff members have LDAP enabled (or disabled) by using the Filter Designer and selecting the usage.ldapAccount field.
For detailed steps of this process, see the Generating a List of LDAP-Enabled Students/Staff section of the LDAP Authentication article.
Image 6: LDAP Enabled Filter
Generating a List of Single Sign On (SSO) Enabled Students/Staff
Tool Search: Filter Designer
You can filter and report which students and staff members have SSO enabled (or disabled) by using the Filter Designer and selecting the usage.ssoAccount field.
Image 7: Creating an SSO Account Filter
Once you have selected the usage.ssoAccount field, Campus recommends adding additional fields to the filter, preferably identifiers such as first name, last name, username, etc., to help in identifying and differentiating between filter results. Below are a few examples:
student.firstName
student.lastName
usage.username
Click the Next button. You be redirected to the Filter Parameters editor (Image 8). To generate a list of users with SSO accounts, give the usage.ssoAccount the following values:
An Operator of =
A Value of 1 (see image below).
Image 8: Entering Filter Parameters
Once you have entered in the proper filter parameters, select the Save & Test button. A report will be generated in a separate window, displaying users who are SSO authenticated (Image 9).
Image 9: Example of an SSO Account Report
User Account Reports
Tool and Calendar Right Access Report
The Tool and Calendar Right Access Report lists users or user groups who have been granted the selected tool or calendar right access.
Documentation
Tool Search: Tool & Calendar Right Access
The Tool and Calendar Right Access Report allows you to view a list of all users or user groups who have been granted tool rights for a specific tool and/or rights to a particular calendar.
The following table describes each part of the User Account version of the Tool & Calendar Right Access Report.
Area
Description
Header
The header indicates the calendar, tool rights, access rights, and the number of users who meet the criteria entered in each field.
Role Legend
The legend describes how to interpret Role values reported for each user. This information is useful in determining if the user's role(s) match the need for the tool and access rights granted.
Person, Employment, Account and Assignment Information
The body of the report indicates each reporting user's person, employment, user account, role, and school calendar information.
The Granted Access column indicates how the user acquired tool rights for the reporting tool. A value of 'User Account' means the user was assigned tool rights to the tool via the Tool Rights tab. A value of 'Student Information System' means the user has a Product Security role of 'Student Information System' and thus has rights to tools within Campus. If a user acquires rights via a user group, the name of the user group(s) will be reported in this column.
User Groups
The following table describes each part of the User Groups version of the Tool & Calendar Right Access Report.
See the User Groups article for more information about managing user groups within Campus.
Area
Description
Header
The header indicates the calendar, tool rights, and access rights of user groups who meet the criteria entered in each of these fields.
User Group Information
The body of the report indicates which user groups match the report criteria and how many users are members of each user group.
Generating the Tool and Calendar Access Report
The following sections describe different ways to generate and interpret the report.
Enter values in the following fields to view which users have rights to the specific tool with the designated access rights.
The report will detail all users with the tool and access rights for the values entered in the report editor.
Viewing Users Who Have Rights to Access a Specific Calendar
Tool Settings
Report
Enter values in the following fields to view users' rights to the specific calendar.
The report will detail all users with rights to view and access data within the calendar selected on the report editor.
Viewing Users Who Have Rights for a Specific Tool and Calendar
Tool Settings
Report
Enter values in the following fields to view which users have tool and access rights to the specific tool in the designated calendar.
The report will detail all users with tool and access rights for the calendar entered on the report editor.
Viewing User Groups with Rights for a Specific Tool
Tool Settings
Report
Enter values in the following fields to view which user groups have tool and access rights for the specified tool.
The report will detail all user groups with tool and access rights for the tool entered on the report editor.
Viewing User Groups with Rights for a Specific Tool in a Specific Calendar
Tool Settings
Report
Enter values in the following fields to view which user groups have tool and access rights for the specified tool in the designated calendar.
The report will detail all user groups with tool and access rights for the tool and calendar entered on the report editor.
Viewing User Groups with Rights for a Specific Calendar
Tool Settings
Report
Enter values in the following fields to view which user groups grant access rights for the specified calendar.
The report will detail all user groups who grant access rights to the calendar entered on the report editor.
Video
The Tool & Calendar Right Access Report generates a list of users or user groups who have been given access to a specific tool and/or calendar.
User Group Report
The User Group Report provides both high-level and detailed information about user groups. Report options include a list of existing user groups, all tool and calendar rights associated with selected user groups, and a list of user groups associated with staff automation rules.
Documentation
Tool Search: User Group Report
The User Group Report provides high-level and detailed information about which user groups exist, all tool rights and calendar rights assigned to each user group, and which user groups are assigned to which Staff Account Automation rules.
Image 1: User Group Report
To access the User Group Report, you must be granted the Student Information System Product Security Role.
The User Groups Summary lists all existing user groups within the district.
To generate the report:
Select a Report Type of 'User Groups Summary'
Select the Format
Click the Generate Report button. The report will appear in a separate window.
Image 3: User Group Summary Report
As shown in the image below (Image 4), the report will list all user groups within the district.
Image 4: Example of the User Group Summary Report
User Group Details Report
The User Group Details Report lists all tool or calendar rights assigned to selected user groups.
There is a limit of 50 user groups when generating in PDF format.
To generate the report:
Select a Report Type of 'User Group Details Report'.
Select which User Groups will report tool/calendar right data.
Select the Format.
Click the Generate Report button. The Report will appear in a separate window in the designated format.
Image 5: User Group Details Report
As shown in the images below, the report details each tool and corresponding tool rights assigned to each user group within the district (Image 6). It also displays all calendar rights assigned to each user group within the district (Image 7).
Example of Tool Rights
Example of Calendar Rights
Staff Automation Rule Details Report
The Staff Automation Rule Details Report details a list of all user groups associated with selected Rules.
Rules are used during the Staff Account Automation process to determine what calendar rights, tool rights, and homepage settings are automatically applied to user accounts based on the Title and/or Role(s) designated on their District Assignment.
Select a Report Type of 'Staff Automation Rule Details Report'.
Select which Rules will report user group information.
Select the report Format.
Click the Generate Report button. The report will appear in a separate window in the designated format.
Image 8: Staff Automation Rule Details Report
As shown in the image below (Image 9), the report lists all user groups tied to a specific Rule (Behavioral Specialist) and Type (Title). This means any users with a Title on their District Assignment record that matches the Title value set in the Behavior Specialist Rule will be given access to the tool rights and calendar rights encompassed in each user group listed in the User Group Summary section.
Image 9: Example of the Staff Automation Rule Details Report
Video
The User Group Report provides three options for generating information about user groups. This video will review each report option.
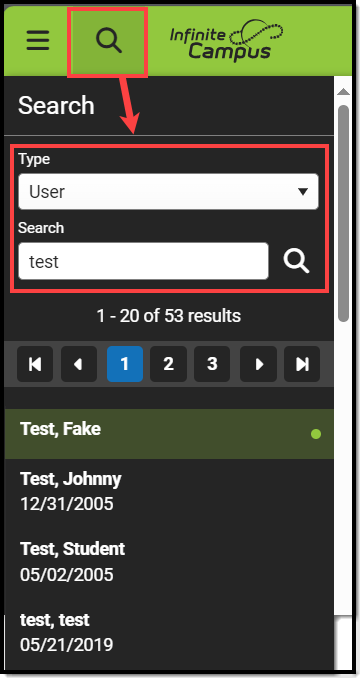
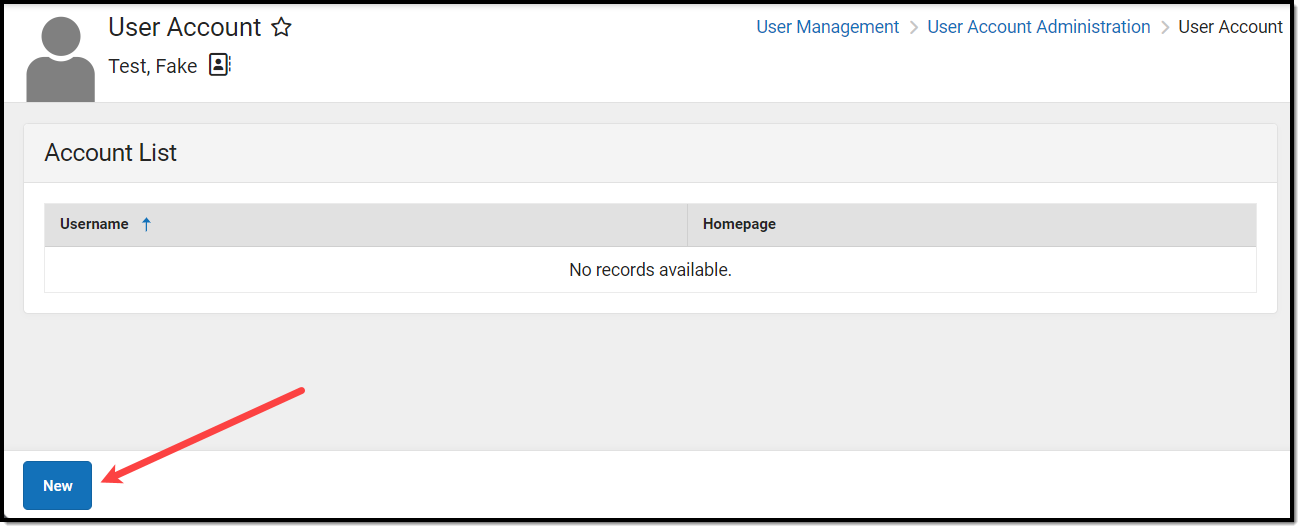


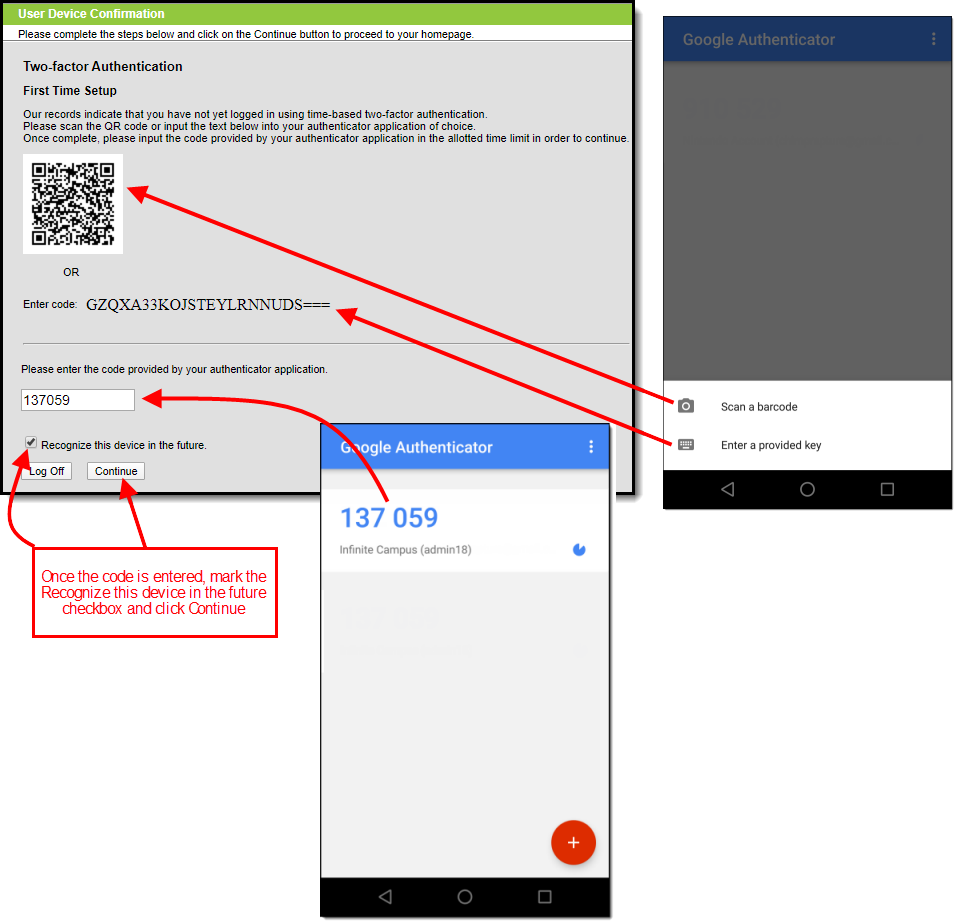
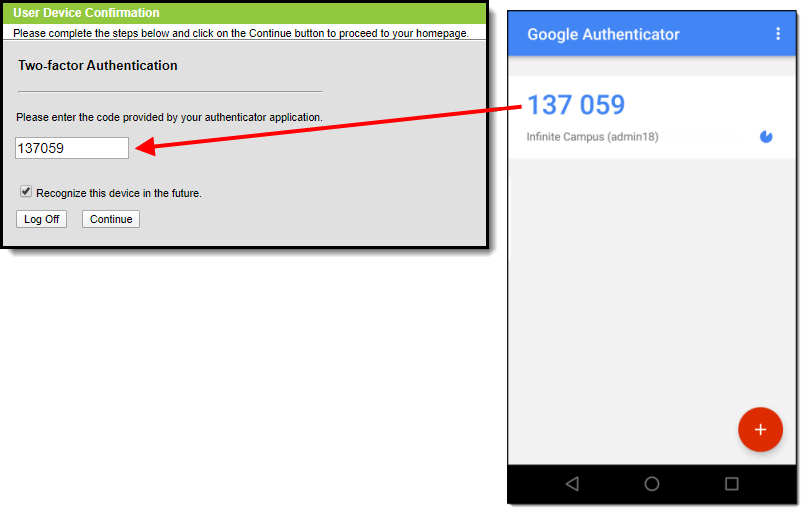
 This will occur when multi-factor authentication has been enabled via the following ways:
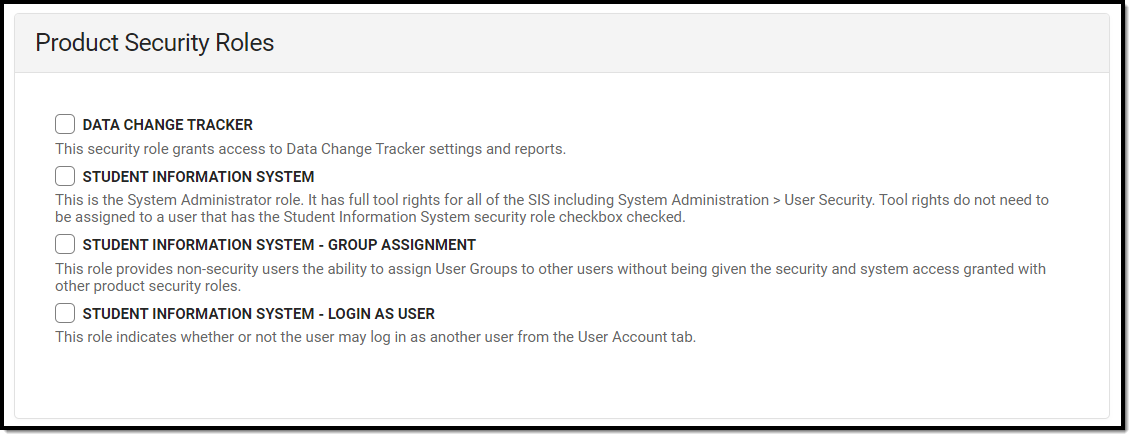
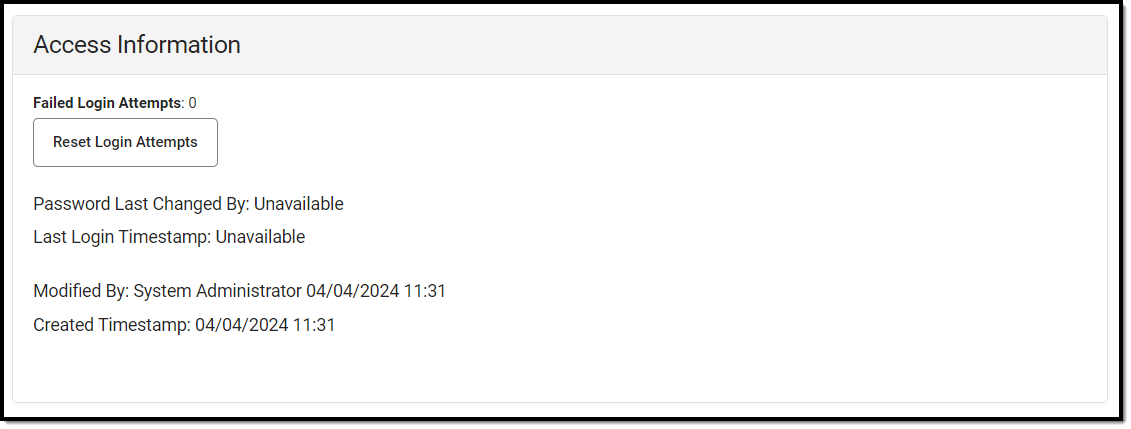
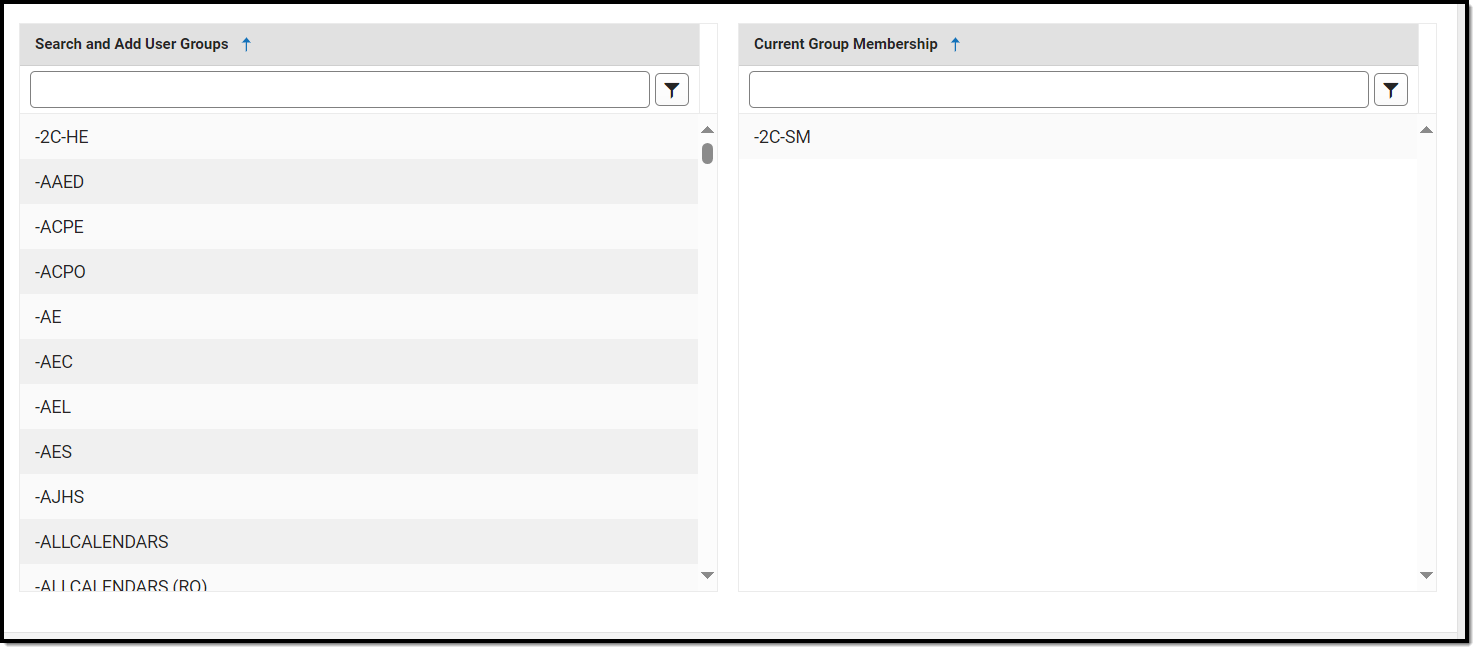
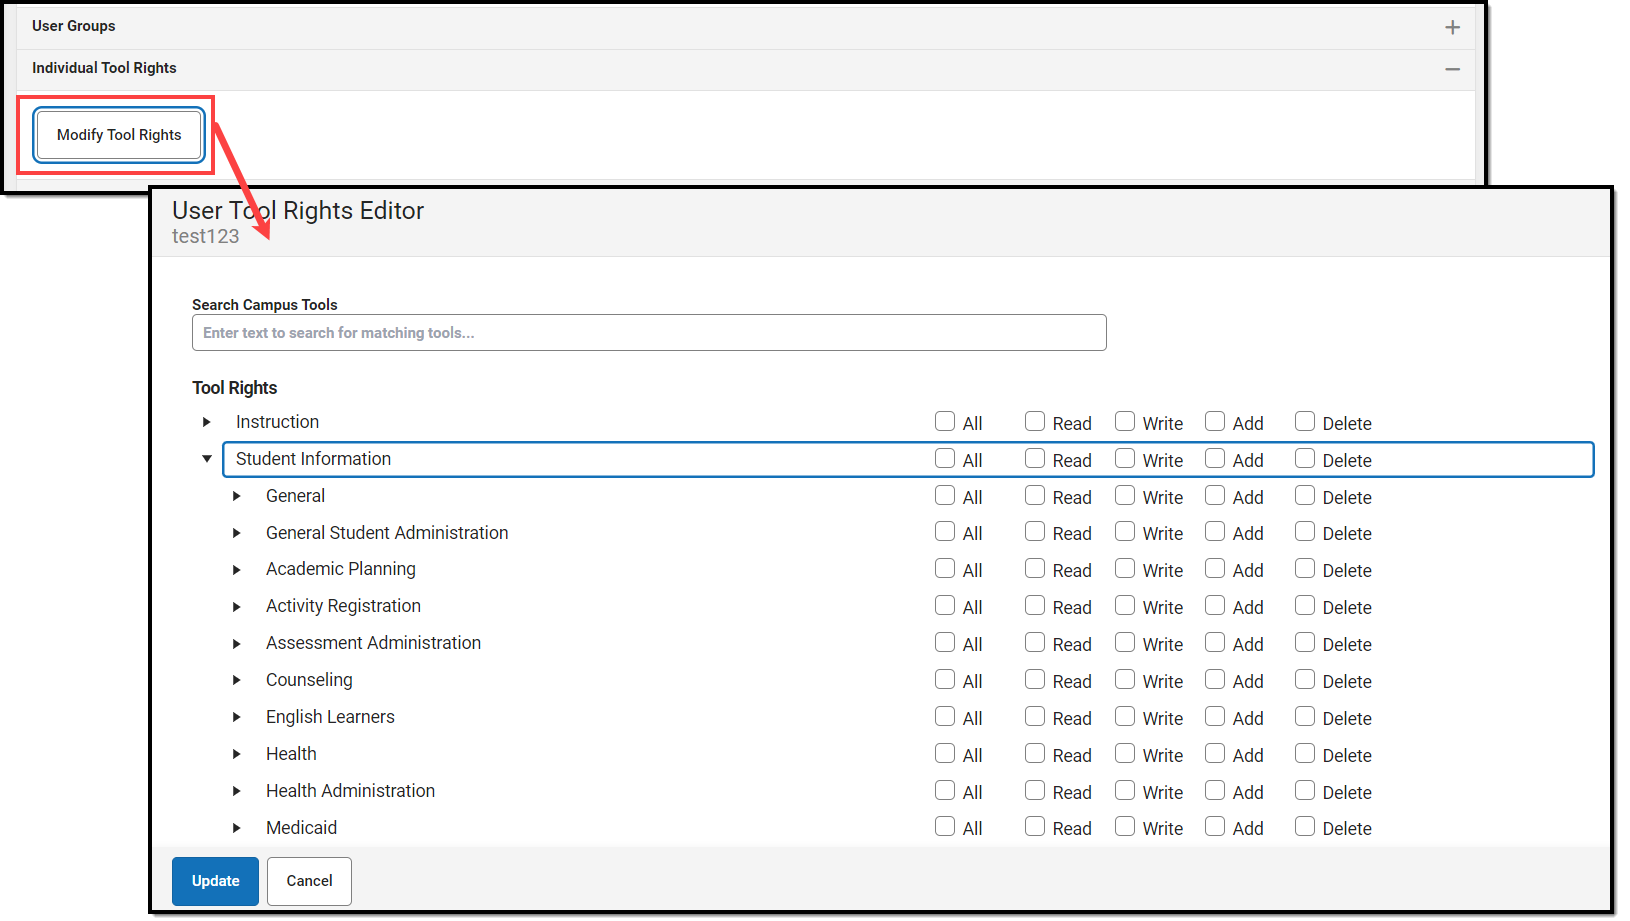
 has been added to the New Look of Infinite Campus, appearing in the RWAD checkboxes of tools/menu items where the user does not have tool rights to the tool/menu item but does have rights to tools or sub-rights contained within the tool/menu-item.
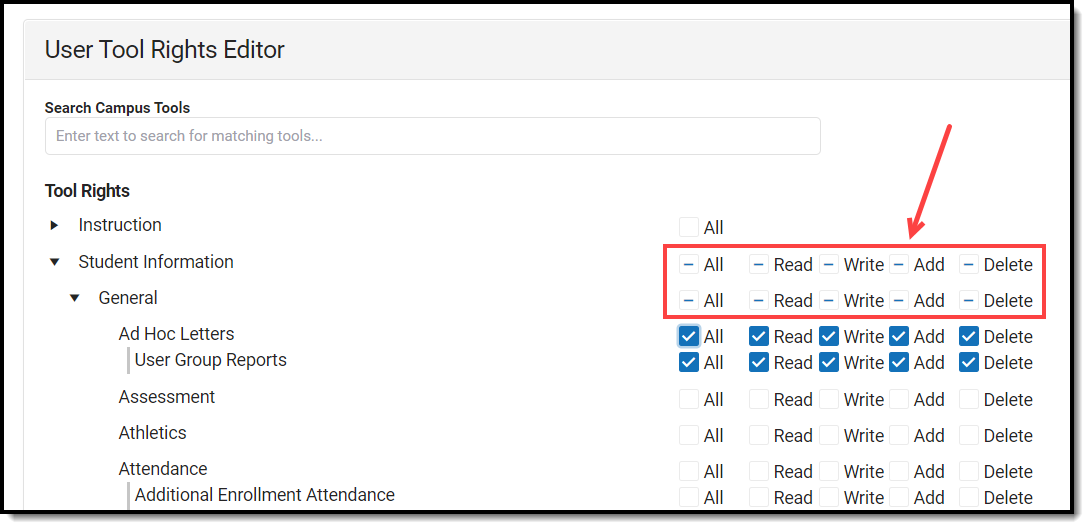
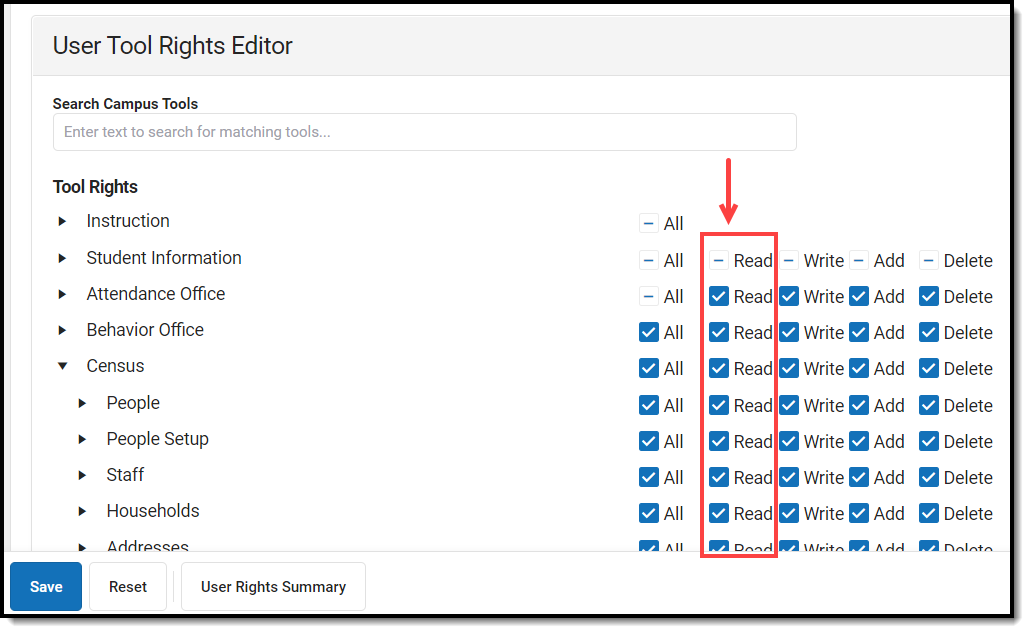
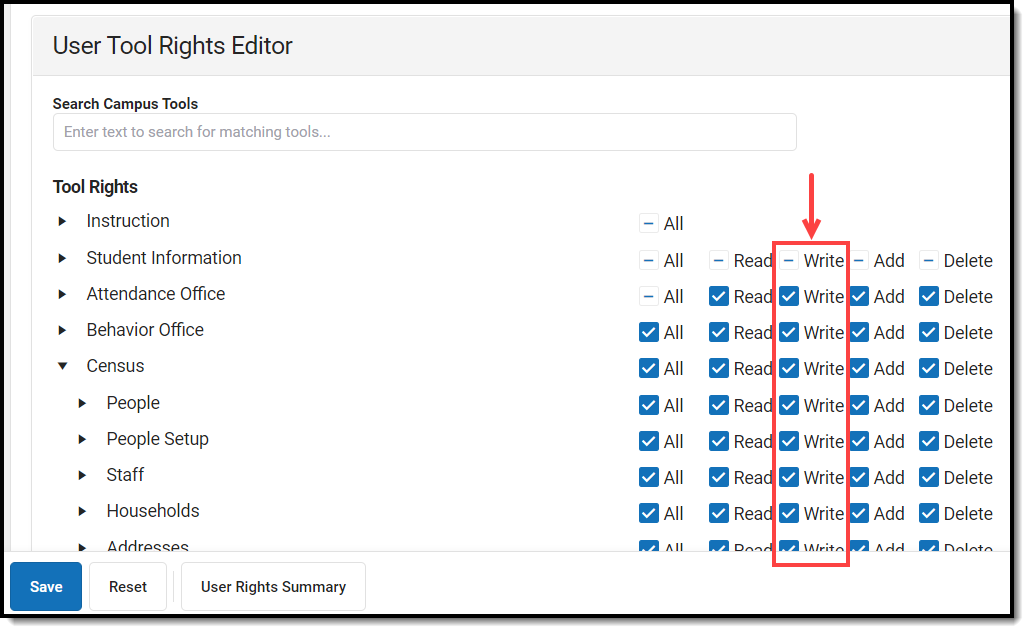
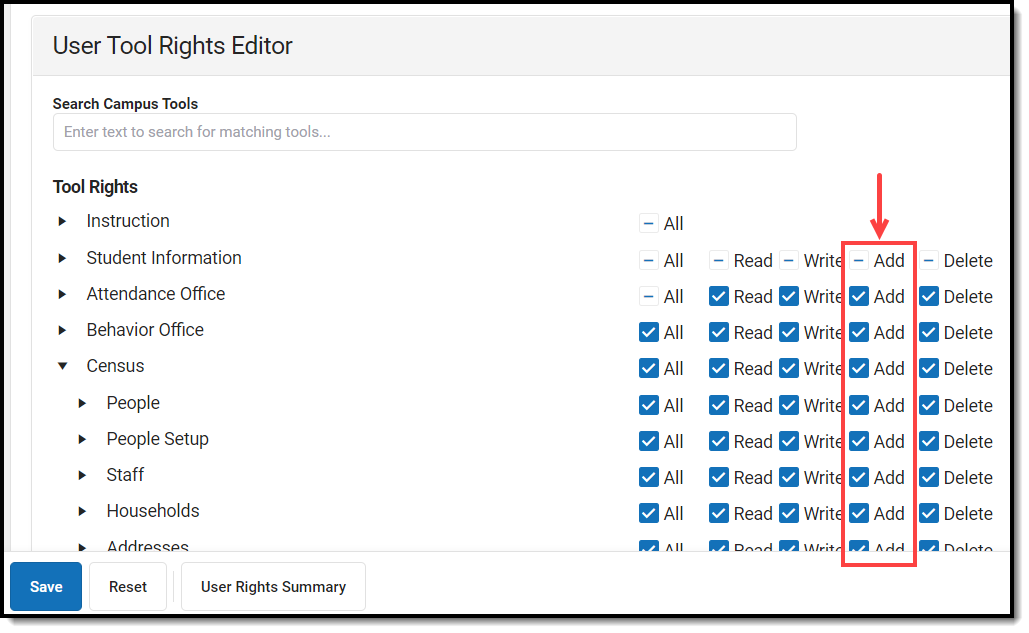
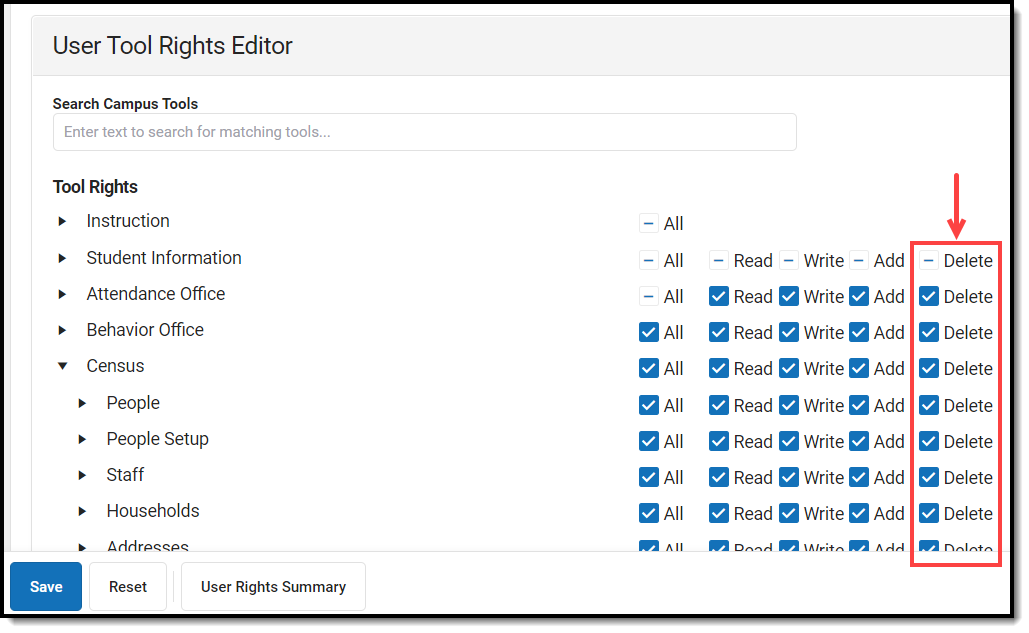
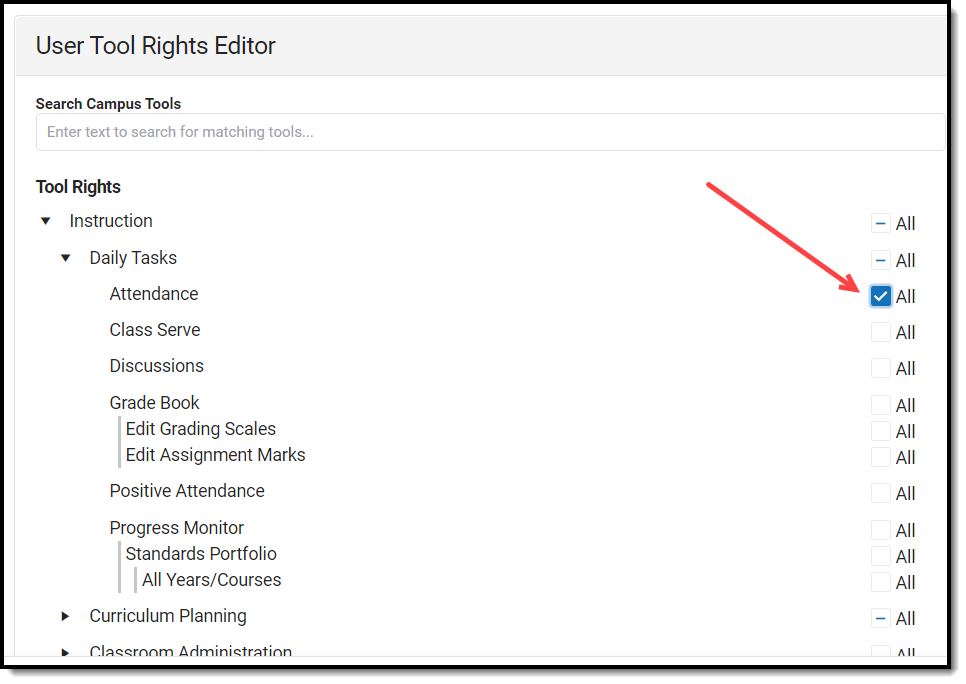
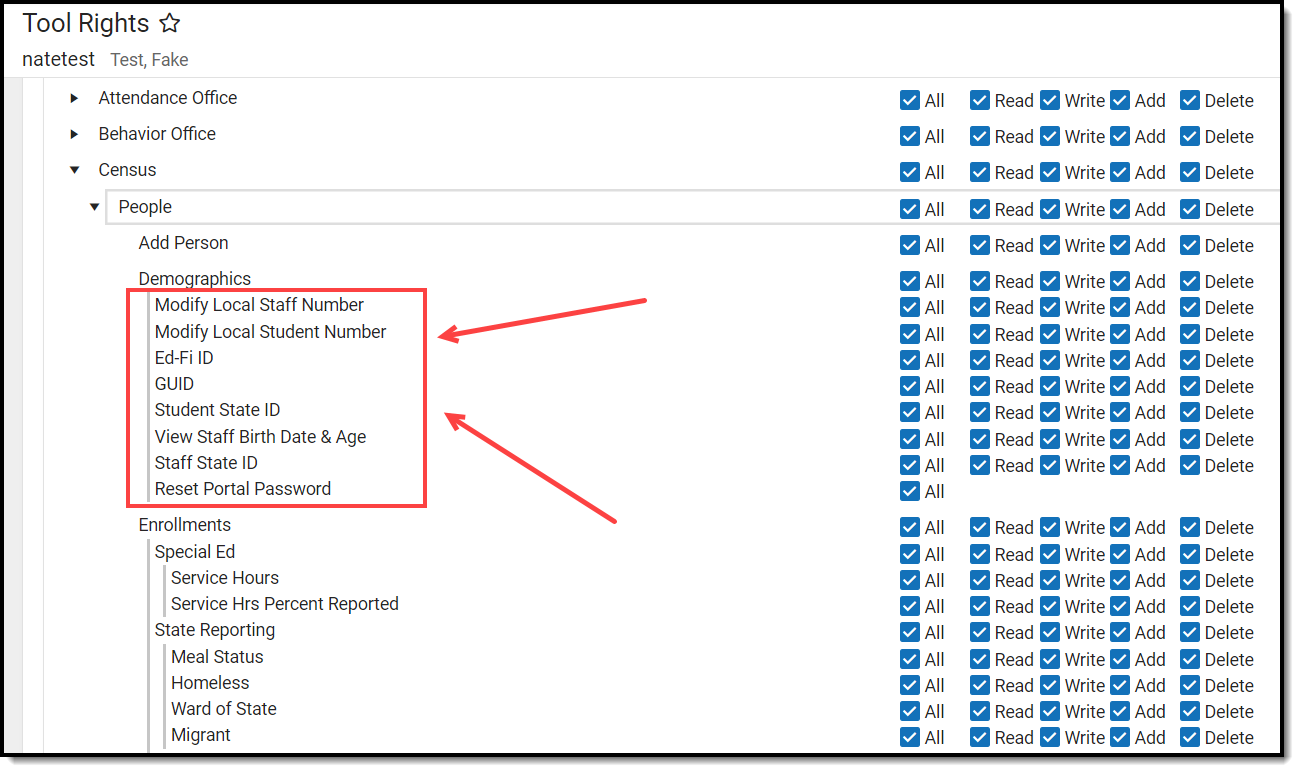
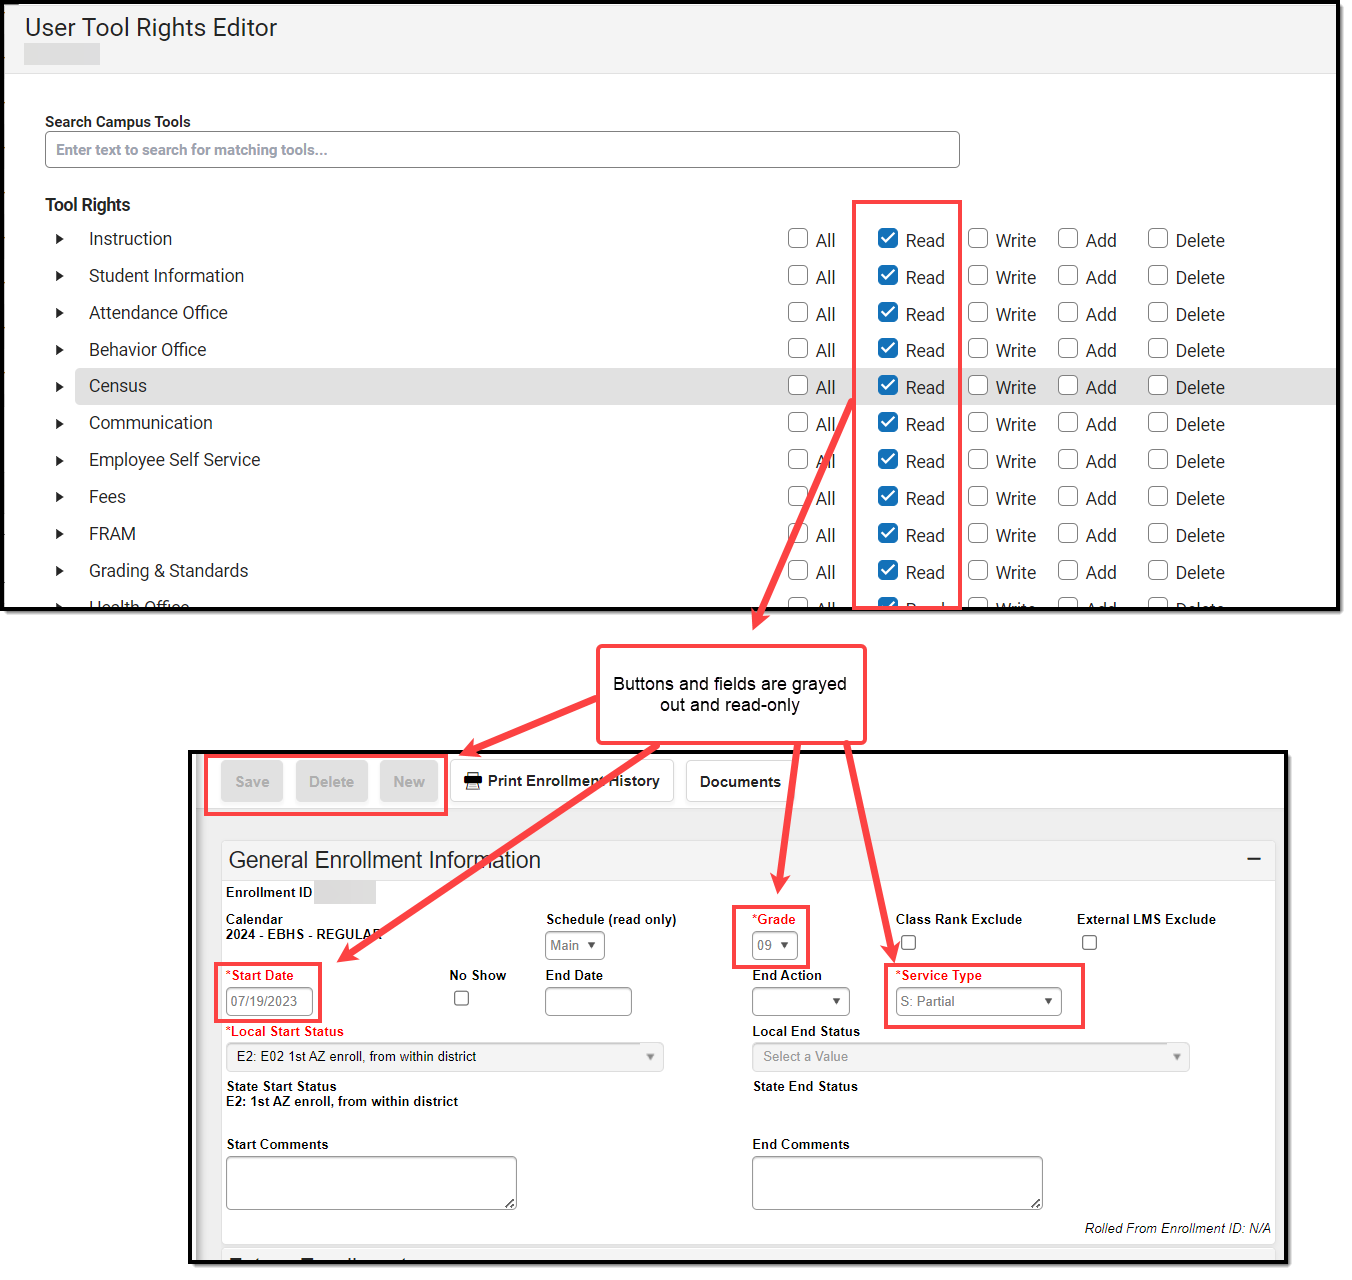
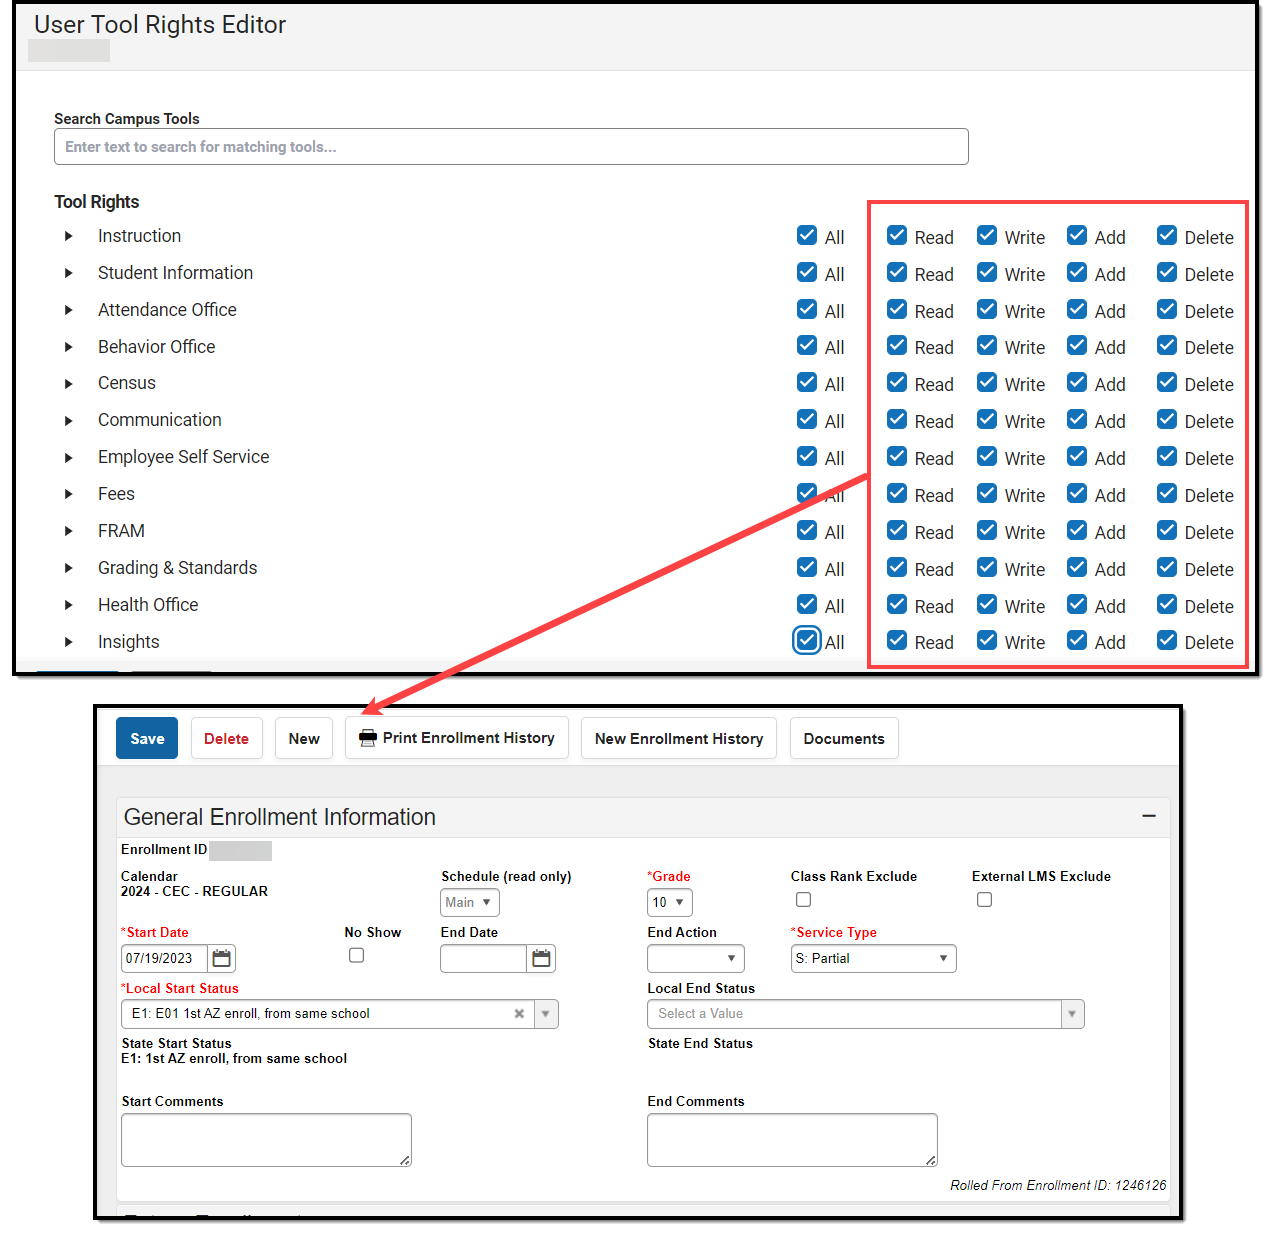
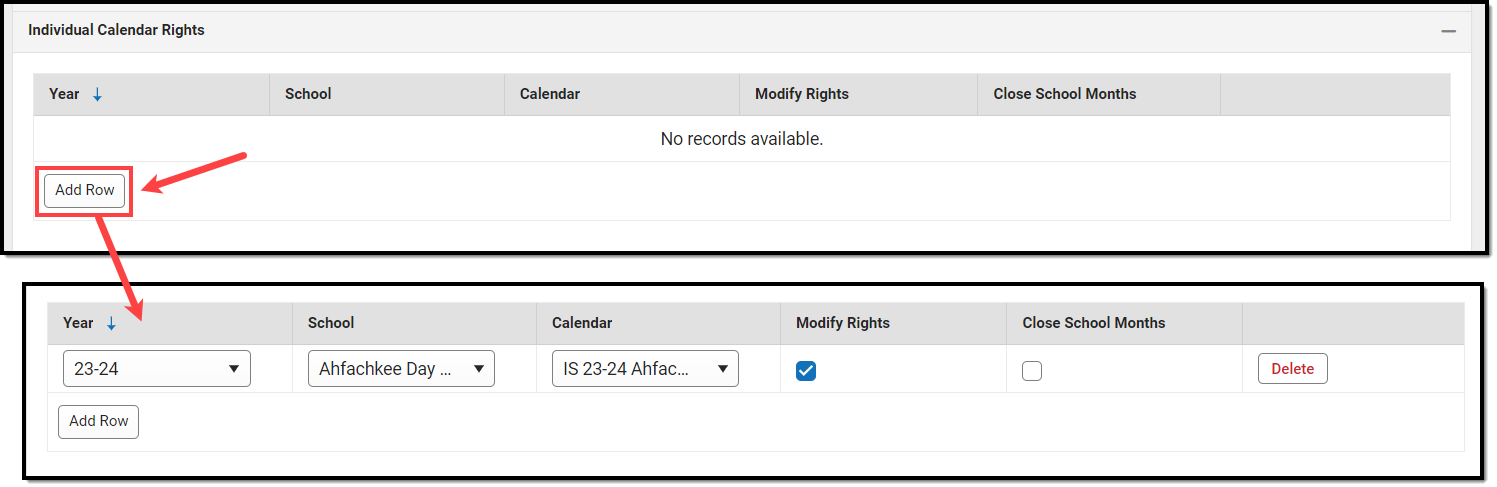
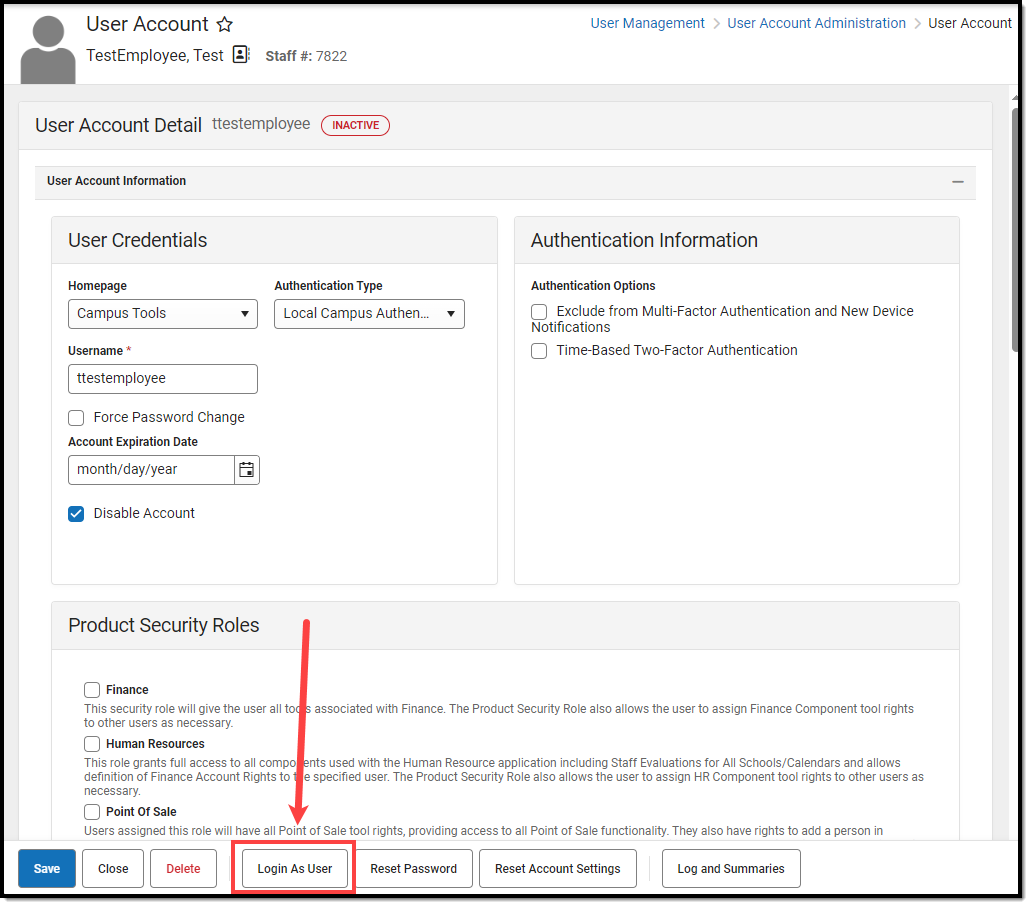
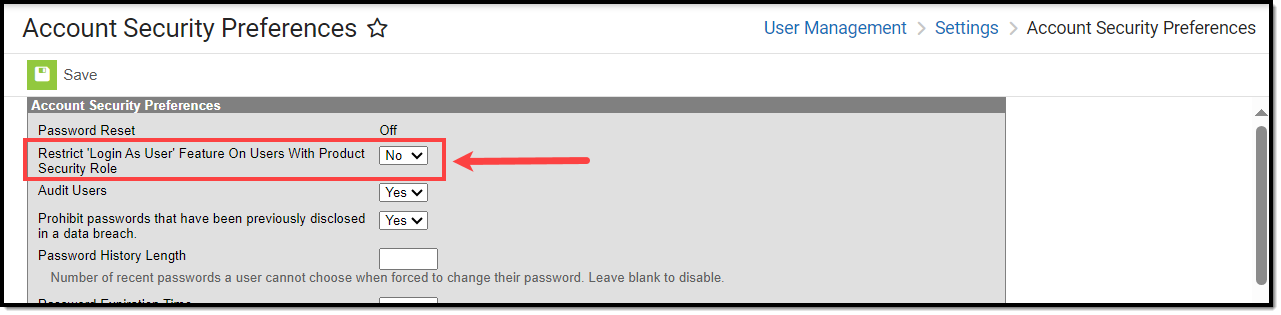

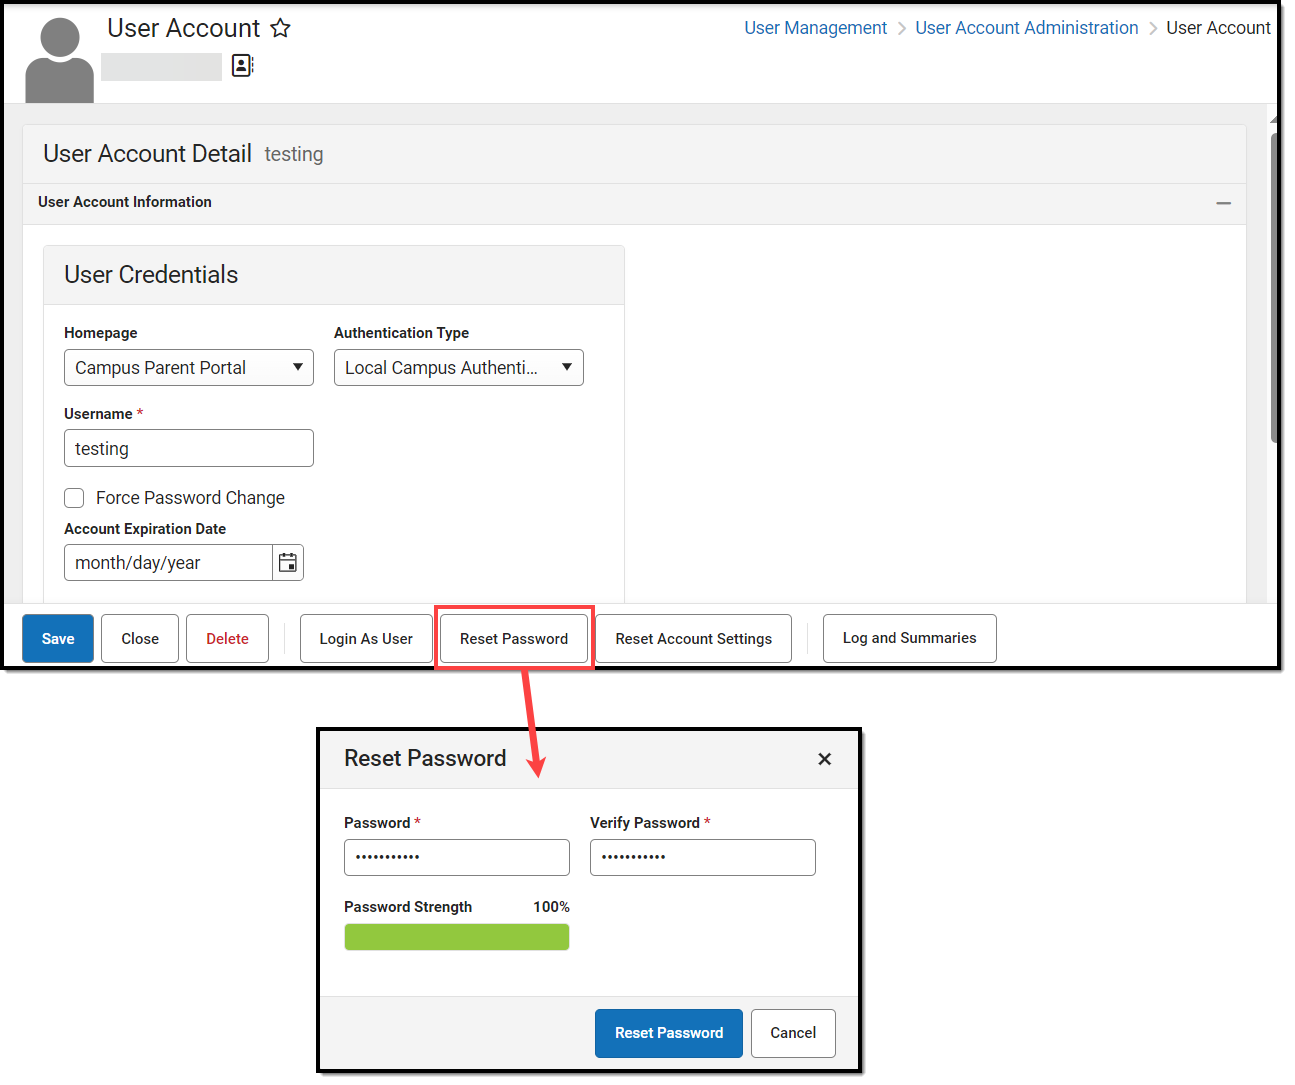
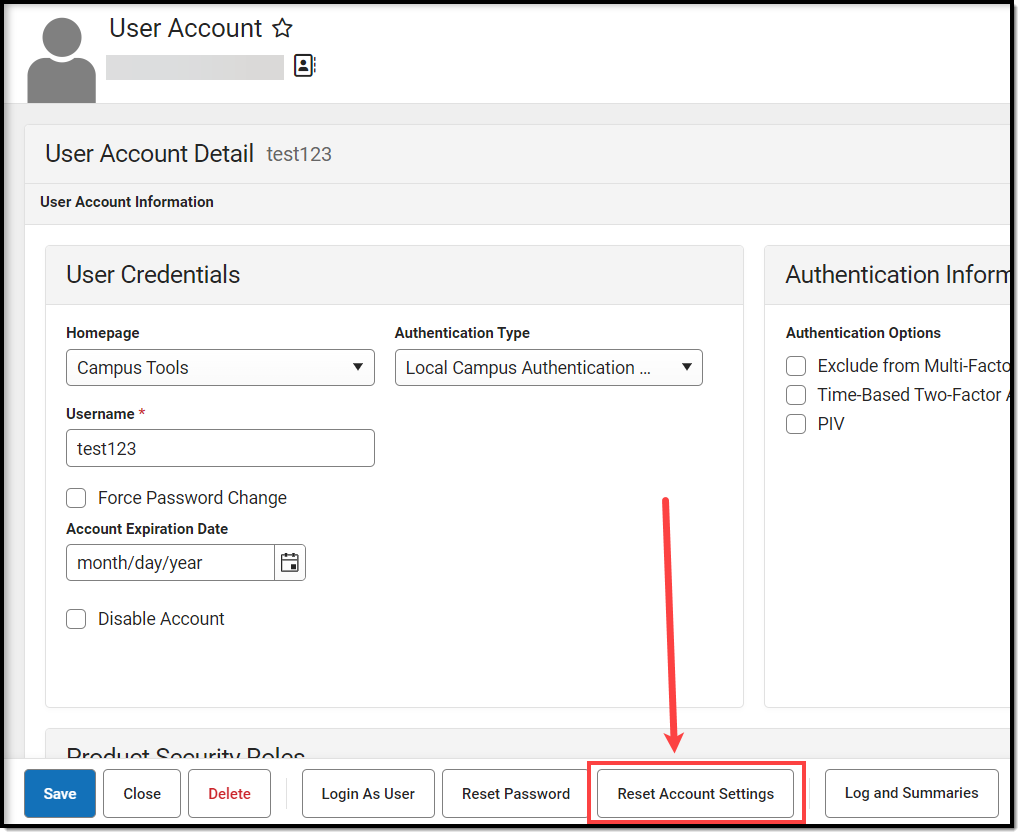

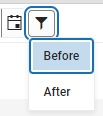
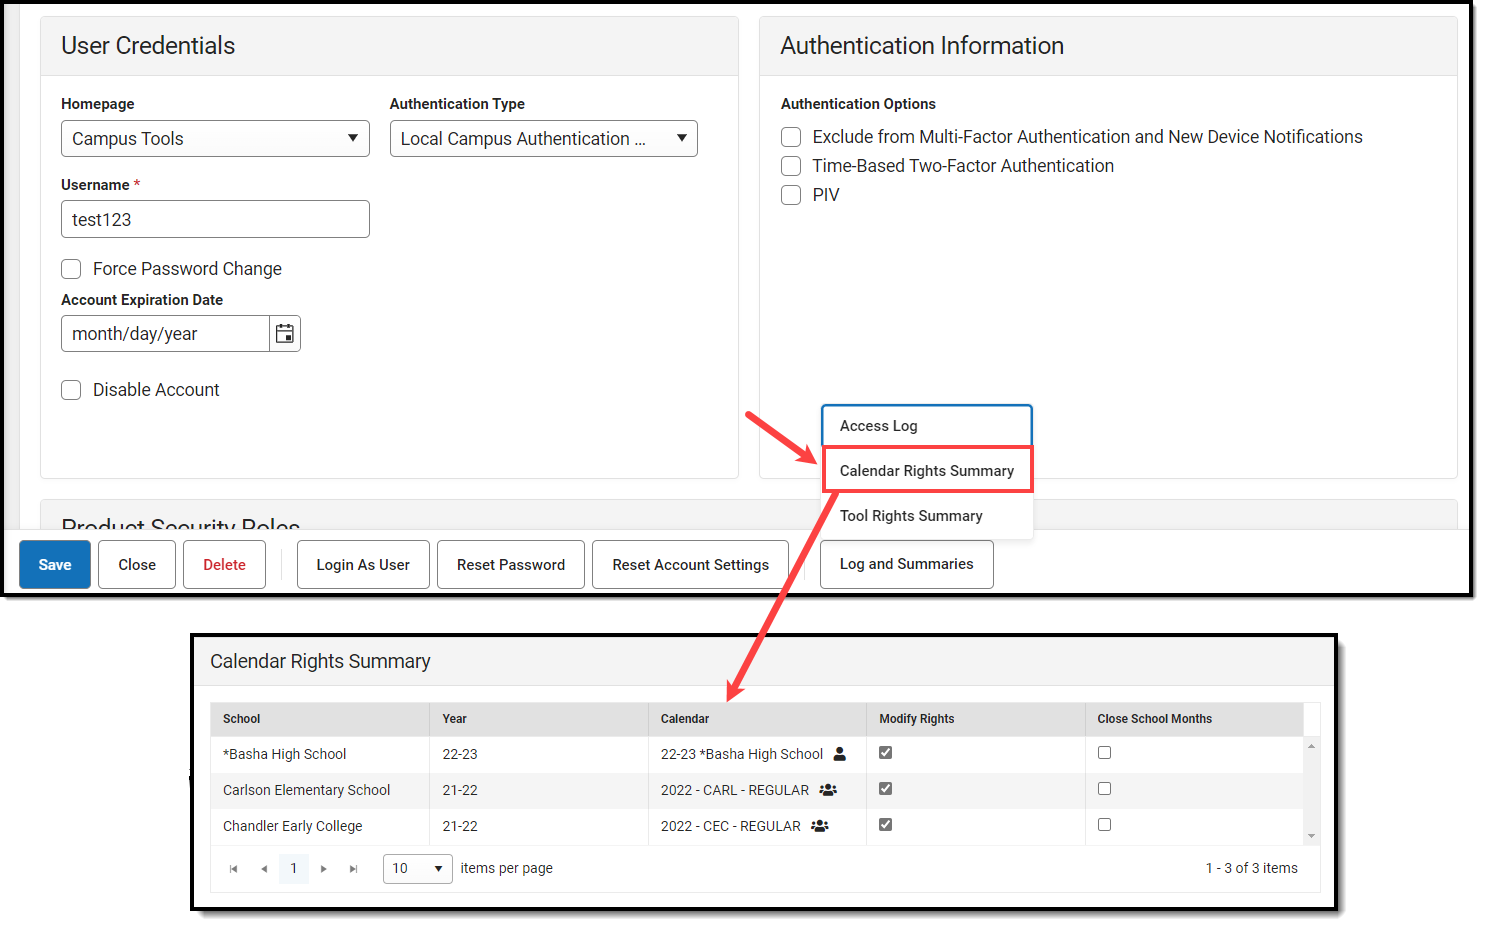 A single-person icon
  indicates access to that calendar was granted via individual user Calendar Rights.
 indicates calendar access was granted by the user being a part of a specific user group. Hovering your cursor over the group icon will indicate which user group(s) granted the user rights to the calendar.
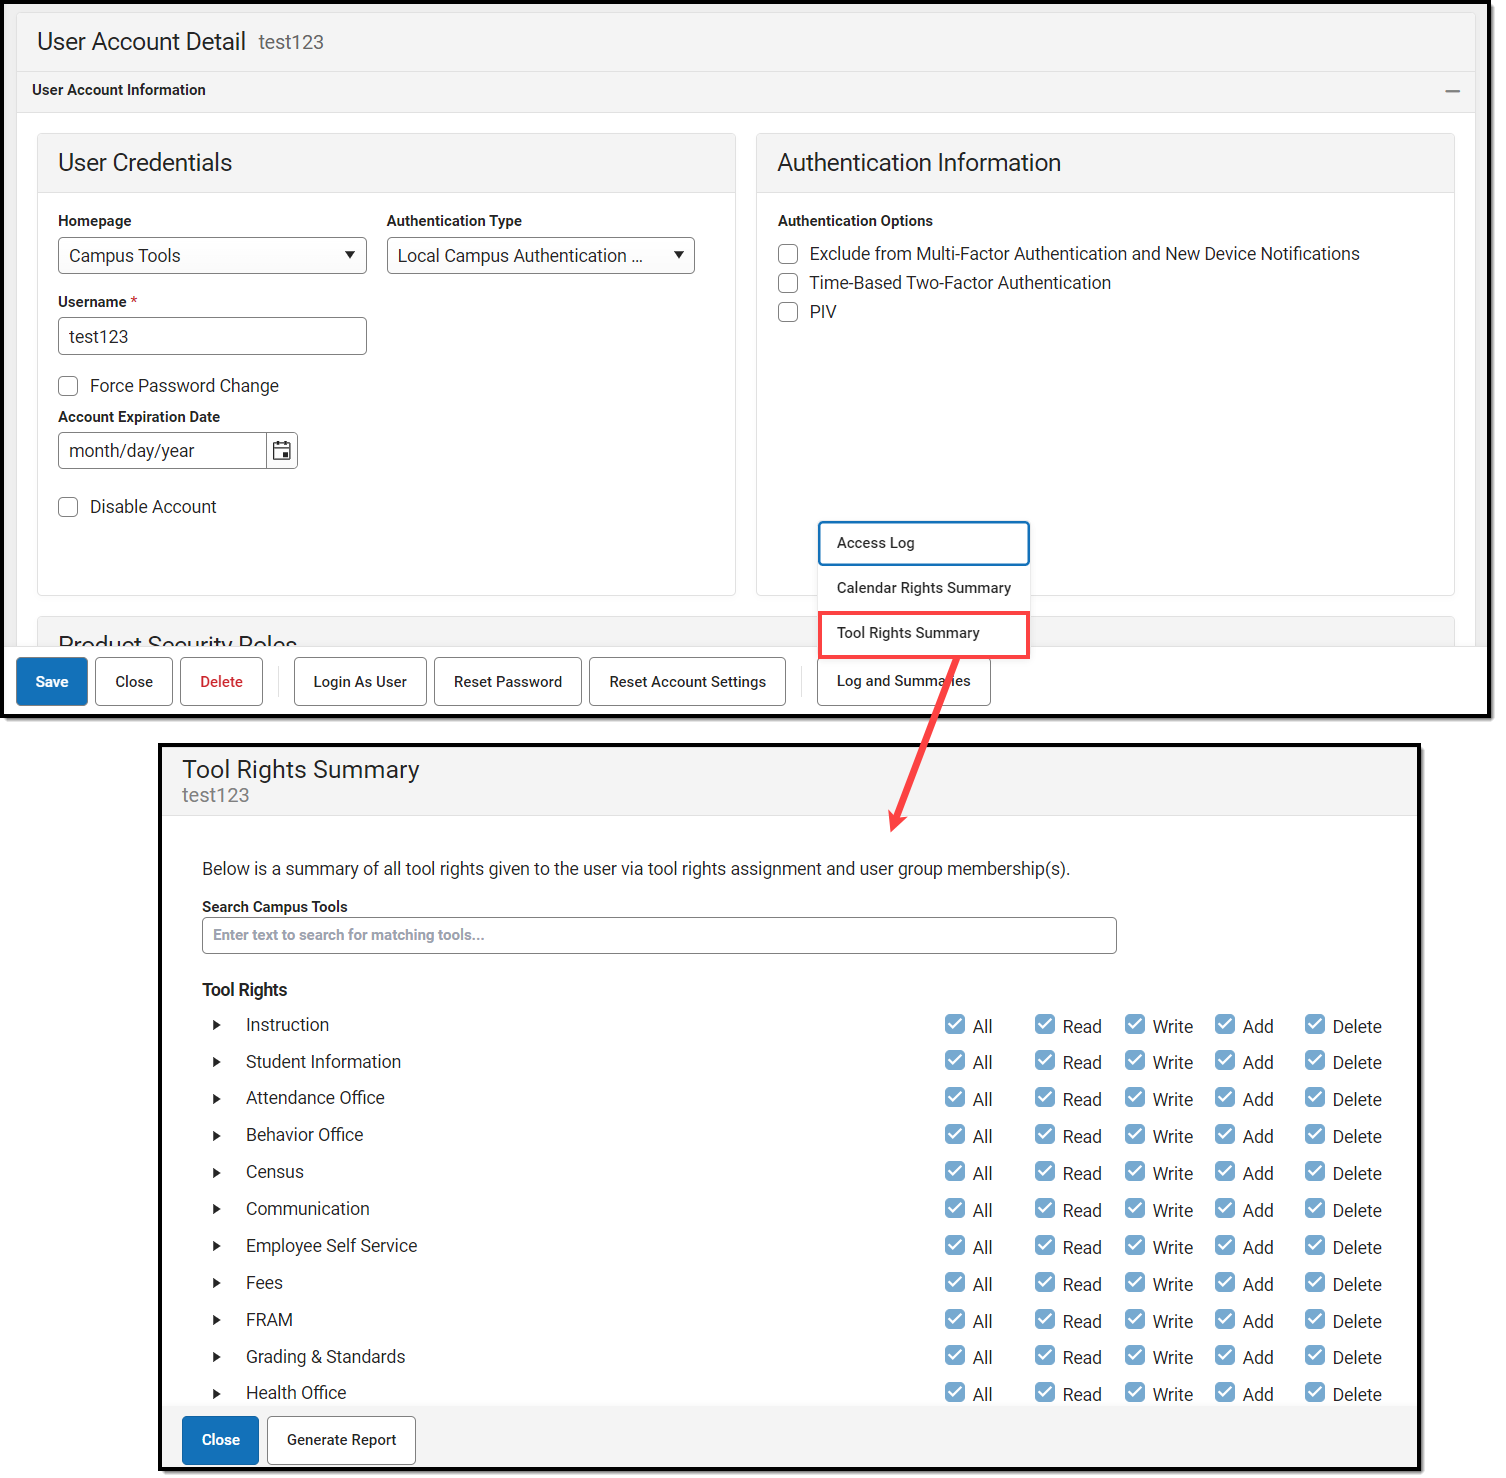


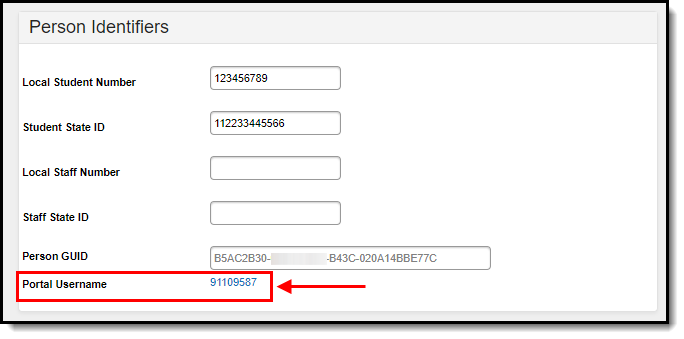
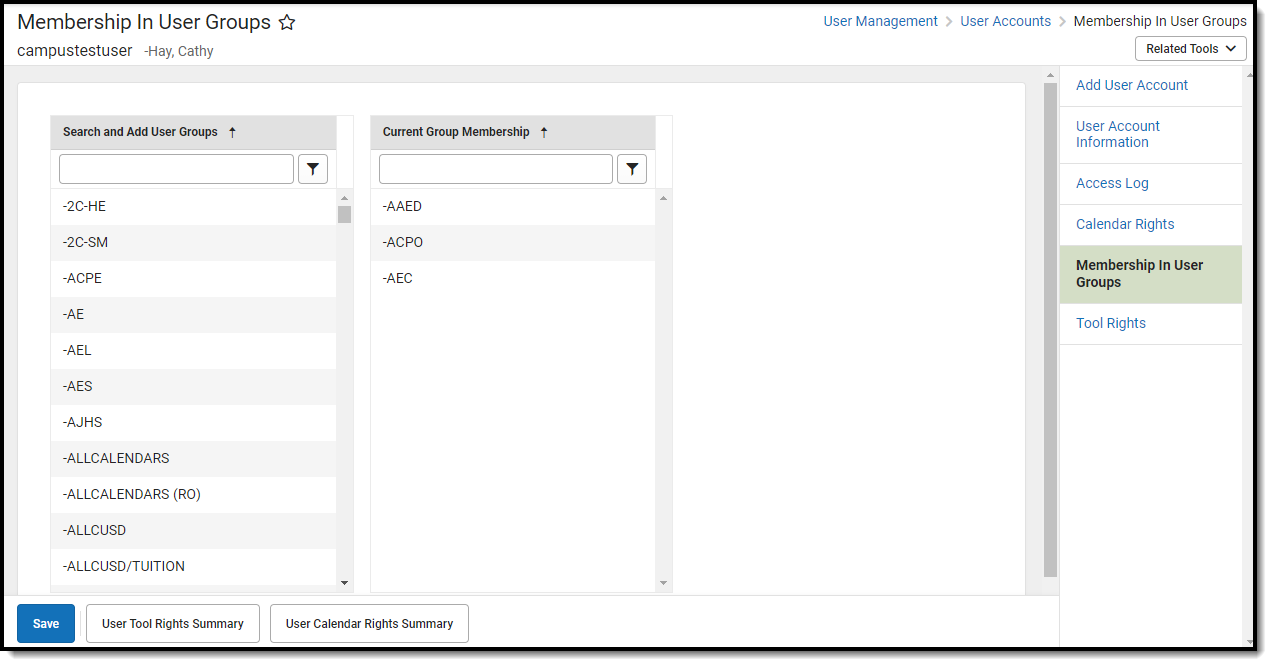
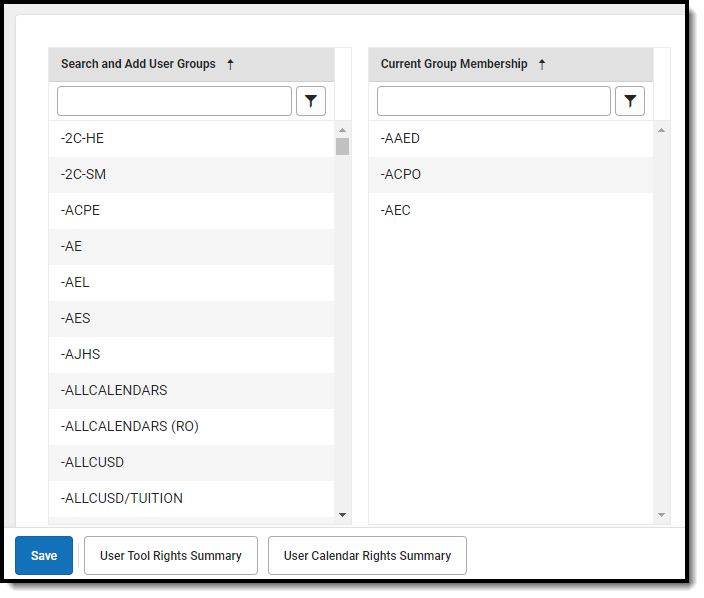
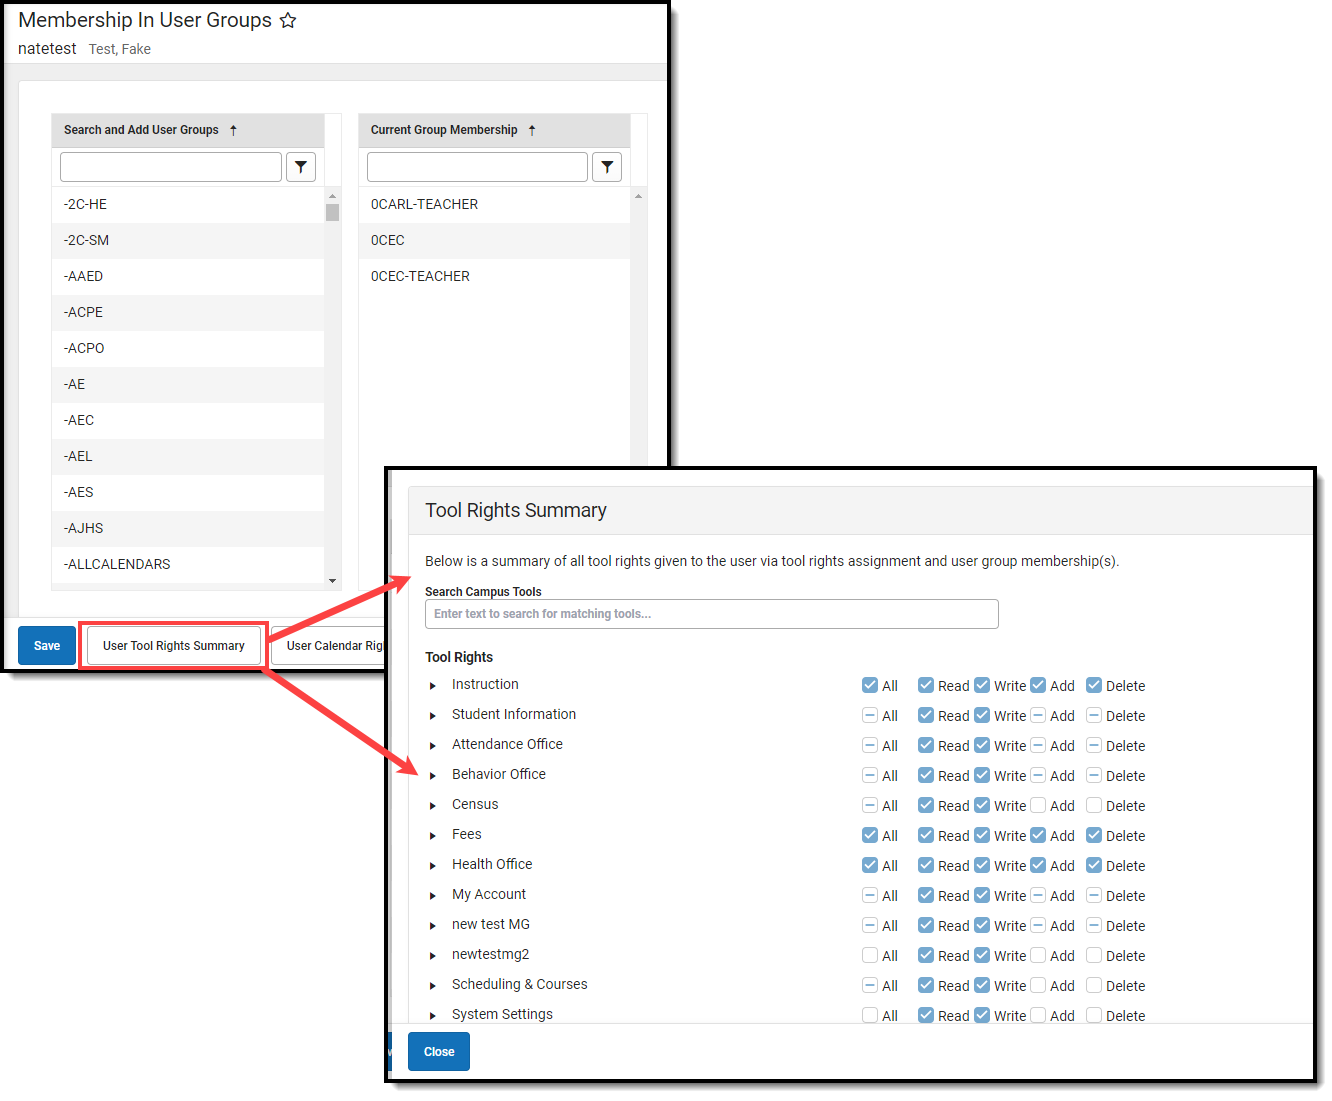
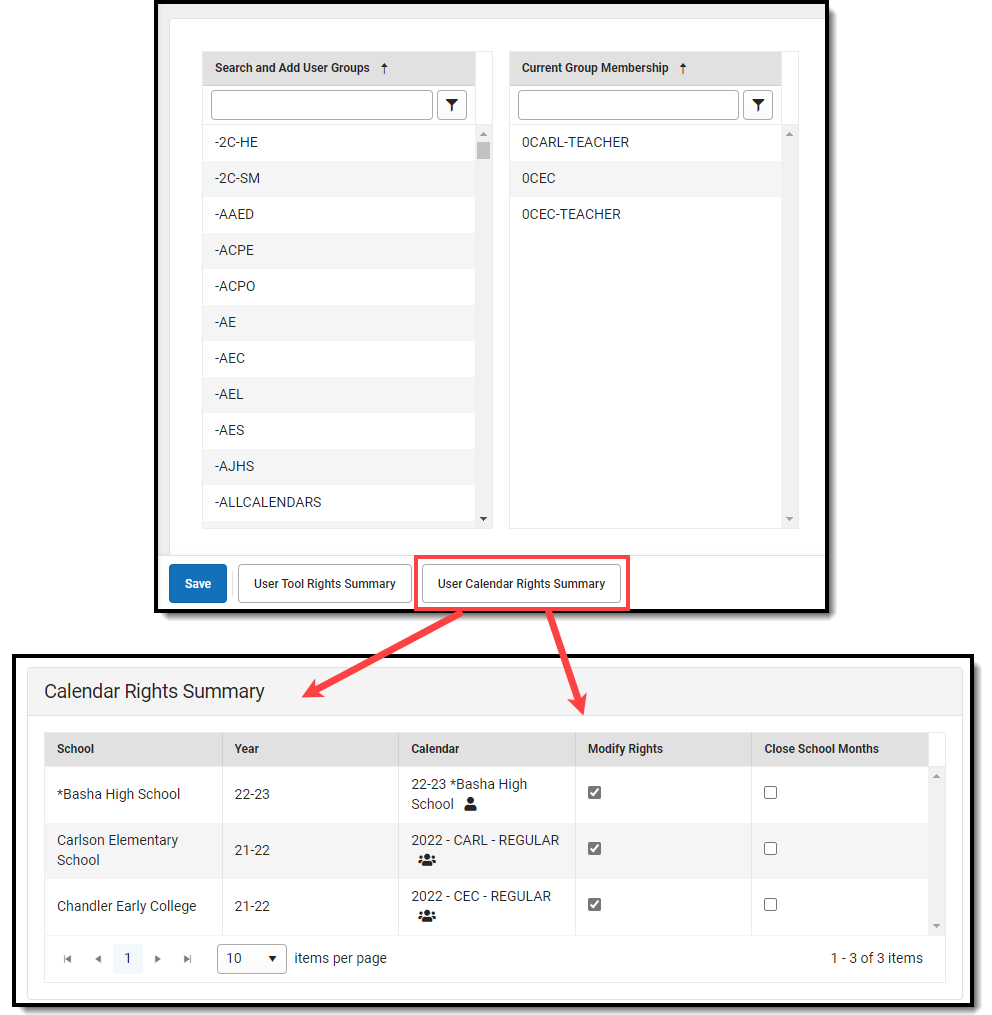
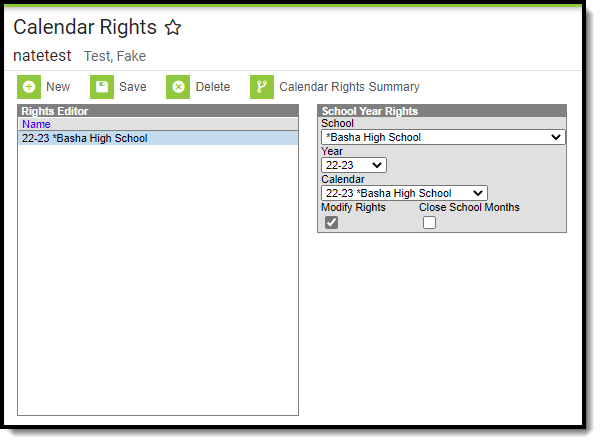
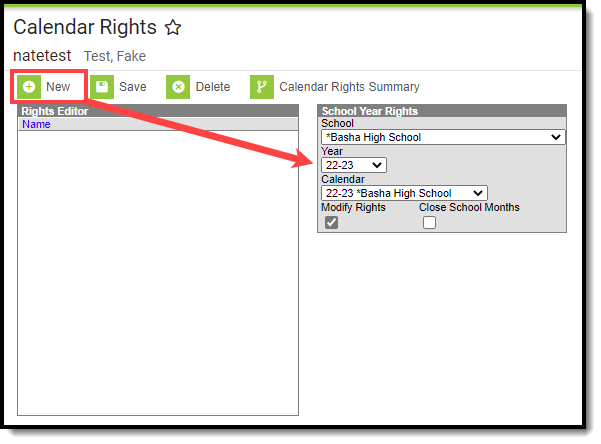
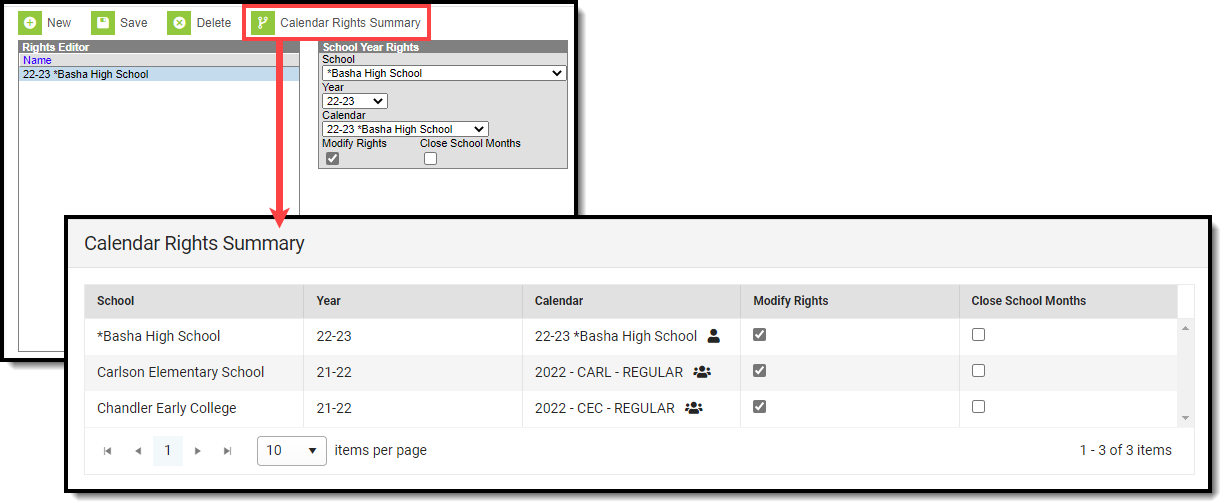
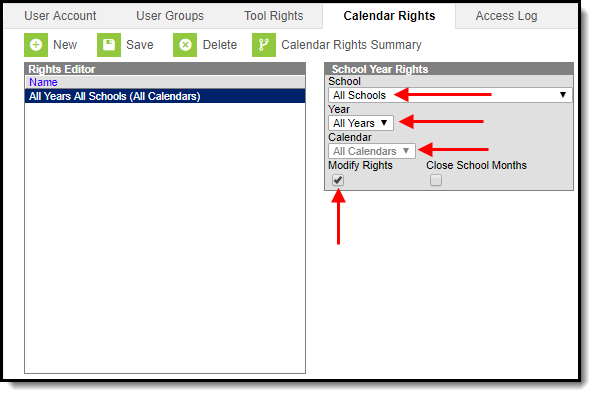
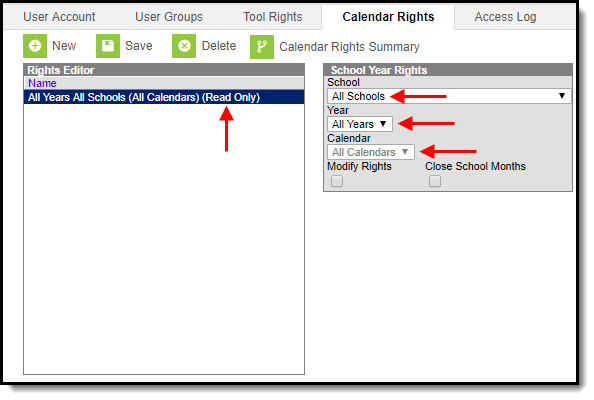
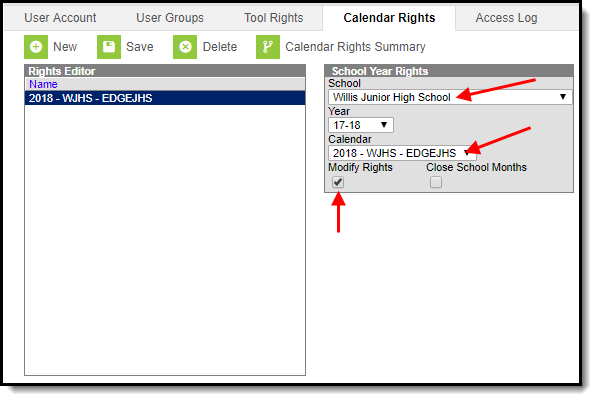
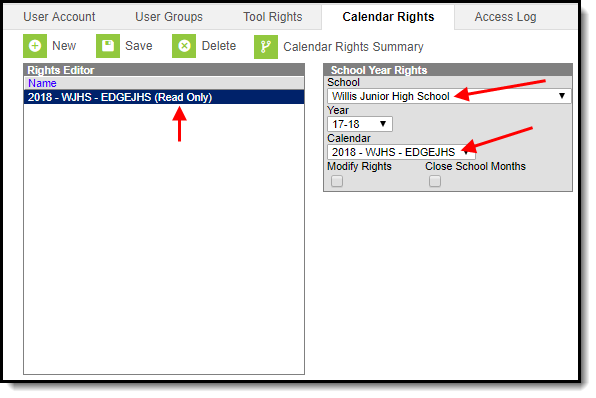
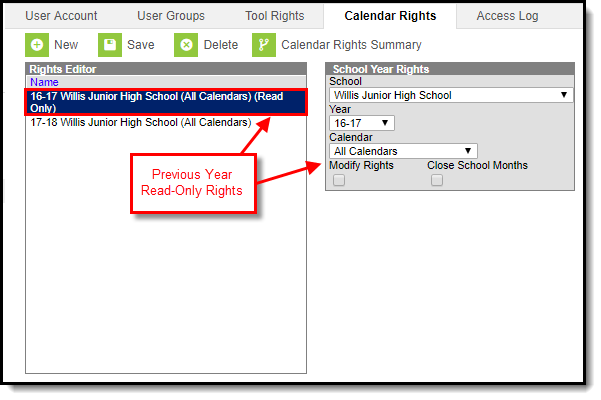


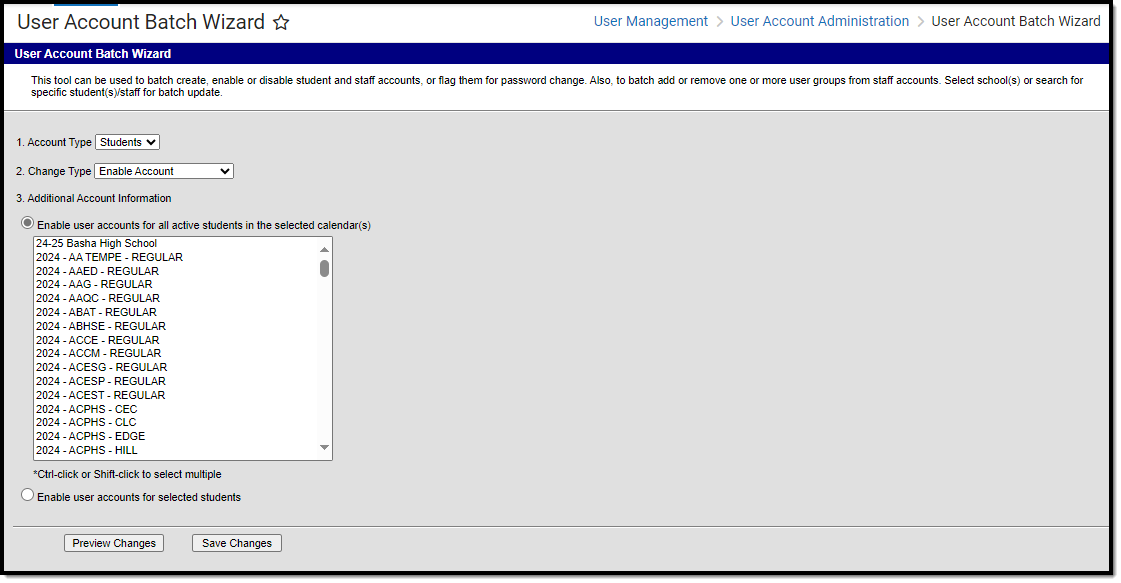
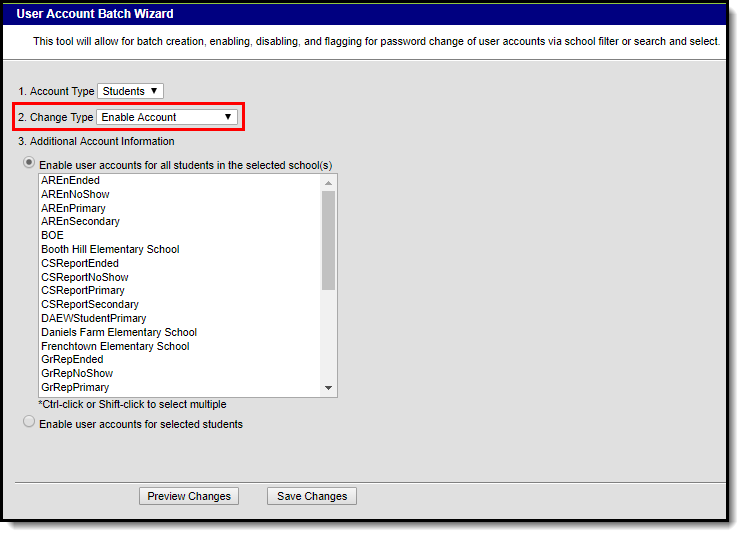
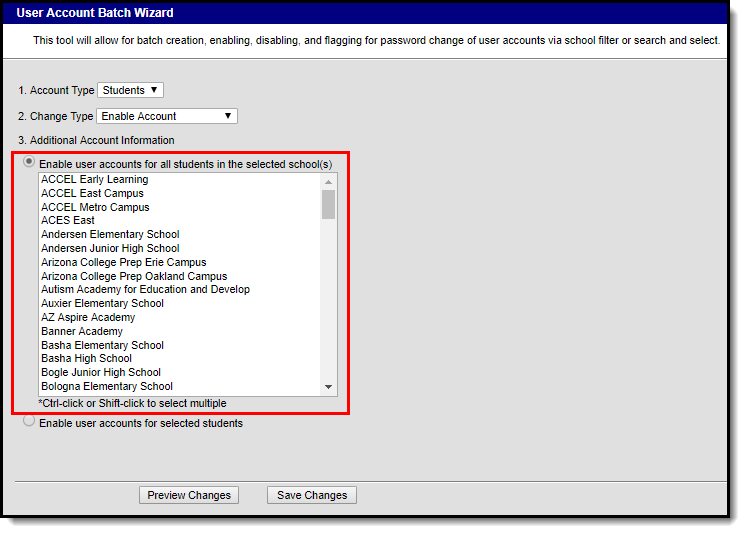

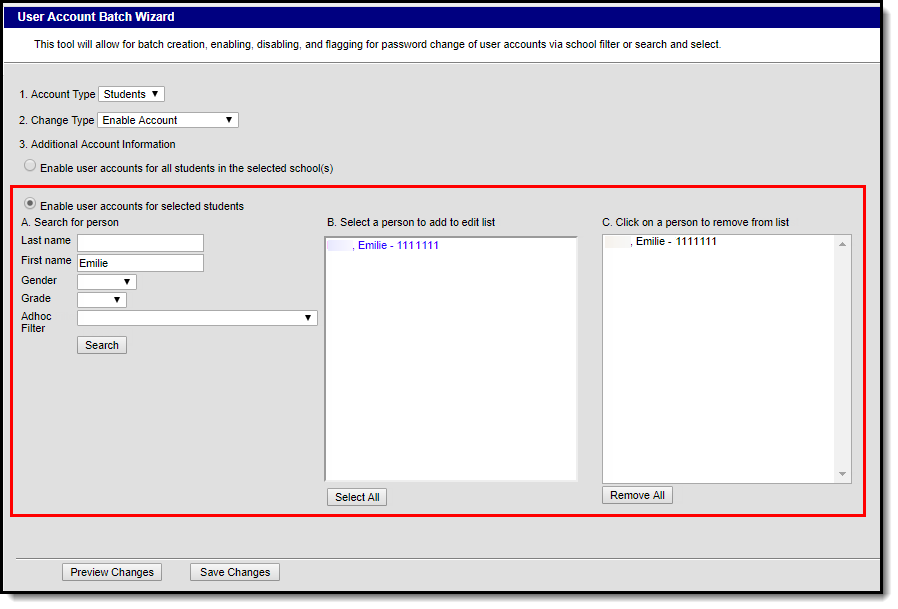
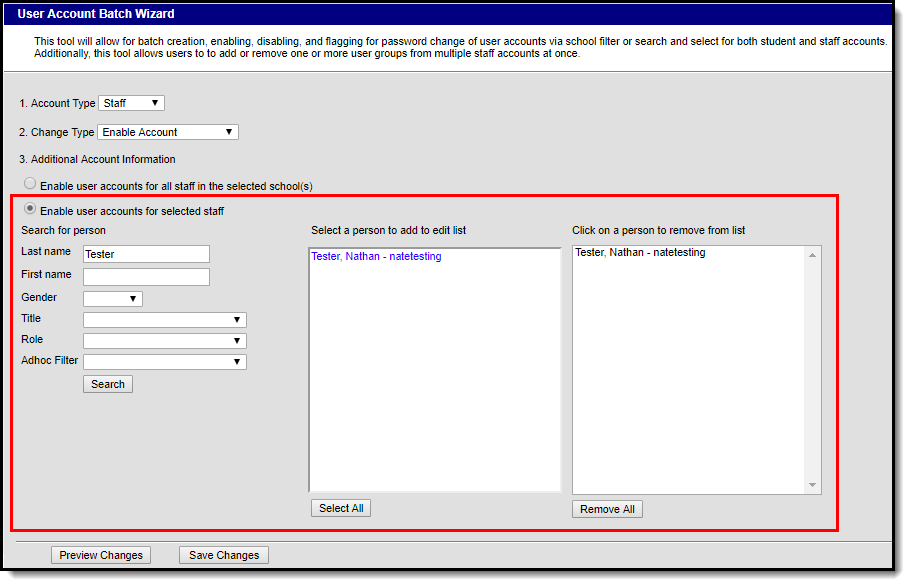
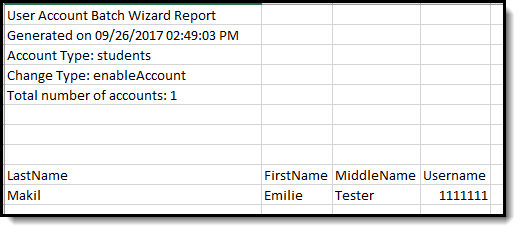
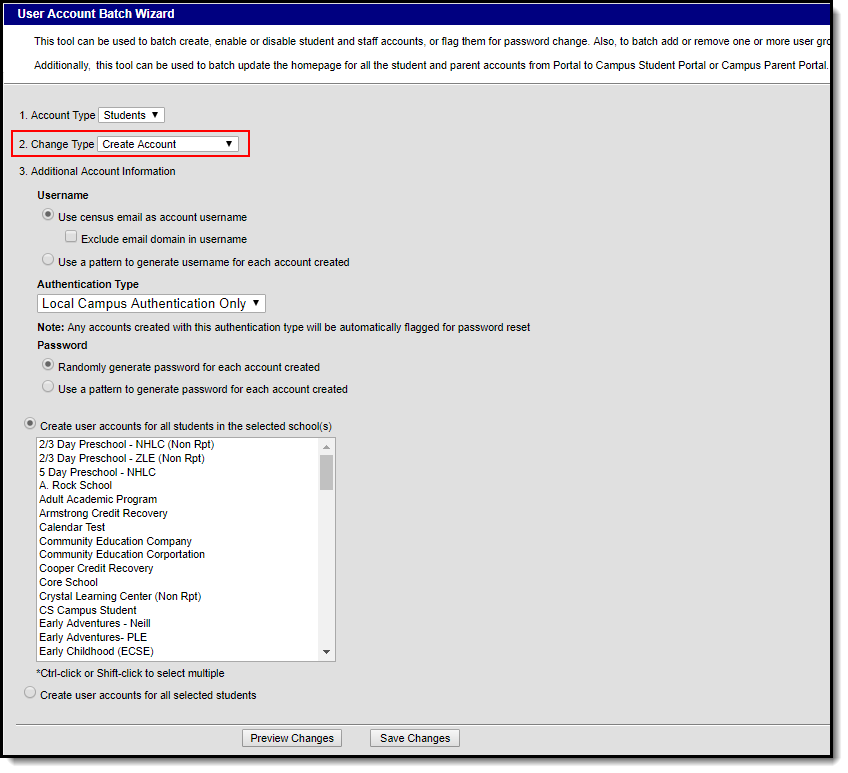
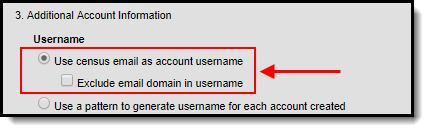
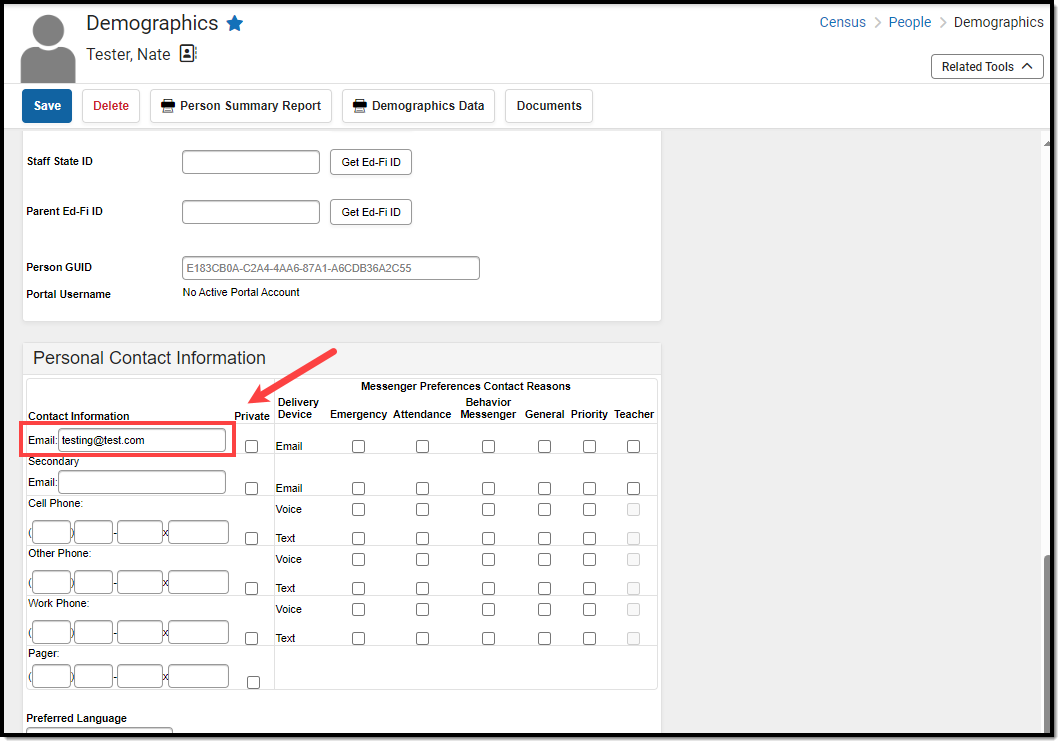
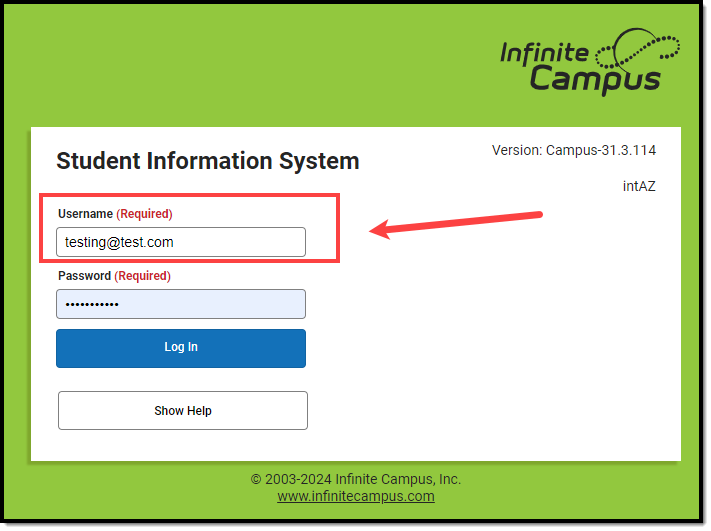
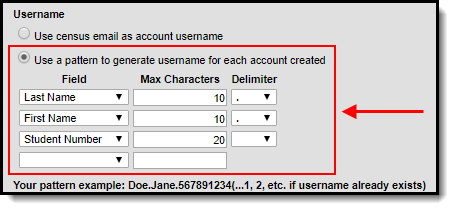
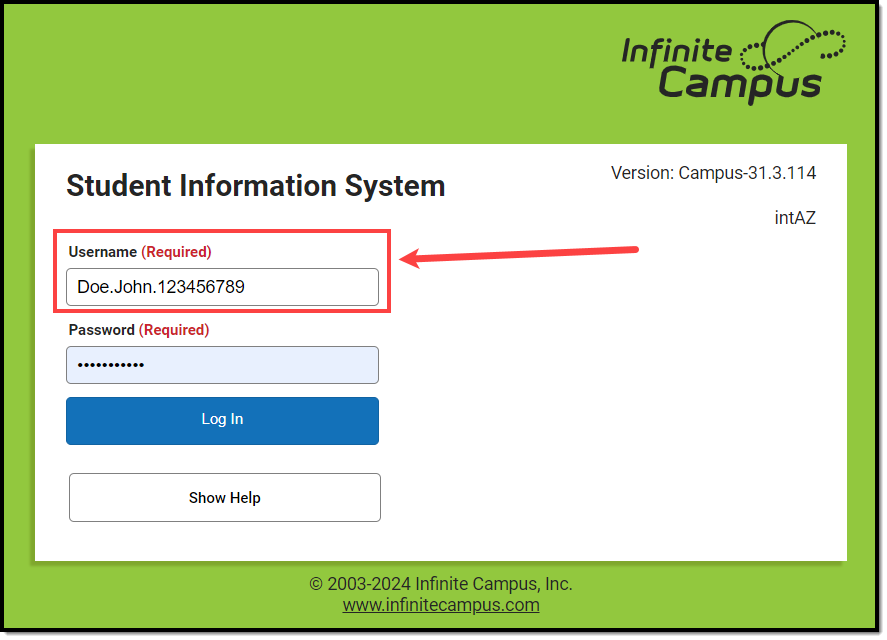


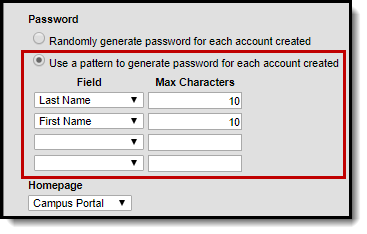

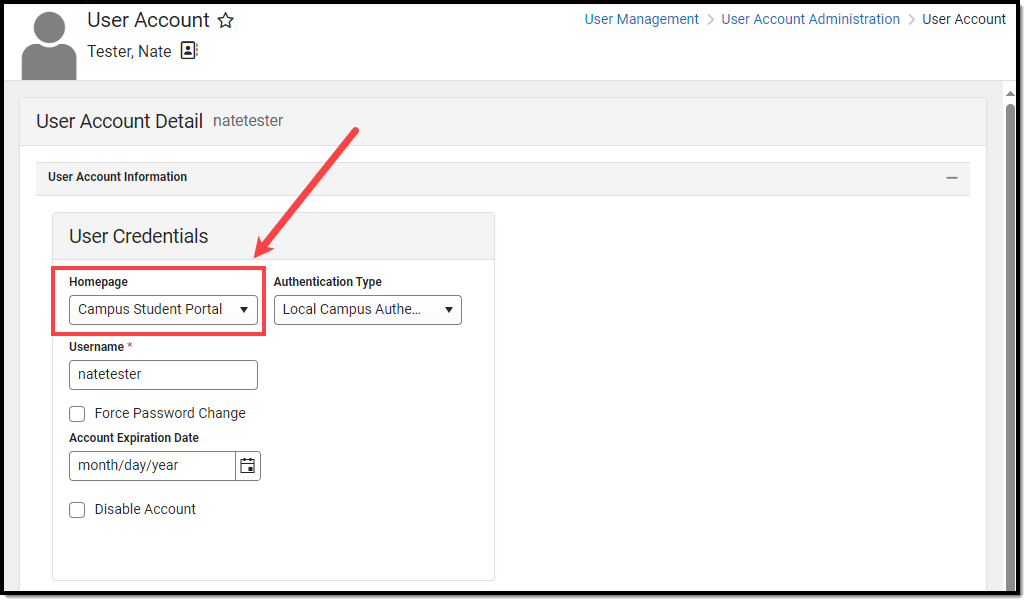
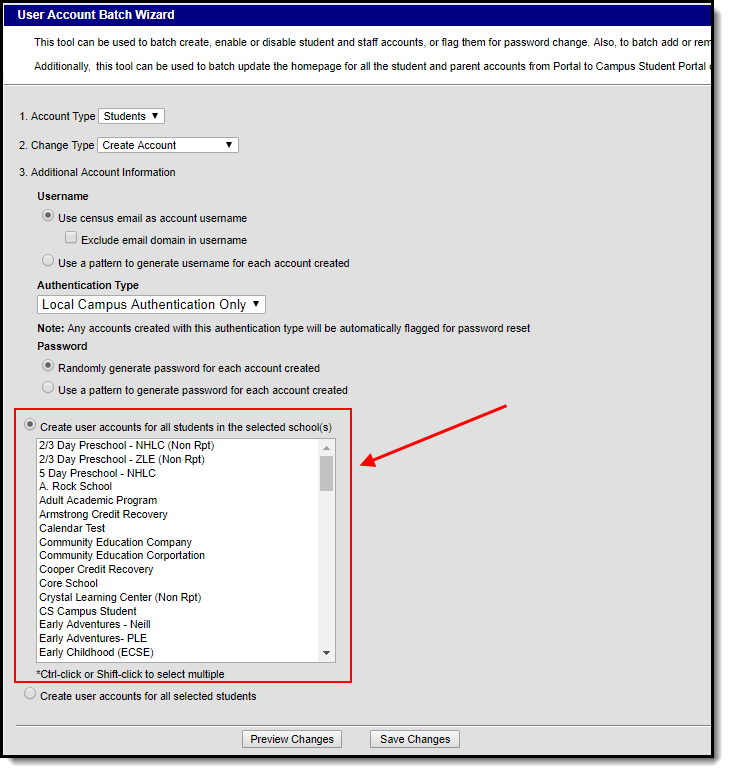
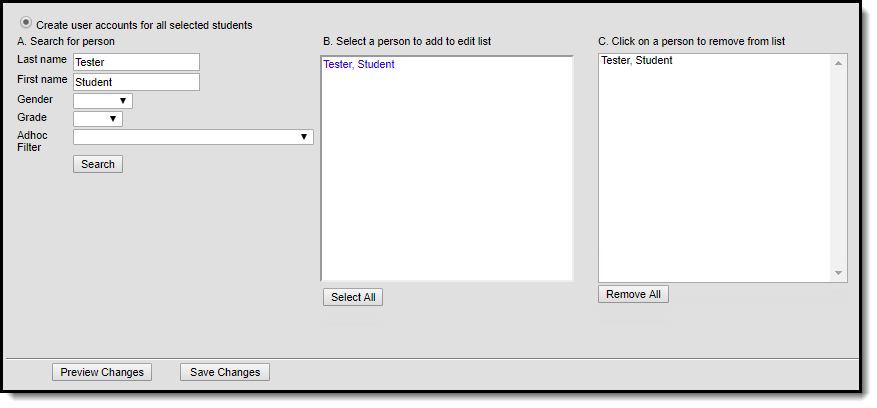

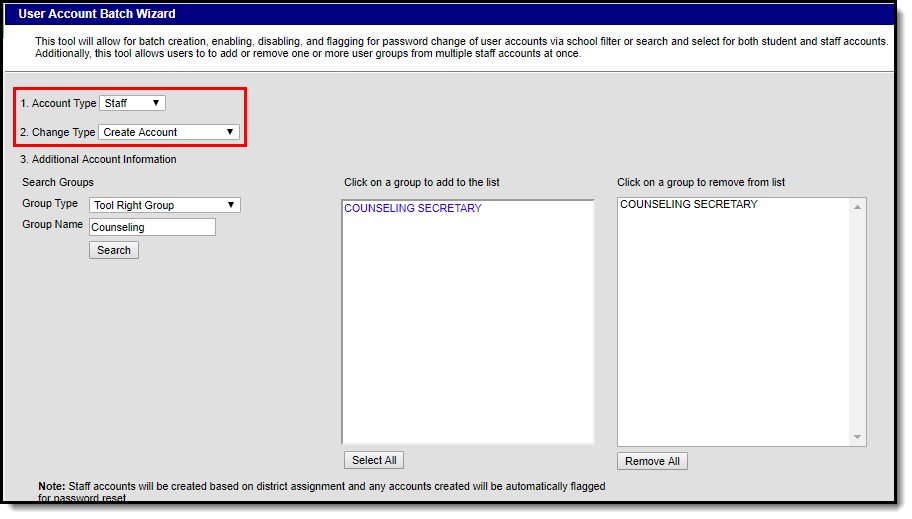


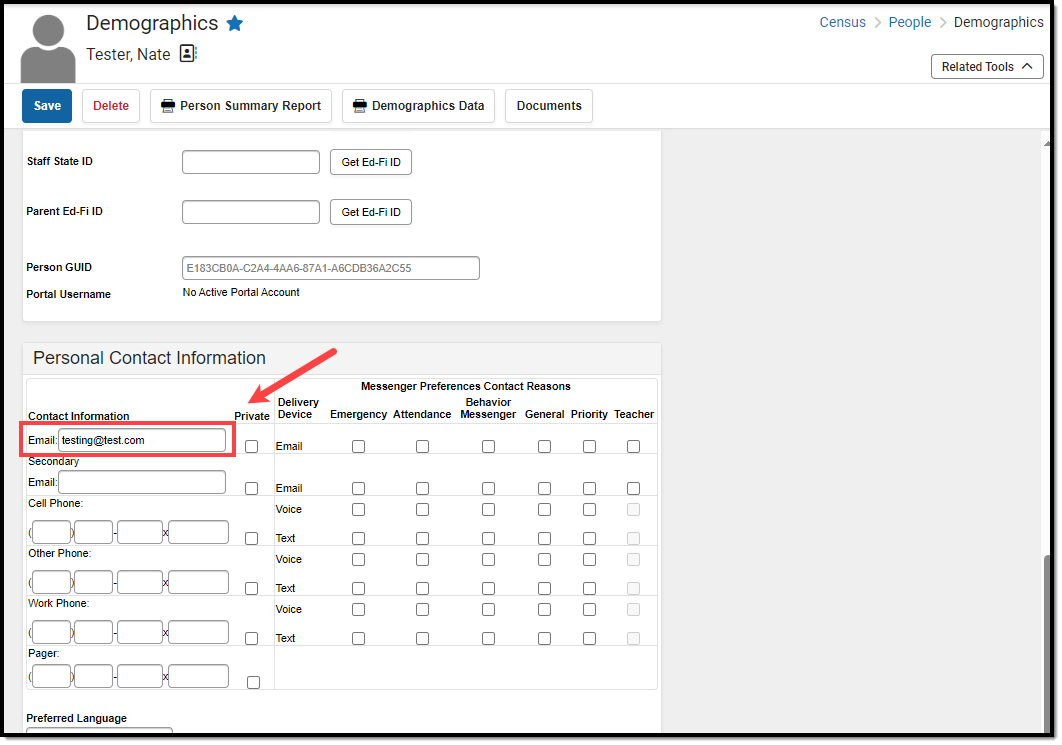
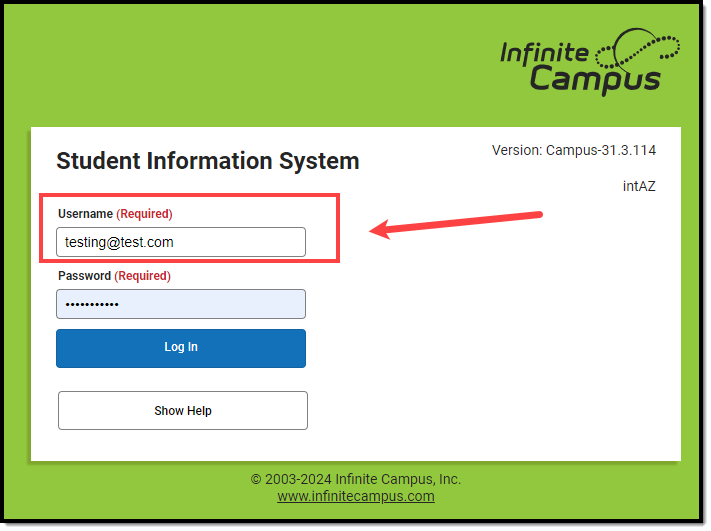
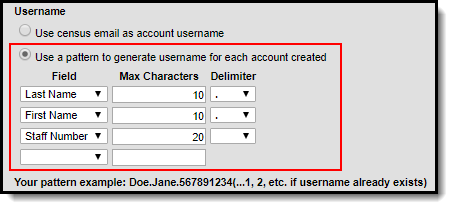


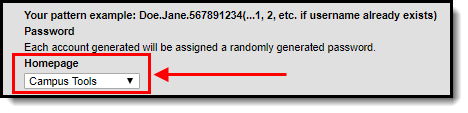
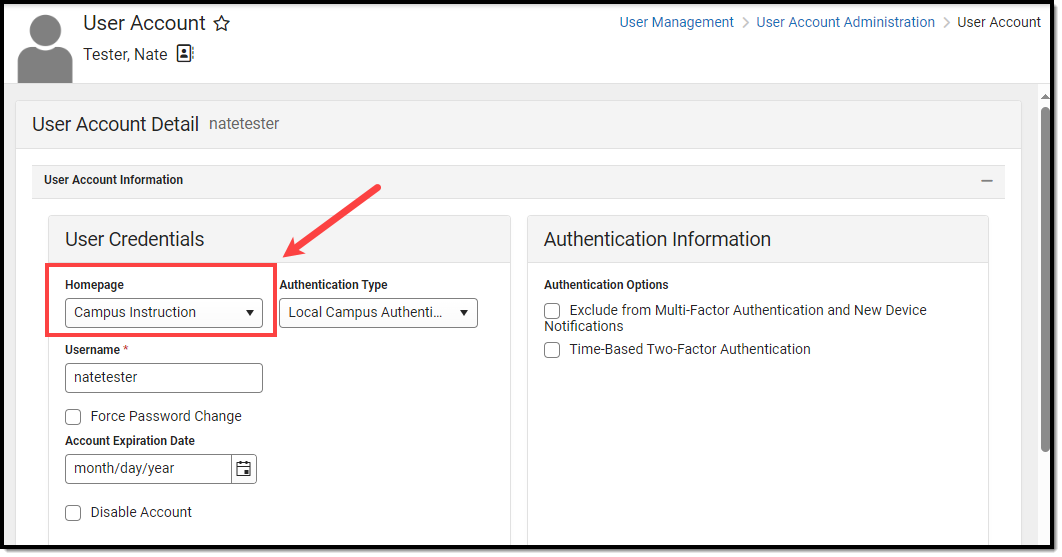
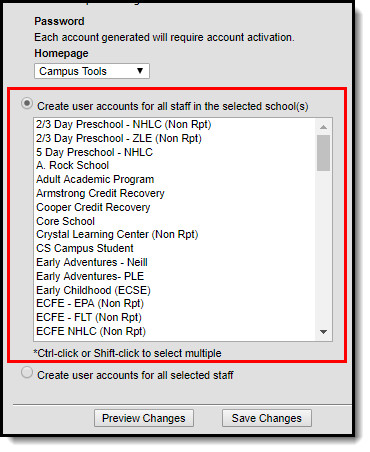

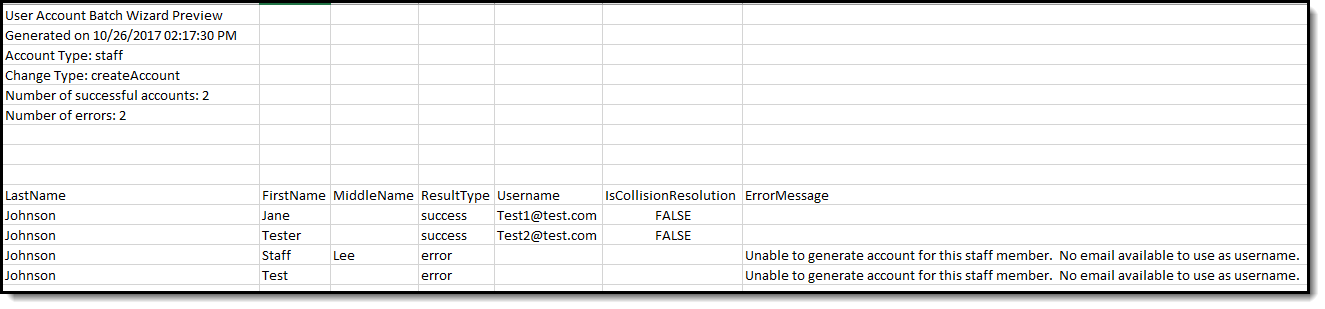
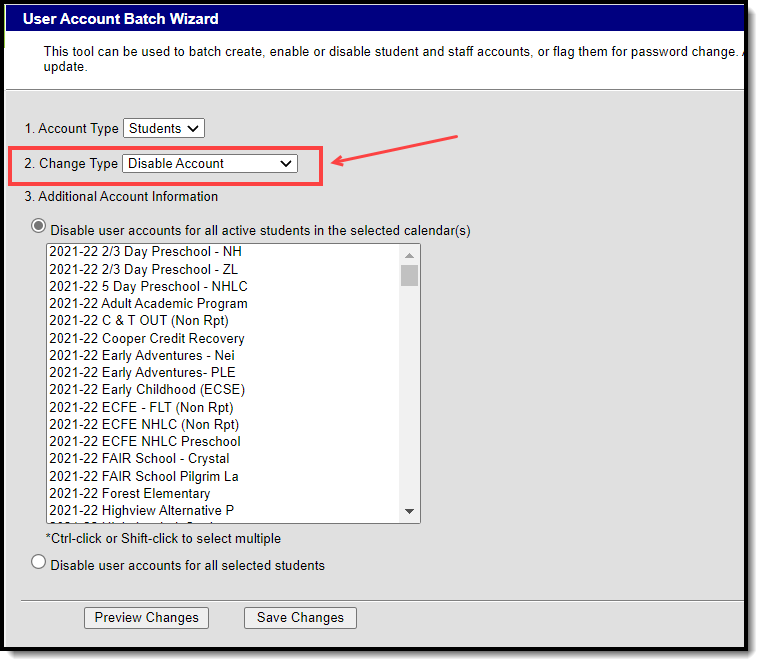
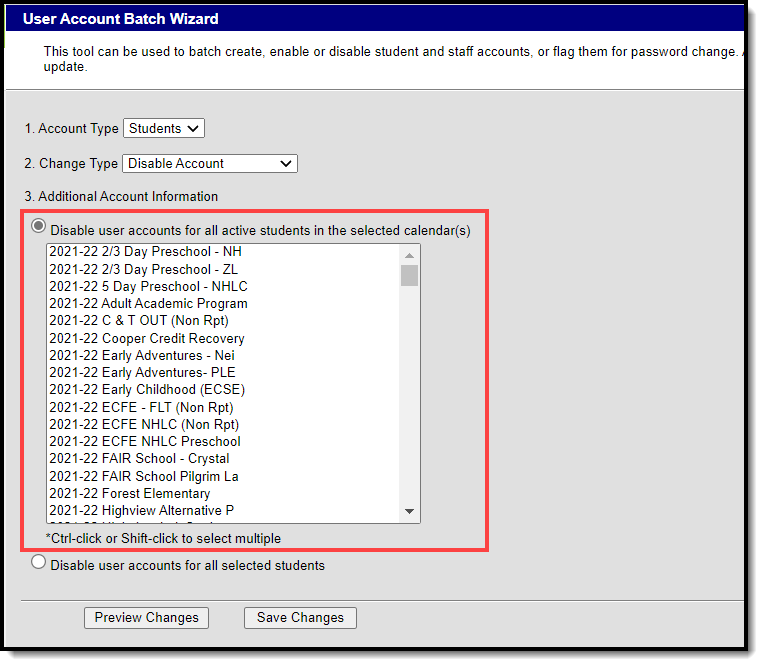
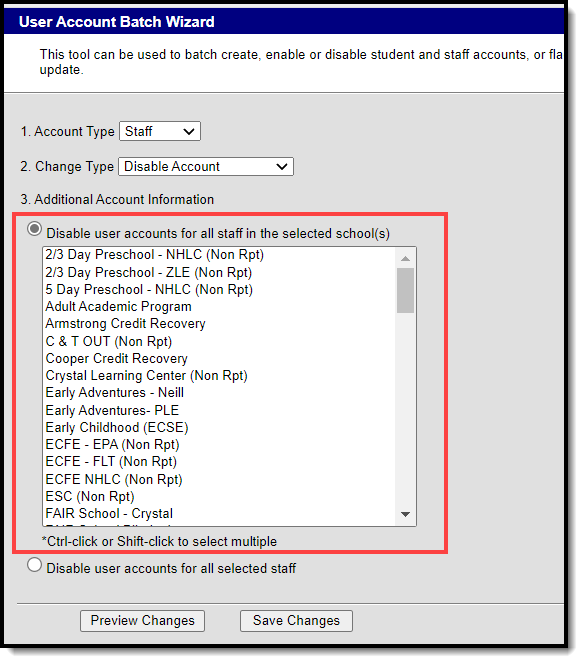

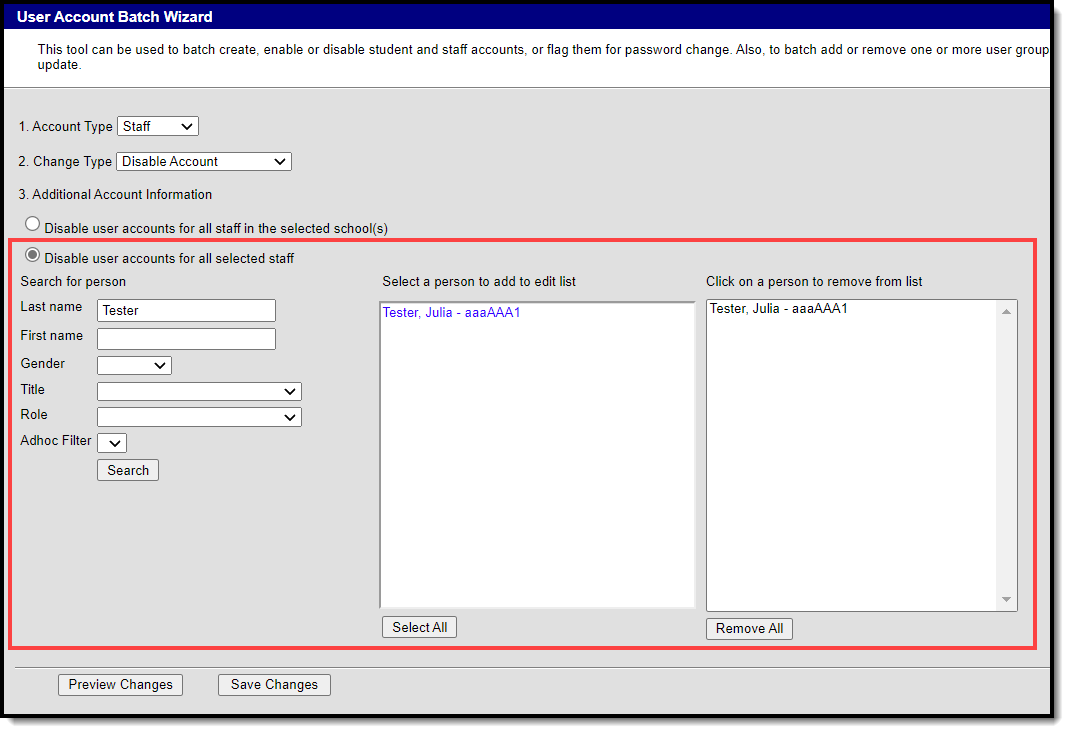
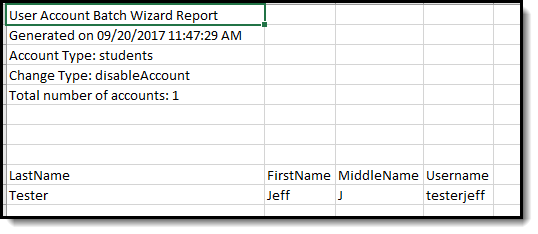
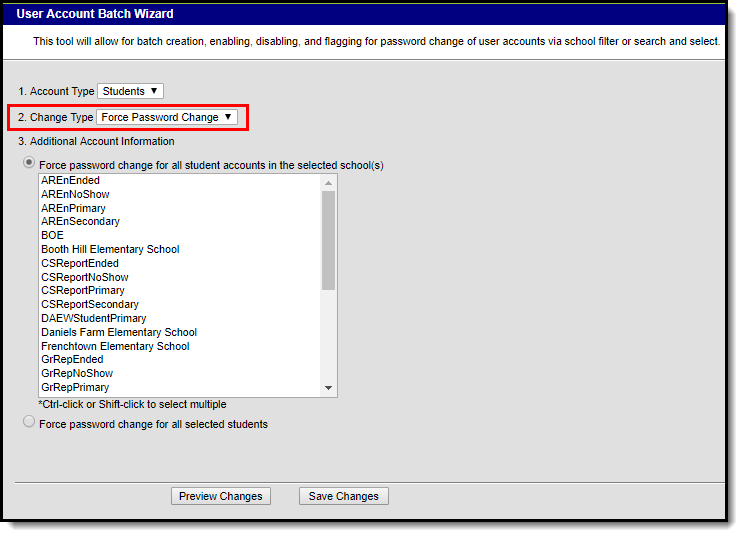
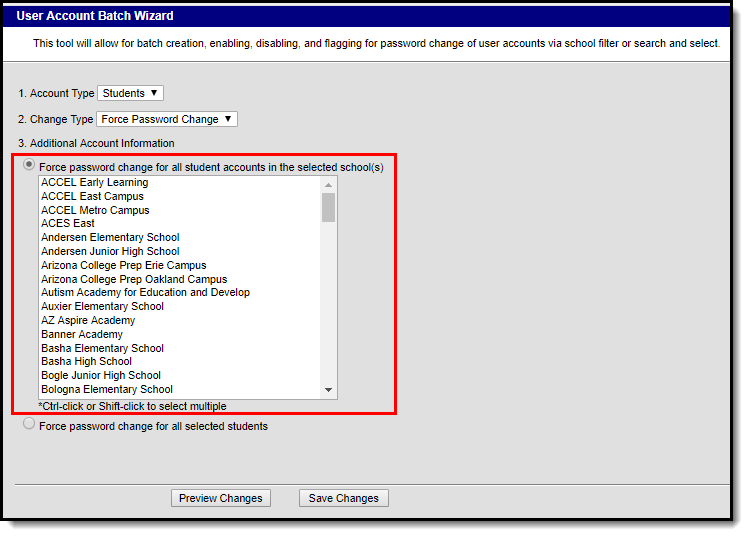
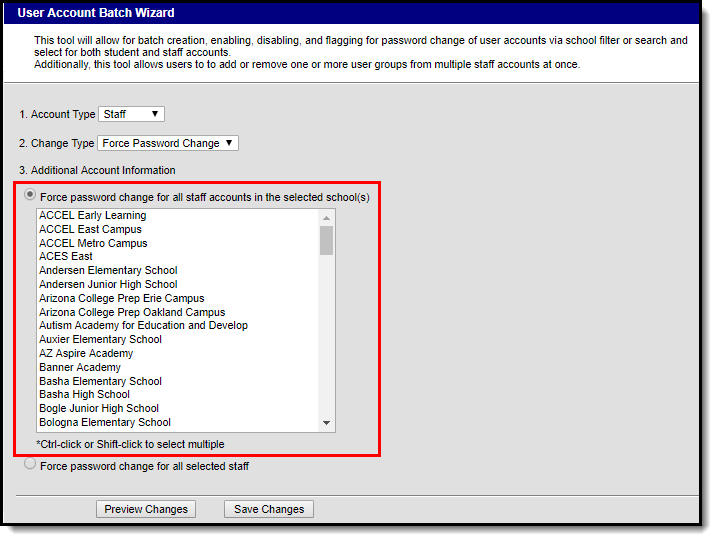
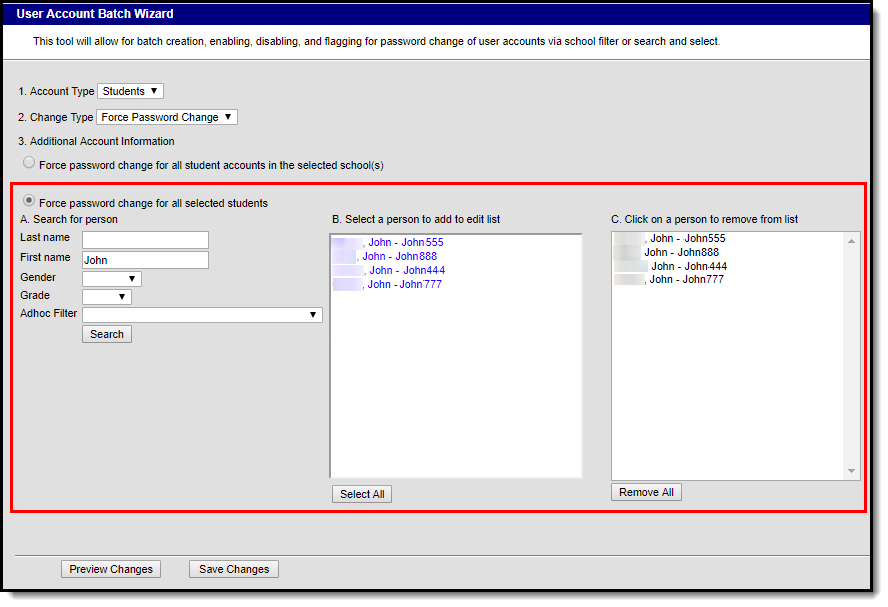
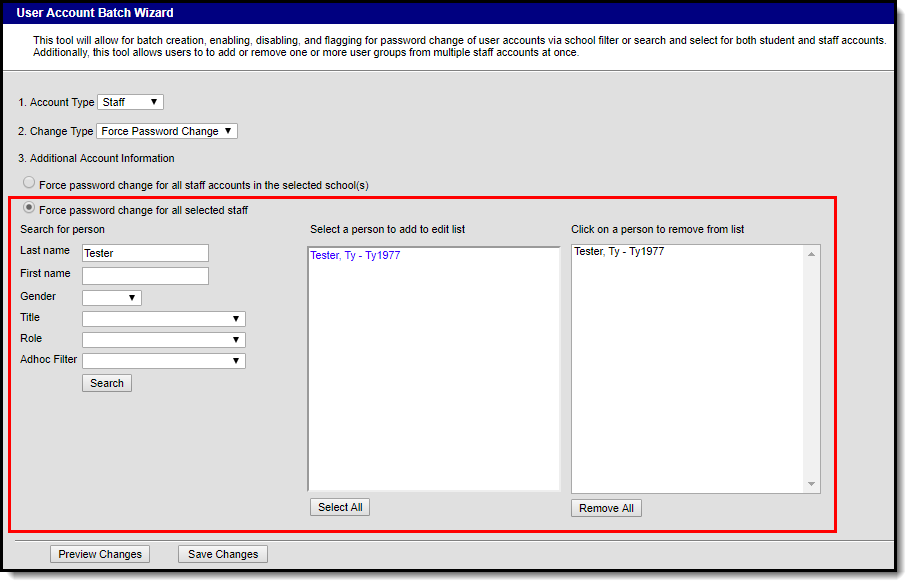

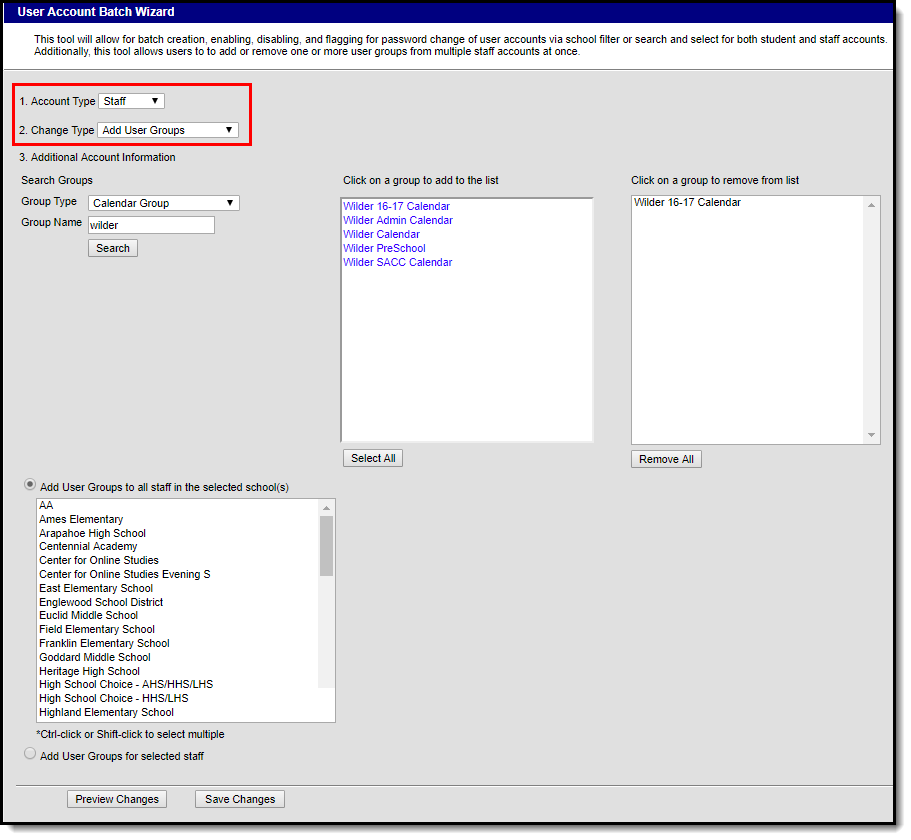
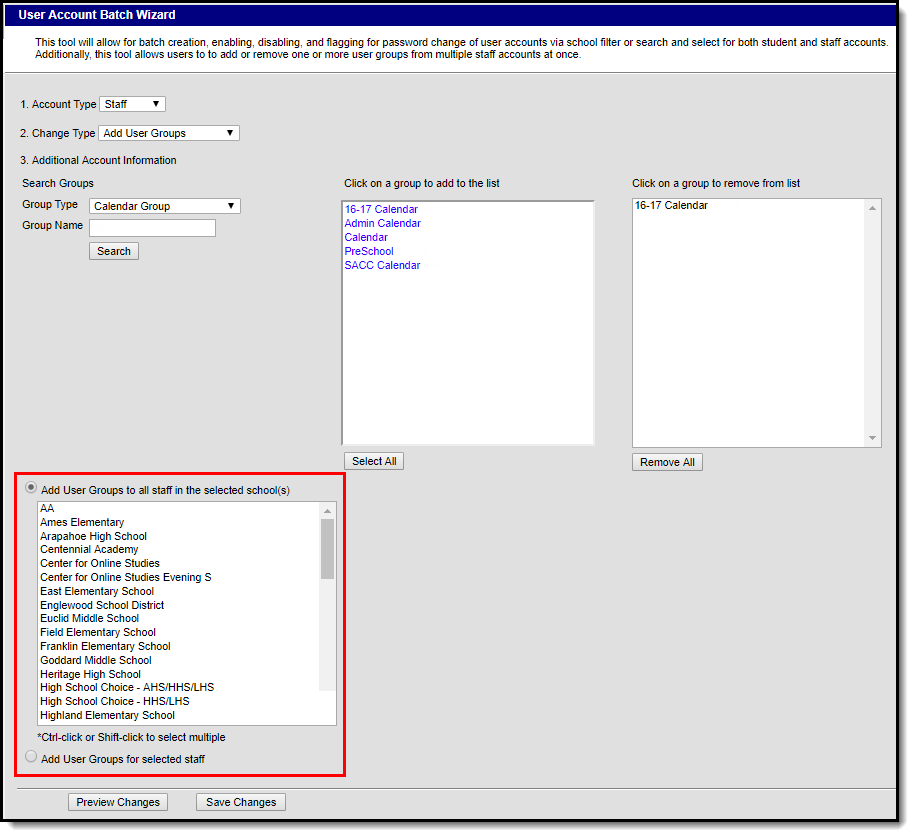
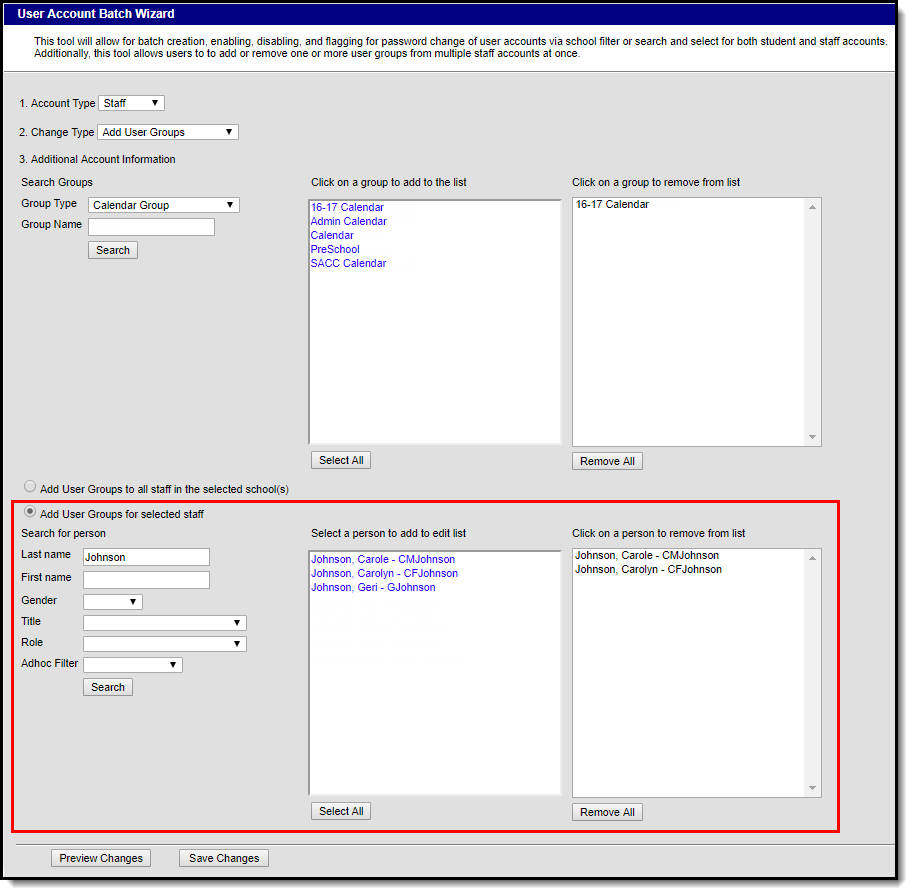
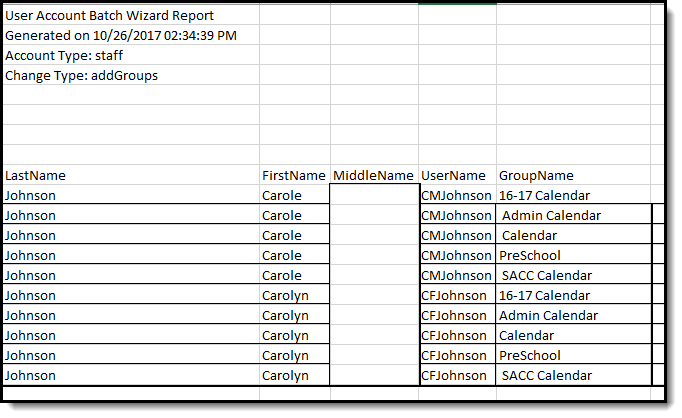
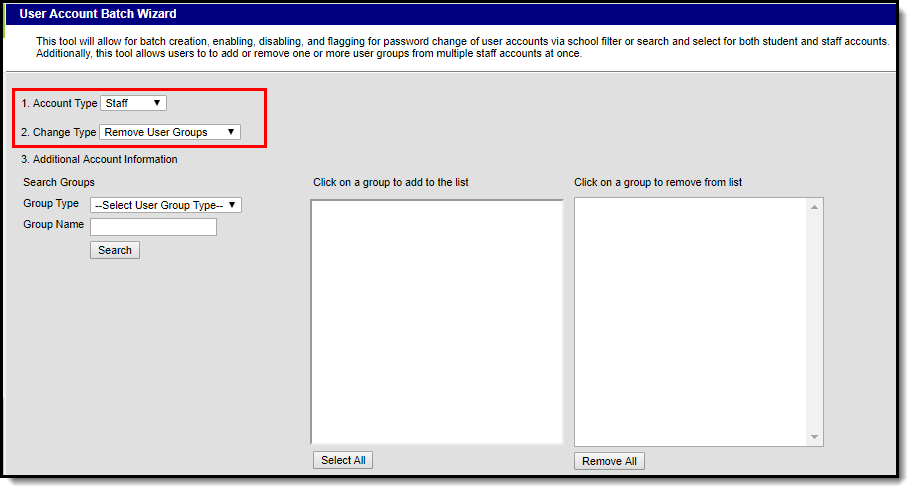
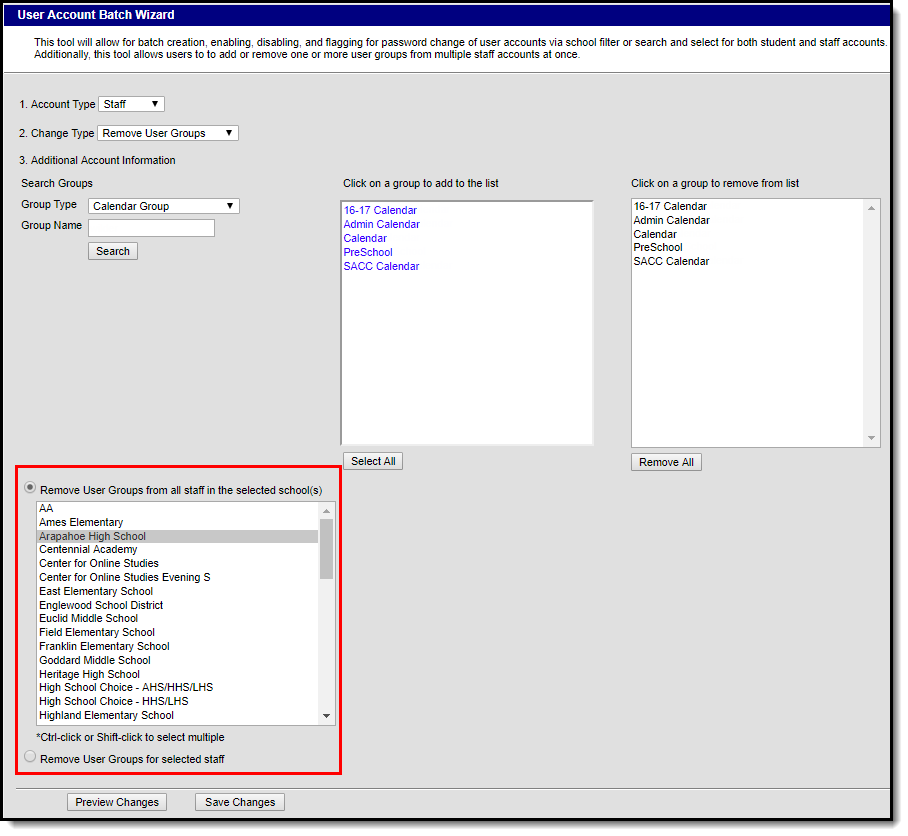
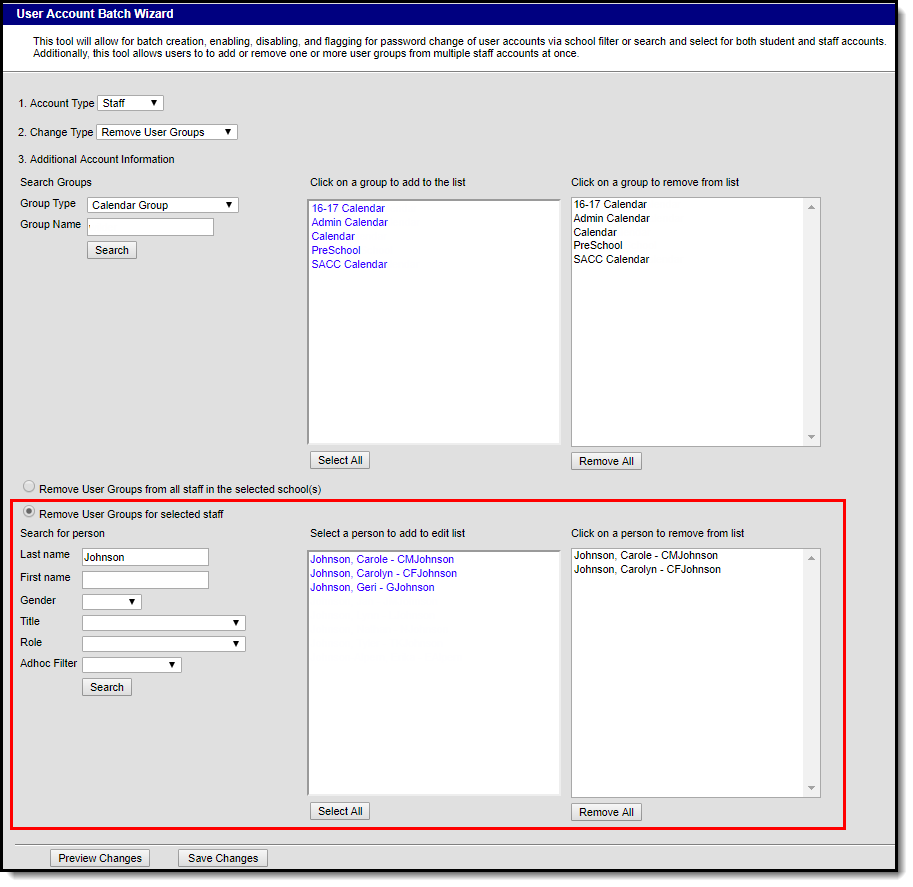
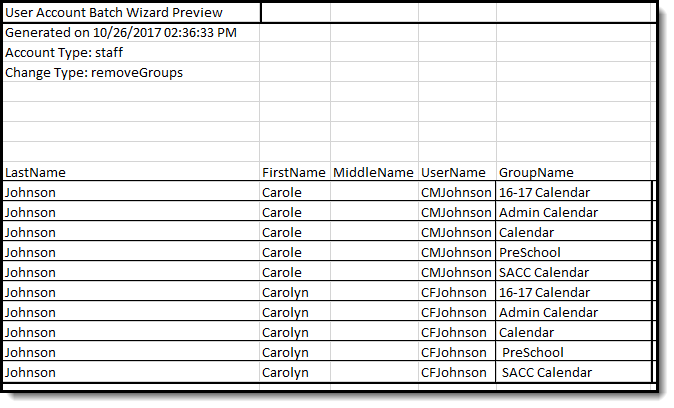
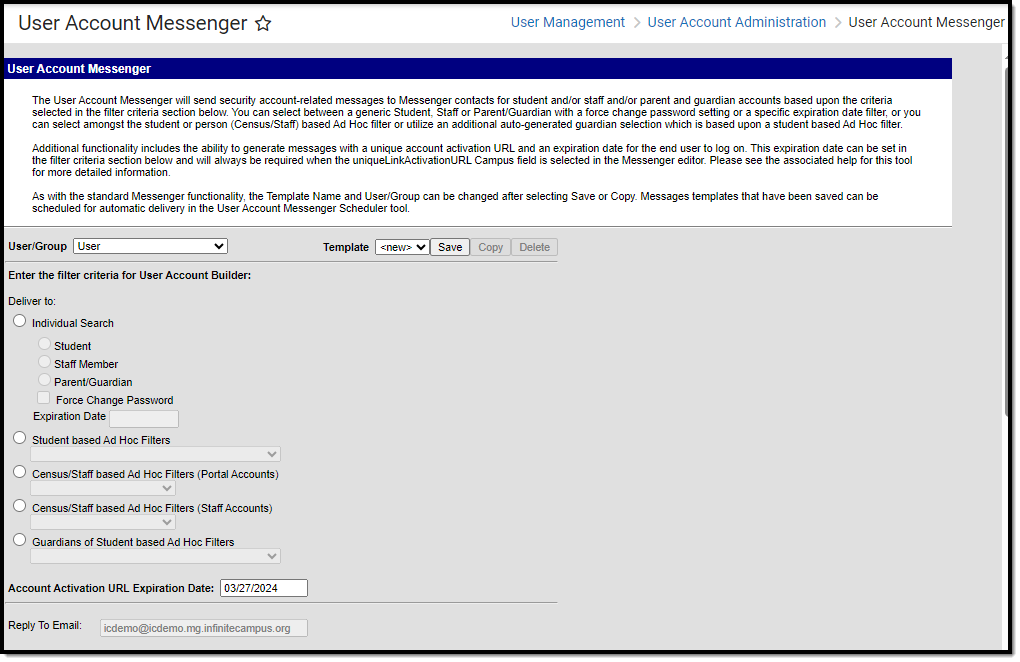


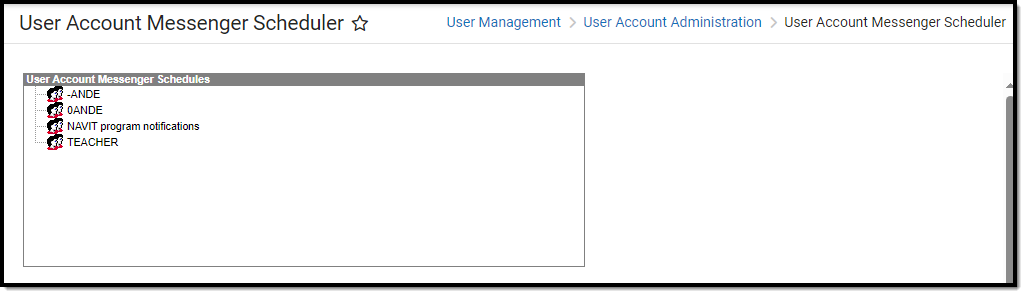
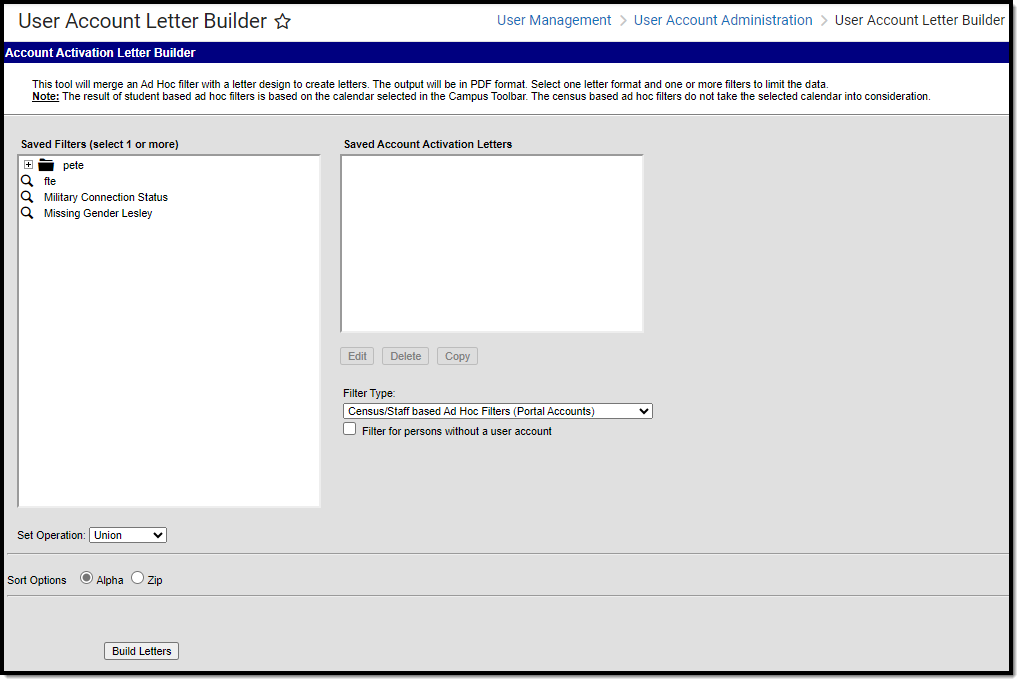
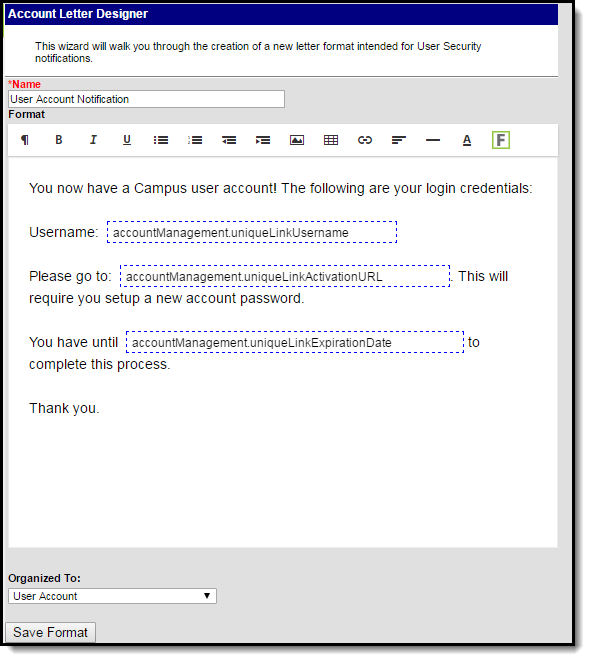
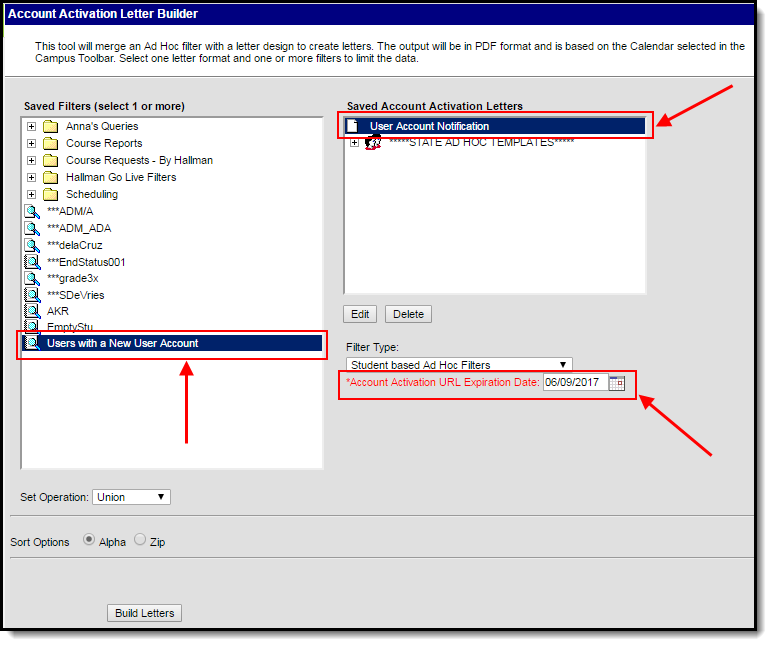
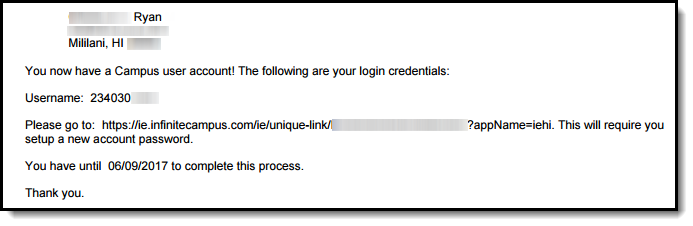
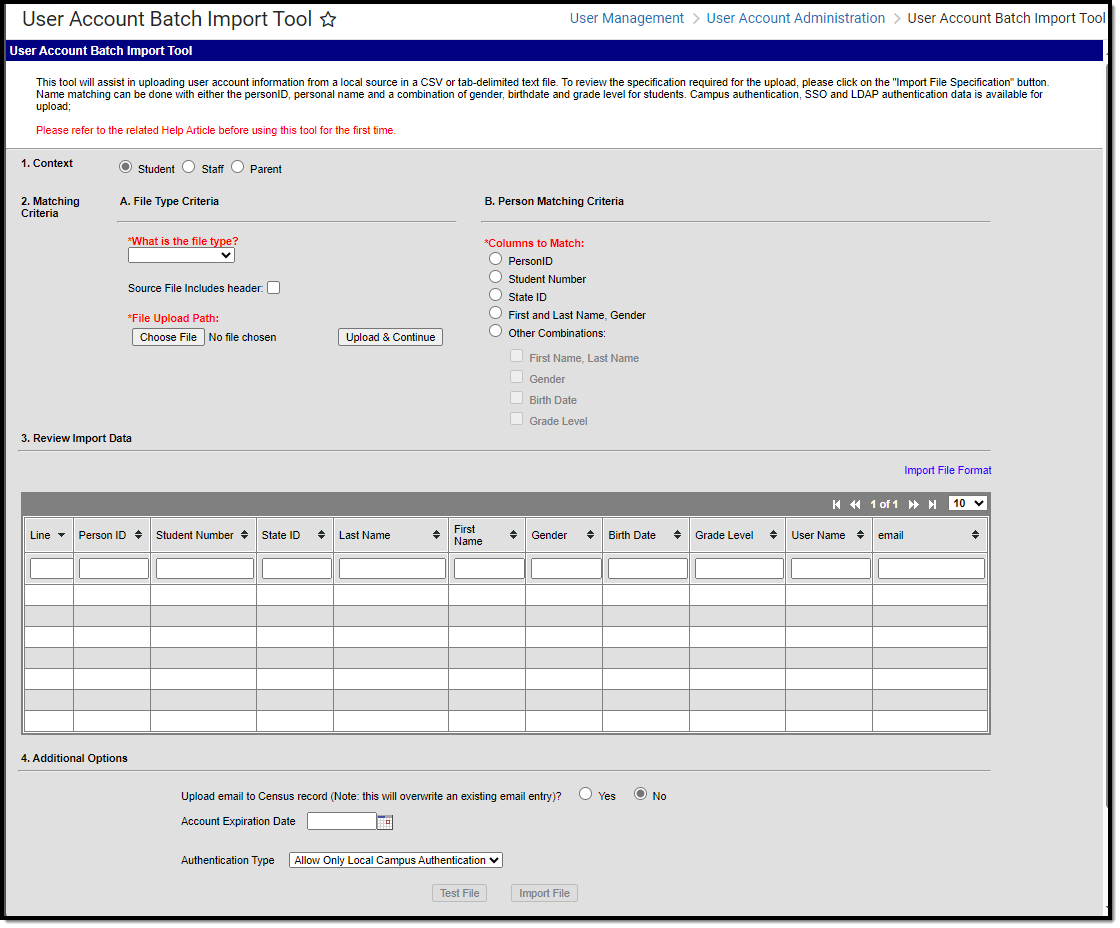
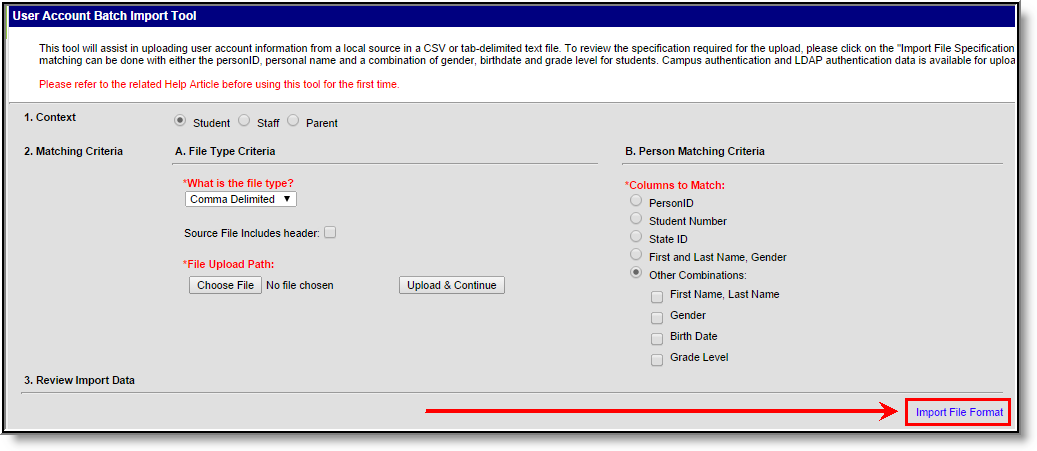
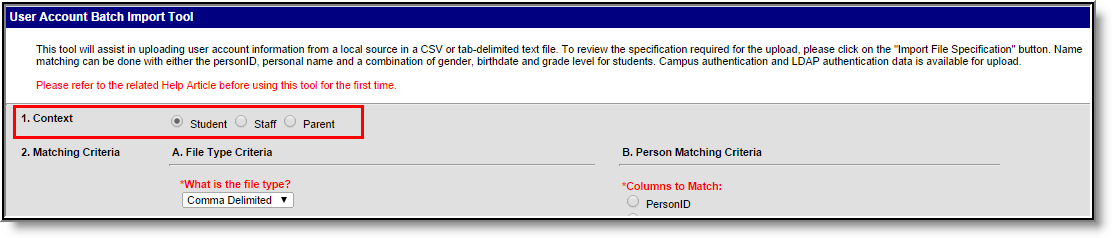

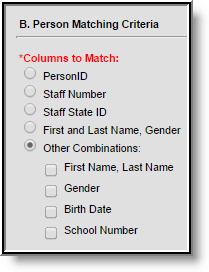
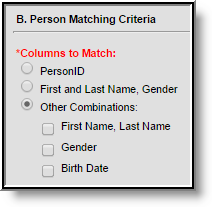
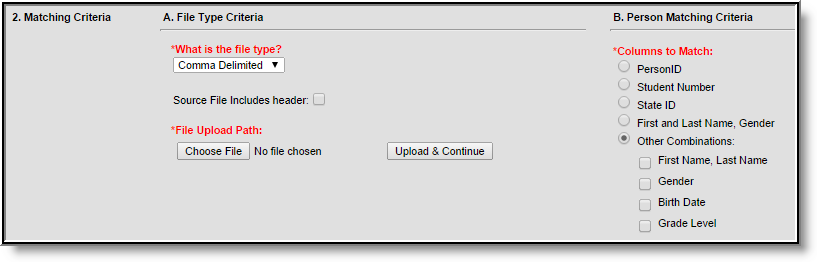
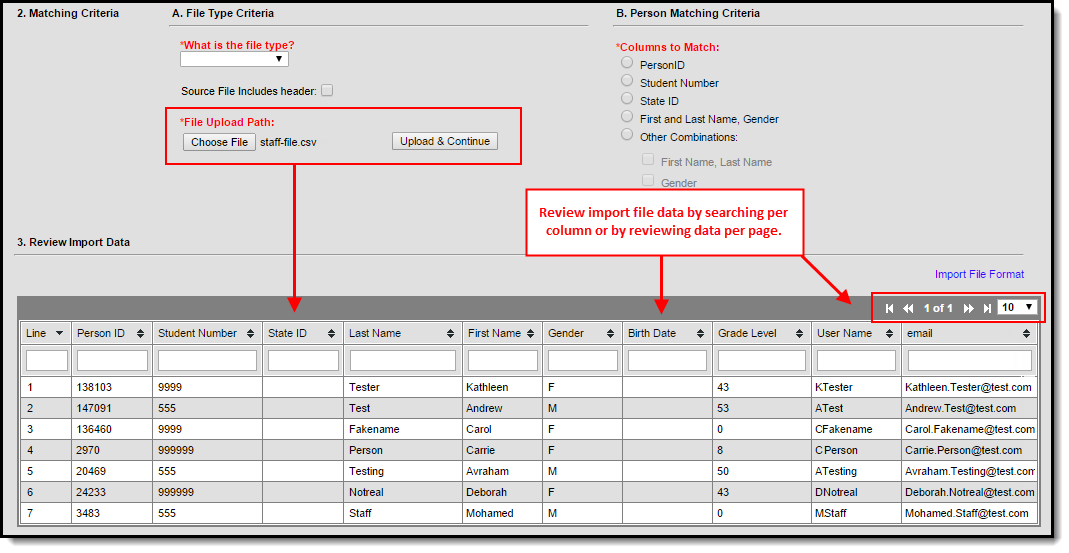

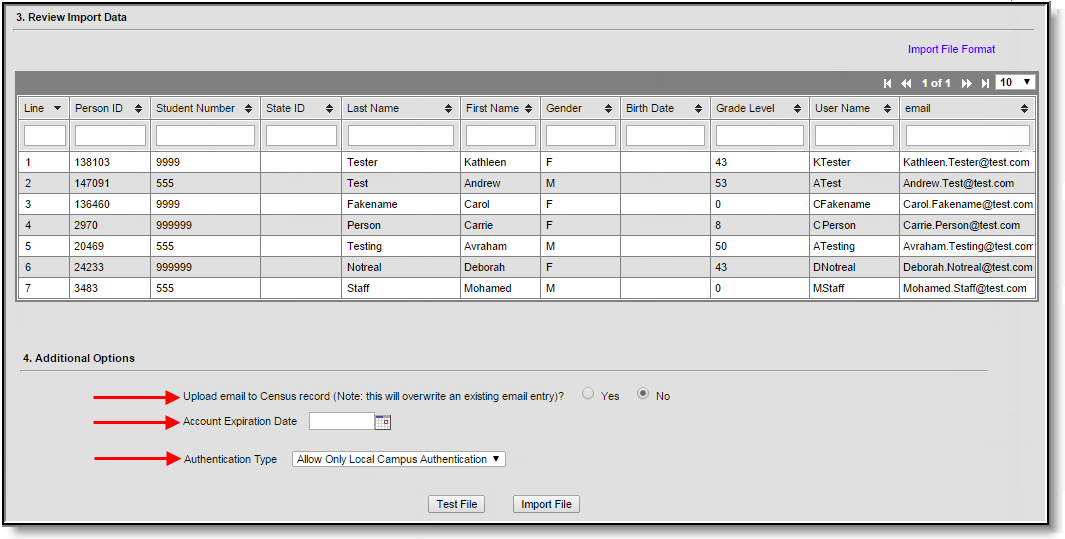
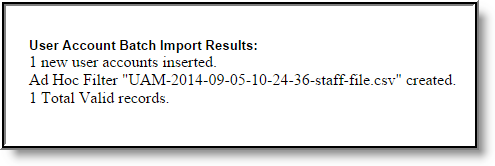

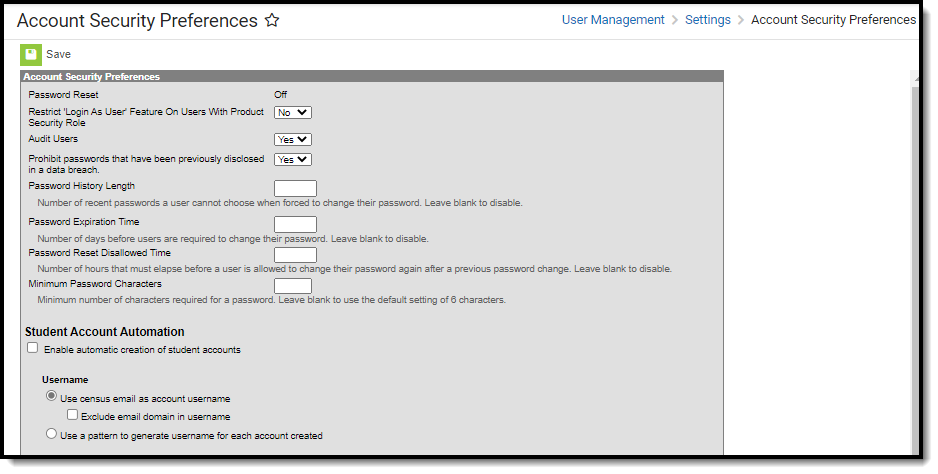


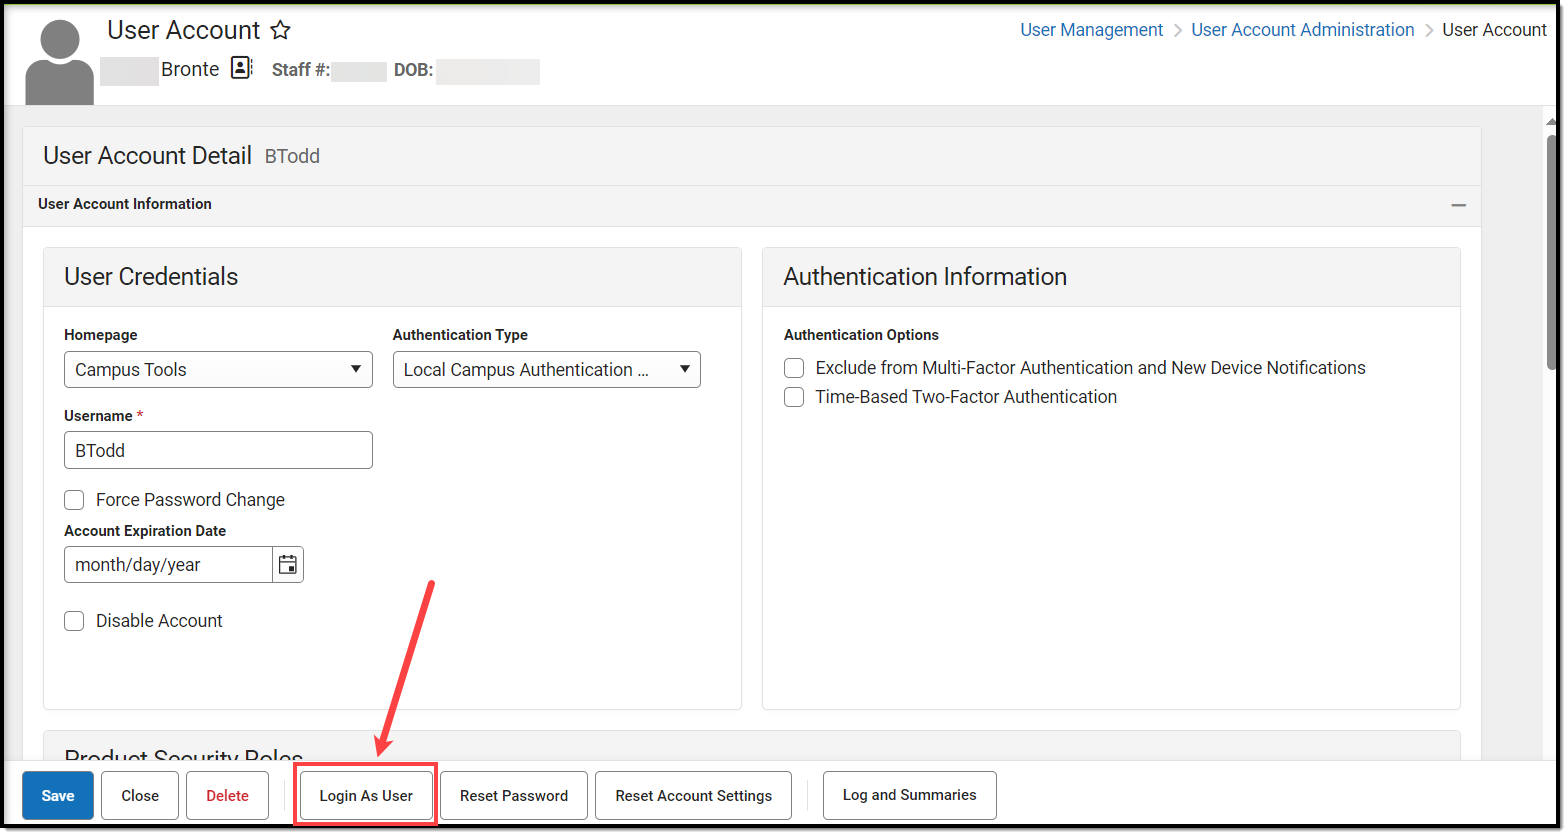


 Messages area (see image below).