Tool Search: Photo Import
The Photo Import tool allows users to attach student and/or staff pictures to Campus accounts. This wizard assists in bulk loading student and staff pictures into the system. Only JPG format is accepted, and all images are resized appropriately prior to storage. This tool is best when used in off-peak hours.
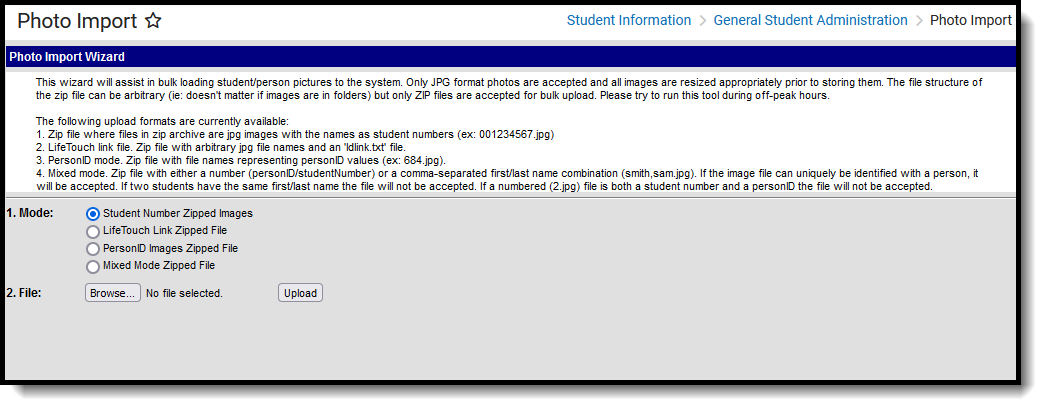 Photo Import
See the Photo Export/Photo Import Tool Rights article for information about rights needed to use this tool.
Technical Requirements
Images are uploaded to a specific application server and replicated across other application district servers that host the production environment. The campus .XML file dictates the photo path (e.g., D:\ CampusDocumentStore \ studentPics \ <districtName>).
The Photo Import Wizard requires specific file extensions for a mass upload to proceed. A district or school should request that the photography company save the photos individually as .jpg files. The individual .jpgs should then be saved in a .zip file. Folders within the .zip file may be structured as desired.
In addition, the identifier (personID, studentID) must be correct. The Photo Import Wizard will not import a photo if it cannot find an exact match of the person within the database.
Photo Import Notes
- A batch upload of photos must be imported as a .zip file.
- Logic used to match student numbers will ignore leading zeros.
- All images are resized to the system default before storage.
- After the upload, all images are resized to 175 x 263; any base image that is equal to or larger than this is best for display.
- Some images may be blurry due to resizing.
- The default upload file size is 3 MB. The recommended individual file size is 30-35 KB.
- The zip file must be 100 MB or smaller, or the import will not work.
- The file structure of the .zip file does not matter (E.g. It doesn't matter if John Smith's photo is within a second-level or sixth-level folder within the .zip file.)
- Unsafe files cannot be extracted (.exe, .dll, .com, etc.)
- A status report is displayed once the image processing is complete. It lists the student names/file names of loaded images, corrupt .zip entries, and unmatched images.
- When using Mixed Mode, note the following:
- If the image file can be uniquely identified with a person, it will be accepted.
- If two students have the same first/last name, the file will not be accepted.
- If a numbered file is both a student number and a personID, the file will not be accepted (E.g. 2, 2.jpg).
- If a district has more than one application server for Campus, the distribution and display of pictures may take up to 24 hours to reach each server.
- When using the LifeTouch Link Zipped File Import Mode, the Idlink.txt file must be formatted with commas separating the student identifier and the file name.
Import Photos
The process of importing/uploading photos is extremely server-intensive. Perform the import/upload when system usage is minimal.
The Photo Import tool can operate in a variety of modes meant to detect common types of person identifiers. The mode used should match the naming convention for the images in the .zip file.
Import Modes
- Student Number Zipped Images - This mode should be used when the photos are identified by student number (E.g. 008965412.jpg). This mode will only work for student photos.
LifeTouch Link Zipped File - This mode should be used when the photos (.jpg) are named with arbitrary file names, and a "ldlink.txt" file. This mode will only work for student photos.
The LifeTouch Idlink.txt file must be formatted with commas separating the student identifier (studentID) and the file name.
- PersonID Images Zipped File - This mode should be used when files names are identified by personID numbers (E.g. 892.jpg). This mode will work for both staff and student photos.
Mixed Mode Zipped File - This mode is for scenarios when (A) a combination of student numbers and personIDs is used to identify the photos or (B) the person's first and last name is used. This mode will work for both staff and student photos.
If the file can still be uniquely matched to a person, the import wizard will accept it. If the numbered file is both a student number and a personID, the file will not be accepted.
When the Upload button is selected, the following screen will display the successful uploads. Rejected and failed uploads, if any, will be listed for the user to review and resolve.
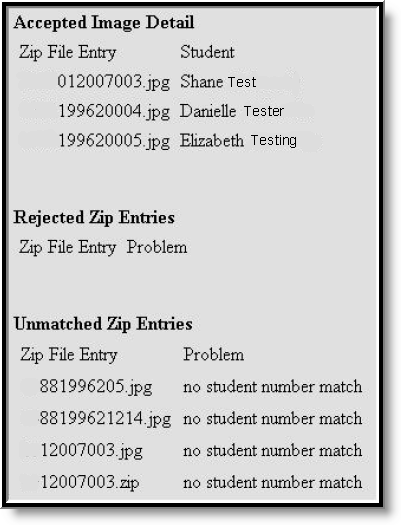 Photo Import Summary
After this screen displays, the photos have been uploaded.
When a district has more than one application server for Campus, the distribution and display of pictures may take up to 24 hours to reach each server, depending on server bandwidth.
Areas of Display
When photos are uploaded, they are displayed in the following areas:
Staff photos (non-student):
- Census Demographics
Student photos:
- Student Portal
- Census Demographics
- Student Summary
- Point of Sale Terminal
- Transcripts (if preference is chosen)
For a teacher/staff member to see student photos in places other than the Summary tool and Demographics tool, the Show Student Picture checkbox must be marked in the Campus Instruction Account Settings.
Student pictures are visible in various places in Campus Instruction.
 Campus Instruction Account Settings
Individual Photo Upload
Individual photos may be uploaded and/or replaced on the Demographics tool. Click the Upload Picture link in the Person Information editor, then browse for the file. After selecting a photo to upload, click Upload to attach it to the student's record.
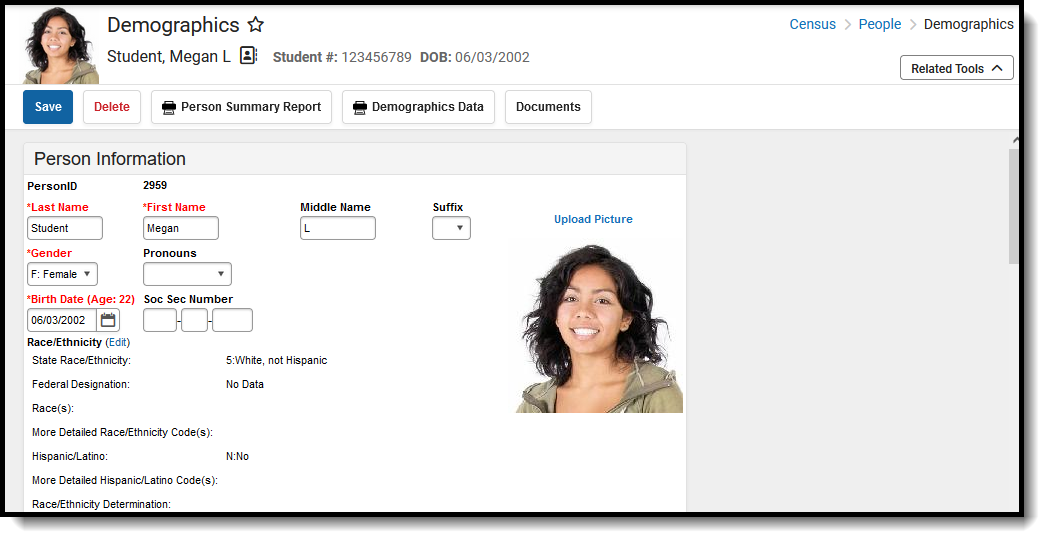 Upload Picture on Demographics