Tool Search: Cross-Site Enrollment Setup
The Cross-Site Enrollment Setup tool allows schools to set up courses and sections as offerings for Cross-Site Courses and to map courses to other schools that offer Cross-Site Courses. Only active courses can be mapped from one school to another.
 Cross-Site Enrollment Setup
See the Cross-Site Enrollment Setup Tool Rights article for information about rights needed to use this tool.
See the following for more information:
Cross-Site Enrollment functionality uses the terms Home and Serving. These terms are already used in the product as they relate to where a student is enrolled.
- Home or Home School refers to where the student is enrolled for the MAJORITY of their classes, programs, and services. This is the school where their Primary enrollment is, where they attend on a regular basis, etc.
- Serving or Serving School refers to where the student attends one or two classes not offered at their Home School, where they participate in additional programming outside of their primary enrollment, and where they have a partial enrollment for services.
Cross-Site courses can occur at any time during the school day. Due to the distance between the Home School and the Serving School, there may be limitations related to that. That issue must be resolved by the student, their parent/guardian, and their counselor.
Submit feedback for Cross-Site Enrollment by clicking the Feedback button in the bottom right-hand corner. This takes you to the Campus Community Cross-Site Enrollment forum topic where you can add your suggestions for the Cross-Site Enrollment tools.
A Year, School and Calendar (and Structure when applicable) MUST be selected in the Campus toolbar in order to display information.
Navigation
Home School and Serving School
The Cross-Site Enrollment Setup tool includes two separate views - The Home view and the Serving view.
- The Home view is the default view and displays courses that are marked for Cross-Site and all current sections of that course that are offered at your school.
- Sections with end dates in the past are not listed.
- When a course does not have any active sections, a No Sections to Display message is listed beneath the course.
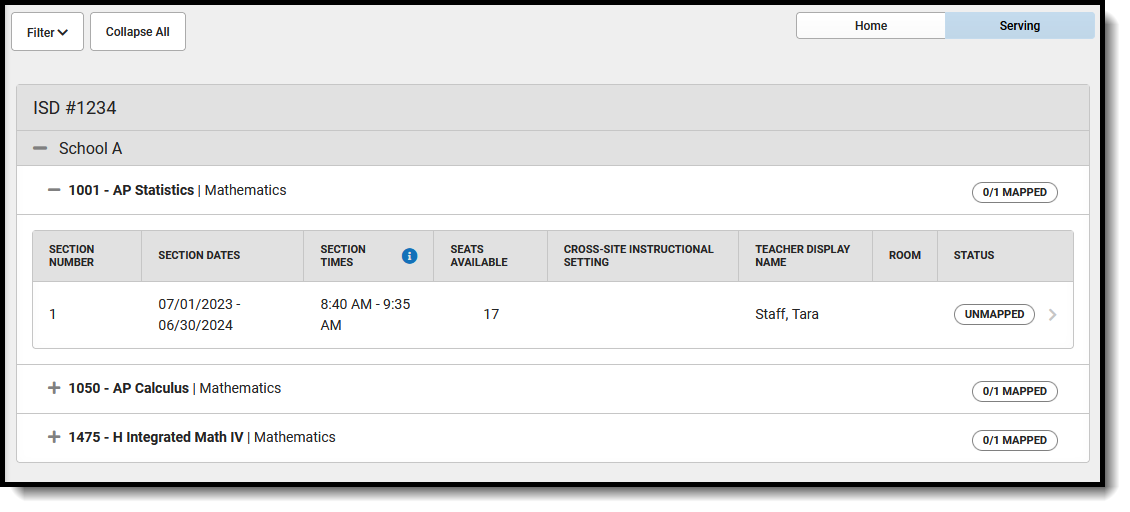
- The Serving view displays courses and sections at other schools in the district that are offering courses to students enrolled at the Home School.
Depending on the actions taken Cross-Site Enrollment Setup tool, switching between the Home and Serving views could be necessary to complete the Cross-Site setup.
For example, in District #500, Emerson High School and Franklin High School are offering Cross-Site courses this year. Counselor Adams and Counselor Davidson both work at Emerson High School. They have chosen two advanced foreign language courses to offer as Cross-Site Courses to students at Franklin High School - IB French I and Advanced Spanish 4.
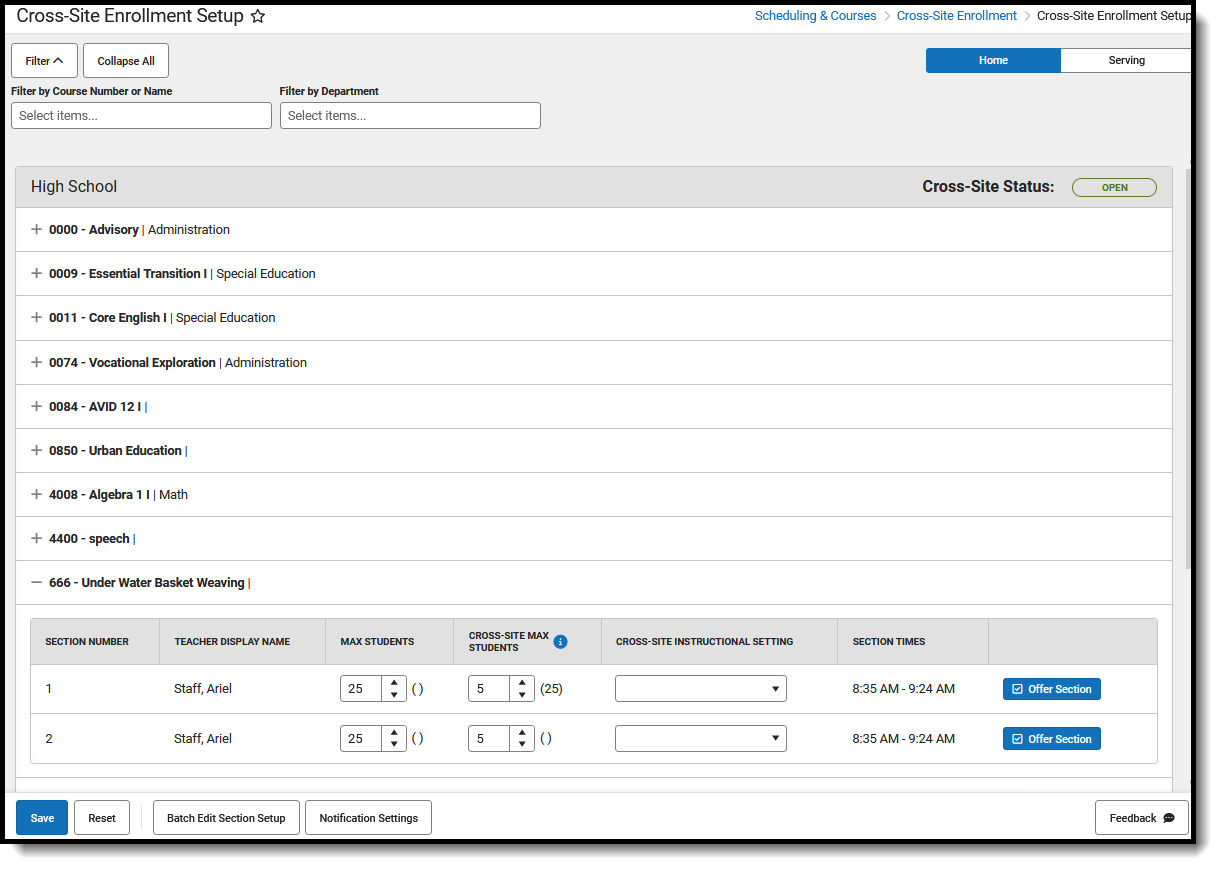
 Cross-Site Enrollment Setup Tool - Home School
When using the Setup tool, the counselors at Emerson High School can do the following when on the Home view:
| Action | Image |
|---|---|
| Use Collapse All or Expand All to navigate through the schools. Alternatively, click the plus or minus signs next to the school and course names as needed. | 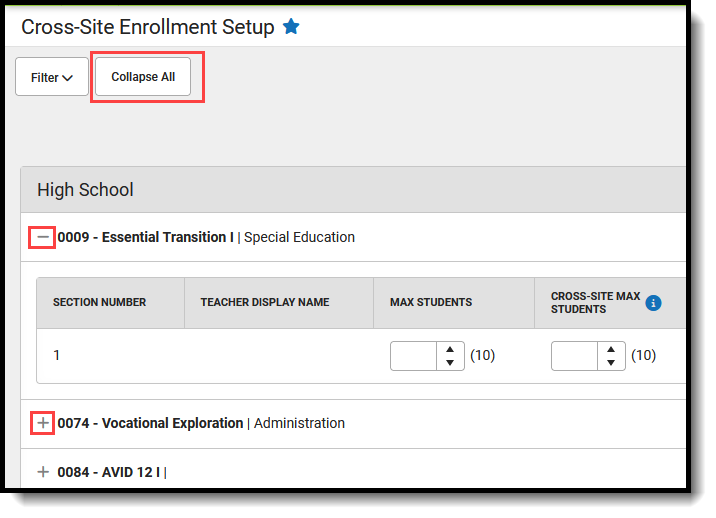 |
| Filter the list of courses by Course Number or Name and Department (must be entered on the Course to select in the dropdown). |
|
| View courses already marked as Cross-Site courses in numeric ascending order, along with the sections for those courses. |  |
| Determine the total number of students who can be scheduled into the section in the Max Students field (up to three digits, cannot be a value of zero or a negative value) |
|
| Determine the number of students from other schools who can be scheduled into the offered section in the Cross-Site Max Students field (up to three digits, cannot be a negative value). |
|
| Set the Instructional Setting for the courses - On-Site, Virtual or Hybrid. |
|
| Mark the Offer Section checkbox, which makes the section available for Cross-Site Sharing (all course sections are enabled for Cross-Site Sharing upon initial setup). |
|
| Set the values for Max Students, Cross-Site Max Students, Instructional Settings, and mark Offer Section for ALL courses/course sections being offered at one time using the Batch Edit Section Setup option at one time. | 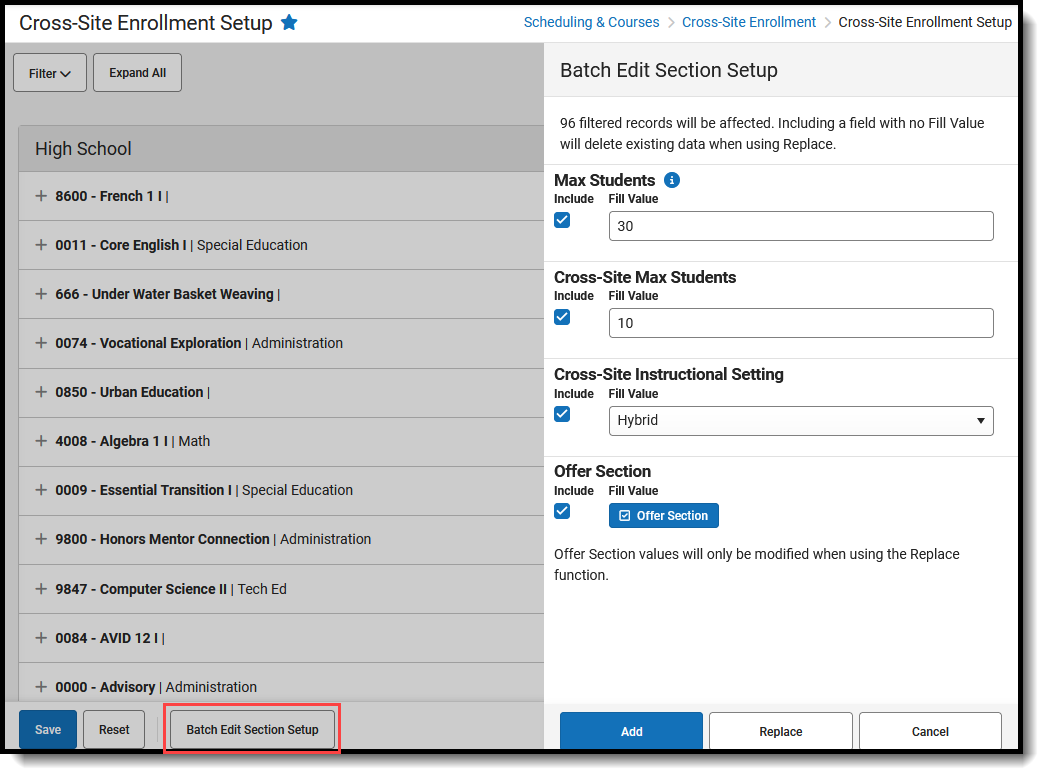 |


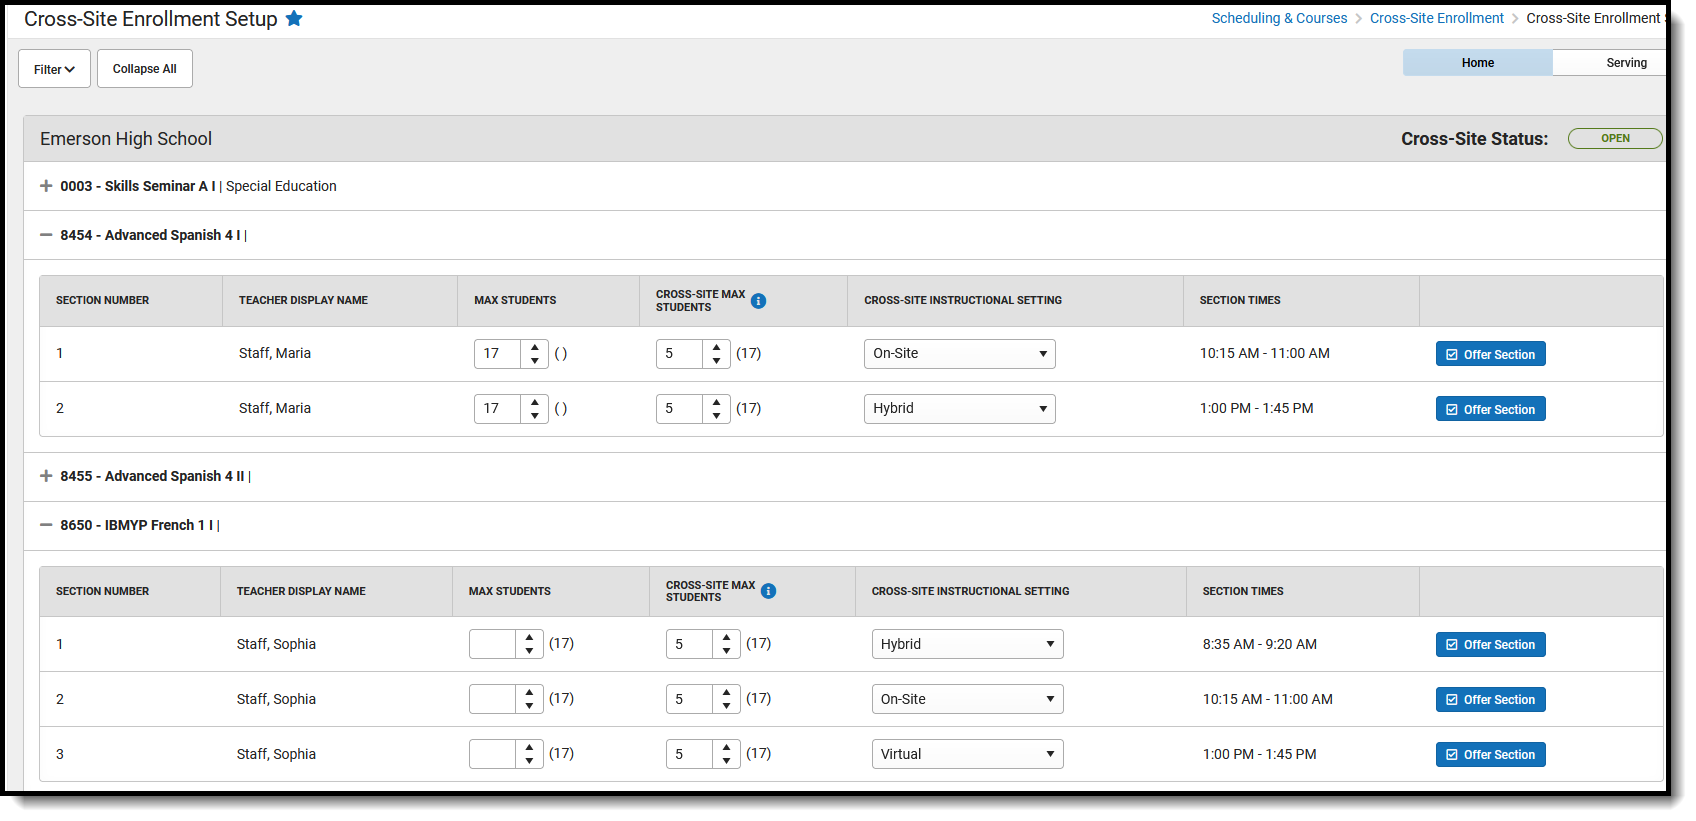
The Counselors at Franklin High School have also chosen to offer courses to Emerson students. The Emerson counselors can see those offerings when they choose the Serving option. 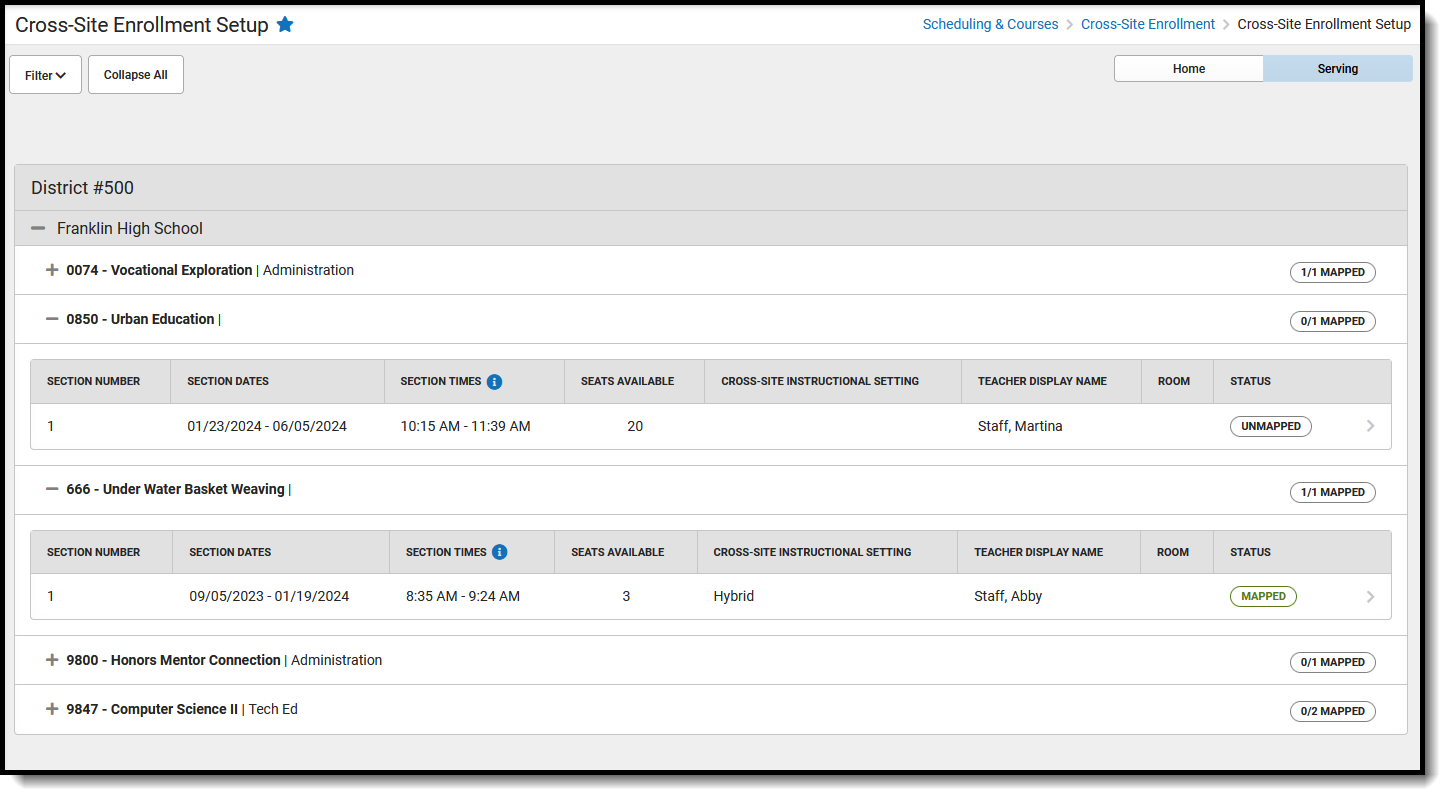 Cross-Site Enrollment Setup - Serving View
The Serving view lists other schools within the district that have shared their cross-site courses.
| Action | Image |
|---|---|
| Use Collapse All or Expand All to navigate through the schools. Alternatively, click the plus or minus signs next to the school and course names as needed. | 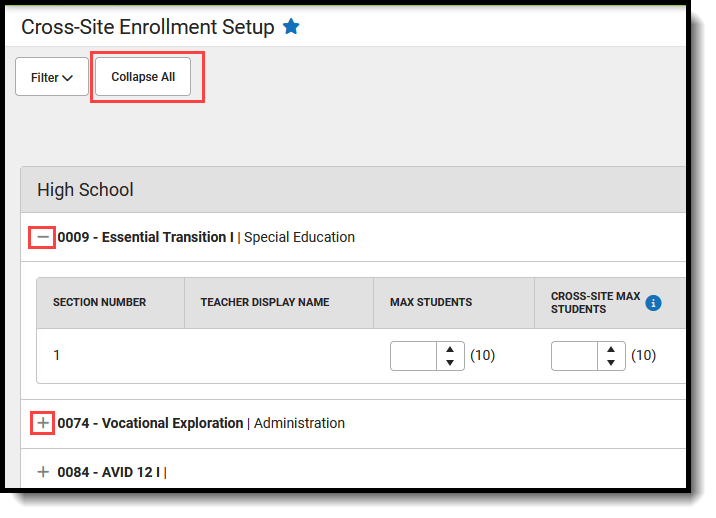 |
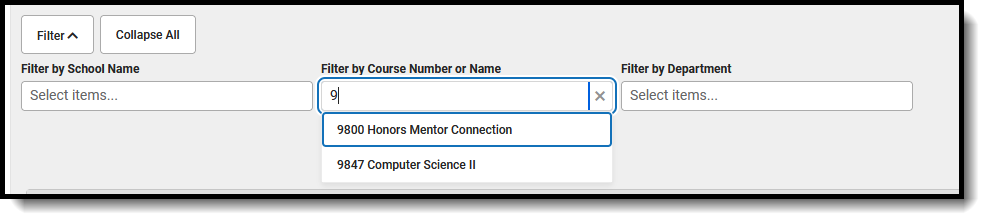
| Filter the list of courses by School Name, Course Number or Name, and Department. |
|
|
View the list of schools and calendars at the district with courses marked for Cross-Site Enrollment.
Schools and calendars are listed in alphabetic order; Courses and Sections are listed in numeric order. |
 |
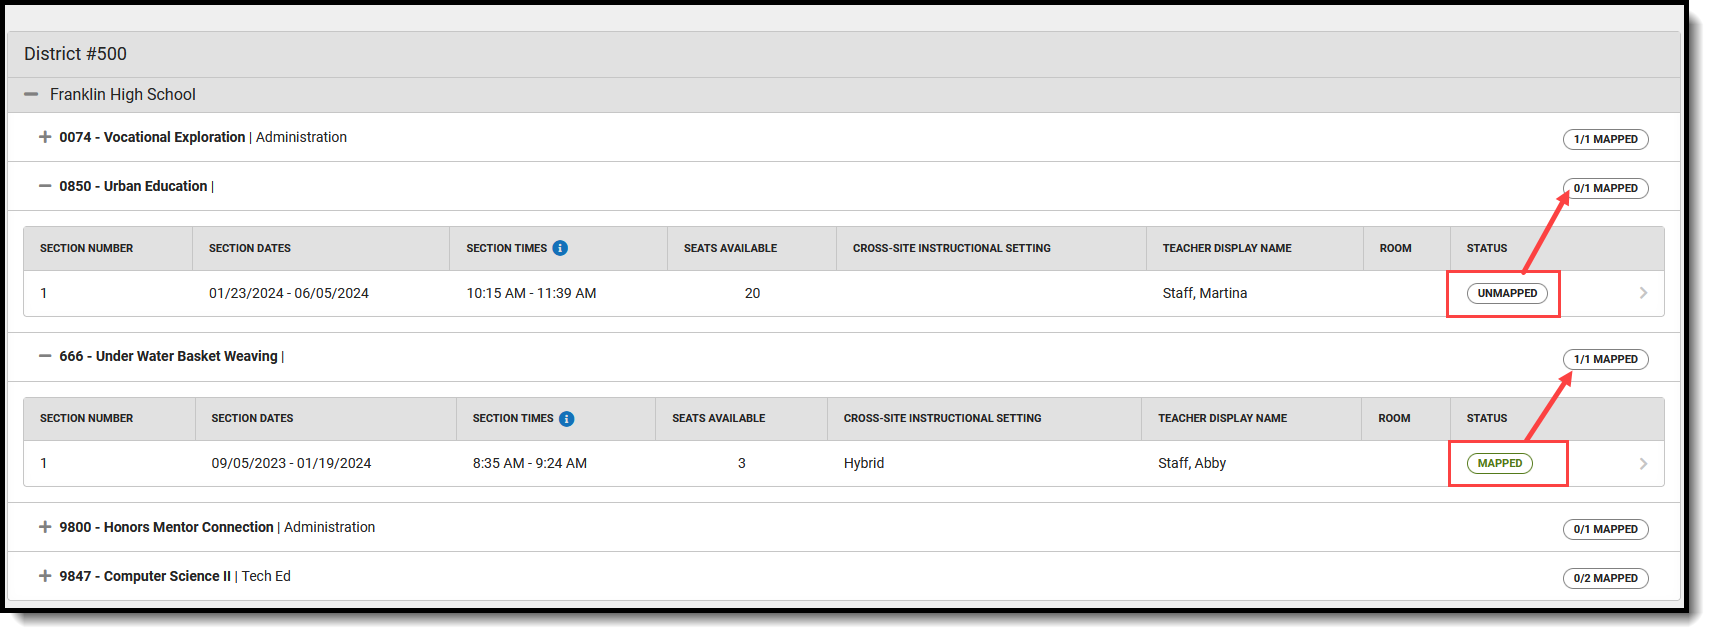
| Verify all offered sections from the Serving School have been mapped to sections at the Home School. |
|
| Print the Day Rotation and Period Schedules used at the Serving School. The reports open in a new browser tab. |  |
| Complete the Mapping of a section that can be offered using the Mapping Side Panel. |
|
Filter Options
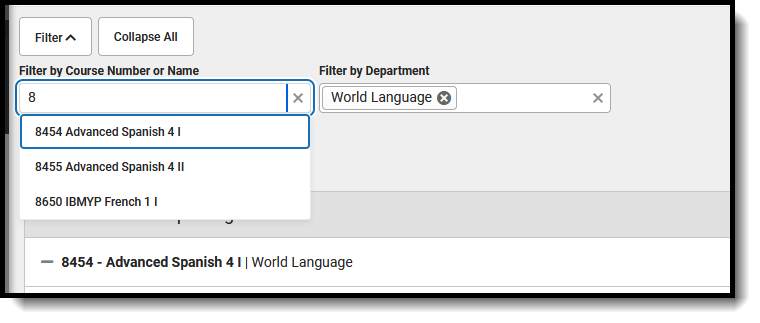
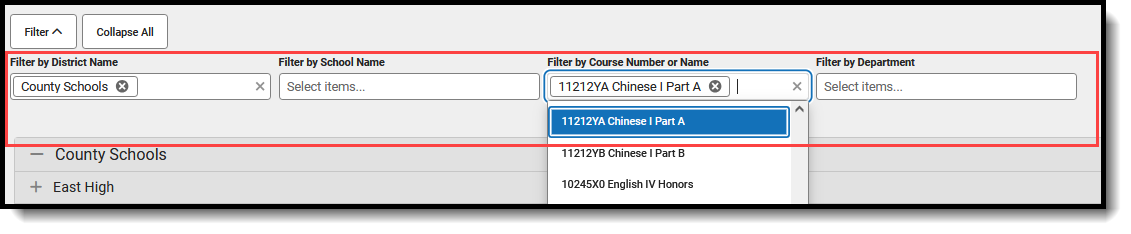
Use the Filter by School, Filter by Course Number or Name, and Filter by Department options to view current mappings or add mappings to courses marked as Cross-Site Enrollment and are ready to allow students to be scheduled. Begin typing in the field by entering a Course Number or Course Name, or the start of a course number or name, the start of a department name, etc. Matching results display and are further refined as more characters are entered. A message displays when no matching results are found.
Filter options change based on whether the Home view or Serving view is selected.
- Filter by District Name. In the Serving view only for Interdistrict participation settings, select a district to only see courses/sections offered by that district. Further filter by school name to reduce the list of courses/sections to a specific school.
- Filter by School Name. In the Serving view only, select a school name to only look at courses/sections offered by that school.
- Filter by Course Number or Name. When a course is selected here, only that course's information displays.
- Filter by Department. Multiple departments can be selected at one time. Only those courses assigned to those departments are listed. This allows mapping for ALL English courses or ALL Science courses, for example. Departments must be created and Departments must be assigned to the Course.
 Cross-Site Setup Filtering Options
Collapse and Expand Options
Collapse/Expand options vary depending on the Home view or Serving view being selected.
In the Serving view, use Expand All to display all offered courses and sections at schools marked for Cross Site that have been mapped for Cross Site; use Collapse All to display only the course names and departments at schools marked for Cross Site that have been mapped.
In the Home view, use Expand All to display all offered courses and sections that have been mapped for Cross Site; use Collapse All to display only the course names and departments that have been mapped.
Click the plus or minus signs next to the school and course names to expand or collapse as needed.
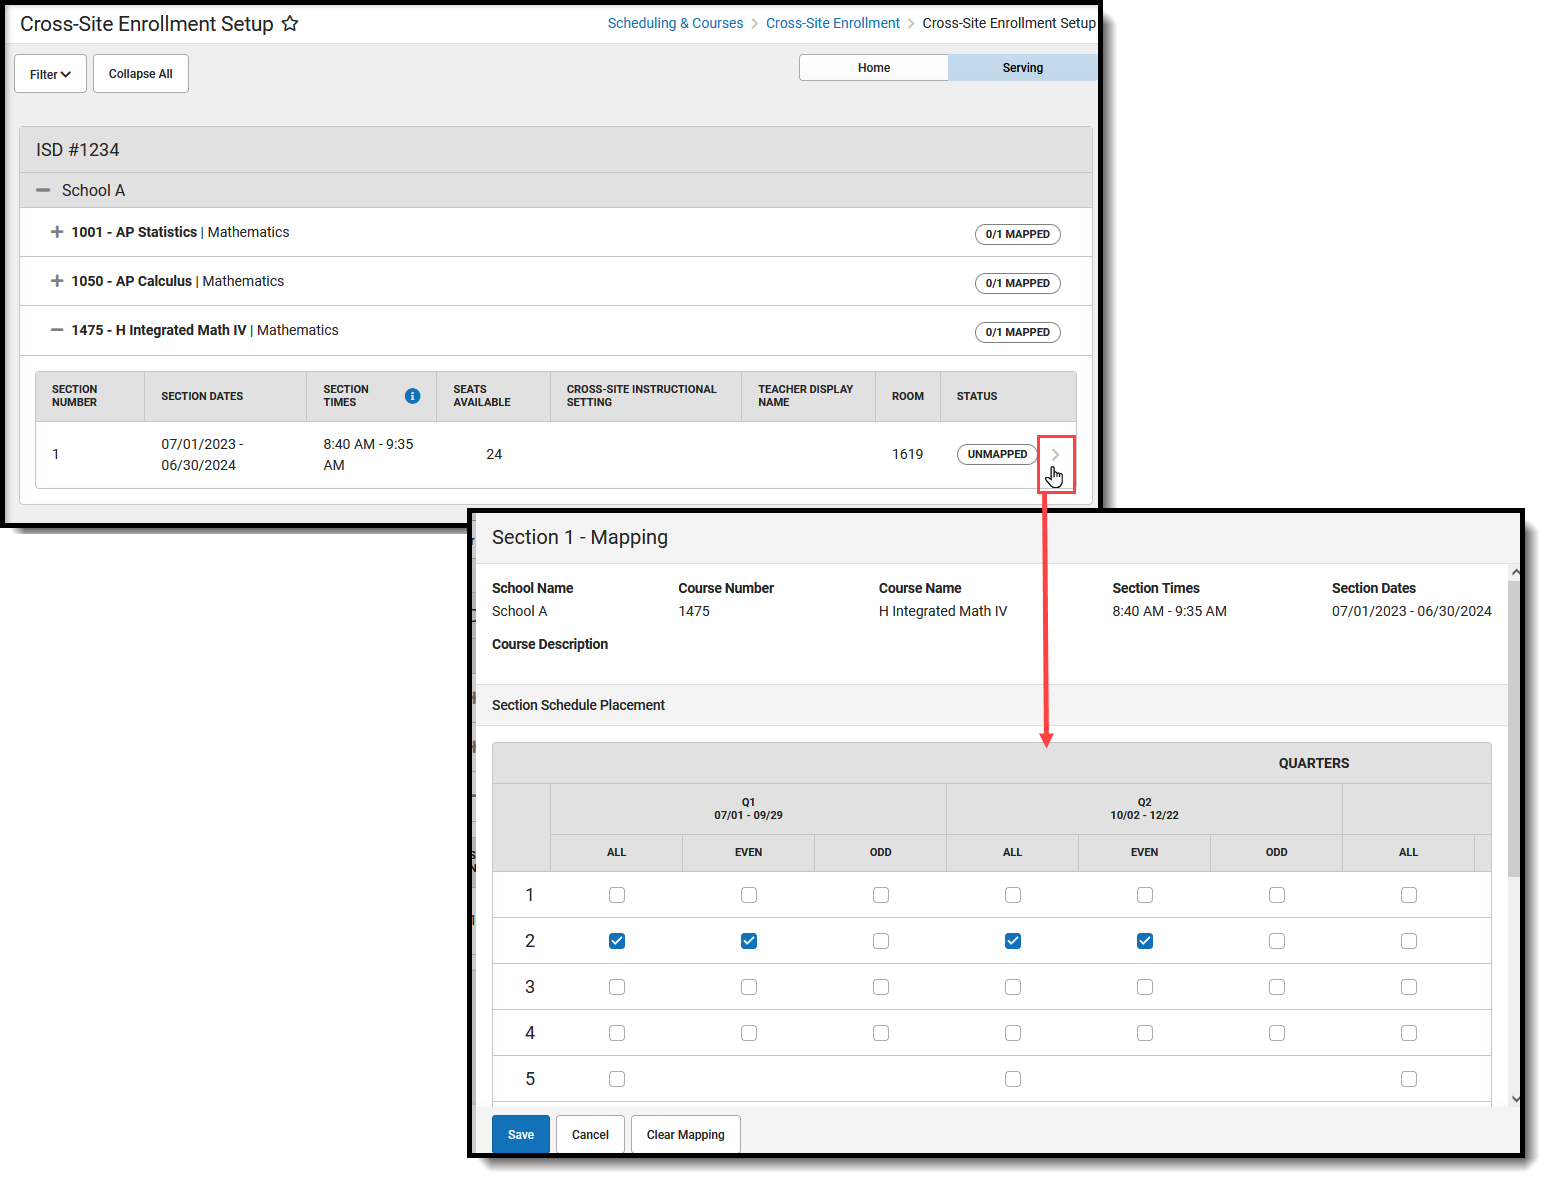
Mapping Side Panel
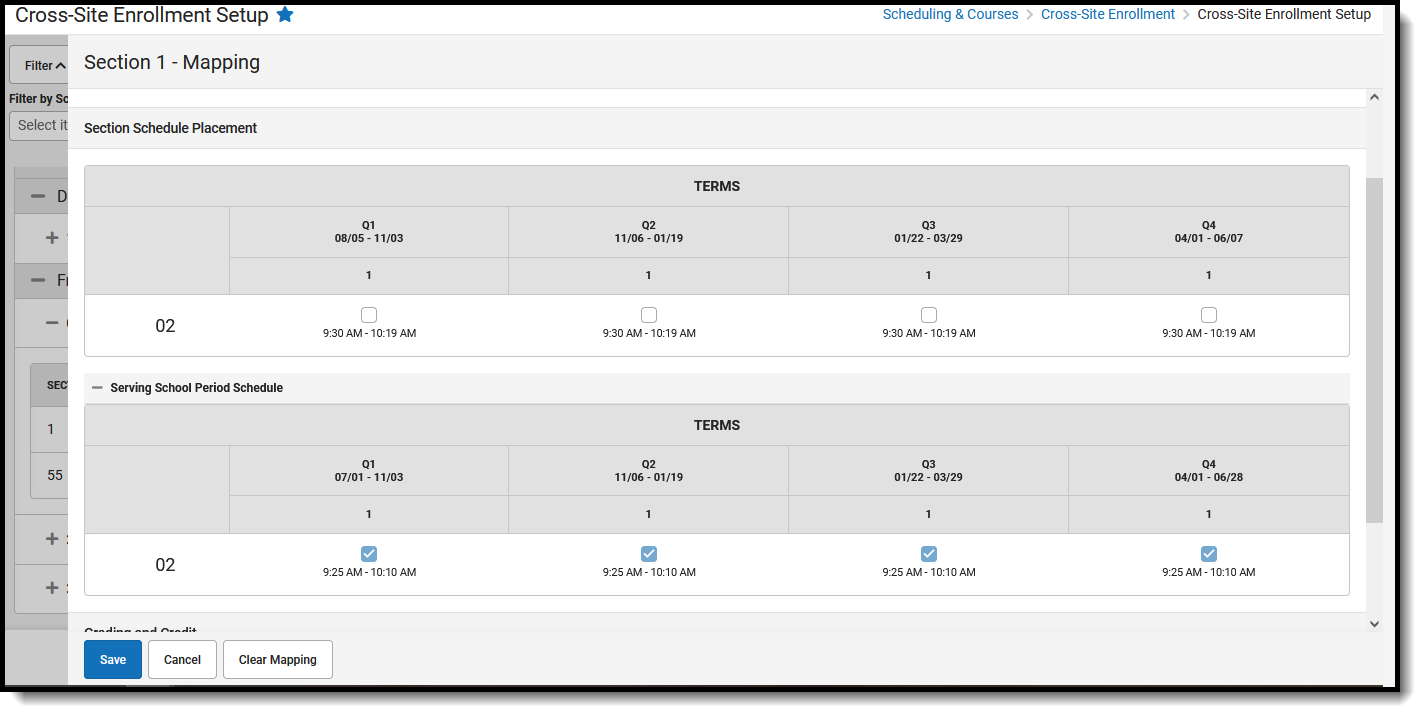
The Mapping Side Panel maps the section at the Serving School to the period times at the Home School. View the terms, periods, and times the section meets at the Serving School and map them to a corresponding period and time at the Home School.
 Mapping Side Panel
Mapped Cross-Site courses and sections are NOT visible on the Course Planner, Staff Planner, or Scheduling Center. Cross-Site courses and sections are also not included in any counts of courses and sections.
Mapping cannot be done when the section to be mapped is past its end date.
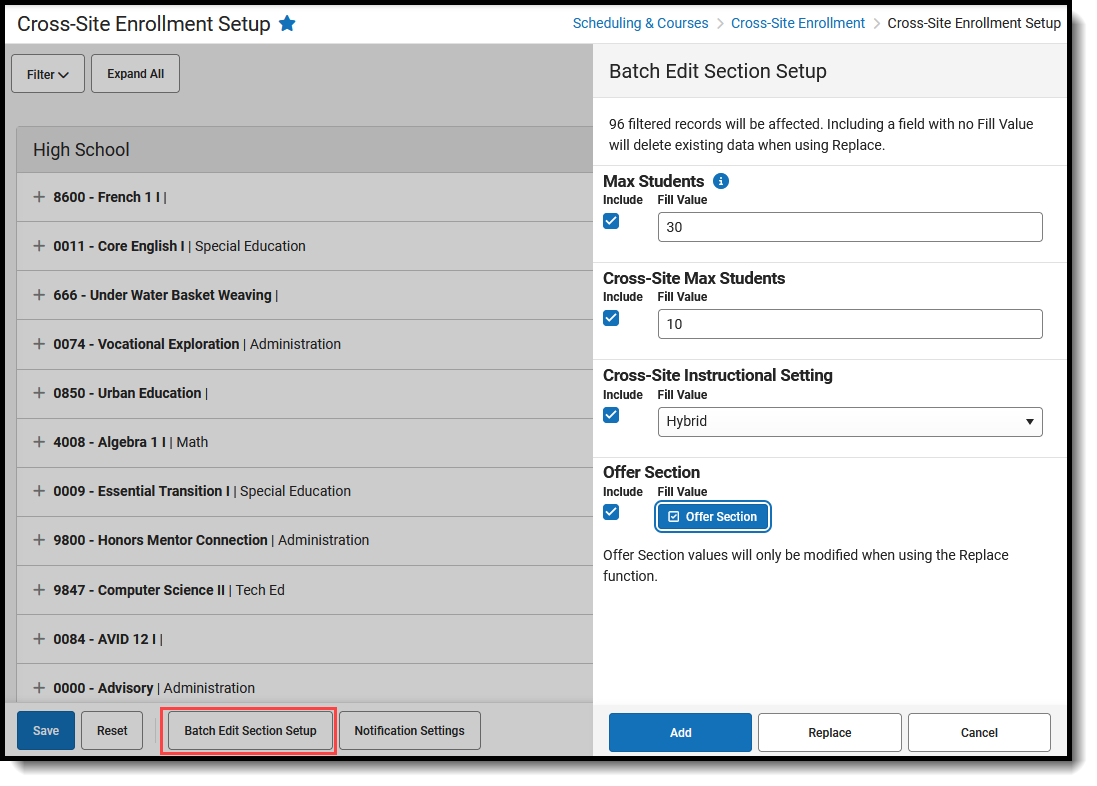
Batch Edit Section Setup
For all courses and sections marked as Cross-Site Enrollment at the Home School, i.e., those that are available to other schools for Cross-Site Enrollment students, use the Batch Edit Section Setup to populate the Max Students, Cross-Site Max Students, Cross-Site Instructional Setting, and Offer Section.
This sets those values for ALL courses/sections that are in the filtered list. Review the filtered list of courses to reduce the number of courses/sections affected by this change.
 Batch Edit Section Setup
Notification Settings
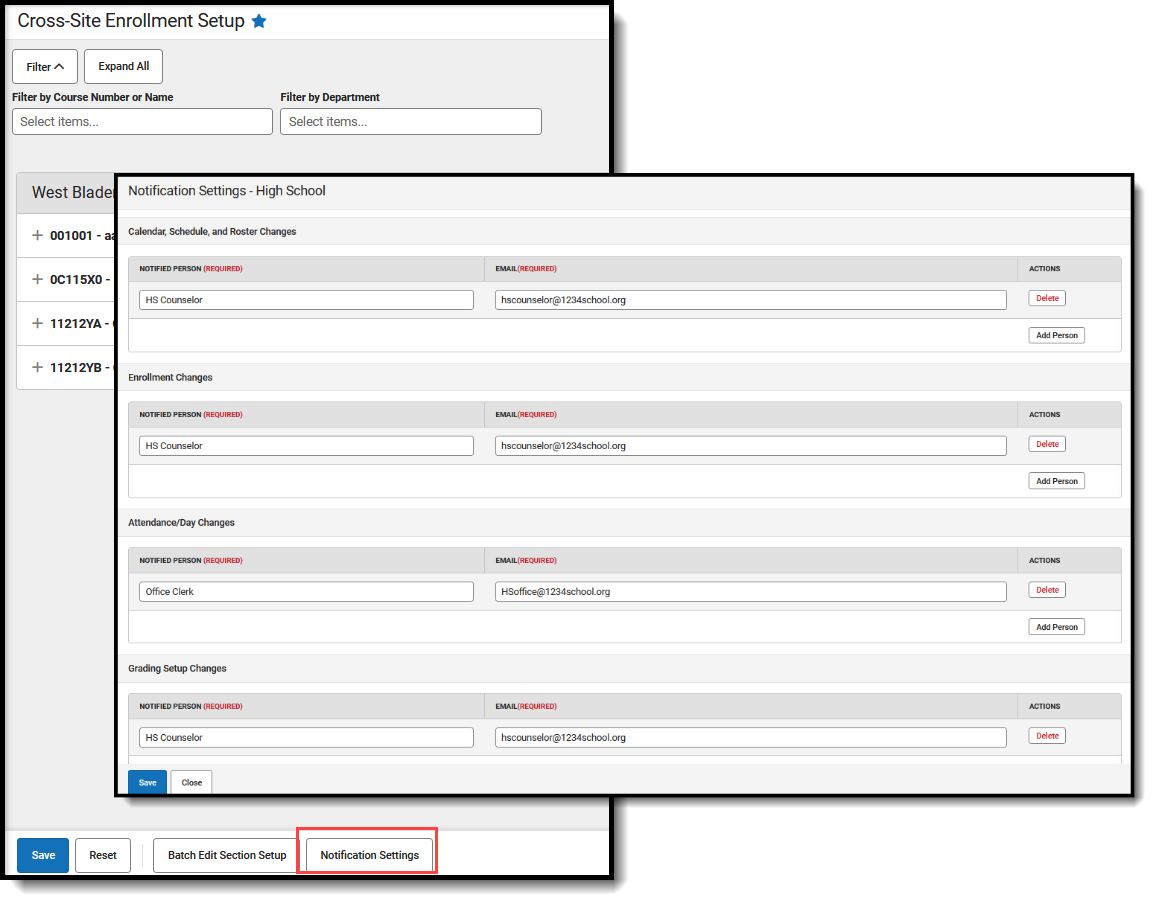
Notification Settings list the staff at the Home School who should be notified when a change is made at the Serving School that has Cross-Site Enrolled students. A Default Sender Email Address entry is required to send messages.
 Notification Settings
| Type of Change | Logic |
|---|---|
| Calendar, Schedule, and Roster Changes |
Messages are sent to the listed staff when a student's roster is ended when the Serving School initiates the ending (e.g., the course ends or is canceled before the end of the term, the student reaches the maximum number of absent days, etc.). |
| Enrollment Changes | Messages are sent to the listed staff when the Serving School ends or deletes a Cross-Site student's enrollment or when the student is marked as No Show at the Serving School.
When the Home School ENDS the Primary Enrollment, the End Date is added to all Home School roster records and is applied to the Cross-Site Enrollment and the roster record at the Serving School. A notification is sent to the Serving School. |
| Attendance/Day Changes |
Messages are sent to the listed staff when the Serving School alters a specific day in their calendar on the Day Detail editor or uses the Day Rotation tool, both in Day Setup, the message is sent to the listed staff. Upon saving, a message is triggered when the following fields are changed:
|
| Grading Setup Changes | Messages are sent to the listed staff whenever a change is made to Grading Tasks or Standards aligned to courses that are Cross-Site enabled. Changes that trigger a message include those made directly to Grading Tasks or Standards as well as changes to grading setup pushed from Course Masters, either individually or en masse.
Changes to grading setup at the Serving School may require updates to grade mapping at the Home School. |
|
Pending Roster/Update Failed |
Messages are sent to the listed staff when the nightly resync job/process runs to reset the Pending Roster queue. That job sets all pending roster entries to failed. The Update Failed message is sent to the Home School side, where the user can reset the rosters and try again. |
Home School View
Courses listed in the Home School view are those marked as Cross-Site Enrollment on the Course and the Section. This means that data has been pushed to sections in the Course Master, and mappings can be done.
Sections can be modified for Max Students, Cross-Site Max Students, and Cross-Site Instructional Setting. Values for these fields can also be entered at the Course level.
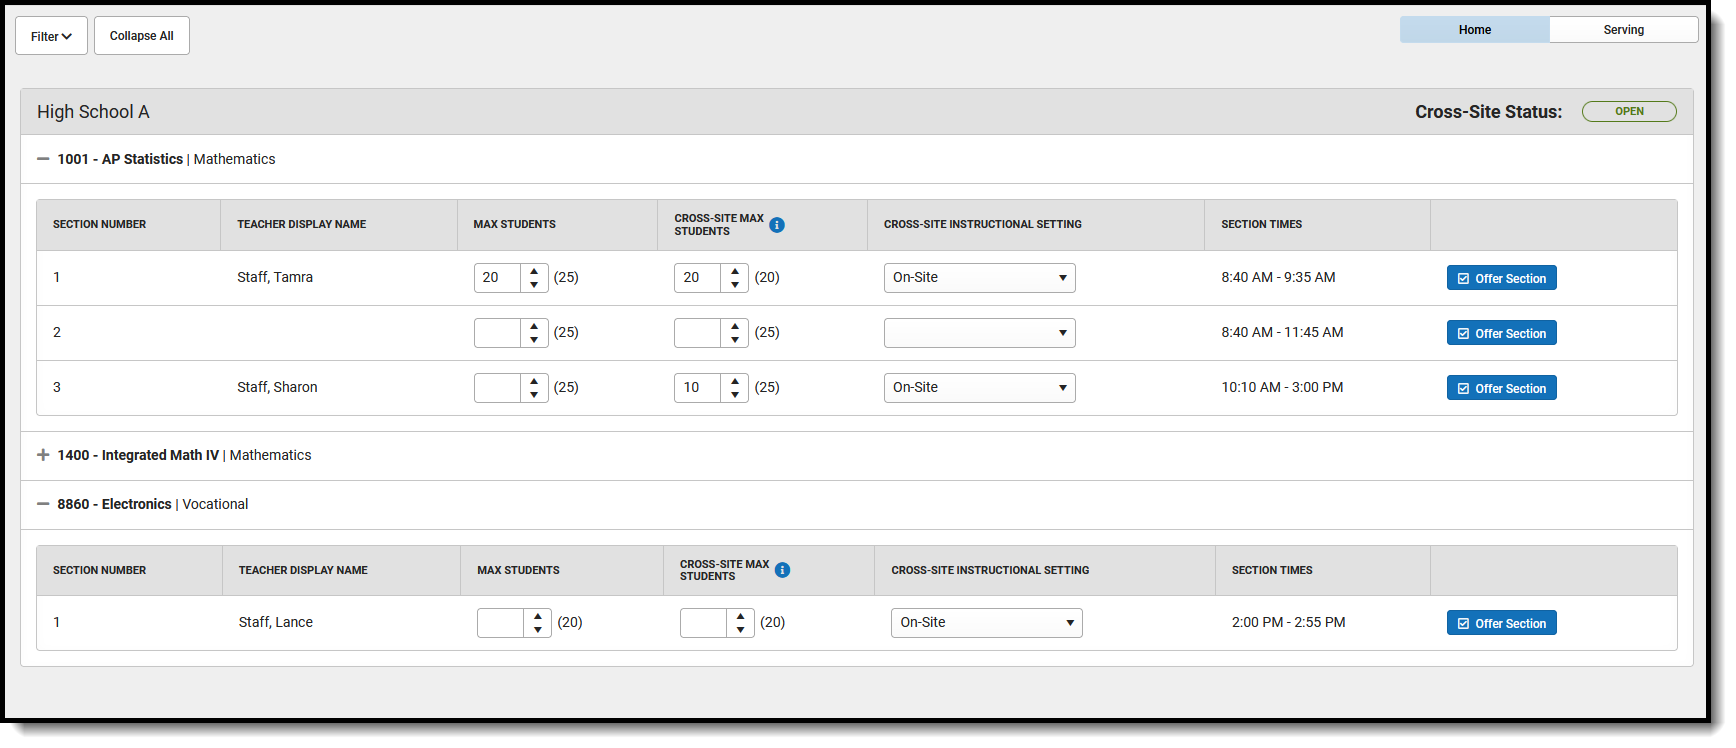 Cross-Site Enrollment Setup - Home Panel
| Field | Description |
|---|---|
| Section Number | Lists the auto-generated Section Number of the Course. This value cannot be modified. |
| Teacher Display Name | Lists the primary teacher assigned to the section. This value cannot be modified. |
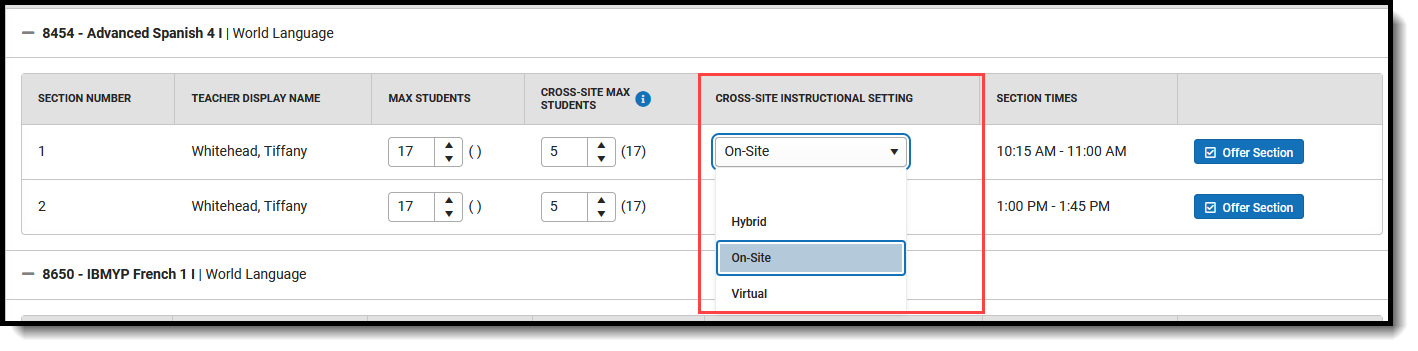
| Max Students | The Max Students value determines the total number of students that can be placed into a specific course section This value is used in the Scheduling process (Scheduling Board, Walk-In Scheduler, etc.) to determine when a section is full.
The Home School view of the Mapping tool lists the same value for Max Students as the Section Information editor and can be modified here as needed. The number displayed in parentheses is the current number of maximum students allowed for this section. |
| Cross-Site Max Students | The Cross-Site Max Students value determines the total number of students from participating schools that can be scheduled into the section. It cannot be more than the Max Students value and cannot be less than 0 (zero).
Cross-Site Max Students does NOT reserve seats; it limits the total number of cross-site students within the section. For example, in a section with a Max Student value of 25, where 20 of your own students have been scheduled into the course, only 5 seats are available for Cross-Site students even when the Cross-Site Max field has a value of 10.
Only positive, whole-number values, including 0 (zero), can be entered. |
| Cross-Site Instructional Setting | This setting determines how Cross-Site students receive instruction for this course - Hybrid (on-site and virtual), On-Site, or Virtual.
These fields cannot be modified once the Section has been enabled for Cross-Site Enrollment. The Cross-Site Enrollment checkbox on the section needs to be removed and saved. This also applies to the Batch Edit Section Setup process. When an enabled section is included in the Batch Edit process, the update 'fails' for that section and the section becomes invalid. |
| Section Times | The Section Times indicates the time of day the section meets, according to the Home School's Period Setup. These times cannot be modified.
When mapping courses at the Serving School, the section time is used as a guide to determine when the student needs to be available for instruction. The EARLIEST Section Start Time and the LATEST Section End Time are displayed on the Mapping Side Panel. |
| Offer Section | The Offer Section button can be turned on (displayed in blue with a checkbox marked) and turned off (displayed in white with a checkbox unmarked) to let other schools in the district register their students into this section. This button is automatically "turned on" and when the information is saved, the section becomes available on the Serving side when the Cross-Site Status is OPEN. 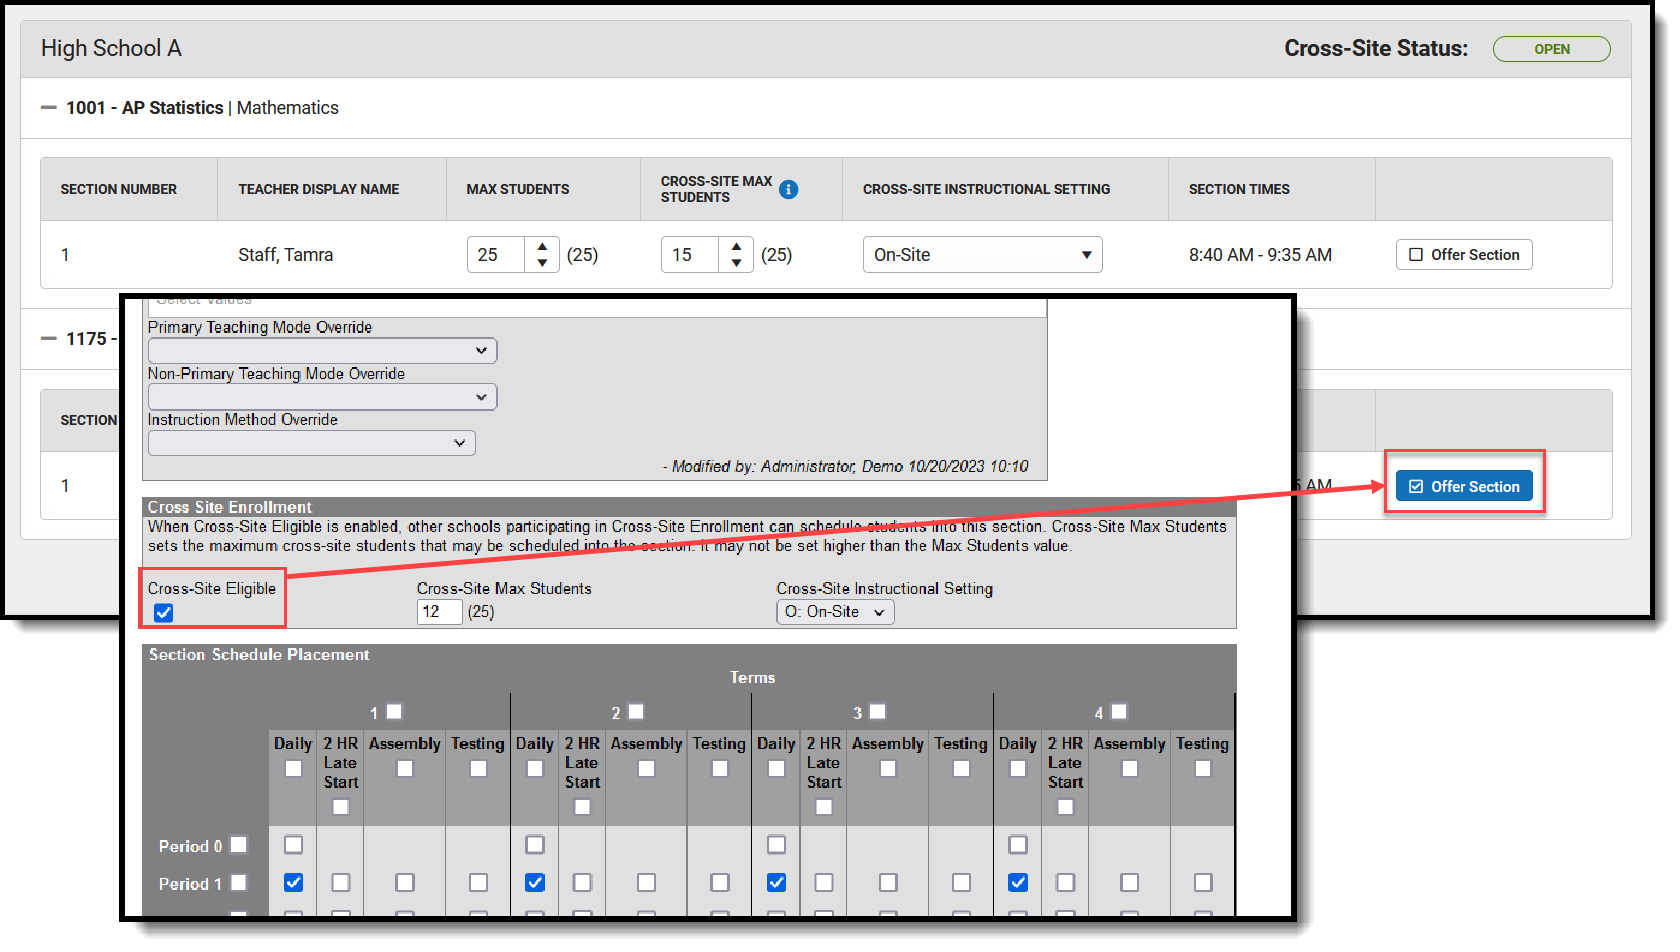 Offer Section ON, Cross-Site Eligible Selected
When it is turned off, the Cross-Site Enrollment checkbox on the Section Information tool is also turned off (not marked).  Offer Section OFF, Cross-Site Enrollment NOT Selected
|
| Save, Reset | Use the Save button to commit any changes made to the course and section mappings. Use Reset to undo any changes to the sections since the last save.
 Save and Reset Options
|
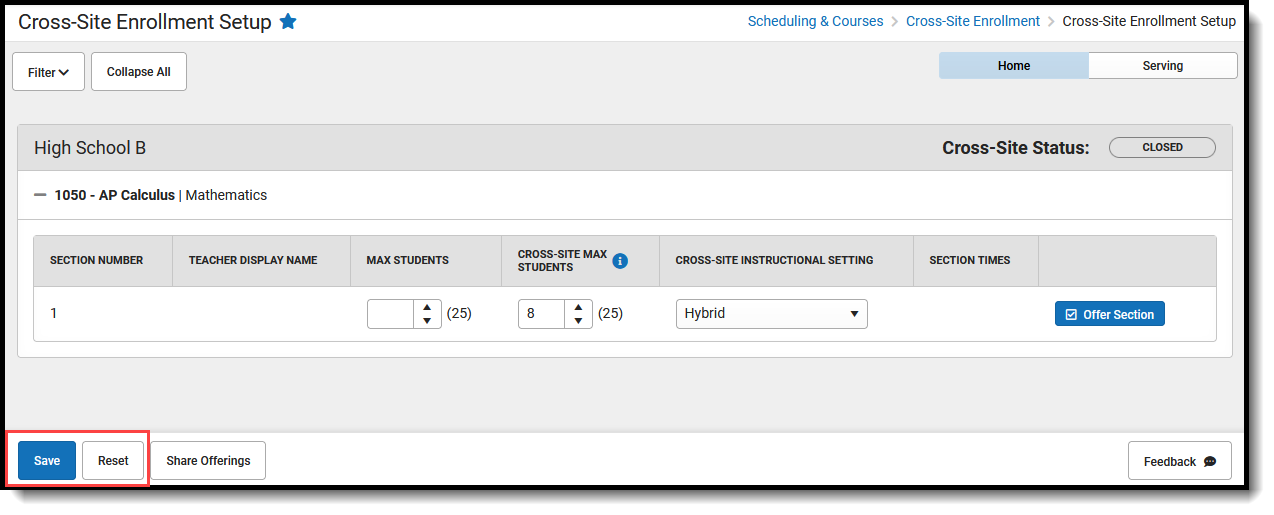
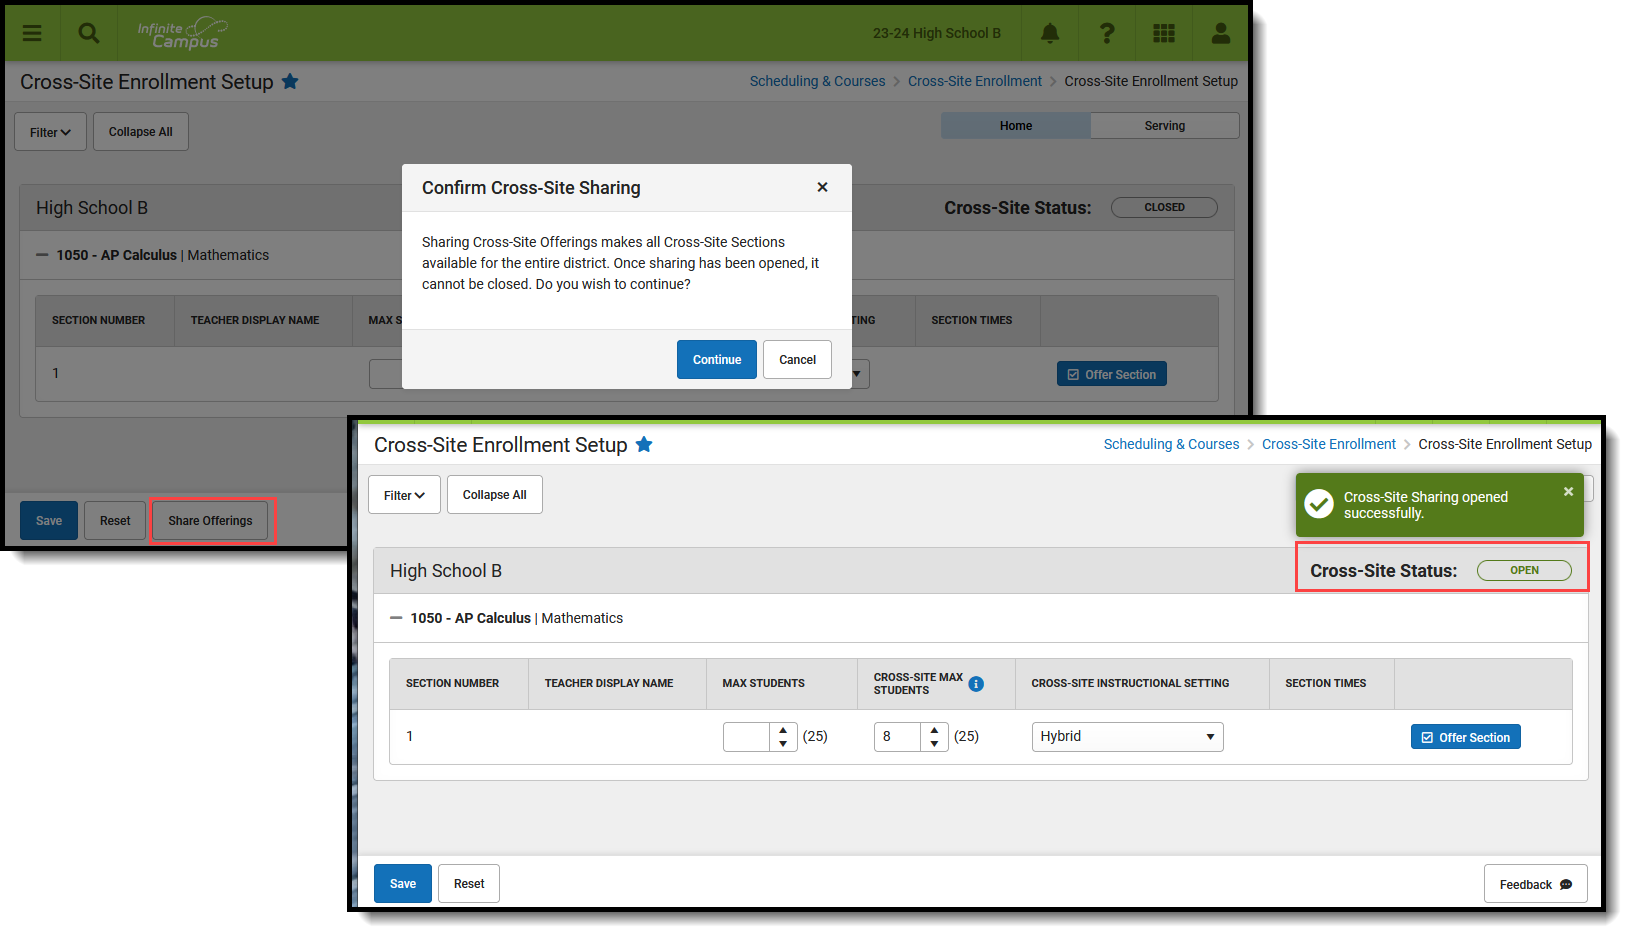
| Share Offering | Once the sections are saved and the Offer Section option is turned on, click Share Offerings. This option displays ONLY when the Cross-Site Status is CLOSED and cannot be undone. Once Cross-Site Status is open, the Share Offerings button no longer displays, and the section becomes available for other schools to enroll their students. 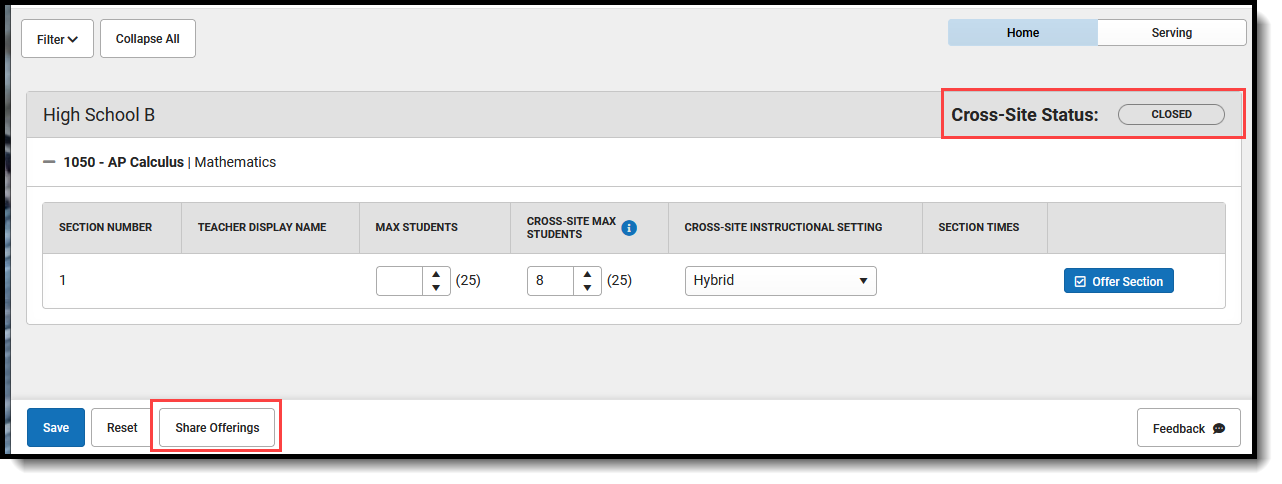 Share Offerings and Closed Status
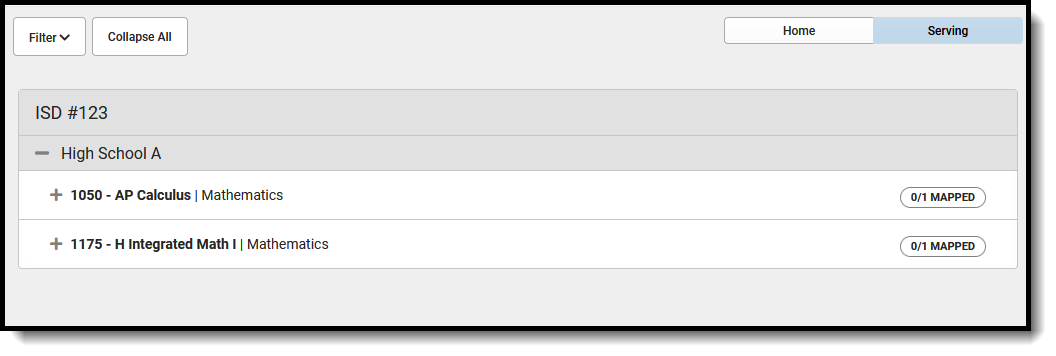
The example below shows three high schools in the district: A, B, and C. The only offerings available for High School C students on the Serving panel are two courses from High School A because High School B has not yet shared its offerings.
 High School B Shared Offerings
High School C can now view the offerings from High School A and High School B on the Serving panel. The only thing left to do is map the sections from the other high schools to comparable period times. |

Set Up Home School Sections for Mapping
- Expand the desired course to make changes to the listed section(s).
- Verify the correct teacher is listed in the Teacher Display Name column. Changes need to be made in the Section Staff History tool.
- Enter the Max Students value for the Section. The current value is listed in parentheses after the field; changing the value here also updates the value listed on the Course Information and Section Information editors.
- Enter the Cross-Site Max Students value for the section. The current value is listed in parentheses after the field; changing the value here also updates the value listed on the Section Information editor.
- Select the appropriate Cross-Site Instructional Setting option.
- Review the Section Times listed for the section. Changes must be made in the Section Information tool's Section Schedule Placement grid.
- Mark the Offer Section checkbox (displayed in blue). This is automatically selected; remove the checkbox when the section should not be offered.
- Repeat steps 1-7 for all sections listed.
- Click Save to update the information or Reset to return the values to their original settings.
- When all sections have been verified for accuracy, and it's time to have other schools enroll their students in this section, click the Share Offerings button. This only displays when the Cross-Site Status is CLOSED. THIS ACTION CANNOT BE REVERSED. Confirm the sharing action by clicking Continue on the confirmation warning. When the system is done processing, the Cross-Site Status reads OPEN, and the sections are visible in the Serving view for other schools.
Share Offerings Process
Once a section is mapped, the Section Schedule Placement grid on the Section Information editor displays a message stating that the section is Cross-Site Enabled, and any changes to its placement require Cross-Site to be disabled first.
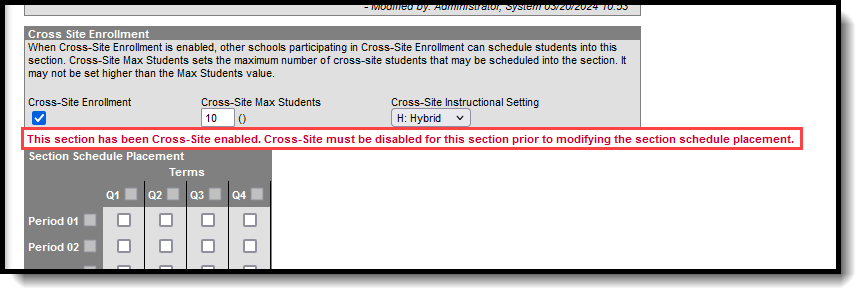 Cross-Site Enabled Message on Section Schedule Placement
Batch Edit Sections for Mapping
When several sections need to be mapped and all of those sections allow the same number of students and Cross-Site students to be enrolled and have the same Cross-Site Instructional Setting, use the Batch Edit Sections for Mapping option.
- Filter the list of mapped courses to the desired list. This can be done by Department or Course Number and Name.
- Click Batch Edit Section Setup button. A Batch Edit Section Setup side panel displays.
- Enter the Max Students value for the Section.
- Enter the Cross-Site Max Students value for the section.
- Select the appropriate Cross-Site Instructional Setting option.
- Mark the Offer Section checkbox (displayed in blue).
- Click Add to add these values to the selected courses. When values already exist for the selected courses, click Replace. Or, click Cancel to close the Batch Edit option and not make any updates to the course sections. The side panel closes.
- Click Save to update the information or Reset to return the values to their original settings.
Serving Side Panel
The Serving Panel lists schools in the district that have enabled Cross-Site Enrollment and have course sections available for scheduling.
Courses are only listed here when they are not available for scheduling at the Home School. For example, when both High School A and High School B offer a French 3 course, it is not listed; however, when High School A's French 3 course is an AP level course, that would be listed.
 Serving School View
Mapping establishes a time when the section "meets" at the Home School. When a counselor schedules this course for a student, the mapped section returns in the Search panel for a period that is open for the student to take this cross-site course.
 Mapping Sections from Home School to Serving School
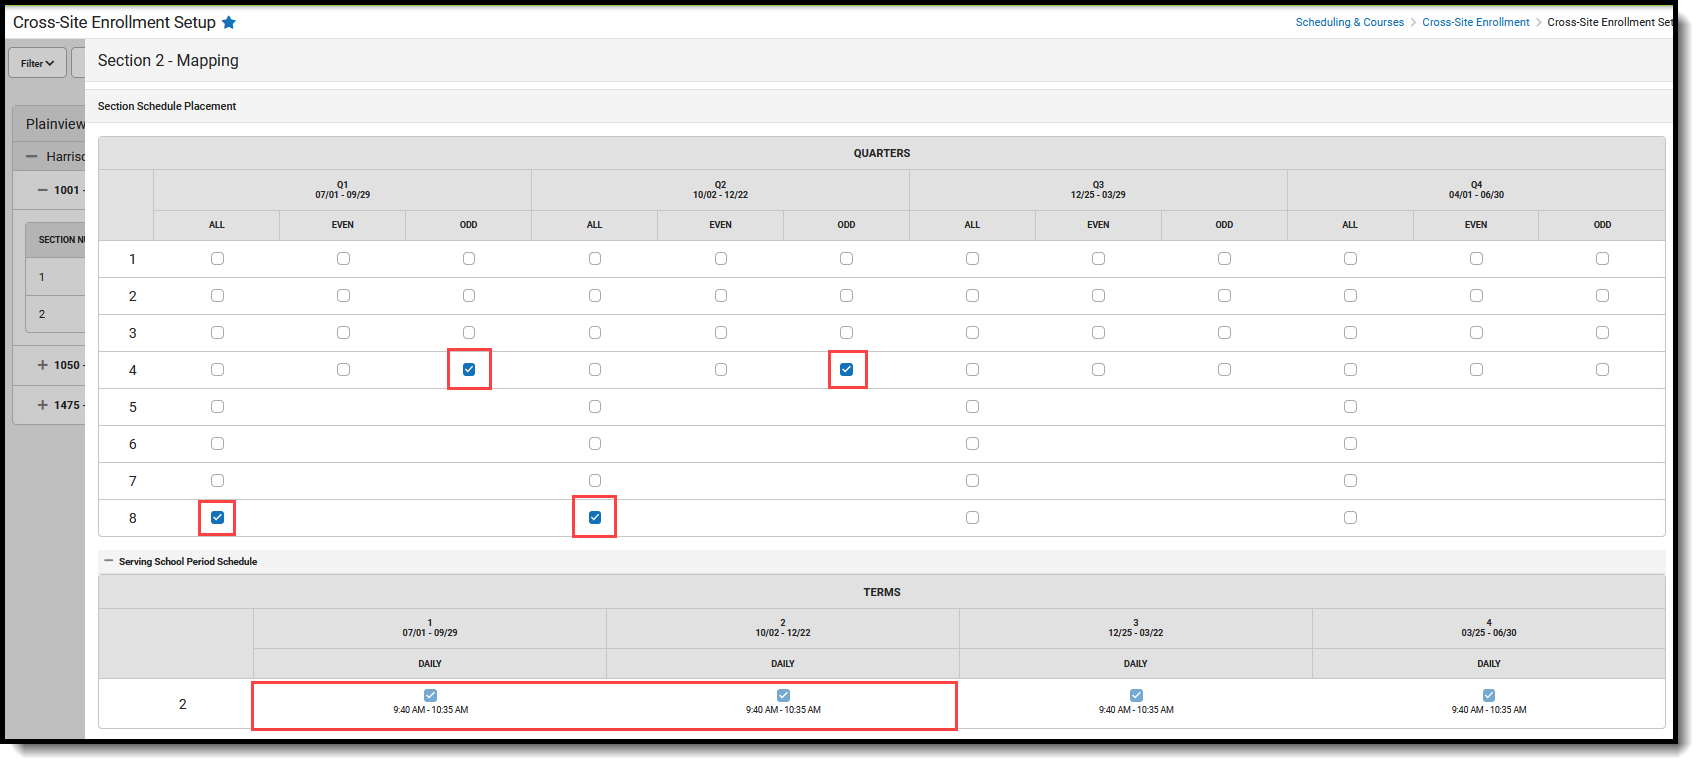
Period times at one school can be different than periods times at another school. Because of this, the times displayed are the EARLIEST Section Start Time and the LATEST Section End Time the period meets at the Serving school. The Schedule Placement Grid displays all Terms and Periods of the Home School that overlap with or are between the earliest start date and time and the latest end date and time of the Serving School section, including non-instructional periods.
Mapped Course/Section data is copied directly from the Serving School. The Course Master is read-only.
Mark the Period Schedules and Periods for each term when the Section can be scheduled for students at the Home School. Non-instructional periods can be marked. Then choose Save, Cancel or Clear Mapping (removes selected periods and period schedule checkmarks).
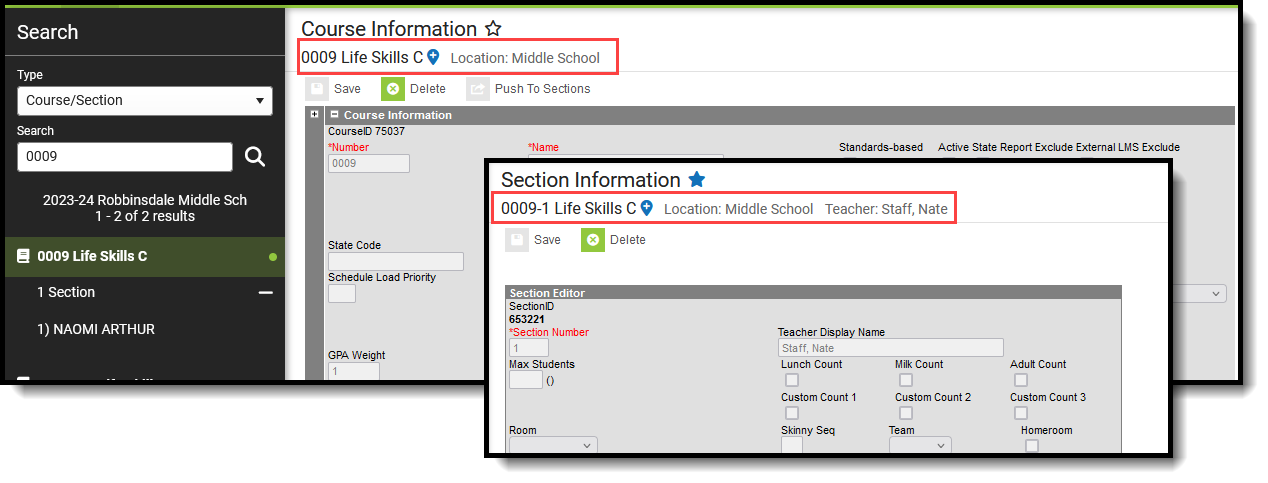
When mapping a course from the Serving School for the first time, the Cross-Site Course Numbers must be unique to avoid conflicts with existing courses and courses from other schools. A Cross-Site Course Number Mapping modal displays. Suggested course numbers are added, with an appended value of CS and a number AFTER the Serving School number. For example, the Serving School course number is 0009; the Mapped Course Number suggestion is 0009CS2. This value can be modified. The Course Name can also be modified, but the Course Name does NOT need to be unique.
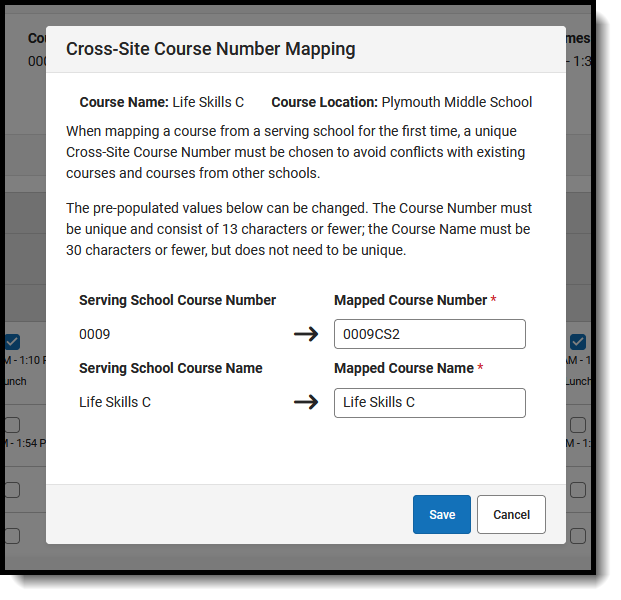 Course Number Mapping
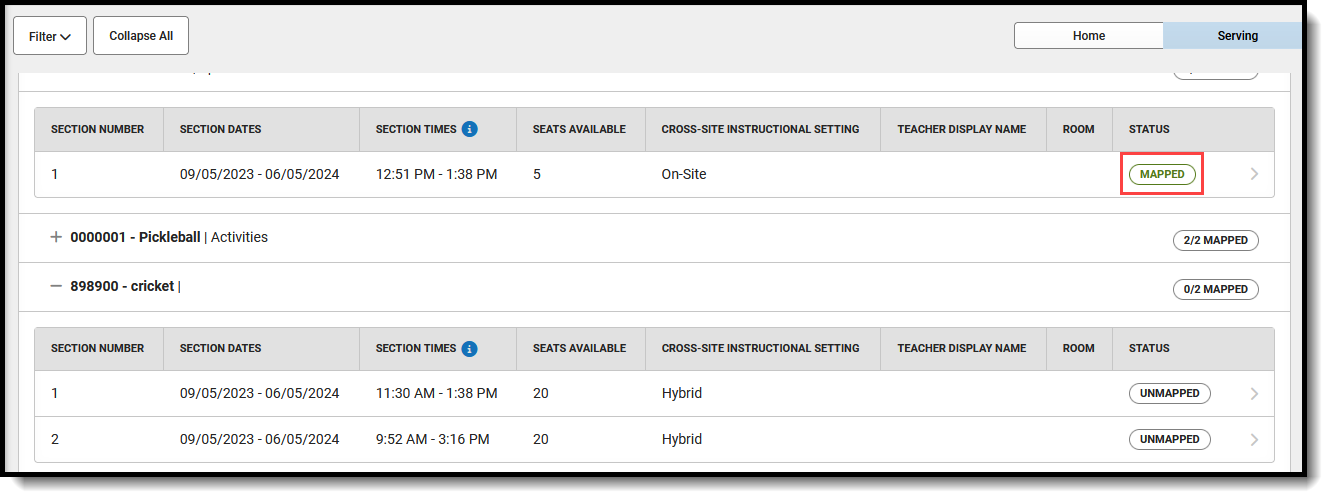
The section Status now displays as Mapped.
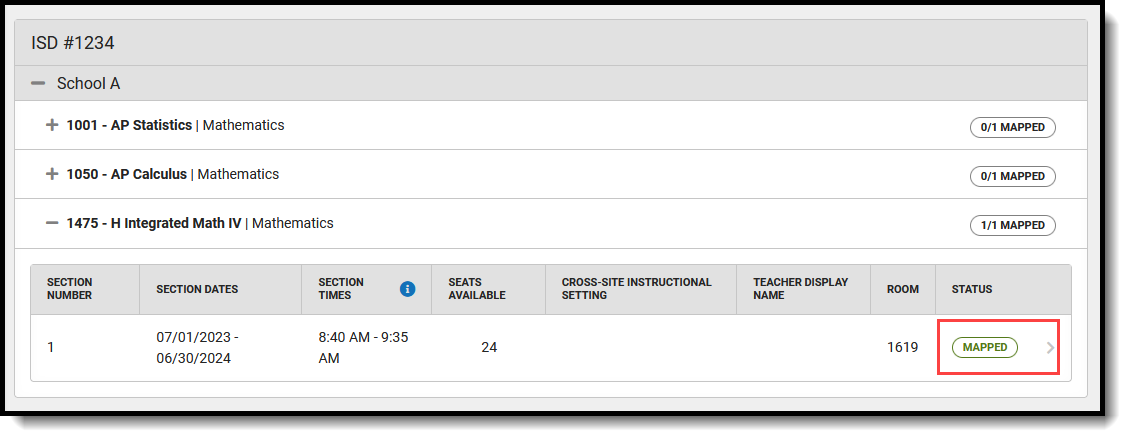 Mapped Section Status
The Course and Section are created in the Home School list of available courses.The Course fields are copied from the Serving School and can be edited at the Home School, while the Sections are read-only. The Course and Section display with the Cross-Site indicator and are mapped to the selected period schedules and periods that were selected on the Cross-Site Enrollment Setup tool. The course's location is also listed.
 Cross-Site Mapped Course in Home School
Map Sections from the Serving School to Offer at the Home School
- Expand the desired School and Courses to view the list of sections to map.
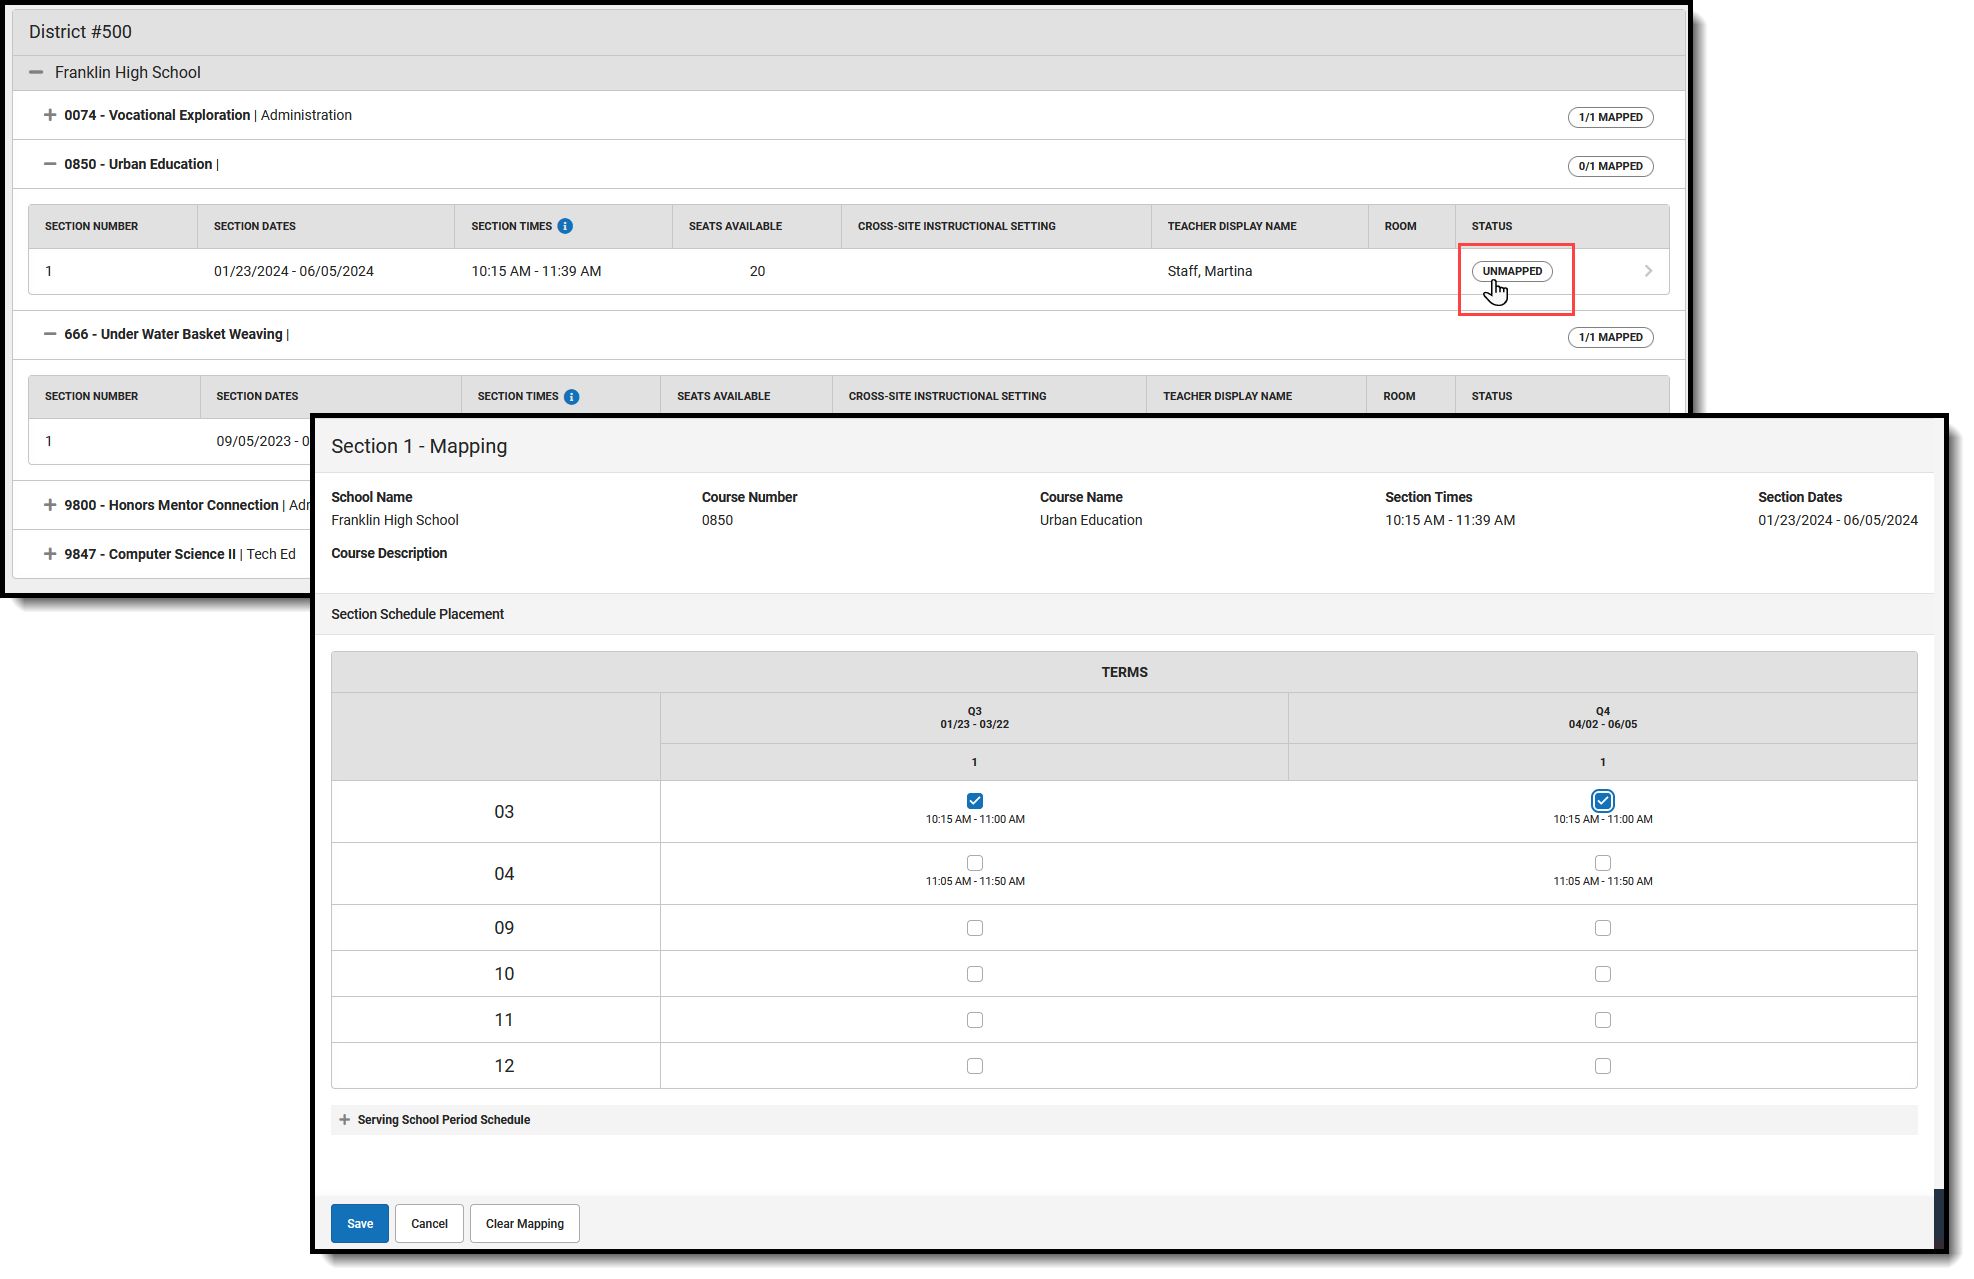
- Click anywhere in the Section(s) that display as UNMAPPED to open the Mapping panel.
- Review the Course Information that's listed to ensure the correct section is being mapped.
- In the Section Schedule Placement grid, the Home School's schedule is listed for the Terms and Periods that correspond to when the Course meets at the Serving School. Below that is the Serving School's Period Schedule with the Period Time of the section. Mark the correct Periods in the Home School school that match the Periods in the Serving School.
 Mapping a Section at the Home School to the Serving School
 - Click Cancel to not map the section. Click Clear Mapping to remove the selections that may have been saved already. The mapping panel closes and the course section now displays as MAPPED.
- Or, continue with the mapping and click Save when finished. A Cross-Site Course Mapping modal displays.
- Modify the Mapped Course Number that displays at the Home School. This value must be unique and is limited to 13 characters.
- Modify the Mapped Course Name that displays at the Home School. This value does not need to be unique.
- Click Save. The Section mapping process continues.

When finished, the section now displays as MAPPED.
 Mapped Section Display
Print Day Rotation or Period Schedule for Serving School
When looking at the courses available at the Serving Schools, counselors (or other users) at the Home School can generate the Day Rotation report or the Period Schedule report used at the Serving School. This is helpful to see when that school has days off or note that school's period schedules and period times. These reports generate in PDF format and are available for any school in the district that has mapped and shared their courses with another school in the district.
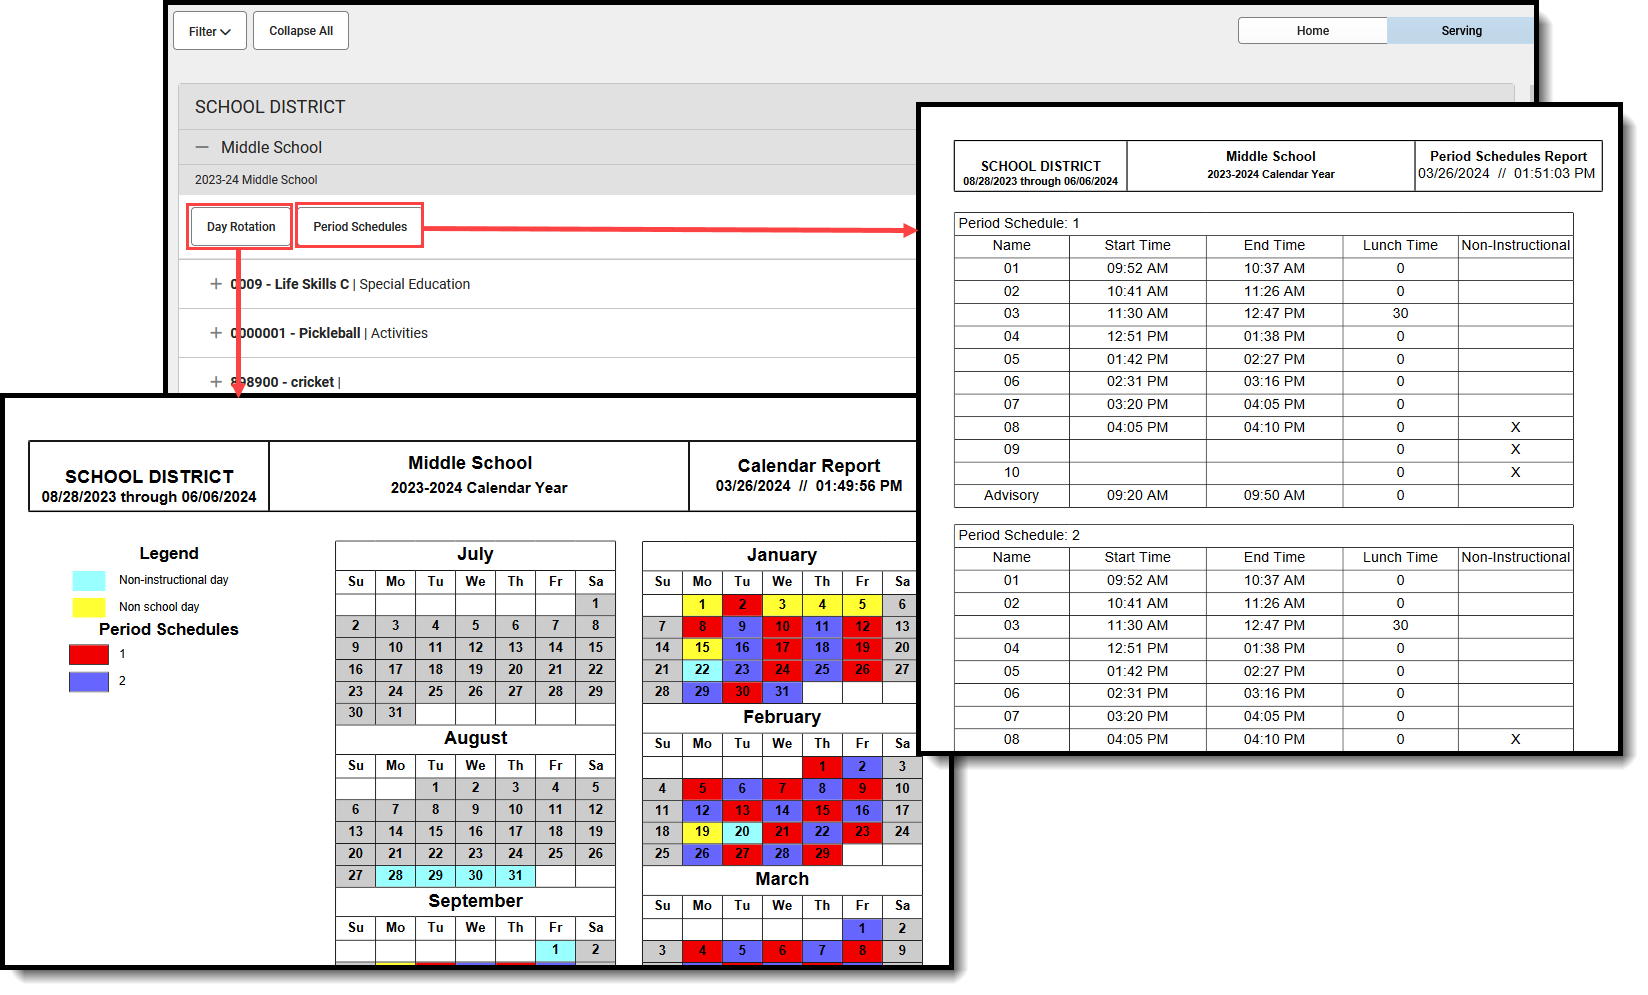 Print Day Rotation, Period Schedules Buttons for Cross-Site Schools
Course and Section Creation at Home School
After the Mapping on the section is saved, the mapped Cross-Site Course and Cross-Site Section are created at the Home School. These courses and sections are read-only for the Home School.
- A single Cross-Site Course is created for all mapped sections of that course.
- Sections are numbered incrementally in order of creation, starting with number 1.
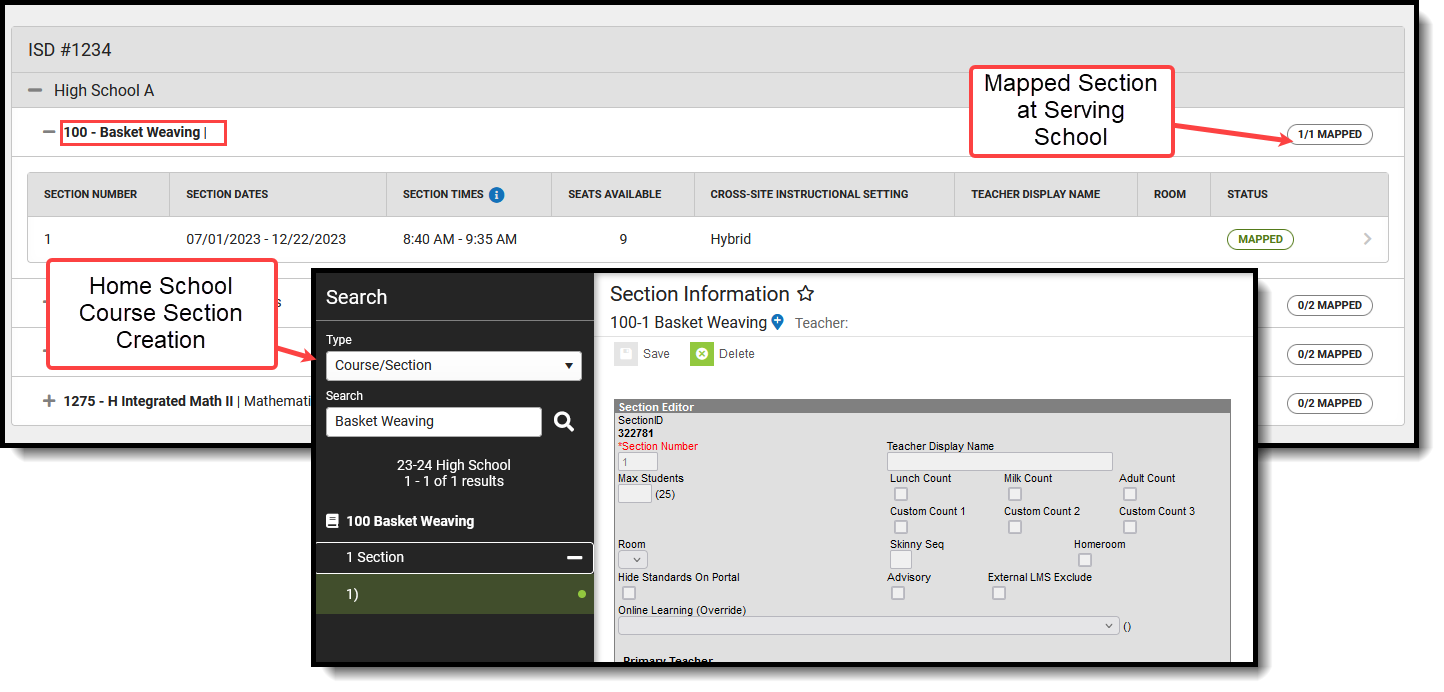 Mapped Section at Serving School Creates Cross-Site Course and Section at Home School
When the Serving School removes the mapping of a section, that section is deleted from the Home School (when no students are scheduled into it). When the mapping of all course sections are removed at the Serving School, that entire course is deleted from the Home School.
Cross-Site Courses and Sections CANNOT be created using the following tools:
- Add a Section option on Course Sections
- Scheduling Board
When viewing mapped Cross-Site Courses and Sections at the Home School, the following Course and Section tools are disabled:
|
|
Remove Invalid Sections
A Serving School can remove mapped sections that aren't needed. This can be done for low enrollment in the section, or a change to the schedule. Sections cannot be deleted when a student is scheduled into it.
For those sections without students that are deleted at the Serving School, that removal creates an orphaned or invalid section at the Home School. When this happens, the Home School can remove these section by choosing the Remove Invalid Sections button on the Serving panel.
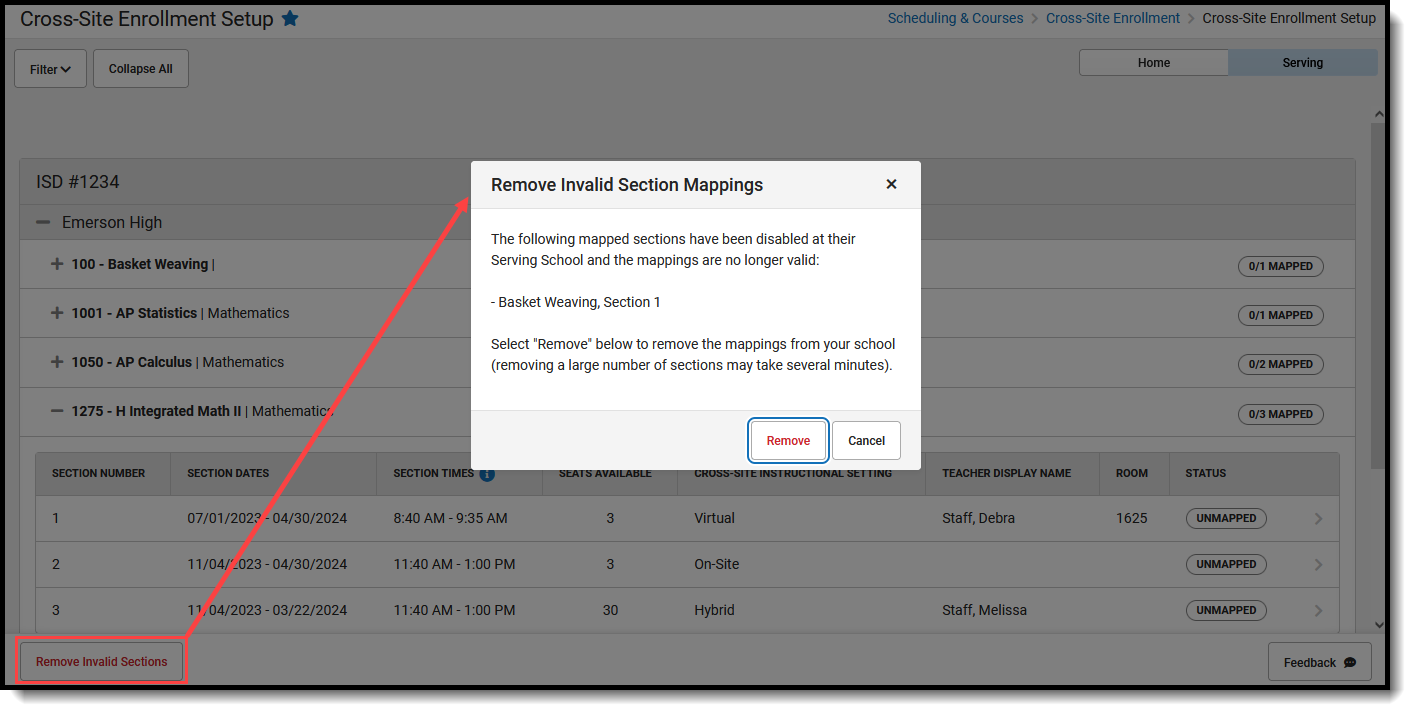 Remove Invalid Sections
A dialog displays that indicates which mappings to which Courses and Sections are no longer valid and will be removed. Click Remove to remove that section. When finished, a green message displays stating the invalid section has been removed and the Remove Invalid Sections option no longer displays.
When the mapped section at the Home School does not match the section at the Serving School (usually when the Serving School modifies the section and reoffers it) an Invalid Mapping label displays on the Serving School for that section. This label continues to display as long as there is at least one invalid section mapping within that course. The label is removed when the last invalid section has been corrected. Invalid sections are still included in the count of mapped sections until it is removed.
The Mapping Side Panel can be opened to review the section, but Section Schedule Placement options will not be selected. Saving the mapping removes the Invalid label and displays the Unmapped label. New Section Schedule Placements can be chosen and saved, causing the section mapping to be updated with the most recent details. At this point, the label changes to Mapped.
The Remove Invalid Section button can also be used to remove the section.
Disable Cross-Site Offering
After a section has been offered and other schools are able to enroll students into those sections, the home school can disable the section if necessary by removing the checkbox for Offer Section. However, the section mappings at the Serving School may become invalidated. After removing the checkbox and saving, a warning message displays, alerting the home school of the issue. Click Continue to disable the section or Cancel to not disable the section.
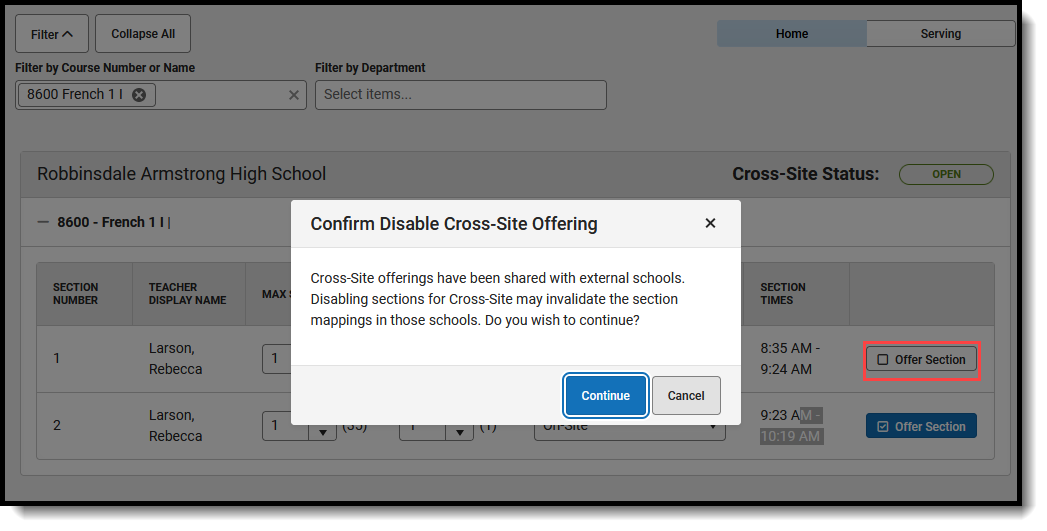 Disable Section Offering
This happens when using the Push to Course option on Course Master Information and on thePush All Course Masters tool.
Next Steps
Schedule students into Cross-Site Course Sections via the Walk-In Scheduler. This is a manual process that is done by the Counselor. The Scheduling Board IS NOT USED to schedule Cross-Site courses.
Additional Information
Deactivating Courses
When a course is modified to no longer be active but has already been shared and offered as a Cross-Site Course, all students who have been scheduled into it need to be removed from that course prior to it being deactivated.
The course and all of its sections are removed from the Home School's course list and no longer display on the Setup tool.
Scheduling Board
Cross-Site Courses offered by the Serving School only display on the Scheduling Board at the Serving School. Those courses CANNOT be moved using the Drag & Drop functionality.
- Course sections cannot be moved until Cross-Site Enrollment is disabled.
- When unbuilding course sections, the Cross-Site sections remain on the board and remain locked.
- When viewing the Student Roster in the Section Side Panel, Cross-Site students cannot be removed from the section.
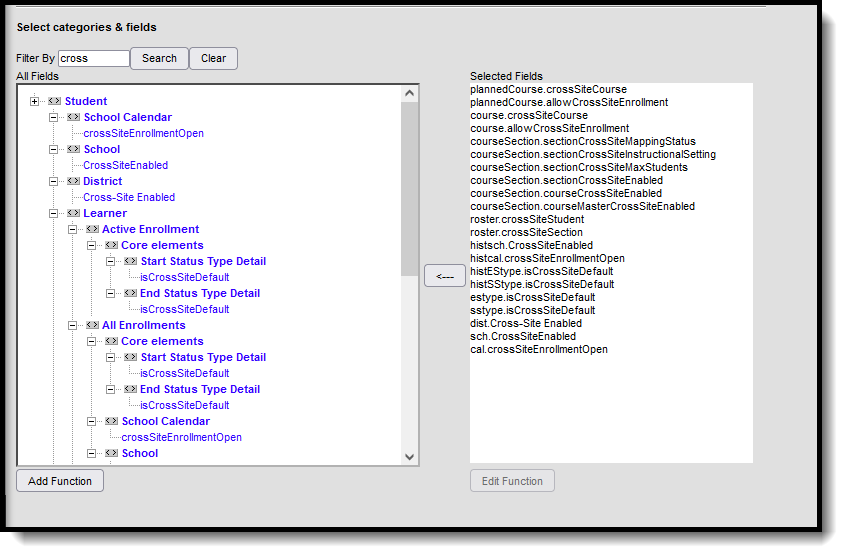
Cross-Site Fields in Ad hoc Reporting
Cross-Site fields are available in the Filter Designer for both the Student Data type and the Course/Section Data Type. Enter the word "cross" in the Filter By field to return only cross-site related fields.
|
|
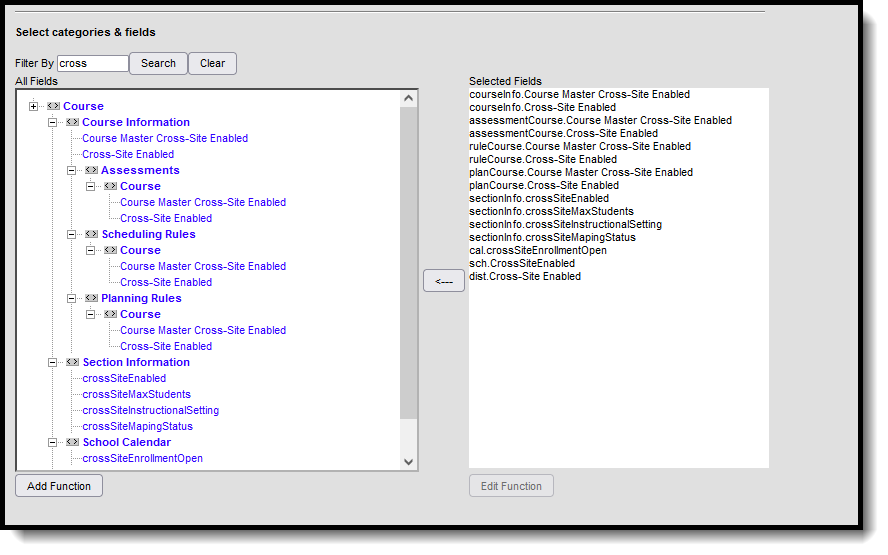 Cross-Site Enrollment Ad hoc Fields for Course/Section Data Type Filters
|