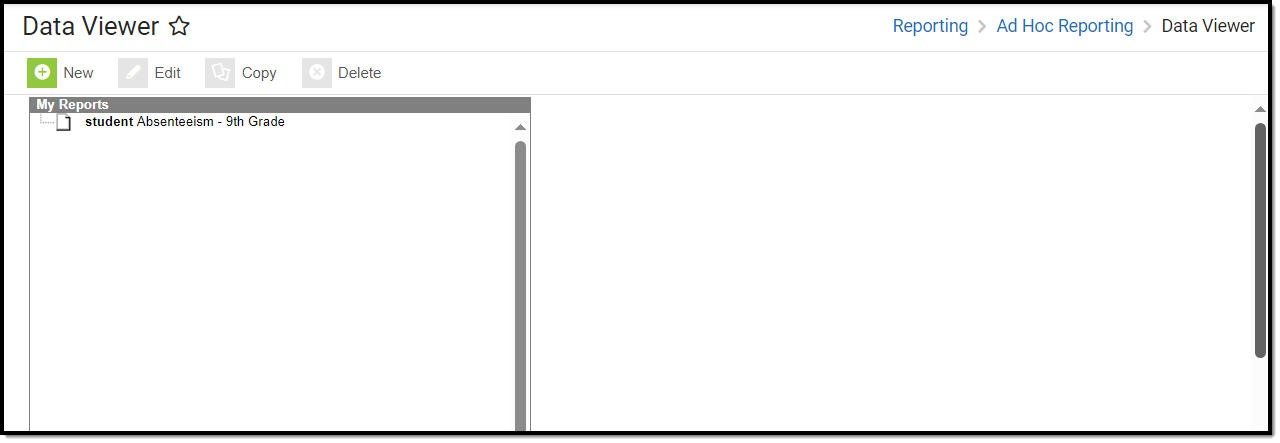
Tool Search: Data Viewer
The Data Viewer is a user-friendly report-building tool that allows users to drag and drop fields into a real-time view of the report as it is being built.
 Data Viewer Tool
Refer to the Data Viewer Tool Rights article for details on the necessary rights to use this tool.
For more information about Tool Rights and their functionality, refer to the Tool Rights article.
Create a New Report
Calendar Selection
Select a saved Student Report or a saved Course/Section Report. Select calendars by the active year, by the school name or by year. If a calendar is selected in the Campus Toolbar, that calendar is already selected.
Calendars cannot be selected if the query is for Census/Staff Data Types.
Only calendars to which the user is assigned calendar rights are available for selection.
New Item
The Data Viewer allows users to drag and drop fields into a real-time view of the report as it is being built. Each report must have a unique name in order to save correctly. To create a new report, select the New button. The Data Viewer - New Item editor appears.
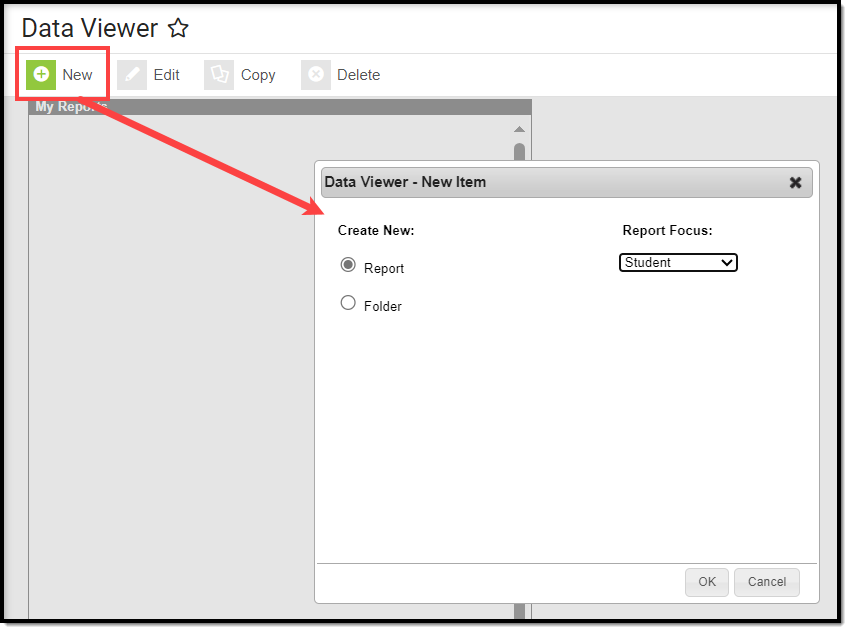 New Item Editor
Select Items to Include on the Report
Select the Report radio button and choose the Report Focus. The report focus determines which fields are made available when building the report and helps you understand which data is being reported for fields that may be shared between staff and students. Users can select a Report Focus of Student, Census/Staff, or Course/Section.
Once Report and Report Focus have been selected, hit the OK button.
 Add Fields to the Report
Select fields from the Field Selection area on the left and drag and drop them into the Report Preview window. You can double-click a field to append it to the right-most column of the Report Preview. The Report Preview will refresh each time a field is added, providing a real-time view of how the report will appear, as well as the first ten records of reported data.
Configure Filtering of Data Elements
Report data can be filtered using the Filtering editor. This editor allows you to apply operators to fields added to the Report Preview.
Fields can be added to the Filtering editor by selecting the Add New Filter button or by dragging and dropping the field from the Field Selection section to the Filtering editor.
See the Operator Options and Rules section for more information about each available operator.
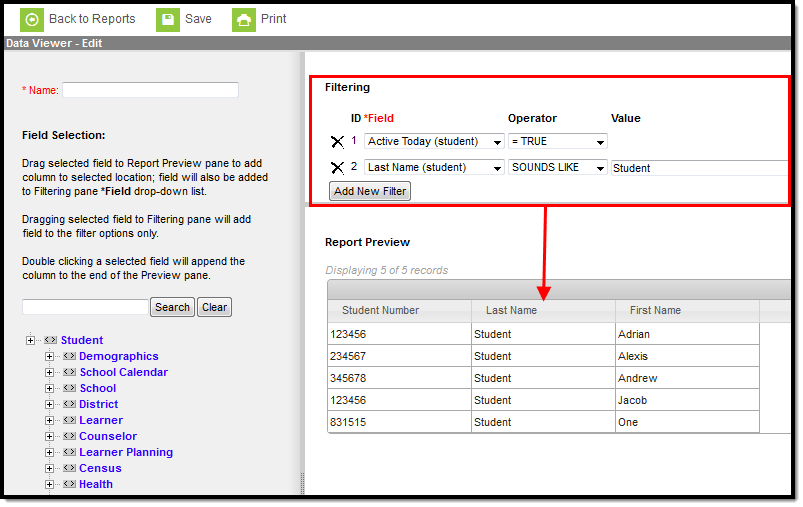 Filtering Report Data
In the example above, data is filtered to report only students who are currently active (Active Today = TRUE) and have a last name that sounds like 'Aarons' (Last Name SOUNDS LIKE Aarons). The Report Preview window will display.
Change a column's name by double-clicking the column name box. Rearrange the column order by clicking on a column name and dragging the column left or right.
To access column options such as sort order, grouping, and deleting the column, select the small triangle to the right of the column name.
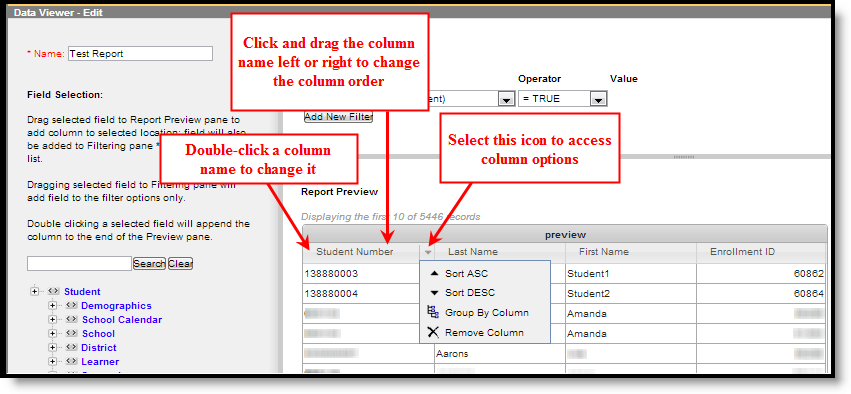 Sorting and Modifying Column Names/Order
Operator Options and Rules
The following table describes each available operator:
|
Operator |
Results |
Example |
|---|---|---|
|
= (Equals) |
Returns exact match of value. |
student.grade = 3
|
|
< > (Does not equal) |
Returns results not equal to the value. |
student.gender < > M
|
|
> (Greater than) |
Returns results that are greater than the entered numeric value. |
student.age > 16
|
|
> = (Greater than or equal to) |
Returns results that are greater than or equal to the entered numeric value. |
student.age >= 16
|
|
< (Less than) |
Returns results that are less than the entered value. |
student.age < 16
|
|
< = (Less than or equal to) |
Returns results that are less than or equal to the entered numeric value. |
student.age <= 16
|
|
IN |
Includes value. |
student.grade IN 9,10
When using this format, do not put spaces after the comma |
|
NOT IN |
Excludes value. |
student.grade NOT IN 11,12
When using this format, do not put spaces after the comma |
|
BETWEEN |
Filters data between two specified values. Works with numbers, dates and strings.
|
For BETWEEN: student.stateID BETWEEN 00001 THROUGH 100000.
|
|
IS CURRENT USER |
Returns the current user's ID. |
For learningPlan.planManagerPersonID IS CURRENT USER
|
|
LIKE |
Searches for test string in field. |
course LIKE hist
|
|
NOT LIKE |
Searches for test string and filters data that is not like the user-defined value. |
course NOT LIKE hist
|
|
SOUNDS LIKE |
Uses a database function to return names with similar sound patterns. |
student.lastName SOUNDS LIKE Ball
|
|
CONTAINS |
Searches for strings that include the same data entered by the user in the field. Any string that does not contain the user-defined value is filtered out. Any wildcard characters entered are treated as standard SQL wildcards. |
student.birthCountry CONTAINS Cana
|
|
STARTS WITH |
Searches for strings that begin with the same data entered by the user in the field. Any string that does not contain the user-defined value is filtered out. Any wildcard characters entered are treated as standard SQL wildcards. |
student.birthCountry STARTS WITH Mexi
|
|
ENDS WITH |
Searches for strings that end with the same data entered by the user in the field. Any string that does not contain the user-defined value is filtered out. Any wildcard characters entered are treated as standard SQL wildcards. |
student.birthCountry ENDS WITH many
|
|
IS NULL |
Returns fields that are completely NULL (0 is considered a value). |
student.stateID IS NULL
|
|
IS NOT NULL |
Returns all fields that are not NULL (0 is considered a value). |
student.ssn IS NOT NULL
|
|
IS TODAY |
Returns result dates as the current date. |
start.date IS TODAY
|
|
IS YESTERDAY |
Returns result dates as of yesterday's date. |
start.date IS YESTERDAY
|
|
IS TOMORROW |
Returns result dates as of tomorrow's date. |
end.date IS TOMORROW
|
|
IN THE MONTH |
Returns all database field data for the month entered.
|
employment.districtStartDate IN THE MONTH October
|
|
=TRUE |
Returns checkbox values of "true" (checkbox is marked) |
enrollment.stateExclude = TRUE
|
|
=FALSE |
Returns checkbox values of "false" (checkbox is not marked) |
enrollment.stateExclude = FALSE
|
Wildcard Search
In addition to the options above, wildcard searching is also available. The following is a list of options:
|
Wildcard or Pattern |
SQL Meaning |
Standard Examples |
|---|---|---|
|
% |
0 or more characters |
Entering the word Man returns the same results when entering Man%.
|
|
_ (underscore) |
One character |
Olson_Zierke and Olson Sierke returns the same results.
|
|
[token] |
A range of possible characters |
L[ae] finds names that start with La or Le. |
|
,James |
No SQL wildcard |
Searches for first name equal to or beginning with James. |
|
Gonzales-Uribe |
Compound name |
Finds that last name.
|
|
Gonzales Uribe or
|
A compound name with a space. |
Will find the name with or without a space or hyphen.
|
Users can also use the following combinations when using the Like operator:
|
Wildcard or Pattern |
SQL Meaning |
Standard Examples |
|---|---|---|
|
% |
0 or more characters |
L% finds names that start with L
|
|
_ (underscore) |
One character |
L__ (two underscores) finds Lee and Lor, not Luewenhook. |
|
[token] |
A range of possible characters |
L[ae]% finds names that start with La or Le. |
|
^ |
Negation of token |
L[Query Wizard^ae] finds names that do not start with La or Le. |
Rules for Operators by Data Type
The following table describes all rules for allowing or disallowing operators by data type where:
Y = Allowed N = Not Allowed D = Depends on Field
|
|
Number |
Float |
String |
Date |
Text |
Bit |
|---|---|---|---|---|---|---|
|
> |
Y |
Y |
Y |
Y |
Y |
N |
|
>= |
Y |
Y |
Y |
Y |
Y |
N |
|
< |
Y |
Y |
Y |
Y |
Y |
N |
|
<= |
Y |
Y |
Y |
Y |
Y |
N |
|
< > |
Y |
Y |
Y |
Y |
Y |
N |
|
= |
Y |
Y |
Y |
Y |
Y |
N |
|
IS NULL |
D |
D |
D |
D |
D |
N |
|
IS NOT NULL |
D |
D |
D |
D |
D |
N |
|
BETWEEN |
Y |
Y |
Y |
Y |
Y |
N |
|
IS TODAY |
N |
N |
N |
Y |
N |
N |
|
IS YESTERDAY |
N |
N |
N |
Y |
N |
N |
|
IS TOMORROW |
N |
N |
N |
Y |
N |
N |
|
IN |
Y |
Y |
Y |
Y |
Y |
N |
|
NOT IN |
Y |
Y |
Y |
Y |
Y |
N |
|
LIKE |
N |
N |
Y |
N |
N |
N |
|
STARTS WITH |
N |
N |
Y |
N |
N |
N |
|
ENDS WITH |
N |
N |
Y |
N |
N |
N |
|
CONTAINS |
N |
N |
Y |
N |
N |
N |
|
SOUNDS LIKE |
N |
N |
Y |
N |
N |
N |
|
=TRUE |
N |
N |
N |
N |
N |
Y |
|
=FALSE |
N |
N |
N |
N |
N |
Y |
Manage and Store Data Viewer Reports
Copy Reports
To copy an existing report, select the report from the My Reports window and click the Copy button. The copied report will appear within the My Reports window, prefixed by the words "Copy of". In the example below, the student gradesreport was copied to have a student Copy of grades report.

Edit an Existing Report
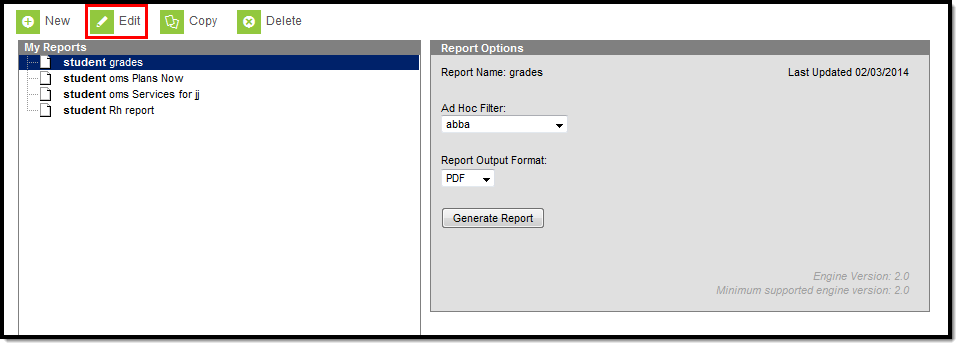
To edit an existing report, select the report from the My Reports window and click the Edit button.
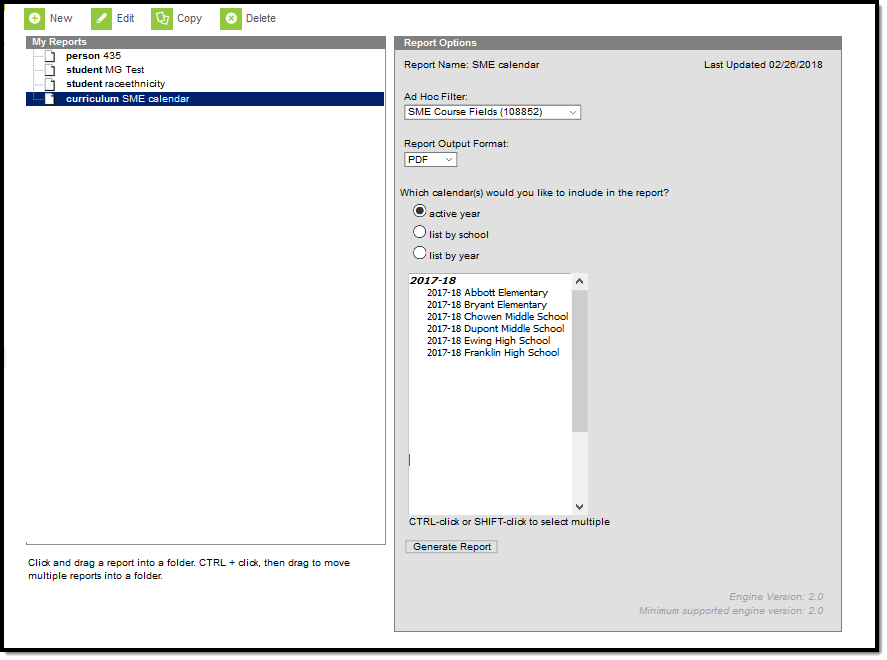
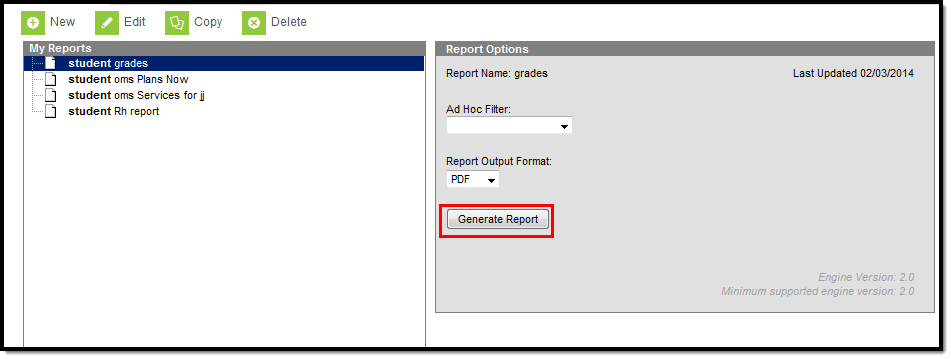
Apply an Ad hoc Filter to an Existing Report
An Ad hoc filter can be applied to an existing report to further filter report data. To apply a filter, select the report from the My Reports window and select the filter from the Ad Hoc Filter dropdown list.
- Select a report from the My Reports window.
- Select a filter from the Ad Hoc Filter dropdown list. Filters are created using the Filter Designer tool.
- Select the Report Output Format. Options include PDF (default), HTML or CSV.
- Click the Generate Report button. The report will appear in the designated format, with data filtered based on the selected filter.
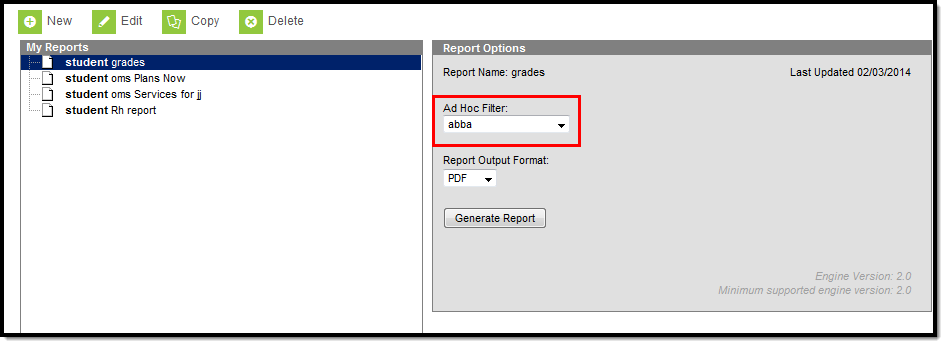 Ad Hoc Filter with an Existing Report
Delete a Report
To delete a report, select the report from the My Reports window and select the Delete button.
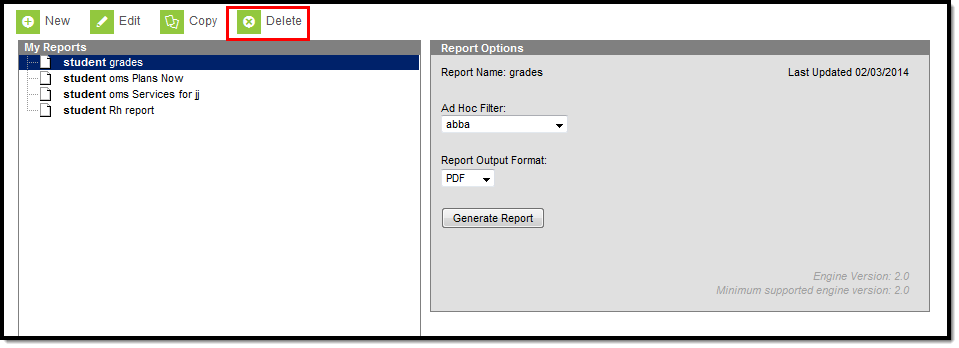 Delete a Report
Create a Folder
Reports can be organized into folders, allowing for easier access to related reports and providing important report context.
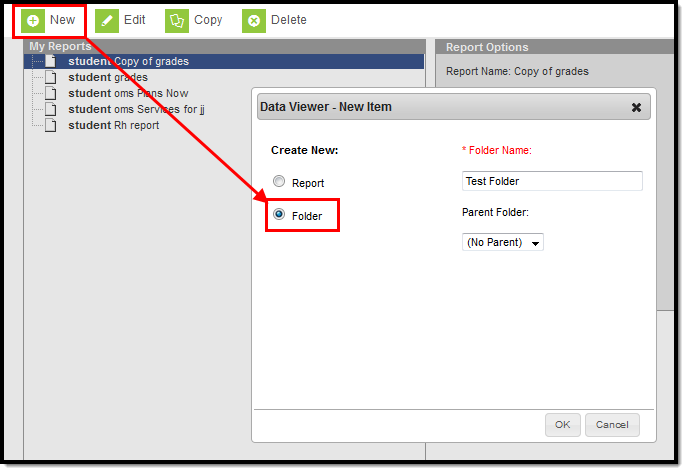 Creating a New Folder
Create a Report Folder
- Select the New icon. The Data Viewer - New Item editor will appear.
- Click the Folder radio button.
- Enter the Folder Name.
- Select the Parent Folder (if necessary). This option allows you to decide if the folder should be separate from all other folders (No Parent) or live within an existing folder.
- Select the OK button. The folder will be added to the My Reports window or within the selected Parent Folder.
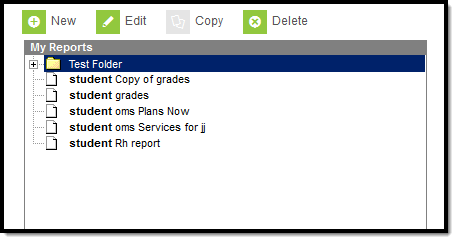 New Created Folder
Edit Existing Folders
To edit a folder, select the folder from the My Reports window and select the Edit button. Select a new Parent Folder and/or enter a new Folder Name and select the Save icon.
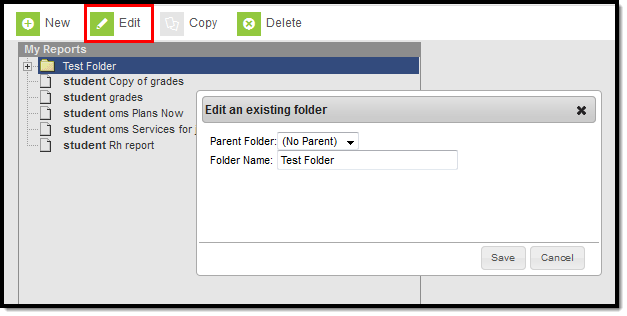 Editing an Existing Folder
Add/Remove Reports into Folders
Reports can be moved in and out of folders by clicking and dragging the report into the folder or dragging it out of the folder. The folder receiving the moving report will be highlighted in yellow.
To remove a report from living within a folder, click and drag the report name to the bottom of the My Reports window. The area displaying reports not within folders will be highlighted in yellow.
Generate New Data Viewer Reports
Once the Name has been entered, all fields have been added to the Report Preview and any Filtering options have been defined, save the report by selecting the Save icon. To generate the report, click the Print button. The report will appear in PDF format.
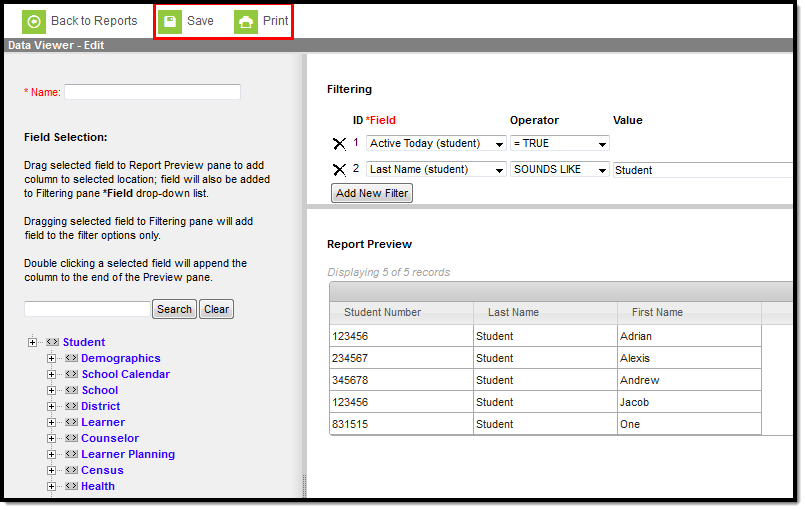 Saving and/or Printing the Report
Generate Saved Data Viewer Reports
- Select the report from the My Reports window
- Indicate the Report Output Format
- Select the Generate Report button.
