Course Plan (Academic Planning)

Tool Search: Course Plan

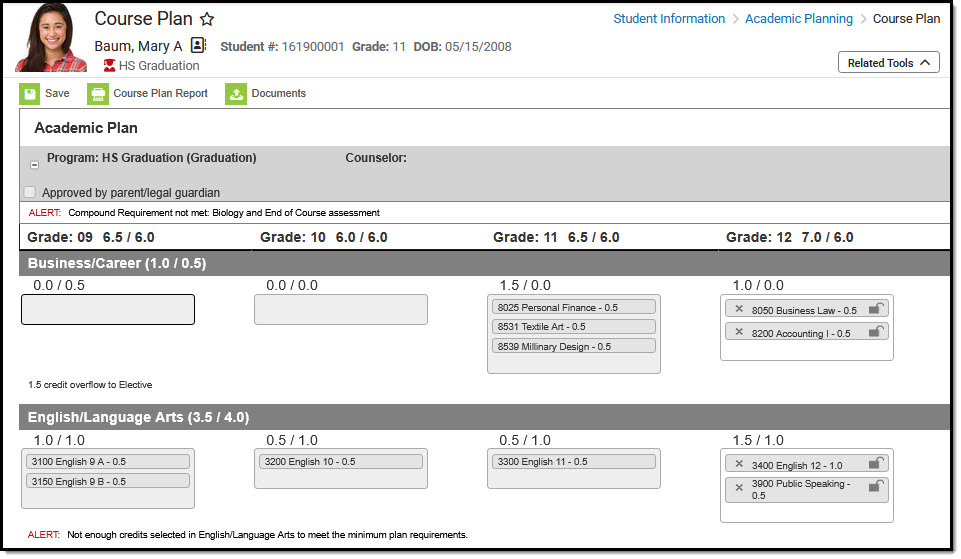
The Course Plan tool displays the student's assigned Graduation Program and Academic Programs (if any are assigned), and the courses the student has planned to take in each school year (represented by grade level). Courses are added by the student through the Academic Plan tool or by the Counselor on this tool.

Screenshot of the Academic Planning Course Plan tool. Course Plan

While only one Graduation Program can be assigned to a student, multiple Academic Programs can be assigned to a student, and are visible in the Course Plan header.

It's possible a student could be assigned to ten academic programs. The Course Plan header is collapsible to hide the header that lists the programs, and reduces the Alerts area at the top of the Course Plan. This gives more working space to the Course Plan tab.

Middle school grade levels only display if the student has earned high school credit in middle school courses.

Add Courses to a Plan

If the assigned program does not have any credit requirements, courses cannot be added to the plan (a message displays if this is the case). The counselor needs to update the Credit Requirements for the selected plan.

Course Planner is locked and cannot be edited for the student’s current grade level when at least one course is scheduled for the student.

The course list displayed shows calendars for future primary enrollments not flagged as No Show. 

The student must have an active academic program in order to use the Course Plan.

  1. Click in the text box below the number of credits for a certain grade level. Courses meeting that credit type display for selection.
  2. Choose the desired course(s). When they are added, they display and the number of credits is updated. The credits assigned to a course appear after the course name.
  3. Add enough credits for future years as needed. When the student has met the number of requirements, the alert that displays for each credit type stating not enough credits are selected disappears.
  4. Repeat these steps for each credit type. At the end of the process, the student should have a clear idea of what courses he will be taking in each grade level.
  5. Click the Save icon when finished.

Screenshot showing the course dropdown list that displays when one of the course fields is selected.Adding Courses to the Course Plan

Add Alternate Courses to a Plan

In order to plan alternate courses, the Graduation Program must be marked to allow the planning of alternate courses. See the Create Graduation Programs article for more information on setting up graduation programs.

Planning rules assigned at the course level are followed when planning alternates.

Step 1. Mark Programs to allow planning of alternate courses

Mark the Allow Planning of Alternates checkbox, and enter a value (greater than zero) for the Minimum number of alternate credits next year the student can plan. This turns on the Alternate panel at the bottom of the Course Plan. If the checkbox is not marked, the Alternates panel is not visible.

Two-part screenshot highlighting the Allow Planning of Alternates field in the Graduation Programs tool and the Alternates section that displays in the Course Plan. Alternate Setup on Graduation Programs

Step 2: Enter Alternate Courses

Adding alternate courses is done the same way as entering other courses. Students and counselors can enter alternative courses to take in the event the student cannot be scheduled into desired courses.

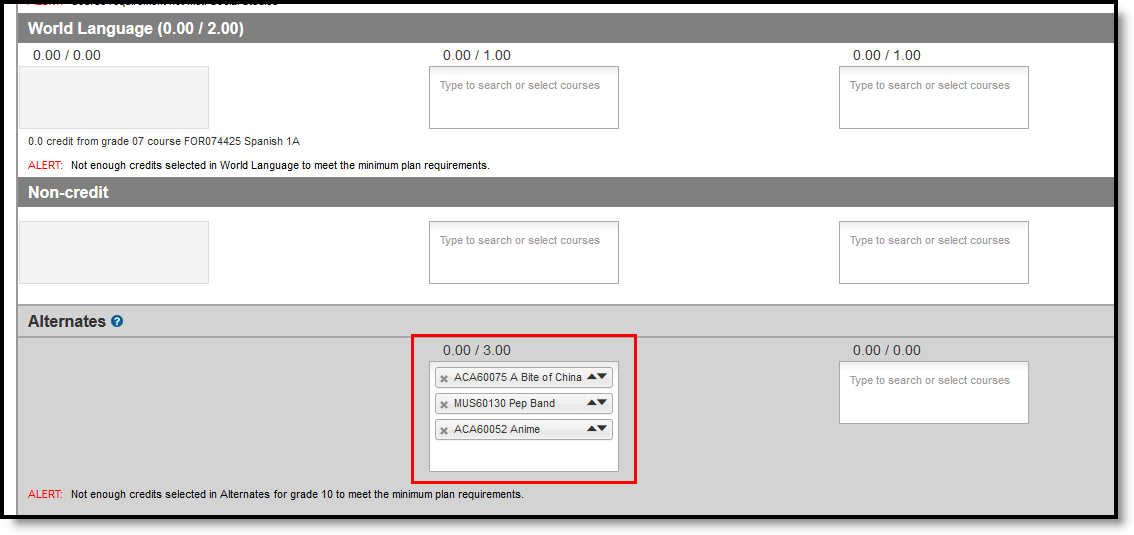
Use the arrows to move the courses into the desired order. In the example below, if an alternate course is going to be placed, the administrator attempts to place the course first in the list (ACA60075 A Bite of China) before placing the second course in the list (MUS60130 Pep Band).

The Scheduling Board never schedules students into Alternate courses. Alternate course requests (courses displayed with A in the Walk-In Scheduler) still require an administrator (counselor, etc.) to hand schedule those courses. However, these alternate courses do appear in the Walk-In Scheduler in the order they are saved on the Course Plan, so the counselor knows which order they were entered.

Screenshot highlighting the order of Alternate courses selected. Alternate Course Order

Note the following:

  • Alternate courses can only be planned for future years. A current year freshman student can only plan alternates for the sophomore, junior and senior years.

  • If a course is already planned as a desired course, it cannot be planned as an alternate in the same year it is planned. But it can be added as an alternate in a different year. A student could plan to take a World Affairs course in the junior year, but could add it as an alternate in the sophomore year.

  • Courses planned as alternates do not satisfy planning rules. If an alternate course is planned and it violates a planning rule, the course is included in the list of alerts.

  • Counselors cannot lock or unlock alternate courses.

  • Courses that are part of a compound requirement display in bold in the selection area when a Grade Level is specified or is marked as Recommended in Course Requirements.

Plan Courses for the Current Year

For students new to the school after the start of the school year, current year course planning can be done. Courses can be planned for the current year if the student meets the following requirements:

  • The student must have no scheduled course sections in the current year (no roster records).
  • The student must have no transcript records in the current year.

Course plan alerts are applicable for the current year, as are grade level planning alerts.

If a student has courses planned for the current year and meets the requirements (no course sections, no transcript records), and a course is added to the transcript, courses can no longer be planned. And any planned courses no longer display on the Course Plan tab.

In the example below, the 11th grade student has an empty schedule (no roster records) and does not have any transcript entries for the current year. Current Year Planning is available (courses can be chosen in Grade 11).

Three-part screenshot showing how a student with an empty schedule and no transcript entries can have courses added to the plan for the current year. Current Year Planning Available - No Scheduled Courses, No Transcript Record for Current Year

In this example, the 11th grade student has a schedule for the current year, but does not have any transcript entries for current year. While the student meets the requirements for the transcript, the student's schedule prohibits the planning of current year course for the 11th grade. 

Three-part screenshot showing how a student with a  schedule and no transcript entries cannot have courses added to the plan for the current year. Current Year Planning Not Available - Scheduled Courses, No Transcript Record for Current Year

And in this example, the 11th grade student has a schedule for the current year, and has transcript records for the current year, which means Current Year Planning is not available (courses for 11th grade not available for selection).

Three-part screenshot showing how a student with a schedule and transcript entries cannot have courses added to the plan for the current year. Current Year Planning Not Available - Scheduled Courses, Transcript Records for Current Year

View and Plan Previously Planned Courses

For students who transfer to another school within the district and have already added courses to their Course Plan for future years, and course numbers do not exist in the new school, but were on the Course Plan, administrators and students can view the previously planned courses to help better modify their course plan in the new school. This applies to any inactive courses as well.  

If the course numbers match, but the course names do not match, the student still retains that planned record; however, note that this may not be the correct course that needs to be planned.  

An Invalid course is defined as a course that existed in a student's plan at the previous school but does not exist in the student's new school. Courses match at the Course Number level. If a course with a number of 1234 in the previous school is Math and in the new school is English, the course is technically not considered invalid because there is a match.

As soon as the Course Plan tab is accessed, an Invalid Courses Found pop-up message displays, indicating which courses need to be corrected (either by ignoring this message as they are deleted when the course plan is saved, or by copying the course to the clipboard and later modifying the course plan).

Screenshot showing the Invalid courses popup that displays. Course Plan Invalid Course Display

To correct these invalid courses, click the Copy to Clipboard option, and open a tool to track the courses (like a Word document or Notepad). In that chosen tool, paste the copied information and note which student needs to correct the course numbers. This only copies the course number and course name; there is no identifying information. Then, click the Continue button to clear the pop-up and modify the Course Plan.

The invalid course number displays in red text with other Invalid Courses. Click the Exclamation Point to view the pop-up warning again to see the invalid courses.

Screenshot showing how Invalid courses display in the Course Plan.Invalid Courses on Course Plan

Make the necessary changes to the Course Plan and save when finished. If the invalid course is not removed, it will be removed when saved.

Lock Courses on a Plan

Counselors have the ability to lock courses on the plan, if they desire. Any course that is required for graduation should be locked. When students create their course plan on the Portal, the counselor can review the plan, make any necessary changes, and lock the necessary courses.

Any courses that are unlocked can be changed by either the counselor or the student.

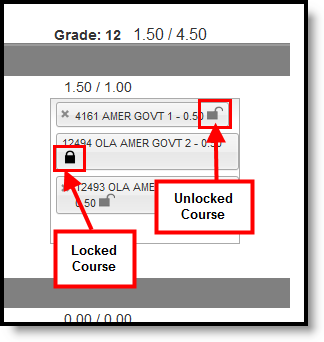
  • To lock a course, click the opened padlock icon by the course. This changes the image to a locked padlock and indicates the course cannot be removed from the plan.
  • To unlock a course, click the locked padlock icon by the course. This changes the image to an unlocked padlock and indicates the course can be removed from the plan.

Screenshot comparing the locked and unlocked icons. Locking Courses

Parent/Guardian Approval

When students build their course plan in the Portal, parents/guardians should be reviewing it. This ensures the student is taking the correct courses in the correct time frame with the adequate amount of credits in a certain term, with a desired amount of rigor and challenge.

Screenshot highlighting the Approved by Parent/legal guardian checkbox.Parent/Guardian Approval

Counselors can see that the parent/guardian has approved the plan from the Course Plan tab. If the student or counselor makes changes to the plan after the parent/guardian has marked the checkbox, that checkbox does not reset. This is a read-only field for the counselor and can only be removed when using the Course Plan Admin tool.

Note the following:

  • An independent student (emancipated minor) cannot sign for themselves.
  • A parent can mark the approved checkbox without the plan being completed.
  • A parent can mark the approved checkbox but cannot save if the plan has errors.

Course Plan Report

The Course Plan Report provides a view of the Course Plan tab, including any alternate courses that have been added. It does not display any alerts, warnings or errors. Click the Course Plan Report icon, then select the desired Report Format (DOCX or PDF), and click the Generate Report button.

When a course is assigned the parent of/child of course planning rule, the Course Plan report lists all of the courses associated with that rule (parent and child courses). It also lists the correct credit value, total credit value per credit type and per grade level for all of the courses.

The report includes in-progress courses and planned non-credit courses, and current year planned courses. Be aware that any grading task credits not associated with the student's program are not displayed. This means courses that provide multiple types of credit do not show on the report.

A warning displays when generating this report before changes have been saved to the Course Plan.

This report can also be generated for multiple students using the Course Plan Batch Report.

Screenshot highlighting the Course Plan Report button and showing an example of the report. Course Plan Report

Course Plan Management

The following section provides details and information on the overall management of student course plans.

Course Plan Warnings, Alerts and Errors

Click here to expand...

Each time a change is made on the Course Plan, all rules and requirements are reevaluated and updated alerts and messages display. The Course plan does not need to be saved to show these alerts. When the alerts have been satisfied, the alert text is removed automatically.

Warnings

  • Warnings display in black font when there is a failure to meet a Credit Requirement or a Course Requirement.
  • Course Plans can still be saved when warnings exist. 

Alerts and Errors

  • A counselor can still save a plan when there is an error. Errors occur when there is a course plan rule violation.

Students who have an Academic Plan that contains an error are not able to save changes made to their course plan from the Portal.

  • Alerts display when:
    • A grade does not have enough credits planned. This displays next to the Grade Level itself, not with the other alerts.
    • A credit type does not have enough credits planned.

Screenshot highlighting the alert that displays when there aren't enough credits for a grade.Grade Level Alerts

Course requirements for academic programs are considered not met when the student does not meet the Minimum Credits and the Minimum GPA Value.

  • If a student has enough Earned Credits on their transcript, and exceeds the Minimum GPA, to satisfy the Career Tech Program Course Requirement, the Alert does not display.
  • If a student has enough Planned Credits to satisfy the Academic Program Course Requirement, the Alert does not display.
  • If a student has a combination of Earned, Planned and/or In-Progress credits to satisfy the Academic Program Course Requirement, the Alert does not display (assuming the Minimum GPA has been met on Earned courses).
  • Any planned courses assume the student meets the Minimum GPA per Course to satisfy the Academic Program Course Requirement.

Certain Portal Display Options apply here that can be turned on or off to show these rules.

  • When the Enforce All Rules option is marked as part of the Academic Planner option, students can only save their academic plan if it meets ALL requirements and planning rules that have been established.
  • When the Enforce All Rules options is NOT marked, students can save their plan without meeting all requirements, but all planning rules must still be met. Warning messages from failed requirements and failed planning rules display so users can see the issues but still save the entry.

Screenshot comparing an alert and a warning. Course Plan Warnings and Alerts

Credit Type Assignment and Display of Alerts

There may be several alerts for a course plan, and they display in multiple locations - (1) at the beginning of the course plan above the Grade/Credit header, and (2) within a Credit type. The number of alerts at the beginning of the course plan can be reduced by adding a Credit Type to the Course Requirements when setting up Graduation and CTE programs.

Assigning Credit Types to Course Requirements gives you more working space on the Course Plan, and provides more information for students when they are planning courses as to what they still need to plan.

In the example below, notice how the Geography requirement is not assigned a Display Alert and the World History requirement is. If the Display Alert field is NULL, the alert will display at the top of the student's Course Plan. If the Display Alert has a Credit Type selected then the alert will display within the credit type to which it belongs. 

Screenshot showing how alerts with and without a credit type display - at the top of the Plan vs in-line with the subject.Course Requirements Assigned and Not Assigned Credit Types

Course Display and Selection

Click here to expand...

Courses can be selected in a Course Plan as long as the course is active. Courses that appear in the dropdown lists are pulled from the student's most future enrollment calendar, based on the primary enrollment (partial or special education enrollments are not used).

Courses that are Recommended from a Graduation Program Course Requirement display in bold text.

Courses that are marked as Repeatable on the Course Editor can be added to the Course Plan multiple times, if the student has already taken the course in a previous year. Courses that are not marked as Repeatable can be added to the Course Plan by the counselor only if the student has already taken the course in a previous year. These courses display with the word RETAKE and display in all dropdowns for that credit type. For example, if a student took a Health course in grade 9, when choosing health courses for grades 10, 11 or 12, that same course (if not marked as Repeatable) would display in the dropdown for all grade levels in the Health credit type.

Screenshot showing a course in one column of the plan and a retake option for that course in the dropdown list for the next year.Retake Course Option
 

Courses that have been completed (have been posted to the transcript) and in-progress courses (student is currently scheduled into) display as such when hovering over the course.

Screenshot showing the Earned and In-Progress credit tool tips that display on hover. Hover Information for Earned Credits (Transcript) and In-Progress Courses

Courses that have planning rules associated with them that have not been satisfied display in gray text in the dropdown when choosing courses.

Courses that have a planning rule of Parent of/Child of display both the parent course and the child courses.

  • The correct credit value for each course (parent and child) displays.
  • The correct total value per credit type for each course (parent and child) displays.
  • The correct total value per grade level displays for each course (parent and child).
  • When a parent course is removed from the course plan, the child courses are also removed.
  • A child course with a different credit type displays in the correct credit type frame and displays the correct credit amount. All child courses display as locked.
  • When selecting a course with a Parent of rule, and the child course has a different credit type, the credit type displays after each course to identity which credit type they are associated.

Planned courses that do not meet planning rules assigned on the course display as a planning rule violation.

Screenshot showing a Planning Rule violation where a student is required to take two courses in the same year.Planning Rule Violation

If a student has not taken or planned a required course tied to a course requirement, an alert displays.


Screenshot showing a Course Requirement alert when a prerequisite has not been taken. Course Requirements Violation
 

Credit Display

Click here to expand...

Existing credits applied to high school courses (those from middle school or transferred credit) display in the credit type section to which they apply. Only high school credits display, as long as the course has been successfully completed and credit has been earned.

In-progress courses also fulfill planning rules.

Any credit assigned to the credit type that is considered overflow displays as well.

Screenshot highlighting the credits the student received previously.  Display of Previously Received Credits

{snippet.Expand_End}}

Course Planning Rules

Click here to expand...

Course Plans rely heavily on criteria that have been previously established, like credit groups and credit types, academic programs and their requirements. The Course Planning Rules also play a large part in course planning and affect the selection of courses and where those courses can be placed on a student's course plan. When planning rules are not met when the course plan is saved, an alert displays.

Middle school courses that are included in a course planning rule fulfill a prerequisite or equivalent planning rule at the high school.

Screenshot of the alert that displays when a course planning rule has not been met. Planning Rules and Course Plan Alerts

The following table provides details on how the planning rules interact with the Course Plan.

Planning RuleCourse DisplayCatalog Search DisplayAlerts, Warnings and Errors
Prerequisite

A course displays in red when a student selects a course that has a prerequisite rule but has not previously taken that prerequisite course or has not planned the prerequisite course.


If the prerequisite was met, the course cannot be selected for the same year in which the prerequisite course was taken. But the course can be selected in other years.


Both courses remain in the course catalog search results.


If the prerequisite was not met, the course cannot be selected and all buttons display in gray (inactive).

If a course is missing its prerequisite(s) on the course plan, the user will get an error when attempting to save.  


If a student takes the Prerequisite course(s) but does not meet or exceed the credit value to meet the requirement, an alert displays. Note that when the Prerequisite Planning Rule uses Parent/Child courses, the rule should only include the Parent course and its credits, not the Parent and Child and the sum of their credit.


If a student takes the Prerequisite course(s) but does not meet or exceed the Min GPA Value to meet the requirement, an alert displays.

 EquivalentCourses display in red if the user selects more than one course listed as an equivalent.

A student can only take one course in the equivalent rule.


A counselor can select the course and the other course(s) will show in gray.


If the course and one of its equivalents has already been taken or planned, the course cannot be selected.

N/A
Concurrent 

Courses display in red if the student hasn't selected a course that meets the concurrent rule.


All course numbers entered into the Transcript/Course Number field must be taken in a single year.


If a credit value is entered, the student must meet that credit amount AND plan each course entered in the Transcript/Course Number field.

If a concurrent course is searched but its counterpart has not been requested, the course can be selected.


If a concurrent course is searched and its counterpart has been requested, the course can be selected.

If both courses have not been selected in the same year, an alert message displays.


If only one of the courses has been selected, an alert message displays.


Failure to meet or exceed the credit minimum requirement triggers an Alert message.

Prerequisite and Concurrent

A course that is selected on the student's course plan and has a prerequisite or concurrent rule will display in RED on a students course plan screen if they haven't taken or planned to take the course(s) that meet the prerequisite or concurrent rule.

If a prerequisite or concurrent course is not in the course plan, user can search and select the course. 


If a prerequisite or concurrent course is in the course plan, any remaining prerequisite or concurrent course can be added in any year in the course plan.


An alert message displays if a course is selected and the user has not selected the other course in a previous year or in the same school year.


Failure to meet the minimum credit requirement triggers an alert message. The student must meet or exceed this credit value on their transcript to meet the requirement.


Failure to meet or exceed the minimum GPA requirement triggers an alert message. The student must meet or exceed this value to be considered as on-track.

Parent Of

Only the Parent Course is available for selection in the Course Plan. The Parent Course credit is a total of all the courses included in the parent/child setup.


If there is credit overflow, it displays the total amount of credits as a sum of the parent child courses.

If the parent course is already on the course plan, it displays in gray.N/A
Child OfCourses marked as Child Of are not available for selection in the Course Plan.N/AN/A

Documents

To view documents, click the Documents button on the action bar. See the Student Person Documents article for more information.

Screenshot of the document list popup. Course Plan Documents