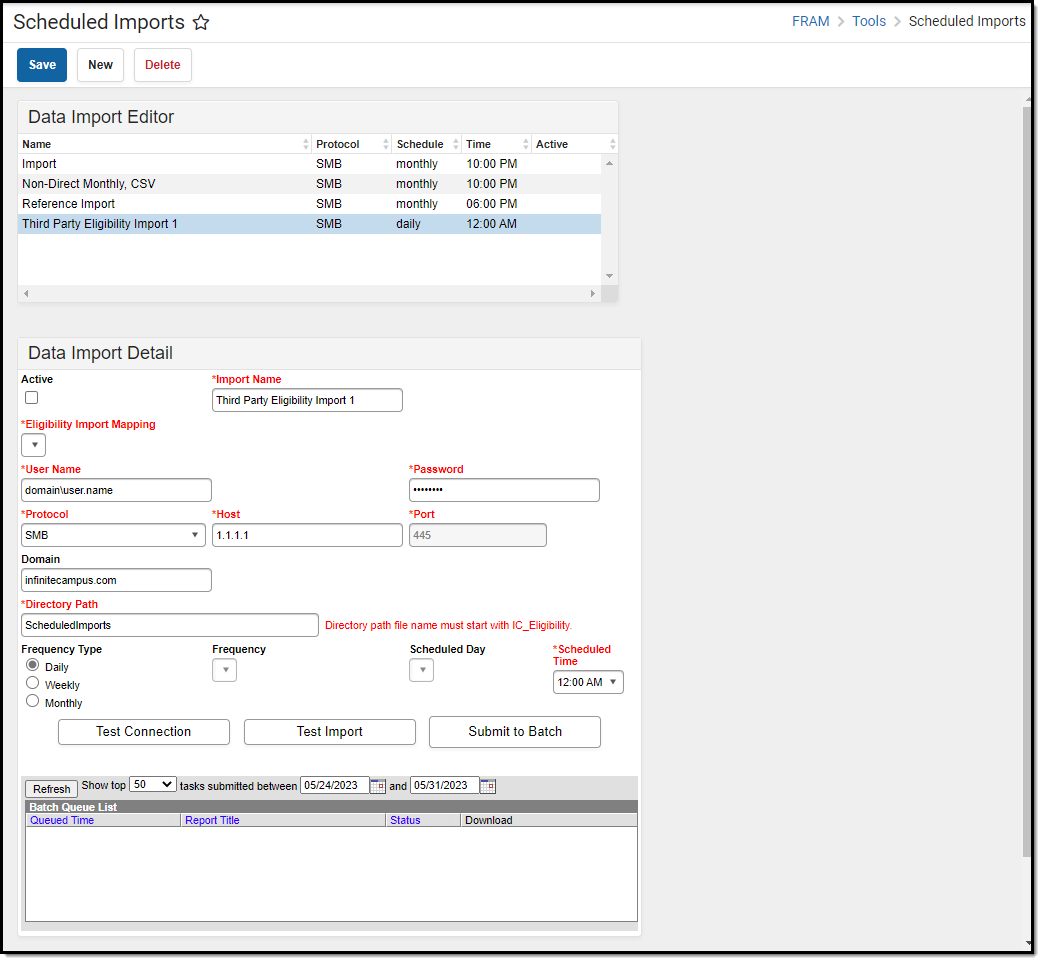
Tool Search: Scheduled Imports
The Scheduled Imports tool allows districts to automate the process of importing eligibility data from any third-party system and eliminates the need for custom scripts. Multiple files can be imported within a single Scheduled Import. If there are existing eligibility records in the database, the import process will not import the duplicate data and the Eligibility Import Report will indicate that records already exist.
Under optimal conditions, where no other process is being run for the district, it is estimated the tool will import 10,000 records every 30-40 minutes.
Currently, the Scheduled Imports tool allows self-signed certificates. Please note that there is a security risk if your district uses self-signed certificates rather than a certificate from a trusted certificate authority.
 Scheduled Imports Editor
Getting Started
Before creating a Scheduled Import, the following tasks must be completed.
| Task | Description |
|---|---|
1 |
The Scheduled Imports process uses a mapping created with the Eligibility Import Wizard. The Import File must first be mapped using the Eligibility Import Wizard. After the file is mapped, the mapping can be selected in the Scheduled Import tool. This Scheduled Import uses the same eligibility import mapping each time it imports a file. If the file layout changes, a new eligibility import mapping must be created in the Eligibility Import Wizard and the Scheduled Import must be updated to reference the new mapping. Only import file mappings with both the Start and End Dates mapped on the file can be selected for a Scheduled Import. |
2 |
The file folder on the server where the Import File is located must be shared and be given read/write permissions. |
3 |
Verify all import file names begin with IC_Eligibility. The file name(s) in the shared folder must start with IC_Eligibility or they cannot be found in the shared folder.
|
Data Import Detail Field Descriptions
| Field | Description | ||||||||||
|---|---|---|---|---|---|---|---|---|---|---|---|
| Active | If Active is not selected, users cannot run an import. However, the import can be tested. | ||||||||||
| Import Name | The import name should be consistent with the import file being used and may include up to 40 alphanumeric characters. | ||||||||||
| Eligibility Import Mapping | The Eligibility Import Mapping previously created in the Eligibility Import Wizard. | ||||||||||
| User Name | The name used to log into the server where the shared folder and import file are located. | ||||||||||
| Password | The password used to log into the server where the shared folder and import file(s) are located. After you save the Scheduled Import, the Password field is hashed and may appear longer than the text you entered. | ||||||||||
| Protocol |
| ||||||||||
| Host | The name or IP address of the server.
Your third-party server must allow list Campus IPs so traffic can pass. For more information, see this article. | ||||||||||
| Port | The Port field displays when FTPS or SFTP is chosen in the Protocol dropdown list. | ||||||||||
| Domain | The address of the computer network connection.
| ||||||||||
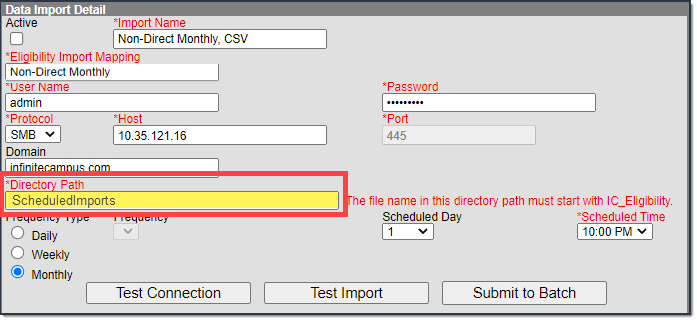
| Directory Path | The path to the shared folder. This field allows up to 100 characters. Multiple files can be imported within a single Scheduled Import; therefore, ALL files found in this directory will be imported at the same time. As a best practice, use different directories for direct certification files and non-direct certification files.
Do NOT start the Directory Path with a slash; e.g., \ScheduledImports or /ScheduledImports. If the file is located on the C drive, do not enter the drive in the directory path. Only enter the name of the shared folder if the shared folder is embedded within other folders. For example, if the folder's location is C:\ScheduledImports\Imports\Eligibility Imports type ScheduledImports\Imports\Eligibility Imports in the Directory Path field. If the folder is at the root level of the C drive; e.g., C:\Scheduled Imports, then type ScheduledImports.
The file name in this directory path must start with IC_Eligibility. The Scheduled Import tool will look for files that start with IC_Eligibility. However, do NOT enter the file name as part of the Directory Path.
| ||||||||||
Frequency Type/ Frequency |
All Frequency Types require that the Scheduled Time be defined to indicate the time of day the data will be imported. Very large routine files should be scheduled to start running long enough after the school day typically ends so the process does not interfere with other district processes at the end of the day but early enough so that the file import completes in time and does not interfere with other district processes at the start of school in the morning.
| ||||||||||
| Scheduled Day | Indicates which day of the month the data will be imported. EOM (end of month) is the last day of each month. | ||||||||||
| Scheduled Time | Indicates the time when the data will be imported. | ||||||||||
| Test Connection | If the Scheduled Import is not set up correctly, an error message appears. | ||||||||||
| Test Import | After the Scheduled Import is set up and the connection to the server where the import file(s) are located is confirmed, you may test the scheduled import. | ||||||||||
| Submit to Batch | The scheduled import will run automatically based on the date/time entered on the options window. The Batch Queue tool helps prevent time-out errors and/or system performance issues. For more information about submitting a report to the batch queue, see the Batch Queue article.
Under optimal conditions, where no other process is being run for the district, it is estimated the tool will import 10,000 records every 30-40 minutes. |
Create a New Scheduled Import
- Click the New button.The Data Import Detail section appears.
- Verify the Active check box is selected.
- Type a descriptive name in the Import Name field.
- Use the information in the Data Import Detail Field Descriptions to fill in the remaining fields.
- Click the Test Connection button.A confirmation message appears. If the Scheduled Import is not set up correctly, an error message will appear.
- Click the Save button. The scheduled import will run automatically based on the frequency and time entered. After the Scheduled Import is set up and the connection to the server where the import file(s) are located is confirmed, users may test or immediately run the scheduled import.
Test the Scheduled Import
Testing an import file confirms that its data will import correctly.
- Select the Scheduled Import name on the Data Import Editor.
- Click the Test Import button. The Eligibility Import Report appears.
- Use the Eligibility Import Report to verify the test results.
Submit Scheduled Import to the Batch Queue
A scheduled import runs automatically based on the frequency and time entered on the import. However, the Data Import Detail editor also includes a Submit to Batch button that allows you to automatically run the import based on the date/time entered on the options window.
- Select a scheduled import from the Data Import Editor.
- Click the Submit to Batch button. The Batch Queue Reporting Options window displays

Use the following field descriptions to complete the Batch Queue Options.
Option Description High Priority
Mark this checkbox if running this import is considered a high priority. Processes designated as "high priority" by this checkbox take precedence over other reports in the Batch Queue that are not designated as such.
This checkbox can only be marked if a user has the proper tool right access (i.e., at least R rights to the the Set Task Priority sub-right located in the Tool Rights index under Ad Hoc Reporting > Batch Queue).Keep Until I Delete
Mark this checkbox if the completed import results should continue to appear on the Add Reports to Batch Queue and Admin Queue tools until manually deleted by a user.
If this checkbox is not marked, the completed report will be cleared from the Add Reports to Batch Queue and Admin Queue tools based on the frequency for the Batch Queue Maintenance task set within the Task Scheduler.
This checkbox can only be marked if a user has the proper tool right access (i.e., at least R rights to the the Set Task Expiration sub-right located in the Tool Rights index under Ad Hoc Reporting > Batch Queue).
Start Date/Time
Indicate the date and time at which the Batch Queue should begin the import process. These fields auto-populate with the current date and time. Click in either field to enter a new date. A calendar displays when choosing a new date. Time must be entered in HHMM format, in either standard time format (i.e., 2:15 pm) or in military time (i.e., 14:15).
Click OK. The import will wait for the date and time scheduled for generation and is listed on the Batch Queue and Admin Queue tools. The data in the import file(s) is imported into the database as scheduled. This data messages the Point of Sale terminal and the State Edition (if the district uses Infinite Campus State Edition). The file name is changed to P_IC_Eligibility and includes a date and timestamp indicating when the file was imported.This prevents the file from being imported again. The Eligibility Import Report is generated.

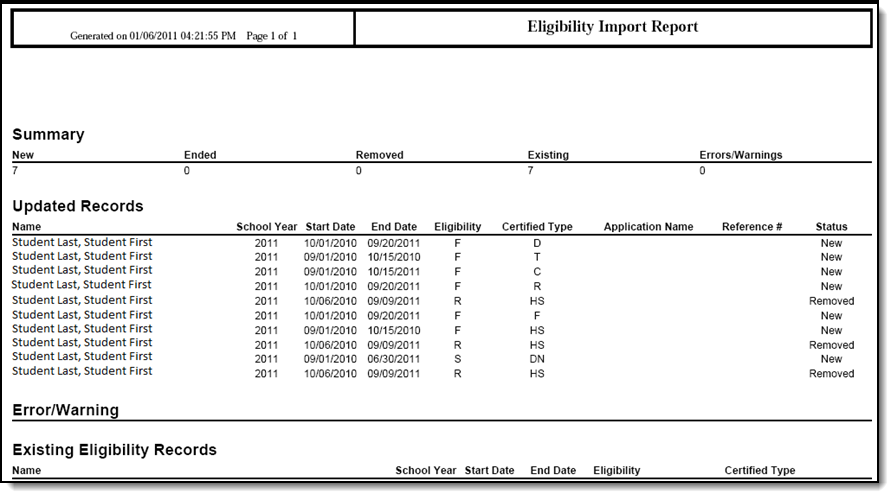
Eligibility Import Report Example
The Eligibility Import Report is a summary report which provides a list of updated records and indicates if there are existing records in the database. This report is generated after Testing the Scheduled Import and can also be accessed when viewing Scheduled Import Logs.
 Eligibility Import Report Example
