Tool Search: Schedule Batch Report
The Schedule Batch Report prints student schedules for the selected calendar en masse, one page per student suitable for handing out. This report allows users to select a saved schedule report with pre-selected schedule options that are set in the Report Preferences tool. Users can select Display Options instead of selecting a pre-saved report.
 Schedule Batch Report
See the Scheduling & Courses Reports Tool Rights article for information about rights needed to use this tool.
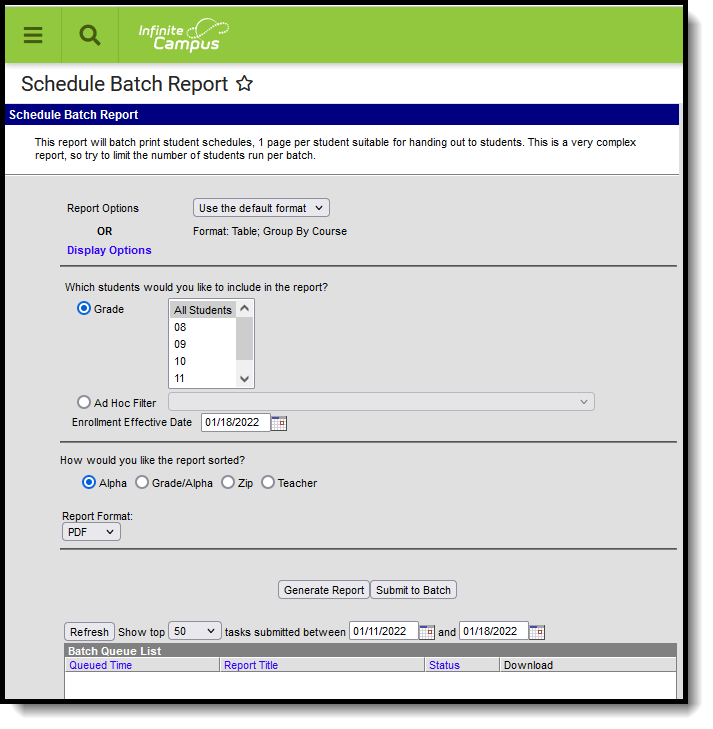
Schedule Batch Editor
| Option | Description |
|---|---|
| Report Selection | Select a saved schedule to generate from the Report Options dropdown. These options are created in the Report Preferences tool in System Administration. In order to see the Display Options and make selections, users must have tool rights to System Administration > Preferences > Reports. Select the Display Options to select the items to include on the schedule. These selections are not saved and need to be re-selected each time the report is generated. When the Display Options link is selected, the report editor displays the options that can be chosen. Use the Close Display Options to return to the original view of the report editor. |
| Student Selection | Students can be selected for the Schedule Batch by either a Grade Level or an Ad hoc Filter. Available grade levels display based on the school selected in the Campus toolbar. Ad hoc Filters are created in the Ad hoc Reporting Filter Designer and only report the students included in that filter who meet the other selected criteria. Enter an Effective Date. This date is used to include only active students as of the entered date. This date displays the current date, but it can be changed by entering the date in mmddyy format or by selecting the Calendar icon to choose a date. For students who have more than one primary address, determine if multiple schedules should be printed. Mark the Print only primary addresses checkbox accordingly. |
| Sort Options | The schedules can be sorted in the following ways:
|
| Report Format | The report can be generated in PDF or DOCX format. |
| Report Generation | Use the Generate Report button to display the results of the report immediately. Or, choose the Submit to Batch button to choose when the report generates. For a complex report like the Schedule Batch, and for a large set of students, using Submit to Batch is recommended. See the Batch Queue documentation for additional information on using Batch Queue functionality. |
Generate Saved Schedule Reports
- Select the desired schedule format from the Report Options dropdown list.
- Select the Grade Level of the students to include on the report. Or, select the students from an Ad HocFilter.
- Enter an Enrollment Effective Date. This date defaults to the current date. If this date is outside of the calendar range, no records are returned. This entry only prints student schedules for those students who were actively enrolled on that date.
- Mark the Print only primary addresses checkbox if more than one schedule should printed for students who live in multiple households.
- Select the Sort Options. Schedules can be sorted alphabetically, by grade and alphabetically, by zip code (for bulk mailing purposes) or by teacher.
- Select the desired Report Format.
- Click the Generate Report button to display the report immediately, or the Submit to Batch button to choose when the report generates.
Generate Schedule Reports by Selecting Display Options
- Select the Display Options link.
- Select the desired options to include on the schedule.
- Select the Grade Level of the students to include on the report. Or, select students using an Ad Hoc Filter.
- Enter an Enrollment Effective Date.
- Mark the Print only primary addresses checkbox if more than one schedule should printed for students who live in multiple households.
- Select the desired Sort Option.
- Select the desired Report Format.
- Click the Generate Report button to display the report immediately, or the Submit to Batch button to choose when the report generates.
Depending on the options selected, the schedule may print more than one page.
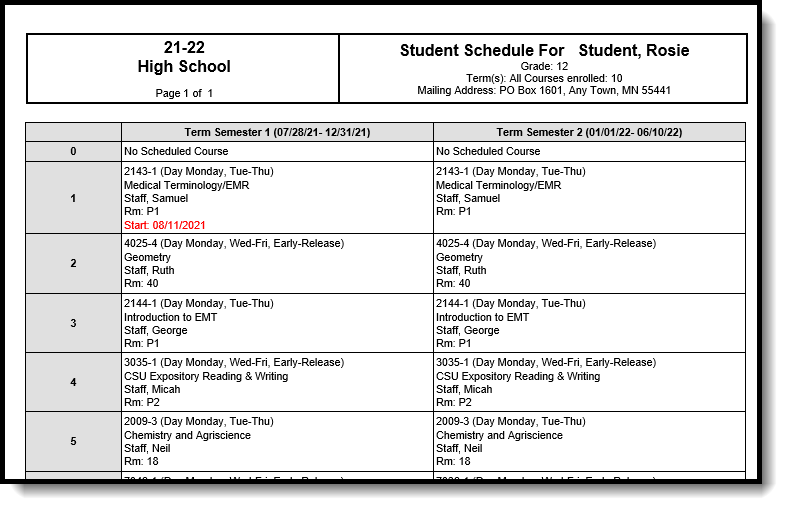 Schedule Batch Report - PDF Format
