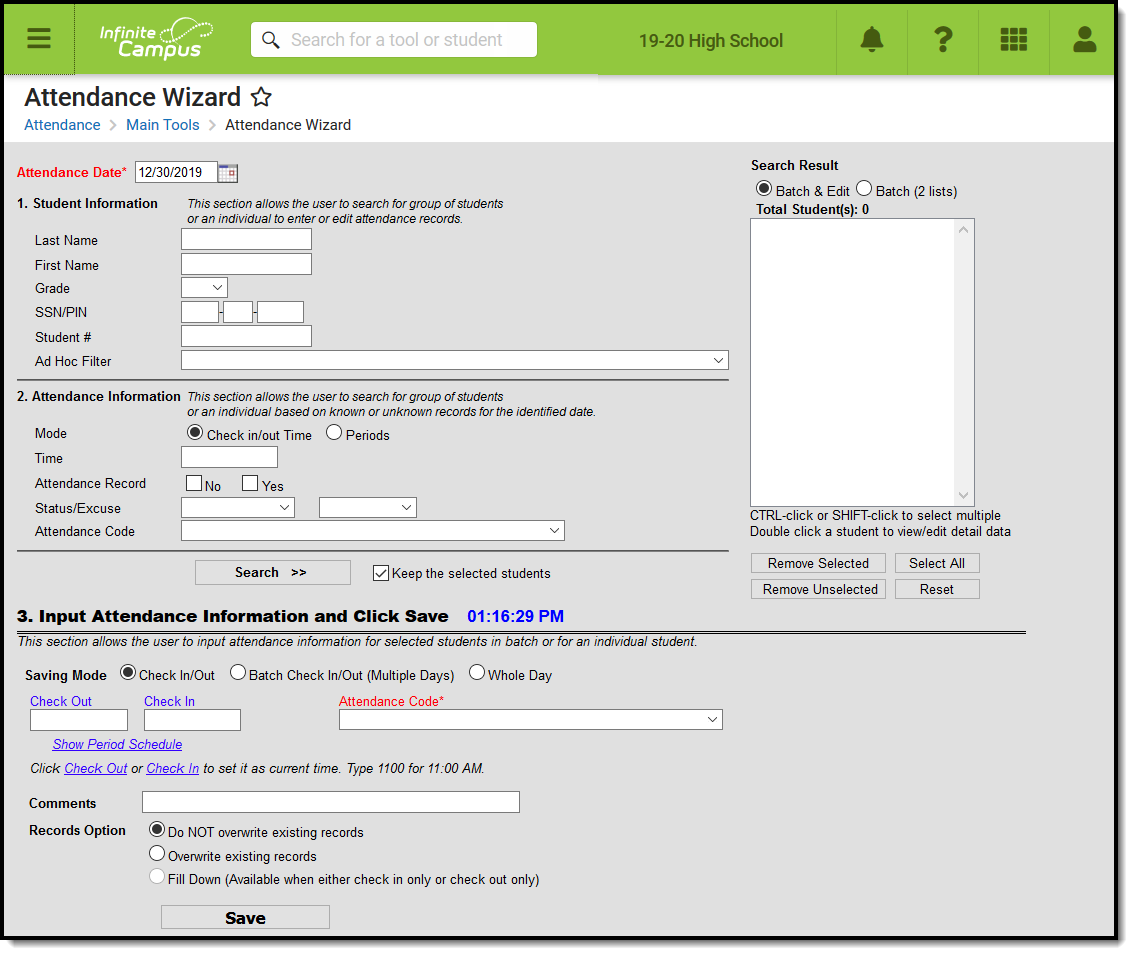
Tool Search: Attendance Wizard
The Attendance Wizard tool allows attendance clerks to mass update, create or delete attendance records for a select student or group of students.
Kentucky Attendance Wizard
Mass Adding/Modifying/Deleting Student Attendance Information
Mass adding/modifying/deleting student attendance information using the Kentucky Attendance Wizard is a two step process. The following sections will walk you through this process.
Step 1. Search for Students Based on Demographic or Attendance Information
Students can be searched for based on demographic information.
Searching by Demographic Information
| Searching by Student Information and Selecting Students by Batch & Edit | Searching by Student Information and Selecting Students in Batch List | ||||
|---|---|---|---|---|---|
|
|
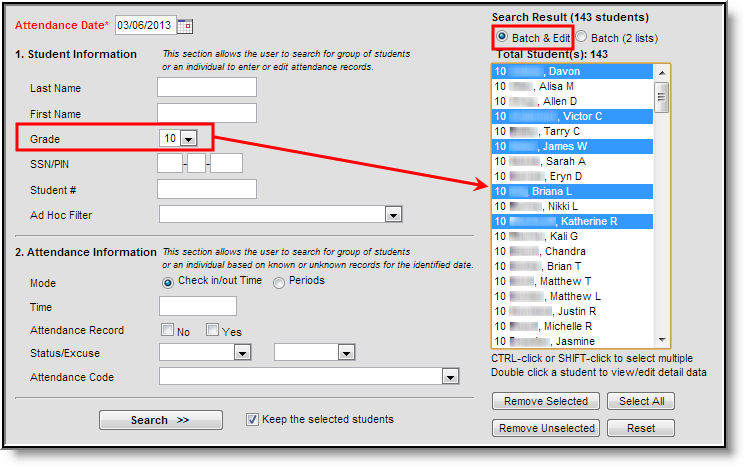
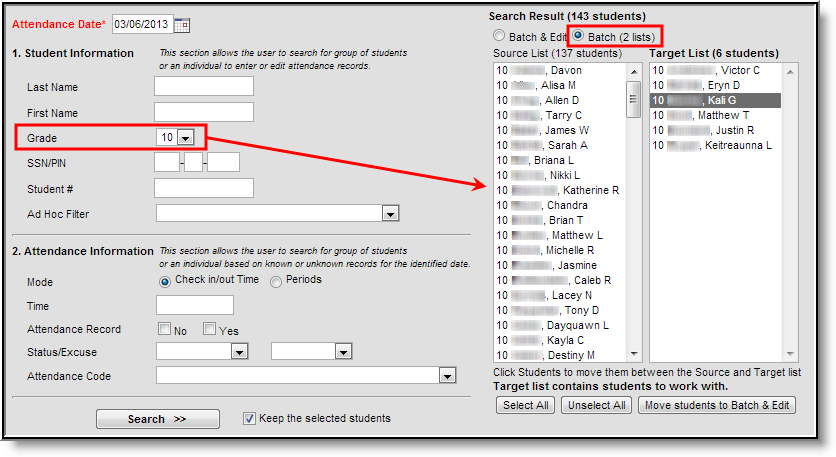
- Enter the Attendance Day. This date determines which attendance days are used for matching search criteria.
- Enter Last Name, First Name, Grade, SSN and/or Student Number information to generate a list of students based on search criteria entered.
- Select the Search button. Students matching search criteria will appear in the Search Results window on the right. In the images above, students are searched for by grade level.
- Select which students will have attendance data modified. Users can select students using one of two options:
Option Description Batch & Edit Allows you to select a group of students (by holding down CTRL when selecting) and remove the selected students or remove the unselected students to create a list of students who will have their attendance records modified. Batch (2 Lists) Allows the user to build a list of students who will have attendance data modified (Target List) by selecting them from the Source List. - Proceed to Step 2.
Students can also be identified based on attendance information.
Searching by Attendance Information
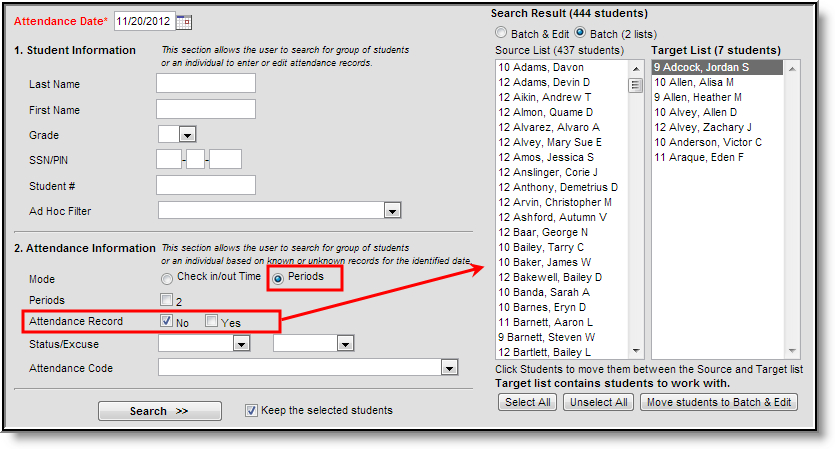
| Searching by Attendance Check In/Out Time Information | Searching by Attendance Period Information | ||||
|---|---|---|---|---|---|
|
|
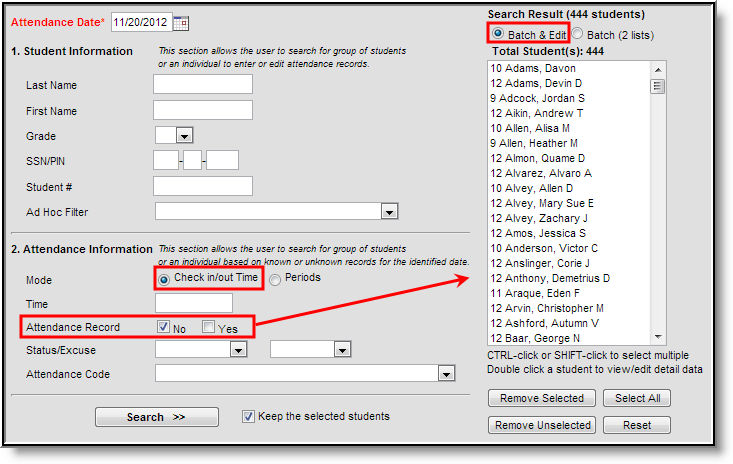
- Enter the Attendance Day. This date determines which attendance days is used for matching search criteria.
Select the Mode.
Option Description Check In/Out Time Users are given options for searching for students based on Check In/Check Out information. Periods Users are given options for search for students based on period information. - Select the Search button. Students matching search criteria will appear in the Search Results window on the right. In the images above, when Attendance Record is marked as No, search results are based on students who did not have attendance entered on the Attendance Date.
- Select which students will have attendance data modified.
- Proceed to Step 2.
Step 2. Input New Attendance Information
Once students have been identified and selected in the Search Results window, users will need to enter the attendance information that is going to be applied to these students. Users can modify attendance information using the following three methods:
- Batch Modifying Check In/Out and Attendance Code Information
- Batch Modifying Check In/Out and Attendance Code Information for Multiple Days
- Batch Adding/Deleting Whole Day Attendance Records
Batch Modifying Check In/Out and Attendance Code Information
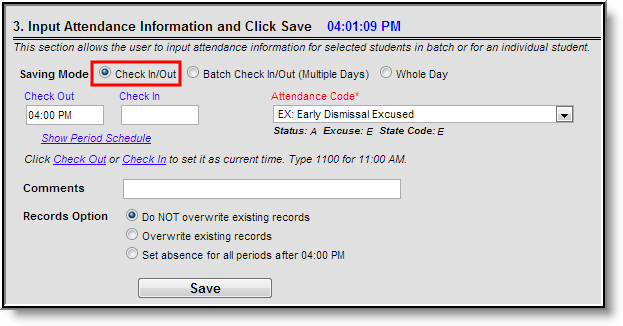
The Check In/Out Saving Mode allows users to mass enter Check In/Out and Attendance Code data for the selected student or group of students.
Modifying Check In/Out Information
- Select a Saving Mode of Check In/Out.
- Enter the Check Out time (optional). Select the blue Check Out text to insert the current time.
- Enter the Check In time (optional). Select the blue Check In text to insert the current time.
Select the Show Period Schedule hyperlink to view the school's schedule period.
Select the Attendance Code.
Existing Attendance Codes mapped to an Excuse of Exempt cannot be modified via the Attendance Wizard.
- Enter any Comments (optional). This comment will appear on each student's attendance record for the day.
- Select a Records Option:
- Do NOT overwrite existing records - Selected students who have existing attendance records on the Attendance Day entered will not have their attendance data overwritten.
- Overwrite existing records - All attendance records on the Attendance Day will be overwritten with the values entered (only applies to students selected).
- Set absence for all periods after 04:00 PM - All periods after 4:00 PM will be marked Absent on the Attendance Day for all selected students.
- Select the Save icon. All selected students will have their attendance record data modified to the values entered for the date entered in the Attendance Date field.
Batch Modifying Check In/Out and Attendance Code Information for Multiple Days
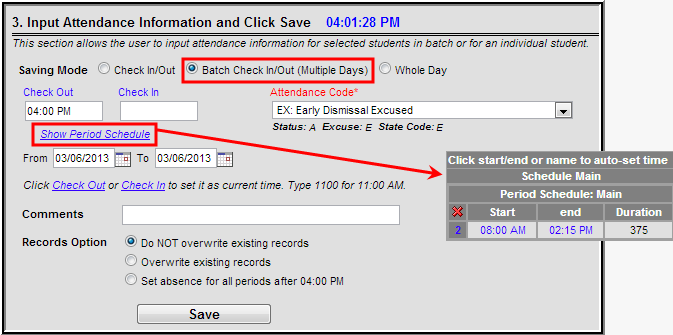
The Batch Check In/Out (Multiple Days) Saving Mode allows users to mass enter Check In/Out and Attendance Code data for all days within a date range for the selected group of students.
Modifying Check In/Out Information for Multiple Days
- Select a Saving Mode of Batch Check In/Out (Multiple Days).
- Enter the Check Out time (optional). Select the blue Check Out text to insert the current time.
- Enter the Check In time (optional). Select the blue Check In text to insert the current time.
Select the Show Period Schedule hyperlink to view the school's schedule period.
- Enter the From and To dates. Identified students will be checked in/out for all days within the date range entered.
- Select the Attendance Code.
Existing Attendance Codes mapped to an Excuse of Exempt cannot be modified via the Attendance Wizard.
- Enter any Comments (optional). This comment will appear on each student's attendance record for the day.
- Select a Records Option:
- Do NOT overwrite existing records - Selected students who have existing attendance records on the Attendance Day entered will not have their attendance data overwritten.
- Overwrite existing records - All attendance records within the date range specified will be overwritten with the values entered (only applies to students selected).
- Set absence for all periods after 04:00 PM - All periods after 4:00 PM will be marked Absent on the Attendance Day for all selected students.
- Select the Save icon. All selected students will have their attendance record data modified to the values entered for the date range identified in the To and From date fields.
Batch Adding/Deleting Whole Day Attendance Records
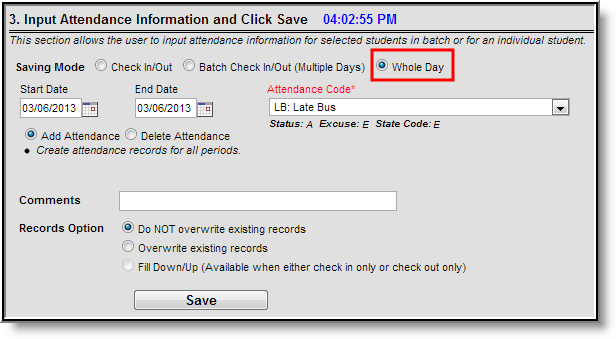
The Whole Day Saving Mode allows users to mass add or delete attendance records for all dates within a date range for a select group of students.
Adding/Deleting Whole Day Attendance Records
- Select a Saving Mode of Whole Day.
- Enter the Start Date. This is the first day that will have an attendance record created/deleted.
- Enter the End Date. This is the last day that will have an attendance record created/deleted.
- Enter the Attendance Code.
Existing Attendance Codes mapped to an Excuse of Exempt cannot be modified via the Attendance Wizard.
- Select the Add Attendance radio button to create an attendance record for each date between the Start and End Date for all selected students.
- Select the Delete Attendance radio button to delete attendance records for each date between the Start and End Date for all selected students.
- Enter any Comments (optional). This comment will appear on each student's attendance record for the day.
- Do NOT overwrite existing records - Selected students who have existing attendance records on the Attendance Day entered will not have their attendance data overwritten.
- Overwrite existing records - All attendance records within the date range specified will be overwritten with the values entered (only applies to students selected).
- Fill Down/Up - When a Check Out time is entered for a student, the student can be marked absent for all remaining periods after the Check Out time using this option. When only a Check In time is entered, any attendance records after the Check In time will be deleted.
- Select the Save icon. Attendance records will be created (or deleted) for all selected students.
