The Course Management tool allows courses to be created and managed at the state level and then pushed to district sites, providing consistent course offerings throughout the entire state.
State Course Code information is published directly to districts. Course Master Information and Course Information are updated with the Course Code values. Using Course Masters is not required to utilize this tool, as data is published to both tools.
This tool is available for State Edition installations, meaning staff at the Department of Education or other governing bodies with access to ALL districts in the state are responsible for managing state course codes. That information is published to the districts.
District Edition users aligned with a State Edition can view the Course Management tool when assigned proper tool rights. For those users, the tool is read-only for the main Course Management list of all codes and when viewing individual course codes.
For district edition users NOT aligned with a State Edition, the tool does NOT display.
The Course Management tool replaces the Course Code Setup tool, which was removed in the Campus.2543 Release Pack (October 2025).
 Course Management
See the Course Management Tool Rights article for details on applicable tool rights.
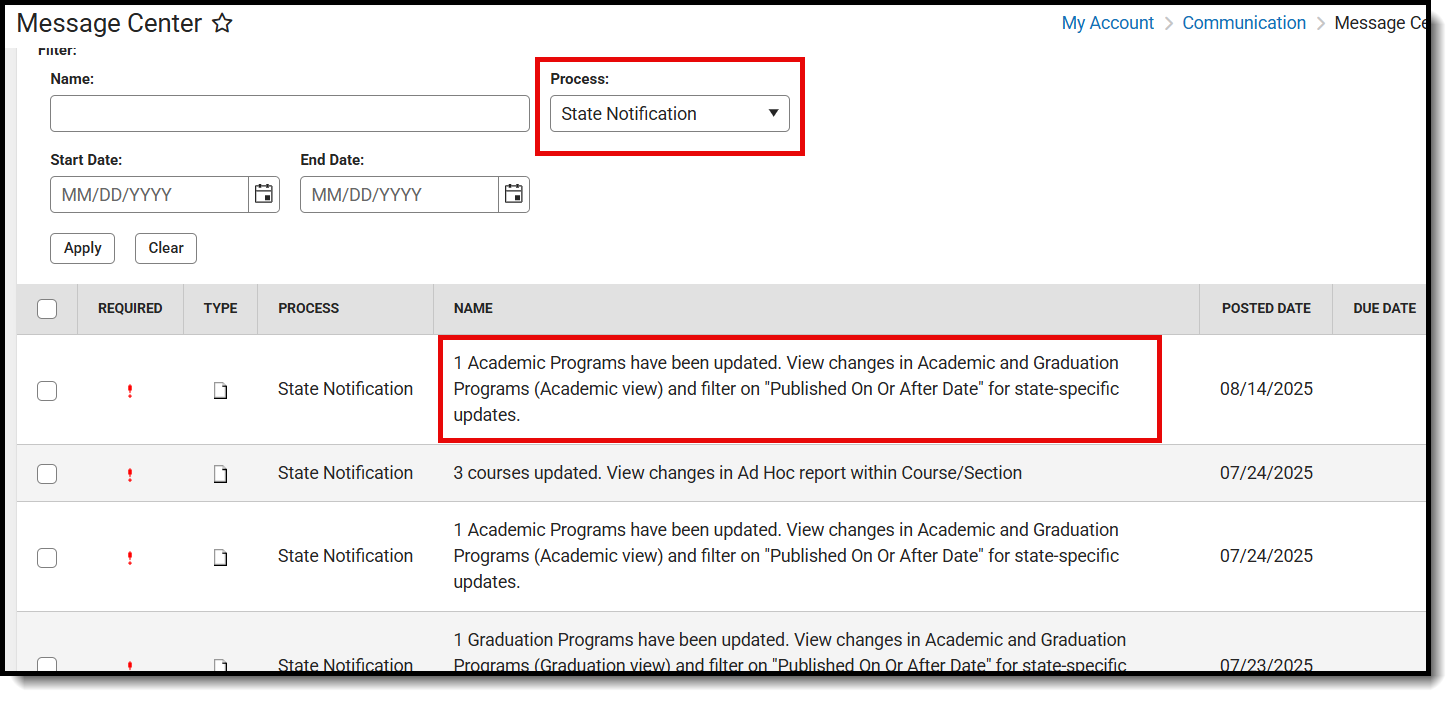
District Edition Visibility to Course Code Updates
When State Course Codes are updated and published to districts, users who have at least Write rights to the following tools receive a State Notification in the Message Center:
School Start Year, School End Year
Course Codes are organized by their assigned School Start Year, with the most recent year first. Codes without a school start year are listed last. Course codes are active as of the first day of the selected school calendar year and remain active until a School End Year is assigned to it.
School Year Setup
Values entered in the School Year Setup tool determine how information is displayed in Course Management. The School Start Year and School End Year in Course Management follow the format of the Label value on the School Year Detail.
When a School Start Year of 28-29 is selected, the state code record is active on the date entered in the Start Date field of the School Year Detail. When a School End Year of 28-29 is selected, the state code record is active through the End Date entered in the End Date School Year Detail.
The active status for state code records depends on what is set up at the state or district level.
 Start Date, End Date on School Year Setup
Assigning a year to the state course codes enables the creation of codes for future calendar years and their publication to districts without affecting state course codes for the current year. Both year fields can be entered, or just one year field, or no year fields.
- A state course code assigned a School Start Year of 25-26, and no School End Year is current and active as of the entered start date of the 2025-26 school year.
- A state course code assigned no School Start Year and a School End Year of 25-26 is active through the entered end date of the 2025-26 school year.
- A state course code with no assigned School Start Year or School End Year is current and active for all years.
 School Start Year, School End Year Assignment
Course Masters
For calendar and school years that fall within the course code's start and end year dates, Course Management information overrides Course Master information. The Course Master displays the locked values from the Course Management record. Course records associated with that Course Master for that calendar are also updated with the locked values from the Course Management record.
For courses that are NOT linked to a Course Master when that Course falls within the same start and end years as the Course Management record, Course Management information overrides State Code information
When a Course Master uses a state code whose start year/end year dates DO NOT fall within the active year, that Course Master becomes inactive for that school year. The state code value for that Course Master needs to be updated with a state code from the published list for that year.
For example, the course code for Spanish I is active for all years (the School Start Year and School End Year fields are not populated) and has been published to all districts. A district is using a Course Master with this course code for the 24-25 school year.
 Active Course Management, Course Code Record, and active Course Masters record
At the end of the 24-25 school year, new state codes are implemented for all language courses. New state code records need to be created and published to districts, and current state code records need to be ended.
To do this, the state user edits (views) that State Code, and assigns a School End Year of 24-25 and publishes that code to the district.
 School End Year added to Course Code
At the district level, when the active year is changed to the next school year, the course master is now marked as inactive and includes the inactive state code. These codes need to be manually changed at the district to use the updated state code provided by the state.
 Invalid State Code, Inactive Course Master
When the Course Master still has an invalid state code and is pushed to Courses, a validation error is displayed, indicating it cannot be pushed because of the invalid state code. The validation may include other reasons why it cannot be pushed to courses.
 Pushi to Courses with Invalid State Code
Courses linked to Course Masters with invalid state codes that exist in future calendars also display the invalid state code in the State Code field.
State Course Codes Search and Filter Options
Searching can be done for All Years and All Districts. There is no need to select a specific year, district, or calendar from the context switcher.
Search Options
 Course Management Search Options
State Course Codes can be searched by the following options:
| Option | Description |
|---|---|
| State Code - Name | Enter the start of the code of the start of the name of the course codes. |
| Status | Course Codes can be Active, Unpublished, or Inactive.
|
| Published Info | Published refers to the date, time, and user who last published the course code from State Edition.
Once published to District Edition, there may be a short lag time before the published course codes display in District Edition, due to the size of the updates made. Enter one of the following:
|
| School Start Year, School End Year | Enter a year that corresponds to the start of a school year and the end of a school year, following the format for how your district has named their school years in the School Year Setup tool (e.g., 25-26, 2027-28, etc.)
Course codes do not require the start year or end year fields to be populated. |
Filter Options
Without entering any search criteria or any filtering, Course Codes are listed in School Start Year order, with the most recent year first. Course codes without any years assigned are listed last. Within each year, the codes are organized by the Code.
When entering values in the search fields, the list of codes is narrowed to only those that match the entered text.
Click the Filter icon to choose additional filtering options.
 Filter Options
Click the Clear Filter icon next to the search field or manually remove the text from the field to return the list to display all state course codes.
 Course Management - Clear Filter Options
Manage State Course Codes
Modifications can be made to any field on any available card. Once updates have been saved, use the Publish to Districts button to push those updates to the districts' Course Master Information/Course Information details.
Click View on the right-hand side to access State Course Information details.
 View State Course Code Information
Course Information is organized into the following sections:
- State Course Information includes identifying course information, SCED information, and the course description. Also included is when the code was published to the districts (displays the most recent date and time stamp and who published it).
- Course Setup includes fields such as whether the course is an attendance-taking course, uses positive attendance, is standards-based, reports scores on a student's transcript, and more.
- State Defined lists all of the fields used for state reporting in your state and includes fields like Dual Credit and State Report Exclude.
- Comments include any additional information about the course that your school or district wants known. This could be a note indicating when the course was added to the catalog, such as the requirement to meet in a specific room, its exclusivity to seniors, or some other relevant information.
For details on the available fields, see the Course Information Field Descriptions article.
Not all fields are available on the State Course Information editor. Fields that do not affect course management at the state level - for example, scheduling or district-defined fields - are not included.
The fields available for the state are the same as those at the district level. Depending on state requirements, those fields may or may not be modified at the district level.
When any field on the State Course Information record is populated by the state, that value is published to the district and locked.
Add a New State Course Code
This is a manual process to add ONE state course code.
Best Practice
Assign a School Start Year to the State Course Codes so staff can easily locate new or updated codes.
- Click New. The State Course Information editor displays.
- Assign a School Start Year and School End Year to the State Course Code.
- At a minimum, enter the required values for saving a new state code - State Code and State Code Name.
- Enter values for the remaining fields as needed.
- Click Add when finished. The new State Course Code is listed within the Start Year it was assigned. When no year is assigned, it is listed after all codes with a start year.
New Course Codes can only be saved when there are no other records for that code with the same overlapping dates.
For example, if State Code 001X with start/end dates of 2024/2027 already exists, then a new State Code 001X record with blank start/end dates cannot be created; however, a State Code 001X record with a start date of 2027 can be created.
Use the Reset button to clear the entered values before saving, allowing you to start over. Use the Close button to close the editor and return to the list of state codes.
Copy a State Course Code
Save changes to the Course codes before copying.
- Select a State Course Code to copy from the list of available course codes. The State Course Information detail displays.
- Click Copy. A blue banner displays across the top of the editor, indicating the code has been copied.
- Modify the code as needed: change the State Code Name, the Start Year, etc.
- Click Add to add the copied course code.
Course Codes cannot be copied when:
- There is an overlap in the start year or end year with another record.
- The State Code and State Code Name match those of another record.
Delete a State Course Code
- Click Delete to permanently remove State Course Codes.
- Confirm the validation message to continue.
Once the record has been deleted, the filtered list of course codes displays.
Course Codes can only be deleted when they HAVE NOT been published to districts.
Batch Edit Course Code Field Values
Use this option to update field values for multiple existing state course code records simultaneously. Mark the Include checkbox next to the fields that need updating, then enter the new value.
Fields on any of the cards can be updated this way, except for the following:
- Published Info
- State Code
- State Code Name
- The entire Comment card
In the image below, the Start Year and SCED Course Level fields are the only ones with the Include checkbox marked, so only those values will be updated.

When the Include checkbox is marked, any value entered in the field is updated to that value for all of the selected Course Code records.
When the Include checkbox is marked for a field that does NOT have a value (null or blank), the selected course code records for that field are updated to that null/blank value.
For example, the course code record currently has the GPA Weight set at 1.0. During the Batch Edit process, the Include checkbox was marked for GPA Weight, but no value was entered into the GPA Weight field. Upon save, the GPA Weight is set to blank for all records included in the Batch Edit process.
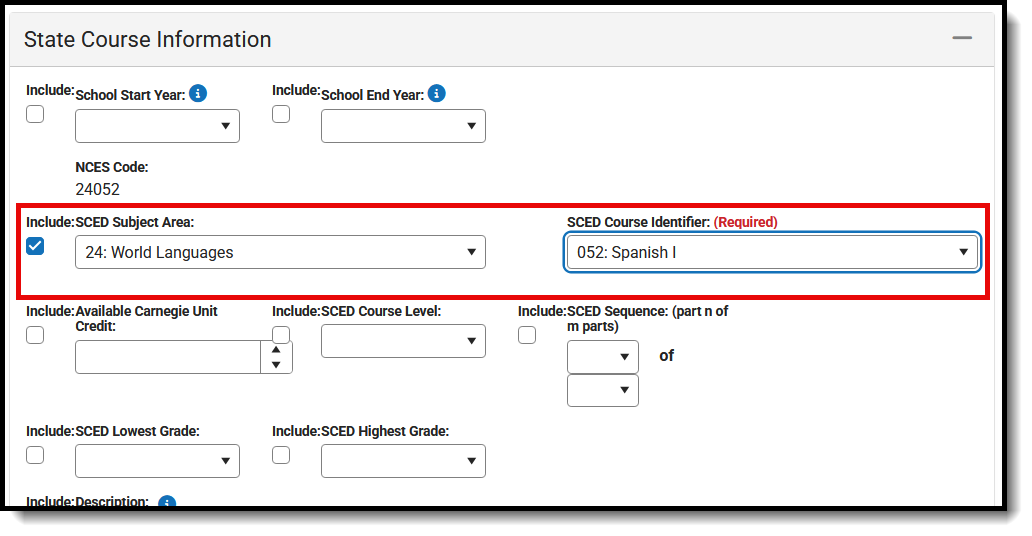
The following scenario describes how to update the SCED Subject Area and SCED Course Identifier fields.
Updates need to be made to courses assigned the Course Code 11412, which are assigned a SCED Subject Area of 24: World Languages and a SCED Course Identifier of 052: Spanish I.
- From the main Course Management view, locate (search for) the courses that require an update.
- Place a checkbox next to each course that needs to be updated.
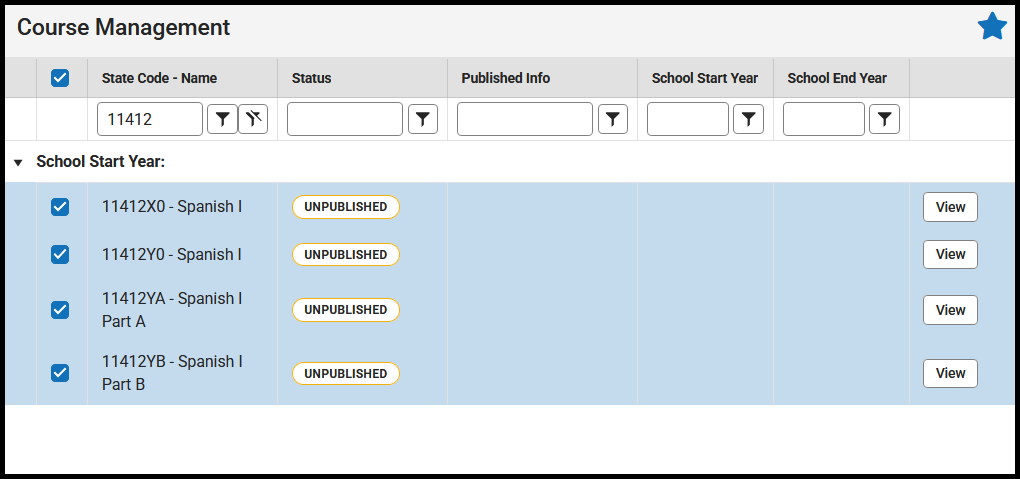
- Click Batch Edit Field Values.
- For each value that needs to be changed, mark the checkbox next to the field and select, enter, or mark the new value. In this example, the SCED Subject Area remains 24: World Languages, but the SCED Course Identifier is changed to 059: Spanish Conversation and Culture.
- Click Save when finished. A confirmation message displays, listing the updated codes, along with an option to export the list to Excel for additional reporting or tracking.
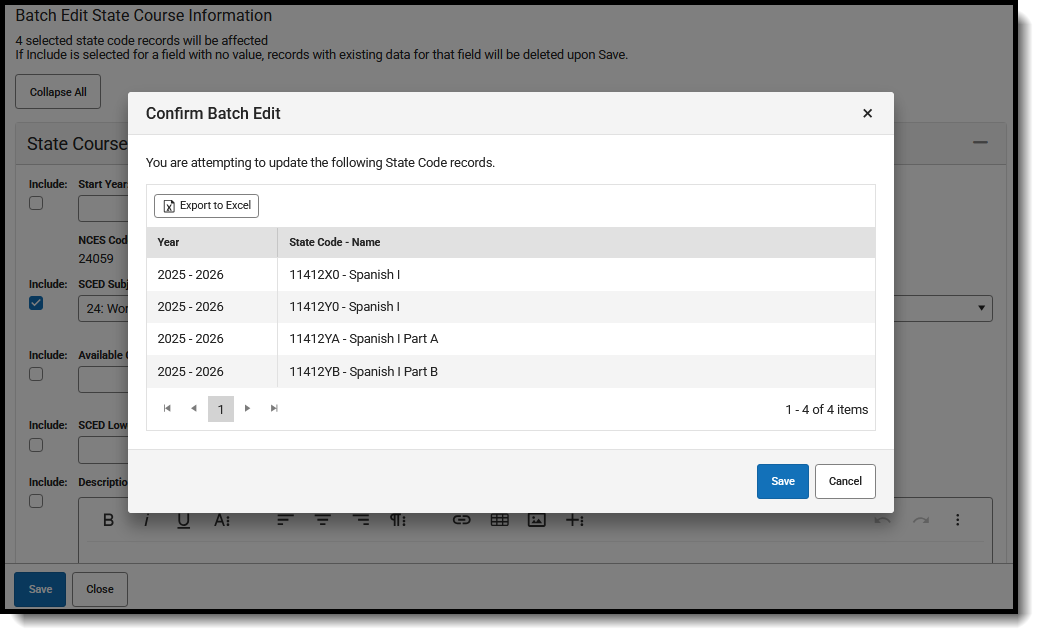
- Click Save on the confirmation to return to the main Course Management view. The selected codes remain selected.


At this point, the values have been updated, and now the changes need to be published to the districts.
- In the main Course Management view, ensure all updated records are selected.
- Click Publish Selected to Districts.
- Select which Districts receive the updated values. Choose All Districts or specific districts from the list.
- Review the updates being published and use the Export to Excel option for additional reporting or tracking.
- Click Publish. When the process completes, the Course Management view refreshes with updated Published Info and the updated value. of 059: Spanish Conversation and Culture.

Publish Course Codes
Published State Course Codes are listed with the date and time, as well as the user who published the codes. This is visible on the main Course Management view and when viewing the State Course Information record.

When a state course code is published, it can be published to all districts or to selected districts from the State Course Information view or the Course Management view, which includes all State Code lists.
When an update is made, a notification is sent to the Message Center in District Edition. A quartz job runs overnight and sends a message to District Edition users who have the appropriate tool rights.

The Last Published Districts lists the most recent districts that received an updated state course code. When that code was published to more than five districts, use the Export to Excel option to see which districts received the update.
The notification is considered a State Notification and looks similar to this.
Publish All Records to Districts
- Click the Publish All Records to Districts button. This selects ALL records on ALL pages. A pop-up window displays the School Start Year and School End Year entered on the State Course Information screen, all State Codes, and when each was last published.
- Click Publish. There may be a short period during which the system processes. When it is complete, the main screen displays, and the Published Info column for those codes is updated to the date and time the publishing at the state edition was complete.
Publish Selected State Course Codes to Districts
Course information can be published to districts from the main page of the Course Management tool or from the individual State Course Information editor.
From the main view of the Course Management tool
- Select which State Course Codes to publish to the districts by placing a checkbox in the left-hand column.
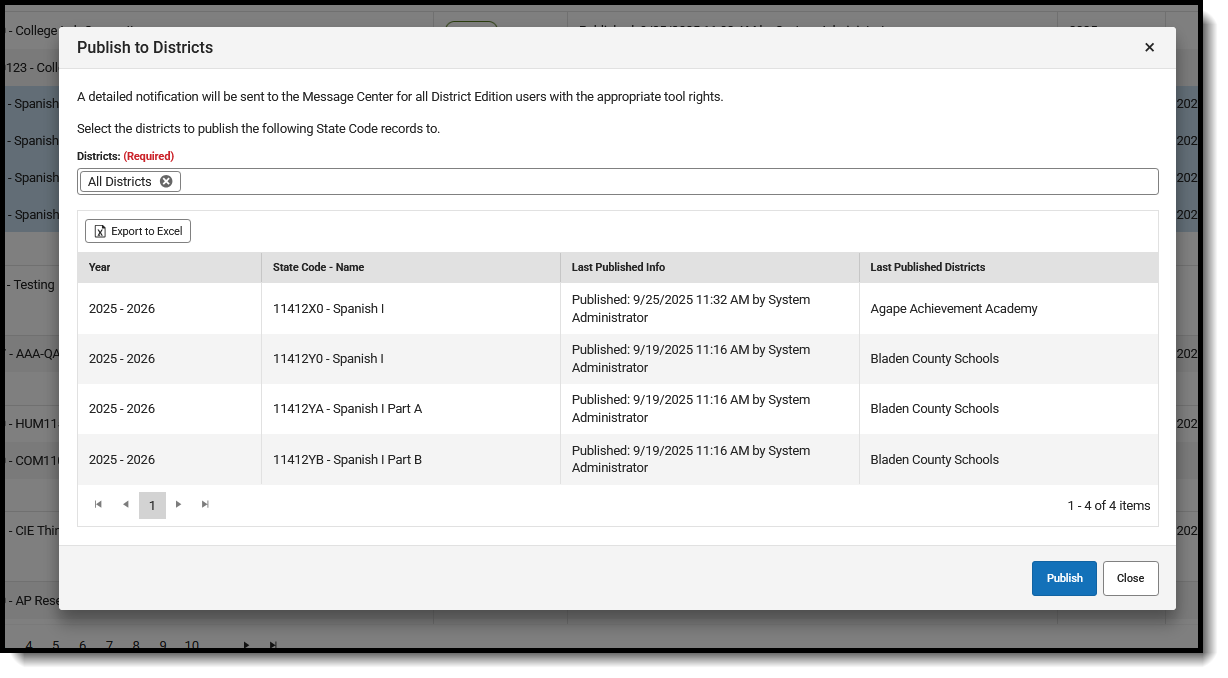
- Click the Publish Selected to Districts button. A pop-up window displays, indicating that a notification with details on the update will be sent to the Message Center and lists the School Start Year and School End Year entered on the State Course Information screen, the selected State Course Codes, when those codes were last published, and to which districts they were last published.
- Select which Districts receive the notification. Choose All Districts to publish the record to all districts in the state, or choose specific districts to publish the record.
- If desired, click the Export to Excel button to export this list of codes to Excel and retain a copy of the update.
- Click Publish. There may be a short period when the system processes. When it is complete, the selected codes are published to districts, and the Published Info column for those codes is updated with the date and time the publishing was completed.
From the State Course Information Detail View
- Click View from the main Course Management list of state course codes. The State Course Information editors display.
- Modify any fields that need updating.
- Save those modifications. After the update is saved, a green Saved banner appears above the Collapse All button.
- Click the Publish to Districts button.
- Select which Districts receive the notification. Choose All Districts to publish the record to all districts in the state, or choose specific districts to publish the record.
- If desired, click the Export to Excel button to export this list of codes to Excel and retain a copy of the update.
- Click Publish. The updated course information is pushed to districts. The updated record, including the date and time the course information was published, is visible on the Course Management list.

