School Store

The Infinite Campus School Store gives members of your school easy online access for purchasing goods and services. Each school in your district can have their own store. The stores display in Campus Parent and Campus Student.

This article walks you through the setup process step-by-step.

Check with your System Administrator and make sure you have tool rights to System Administration > School Store.


Step 1. Enable School Store in the Digital Repository
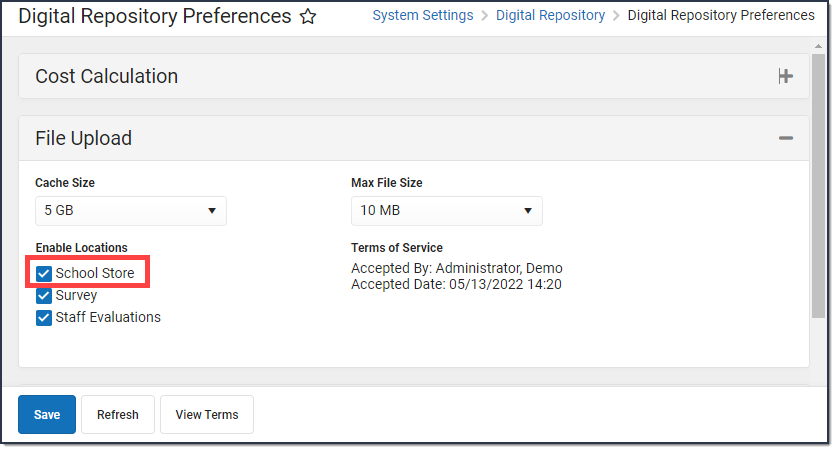
Classic View: System Administration > Digital Repository

Search Terms: Digital Repository Preferences

Before you can set up the School Store, you must enable the School Store in the Digital Repository tool by marking the School Store checkbox at the bottom of the screen then clicking Save. For more information about the Digital Repository see the Digital Repository article on the Campus Community.

Screenshot of the Digital Repository Preferences tool with a callout around the School Store location enabled.


Step 2. Set up Product Types

Classic View: School Store > Administration > Product Types

Search Terms: Product Types

About Product Types

Product Types are assigned to Products and to Fund Accounts. When a product is purchased, funds are deposited into the bank associated with the Fund Account to which you assigned the Product Type.

Important Information About Product Types

  • Product Types are not unique for each school. Once a Product Type is added, it is available to every school in the district.
  • You cannot delete a Product Type if it's tied to an active product in the Inventory. However, you can edit the Product Type.

Screenshot of the Product Types tool with a list of available product types.


Step 3. Set up Fund Accounts

Classic View: System Administration > Payments > Payments Setup > Fund Accounts

Search Terms: Payments Setup

Fund Accounts identify which bank accounts are used for items purchased in the School Store. You can manage Fund Account in the Payments Setup tool.

You can assign each Product Type to a unique Fund Account or group Product Types together on the same Fund Account.

 You can NOT remove a Product Type from a Fund Account after you save your changes.
See the article Fund Accounts (Payments Setup) on the Campus Community for more information about setting up Fund Accounts.

Screenshot of the Payments Setup screen, with Fund Account selected, displays with a callout indicating where School Store Product Types can be assigned.


Step 4. Create a Store for Each School

Classic View: School Store > Administration > Settings

Search Terms: Settings

The Settings tool allows you to choose where you want the School Store to display and set up different options for every store. From here you can also set up Public Store options. The Public Store is a website where anyone can shop for goods or services from your district.

What can I do?

Create a School Store

Create a store for each school by selecting the school in the Campus toolbar. Use the field descriptions provided here to complete the screen then click Save. Repeat this procedure for each school that is going to have a school store.

Two-part screenshot indicating the need to select a school from the Campus toolbar to begin creating a school store, that will then be available in Campus Parent and Student.

Field Descriptions (School Store)

FieldDescription
TitleThe name of the store.
Display On

You can display the store in Campus Parent, Campus Student, Employee Self Service or the Public Store. If you do not want the store to display, do NOT mark the checkbox.

Allow Free and Reduced Pricing

When this checkbox is marked, students that have an active eligibility record (FRAM > Eligibility) can be given a reduced price for items in the store.

The reduced price is set up on the product. If you do not set up a reduced price, the student is charged the regular selling price.

Shop By CategoriesThis option allows you to set up the School Store for users to shop by category or by products. 
  • When this checkbox is marked, the first page in the store displays the Categories. Users can select a Category to see the products they can purchase. 
  • When this checkbox is not marked, the first page in the School Store displays all of the products in the store. Users still have the option to view and group the products by category from the products page.
Image Upload

A picture that represents the school store in Campus Student and Campus Parent. If this is your first time uploading an image in Campus, Campus prompts you to accept the Terms and Conditions.

Mark the checkbox before you save.

The image must use one of the following extensions: .jpg, .jpeg, .png, or .gif.


Create a Public Store

Create a Public Store by selecting All Schools in the Campus toolbar. Use the field descriptions provided here to complete the screen then click Save.

Tip: See the Public Store Overview for more information about setting up a Public Store. There are multiple steps that you must complete before products can be purchased on the Public Store.

Screenshot indicating the need to select All Schools from the Campus toolbar to create a public store.Example Public Store Settings

Field Descriptions (Public Store)

FieldDescription
Public Store ON/OFF

Once the Public Store toggle is switched to ON, people can use the Public Store Link found on this Settings page to shop at your Public Store.


You must fill in the Public Store Home Page section before the Public Store toggle can be switched to ON.

Public Store Home Page
TitleThe name of the store as it appears in Campus Student and Campus Parent.
Public Store URLThis is the link people can use to shop at your Public Store. The URL is cannot be modified.
Require User Account

Public Store customers can create a user account before they make purchases on the Public Store. If you mark this checkbox, customers will be required to create a user account before making a purchase.


When someone creates an account, their name and email address are saved in Campus in the Demographics tool and Campus assigns the Public Store Homepage to their user account. Public Store customers can review their payment methods and purchase history after they log in.

Click here to expand...

Screenshot of the public store user account options to Log In or Create Account.Screenshot of the User Account Information tool with a callout around the Homepage dropdown and Public Store selected.


DescriptionThe text you enter in this field displays below the Title on the Public Store.
Screenshot of the Public Store Home Page with a callout around the Description.
Logo Upload

A picture that represents the Public Store. This image displays at top of the page.


The image must use one of the following extensions: .jpg, .jpeg, .png, or .gif.

Screenshot of the Public Store Home Page with a callout around the Logo.

If this is your first time uploading an image in Campus, Campus prompts you to accept the Terms and Conditions. Mark the checkbox before you save.

Screenshot of the Consent checkbox that will need to be selected before saving an uploaded logo.


Step 5. Set up Categories

Classic View: School Store > Administration > Categories

Search Terms: Categories

Categories are how similar products are grouped together in the store. When a portal user selects a category, only the products assigned to that category display. Inactive categories and active categories with NO active products do not appear in the School Store.

  • If you select All Schools in the Campus toolbar, the Categories for every school can be seen.
  • If you set the Show Inactive toggle to ON, inactive Categories also display. Otherwise, when the toggle is set to OFF, only active Categories display. Inactive Categories can be deleted if if there are no Products assigned.

Screenshot of the Categories tool with example categories listed and Show Inactive switched on. Example Categories

Create a New Category

  1. Select School Store > Administration > Categories.
    Result 
    The Categories screen displays.Screenshot of Categories.
  2. Click New in the action bar.
    Result 
    The Category panel displays. The Active checkbox and the Display On Portal checkbox are automatically selected.Screenshot of the Category panel displaying category options.
  3. Enter a Name for the category.
  4. Select the Schools where the category will be available.

     This field only displays schools you have tool rights to.
  5. Mark the appropriate Product Association checkboxes:

    • General Product - Mark this checkbox if the category will include products for purchase in the School Store.

    • Activity Registration - Mark this checkbox if the category will include activities for which students can register. When this checkbox is marked, Campus makes the category available for selection in the Activity Builder. If this checkbox is not marked, the category will not be available in the Activity Builder.

      When using Activity Registration, review information related to Restrict to Associated School Enrollments. When this checkbox is marked within the Activity Builder, the Recipient dropdown list will only display students who have an enrollment in the active school year at the school to which the activity is attached. This includes primary, secondary, and enrollments with a future end date.
  6. Mark the appropriate Display On checkboxes:

    • Portal
      Tip: This checkbox is automatically selected on new Categories. Clear this checkbox if you do not want this Category to display in Campus Parent or Campus Student.

    • Employee Self Service

    • Public Store 

    • Mobile Payments

      The options Employee Self Service, Public Store, and Mobile Payments must have General Product selected (under Product Association).
  7. Use the Select Files option to upload an image for the category.

    The image must use one of the following extensions: .jpg, .jpeg, .png, or .gif.

  8. Click Save.
    Result 
    The Category is ready for you to add Products.
After Categories are set up: 
  • if someone else wants to edit the School field on the Category, they must have tool rights to all of the assigned schools. Otherwise, they cannot make changes to the School field.
  • if you decide to inactivate a Category and active products are tied to the Category, Campus also inactivates the products and the products will not display in the School Store until they are manually made active again.

  • the Product Category is a required field on the Orders Report. If you remove a school from a Category, you will not be able to use the Orders Report for purchases made for that combination of Category and School.


Previous Versions

Categories (School Store) [.2211 - .2247]


Step 6. Set up Products

Classic View: School Store > Product Inventory > General Product

Search Terms: General Product

After Categories are set up, Products can be created using the Product progress tracker. The Product progress tracker includes the following three parts:

  • 1 - Product
  • 2 - Product Items
  • 3 - Availability

To get started, select All Schools or a specific school in the Campus toolbar, then click the Products button on a Category.

If you create a Product and decide you do not want it, you can delete the Product if it has never been purchased.

Screenshot of the Categories tool with example categories listed and Show Inactive switched on.

Part 1 - Product

Screenshot of Part 1 of the Product Progress Tracker displaying Product options.


FieldDescription
Product NameThe name that displays in the School Store, Public Store, Employee Self Service, and/or Campus Mobile Payments.
Categories

The Categories under which you want the Product to appear. You can select multiple Categories. 


When you select a Category in School Store, Public Store, Employee Self Service, and/or Campus Mobile Payments, the assigned Products display. 


The Products and Items associated with the Category are available for selection when setting up the Event Layout in School Store > Administration > Events.


The Product Category is a required field on the Orders Report. If you remove a school from a Category, you will not be able to use the Orders Report for purchases made for that combination of Category and School.

Product Type

The Product Type to which you want to assign the Product. When this product is purchased, funds are deposited into the bank associated with the Product Type's Fund Account.

Purchase Limits

Purchase Limits restrict the number of products or product items that can be bought for an individual recipient.

  • If you choose Product, the purchase limit is set in Part 3 - Availability.
  • If you choose Product Item, the purchase limit is set in Part 2 - Product Items.

If you choose not to use this feature, Campus automatically limits the number of products that may be purchased to 10 products per recipient.


Purchase Limits can only be used in Parent Portal, Student Portal, and Employee Self Service.

DescriptionDetailed information about the product. This Description appears below the picture of the product.
Receipt CommentsThis field allows for comments or special instructions to be added to a customer's receipt when the product is purchased. Comments appear below the purchased item.
Screenshot of Receipt Comments.
Variable RateMark this checkbox if you do not want to set a specific price for the item. When this checkbox is marked, the customer can enter any amount they want when they check out. This option is useful for things like donations.
The Variable Rate checkbox cannot be marked if the product is going to be purchased using Campus Mobile Payments.
Partial RefundMark this checkbox if you want to allow partial refunds for this item. 
Inventory Tracking

When this checkbox is marked, Campus calculates the amount of inventory you have available after a purchase is made.

An additional column called Inventory on Hand displays on the Step 2 Attributes screen and allows you to manage the items in your store. If the number in this column is zero, Campus displays the message Out of Stock when the users try to add the item to their cart.

Do NOT mark this option if 

  • you are allowing users to preorder this product, or
  • you do not want to limit the quantity of items that can be sold.

When this checkbox is marked, the product is included in the Inventory on Hand report.

If you use the Payments Reporter to issue refunds for products purchased in the School Store and this checkbox is marked, Campus allows you to choose whether you want to return the item to Inventory on Hand.

Customer Comments

When this checkbox is marked, customers can add information to their purchase before they check out. Comments appear on the Pick List report.

You may enter text in the customer comment field to automatically display a message.  


Customer Comments are not available in the Campus Mobile Payments app.

DescriptionDetailed information about the product. This Description appears below the picture of the product.
Image UploadThis option allows you to add a picture of the product.

The image must use one of the following extensions: .jpg, .jpeg, .png, or .gif.

As a best practice, the file should not exceed 3MB. The image that displays in the store is a square, so a 1:1 aspect ratio is also recommended.


The uploaded images do not display in the Campus Mobile Payments app.

File Upload

This option allows you to add a PDF file to the product. For example, pencils are going to be sold at a fundraiser, so a flyer about the fundraiser can be uploaded to the Pencils product. 


A link to the PDF file displays between the image and the description.

Screenshot of File Upload with a callout around the file name.


The uploaded files do not display in the Campus Mobile Payments app.

Part 2 - Product Items

Screenshot of Part 2 of the Product Progress Tracker displaying Product Items.

You can drag and drop rows to easily reorder lines in the table. To add multiple attributes (lines and rows) to the table, you must first click the Add Attribute button.

FieldDescription
ExportThe Export button allows you to download an Excel version of the Product Items table.
Import

The Import button allows you to upload an Excel or CSV file to populate the Product Items table.


To begin, use the Export button to download a template of the Product Items table.

  • You can have up to three custom attribute columns for tracking additional product information. 
  • At least one custom attribute column is required to add more than one product item. 
  • If your import file includes more than three custom attribute columns, only the first three columns are used and additional columns are ignored.
  • Depending on the options selected in Part 1 - Product, not all fields may display when exporting.
  • Do NOT change any of the following default column headers. Changing the name of a default column makes it a custom attribute column.
    • SKU
    • Student Number (Mobile)
    • Inventory on Hand
    • Selling Price
    • Reduced Price
    • Free Price
    • Cost
    • Purchase Limit
  • When you import the file, the Student Number (Mobile) column automatically populates with No if there isn't a value in the file.
  • When you import the file, the Selling Price column automatically populates with 0.00 and Inventory on Hand populates with 0 if there aren't values in the columns. The other fields will be filled with a blank if there are no values for them.
  • If you are using an Excel document and one of your attributes represents time, you must use quotes around the time. For example, if the time is 5:30pm it must be "5:30pm" or '5:30pm' in the excel document.
Add Item
The Add Item button allows you to add another row to the table if you are using custom attributes.
Add AttributeThe Add Attribute button allows you to add custom attributes to the table. You can add up to three custom attribute columns for tracking additional product information.
Student Number (Mobile)This column displays if Mobile Payments is marked within the Category under Display On.
Screenshot of the Mobile Payments checkbox selected.The Student Number (Mobile) field is used to track information about purchases for students. For example, if selling prom tickets, you may want to enter the student number at the time of purchase to track the students who are attending.

When a row is added in Step 2 Product Items, the Student Number (Mobile) column displays three options:
  • No - is the default option. When an item is purchased using the Campus Mobile Payments app, the Student Number will not display.
  • Allow - gives you the option to enter a student number during the purchase of an item; it is not required.
  • Require - requires the student number to be entered during the purchase of an item.

The Student Number (Mobile) column appears in the Campus Mobile Payments app only.

SKU

You can enter your own SKU or one from a vendor. If you leave this field blank, Campus assigns a unique, system generated number.

Infinite Campus recommends using unique SKUs for each product. 

Inventory on Hand

This column only displays if Inventory Tracking is selected in Step 1 Product.

This is the total amount of inventory on hand. You can manually update this number at any time.

If the number in this column is zero, Campus displays the message Out of Stock when the user tries to add the item to their cart.

Selling PriceThe price customers pay and see in the store. The price can be $0.00.

Items that cost $0 cannot be purchased through the Public Store.

Reduced Price

The price students with reduced eligibility status pay and see in Campus Parent/Student only. The price can be $0.00.

Free PriceThe price students with a free eligibility status pay and see in Campus Parent/Student only. The price can be $0.00.
CostThe price the district paid to purchase the product from the vendor. This field is optional.
Purchase LimitThis column only displays if you chose Purchase Item in the Product Limits dropdown list (Part 1 of the Product Progress Tracker). Enter the maximum number of this particular item the user is allowed to purchase for a recipient.

Part 3 - Availability

Screenshot of Part 3 of the Product Progress Tracker displaying Availability options.

FieldDescription
ActiveWhen this checkbox is marked, the product is available on the Start Date in the store(s) marked in the Available On section.
Restrict to Associated School EnrollmentsWhen this checkbox is marked, the Recipient dropdown list in the School Store will only display students who have an enrollment in the active school year at the school to which the product is attached. This includes primary, secondary, and enrollments with a future end date.
Example

If you have a Product attached to the High School only and this checkbox is marked, parents will only be able to select their student(s) with primary and secondary High School enrollments in the active school year as well as enrollments with a future end date. Please note that if the same Product is associated with multiple schools; e.g., a middle school and a high school, parents can select both middle and high school students in both stores.

This option is only available when the product is only available on the Portal. If the Employee Self Service, Public Store, or Mobile Payments checkboxes are also selected, this field is disabled.

Available On
  • Portal
  • Employee Self Service
  • Public Store
  • Mobile Payments
Start Date

The first day and time on which the product may be purchased. This field is required.

Campus verifies the Product Type and Category are active on the same day or prior.

End DateThe last day and time on which the product may be purchased. After this date and time, the product is inactive and is not available in the store.
Purchase LimitThis field only displays if you chose Product in the Product Limits dropdown list (Part 1 of the Product Progress Tracker). Enter the maximum number the user is allowed to purchase for a recipient from that product group. For example, if the Product Limit is set to 3 for School Supplies, this means you can purchase any 3 items from the School Supplies product group.
Purchase Limits can only be used in Parent Portal, Student Portal, and Employee Self Service.
Select a Saved Filter

This option allows you to select an Ad Hoc filter to limit purchasing to the people included in the filter. Only people who are included in the Ad Hoc filter and have an active enrollment in the active calendar year can be selected as a Recipient.

  • You can only select one Ad Hoc filter.
  • The Ad Hoc filter must include the personID.

Screenshot of selecting a Saved Ad Hoc Filter.

See the Ad Hoc Filter Examples for more information.

Select a Saved Filter is only available when Portal is selected from the Available On section. If the Employee Self Service, Public Store, or Mobile Payments checkboxes are also selected, Ad Hoc filters cannot be applied.


Ad Hoc Filter Examples

Classic View: Ad Hoc Reporting > Filter Designer > Query Wizard > Student

You can create an Ad Hoc filter to limit purchasing to specific people. Only people who are included in the Ad Hoc filter and have an active enrollment in the active calendar year can be selected as a Recipient when a purchase is made.

See the article Student Filter fields for Ad Hoc Reporting for more information about this type of Ad Hoc Query.

The Ad Hoc filter must always include the Person ID: Student > Demographics > Person ID (student.personID)

Filter for Students with a Parent Consent of Yes

This filter restricts purchasing to students who have a parent consent of yes on their Athletics record.

  • Student > Demographics > Person ID: student.personID
  • Student > Activities > Athlete Eligibility > parentConsent: ath.parentConsent
FieldOperatorValue
ath.parentConsent=

Screenshot of an Ad Hoc Query Example.

Ad Hoc Query Example

Filter for Students with an Active Physical Form

This filter restricts purchasing to students who have an active physical on record.

  • Student > Demographics > Person ID: student.personID
  • Student > Activities > Athlete Eligibility > physicalDate: ath.physicaldate
  • Student > Activities > Athlete Eligibility > physicalEndDate: ath.physicalenddate
FieldOperatorValue

The values provided here are applicable for the 2019/2020 school year. Modify these dates as necessary

or use the IS NOT NULL Operator.

ath.physicaldate>09/01/2019
ath.physicalenddate<09/01/2021

Screenshot of fields used in an Ad Hoc Query Filter.Ad Hoc Query Example


Refunds

  • Use the Payments Reporter to issue refunds for products purchased in the School Store. 
  • If the Inventory Tracking checkbox is marked on the product, Campus automatically updates the Inventory on Hand to include the refunded item. 
  • Users can choose whether to return the item to inventory or reimburse the customer.