This tool is available as part of the Campus Learning premium offering and only in Ohio.
Location: Digital Learning Applications Configuration > click the SameGoal tile
Establishing a connection to SameGoal allows districts to:
- Connect IEP documents in SameGoal to a Flag in Campus.
- View IEPs for students from the student header, Instruction > Roster, Section > Roster, and the new student details side panel in Instruction.
- Include data from SameGoal IEPs in relevant state reports.
SameGoal connections are only available for customers in Ohio who have a Campus Learning license.
Integrating with SameGoal requires three types of connections to be configured in Campus: OneRoster, LTI, and Vertical Reporting. OneRoster connections provide SameGoal with the necessary demographic data to connect to student records. LTI connections allow users to view specific documents from third-party systems within Campus. And Vertical Reporting connections allow data to be pulled from SameGoal for reporting purposes.
The basics of establishing these connections are provided in this article. However, the following articles provide additional information and context and may prove helpful: OneRoster API, Digital Learning Applications Configuration, Configuring OneRoster Connections, and Configuring LTI Connections.
Before beginning the connection configuration process, review these instructions provided by SameGoal.
See the SameGoal FAQ article for answers to commonly-asked questions about SameGoal connections.
Tool rights to Digital Learning Applications Configuration and Flags Setup are required to complete this process.
Step 1: Add Application
Tool Search: Digital Learning Applications Configuration
To start creating the connection, click Add Application and select SameGoal from the list of available vendors. Integrating with SameGoal requires OneRoster, Vertical Reporting, and LTI connections, as described below.
 Integrating with SameGoal requires all three types of connections: OneRoster, Vertical Reporting, and LTI 1.3.
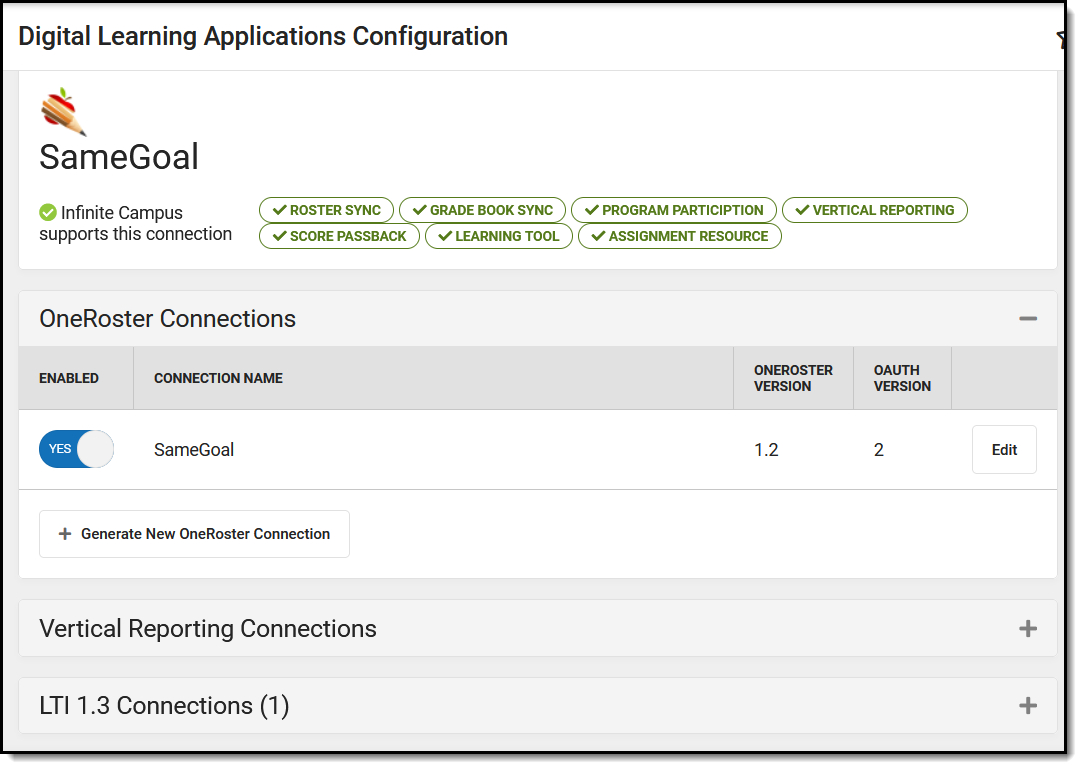
Step 2: Create a OneRoster Connection
- Expand the OneRoster Connections section and click Generate New OneRoster Connection.
- In the popup that displays, leave OneRoster 1.2 selected and click Generate.
- If desired, modify the Name of the connection. This option is helpful if your district has multiple schools connected to the same vendor - each school can have their own connection.
- Leave Demographics selected in the Data to Share section.
- By default, 1.2 connections are scoped to all schools in the district. If desired, expand Enabled Schools and select which school should be included in this connection.
- The fields in the Information to Share with SameGoal section are used to connect SameGoal to your district's instance of Campus. Log in to your district's instance of SameGoal and copy/paste this data into SameGoal, as described in this section.
- Consult Troubleshooting Documentation as needed. The link to the OneRoster 1.2 API Documentation is provided, which documents the API and allows users to review endpoints and retrieved data for troubleshooting and verification purposes.
- Expand the section called Connection Configuration and make sure the Include Legal Name checkbox is marked.
- Click Save when finished.
Step 3: Create a Vertical Reporting Connection
- Expand the Vertical Reporting Connections section and click Generate New Vertical Reporting Connection.
- In the screen that displays, enter data provided by SameGoal - the Client ID, Client Secret, Base URL, and Token URL as provided here.
- Click Save when finished.
Step 4: Create an LTI Connection
- Expand the LTI 1.3 Connections section and click Add LTI Connection.
- If desired, modify the Name is specific to the connection.
- Ignore the Transfer Email Address and Allow Campus Parent Portal Access fields.
- In the Configuration Information from the Partner Program section, enter data provided by SameGoal - the Launch URL, Public Keyset URL, Login Initiation URL, and Target Link URL.
- Copy the data in the Configuration Information from Campus section and enter it into SameGoal. Note: SameGoal only requires the Public Keyset, Client ID, OpenID Endpoint, and Deployment ID.
- If limiting the connections to only specific schools, expand School Selection and mark schools to be included in the connection.
- Ignore the Advanced Settings section.
- Click Save when finished and then Close.
Step 5: Set up Flag
Tool Search: Flags Setup
The final step of configuring SameGoal is done outside of the Learning Interoperability/Digital Learning Application Configuration tool.
- Navigate to the Flags Setup tool and click New.
- Give the flag a Name and leave the Active checkbox marked. Note: Follow the naming conventions provided by SameGoal as described here.
- Mark the Flagged checkbox to display the flag in relation to the students who have it assigned. Select a color and image for the flag.
- Mark the Special Ed checkbox. This checkbox allows SameGoal to identify this flag and make a connection with it.
- Click Save when finished.
Results
Syncs with SameGoal are performed nightly. Therefore, data entered in Campus or SameGoal is not available in the other program until the next day.
Once the SameGoal configuration is complete and data has synced with SameGoal overnight, Samegoal will request the needed student information and add flags for students who have documents in SameGoal.
- Users can manage documents in SameGoal without having to double-enter the data in Campus.
- Students who have documents in SameGoal have the corresponding flag assigned.
- Click that flag in the student header, Instruction or Section Roster, or the new Student Details side panel to open the student's SameGoal document in another tab/window. See the SameGoal Integration article for examples from the user's perspective.
- Data from SameGoal documents is populated in relevant state reports: Student SPED Graduation Requirement (FE), Student SPED Record (GE), Student Attributes Effective Date Record (FD), and Student Program (GQ).
- For a student with a SameGoal record, the only data stored in the Campus database is the flag/program participation record. When Vertical Reporting is enabled, data is pulled from SameGoal at the time a state report is generated and is not stored in Campus.
See the SameGoal Integration article for more information about the SameGoal connection looks for other users.
