The Behavior tools are used to manage behavior-related data for a school district. The Behavior Settings tools are used to set up preferences for tracking data related to behavior events, resolutions, and responses.
Overview of Behavior Module and Setup Options
Behavior Module Overview
Use this overview to learn about the tasks, skills and procedures related to recording, maintaining, communicating and reporting behavior information.
The Behavior module provides tools for monitoring and recording behavior incidents, for creating letters for parents/guardians regarding student's behavior and for generating reports related to behavior. This page is designed to assist the user in the tasks, skills and procedures relating to Behavior. All tasks and tools are linked to the appropriate help articles.
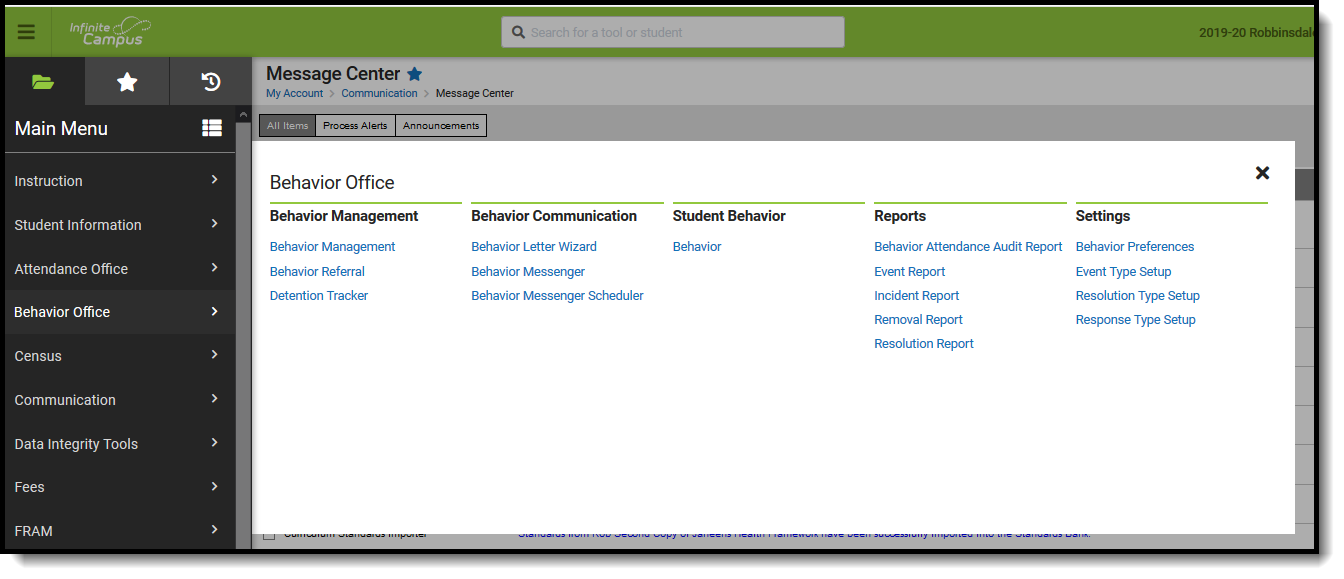 Behavior Office Tools
What is an Incident?
An incident is a group of behavior events linked by time and proximity. Events do not have to be related or have the same participants to be grouped together in a incident. In this way, incident reporting is similar to a police report - a record of occurrences at a specific time and place.
Pep Rally Example
During a pep rally during school, a fight breaks out between two students, which results in a third student being injured. Two teachers break up the fight and find that one of the students is in possession of drugs. While the fight is happening, another student is caught attempting to steal from observers' backpacks. This occurrence would be considered a single incident with multiple events (the fight, drug possession, attempted theft) and multiple participants (fighting students, injured student, thief).
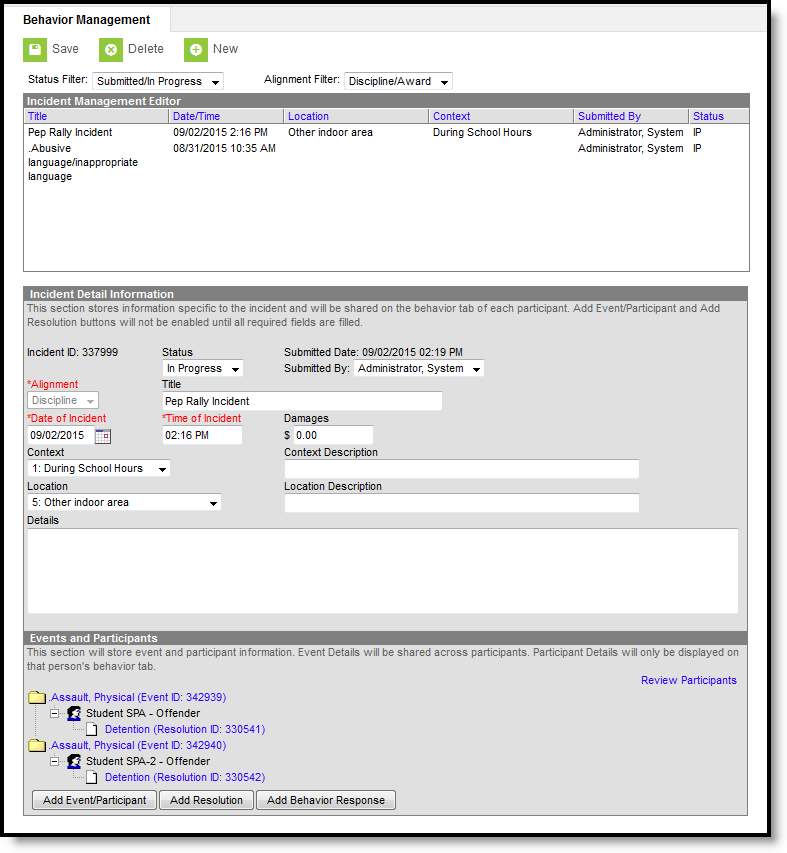 Pep Rally Incident
The images that accompany each section of the incident detail this Pep Rally incident. The image above shows the complete incident based on the Pep Rally example.
Set Up Behavior Options and Behavior Administration
Topic | Tool |
|---|---|
Establish Tool Rights for the appropriate users/groups to use behavior tools. | |
Create district-level and school-level Behavior Event options. | |
Create district-level and school-level Behavior Resolution options. | |
| Create district-level and school-level Behavior Response options. | Response Types |
Merge duplicate Event Types. | |
| Merge duplicate Resolution Types. | Resolution Types |
Setting behavior Preferences for default Notify options and report Display options. | |
Customize Behavior options. |
Create a Record of a Behavior Incident
Topic | Tool |
|---|---|
Report a Behavior Incident using a Behavior Referral, including:
| |
Create a Behavior Incident record in the Management Tool, including:
|
Student Behavior Tab
Topic | Tool |
|---|---|
Assign a Resolution. | |
| Enter a Behavior Response. | Behavior (Student) |
Manage Detention for a student from within the incident record. | |
Print individual behavior information for a student for an Incident, the current Calendar or All Years. |
Manage Detention
Topic | Tool |
|---|---|
Assign a Behavior Resolution of Detention through the Behavior Tab or the Management Tool as part of incident participation. | |
Manage Detention for a student from within the incident record. | |
Enter detention for an individual or a group of students using the Detention Tracker. |
Report Behavior Information
Topic | Tool |
|---|---|
Print individual behavior information for a student for an Incident, the current Calendar or All Years. | |
Report a Behavior Incident using a Behavior Referral. | |
View a report of Behavior Events by event type or resolution type. | |
View a report of Behavior Incidents based on the selected criteria. | |
View a report of resolutions assigned to students with Removal subtypes of Detention, Suspension and/or Expulsion. |
Notify Parents of Behavior Events
Topic | Tool |
|---|---|
Create a disciplinary letter regarding behavior events. | |
Create a message template reporting a behavior event and schedule it to be sent. |
Link Behavior and Attendance Records
| Task | Tool |
|---|---|
| Mark the appropriate attendance codes that relate to behavior resolutions. | Attendance Codes |
| Mark the appropriate behavior resolution types to allow for attendance modification. | Resolution Types |
| Create a behavior incident, assigning events and participants. | |
| Enter a behavior resolution for one of the event participants. | |
| Verify the entered behavior event and resolution, and mark the incident complete. | Behavior Management |
| Verify the behavior event displays on the student's behavior tab. | Student Behavior |
| Verify the attendance tab displays an entry for the behavior resolution. | Student Attendance |
| Generate a report looking for any inconsistencies in linked behavior/attendance records. | Behavior Attendance Audit Report |
Behavior Records Logic with Combine Person
The following table describes what happens to behavior records when student or staff records are combined using the Combine Person tool.
| Tool | Combine Person Result |
|---|---|
| Behavior Management | All incidents assigned to the drop person are moved to the keep person. |
| Behavior Referral | All incidents assigned to the drop person are moved to the keep person. |
| Behavior Letter Wizard | All letters associated with the drop person are moved to the keep person. |
| Behavior Messenger | All messages sent to the drop person are moved to the keep person. |
| Behavior Messenger Scheduler | N/A |
| Detention Tracker | All records for the drop person are moved to the keep person. |
| Student Information | All student records from the drop person are moved moved to the keep person. |
| Behavior Events | All events associated with the drop person are moved to the keep person. |
| Behavior Resolutions | All resolutions associated with the drop person are moved to the keep person. |
| Behavior Responses | When combining two staff persons:
When combining two students:
|
Behavior Settings
This content provides an information regarding the tools used to configure behavior preferences and define behavior events, resolutions and response types.
The Behavior Management Tool is used to enter new behavior incident information, complete behavior documentation that's in progress, view completed behavior incidents, and process submitted behavior referrals. This video shows how to process a submitted behavior referral, but the same information can be applied to entering a new behavior incident and to completing an existing one.
Always follow your district and state practices when using this tool. This video provides a general overview of how to use the Behavior Management tool.
This video is approximately 6:13 in length. It's been divided into chapters to make it easier for you to navigate to the areas where different tasks performed with this tool are demonstrated. The video fades out and in throughout so you can spend your time learning about how the tool works rather than watching data entry that may differ from your local requirements.
Chapters:
0:00 - Introduction
0:33 - Filter, Sort and Select
1:04 - Incident Detail Information
1:44 - Review Participants
2:32 - Add Participant
3:06 - Add Event/Participant
3:27 - Add Resolution
4:33 - Add Behavior Response
5:16 - Complete Incident
Behavior Response Types are used when documenting actions taken when approved staff need to administer a restraint on a student.
Areas That May Impact Behavior Set Up
District Assignments
Settings made in District Assignments can impact where staff names appear in behavior-related areas of Campus.
District Assignments are used when assigning course sections to teachers. Only teachers in the selected school who are employed during the date range can be assigned to sections as teachers. Any staff member with a district assignment to a school may be added as a new section staff member.
A staff member’s employment record is organized into two areas - the district of employment and the school(s) to which the person is assigned.
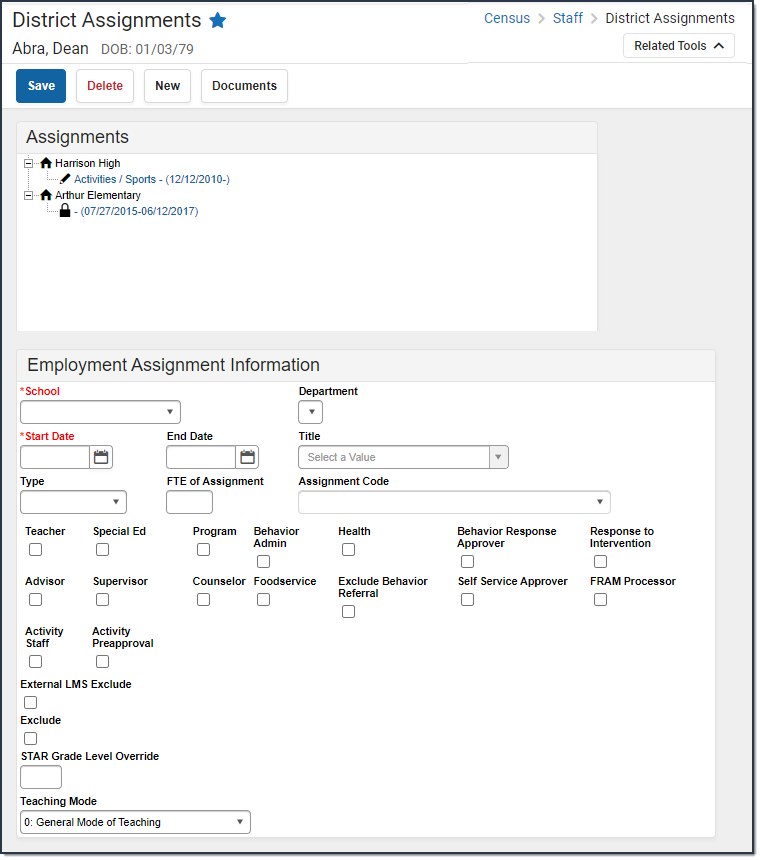 District Assignments Editor
See the District Assignments Tool Rights article for information about rights needed to use this tool.
The available fields and data elements on the District Assignment editor vary from state to state. See the Localizations page for specific state information.
District Assignments Editor
The following fields are available on the District Assignments editor.
| Field | Description |
|---|---|
| School | Indicates at which school building the staff person is employed. |
| Department | Indicates the assigned area within the school where the staff person is assigned. The list is populated from the available Departments at the district. This is used for scheduling purposes. |
Start Date Required | Indicates the date the staff person began employment at the selected school. This is the very first date the staff member was employed at the school. Dates are entered in mmddyyyy format or the calendar icon may be used to select a date. |
| End Date | Indicates the date the staff person ended employment at the selected school. This is the very last date the staff member was employed at the school. Dates are entered in mmddyyyy format or the calendar icon may be used to select a date. A District Assignment record is considered active through midnight on the entered end date. For example, if the district assignment record is ended for a staff person as of September 19, the district assignment record is considered active until midnight on September 19. At 12:01am on September 20, the district assignment record is no longer active. |
| Title | Position name of the staff person. This list of titles is editable within the Attribute/Dictionary. See the Attribute Dictionarydocumentation for additional information. |
| Type | Indicates the position of the staff member. |
| FTE of Assignment | Indicates what portion of the employee’s FTE percent this particular district assignment represents. The field accepts both decimal and whole numbers (e.g., .5 or 50 to represent a half-time assignment). It is important for consistency and accuracy of reporting that the same numbering system is used for all employees (e.g. FTE of Assignment in decimal format for all employees). Not all states use this field. The District Employment editor also includes a FTE Percent field. |
| Assignment Code | The Assignment Code field is an auto-complete field that is dynamically searchable depending upon user-entered text. This information is populated by the values stored in the Attribute Dictionary. If an entered search request does not match any entries in the dictionary, a warning message displays indicating the user should modify the entered search results. |
| District Assignment Checkboxes | These checkboxes determine, in addition to appropriate tool rights, what access a user has to certain areas of the product. See the District Assignment Checkboxes section for more information. |
| Health License | Indicates the title of the health staff member. This value only pertains to staff with the Health checkbox marked. This field defaults to hidden. The display name and values populated in the dropdown can be modified in the Attribute/Dictionary at System Administration > Custom > Attribute/Dictionary > EmploymentAssignment > HealthLicense. See the Attribute Dictionary documentation for additional information. |
| Supervisors | Denotes the staff person as being a supervisor within the department. If a staff member is marked as a Supervisor on the District Assignment record, this field is available. |
| External LMS Exclude | When marked, prevents this record from being shared with external learning management systems, such as through OneRoster or a custom district configuration. |
| Teaching Mode | Indicates an alternative mode of instruction the staff person uses when teaching classes. |
| Exclude | When marked, the district assignments record is not included in state reporting. It's used in Ed-Fi reporting (Michigan, Nebraska, Wisconsin and Wyoming) and for other state reporting needs. |
District Assignments Checkboxes
A series of checkboxes display on the District Assignments tool that determine, in addition to the appropriate tool rights, what access a user has to certain areas of the product. The following defines what tool rights need to be given and when these checkboxes should be selected.
These checkboxes are used by other areas of the product (e.g., My Data, Emergency Messenger, Ad hoc Reporting) to differentiate between types of staff members.
In addition to the selections made on the District Assignments tool, appropriate tool rights need to be assigned.
Checkbox | Description | Affected Area |
|---|---|---|
Teacher | Selecting the Teacher checkbox makes the staff member’s name available in the Teacher dropdown lists on the Staff History tool. This option is available in State Edition. | Scheduling > Courses > Course > Section > Staff History |
Special Education | Selecting the Special Education checkbox makes the staff member’s name appear in the Special Ed Staff dropdown list on the student’s Team Members tool when adding new team members. This option is available in State Edition. | Student Information > Special Ed > Team Members |
Program | There is no logic tied to this checkbox. | N/A |
Behavior Admin | Selecting the Behavior Admin checkbox makes the staff member’s name appear in the Behavior Admin Staff dropdown list on the student’s Behavior tool when adding new behavior events and on the Behavior Management Resolution editor. It is also used to display the staff person's name in the Notify list on the Behavior Referral tool. | Student Information > General > Behavior Behavior > Behavior Management > Incidents > Resolutions Behavior > Behavior Referral > Incident Detail Information > Notify |
Health | Selecting the Health checkbox allows the staff member’s name to appear in the Recorded By dropdown on the student’s Medications and Health Office Visits tool when adding/editing medications and health events. | Student Information > Health > Health Office Visits Student Information > Health > Medications |
| Behavior Response Approver | When marked, the staff person can be selected in the Behavior Response Approver dropdown list on the Response editor. | Behavior > Behavior Management > Incidents > Response Editor |
| Response to Intervention | When marked, the staff member’s name appears in the Response to Intervention dropdown list on the student’s Team Members tool when adding new team members. | Student Information > Response to Intervention > General Team Members |
Advisor | Selecting the Advisor checkbox allows the staff member’s name to appear in the Advisor dropdown list on the student’s Team Members tool when adding team members for PLP purposes. This option is available in State Edition. | Student Information > PLP > Team Members |
Supervisor | Selecting the Supervisor checkbox indicates the person is considered a supervisor at the school or district and will display a Supervisor dropdown on the District Assignments tool. Once this checkbox is chosen for anyone at the school, the Supervisor dropdown will appear on all staff member’s District Assignment tool. | Census > Staff > District Assignment |
Counselor | Selecting the Counselor checkbox places the staff member’s name in the Counselor dropdown list on the Fill Counselor Wizard in Scheduling. | Scheduling > Fill Counselor |
Food Service | There is no logic tied to this checkbox. However, staff members can still be marked accordingly and information can be pulled in Ad hoc Filter Designer if needed. | N/A |
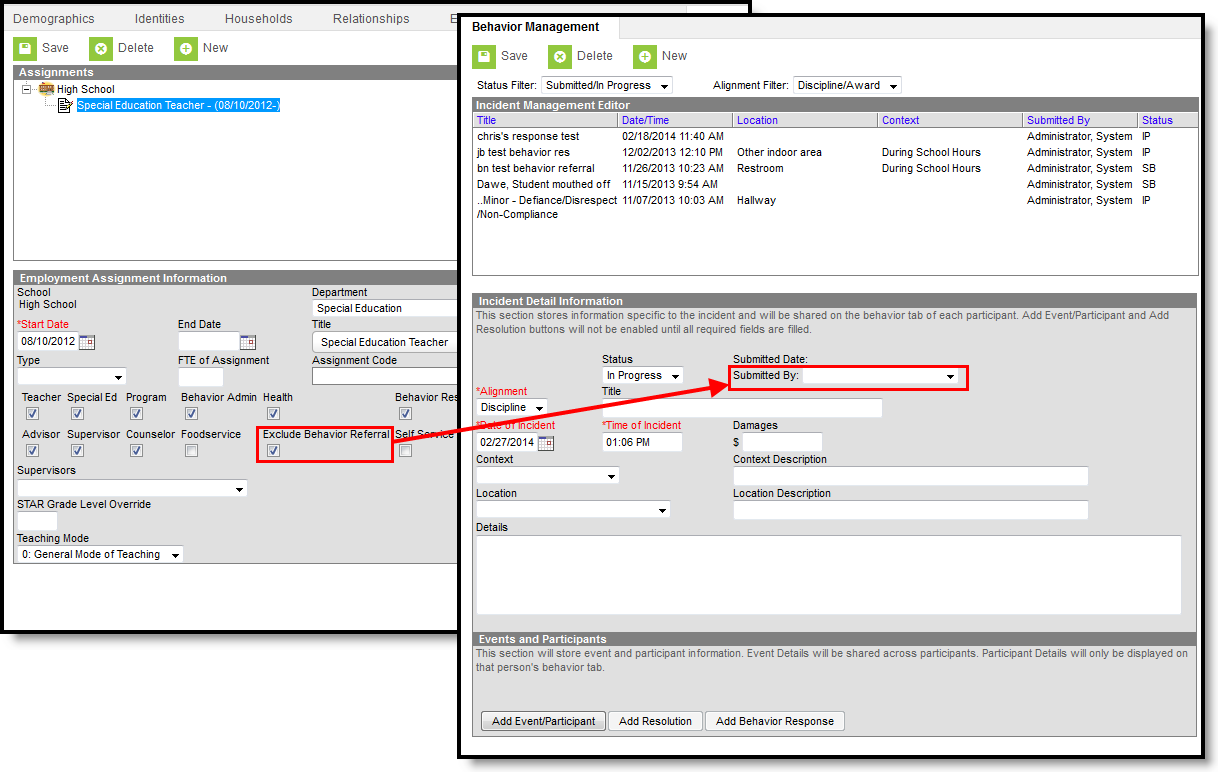
Exclude Behavior Referral | Eliminates that user’s name from the Submitted By dropdown list on the Incident Detail editor.
|
|
Self Service Approver | The Self Service Approver checkbox indicates that staff member has the ability to approve or deny requests entered by co-workers using the My Data feature in Census and should receive notifications of those requests in their Process Inbox. The staff member with this checkbox requires additional tool rights to the Request Processor feature. This selection only turns on/off the notification of requests through the Process Inbox. In addition to this checkbox, those staff members who will be responsible for approving staff member's My Data requests will also need tool rights to the Request Processor. This option is available in State Edition:
| Census > Staff Request Processor |
FRAM Processor | Indicates the staff member is a designated FRAM Processor and has the ability, depending on assigned tool rights, to process Meal Benefits Applications via the Household Applications or Online Applications tools. | FRAM > Household Applications > Online Applications |
| Activity Staff | When this checkbox is marked, the staff member may be assigned as the primary or secondary owner responsible for an activity in the Activity Registration tool. | Activity Registration > Activity Monitor > Activity Builder |
| Activity Preapproval | When this checkbox is marked, the staff member may be assigned as the School Approver, District Approver, or International Approver for an activity preapproval request. | Activity Registration > Preapproval Configuration; Preapproval Requests |
District Assignment/Course Section Logic
The District Assignment Record is linked to the Course Section Editor by the District Assignment field on the Course Section tool. The following defines the logic used.
This field pulls the Title (or, in some locations, the State Title) assigned to the selected staff person on the District Assignment record. Only assignments within the current school will be available for selection. This field is not required.
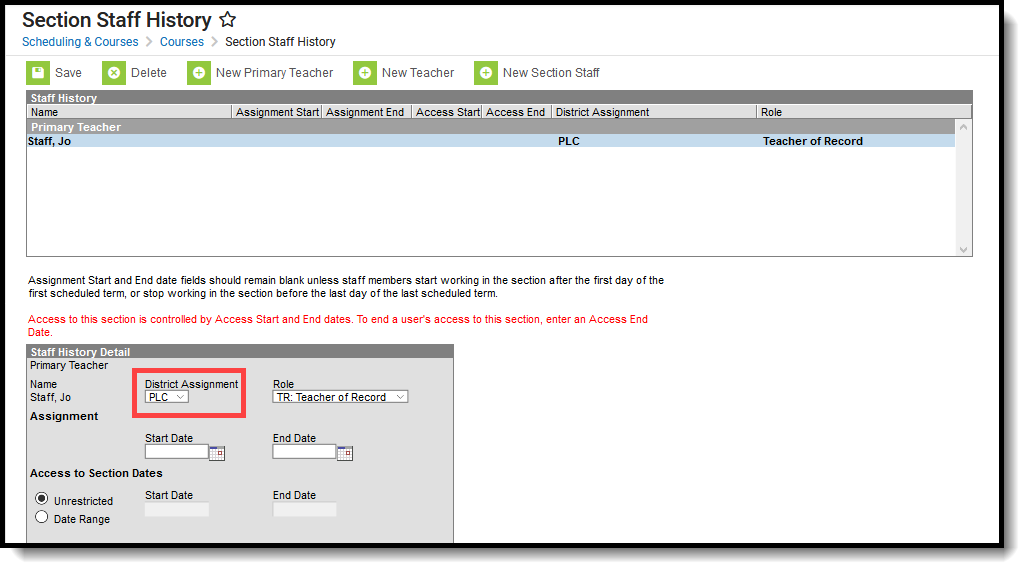 District Assignment Field on Staff History
Once a District Assignment selection has been made on the Staff History Editor, the following logic is applied:
- Users may not remove a District Assignment when that staff person has a section assignment. A warning message will appear indicating that the District Assignment is linked to a Course Section.
- Users may not remove the Title/State Title selection from the District Assignment when the staff person has a section assignment. A warning message will appear indicating that the District Assignment is linked to a Course Section.
- Users may not remove the Teacher checkbox selection when that staff person has a section assignment. A warning message will appear indicating the District Assignment is linked to a Course Section.
When a District Assignment is ended for a teacher, the start and end dates of the District Assignment display in the selected District Assignment option.
Add District Assignments
- Click the Add Assignment icon. An Employment Assignment Information window will appear.
- Select the School at which the person works from the dropdown list. This is a required field.
- Select the Department in which the person works from the dropdown list.
- Enter the Start Date for this person. This is the date the person began working at the selected school. Dates are entered in mmddyy format or by clicking the calendar icon and selecting a date.
- Select a Title from the dropdown list.
- Select a Type of employment. These types vary by state. Please select the appropriate options for the user.
- Enter the person’s Assignment Code and enter the FTE of Assignment.
- Check the boxes to indicate the designations of the person.
- Select a Health License option, if applicable.
- Select the person’s Supervisor from the dropdown list.
- Enter any other fields necessary that are localized for your state and required for reporting purposes.
- Click the Save button when finished.
State Edition users are not required to select all options on this editor.
The Primary Teaching Area field is not used in all states and options can be localized to fit individual state needs. This field becomes available when the staff member is designated as a Teacher.
Edit District Assignments
- Select the assignment record to modify.
- Make the necessary changes to the record.
- Click the Save button when finished.
When an assignment needs to be ended, enter a date in the End Date field. All other information should remain as a historical instance of the staff person's employment and settings during a certain range.
Manage Documents
To view documents, click the Documents button on the action bar. Users with the appropriate tool rights may also complete the following tasks.
- Upload Documents
- Delete Documents
- Replace Documents
- Edit a Document Name or File Description
- Download Documents
State-Specific Information
Fields vary by state. Follow these links to view District Assignment information for your state. Linked articles open in a new browser tab.
Save
Custom Attribute Dictionary
Districts can use the Custom Attribute Dictionary to create and place custom elements like fields and lists for use in Campus.
Campus Digital Repository (CDR)
Districts who have purchase Campus Digital Repository (CDR) as a storage area for files utilized within Campus can use those tools to select where documents such as behavior-related files may be uploaded.
Tool Search: Digital Repository Preferences
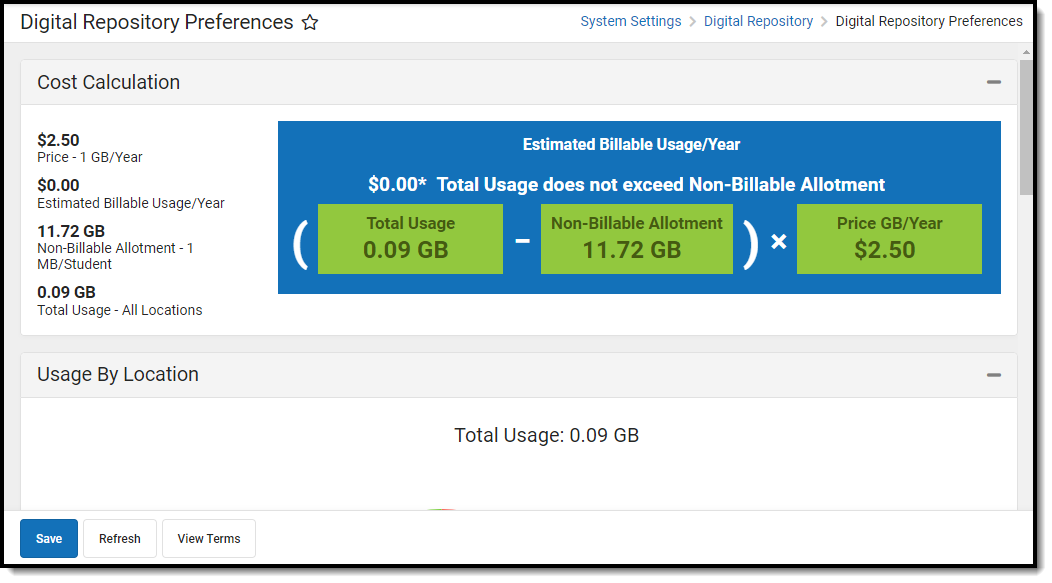
Digital Repository Preferences allow you to control which tools have document upload functionality, modify the cache, and limit the file size allowed for uploads. They also provide a detailed breakdown of your district's cost (based on total usage) and a useful pie chart to better understand your district's usage per Infinite Campus location.
With the end of June 2025 release (Campus.2527), CDR on-premise hosting will be transitioned to an off-premise cloud-based solution.
To maintain uninterrupted access to CDR, all districts still using the CDR on-premise repository will be automatically migrated to the CDR off-prem repository starting with the end of June release. CDR functionality is not impacted during migration and remains the same after the migration.
Prior to the end of June release, CDR on-premise districts should review and accept the latest terms and conditions by selecting the Change CDR Hosting button

Click here to learn more about our off-premise CDR storage.
See the Digital Repository Tool Rights article for details on available tool rights.
Enable Campus Digital Repository
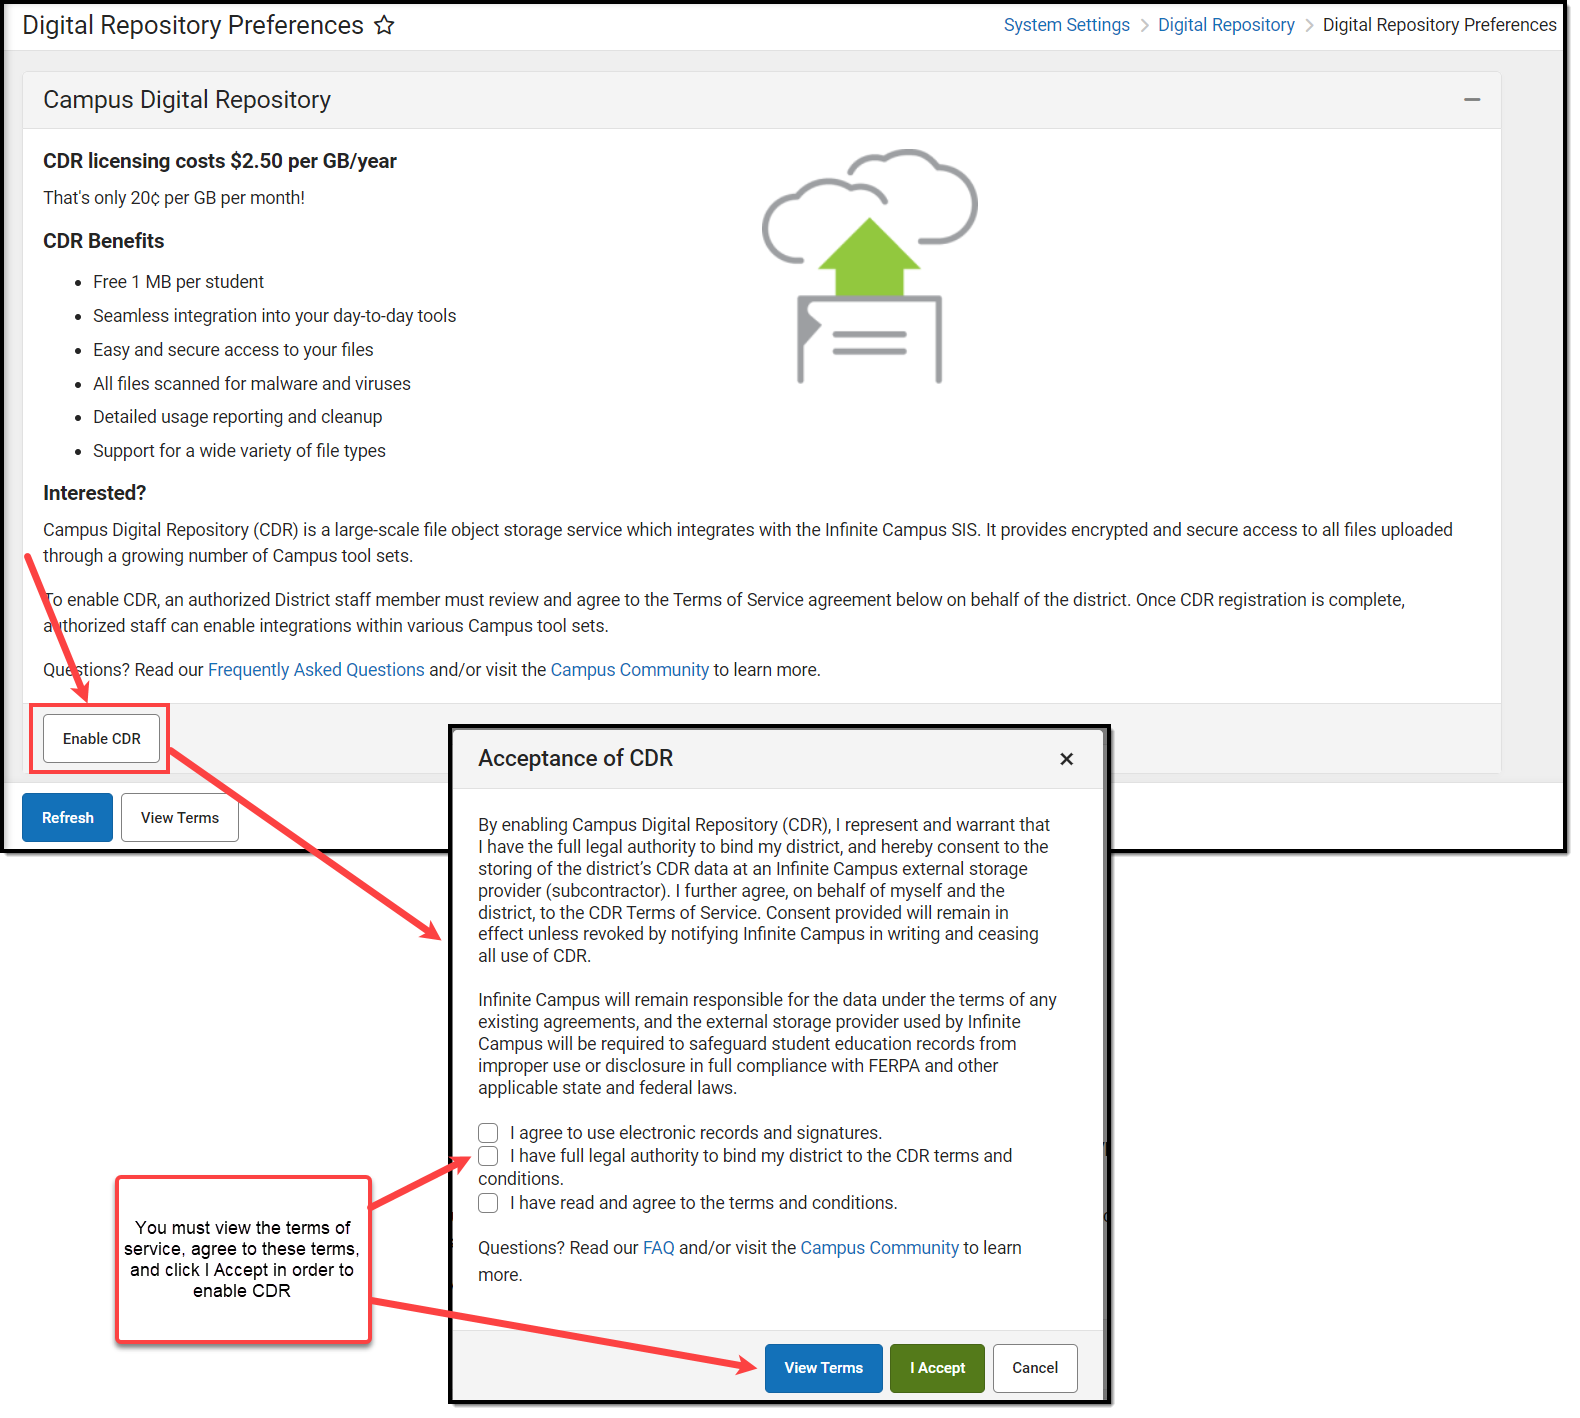
To begin using Campus Digital Repository functionality, authorized district personnel can select the Enable CDR button.
The Acceptance of CDR editor will appear, requiring you to click View Terms and read all terms and conditions, mark all three checkboxes indicating you agree to each of the terms listed for each checkbox, and select the I Accept button.
Enabling CDR allows your district 1MB of storage space per student at no cost. The student count used is your state-reported student number. Read the Terms of Service to see additional costs for using space beyond your free amount.
Please allow up to 24 hours for your free storage allocation to be calculated.
Understand the Cost Calculation
The Cost Calculation section details your district's current estimated cost per gigabyte per year, your estimated billable usage, your non-billable allotment, your total space usage across all of Infinite Campus, and a display of the calculation (using real-time numbers) of how Infinite Campus determines your Estimated Billable Usage for the year.
The non-billable allotment is determined by the district’s count of state-funded students. Annual usage is calculated as the average of monthly values.

Usage by Location
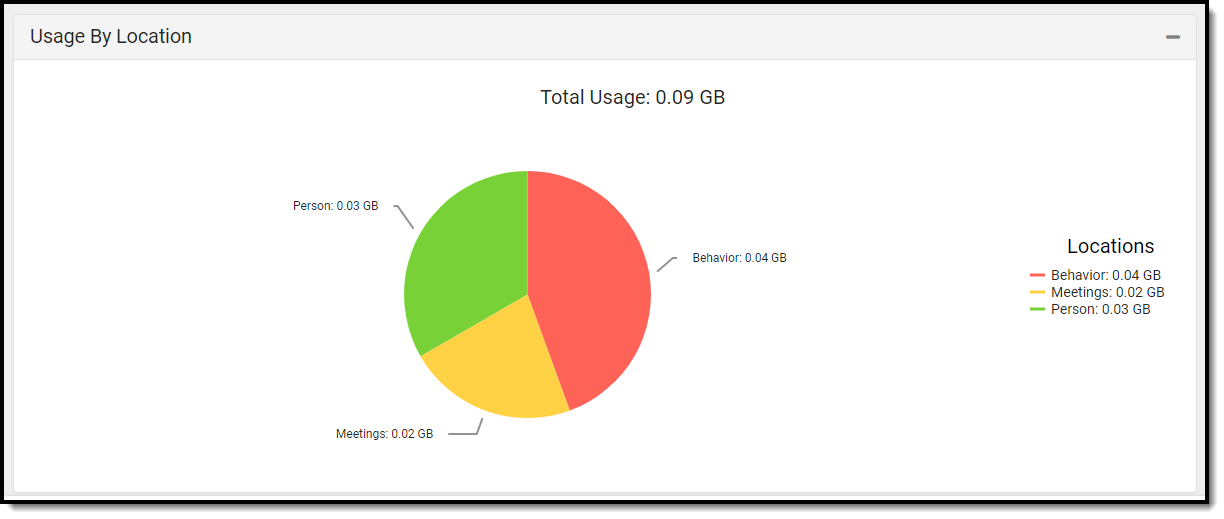
The Usage By Location pie chart displays how much space is being used by uploaded files per area of Infinite Campus. This chart is useful for understanding where the most data is being used and can serve as guidance on potential cleanup when needing to free up space.
File Upload Preferences
The Cache Size is the amount of space available on the district's local repository instance, and the setting is used to support system performance. Five GB is the recommended Cache Size, but options are 1, 5, and 10. Contact Infinite Campus Support if your district's needs exceed the allowed amount.
The Max File Size field allows you to control the maximum size allowed per uploaded file. This field allows for a range between 1 - 100mb.

Common File Sizes
The following information can be used as a reference for common file sizes. Files that include images are commonly larger than those that don't.
- 1000 KB = 1 MB
- 1000 MB = 1 GB
File Type |
Size |
|---|---|
2-page Word document |
Less than 20 KB |
20 slide PowerPoint |
Roughly 1 MB |
25 page PDF |
Roughly 2 MB |
1 MP3 |
Roughly 3-6 MB |
Enable Campus Digital Repository Per Module/Tool
Use the table below to better understand how each Digital Repository preference functions within Infinite Campus.
| Module | Toggle and Explanation |
|---|---|
| School Store | Enabling this option allows you to upload images for display of each item within a School Store.
Infinite Campus highly recommends enabling this option when using the School Store.  |
| Activity Registration | Enabling this service allows you to enable and disable the document upload feature in the Activity Registration. After the service is turned on, administrators can select the option to allow uploading files when purchasing an activity.
If Campus Digital Repository is disabled (either at the Activity Registration location or the specific post location), activities will become inactive (the step 4 "Active" checkbox will be unchecked) and cannot be re-checked until Campus Digital Repository is re-enabled. Once Campus Digital Repository is re-enabled, you will need to manually check the "Active" checkbox to allow the activity to go live again.  |
| Survey | Enabling this option allows files (such as images, signatures, etc) to be uploaded to surveys via the Survey Designer tool.
NOTE: Survey Designer options that utilize file upload capabilities are part of the Campus Analytics Suite  |
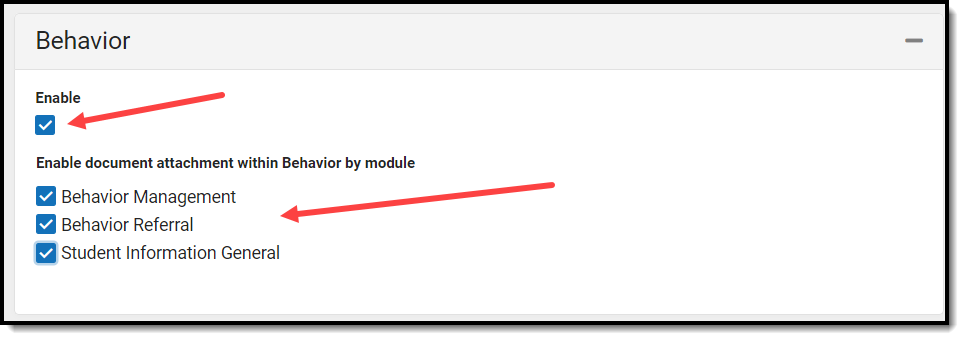
| Behavior | Enabling these options adds a Manage Files button to behavior events and incidents, allowing behavior administrators to attach files to them. See this document for more information. This does NOT add a documents button to the top of any Behavior tools.
To enable document attachment functionality, mark the Enable checkbox, mark the checkbox next to each tool that should allow files to be attached, and click Save.
File attachments can be added to student behavior records in the following tools:
|
| Campus Communicator | Enabling Inbox / Email - Inline Images allows users to embed images directly into the message body in Messenger 2.0. Enabling Voice/Text allows Messenger with Voice customers to upload .wav files for use in voice messages.  |
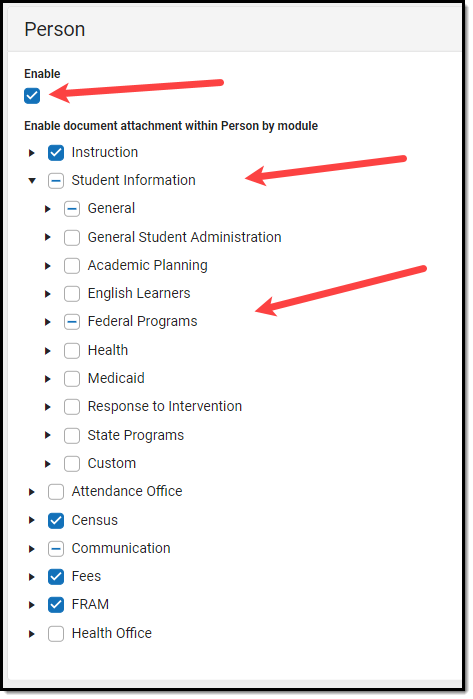
| Person | Enabling these options allows documents to be attached to various person-related tools, including Custom Tabs.
To give users access to the document upload feature, mark the Enable checkbox and then mark the checkbox next to the tool(s) where the Documents button should appear, and click Save.
All documents uploaded via any of the Person tools listed are visible in Person Documents.
To use the Document feature, users must have tool rights to the tool in which the Documents button appears. Read/Write (RW) rights allow users to view the document, edit details (description and file name), and replace a file. Add (A) rights allows the user to upload a new document and Delete (D) allows the user to delete a document.
Clearing the checkbox next to the tool disables the user's ability to upload documents and hides the Documents button. Previously uploaded documents are NOT removed. Removing document attachment functionality only disables the user's ability to add additional documents. |
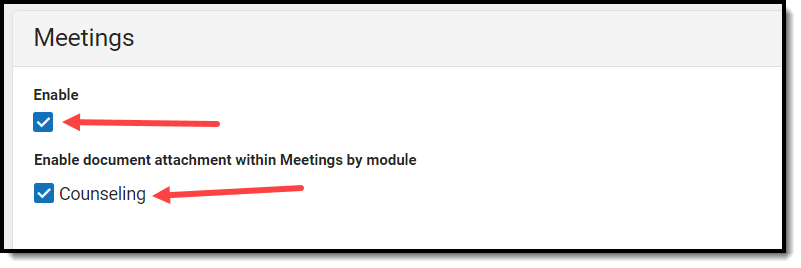
| Meetings | Enabling this option allows counselors to attach files to meetings.
 |
| Campus Learning | |
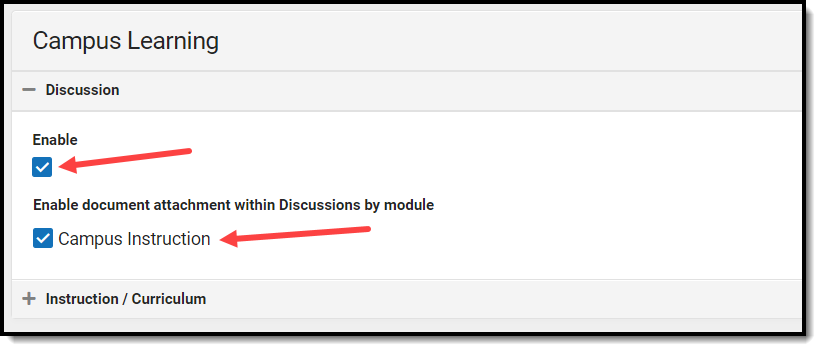
| Discussion | Enabling this option allows moderators to set up discussions that allow participants to attach files to their posts.
 |
| Instruction/Curriculum | When this option is enabled for a school, teachers have the option to allow students to submit assignments via the Campus Student Portal.
If you are a teacher, see the Enabling Submissions article for directions about using the repository to create assignments for submission on the portal, viewing student submissions, and responding to student submissions.
Marking the Staff File Uploads checkbox allows staff to upload files within Instruction/Curriculum tools. 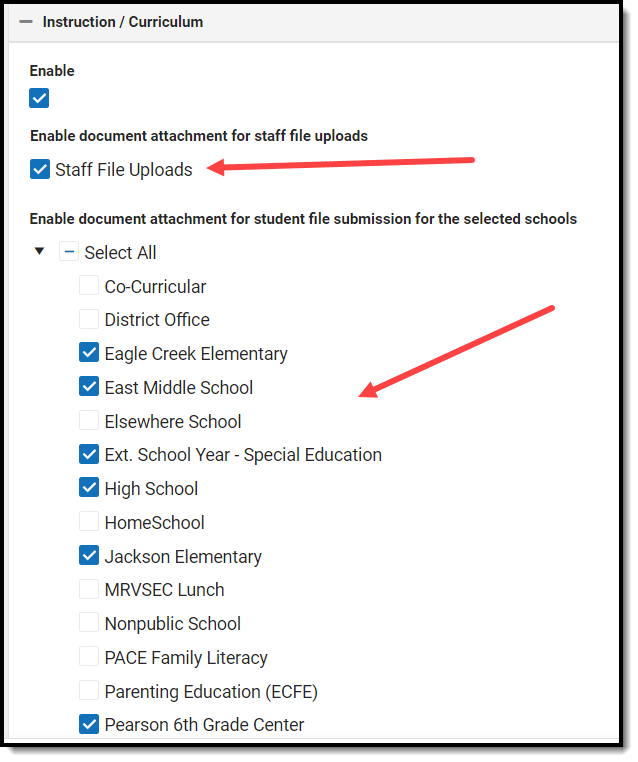 |
| Groups | When this option is enabled for a school, participants in a group can add file attachments and images to posts and replies.  |
Supported File Types
Digital Repository allows for the upload of all file types except for the extensions listed below.
You cannot upload a document with a file name containing one or more of the following illegal characters: | , [ ] { } ( ) ! ; " * ? < > : / Tab, LF, CR
Periods are allowed except at the end of the file name, creating two or more periods before the extension (i.e., testFile..jpeg)
The following file types cannot be uploaded to the Digital Repository:
Excluded File Types |
|---|
_exe, a6p, ac, acr, action, air, apk, app, applescript, application, awk, bas, bat, bat, bin, cgi, chm, class, cmd, com, cpl, crt, csh, dek, dld, dll, dmg, docm, dotm, drv, ds, ebm, elf, emf, esh, exe, ezs, fky, frs, fxp, gadget, gpe, gpu, hlp, hms, hta, hta, icd, iim, inf, ins, inx, ipa, ipf, isp, isu, jar, java, js, jse, jsp, jsx, kix, ksh, lib, lnk, mam, mcr, mel, mem, mpkg, mpx, mrc, ms, msc, msi, msp, mst, mxe, obs, ocx, pas, pcd, pex, pif, pkg, pl, plsc, pm, potm, ppam, ppsm, pptm, prc, prg, pvd, pwc, pyc, pyo, qpx, rbx, reg, rgs, rox, rpj, scar, scf, scpt, scr, script, sct, seed, sh, shb, shs, sldm, spr, sys, thm, tlb, tms, u3p, udf, url, vb, vbe, vbs, vbscript, vdo, vxd, wcm, widget, wmf, workflow, wpk, ws, wsc, wsf, wsh, xap, xlam, xlm, xlsm, xltm, xqt, xsl, zlq |
The Digital Repository Preferences tool allows districts to manage settings for the Campus Digital Repository, including storage space, maximum file size, and the areas throughout Campus where file upload is enabled.
Existing Campus Digital Repository users can now switch their hosting model from on-premise to off-premise.
Off-premise hosting provides a highly available, reliable, and secure way to store and transmit your files within Campus. See this section for more information.
In the July 2025 release of Campus, access to the Campus Digital Repository will be disabled for districts who are still using the on-premise object repository.
In preparation for this change, a series of notifications will be sent to Campus administrators of districts who need to migrate their CDR accounts off-premise. A Process Inbox message is sent to all users with the SIS Product Security role or who have tool rights to the Digital Repository Preferences tool. The message instructs users to visit the Digital Repository Preferences tool and switch their CDR account to off-premise. An additional message is sent every two weeks until the CDR hosting model for their account is updated.
Switch to CDR Off-Premise
Customers who have already enabled and are using Campus Digital Repository services now have the option to change their hosting from on-premise to off-premise. Off-premise hosting provides numerous benefits, including:
- File replication across multiple geographically distant availability zones.
- 99.99999999999% durability.
- 99.99% availability.
Switching to off-premise hosting does not change or modify the user experience within Campus, and your existing files are seamlessly migrated without any work or intervention required.
To make the switch, click the Change CDR Hosting button, agree to the terms, and get started!
If you do not see the Change CDR Hosting button, your district already uses off-premise CDR hosting.
NOTE: Off-premise hosting is not available for BIE customers.

