Location: Digital Learning Applications Configuration > select a OneRoster connection that uses OAuth 2 > Edit > Troubleshooting Documentation > OneRoster API Documentation
What is 'API Documentation'?
The OneRoster API Documentation allows users to explore the data their district shares with the OneRoster API for connections that use OAuth 2. The data shown in this API documentation is what your Campus site makes available through OneRoster connections; vendors may not use all data made available through the API.
This tool is an implementation of Swagger, an industry-standard API documentation tool.
In most instances, Campus recommends only using the GET option, which allows you to view data and not modify it. The POST, PUT, and DELETE buttons of this tool allow a user to insert and delete records in Campus. Campus recommends not using the POST, PUT, and DELETE methods in your Production instance of Campus.
Accessing API Documentation
|
See the Configuring OneRoster Connections article for more information about setting up connections. |
 For a connection that uses OAuth 2, click Edit and then click the OneRoster API Documentation link. |
The API Documentation has three sections:
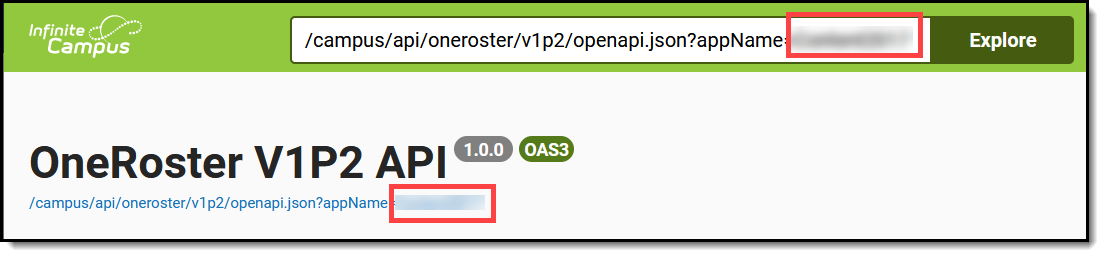
- The information at the top of the screen (the URL, the Servers dropdown list, and the Authorize button) are populated by default.
- Next, API endpoints are grouped by the type of data they contain, such as AcademicSessionsManagement, ClassesManagement, etc. The endpoints in these groups represent the data that is available to vendors and allow you to mimic the full range of what a OneRoster Digital Learning Partner can do via the API.
- Below the endpoints are the Schemas. This section can largely be ignored The schemas show in general terms the contents and order of a specific record type. Although these schemas can be expanded and viewed with the > button, these same schemas are also built into each Management section where they can be viewed with more context.
Endpoint Management
Methods
The GET, POST, PUT, and DELETE options for endpoints allow you to send a sync request to your districts instance of the OneRoster API that mimic the requests that vendors send. Doing so lets you observe your Campus site's response and confirm that your site is making records available to your vendor via the API.
Each endpoint has a method that describes what the endpoint does:
- GET: Sends a request to your Campus site to view the record(s) your site makes available through that API endpoint. This method is the recommended use of this Documentation tool.
- POST, PUT: Insert or update a record in your Campus site via the API. Not recommended for Production instances of Campus.
- DELETE: Deletes a record in your Campus site via the API. Not recommended for Production instances of Campus.
Campus recommends only using the GET method in your Production instance to avoid modifying data.
OneRoster URLs
 Example of a OneRoster URL
- All OneRoster endpoints begin the same with /api/oneroster/v1p2/{appName}/ims/oneroster.
- 'rostering' or 'gradebook,' indicates the type of record. Connections may have roster sync and/or grade book sync enabled on the configuration screen.
- 'v1p2' indicates that you're using the 1.2 version of the API.
- The name of the endpoint, such as 'academicSessions,' 'classes,' or 'orgs.'
- {SourcedId}, which are unique identifiers for records; if an endpoint specifies a sourcedId, it returns data specific to that entity, such as a class, school, or student.
- Following the URL is a simplified description of what that endpoint returns, such as getStudentsForClass.
For example, the endpoint shown above returns data for all students in a specific class. The class is specified by its sourcedId.
Types of Queries
There are 3 types of queries, indicated by the format of the URL:
- getAll (...v1p2/endpoint name): Returns all records for the given endpoint.
- For example, '...v1p2/classes' returns all class records available in the API.
- get (...v1p2/endpoint name/{sourcedId}: Returns the specific record identified by the sourcedId.
- For example, '...v1p2/demographics/{sourcedId}' returns the demographics record for the person identified by the sourcedId.
- get...For (...v1p2/endpoint name/{sourceId}/endpoint name: Returns associated records for a specific record identified by the sourcedId. This is called a 'helper endpoint.'
- For example, '....v1p2/schools/{schoolSourcedId}/classes' returns all classes for a specific school identified by the sourcedId.
Viewing Records
This API Documentation does not provide access to lineItem, Results, Program, or Assessment endpoints. A vendor's key and secret are required to interact with that data.
All Records and Total Counts
|
A Specific Record
|
| The response displays under Server Response in JSON format. Data is organized by a hierarchy of tags, starting with the object, embedded elements and values, and followed by any linked objects and their values. | |

See the Accessing Specific Data section following for specific examples of using the API Documentation to query OneRoster records.
Parameters
Expand below to view descriptions and examples of available parameters.
Interpreting Results
After executing a GET command, data displays in the Server Responses section. This section is different from the Responses section, which contains general examples and schema information and can be ignored.
The most useful content is in the Response Body. Ignore the technical information provided in the Curl. The Request URL is the endpoint you selected appended with any parameters. The Code is the HTTP response code issued by the Campus site in response to the sync request. A 200-level code indicates a successful request; a 400 or 500-level code indicates an error. See the Common Errors section following for more information.
Common Errors/Response Codes
The following is a list of common errors that could indicate improper use of the OneRoster API Documentation tool rather than an actual issue with the OneRoster API itself.
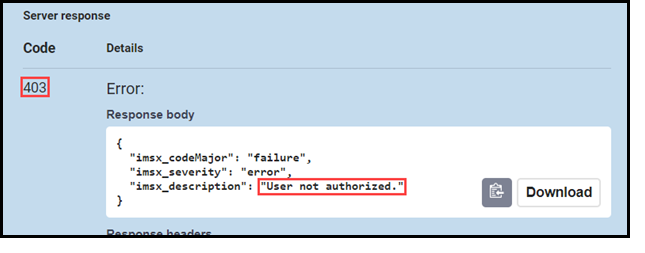
When an error occurs, consult the Code and "imsx_description" returned to learn more about the error.
 Reference the Code to learn more about the error.
| Code | Description |
| 200
201 |
Success
Your Campus site was able to load the requested data. This is not an error; it indicates a successful GET request. |
| Receiving a 200 with an empty Response Body that only includes the name of the endpoint and an empty set of brackets [ ] indicates that the request was successful but there is not data to display. An empty Response Body could indicate that the API does not contain any values that fit the Filters entered in the request. | |
| 401 | User not authorized
This error is most commonly received when your session has timed out due to inactivity. The OneRoster API Documentation does not automatically log you out when your session has timed out. However, once you are no longer logged in to Campus, requests cannot be made to the API. If you receive this error, close the API Documentation tab, reopen it via the Digital Learning Applications Configuration tool, and resubmit the request. |
| 404 | Unknown object HTTP 404 not found
This error indicates that the record(s) requested are not available via your Campus site's instance of the API. To troubleshoot:
|
| 422 | Invalid data; offset is not a modulus of limit: Invalid parameter 'offset' value of '____'.
Indicates an incorrect Offset parameter. To troubleshoot, verify that the Offset value entered is a multiple of the Limit value. For example, if the Limit is 500, the Offset cannot be a value such as 100 or 600. With a Limit of 500, valid Offsets include 0, 500, 1000, 1500, etc. |
| 422 | Invalid data: Pagination limit value must not be greater than 50000: Invalid parameter 'limit' value of '____'.
In Parameters, the Limit must be less than 50,000. If you need to see records beyond the first 50,000, submit a request with a smaller Limit and a corresponding Offset, such as a Limit of 1000 and an Offset of 50,000. |
| 400 | invalid_filter_field
Indicates an incorrect Filterparameter. To troubleshoot:
|
| 400 | invalid_selection_field
Indicates an incorrect Fields parameter. Ensure that the Field entered is correct. This field is case sensitive. |
Response Body
The Response Body displays the returned records in JSON format. See the OneRoster 1.1 Data Models article for guidance in understanding this JSON content and where the data can be found in the Campus UI and database.
If the request was not successful, an Error displays instead of the Response Body. See Common Errors above for more information.
Response Headers - x-total-count
The most useful part of the Response Headers section is the x-total-count, which is the total number of records available in the API to request in this endpoint, given the Filters entered above.
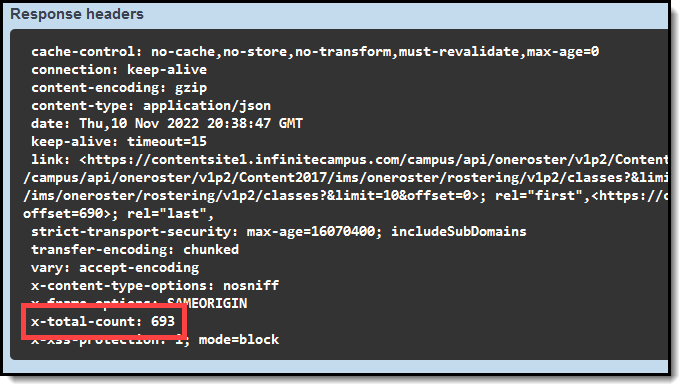 The x-total-count displays in the Response Headers section.
Accessing Specific Data
The following sections detail looking up specific data using the API Documentation. These are just a few examples; other endpoints work the same.
Users
The Users endpoint includes students, teachers, non-teacher staff, guardians, and relatives.
User by SourcedId (Person GUID)
Follow the steps below to view data for a specific user, as identified by sourcedId.
In OneRoster 1.2, the sourcedId for a user is the Person GUID, not the Person ID with a leading letter indicating their role, as it is in OneRoster 1.1.
The user's Person GUID is found in their Demographics or Summary record.
- Scroll to getUser (or getTeacher, or getStudent).
- Click GET and then Try it out
- In the sourcedId field, enter the Person GUID of the user.
- Click Execute.
If the user is included in your instance of the OneRoster API, their details display in the Response Body. The Role attribute indicates whether the user is a student, teacher, etc.
User by Filter (such as Name, Email, Username, etc)
Follow the steps below to view data for a specific user, as identified by a detail about the user.
- Scroll to getUser (or getTeacher, or getStudent).
- Click GET and then Try it out
- Enter a value in the Filter field as described in the table below. For a partial search, use the ~ symbol; for exact search, use =.
- Click Execute.
If the user is included in your instance of the OneRoster API, their details display in the Response Body. The Role attribute indicates whether the user is a student, teacher, etc.
| Look up user by: | Filter | Example |
| First and last name (exact) | givenName='FirstName' AND familyName='LastName' | givenName='John' AND familyName='Smith' |
| First name only (partial) | givenName~'FirstName' | givenName~'Joh' |
| Last name only (partial) | familyName~'LastName' | familyName~'Smi' |
| email='Email' | email='john.smith@exampleschool.edu' | |
| Username | username='Username' | username='john.smith' |
Schools a User is Associated with
In Campus, a student is associated with a school through their Enrollments; teachers and staff are associated with a school via District Assignments. In OneRoster, this association between a User and a School is represented by an 'org' reference (School GUID) listed in that person's User record. Only students and staff are associated with schools.
Once you've looked up a user record, find the org in the roles section of the Response Body. This section includes the org sourcedId. which is a different value than the user's sourcedId.
Use the org sourcedId, which is the School GUID in Campus, to look up the name of the school. To do so, either create an Ad hoc Filter that includes sch.schoolGUID and sch.name fields, or use the sourcedId to look up the School via the API Documentation.
| See a different School GUID than you expected?
For a student: View the student's Enrollment and verify that External LMS Exclude is not marked. Verify that External LMS Exclude is also not marked for the student's Grade Level, Calendar, and School. For a staff member: Verify that the user has a District Assignment in the correct school, has start and end dates within the Active Year and the School Year, and has the correct Role(s) marked. For teachers, the Role is Teacher; for non-teachers, the Role is Program with no other roles marked. Verify that External LMS Exclude is not marked on the District Assignment, School, or District. For a guardian/relative: Only student and teachers records are associated with schools. |
Classes
Classes in OneRoster correspond to Sections in Campus.
Classes by SourcedId (Section ID)
Follow the steps below to view data for a specific class, as identified by sourcedId.
The SourcedId of a class is the Section ID, which displays at the top of the Section Information.
- Scroll to getClass.
- Click GET and then Try it out
- In the sourcedId field, enter the Section ID of the class.
- Click Execute.
If the class is included in your instance of the OneRoster API, its details display in the Response Body.
Classes by Filter (Course/Section Number, etc)
Follow the steps below to view data for a specific class, as identified by a detail about the class.
- Scroll to getAllClasses.
- Click GET and then Try it out
- Enter a value in the Filter field as described in the table below.
- Click Execute.
If the class is included in your instance of the OneRoster API, its details display in the Response Body.
| Look up Class by | Filter | Example |
| Course Number and/or Section Number | title~'CourseNumber_space_SectionNumber' | title~'1001 3a' |
| Course Name | title~'CourseName' | title~'AP Chemistry' |
| Teacher Display Name | classCode~'TeacherDisplayName' | classCode~'Smith, John' |
| Note: The Teacher Display Name in the API may not be formatted as Last Name, First Name, although that is the default. Match the format to whatever displays as the Teacher Display Name on the Section. | ||
Student Schedule/Staff History
Enrollments in OneRoster correspond to section roster records for students and section staff history records for teachers in Campus. To query data related to what Campus calls Enrollments, student membership in a specific school, see the Schools a User is Associated with section above.
The Enrollments endpoint does not report the names of users or classes. Additionally, the sourcedId for enrollments records is not visible in the Campus UI. Therefore, Campus recommends filtering this endpoint by Person GUID or Section ID to generate a set of data that is more easily understood. Suggestions for ways to use this endpoint are found in the next four sections.
Confirm User Association with a Class
Follow the steps below to confirm that a specific student is rostered into a specific class, or that a specific teacher is assigned to teach a specific class.
To start, locate the user's Person GUID, in the Demographics or Summary tools for students or the Demographics tool for teachers. Also locate the Section ID of the class, which displays at the top of the Section Information
- Scroll to getAllEnrollments.
- Click GET and then Try it out
- In the Filter field, enter a filter as follows:
userSourcedId='PersonGUID' AND classSourcedId='SectionID'
For example: userSourcedId='0A987F90-B6F1-47C1-8967-1A8A1234D563' AND classSourcedId ='285487' - Click Execute.
If the user indicated by the Person GUID is associated with the Class specified in your instance of the OneRoster API, details display in the Response Body. The Person ID and Section ID of the user and class are shown, as well as a status for the association. Status options are 'active' and 'tobedeleted', which returns for inactive associations.
Classes in a Student's Schedule
Follow the steps below to view a list of classes for a specific student.
To start, locate the student's Person GUID in the Demographics or Summary tools.
- Scroll to getAllEnrollments.
- Click GET and then Try it out
- In the Filter field, enter a filter as follows:
userSourcedId='PersonGUID' AND role='student'
For example: userSourcedId='0A987F90-B6F1-47C1-8967-1A8A1234D563' AND role='student' - Click Execute.
If the student's roster records are available in your instance of the OneRoster API, details display in the Response Body, including the Section IDs of the classes on the student's schedule.
Classes a Teacher Teaches
Follow the steps below to view a list of classes a teacher teaches.
To start, locate the teacher's Person GUID in the Demographics tool.
- Scroll to getAllEnrollments.
- Click GET and then Try it out
- In the Filter field, enter a filter as follows:
userSourcedId='PersonGUID' AND role='teacher'
For example: userSourcedId='0A987F90-B6F1-47C1-8967-1A8A1234D563' AND role='teacher' - Click Execute.
If the teacher's Staff History records linking them to classes are available in your instance of the OneRoster API, details display in the Response Body, including the Section IDs of classes for which the teacher has staff history records.
Users Associated with a Specific Class
Follow the steps below to view a list of all users associated with a specific class, including students who are rostered into the class and teachers who have a section staff history record for the class. Data returned includes the status of the user in the class - whether the student has dropped the class or starts in the future, or whether the teacher's staff history record has ended or not started.
The getStudentsForClass and getTeachersForClass helper endpoints also return users for a class. These endpoints provide full user records, but do not include the status of the users' memberships.
To start, locate the Section ID for the class, which displays at the top of the Section Information.
- Scroll to getAllEnrollments.
- Click GET and then Try it out
- In the Filter field, enter a filter as follows:
classSourcedId='SectionID'
For example: classSourcedId='285487'
If desired, include AND status='active' to return only active memberships. - Click Execute.
If there are student and/or teacher records associated with this class in your instance of the OneRoster API, details display in the Response Body. The following fields may be helpful:
- Role: A role of 'teacher' indicates that the user is associated with the class via a staff history record, with a "primary: true/false" field to indicate whether the teacher is a Primary Teacher or a [secondary] Teacher. A role of 'student' indicates that the user is associated via a roster record.
- Status: Dropped or ended records (with an End Date prior to today) return with a status of 'tobedeleted,' compared to a status of 'active.' A status of 'tobedeleted' indicates to the vendor system that they may display the record as inactive or purge it, depending on that vendor's process.
- x-total-count: It may be helpful to reference the x-total-count in the Response Headers to verify that the number of records returned for students and teachers matches the expected count.
Orgs (Schools & Districts)
Orgs in OneRoster correspond to both Schools and Districts in Campus.
Specific School by Name
Follow the steps below to view data for a specific school, as identified by School Name.
To start, locate the School's Name in School Information.
- Scroll to getAllSchools or getAllOrgs
- Click GET and then Try it out
- In the Filter field, enter a filter as follows:
name~'SchoolName'
For example: name~'Plainview High School' - Click Execute.
If the school is included in your instance of the OneRoster API, its details display in the Response Body, including the name and State School Number of the school.
Specific School by SourcedId
Follow the steps below to view data for a specific school, as identified by sourcedId.
To start, locate the School GUID for the school. This value is not visible in the Campus UI. To determine the GUID, either create an Ad hoc Filter that includes sch.schoolGUID and sch.name fields, or find the GUID in a User record.
- Scroll to getSchool or getOrg.
- Click GET and then Try it out
- In the sourcedId field, enter the school's School GUID.
- Click Execute.
If the school is included in your instance of the OneRoster API, details display in the Response Body, including the name and State School Number of the school.
All Orgs
Follow the steps below to view a list of all orgs (districts and schools).
- Scroll to getAllSchool or getAllOrg.
- Click GET and then Try it out
- Click Execute.
If school and district records are available in your instance of the OneRoster API, details display in the Response Body, including Name, State Numbers, and sourcedIds for the district and schools.
Terms
Terms, Grading Periods, and Academic Sessions in OneRoster all correspond to Terms in Campus.
Terms by SourcedId (Term ID)
Follow the steps below to view data for a specific term, as identified by sourcedId.
The SourcedId of a term is the Term ID, which does not display in the Campus UI. To determine the GUID, either create an Ad hoc Filter or find the GUID in a Class record.
- Scroll to getTerm.
- Click GET and then Try it out
- In the sourcedId field, enter the Term ID of the term.
- Click Execute.
If the term is availble in your instance of the OneRoster API, details display in the Response Body, including Name, Dates, and sourcedId.
Terms by Name
Follow the steps below to view data for a term as identified by Term Name. If you district reuses term names across calendars, querying by term Name may not be specific enough.
To start, locate the Name of the term in question in Terms.
- Scroll to getAllTerms or getAllGradingPeriods, or getAllAcademicSessions.
- Click GET and then Try it out
- In the Filter field, enter a filter as follows:
title~'TermName'
For example: title~'Q1' - Click Execute.
If the term is available in your instance of the OneRoster API, details display in the Response Body, including the Name, Dates, and sourcedId. If multiple terms share the same name, multiple records may return.
