This guide will outline how to use Sent Message Log 2.0 and how to set up your district. Districts are required to enable CDR for Voice/Text in order to send messages containing .wav files.
Emergency call flows have a dedicated Emergency Call Flow process, and should ONLY be used in a true emergency.
- General and Priority calls contact individuals with multiple devices (Cell phone, work phone, etc) in a designated order
- Priority messages will be sent to Voxology with a higher priority than General messages (Same as the old engine)
- Emergency Calls now use a special call flow, where we immediately contact all devices for that contact simultaneously. For example, if you have a cell and a work phone, BOTH will ring on the first call wave.
Enabling Messenger Tools: Digital Repository
As an administrator, you will need to enable the Voice/Text option in the Digital Repository Preferences in order to upload .wav files to a message.
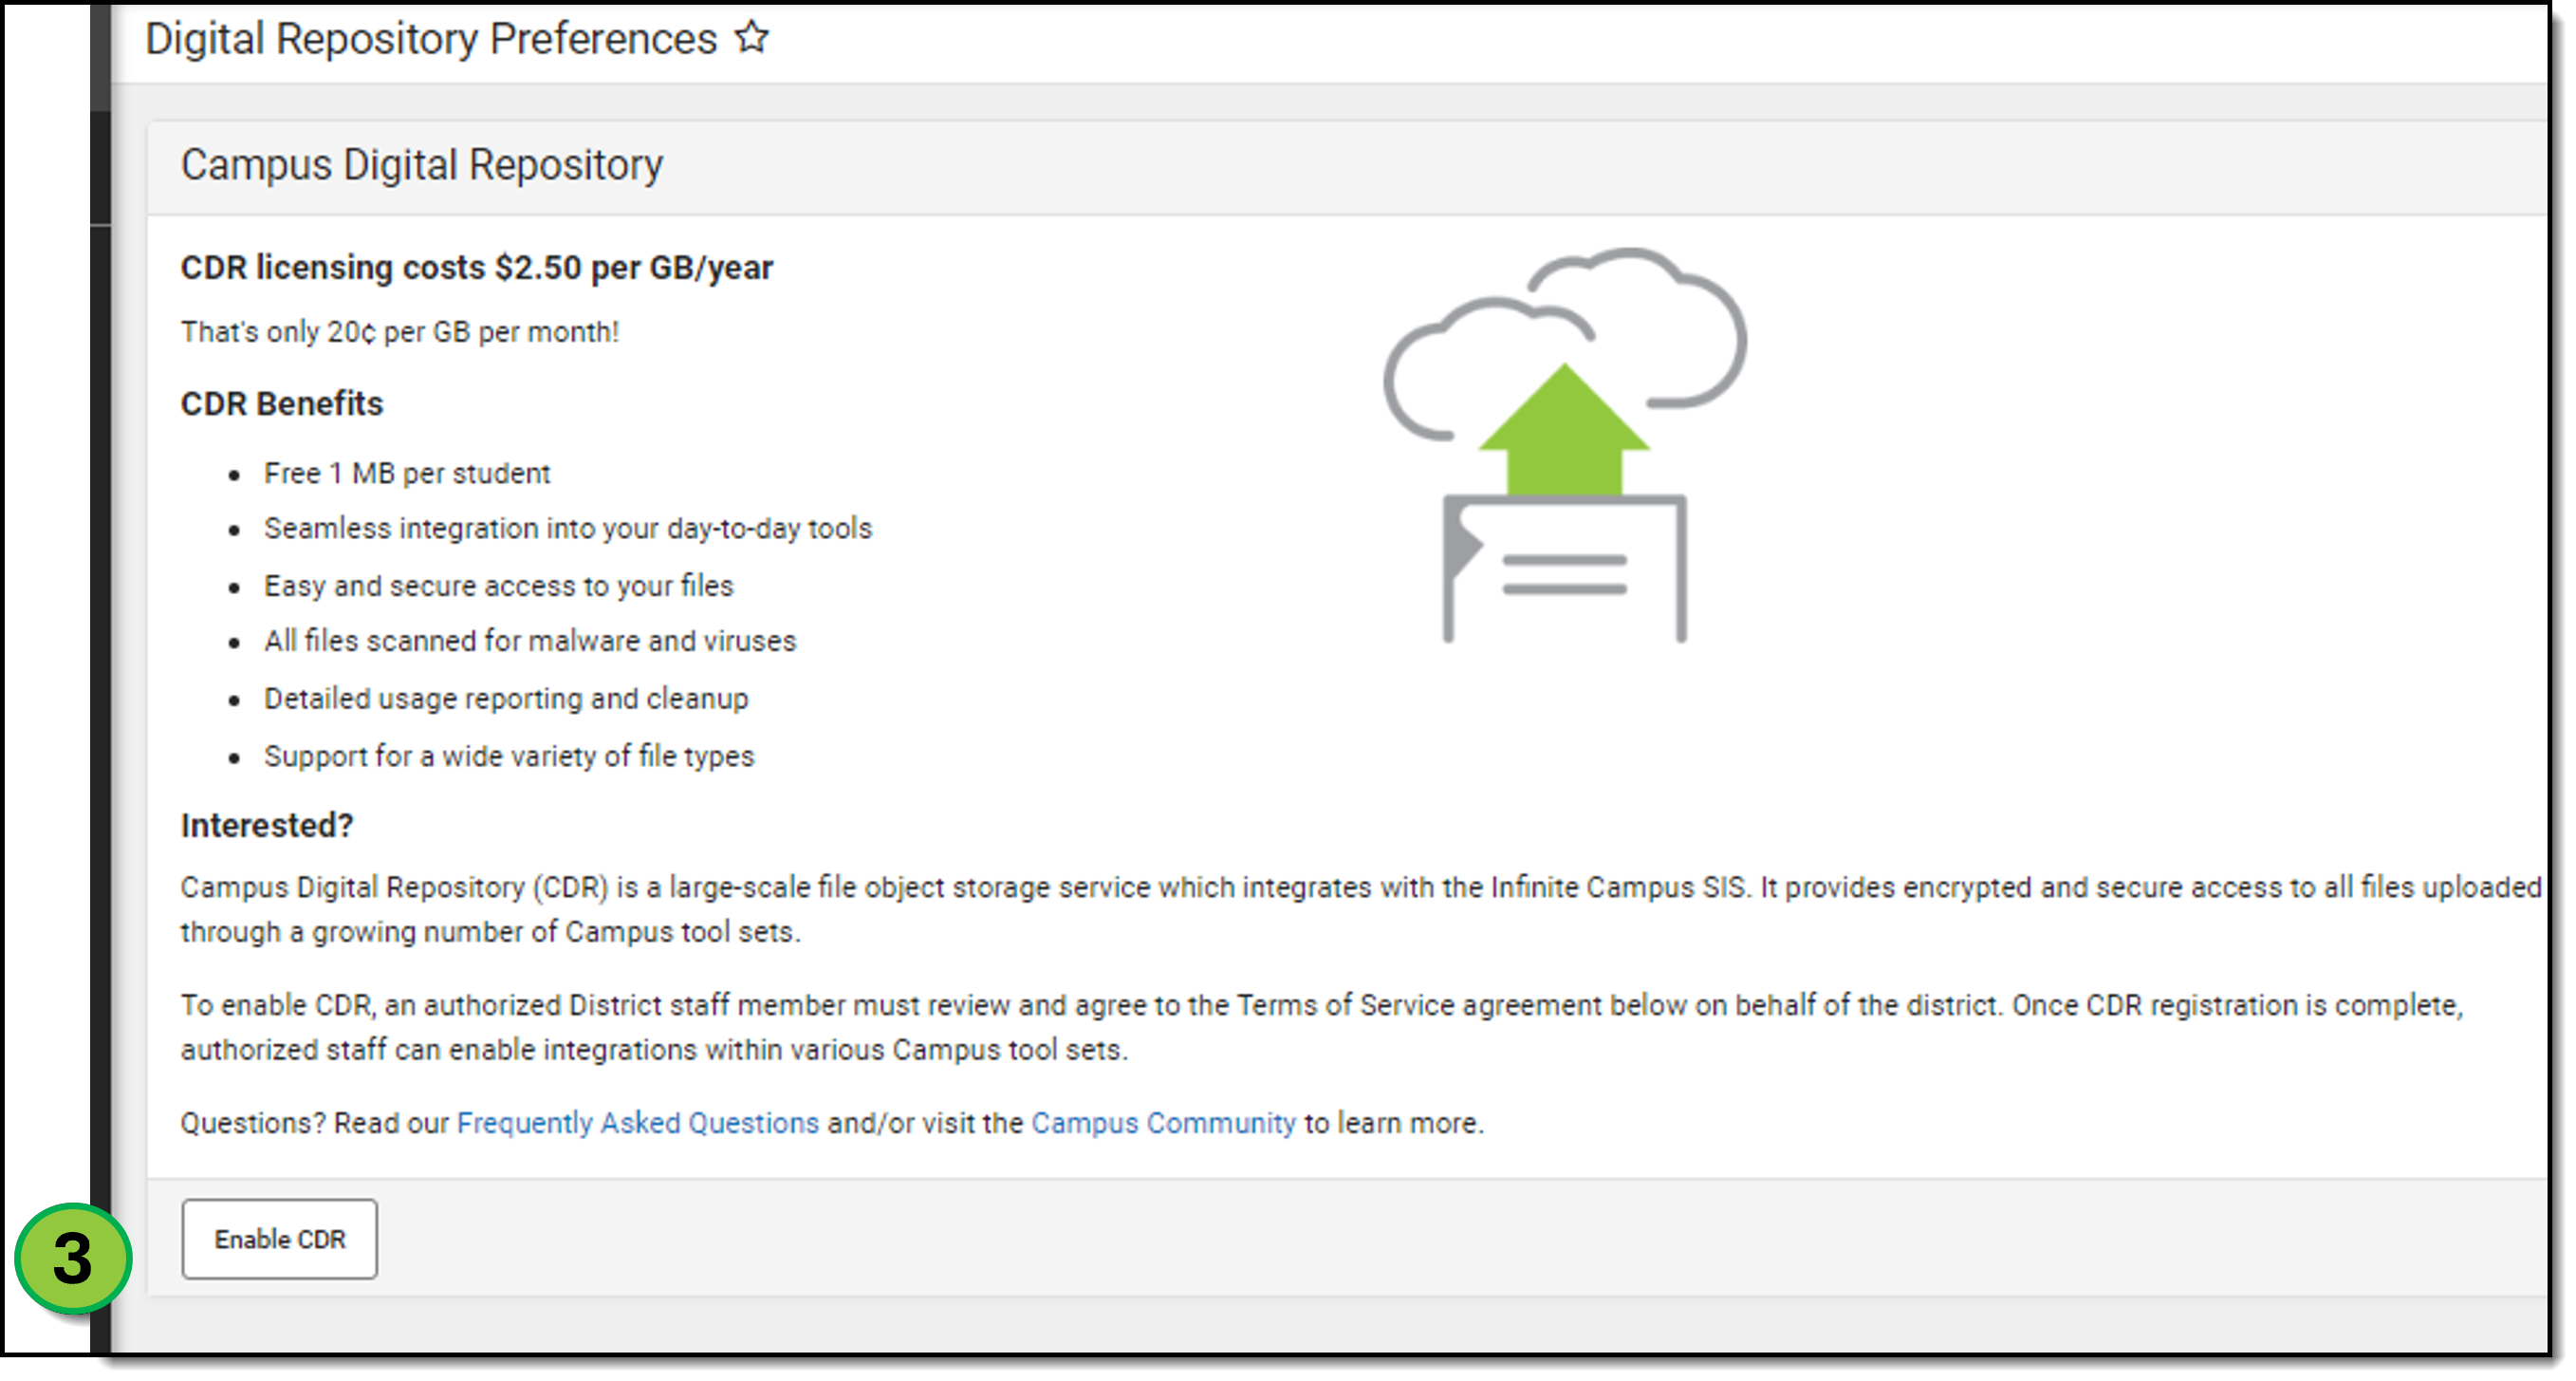
If your district is not using the Campus Digital Repository (CDR) yet, you will first be asked to enable CDR for your district. If your district already uses CDR elsewhere, skip to step 6.
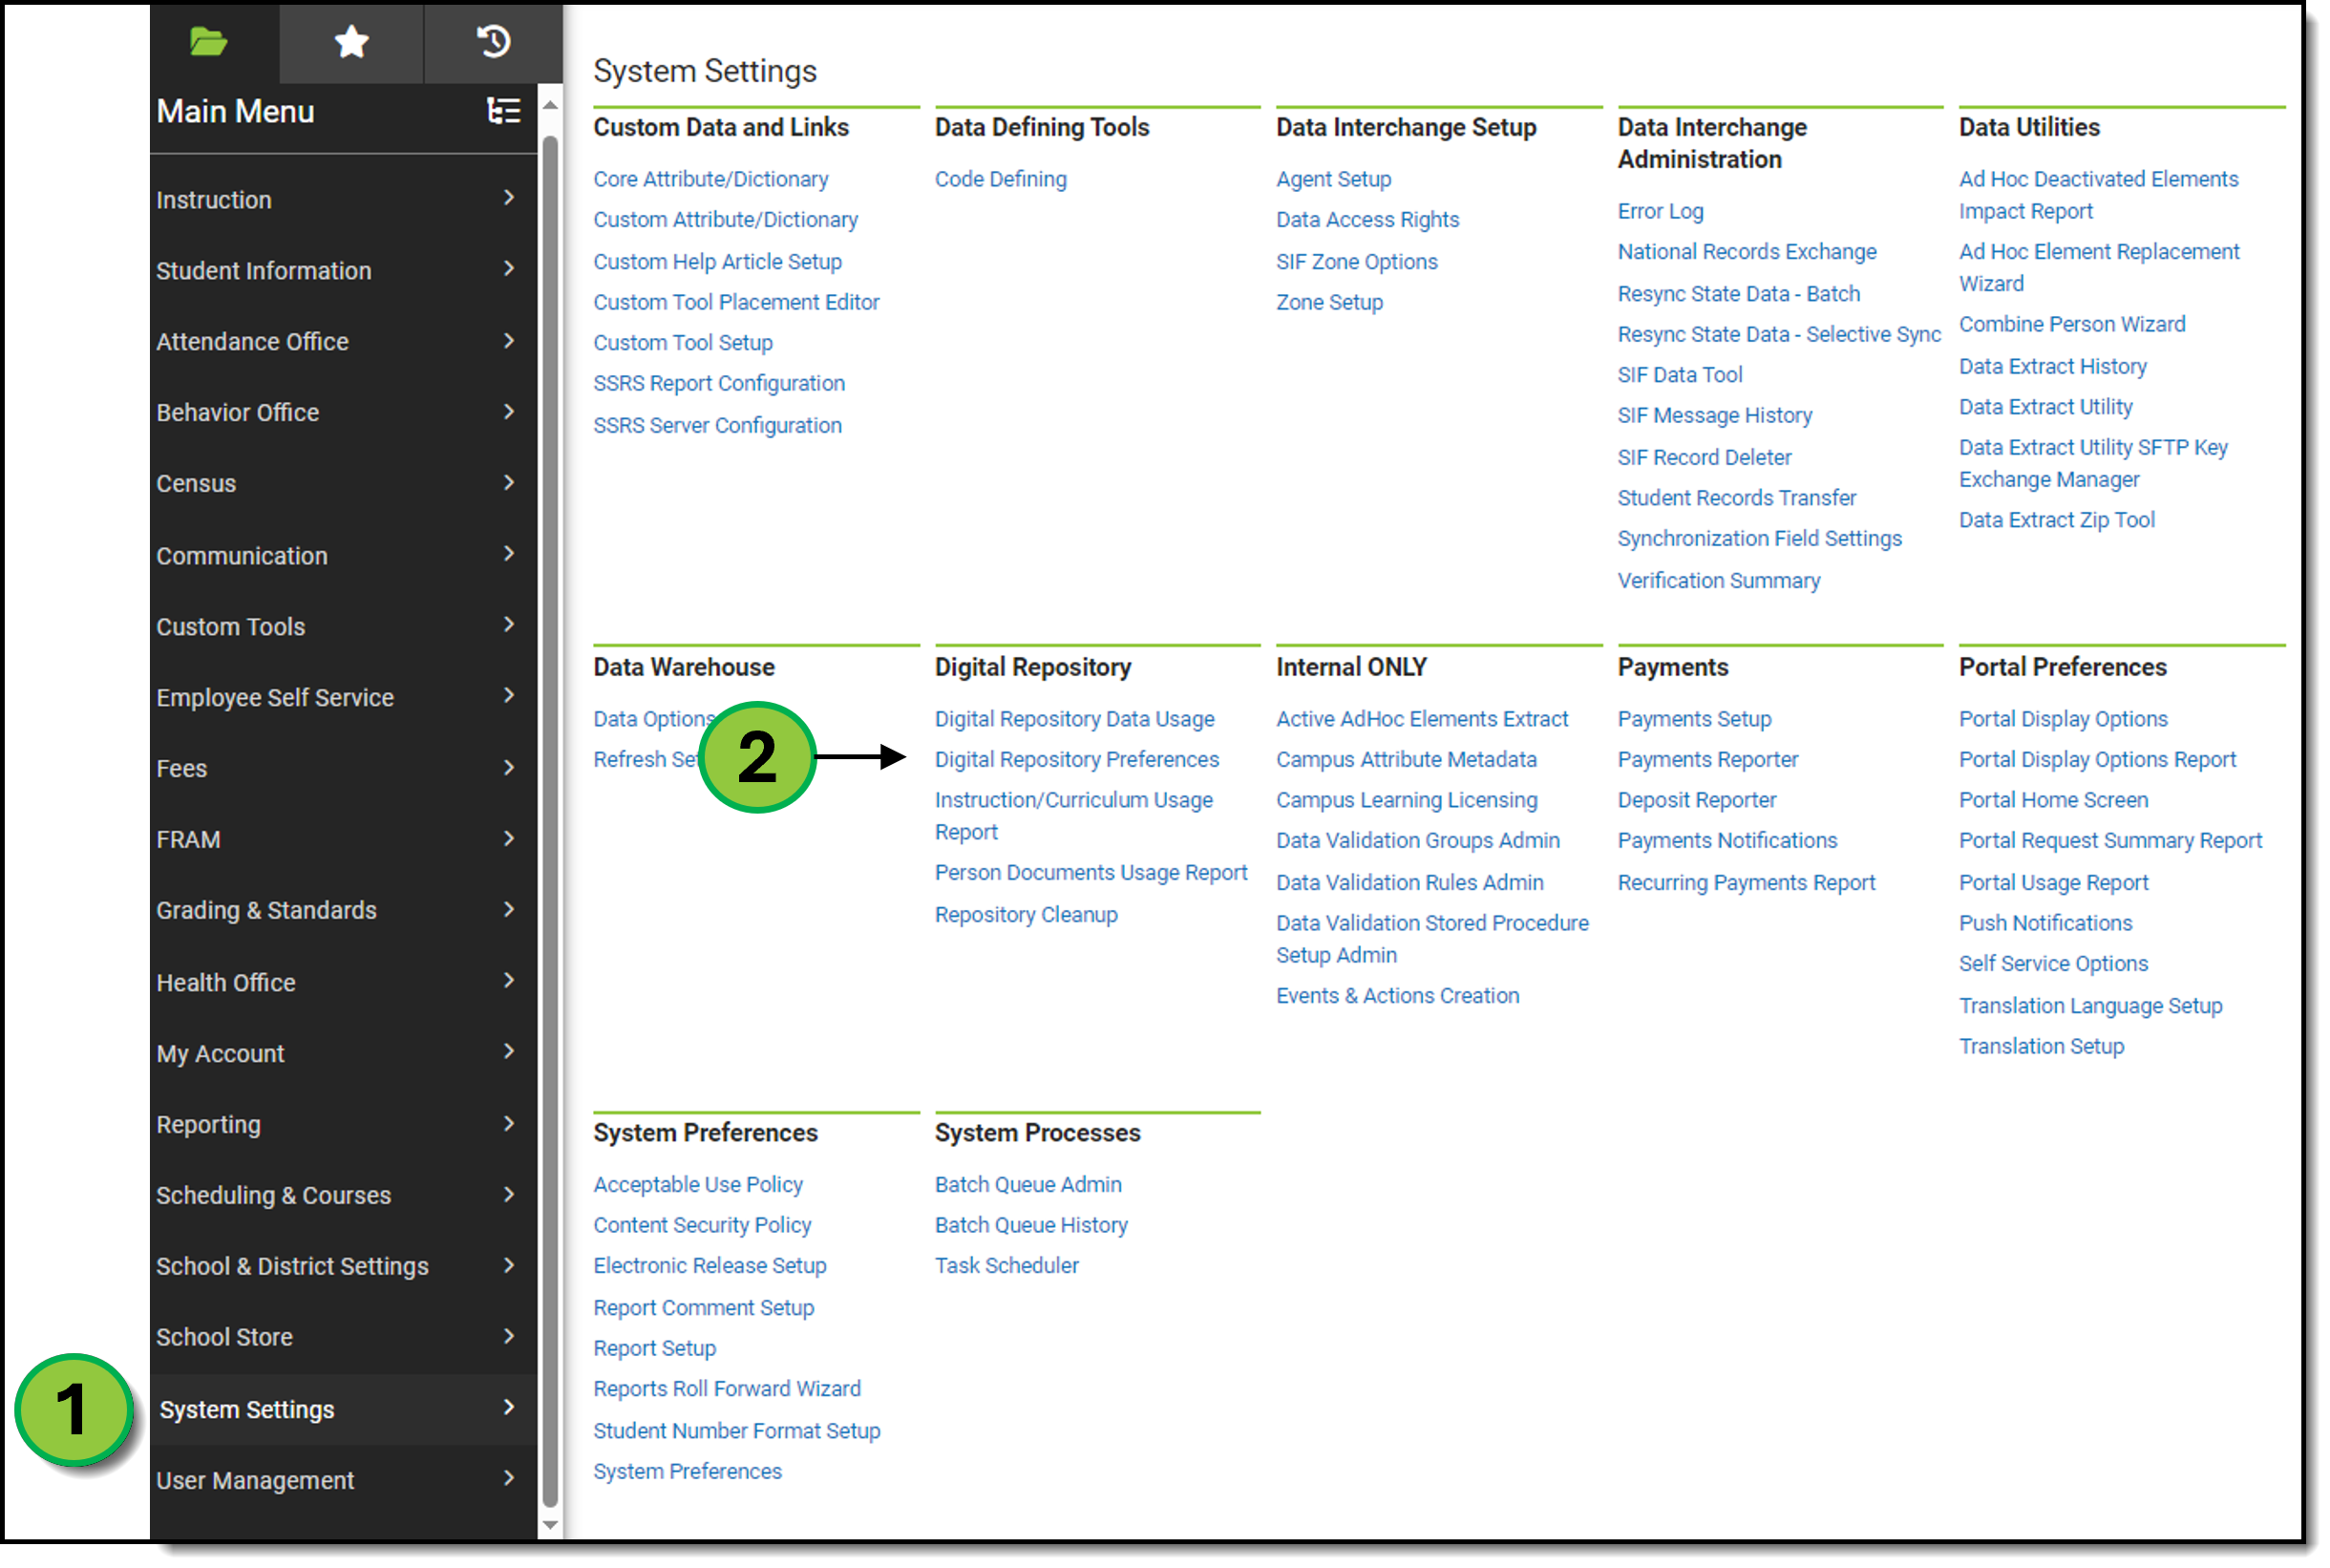
- In the left-hand panel, select System Settings.
- Under the Digital Repository section, select Digital Repository Preferences.
- Click the Enable CDR button on the lower left of the screen.
- Select all three checkboxes and click View Terms.
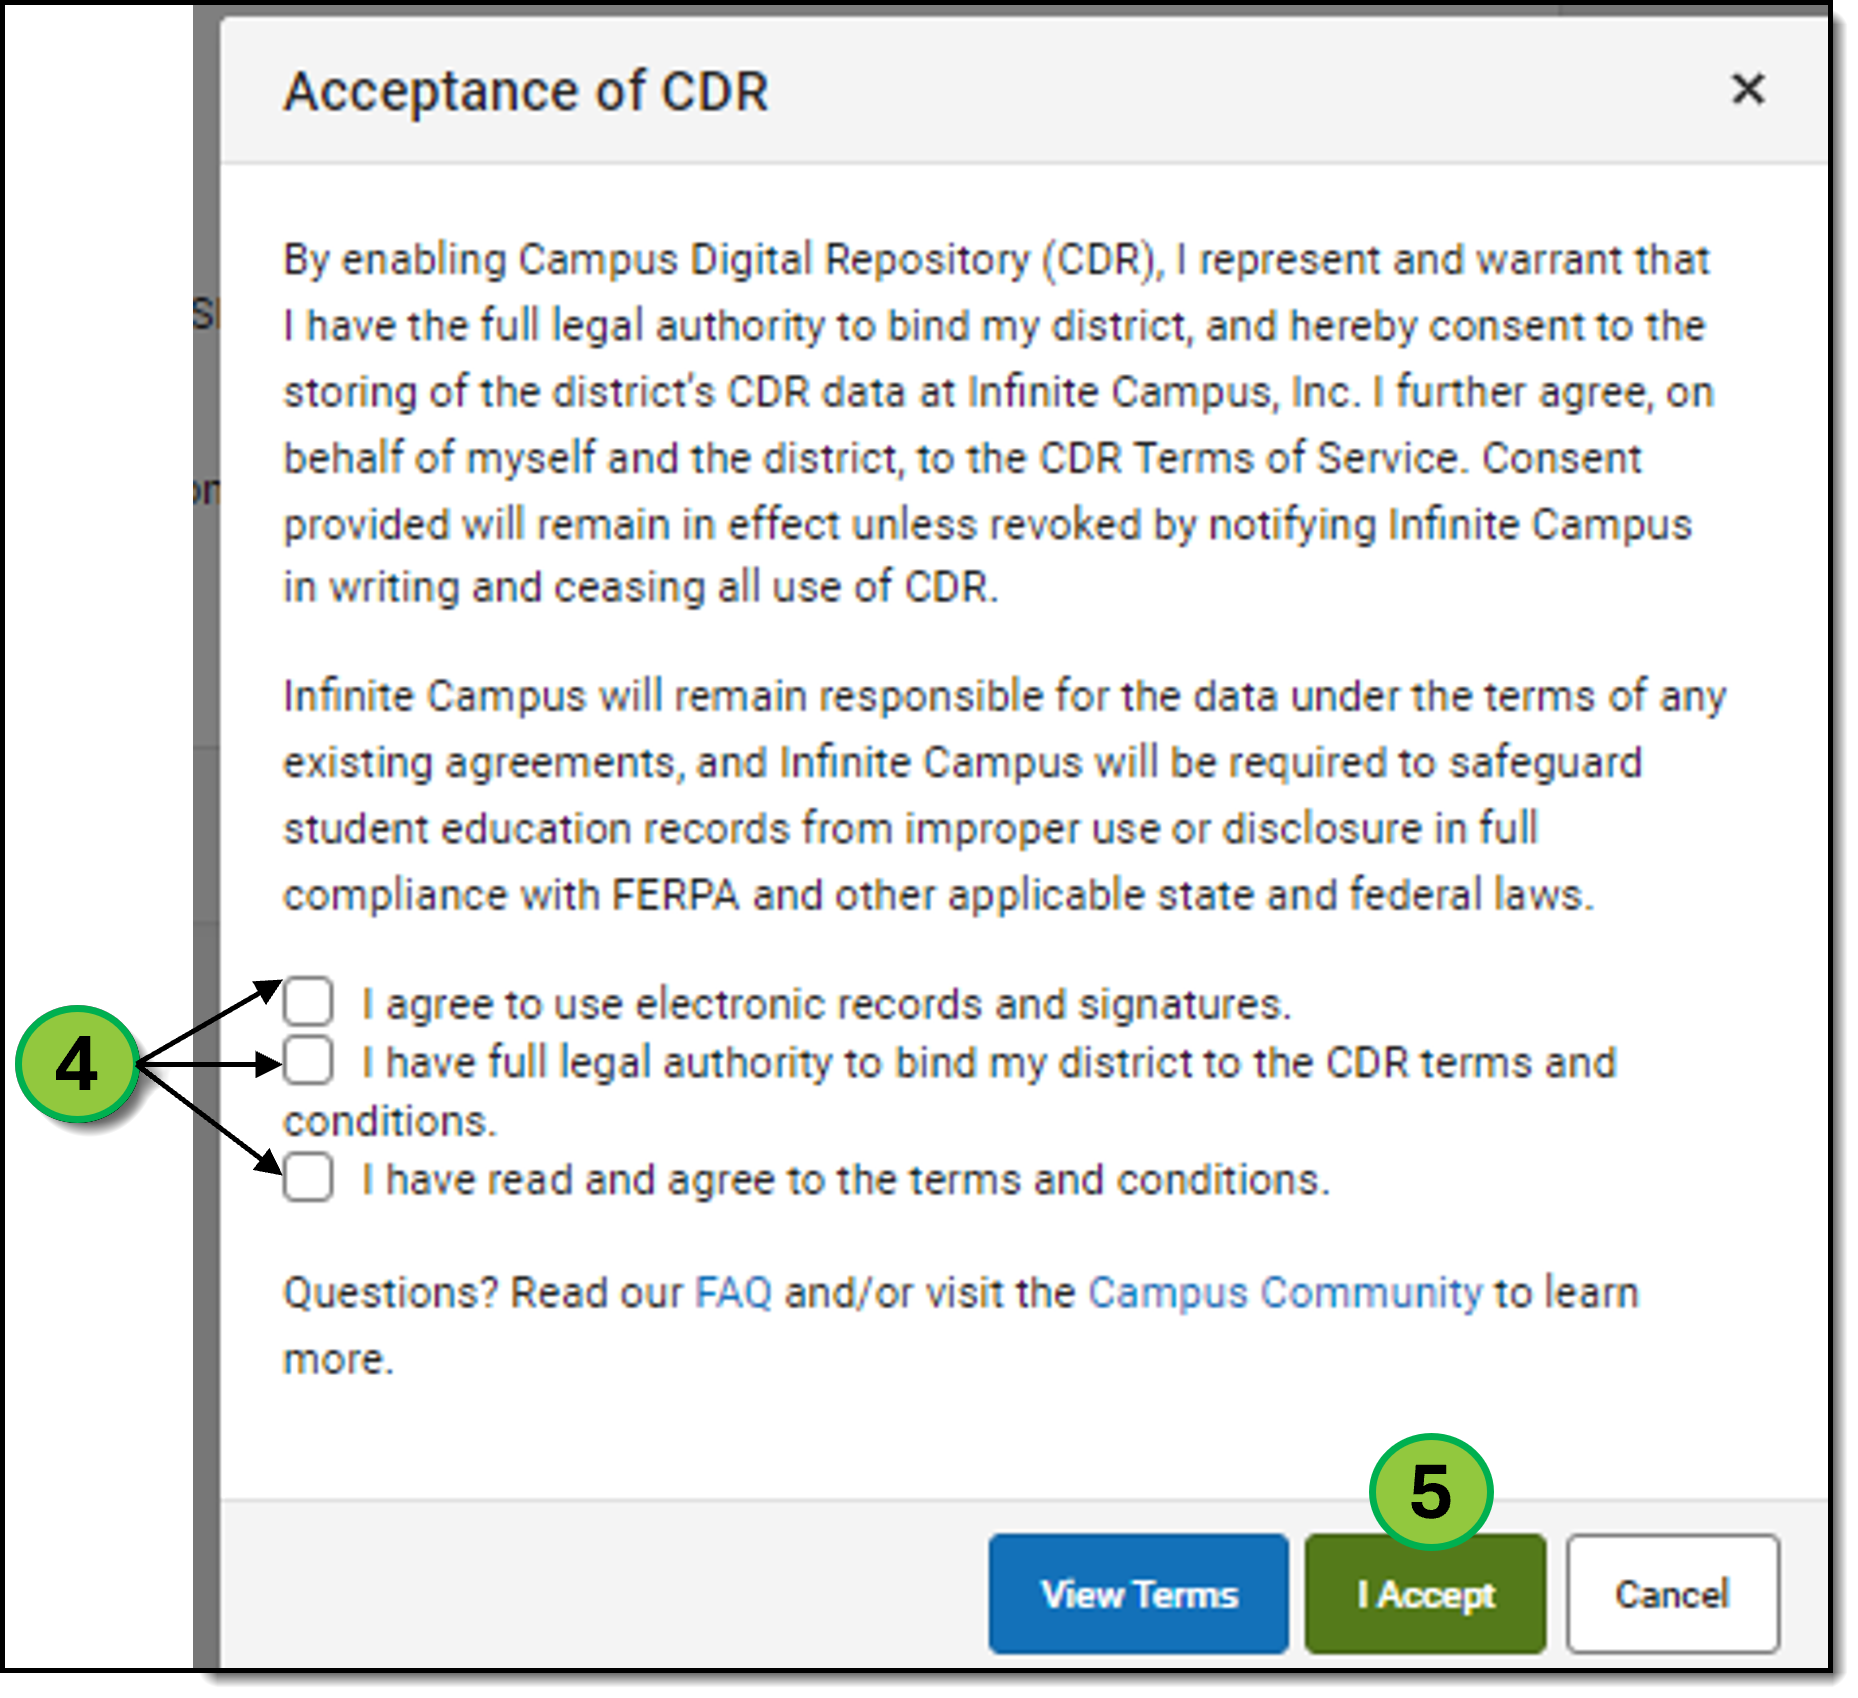
- Once the checkboxes and terms have been selected, click the green I Accept button to proceed to the Digital Repository Preferences page.
- Administrators will need to enable the Voice/Text option in the Digital Repository Preferences before .wav files can be uploaded to messages. Scroll down the page to the Campus Communicator section, and click the checkbox labeled Voice/Text.
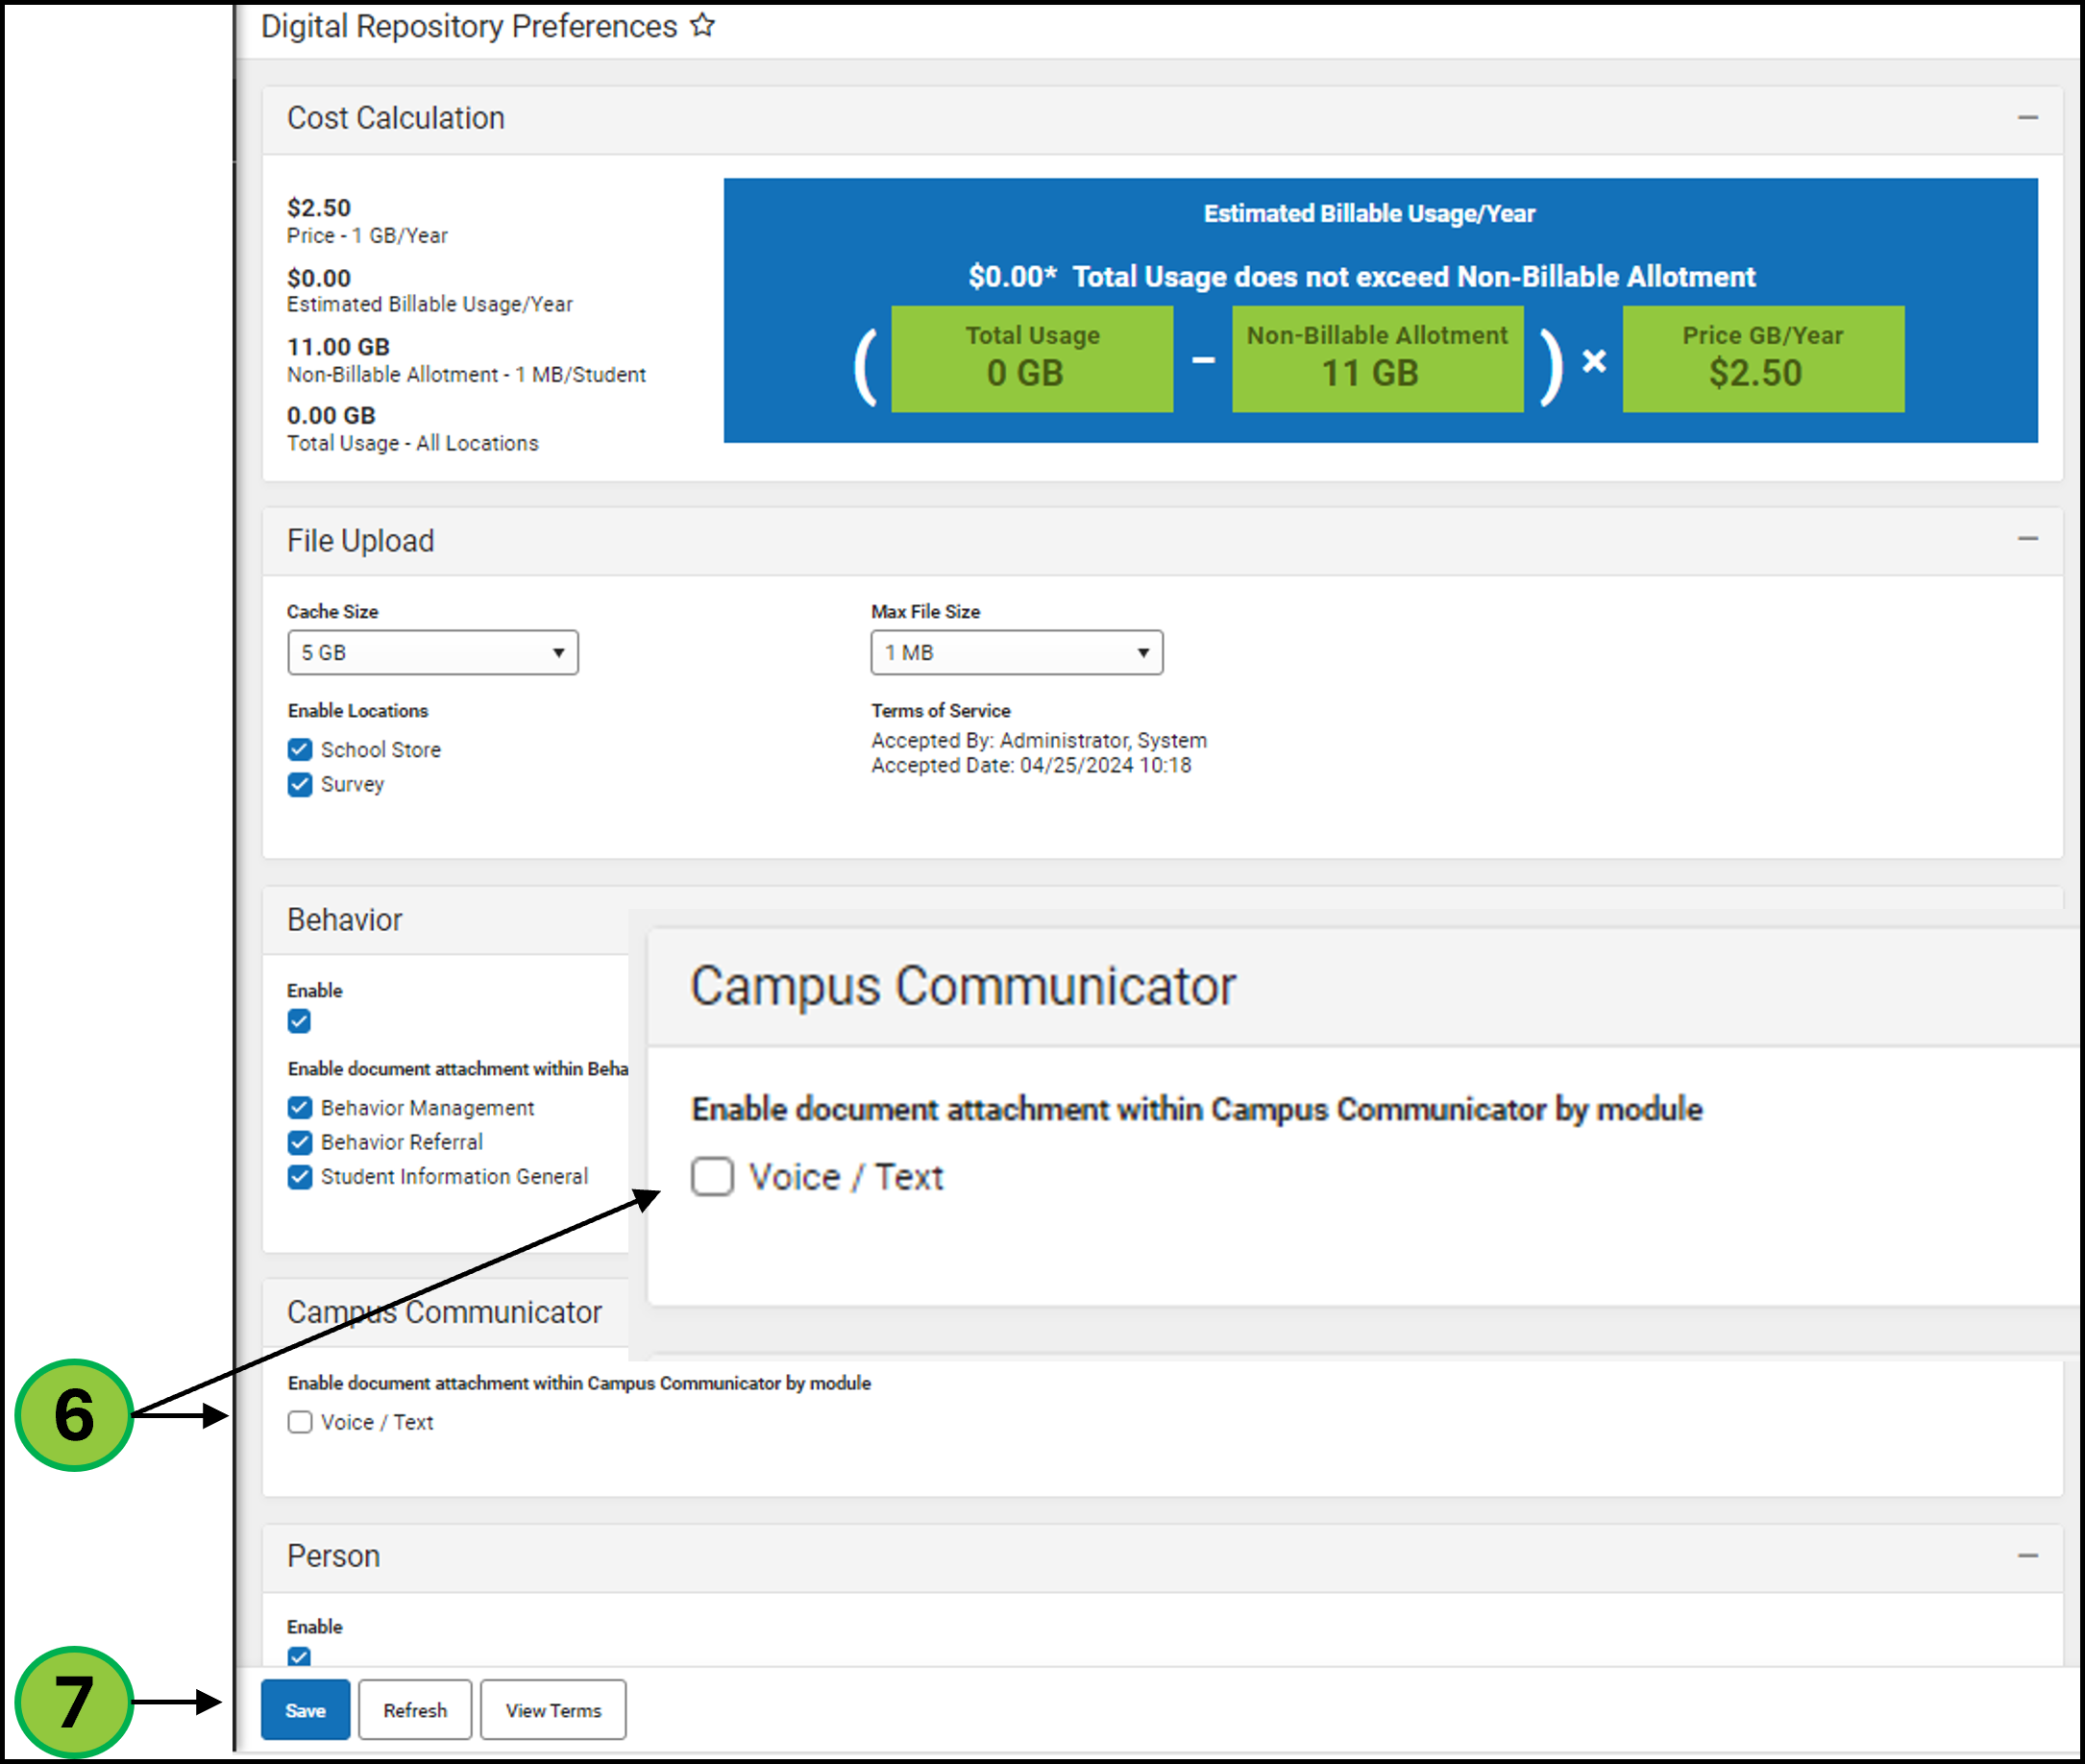
- After checking the box, click Save.
Messenger 2.0: New and Scheduled Message CDR User Acceptance
Messenger 2.0 users will be asked to accept the CDR terms and conditions when uploading a .wav file to a new message. This is a one-time action unless the terms change. If a user has scheduled messages containing .wav files and hasn't accepted the terms and conditions, they will be prompted to do so when editing the scheduled message. However, existing messages will not be stopped.

- On Step 2 of message creation, click either the Upload or Record WAV button.
- A modal window will pop up, requiring the user to accept the terms and conditions.
- The user must open both the Terms of Service and Privacy Policy links.
- Once the terms are reviewed, click Accept to proceed with the upload process.
Setting Up Tool Rights
As an administrator, you have the ability to grant access to Sent Message Log 2.0 in the tool rights section of Messenger.

- Select User in the Search.
- Select a user account.
- Click Tool Rights in the side panel.
- Click the expand arrow icon next to Messenger.
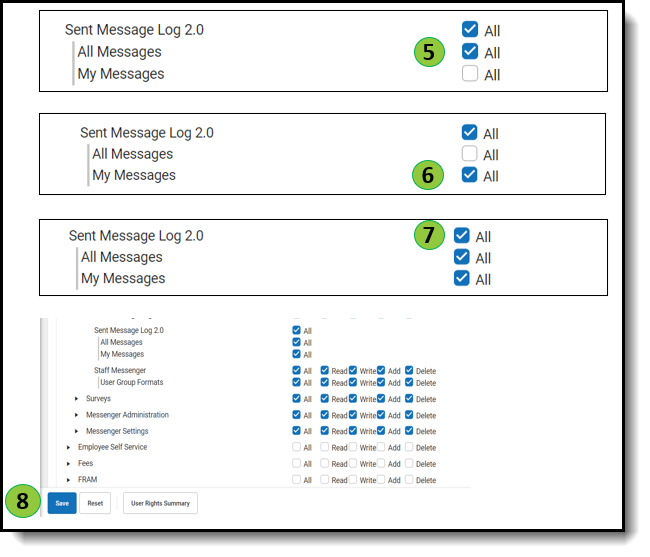
- Navigate to the Sent Message Log 2.0 tool rights.
- Select the checkbox next to “All Messages” to grant a user visibility to all messages for a district.
- Select the checkbox next to "My Messages" to grant a user visibility to only messages they create.
- Both permissions can be granted by clicking the "All" checkbox for Sent Message Log 2.0.
Accessing Sent Message Log 2.0
Once a user has tool rights assigned, they will be able to access Sent Message Log 2.0.

- Click Communication.
- Click Sent Message Log 2.0.
Sent Message Log 2.0 Fields
Sent Messages are displayed automatically and users with proper tool rights can alternate between sent messages they created and sent messages for the entire district by clicking the corresponding buttons at the top of the table.

| Field | Description |
| My Messages | A filter that shows only the messages created by the user. This is the default view for users with both “All Messages” and “My Messages” Tool Rights. |
| All Messages | A filter that shows the messages a user created and messages that were sent by other users. |
| Message ID | The unique ID number for that message campaign. |
| Start Date and End Date | Enter either one day or a date range to filter messages sent on or between the dates selected. |
| Calendar | The Calendar messages were sent in. |
| Subject | The subject of the message campaign. |
| Apply Filters | Used to apply all selected filters to the Sent Message Log. |
| Reset Filters | Removes all the filter selections and returns the table to the default view. |
| Date | Date the message was sent with the newest date appearing at the top. |
| Calendars | Calendars that were selected in the sent message. |
| Subject | The title of the message. |
| Created By | The user who sent the message. |
| Type | Shows if the message was Emergency, Priority, General, Behavior, etc. |
| Delivery Mode | Shows if the message was sent via Inbox, Email, Voice, Text or multiples. |
| Attachment | Shows if the message contains an attachment. |
| Status | Shows if the message was Sent, Errored, or Canceled. |
Message Detail
Clicking on an item in the Sent Messages list allows you to view high-level message details directly without generating a report.

| Field | Description |
|---|---|
| Message Status | Overall message status. This shows the status of the message as a whole. Individual recipient status is only visible by running a report. |
| Message Settings | Shows the selections that were made. |
| District | The school district the message was sent from. |
| School Year | The school year that the message was sent. |
| Calendar | The calendars selected by message creator. |
| Delivery mode | The Inbox, Email, Voice, or Text mode selected. |
| Recipients | Which Groups of people the message included. |
| Recipient Count | The number of People the message was sent to. |
| Message Type | The Message Type that was selected when the message was sent. |
| Delivery Information | Shows delivery attempts per device. |
| Total Message Duration | The total duration of the entire campaign dispatch from beginning to end. |
| Delivery Mode | The number of eligible Inbox, Email, Voice, and Text. |
| Total Devices | The number of eligible device types. Message recipients may have multiple phone numbers. The number of devices can be much larger than the number of recipients. |
| Total Attempts | The number of attempts made. |
| Total Successful | The number of successful attempts. |
| Total Failed | The number of attempts that had an error. |
| Total Canceled | The number of attempts that were canceled. |
| First Attempt Duration | Shows how long it took to contact all recipients in a campaign on the first attempt. If the time is zero seconds, it was sent in either less than a second or instantly.
|
| Message Details | Shows the information in the message such as the sender, the time it was sent, and the message that was included. |
| Build report | Opens the Build Report panel |
Building Reports
Use the Build Report panel to generate a detailed report to view the complete status of all recipients.

- Click Build Report to open a new side panel.
- Select the desired delivery mode. By default, "All" is selected. If left unchanged, the report will include all delivery modes in the message. At least one delivery mode must be selected.
- Select the delivery status. The default option is "All." If left unchanged, the report will include all statuses in the message. At least one status must be selected.
- Select the report format. The default selection is PDF, with options to choose from three supported file types:
- CSV
- DOCX
- Click Generate to create the report. The report will open in a new browser tab, where it can be viewed, printed, or saved.


