Tool Search: Grading Window
The Grading Window determines when scores can be posted to official student documents. Grades are posted for individual Grading Tasks and Standards, with assignments attached and scores entered for those assignments. This process moves grades from In-Progress to Posted. Teachers can enter scores at any time, but those grades are posted at specific times, such as when progress reports are sent out or towards the end of terms. The Grading Window may be opened for an entire school, based on a selected task/term combination using the Grading Window.
Grading Window information is not included in the Ad Hoc Filter Designer. However, courses assigned grading tasks and standards are available in the Filter Designer. This information can be included in a report to see which courses may be missing grading tasks and standards.
Use the Course type and include fields in the Grading Task Credit and Standards folder
 Grading Window - Grading Tasks View
 Grading Window - Standards View
When the Standards Replacement Wizard is used to update standards, any scheduled Grading Window that includes any selected standards that were updated in the replacement process is also updated.
Use the information in this article to schedule Grading Windows for schools to post student grades/scores at the end of terms. To schedule a Grading Window for a specific student, grade level, or teachers, courses, and sections, follow the instructions in the Grading Window Exceptions article.
Check out the Grading Window video for more information!
See the Grading Window Tool Rights article to learn about the rights needed to use this tool.
Required Course Setup
The following are required to post grades for courses:
- Grading Tasks need to be created for the school.
- Standards need to be created for the school, and School Standards need to be marked accordingly.
- Grading Tasks and Standards must be assigned to courses.
- The Term Mask for both Grading Tasks and Standards must be marked for the appropriate terms where those grading tasks and standards are to be graded.
Create/Edit Grading Windows
Grading Windows can be modified and created from the main view in three ways:
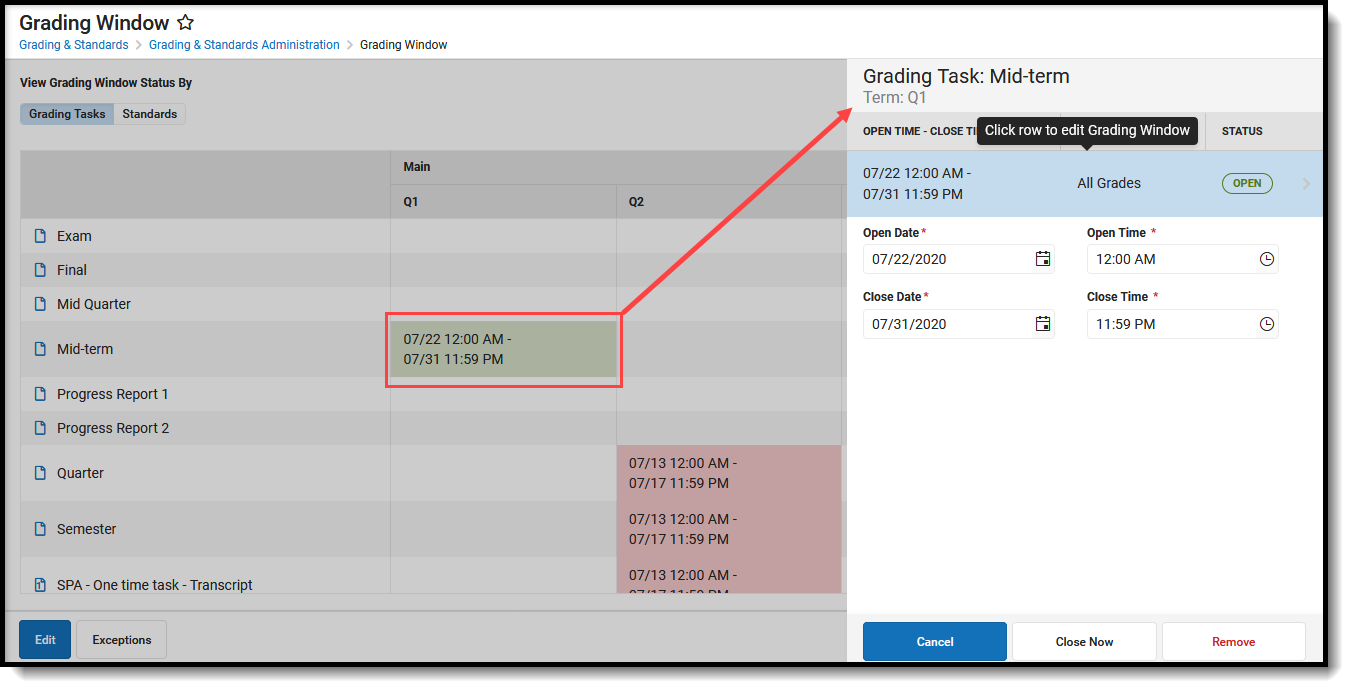
- Modify or View an Existing Grading Window - Click the existing record from the main grid of the Grading Window. A side panel opens. Click the row to change the dates and times of the Grading Window. From here, Grading Windows can be immediately closed (Close Now) or deleted (Remove). Modifications to closed Grading Windows from this side panel as well.
- Schedule a New Grading Window for a Single Task and Term by Clicking in an Empty Term Cell - For a particular Grading Task or Standard, click the corresponding empty cell in line with the desired term. A side panel shows where the Open Date and Time and the Close Date and Time can be entered and saved. Once saved, click the cell again to edit (as described above), or click Edit to modify all grading windows for the calendar (as described below)


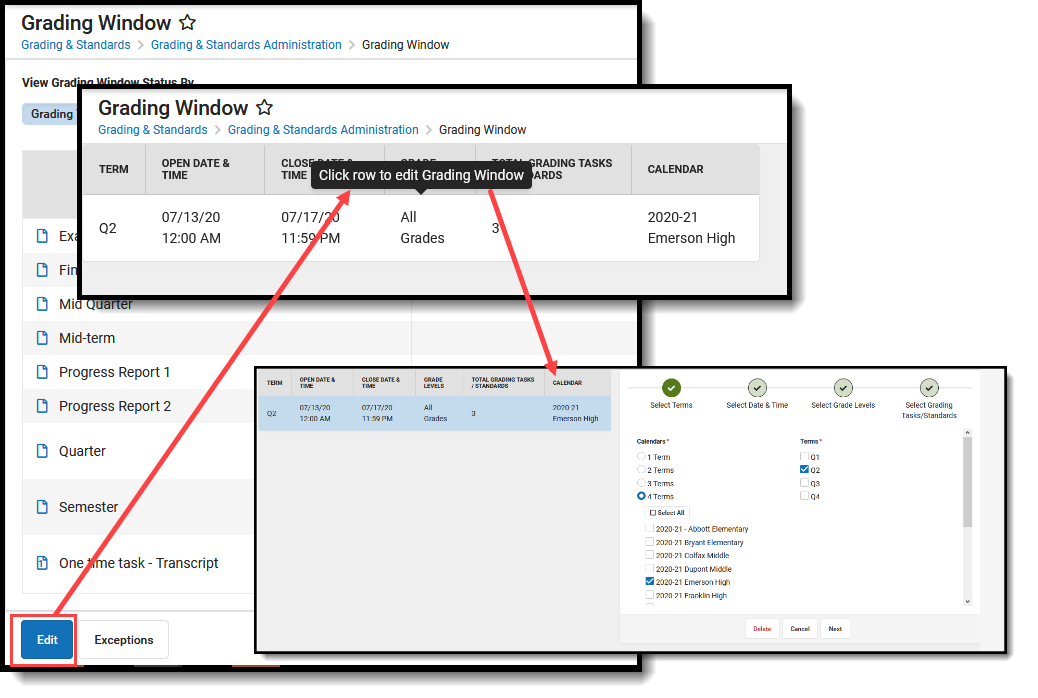
3. Schedule a New Grading Window Using the Progress Tracker - Click the Edit button. This displays a list of existing Grading Windows. To modify those Grading Windows, click that item in the list. To add a new Grading Window, click the Add button. At any time during the process, use the Previous button to move to the previous screen, the Cancel button to start over, or click the Progress Tracker checkboxes to return to that specific screen. Detailed steps for this option follow.
Understanding the Scheduling Grading Windows Process
Scheduling a Grading Window is a four-step process that includes selecting the calendars and terms, choosing dates and times for the grading window, and selecting the desired grading tasks and standards.
A Year must be selected from the Campus toolbar in order to create Grading Windows.
A progress tracker displays on each screen so users can quickly tell where they are in the process. If there is an issue with one of the selections, an exclamation point displays (i.e, when there are no dates selected or when there are no grading tasks selected). These are indications to revisit that step in the process (click the exclamation point) to verify the entered information is correct.
![]() Grading Window Progress Tracker
Grading Window Progress Tracker
When editing or adding grading windows, the left side shows a live update to the grading window as long as calendars, terms, and dates have been added.
 Live Updates to Grade Levels, Grading Tasks
When adding or editing a Grading Window using the Progress Tracker, grading windows that have identical terms, open/close dates and times, and grade levels, the Grading Windows are merged in the table to the left. A pop-up message displays when this happens, and the record must be saved.
Calendars and Terms
Calendars are grouped by term structure, like Semesters, Quarters, etc. When a Term radio button is selected (1 Term, 2 Terms, etc.), calendars with 1 or 2 terms are displayed for selection.
Grading Windows can only be created for calendars with similar term structures at one time. This means that a Grading Window for a calendar with Trimesters and one for a calendar with Quarters cannot be created together.
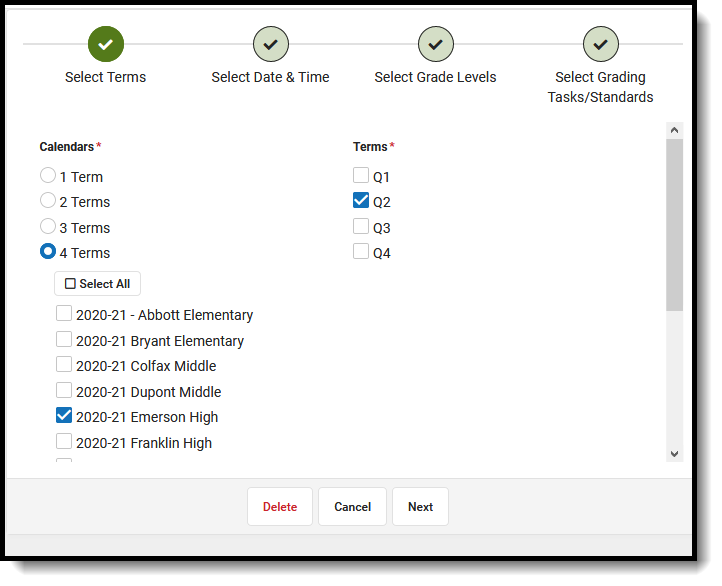 Calendar and Term Selection
If a calendar has more than one Term or Schedule structure, it appears multiple times with the added criteria. For example, if Emerson High School had two schedule structures - one called Main and one called Alternate - Emerson High is listed as Emerson High School - Main and Emerson High School - Alternate. If Emerson High - Alternate had many term structures, it would be listed in each category, such as Emerson High School - Alternate - Trimesters and Emerson High School - Alternate - Quarters.
To select all calendars, click the Select All button below the Terms heading (and Deselect All to remove the selection).
Once a calendar is selected, its Terms are enabled and can also be selected. The Grading Window can be set for any combination of terms, meaning the first and third terms can be turned on, or just the first term, or just the third term. Note that the term numbers displayed are the order assigned to the term, and not necessarily the name of the term. This means that, for the term structure Q1 (order 1), Q2 (order 3), Q3 (order 5), and Q4 (order 7), the terms are displayed as 1, 2, 3, and 4.
All calendars to which the user is assigned, with modify rights, are listed. At least one calendar and one term must be selected.
Date and Time Selection
Selecting a date and time for the grading window can be done by choosing dates in the calendar view or using the term-end dates.
Entering information in the Date Range view and then switching to the Term End Date view removes any selected dates in the Date Range view, and vice versa.
The Date Range format creates a single Grading Window for all terms selected in a calendar. The Term End Date format creates multiple Grading Windows, one for each term selected. For example, if terms 1 and 3 are selected, choosing the Date Range option allows grades with the term mask of 1 and 3 to be open for grading during one date range; choosing the Term End Date option opens the grading window for two days after the term, for four days on different dates.
Dates are required when scheduling a grading window.
Date Range
The Date Range option shows two months: the current month, with the current day highlighted in blue, and the next month. Arrows allow scrolling to previous months and future months. Click the TODAY option in the upper-right corner to set the current date as the selected date.
An alert displays to let users know the dates are outside the calendar range, but users are not prevented from creating grading windows outside the calendar range.
- The Open Date cannot be before the Start Date of the selected Calendar. If more than one calendar is selected, the earliest calendar start date is used to validate the Open Date of the Grading Window.
- The Close Date cannot be more than 90 days after the Calendar's End Date. If more than one calendar is selected, the latest calendar end date is used to validate the Close Date of the Grading Window.
Dates are selected by clicking a specific date in the calendar, by typing a date in the date fields, or by clicking the calendar icon in the date fields. Click the calendar itself to easily jump to a specific month. Times default to midnight (12:00 AM) on the entered open date through 11:59 PM on the entered close date, and can only be entered in standard AM/PM format.
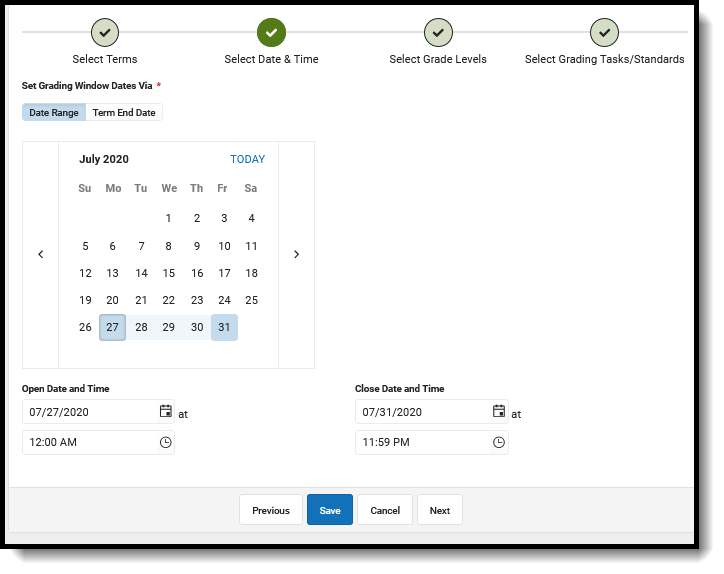 Date Range Selection
Term End Date
The Term End Date option allows users to choose how many days before or after the term's end date that a grading window is open, grouped by term end dates, starting at a certain time, and for how many days, and closing at a certain time. A list of the calendars chosen in Step 1 displays, along with the term's end date.
The entered date applies to EACH term included in the Grading Window.
Only numeric values, including zero (0), can be entered in the Open and Duration fields. Times are entered in standard AM/PM format.
In this example, the grading window opens 2 days after the term end date, beginning at 6:30 am for 4 days, and closes at 8:00 pm. Notice that the Term information from the calendar updates with that information. This calendar's Term 1 end date is August 16. With the entered information, the grading window opens on August 18 at 6:30 am and closes on August 22 at 8 pm.
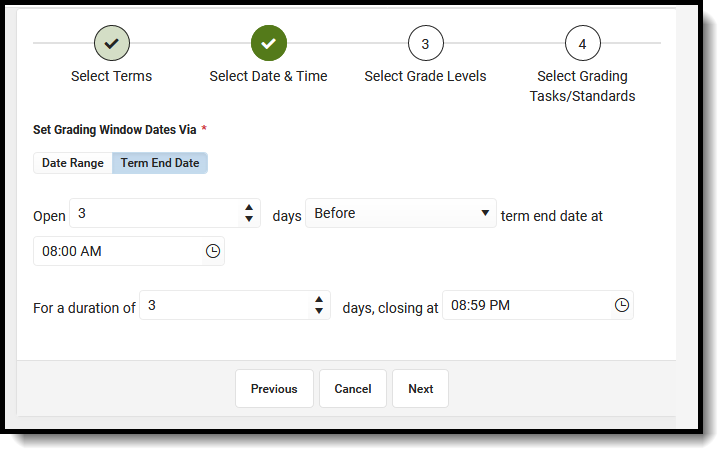 Term End Dates
Grade Levels
At least one grade level needs to be associated with the Grading Window.
Choose either All Grade Levels or Specific Grade Levels. The complete list of grade levels used in the district is available for selection. Individual grade levels cannot be marked when the All Grade Levels option is selected.
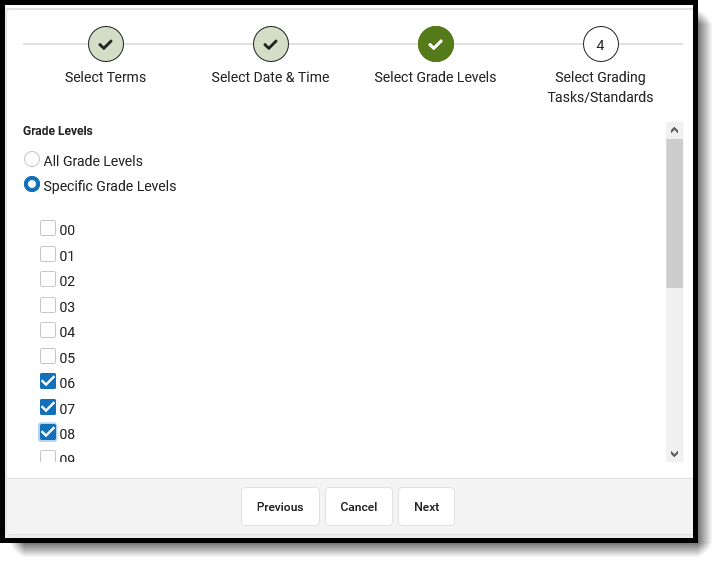 Grade Level Selection
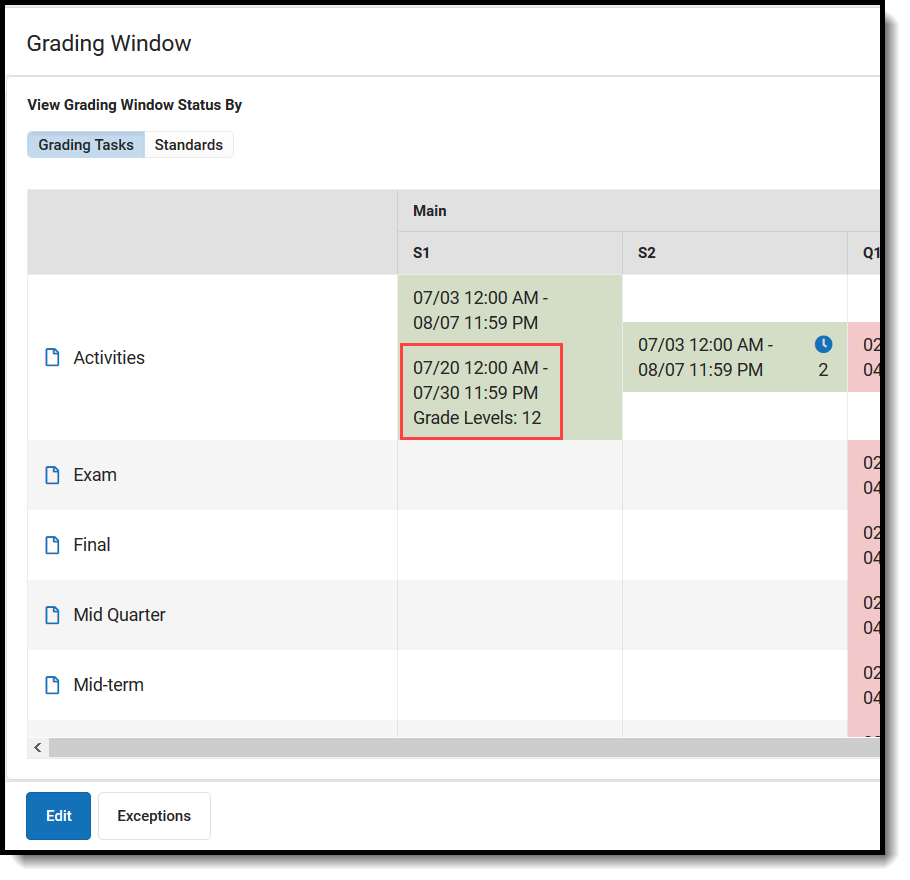
When specific grade levels are selected, they are included in the summary of the Grading Window display on the main grid.
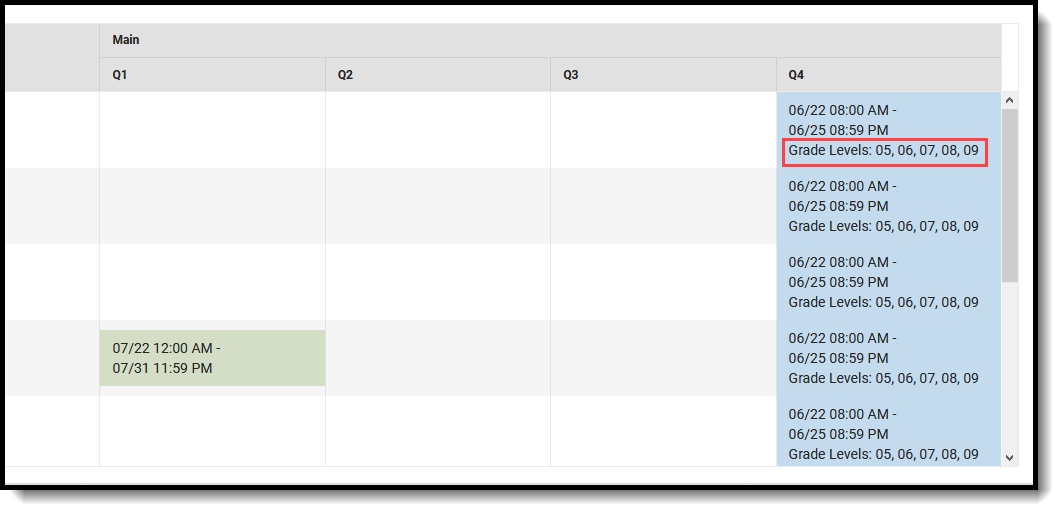 Specific Grade Level Selection
Grading Tasks and Standards Selection
At least one grading task or at least one standard is required when scheduling a grading window. If no grading tasks or standards are associated with the selected terms, a statement indicating this appears on the Select Grading Tasks and Select Standards screens.
All grading tasks associated with a course that have the Term Mask checkbox marked that match the terms selected when choosing calendars/terms are listed. For ease in selecting and viewing grading tasks, use the Select All/Deselect All and Expand All/Collapse All buttons. To locate a specific grading task or standard, enter the name of the task in the Search Grading Tasks or Search Standards field.
 Grading Tasks and Standards Selection
When the Include Children on Selection (shown here with Standards) is set to On, marking the Standard group name (the parent standard) - Decision Making/Personal Health - selects all of the child standards associated with that standard group. When that option is set to Off, the parent standard can be posted without automatically selecting children, or the children can be posted without automatically selecting the parent.
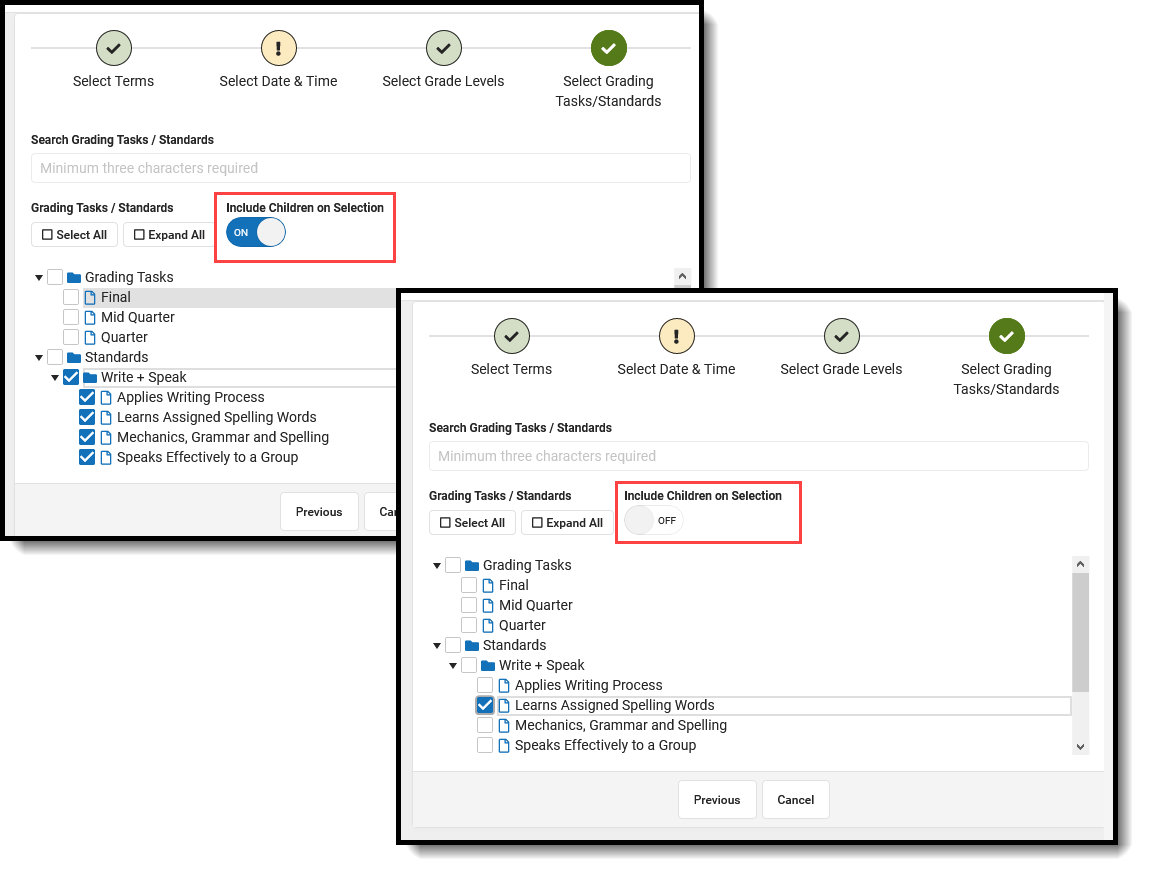 Parent/Child Standards Selection
Grading Tasks and Standards Icons
|
Grading Task Standard |
|
One-Time Grading Task One-Time Standard |
|
Archived One-Time Grading Task Archived One-Time Standard |
|
Archived Grading Task Archived Standard |
|
Standard Group |
|
Archived Standard Group |

Scheduling Grading Windows
Step 1. Calendar and Term Selection
- Choose the desired Calendars by locating them in the list. Calendars are organized by the number of terms they have.
- Mark the checkbox next to the calendar name. More than one calendar can be selected at a time.
- Select the desired Terms for the calendars.
- Click the Next button to select the dates and times of the Grading Window.
Step 2. Select Date and Time
Set the grading window dates using either the Date Range or the Term End Date option.
Set Grading Window Dates via Date Range
- Select the Date Range option in the Set Grading Window Dates Via field.
- Choose the date the grading window opens by selecting it in the calendar view.
- Choose the date the grading window closes by selecting it in the calendar view. The open date must be before the close date.
- The selected dates populate in the Open Date and Time and Close Date and Time fields. Modify the times as needed.
- Click Next to select the Grading Tasks and/or Standards.
The By Term Date fields are the only fields that do not populate for the record.
Set Grading Window Date via Term End Date
- Select the Term End Date option in the Set Grading Window Dates Via field.
- Enter the value of days before or after the term date for when the grading window Opens, or use the arrows on the field to change the number higher or lower than what was entered.
- Determine if the entered Open value is days Before or After, and change the selection accordingly.
- Enter the Time for the grading window to open in standard AM/PM format, or use the clock icon.
- Enter the number of days the grading window is open in the For a durationof field.
- Enter the Time for the grading window to close in standard AM/PM format, or use the clock icon.
- Click Next to select the Grade Levels.
Step 3. Select Grade Levels
Choose the desired Grade Levels by selecting the All Grade Levels or the Specific Grade Levels button. When selecting specific grade levels, at least one grade level must be selected.
Click Next to select the Grading Tasks or Standards.
Step 4. Select Grading Tasks and Standards
Mark the desired Grading Tasks and Standards to be scored in the grading window. Use the Select All button to mark all available grading tasks. Use the Expand All button to open all Standards Groups and display all parent/child standards. Enter search criteria for the grading task in the Search Grading Tasks/Standards field.
- If the Include Children on Selection is set to On, select the checkbox by the parent standard to mark the parent and all children; or, click the name of the parent standard to mark the parent and all children.
- Remove selections for individual standards as needed.
- If the Include Children on Selection setting is Off, parent and child standards must be marked individually.
Click Save when finished. The new Grading Window is listed in the existing Grading Windows table to the left.
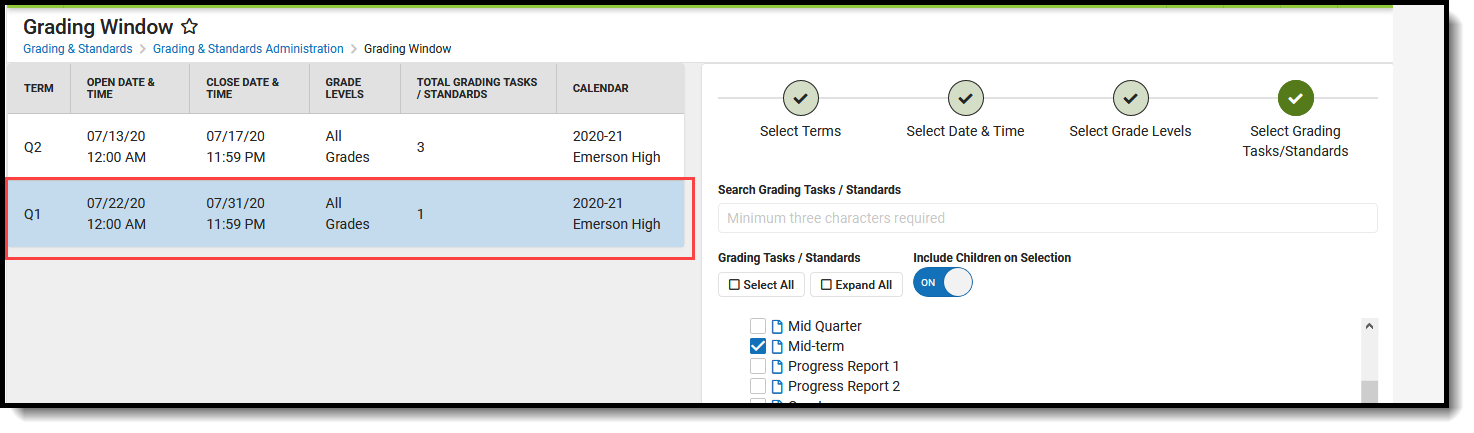 New Grading Window Added
View Grading Windows by Grading Tasks or Standards
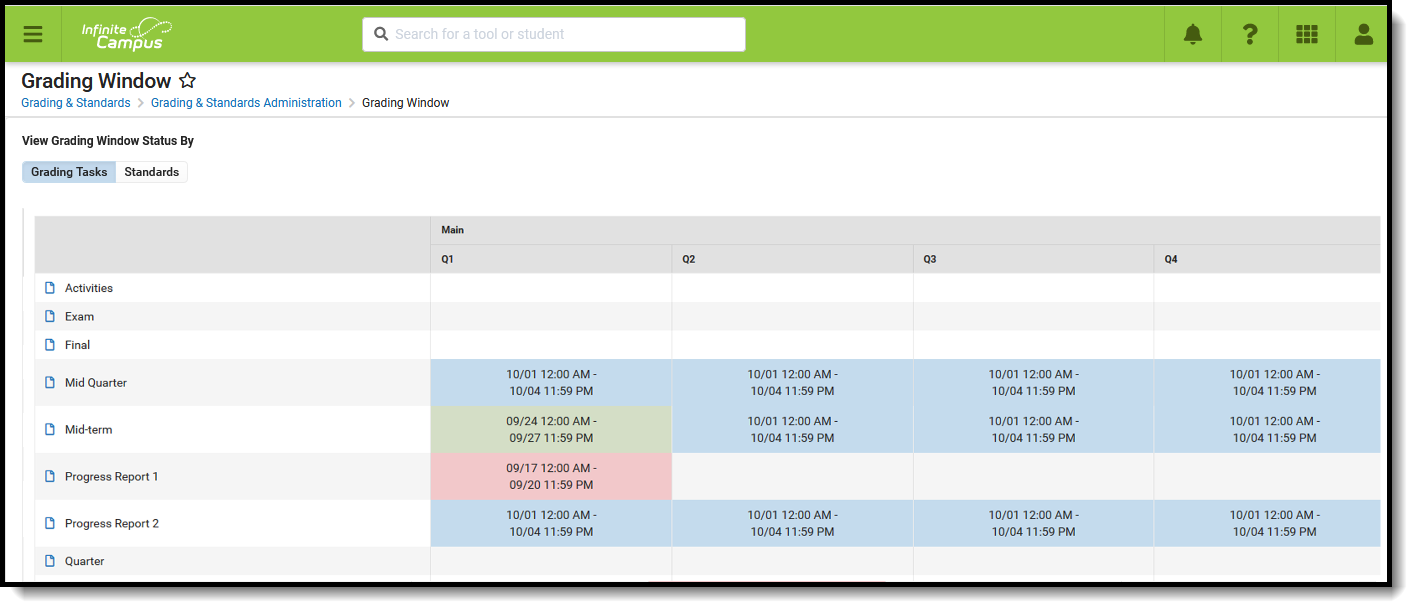
Scheduled Grading Windows display on the main view of the grading window, and can be viewed by Grading Tasks (default view) or by Standards by changing the selection of View Grading Window Status By. This view displays for the calendar selected in the Campus toolbar. If that calendar only uses Standards, the Standards view displays, and vice versa.
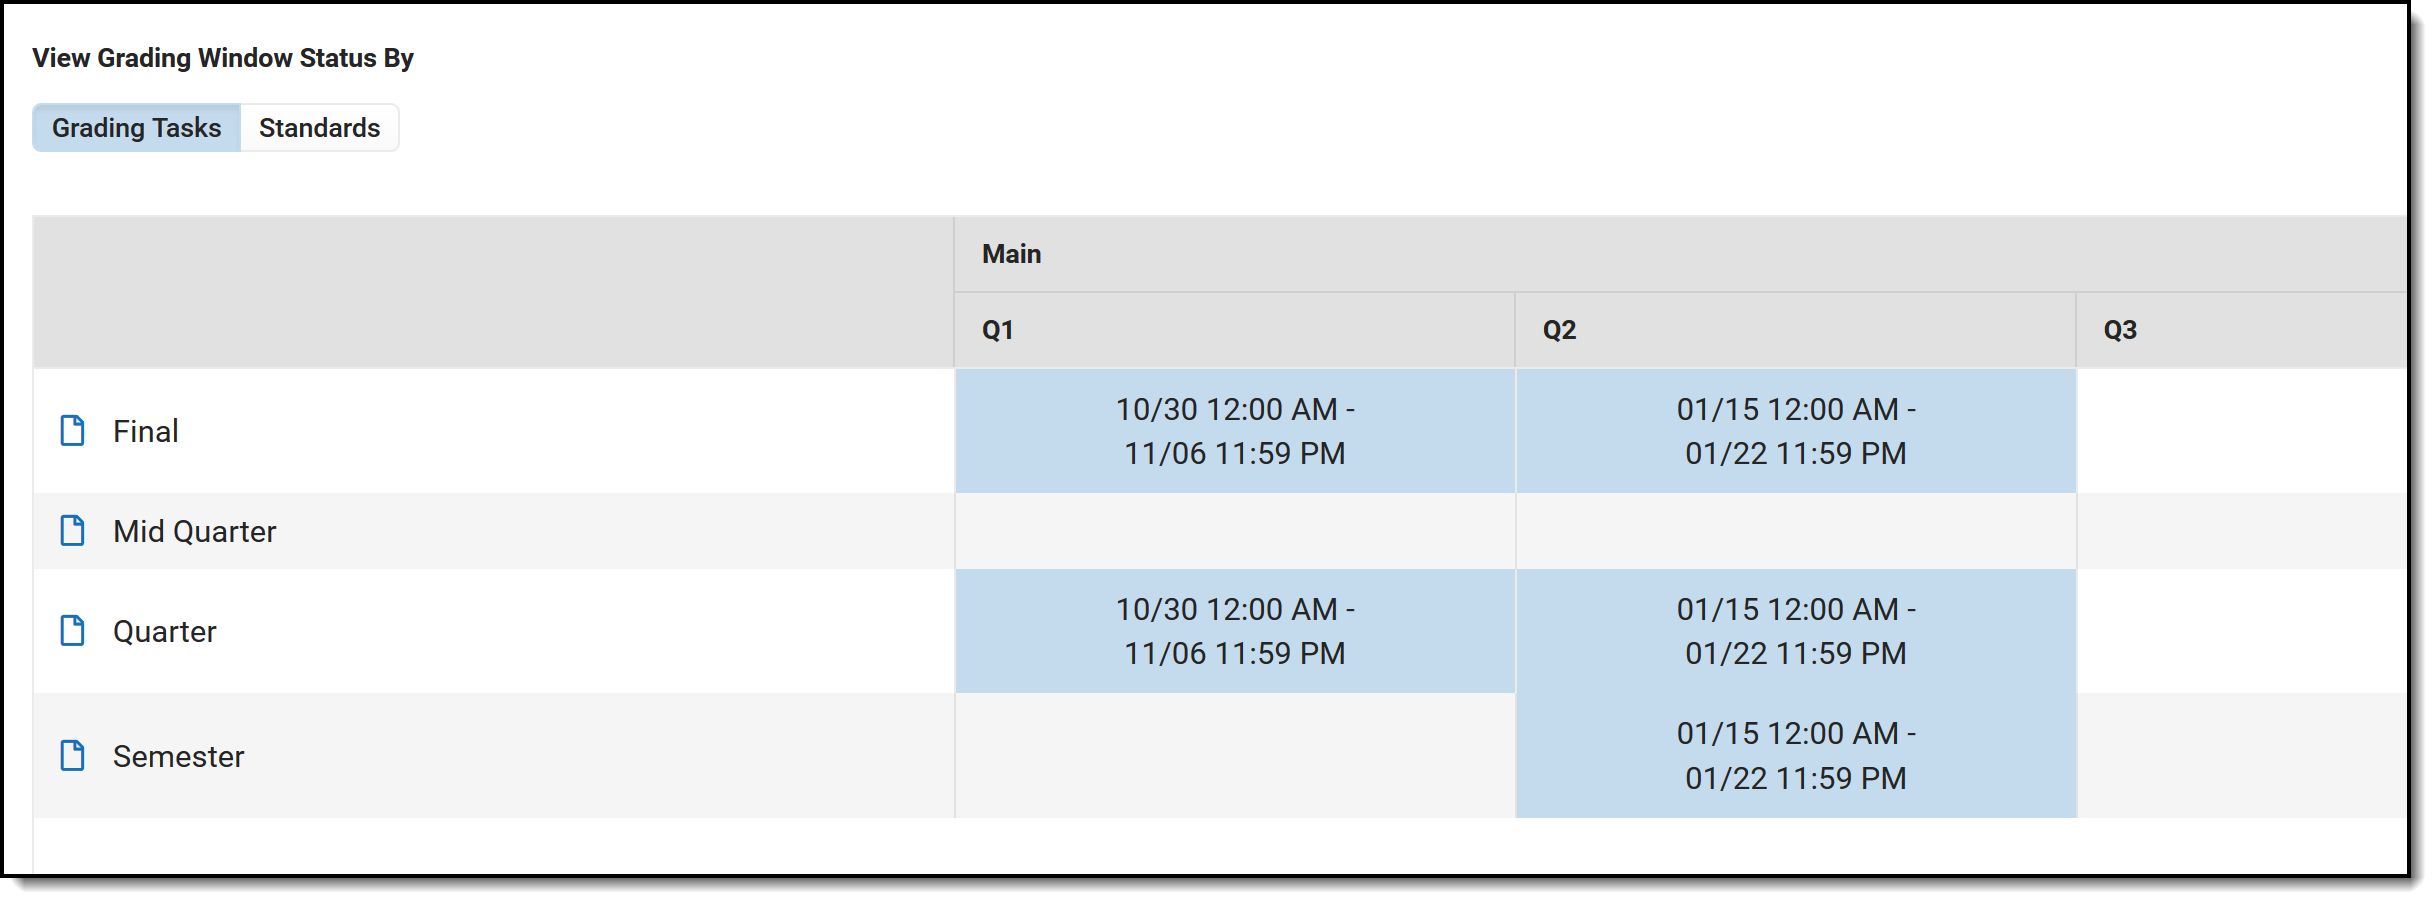
The Grading Task view lists the grading tasks associated with the school in the Campus toolbar, along with the dates of the grading window for each term. In the example below, grading windows have been scheduled for the Final, Quarter and Semester grading tasks. These are displayed in blue, indicating that the dates are in the future.
Grading tasks are only listed in the grid if they are associated to a course in the selected calendar, or previously had a grading window record for the year chosen (for archived tasks; no longer associated but once had a grading window).
 View Scheduled Grading Windows by Grading Tasks
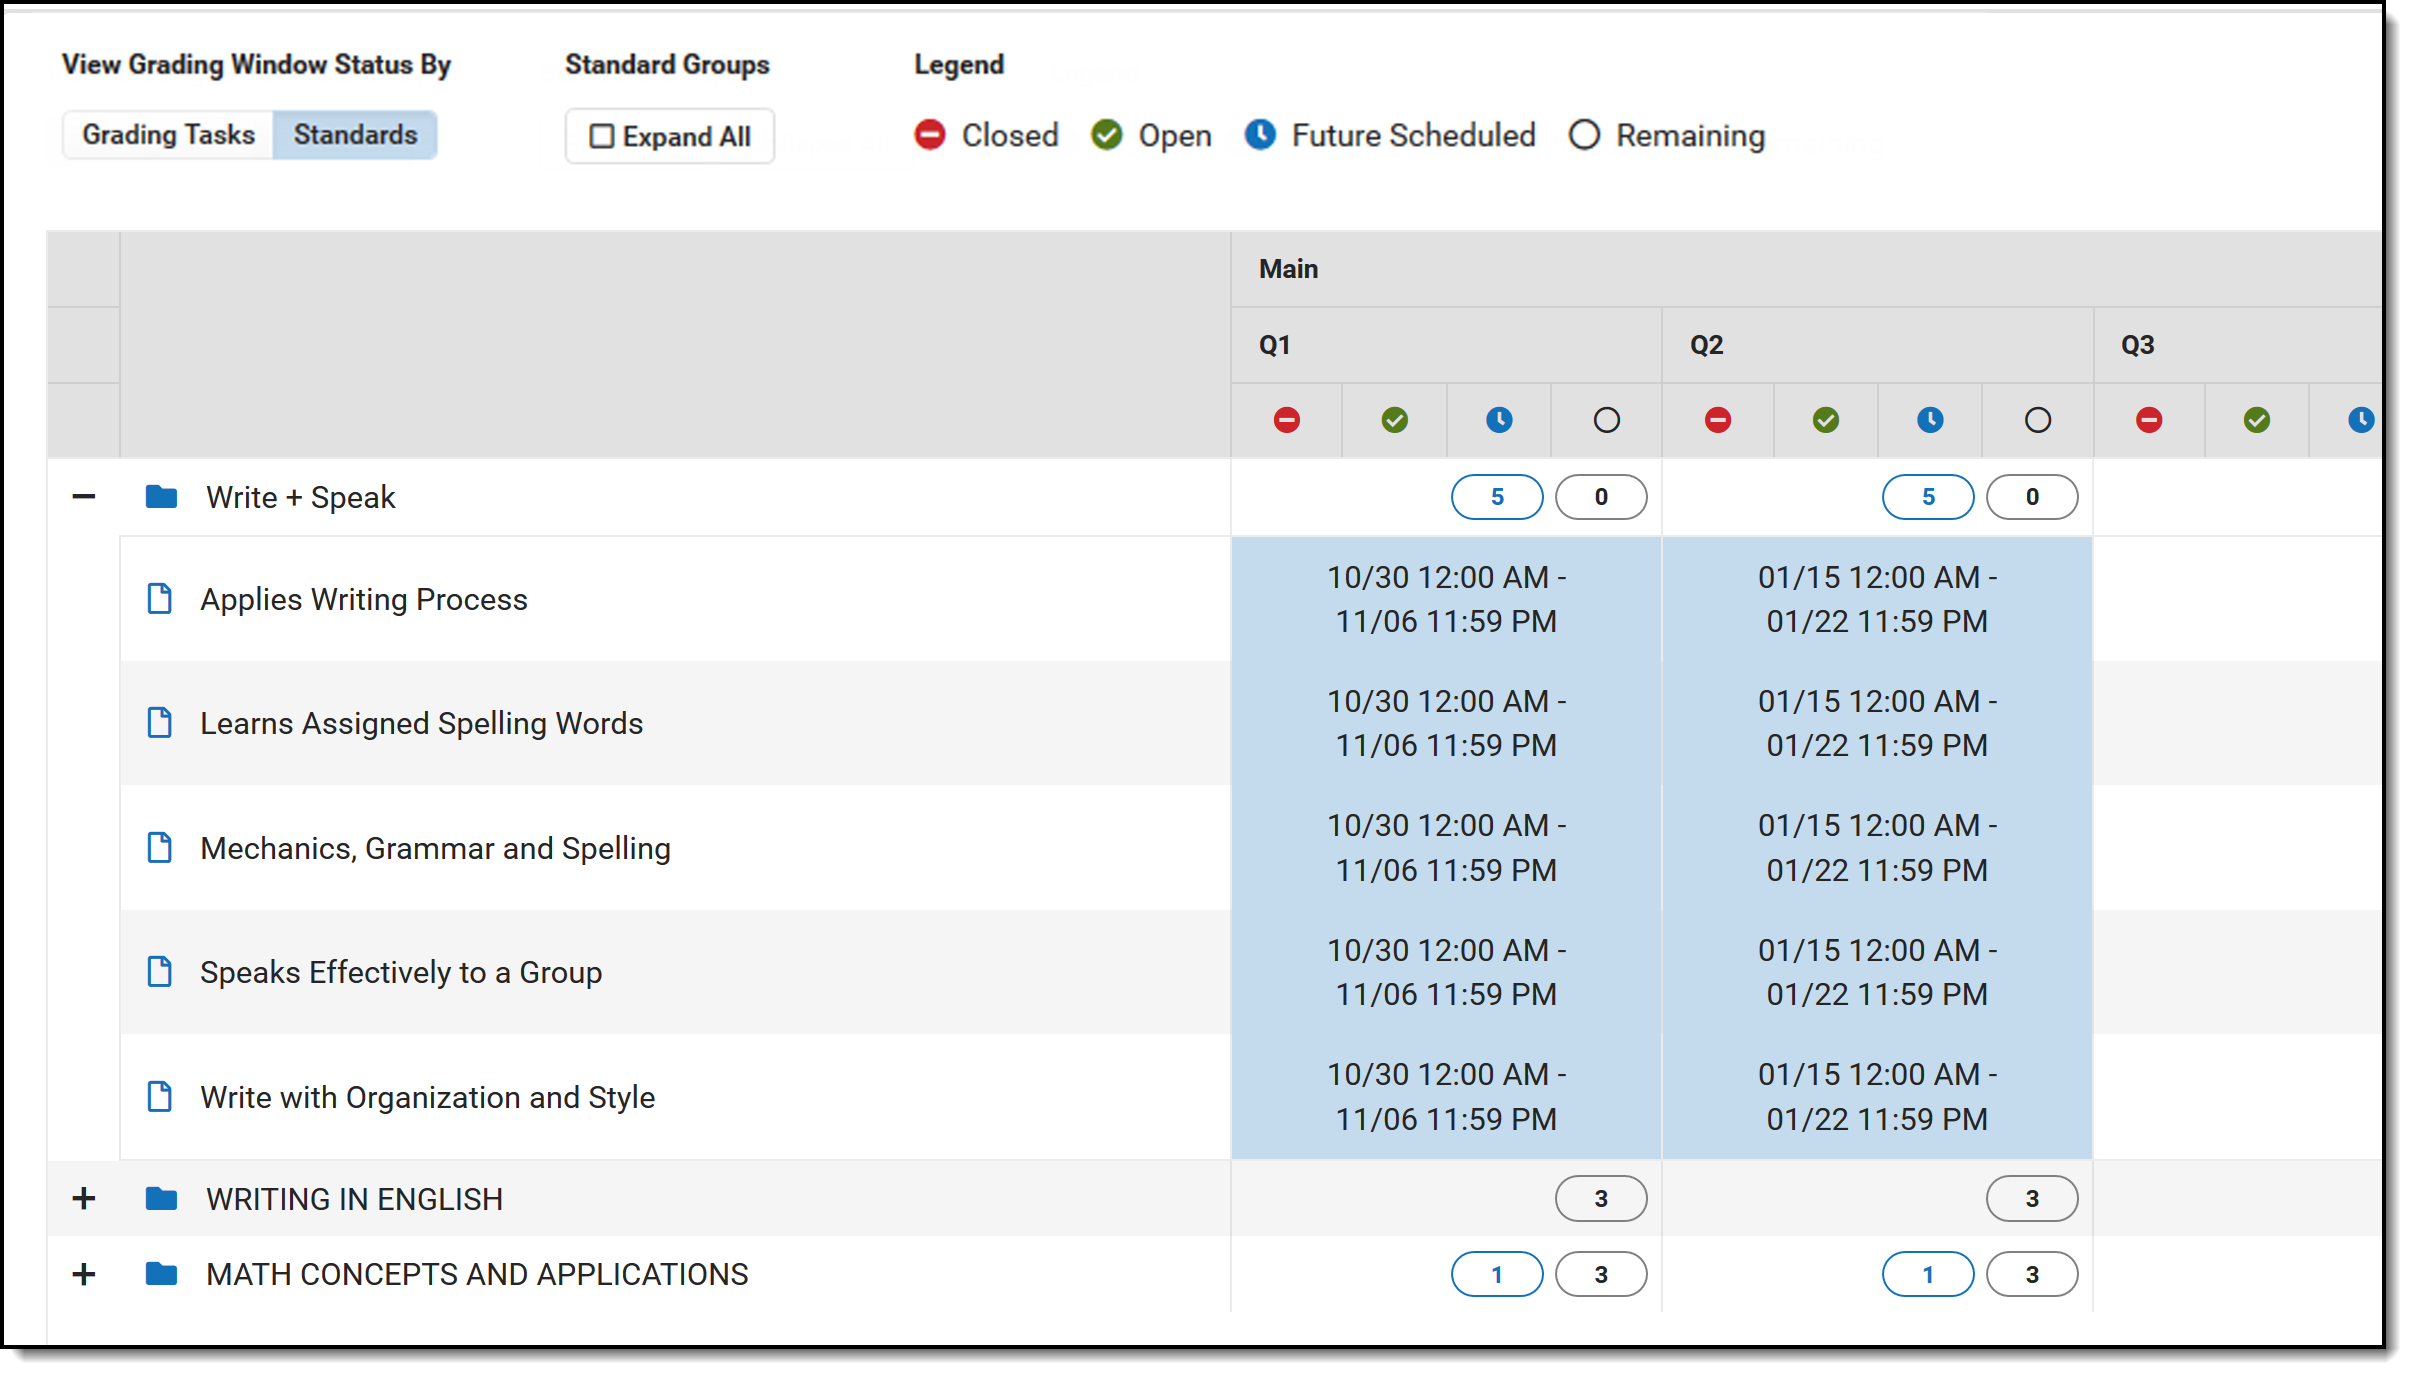
The Standards view is organized by the Standards Group Name and lists the standards the school has chosen to score for that calendar. Using the Standards Legend as a guide, it is easy to see which standards for a particular term still need to be scheduled, have been scheduled, are currently open for grading, and which remain unassigned to a grading window.
- When the most current time slot is in the past (prior to the current date), a count displays in the first column for Closed and is in red text.
- When the time slot is currently open and today falls within the grading window, a count displays in the second column for Open in green text.
- When the time slot is in the future (after the current date), a count appears in the third column labeled Future Scheduled in blue text.
- When there is a task/term combination without any grading window time slots, a count appears in the fourth column for Remaining, displayed in black text.
 View Scheduled Grading Windows by Standards
In the example above, the five standards in the Write + Speak Standards Group are included in a Grading Window that opens at the end of October. Notice the Future Scheduled value has a total of 5, and the Remaining value is zero (0). The Writing in English Standards Group has no standards selected for grading, and the Remaining value is 3 (the number of standards in that group).
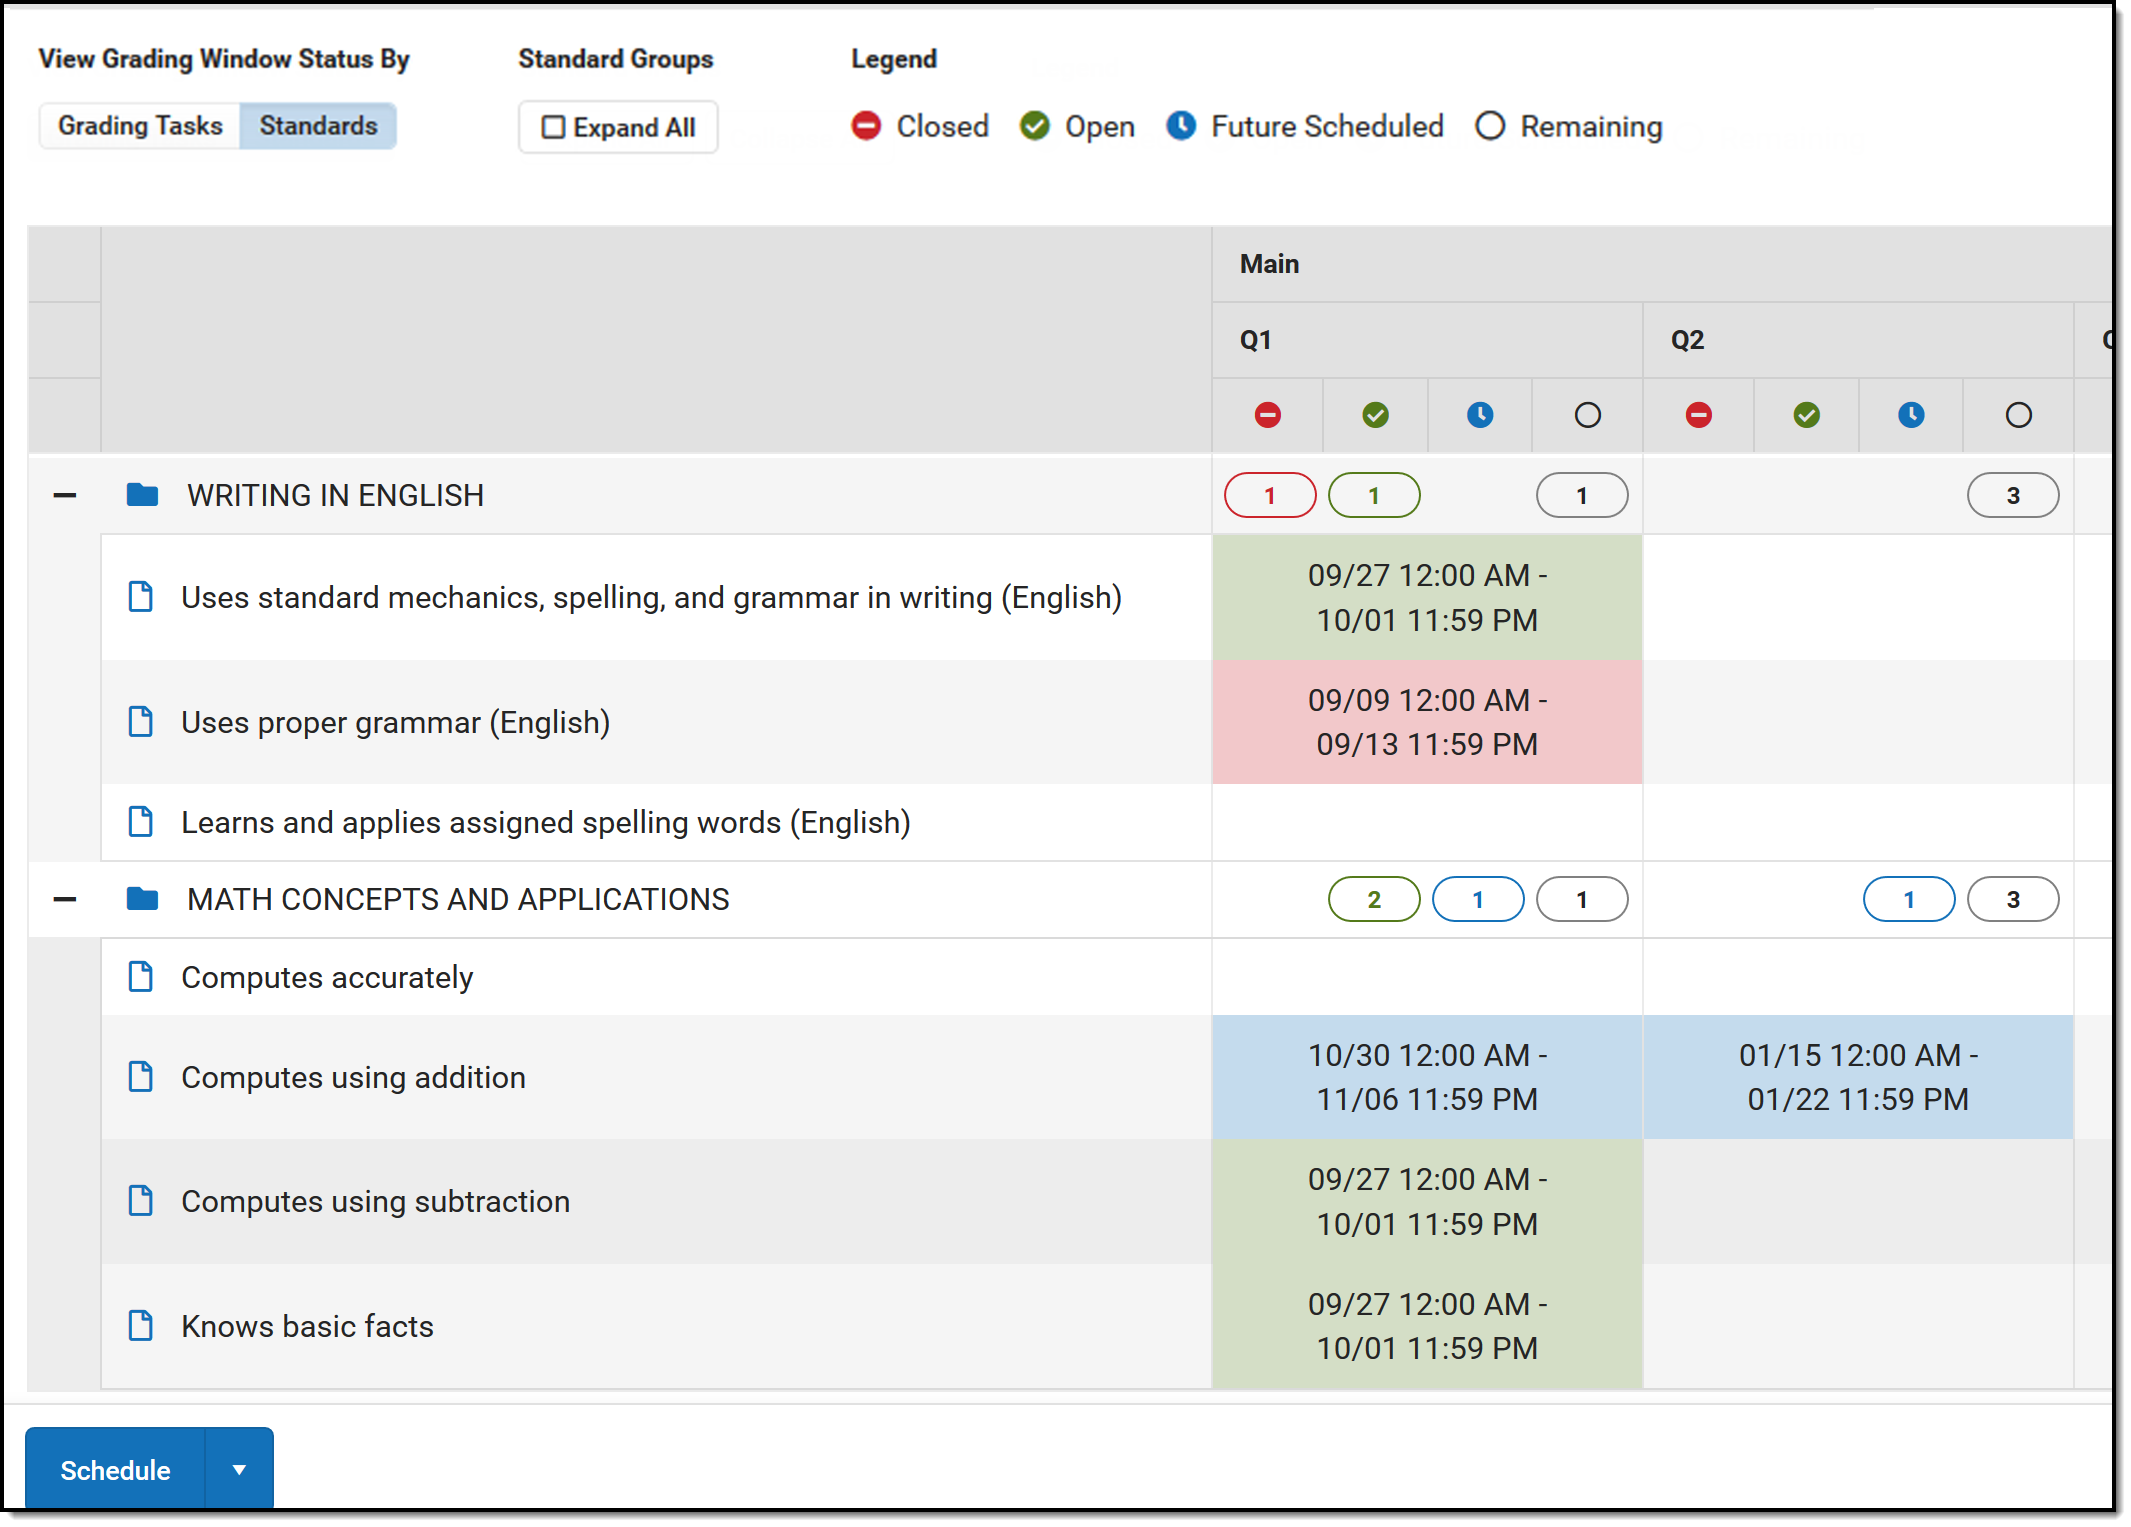
In the following example, standards have been scheduled for the Writing in English Standards Group and the Math Concepts and Applications Standards Group. Notice that the Uses standards mechanics standard has a grading window in green, indicating it is currently open, and the Uses proper grammar standard is in red, meaning the window for that standard is in the past. The total for this standards group lists one in the Closed column, one in the green column, and one in the remaining column, since one more standard in the group needs to be scheduled.
 Additional Standards View Scheduled in the Past and Currently Open
Future scheduled icons appear when an additional Grading Window is scheduled but not represented in the main grid. In the example below, one grading window is currently open, and two additional grading windows exist that are also scheduled for the same term/task combination. 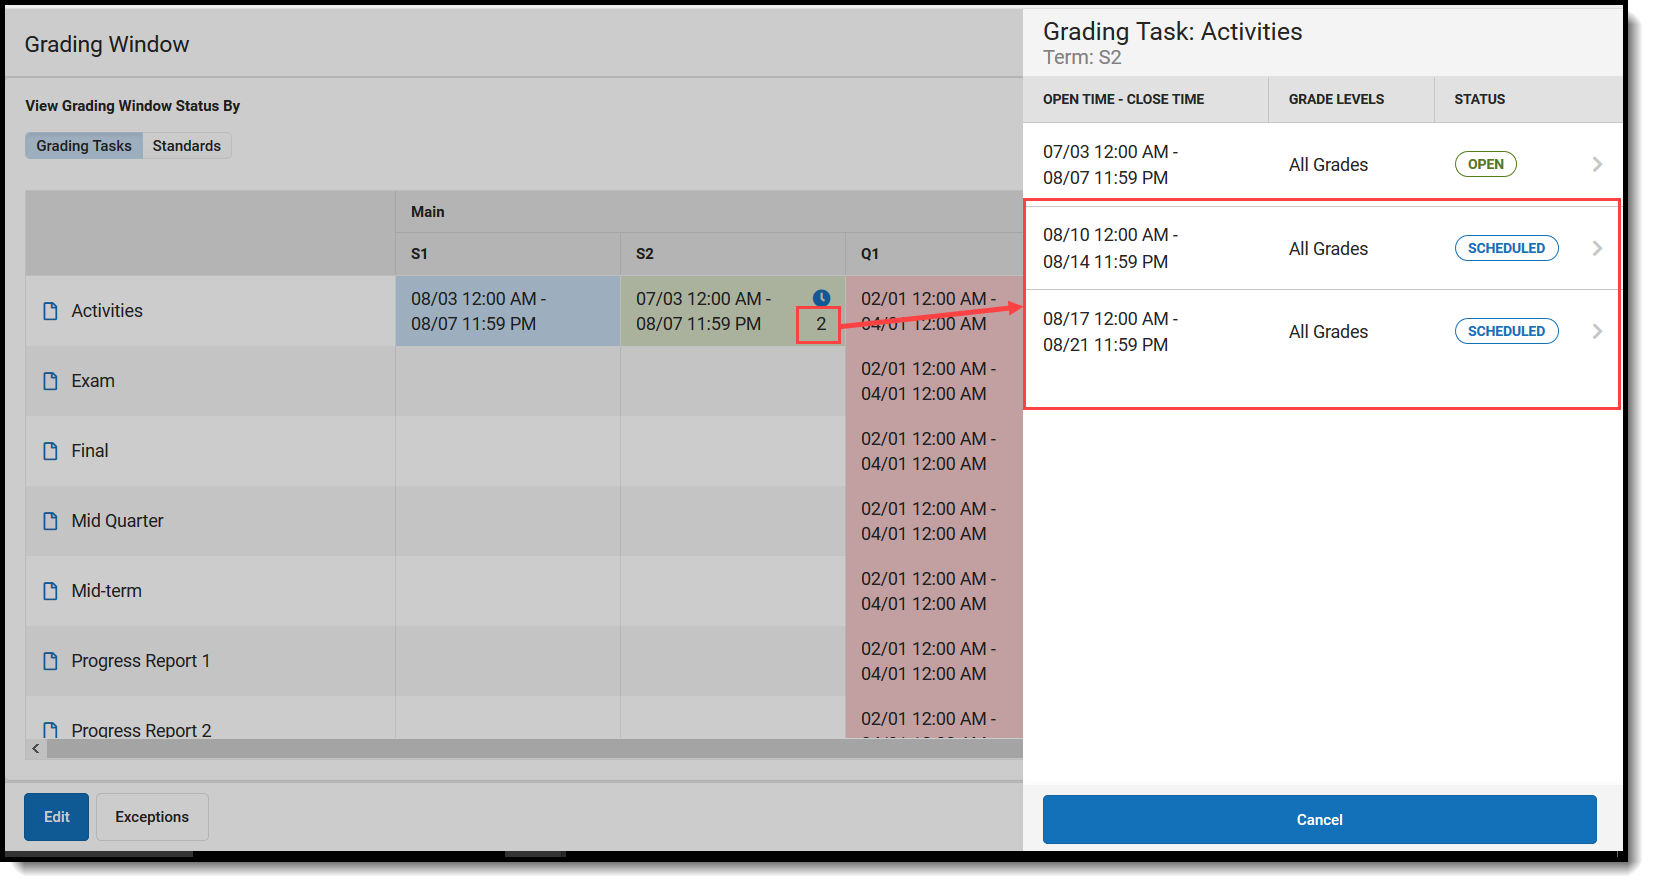 Future Scheduled Grading Window
When there is more than one Grading Window currently open, the main grid displays a second row for that Grading Window. There may be different open/close dates or times, but both can be seen from the main grid.
 Multiple Rows for Grading Window Term
Change Dates of Grading Windows
- Select the Edit option to see a list of existing Grading Windows.
- Make the necessary changes, then click Save to apply the new selections.
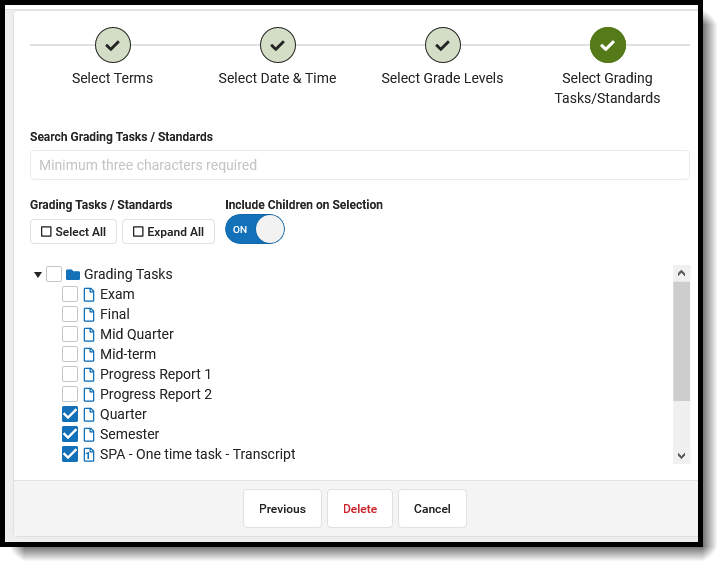
Delete Grading Windows
- Select the Edit option to see a list of existing Grading Windows.
- Choose which Grading Window to delete from the list of existing Grading Windows.
- Click the Delete button to completely remove the Grading Window.
Deleting a grading window does not show if there are unsaved edits in the Progress Tracker.
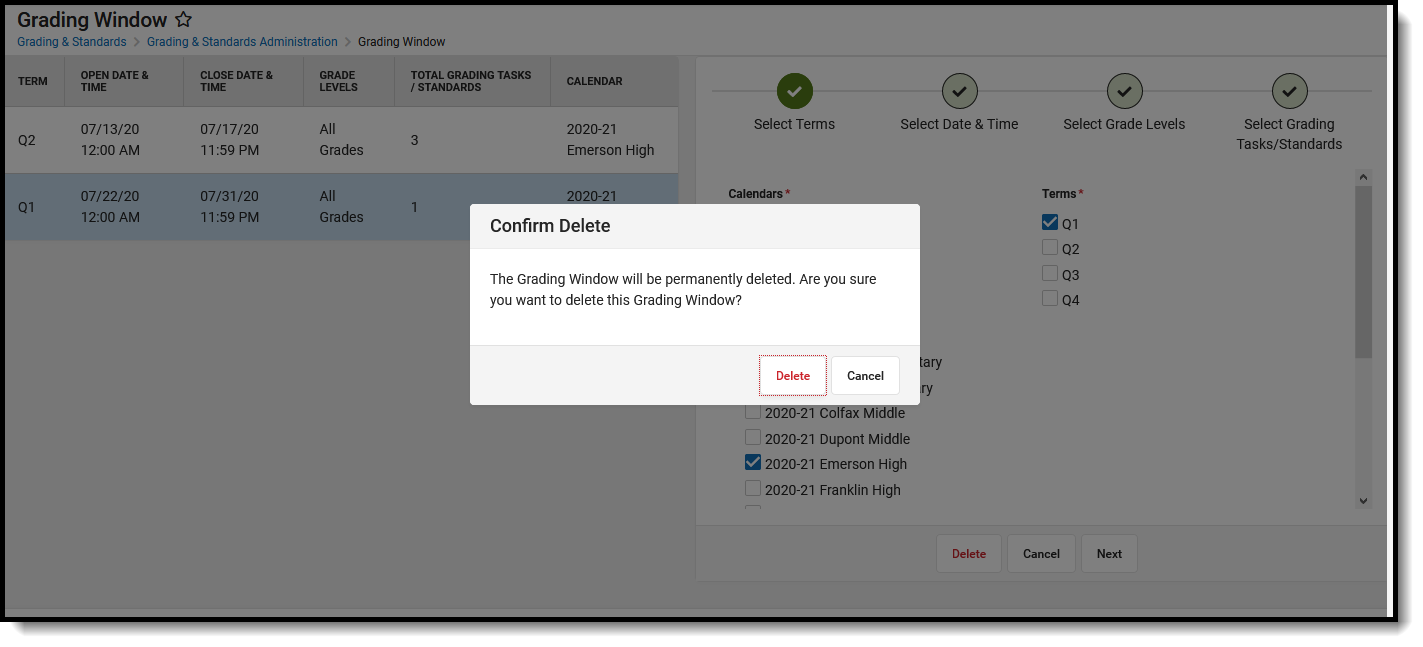 Delete Grading Window
