Tool Search: User Account Batch Import Tool
The User Account Batch Import Tool allows schools and districts to import a file which creates Campus user accounts en masse.
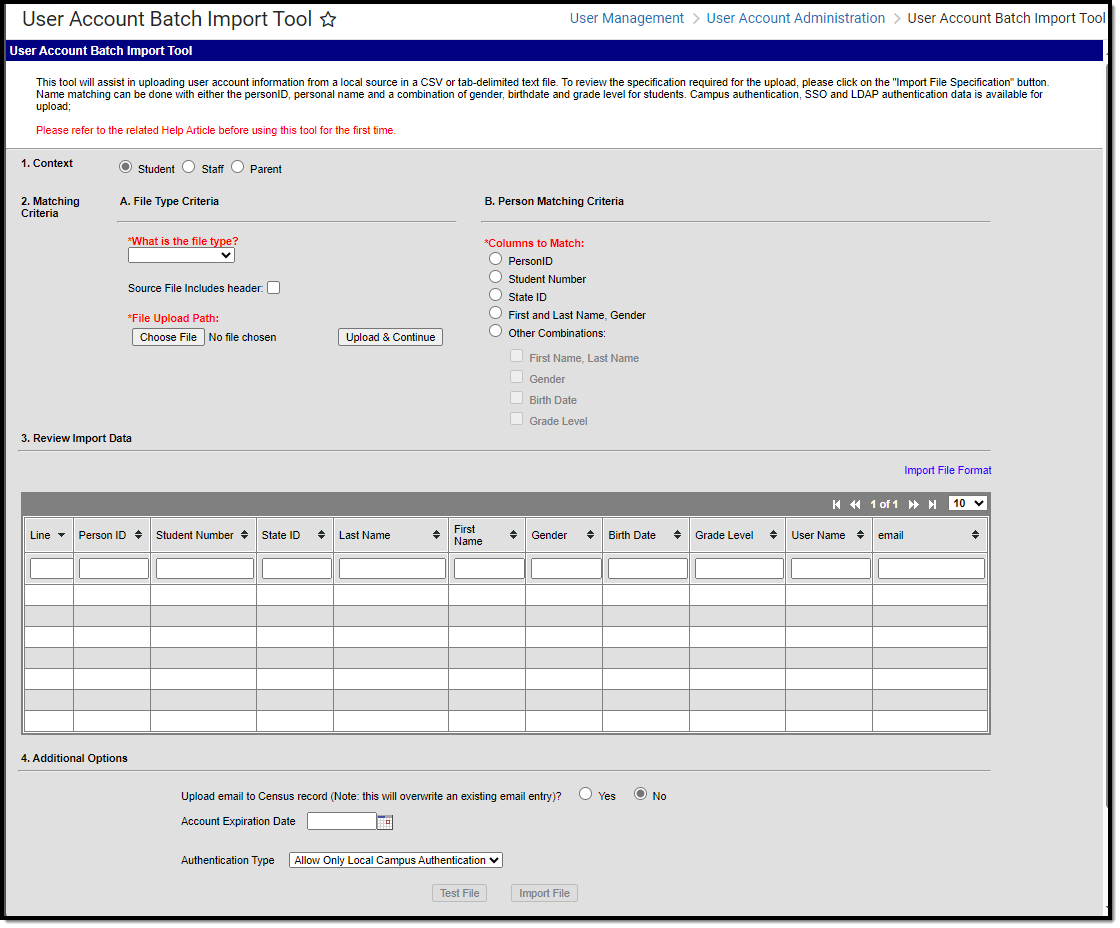
Image 1: User Account Batch Import Tool
Importing User Accounts
In order to properly import and create user accounts, the following steps should be taken:
- Step 1. Create the Import File
- Step 2. Identify the Context of the Import File
- Step 3. Enter Matching Criteria
- Step 4. Review and Test Import Data
- Step 5. Import File Data
- Step 6. Send Activation Emails and/or Letters to Users
Step 1. Create the Import File
The first step is create the file you will use to import and create Campus user accounts. See the File Specifications area for details on file format requirements or click the Import File Format hyperlink on the right-hand side of the tool (see Image 2).
In order to prevent any potential errors, it is important to create the import file in the order defined in the Import File Format (see Image 2).
Data is not required in each column however, each column defined in the File Specifications must be present in the import file.
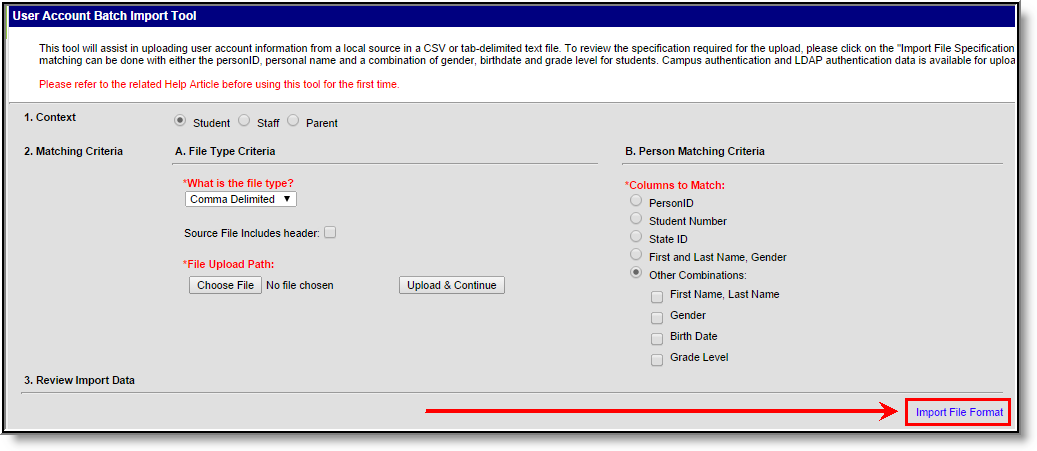
Image 2: Viewing the Import File Format
Step 2. Identify the Context of the Import File
The second step is to identify the Context or type of users who will receive user accounts. When creating user accounts, tool logic looks at information entered in the import file and based on the Columns to Match selected, identifies and matches a person to the user account.
The following describes the requirements necessary for a user to be included per Context option:
- Student - A student must have a current enrollment record or have had an enrollment record in the active school year.
- Staff - Staff members must have an active District Assignment record.
- Parent - Parents must be marked as Guardian within a student's household
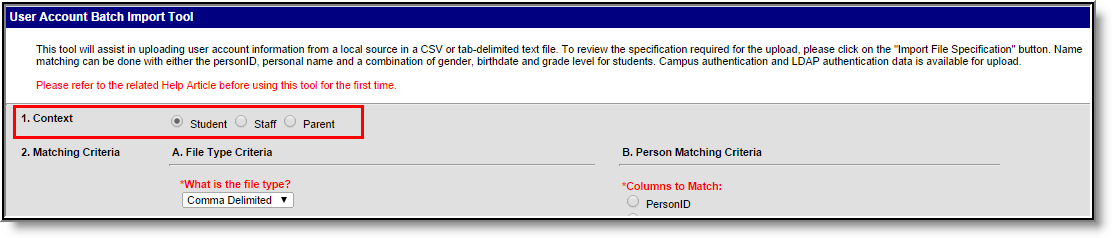
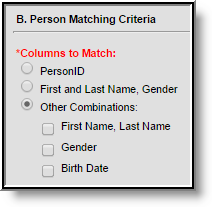
Image 3: Selecting a Context
For example, the table below shows the matching criteria available based on the Context selected.
| Student | Staff | Parent |
|---|---|---|
 |
 |
 |
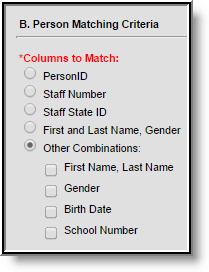
Step 3. Enter Matching Criteria
Once a Context has been selected, enter matching criteria. Use the table below as guidance.
Match criteria is available based on the Context selected. See the images below Image 3 for examples of available options per Context selected.
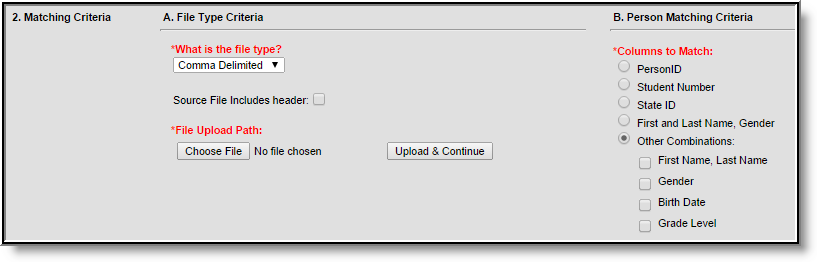
Image 4: Entering Matching Criteria
| Field | Description |
|---|---|
| What is the file type? |
Indicates if the import file was formatted as comma or tab delimited. See the File Specifications section for more information on how to build the import file. |
| Source File Includes header | If the import file includes a header, mark this checkbox. |
| Columns to Match |
PersonID - If selected, import logic will use personID to match import file data to people within Campus. This is an option in the specification, meaning the personID as it exists within Campus. This field is only relevant if data entered is Campus personID data. |
|
Student Number - If selected, import logic will use Student Number to match import file data to people within Campus. (Only available for a Context of Student) | |
|
Staff Number - If selected, import logic will use Staff Number to match import file data to people within Campus. (Only available for a Context of Staff) | |
|
State ID - If selected, import logic will use Student State ID to match import file data to people within Campus. (Only available for a Context of Student) | |
|
Staff State ID - If selected, import logic will use Staff State ID to match import file data to people within Campus. (Only available for a Context of Staff) | |
|
First and Last Name, Gender - If selected, import logic will use a combination of first name, last name and gender to match import file data to people within Campus. | |
|
Other Combinations - More than one combination value can be selected.
| |
| File Upload Path |
Choose File - Select this button and locate the import file. |
| Upload & Continue - Once the file has been added, select this button to import the file into the tool and begin review of file data. |
Step 4. Review and Test Import Data
The fourth step is to review the import data to ensure it's correct and test the file to ensure user accounts were created appropriately.
Import the file by selecting the Choose File field and selecting the file on your hard drive or network storage. Once selected, click Upload & Continue. The Review Import Data table will populate with data from the import file (see Image 5). Review data by searching per column or reviewing data per page.
File headings will differ based on the Context selected.
- For the Student context - column three becomes Student Number and column nine becomes Grade Level.
- For the Staff context - column three becomes Staff Number and column nine becomes School Number.
- For the Parent context - columns three, four and nine disappear.
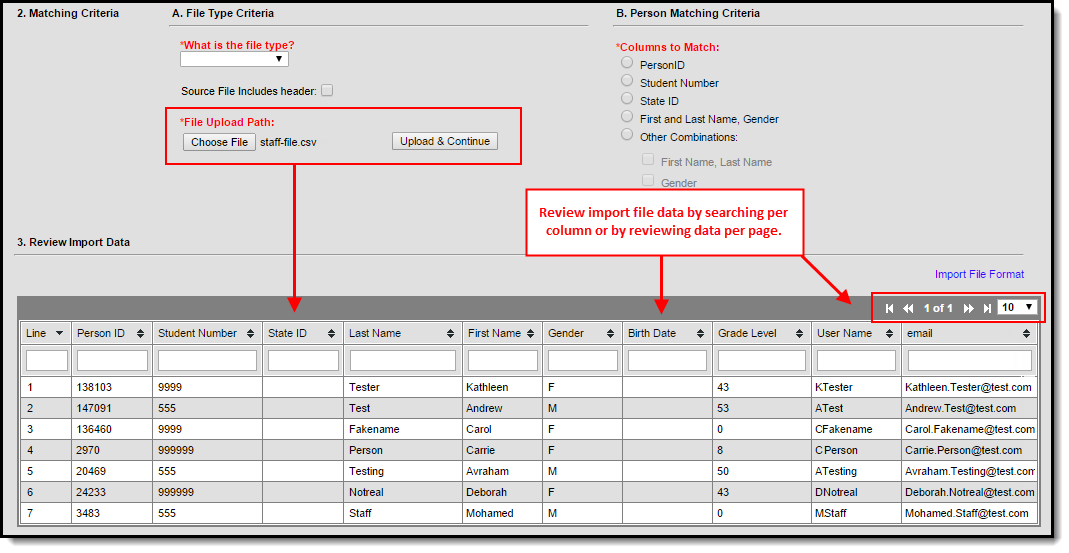
Image 5: Uploading and Reviewing File Data
Once data has been reviewed, click the Test File button. The tool will perform a test import and display results (including errors) in a separate window (see Image 6).
No data is written to the database when performing a test of the file.
If errors are reported, correct these errors within the file and test the file again. Once you are satisfied with test results, move on to Step 5.

Image 6: Reviewing Test Results
Step 5. Import File Data
Once file data has been reviewed and deemed ready for importing, consider the following options before selecting the Import File button:
| Field | Description |
|---|---|
| Upload email to Census record |
Selecting the Yes radio button means all email addresses within the file will overwrite each person's existing email addresses currently stored within the Census module of Campus. Only email addresses matching new Campus accounts being added will have email addresses uploaded and overwritten within Campus. Email addresses of existing users will not be modified. |
| Account Expiration Date | If you would like to set an expiration date for all user accounts created after the file is imported, enter the date in this field. |
| Authentication Type
(if SAML SSO or LDAP is enabled) |
If SAML SSO or LDAP authentication is enabled, select whether to use Local Campus Authentication (Campus username and password), SAML SSO Authentication, or LDAP Authentication when creating each account For more information about SAML SSO functionality, see the SSO Service Provider Configuration article. For more information about LDAP, see the LDAP Authentication article. |
Once options have been determined and you are ready to import, select the Import File button.
Importing a file does NOT update existing information within the Campus database. This tool creates Campus user accounts for all users within the file if they do not currently have a Campus user account. Data within the import file is used to match existing Campus users to the Campus user account created.
There is one exception to this rule: If the Upload email to census record option is set to Yes, all email addresses in the file will be imported into the Campus database, overwriting existing data.
Also, if the username in the import file differs from the one in Campus, a new username will be created and made active for the corresponding user account.
Authentication Type is available only to users with SAML SSO and/or LDAP enabled.
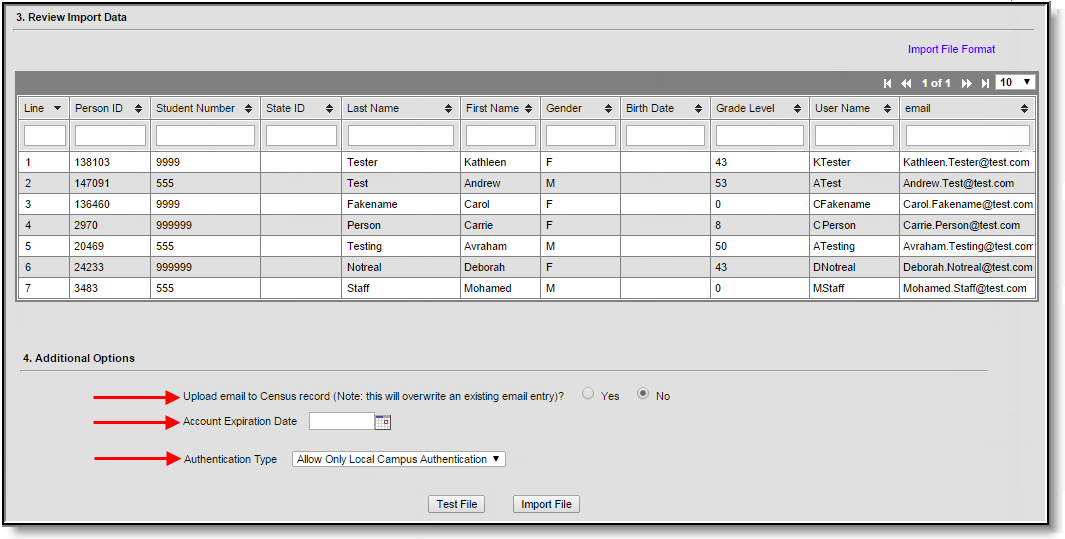
Image 7: Importing File Data
The User Account Batch Import Results window will appear, indicating how many user accounts were created and the Ad hoc filter created (Image 8). The Ad hoc filter created includes all people who just had a user account created and should now be alerted to activate their accounts, as mentioned in Step 6.
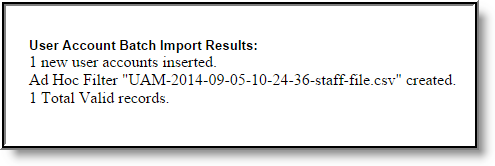
Image 8: Import Results
Step 6. Send Activation Emails and/or Letters to Users
Once user accounts have been created, emails and/or letters MUST be sent to each user informing them of their Campus account username and activation URL. This process can be completed via the Account Letter Builder and User Account Messenger tools.
- Account Letter Builder Process: See the Building Activation Letters for Newly Imported/Created Campus Portal Accounts and Build Activation Messages for Newly Imported/Created Campus Portal Accounts sections for more information on building account activation letters.
- User Account Messenger Process: Please see the Informing Users of Newly Created User Accounts section for more information on sending emails or letters to users.
Failure to send activation emails and/or letters to these users will result in them not knowing their credentials and thus being unable to log in to their Campus account.
File Specifications
The following file specifications should be used when creating the import file.
Data is not required in each column; however, each column defined in the File Specifications must be present in the import file.
| Column Name | Column Type | Column Size | Required | Required Value | Default Value |
|---|---|---|---|---|---|
| personID | integer |
|
No |
|
NULL |
| studentNumber | varchar | 15 | No |
|
NULL |
| stateID | varchar | 20 | No |
|
NULL |
| lastName | varchar | 40 | No | Variant String | NULL |
| firstName | varchar | 35 | No | Variant String | NULL |
| gender | varchar | 1 | No | F / M | NULL |
| birthDate | smalldatetime |
|
No | MM/DD/YYYY | NULL |
| gradeLevel | varchar | 4 | No | Variant String | NULL |
| username | varchar | 50 | Yes |
|
NOT NULL |
| varchar | 200 | No |
|
NULL |
For parent data to import properly, the parent must have a relationship to a student with the Guardian checkbox marked in the Relationships tool in Campus.
The image below is an example of a comma-delimited import file (created in Microsoft Excel):

Image 9: Example of a Comma-Delimited Import File
