Tool Search: Locker Schedule Wizard
The Locker Schedule Wizard provides the school with the ability of assigning lockers to students en masse. This wizard has the ability to schedule more than one student to a locker. If lockers are marked as Shared, the wizard will assign the lockers to two same-gender students. Multiple locker types can be assigned when using this wizard.
Students must be actively enrolled in the school selected in the Campus toolbar.
This tool can be used to assign lockers to students who are enrolled in multiple schools at the same time, as long as the student does not have an existing active locker assignment in the selected school and school year in the Campus tool bar.
The following must be created in the Locker Resources tool before scheduling lockers:
- Lockers
- Locks and locker combinations
- Locker Locations
- Locker Types (created in the Custom Attribute/Dictionary)
Locker Schedule Wizard Editor
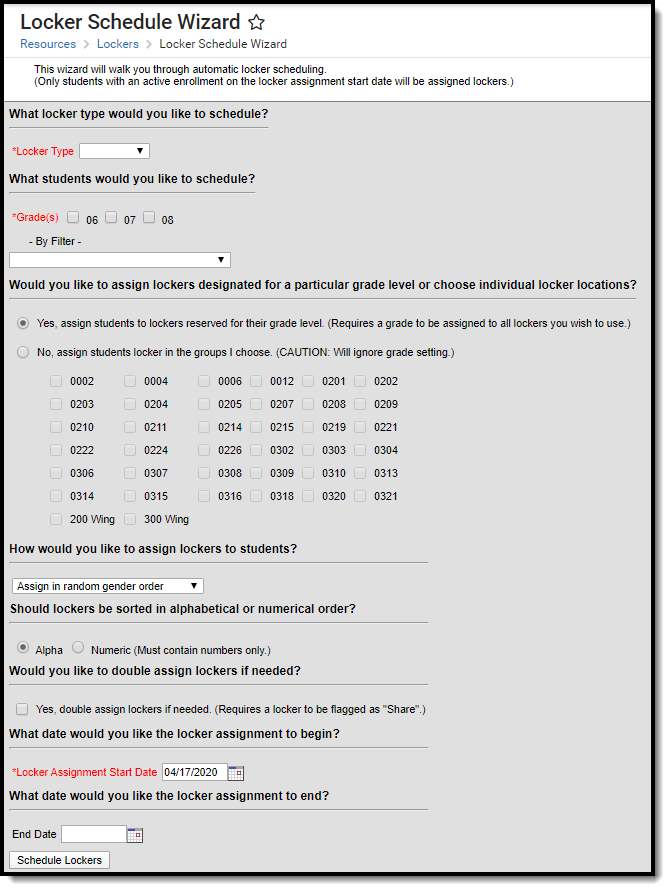
The following options can be selected on the Locker Schedule Wizard.
Option |
Description |
|---|---|
What locker type would you like to schedule?
|
Select which Locker Type (academic, PE, etc.) to assign to the students. |
What students would you like to schedule? |
Select the students to schedule either by Grade level or an Ad hoc Filter.
|
Would you like to assign lockers designated for a particular grade level
|
Only those lockers designated for the selected grade level will be assigned if YES is chosen. Otherwise, the grade level selected on the lockers will be ignored (if NO is chosen).
|
How would you like to assign lockers to students? |
Choose one of the following options from the dropdown list.
If either of the gender options are chosen, the wizard assigns lockers by the assigned gender code (Male, Female, or Non-Male, Non-Female). until one gender group has run out; at that time, it assigns the remaining gender group.
This tool assigns lockers using the standard Gender field (Census > People > Identities > Gender); Legal Gender assignment (Census > People > Identities > Protected Identity Information > Legal Gender) is ignored. Note that lockers are still assigned in numeric order (e.g., 1-5) when random options are selected. The random designation applies to gender or student only. |
Should lockers be sorted in alphabetical or numerical order? |
Determine if lockers should be sorted either alphabetically or numerically. If numeric is chosen, the locker number must contain ONLY numbers (that means no special characters, no letters).
When lockers are sorted numerically and a locker number has a non-numeric character, a validation message displays indicating at least one locker has non-numeric character. Users can either sort the lockers alphabetically or update the locker number to contain only numeric characters. |
Would you like to double assign lockers if needed? |
If lockers are marked as Shared, more than one student can be assigned to it. If this is desired, mark Yes, double assign lockers if needed. |
What date would you like the enrollment/ locker assignment to begin?
|
Enter the Effective State Date of when the locker assignment should begin. Dates are entered in mmddyy format or can be selected by clicking the calendar icon. This start date must be on or after the student's enrollment start date. |
What date would you like the locker assignment to end? |
If the locker assignment should have an end date, enter that date. Dates are entered in mmddyy format or can be selected by clicking the calendar icon. This date does not have to be entered at this time. However, the locker is considered unavailable until the student's locker assignment is ended. |
Use the Locker Schedule Wizard
- Select which locker Type to schedule from the dropdown list.
- Select the grade levels for which to assign lockers. All grade levels may be selected at one time. An ad hoc filter can also be used to select the students.
- Select the method that will be used to assign students to particular lockers.
- Determine how lockers should be assigned to students by selecting an option from the dropdown list.
- Select how lockers should be assigned, either alphabetically or numerically.
- Check the Yes box to double-assign lockers.
- Enter the Effective Start Date for the locker assignment.
- Enter an End Date for the locker assignment.
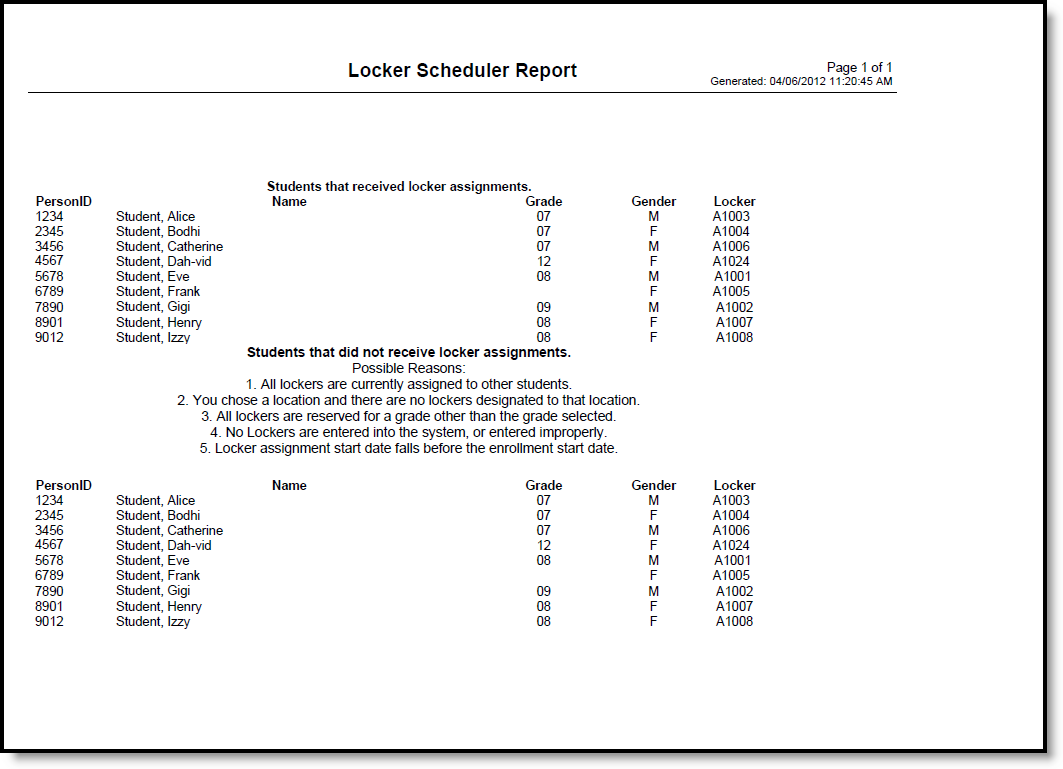
- Click the Schedule Lockers button. Once the wizard is finished, a report displays, listing which lockers were assigned and which students were not assigned a locker.
The report prints the student's person ID, name, grade level, gender and locker to which the student was assigned. Or, if a student was not assigned, his/her information will also print. Reasons for a student not being assigned a locker are also listed.
Locker Scheduler Report


