Tool Search: Ed-Fi Configuration
The Ed-Fi Configuration tool is used to establish a data connection between Campus and the Ed-Fi system and to map resources to Ed-Fi.
Infinite Campus only supports one open connection at a time when a multi-tenant setup is being used.
Once a successful connection is made, Resource Preferences are selected, and Ed-Fi ID's are assigned to users, data will flow properly from Campus to Ed-Fi.
Read - View the Ed-Fi Configurations
Write - Modify and save Ed-Fi Configuration values
Add - Provides no function for this tool
Delete - Provides no function for this tool
For more information about Tool Rights and how they function, see this Tool Rights article.
Ed-Fi Claim Sets and District Numbers
A Claim Set must be set up for a district in the Ed-Fi ODS in order for data to be posted from Campus.
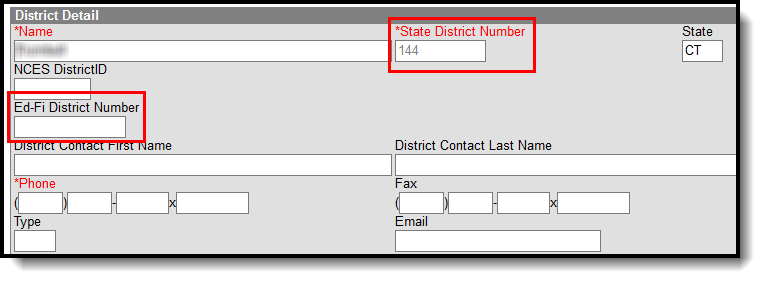
The district number located in the State District Number field in School & District Settings > District > District Information is the default district number used by Ed-Fi. If this number contains alphanumeric characters or if a district wants to use a different number, then the Ed-Fi District Number field can be used as an override.
Enter Ed-Fi Configuration Values
Ed-Fi Configuration values are created by the Ed-Fi ODS and are entered by the district. If information does not make a successful connection, work with Campus Support to troubleshoot your issues.
The following describes each Ed-Fi Configuration field:
| Connection Credentials Field | Description |
|---|---|
| Connection Type | Indicates the type of Ed-Fi connection, either State or Core. |
| Student Unique ID | Indicates the unique identifier assigned to students. This unique identifier is used in Ed-Fi to link all related data to a student. Options are:
Once an ID has been used for a Configuration it should not be changed. If this option is changed after data has been sent, there is potential for data conflicts from Campus to the ODS. |
| Staff Unique ID | Indicates the unique identifier assigned to staff. This unique identifier is used in Ed-Fi to link all related data to a staff member. Options are:
Once an ID has been used for a Configuration it should not be changed. If this option is changed after data has been sent, there is potential for data conflicts from Campus to the ODS. |
| Connection Name | The unique name given to the connection. |
| School Year | The school year scoped for the configuration values entered. Start Date and End Date values should be entered for the school year in the School Years editor. Otherwise, a default Start Date of 7/1/XXXX is used and a default End Date of 6/30/XXXX is used to determine what year to send data (where XXXX = the Start Year and End Year values entered on the School editor). |
| O-Auth URL | The base URL of the endpoint to retrieve an OAuth Token. Please see the O-Auth URL and ID Post Amble Information section below for details on entering information in this field. |
| API URL | The base URL of the API. |
| ID Post-Amble | The URL for Ed-Fi resources and Ed-Fi Identities is generally different, so this parameter is to store the URL segment for identities (this is appended on to the API URL). Please see the O-Auth URL and ID Post Amble Information section below for details on entering information in this field. |
| Timeout in Seconds | This field determines (in seconds) the amount of time allowed to pass before the connection between Campus and Ed-Fi is considered timed out and Ed-Fi events are not processed. These Ed-Fi events are then reprocessed the next time a quartz job runs. This field is defaulted to a value of 60 seconds but can be modified if desired. |
| Client Key | The client key. There could be multiple APIs attached to one given URL. They are demarcated based on a key. |
| Client Secret | The secret that goes along with the above key. This is used to generate the OAuth token. |
| Test Connection | Selecting this button initiates a check to see if the values entered in the configuration fields are valid and proper connection has been made between Campus and Ed-Fi. If a connection is made, a message saying "Connection is Valid" displays. |
O-Auth URL and ID Post Amble Information
| Ed-Fi Version | Field | Value | Example |
|---|---|---|---|
| 3.X | O-Auth URL | The server URL concatenated with /edfi.ods.webapi. | If the Base URL is: https://edfiods-dev002.infinitecampus.com/edfi.ods.webapi/data/v3. Then the O-Auth URL is the part of the Base URL before /data. Add https:// to the beginning if it is not present. So in this example, the O-Auth URL is: https://edfiods-dev002.infinitecampus.com/edfi.ods.webapi. |
| ID Post Amble | The ID Post Amble is /data through the end of the Base URL. Note: The end year of the school year is optional as part of the ID Post-Amble in Ed-Fi 3.X. | If the Base URL is: https://edfiods-dev002.infinitecampus.com/edfi.ods.webapi/data/v3 Then the ID Post Amble is /data through the end of the Base URL. So in this example, the ID Post Amble is: /data/v3. |
To enter Ed-Fi Configuration values:
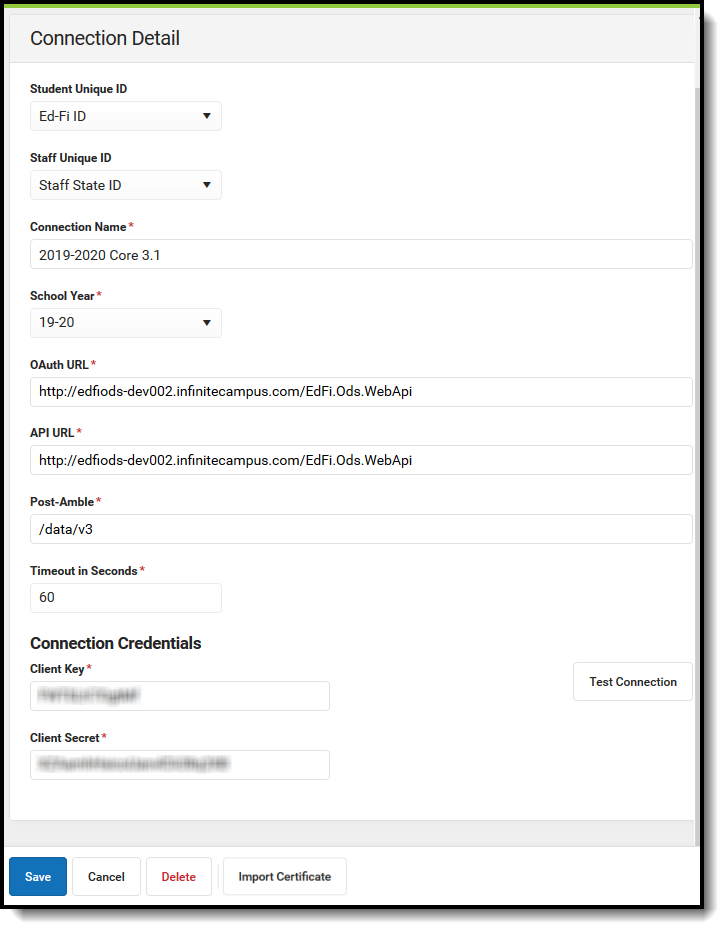
- Click the Connection button. The Connection Detail editor will appear.
- If desired, select a Unique Identifier for students.
- If desired, select a Unique Identifier for staff.
- Enter the Connection Name.
- Select the School Year.
- Enter the O-Auth URL.
- Enter the API URL.
- Enter the Post-Amble.
- Enter the Timeout in Seconds (or leave the default value of 60).
- Enter the Client Key.
- Enter the Client Secret.
- Select the Save icon.
- Click the Test Connection button to ensure configuration values were correct and a connection to Ed-Fi was made. If a proper connection is made, a message saying "Connection is Valid" displays.
Multiple Applications
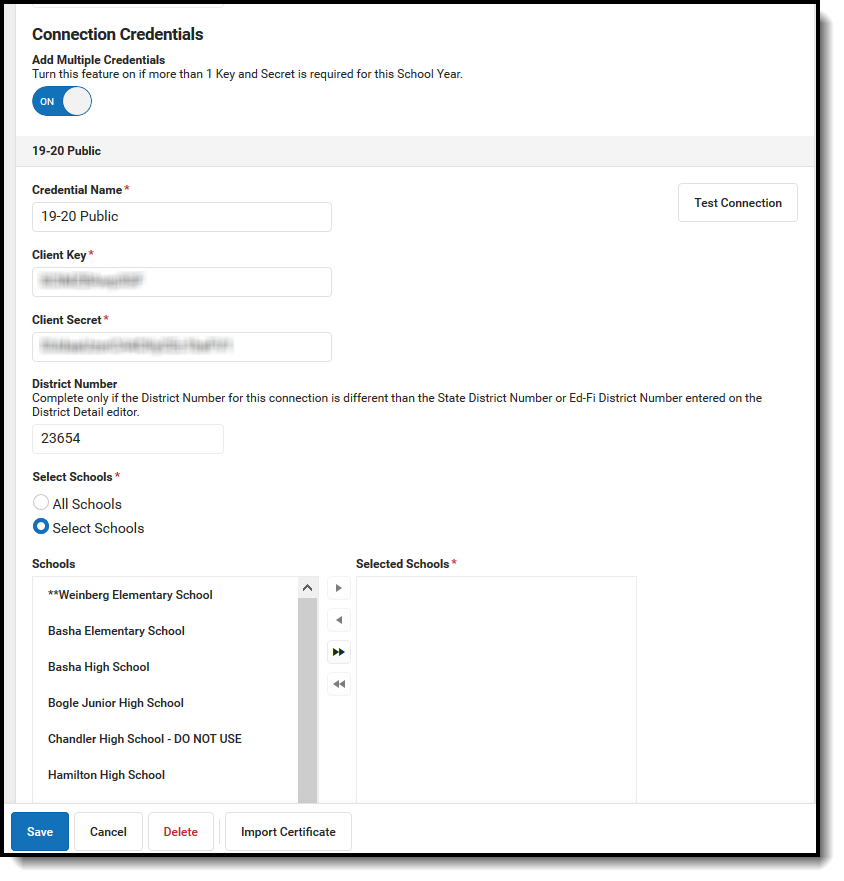
Multiple Applications are used to allow Infinite Campus users that have more than one District using the same instance of Infinite Campus (one database) to create multiple connections to the state ODS in the same school year. Examples of this are Charter Schools, Private Schools, Consortium, etc. where the State considers these to be independent Districts but share a single Infinite Campus database. Users can enter multiple Keys and Secrets and assign which schools belong to that application.
Single Configuration with Multiple Applications vs. Multiple Configurations
If all the schools can share the same Resource Preference settings, users should create one configuration and add an application for each Key and Secret they need to report. If different groups of schools need to use different Resource Preference settings, it is recommended that a configuration is created for each type of Resource Preferences needed. Multiple applications can be created under each configuration if needed.
The following describes each Multiple Credential field:
| Field | Description |
|---|---|
| Add Multiple Credentials | Turn this feature on if more than one Key and Secret is required for this School Year. This option is only available in states where Ed-Fi is used for state reporting and the Ed-Fi Connection Type is State. |
| Credential Name | The name of the application. |
| Client Key | The client key. There could be multiple APIs attached to one given URL. They are demarcated based on a key. |
| Client Secret | The secret that goes along with the above key. This is used to generate the OAuth token. |
| Identity Credential (Wisconsin Only) | Identifies the credential that is used when using the Ed-Fi locator tool to search for/assign Ed-Fi IDs. Only one credential can be marked as the Identity Credential. |
| District Number | Used to assign a District Number (Local Education Agency) to an application. This field should only be used if the District Number is different than the Ed-Fi District Number or the State District Number. |
| Selected Schools | The school(s) that should report the ODS for the Key and Secret entered in this application.
|
| Add | Allows the user to add a new Key and Secret to create a new Application within the ODS. This should only be done if all applications will share the same Resource Preferences. |
| Remove | Removes the application. All data will remain in the ODS and in the Identity Mapping tables if any data was sent. |
| Test Connection | Selecting this button initiates a check to see if the values entered in the configuration fields are valid and proper connection has been made between Campus and Ed-Fi. If a connection is established, a message stating "Connection is Valid" appears. |
To enter Multiple Credentials:
- Turn the Add Multiple Credentials on.
- Enter the Credential Name.
- Enter the Client Key.
- Enter the Client Secret.
- If necessary, enter a District Number.
- Select the Schools that should report the ODS for the Key and Secret entered in this application.
- Select the Save icon.
- Click the Test Connection button to ensure the configuration values are correct and a connection to Ed-Fi is established. A message stating "Connection is Valid" displays if a proper connection is made.
- Add or Remove applications as necessary.
Turn Off Old Connections
Users can turn off connections from previous years and store the Connection Details and Resource Preferences if desired. This ensures that data from previous years is not sent. Changes to Resource Preferences and Connection Details cannot be made to inactive connections.
Note: When a connection is turned off, it does not appear in the Resync and Delete tools.
 Configuration Toggle
Generate a Report of Configurations
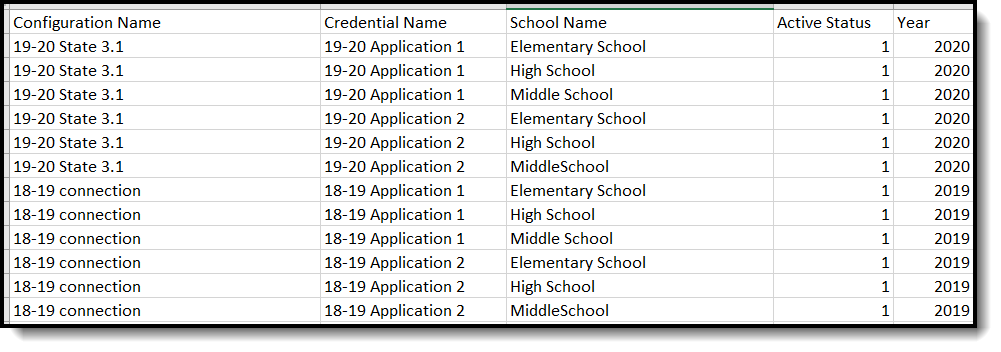
A report of configurations and related details can be generated by clicking the Reports button on the Ed-Fi Configuration screen.
To enter generate the report of configurations:
- Select Reports on the Ed-Fi Configuration screen.
- Select the Configuration Detail Report.
- The report generates and displays details of the different configurations:
Import Certificates
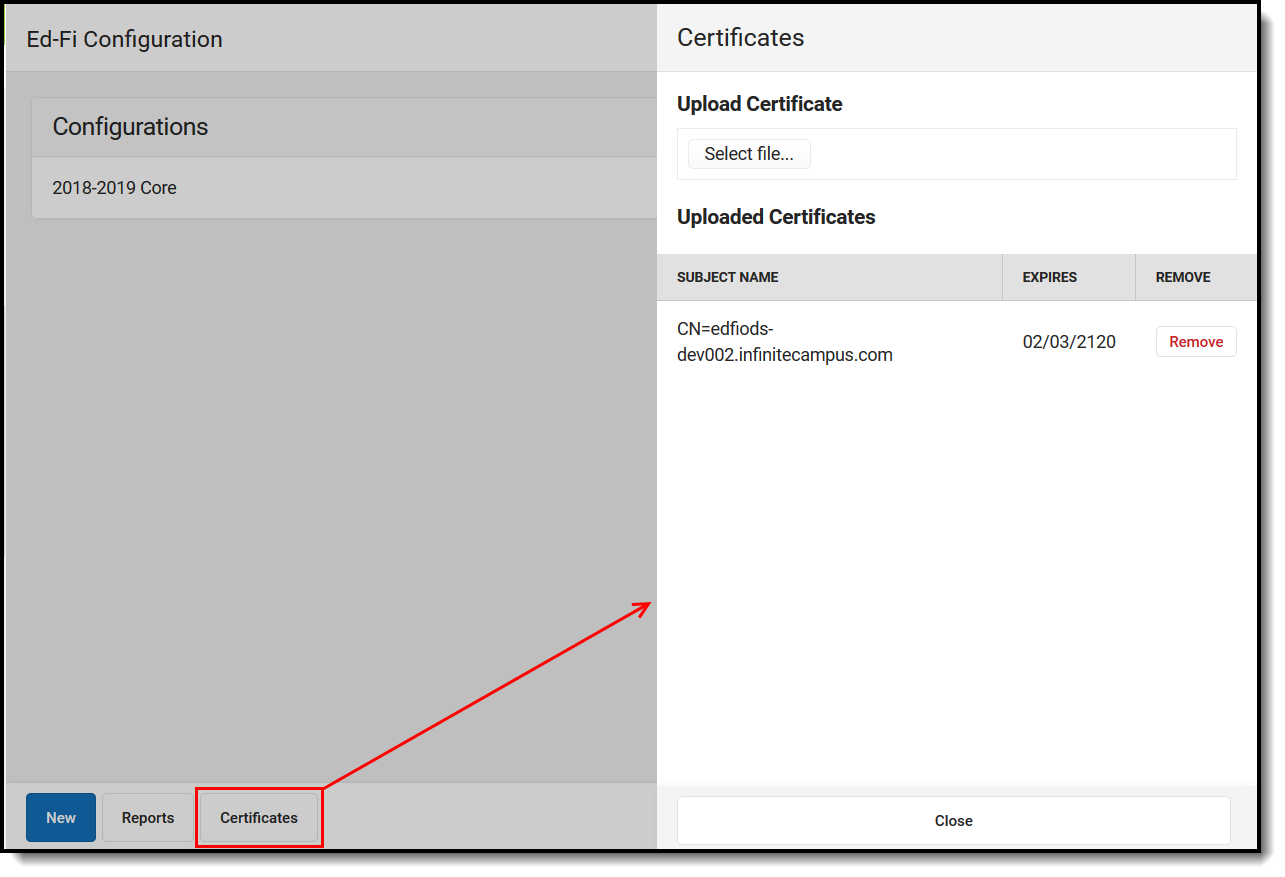
The Certificate Import Tool allows users to import Certificates needed for Ed-Fi that Campus does not support.
Self-hosted districts should have the CSM database installed in order to see the upload button in the Campus UI. Managed Services can install the local Campus Agent/Campus Site Manager database on self-hosted districts.
To import new certificates:
- Select Certificates on the Ed-Fi Configuration screen.
- Click the Select File button.
- Select the Certificate that will be uploaded.
- Select Open.
- The selected certificate will be imported and appear in the Uploaded Certificates list. Select Close.
To update an expiring certificate:
When a notification is received stating that a certificate is going to expire, please use the following steps to upload a new certificate:
An automated email notification is sent out to all users with tool rights to the Ed-Fi Configurations page on the following days prior to expiration:
- 14 Days
- 7 Days
- 3 Days
- 2 Days
- 1 Day
The message that is sent out is:
An Ed-Fi certificate is expiring or has expired. To avoid any disruption in service, click on the notification or go to Ed-Fi Configuration to upload a new certificate. To stop receiving these notifications, delete these expiring or expired certificates.
If you have a new certificate to replace the expiring certificate:
 Certificates button
- Navigate to Reporting > Ed-Fi > Configuration. Select the Certificates button.
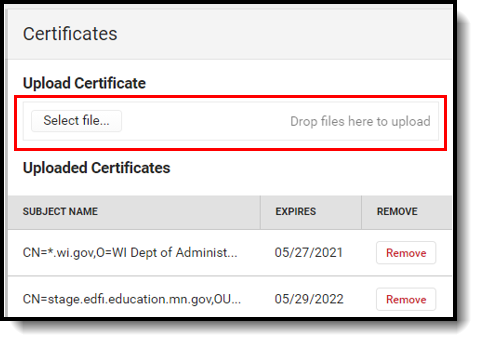 Select File
 - Upload the new certificate by clicking on Select file and selecting the proper file.
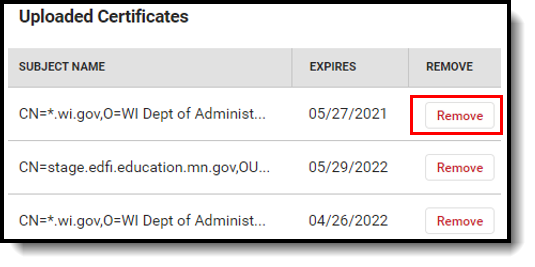 Remove Certificate
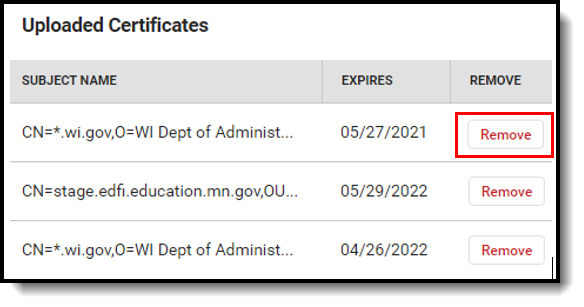
 - Remove the expiring or expired certificate from the Uploaded Certificates section by selecting Remove. Removing the expired certificate will stop expiration notifications.
If you do not have a new certificate and are connected to an external ODS that will provide the certificate:
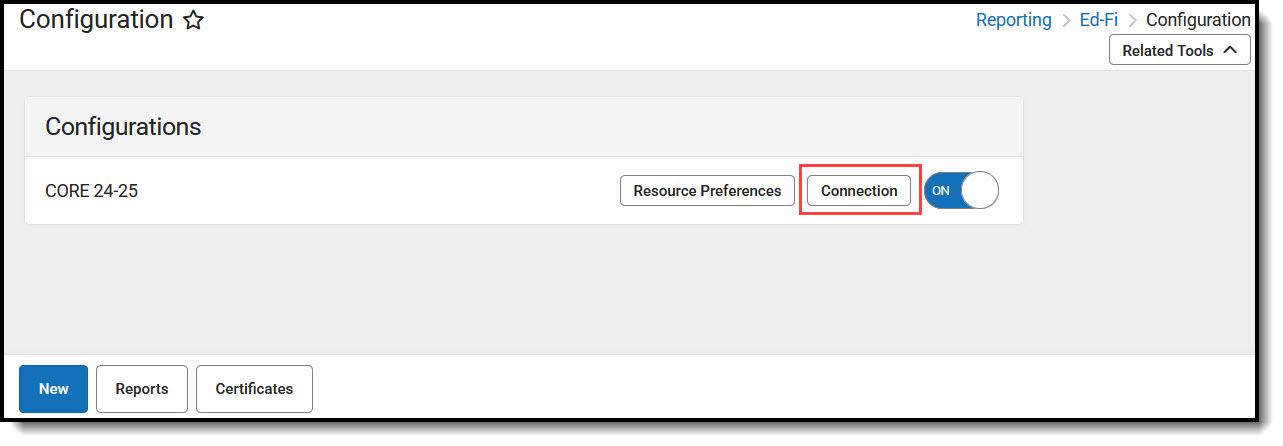
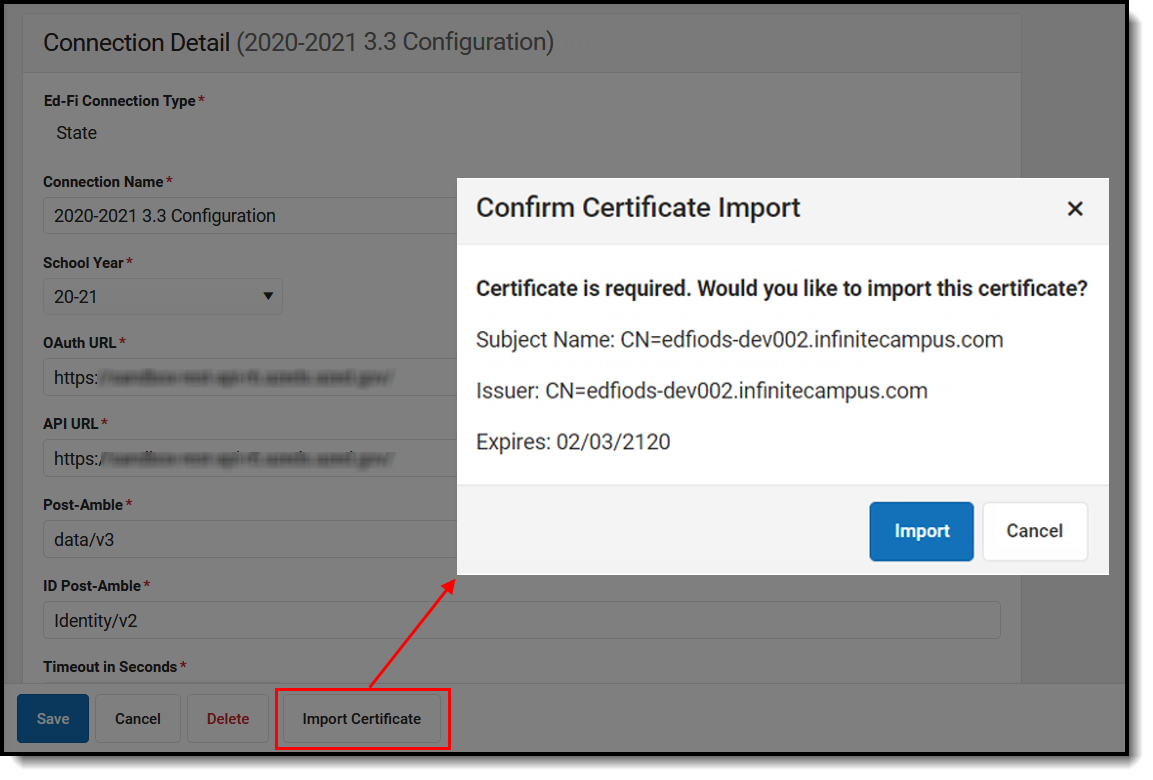
- Navigate to Reporting > Ed-Fi > Configuration. Select the configuration with the expiring certificate and click Connection.
 Import Certificate
- Click the Import Certificate button.
(Please note that if the certificate is available to be uploaded, the Confirm Certificate Import dialog box will display by clicking Test Connection on Connection Credentials as well) - If a certificate is returned, confirm you would like to import the certificate. Review the text and verify it looks like a certificate from the source managing the ODS. Confirm by clicking Import.
- Once the import is confirmed, a green notification displays stating 'The certificate has been successfully imported'.
- If you receive a message saying 'Certificate is already installed', this means the ODS you are connecting to does not yet have an updated certificate. If your certificate is not yet expired, you may need to come back and try again closer to when it expires. If your certificate is expired already, you should contact whomever is managing the ODS (the Department of Education for your state if you are using the Ed-Fi connection for state reporting).
- If there is an Error while importing the certificate, a red error notification displays. If this occurs, please contact Campus Support.
 Remove Certificate
 - Once the updated certificate has been imported, remove the expiring certificate by navigating to Reporting > Ed-Fi > Configuration > Certificates and selecting Remove. Removing the old certificate will stop the expiration notifications.
 Delete Certificate
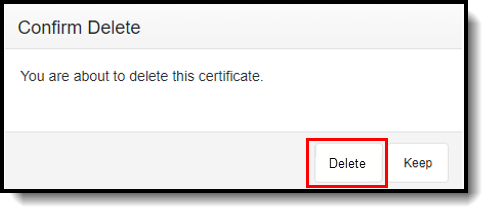
 - Confirm the delete by clicking Delete.
Next Steps
Now that Ed-Fi has been configured and verified to be working correctly, the following steps can now be taken:
Ed-Fi data resources need to be established via the Resource Preferences.
- Make sure all Staff and Student's have a valid ID in the field identified for the Ed-Fi unique identifier.

