Tool Search: Behavior Management
The Behavior Management Tool allows users with the appropriate tool rights to manage existing behavior as well as enter new behavior incidents.
There are several Behavior Preferences related to Events, Referrals, and the overall processing of behavior records. Please review this information prior to recording behavior incidents.
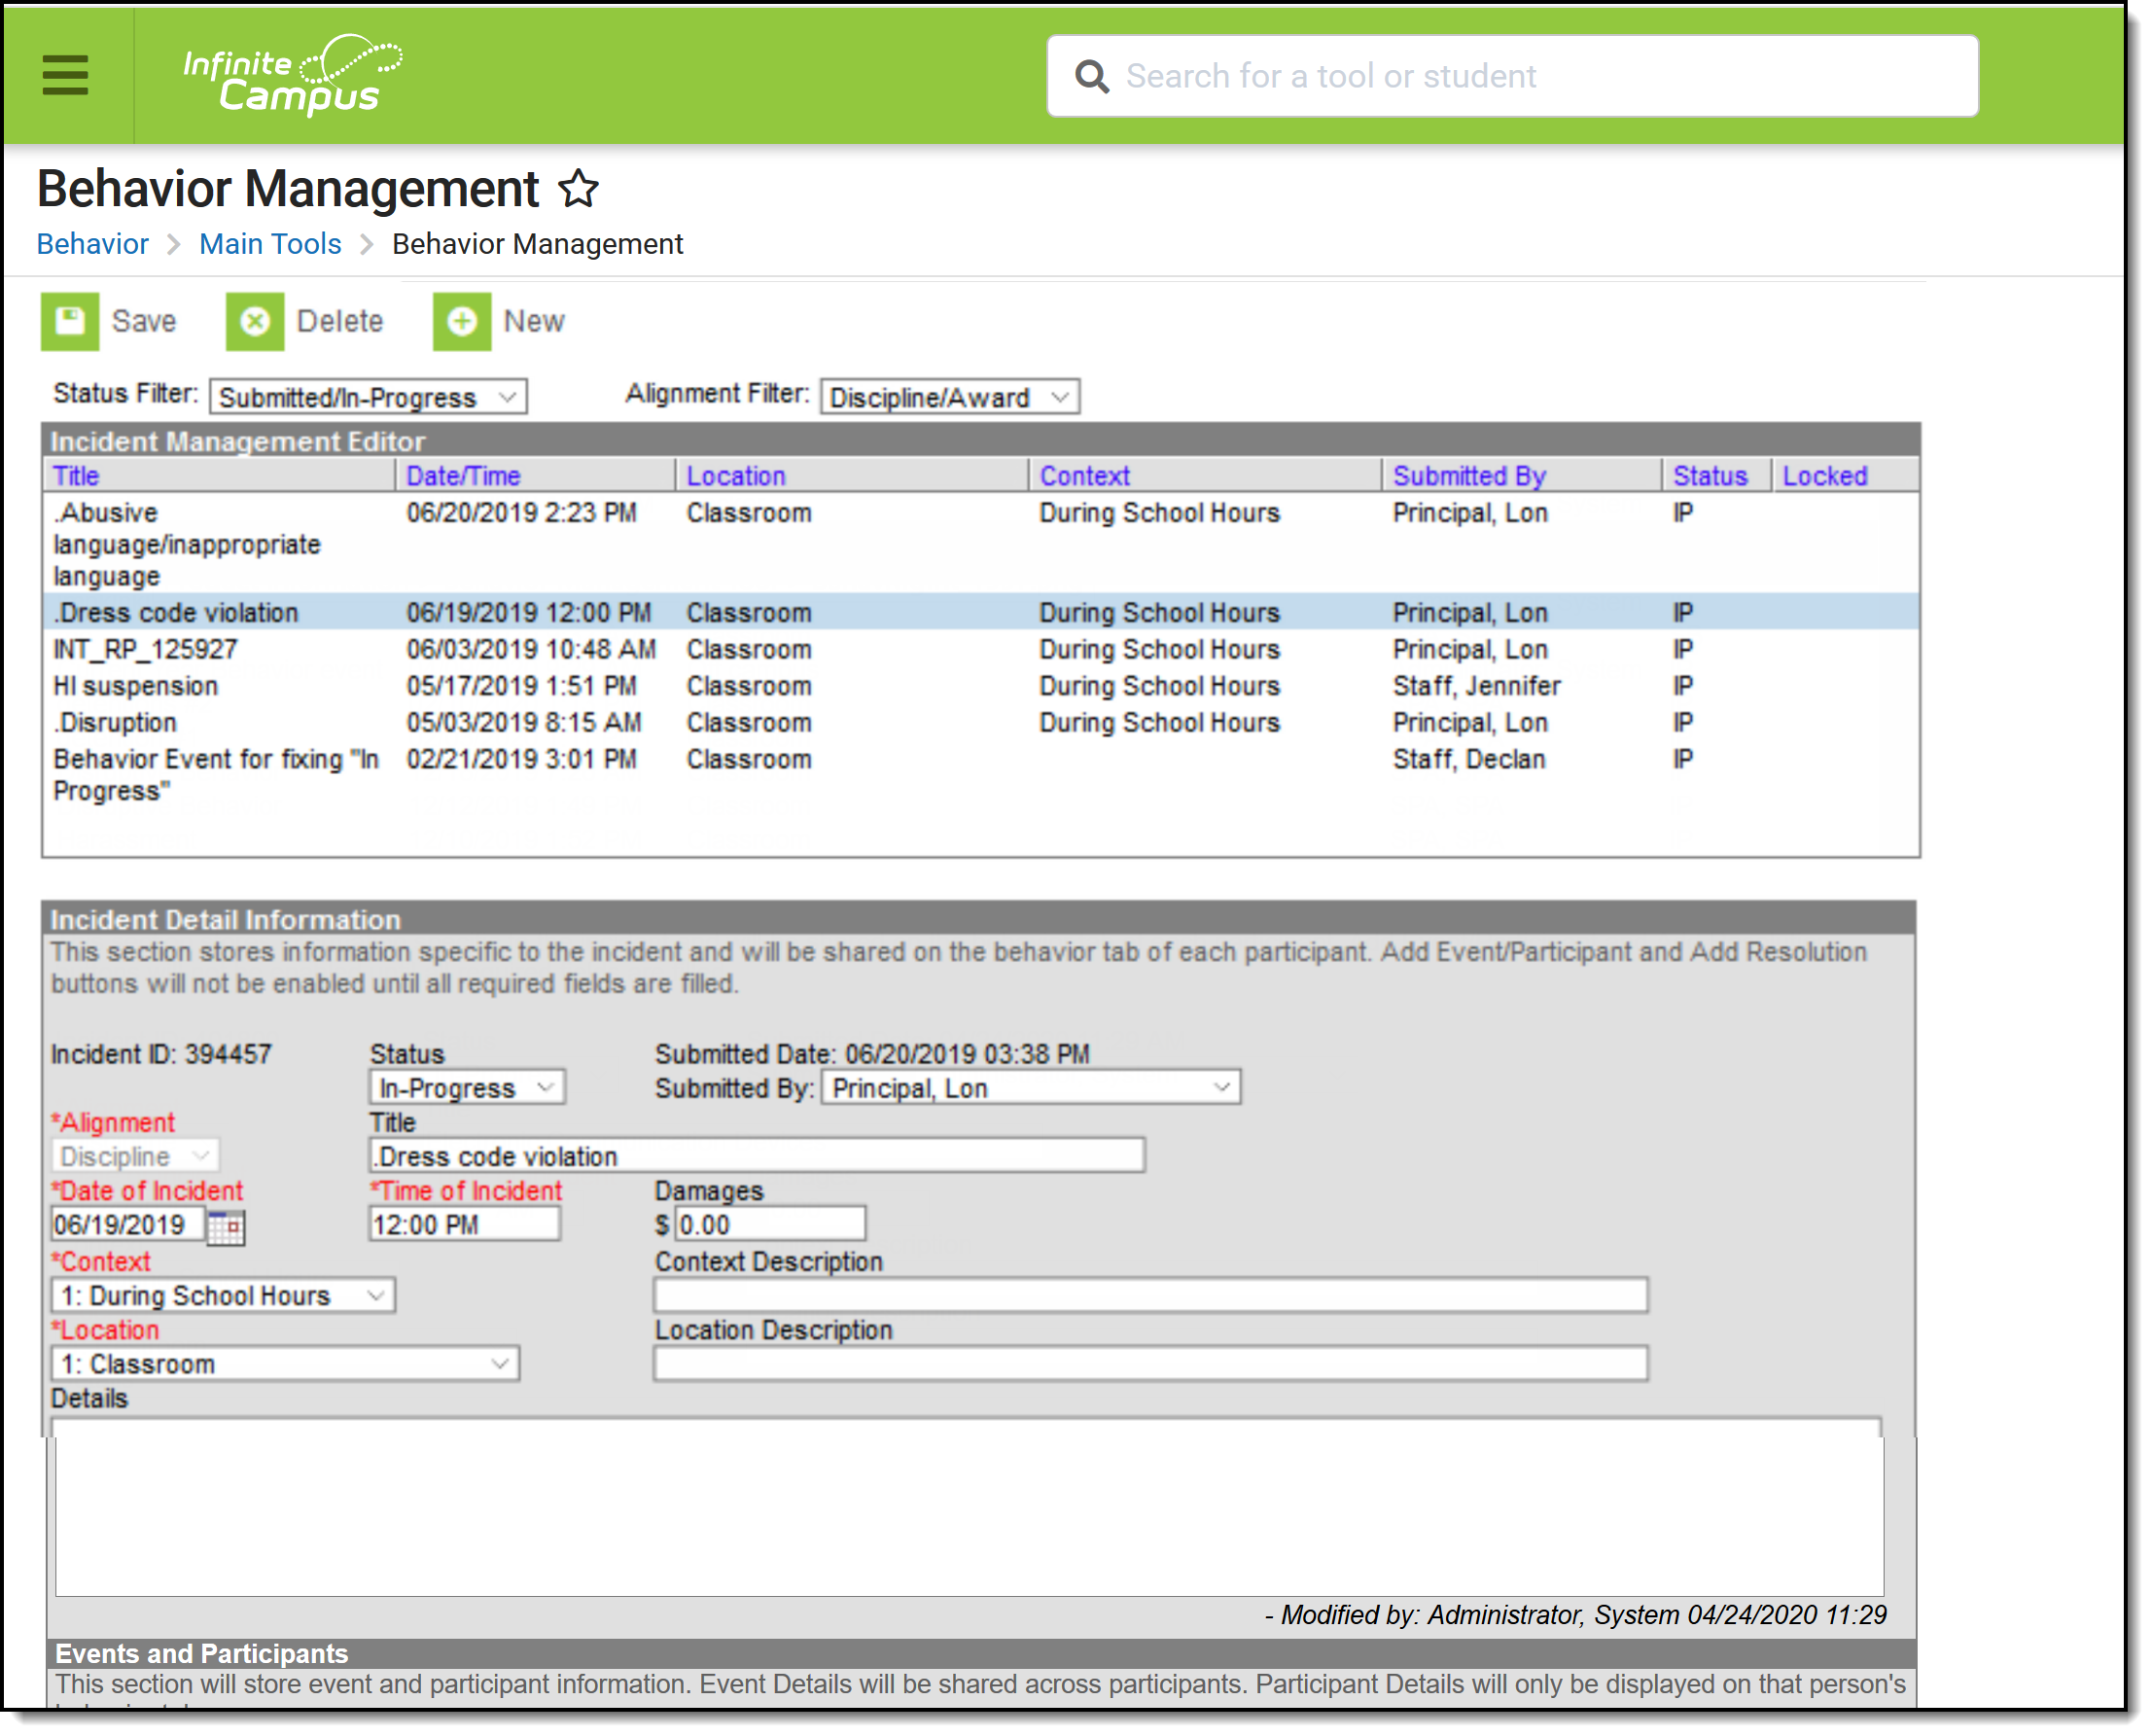 Behavior Management Tool
See the Behavior Management Tool Rights article for available tool rights.
A user must have at least R(ead), W(rite) and A(dd) Modify Attendance tool rights in order to assign an attendance code to a behavior resolution.
An incident record is made up of two parts, the Incident Information, which provides the general information about the behavior incident, and the Events and Participants area, which describes the individual events within the incident and the participants in each event and any assigned resolutions. Information entered in these areas is visible on the student's Behavior record as described below:
Area |
Where information displays |
|---|---|
Incident Information |
Visible for all participants. |
Event Information |
Visible for all participants in that event. |
Participant/Resolution Information |
Only visible for that participant. |
For state-linked districts, data only syncs from district to state under the following conditions:
- An Incident with a state event code mapping (with or without a participant).
- An Incident with a state resolution code mapping.
- For BIE only:
- An Incident with a BIE event code mapping.
- An Incident with a BIE resolution code mapping.
- For Maine only:
- Both the event and resolution have a state code mapping.
- Both the event and resolution have a state code mapping.
When syncing Behavior Resolution data to the state, it does not matter whether the Resolution is linked to an attendance code. Linked Attendance codes should not sync (or attempt to sync) as if they are Behavior Resolution codes.
Manage Submitted Referrals
When a Behavior Referral is submitted, it displays in the Management tool in a status of Submitted. Users can then modify the incident record as desired, including modifying events or participants and assigning resolutions to participants. See the following Incident, Event, Participant and Resolution sections for a description of the fields that display in each area.
When a referral is submitted, a Process Alerts message and email are sent to the individuals selected in the Notify field. The email is only sent when the recipient has an email address and has 'Staff' marked in the Demographics tool.
When a resolution is entered for a referral and the incident is then marked as complete, AND the Behavior Preference of Notify the person who enters the referral when a resolution has been assigned is set to Yes, then both a Process Alerts message and email are sent to the person who submitted the referral. The email is only be sent when the recipient has an email address and has 'Staff' marked in the Demographics tool.
- Messages are sent ONLY when the Notify the person who enters the referral when a resolution has been assigned is set to Yes.
- Only one message is sent, regardless of the amount of resolutions associated with the event.
- When an incident is marked Complete and no resolutions are entered, a message is not sent.
- When an incident moves from Complete to In-Progress and back to Complete, a message is sent (unless there are no resolutions).
Incident Management Editor
The Incident Management editor lists all behavior incidents for the School and Year selected in the Campus toolbar and filters results based on criteria selected in the Status and Alignment filters. Incidents can be filtered by status and alignment and sorted by any of the column headings. The list is automatically sorted by Date/Time. The fields that display in this editor are based on values selected for the incident.
When the preference to lock completed incidents is set to Yes, a Locked icon displays for completed incidents aligned to Discipline (this does not affect incidents aligned to Award). Staff can be assigned a specific tool right (called Unlock Incident) that allows the ability to unlock a completed incident, make modifications as needed, and relock the incident.
The Reporter is the individual indicated in the Submitted By field, who submitted the referral or created the incident. Status options are as follows:
Abbreviation |
Status |
Description |
|---|---|---|
SB |
Submitted |
Incident has been submitted as a referral but not yet reviewed by the behavior administrator or other authorized user. |
IP |
In Progress |
Incident is being modified, such as when incident details are being verified. This status is also applied to incident records created in the Management tool. |
CM |
Complete |
Incident details have been verified, resolutions assigned, and modifications completed. |
Incident Detail Information
The Incident Detail Information editor stores data specific to the incident. That data is viewable on the student's Behavior record for all participants of the incident.
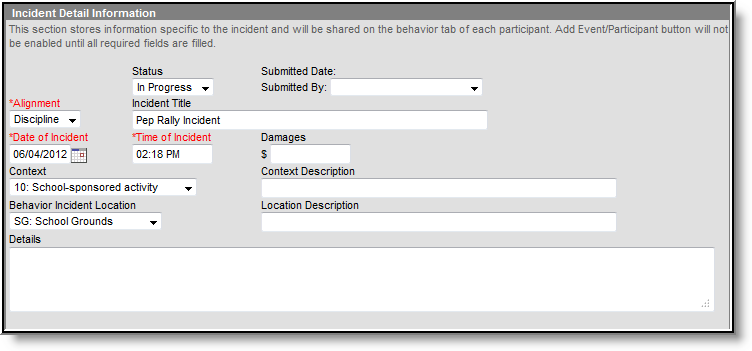 Incident Detail Information
Once general incident information has been entered, add Events to describe the individual occurrences and the Participants in each event.
Events and Participants
After adding details of the incident, specific information on the event and participants involved in the event can be associated with the incident.
 Behavior Event Information
Enter information about the event as described in the following table. Options may differ by state.
Additional events with distinct or repeated participants can be added to an incident. There is no limit to the number of events that can be added to an incident.
To modify an event, click the hyperlinked Event Type, make the desired modification and click Save. To delete an event from the incident, click the hyperlinked Event Type and click Delete. Deleting an event also removes the associated participants' roles from the incident.
Field |
Description |
|---|---|
Event Type |
The identifying code and name of the event, sorted alphabetically by name. Event Types are created in the Event Type Setup tool and can be mapped to State Event Codes. Options are dependent on the Alignment selected for the Incident; only Event Types with the same alignment will be available. |
Demerits/Points |
Indicates a mark of poor conduct for a discipline event or a mark of positive action for an award event. This field displays the value entered for the Event Type. |
State Code |
The State Event Code to which the event is mapped. This information is used in report behavior events to the state. This field displays the value entered for the Event Type. |
Category |
Indicates whether the event is considered to be Minor, Serious or Extreme. This field displays the value entered for the Event Type. |
| This event required the use of a Behavior Response Not available in all states |
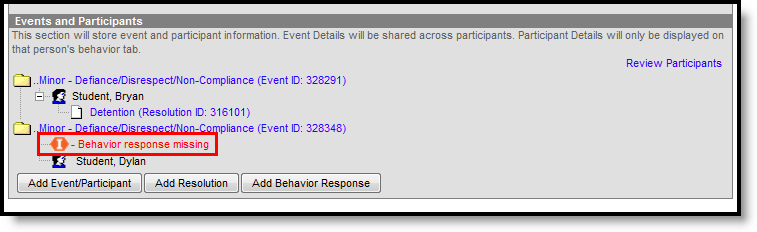
When marked, this indicates the event requires a behavior response to be entered. When this is marked, but a response has not yet been entered, a warning message displays on the Events and Participants section of the Incident Detail, "Behavior response missing." See the Add Behavior Responses section for additional information. Behavior Response Missing Warning |
Delete an Incident
To delete an incident, click the Delete button in the action bar. The incident is removed, along with all event, participant, resolution and response information within this tool and elsewhere.
An incident must be unlocked in order to be deleted.
When the incident is tied to an attendance event, the resolution and attendance information needs to be deleted prior to deleting the incident.
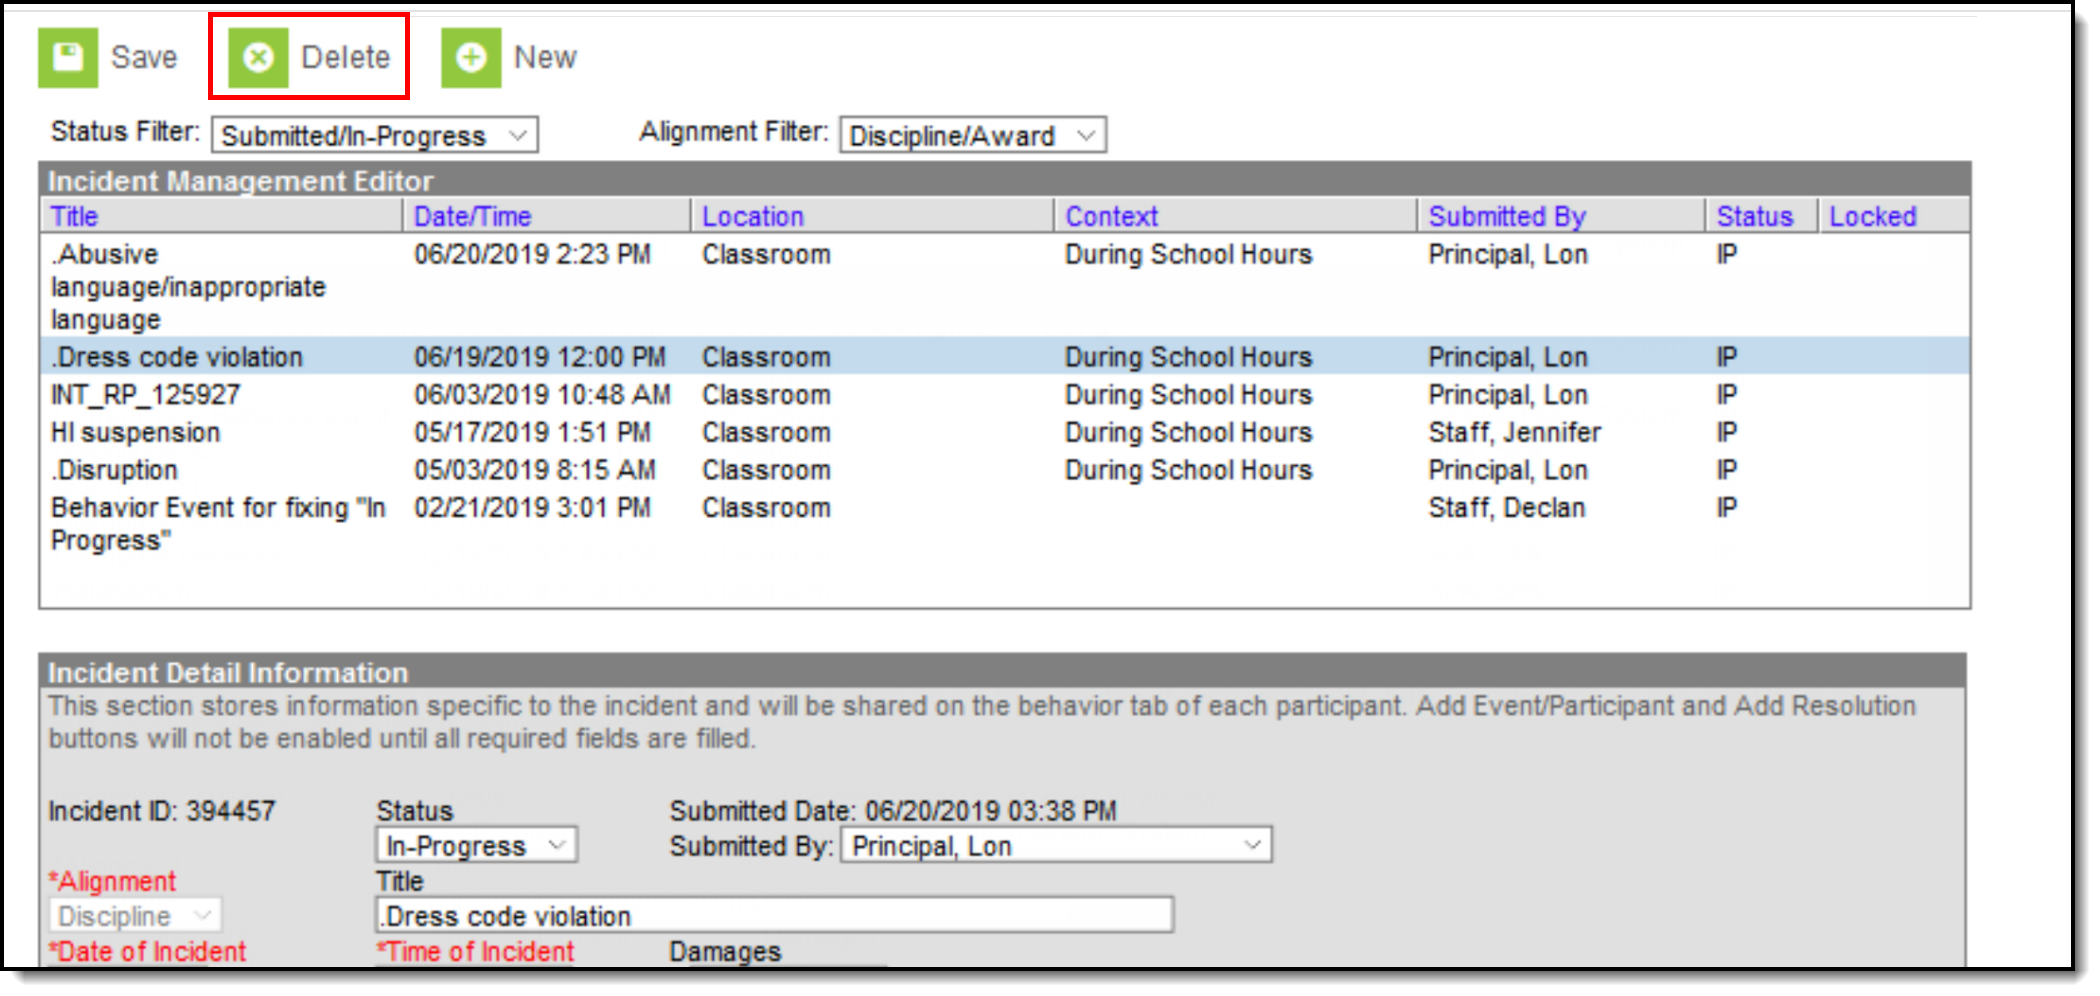 Delete an Incident
Change the Status of an Incident
The Status of an Incident indicates whether an incident has been submitted, is in progress or is complete. There may be instances where several staff are involved in managing behavior incidents for the school, including scheduling meetings with parents/guardians and processing information with law enforcement. The status is also used in reports and determines what events display when first accessing the Behavior Management tool.
To change the status, select the incident and modify the Status field.
- When an incident is first created, a status of Submitted is assigned. This indicates no action has yet been taken to process the incident. Staff need to assign participants and determine resolutions, and make note of the details of the incident.
- When an incident has been submitted and behavior staff are entering information and adding participants and details, the status should be changed to In Progress.
- When an incident has participants assigned, necessary staff and outside representatives are contacted, and a resolution has been assigned and completed, the incident can be marked as Complete.
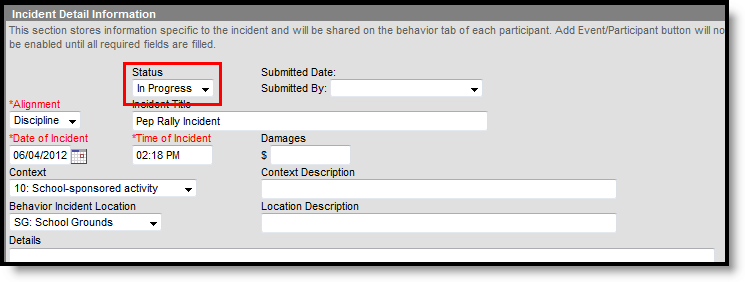 Incident Status
Behavior Preferences Related to a Changed Status
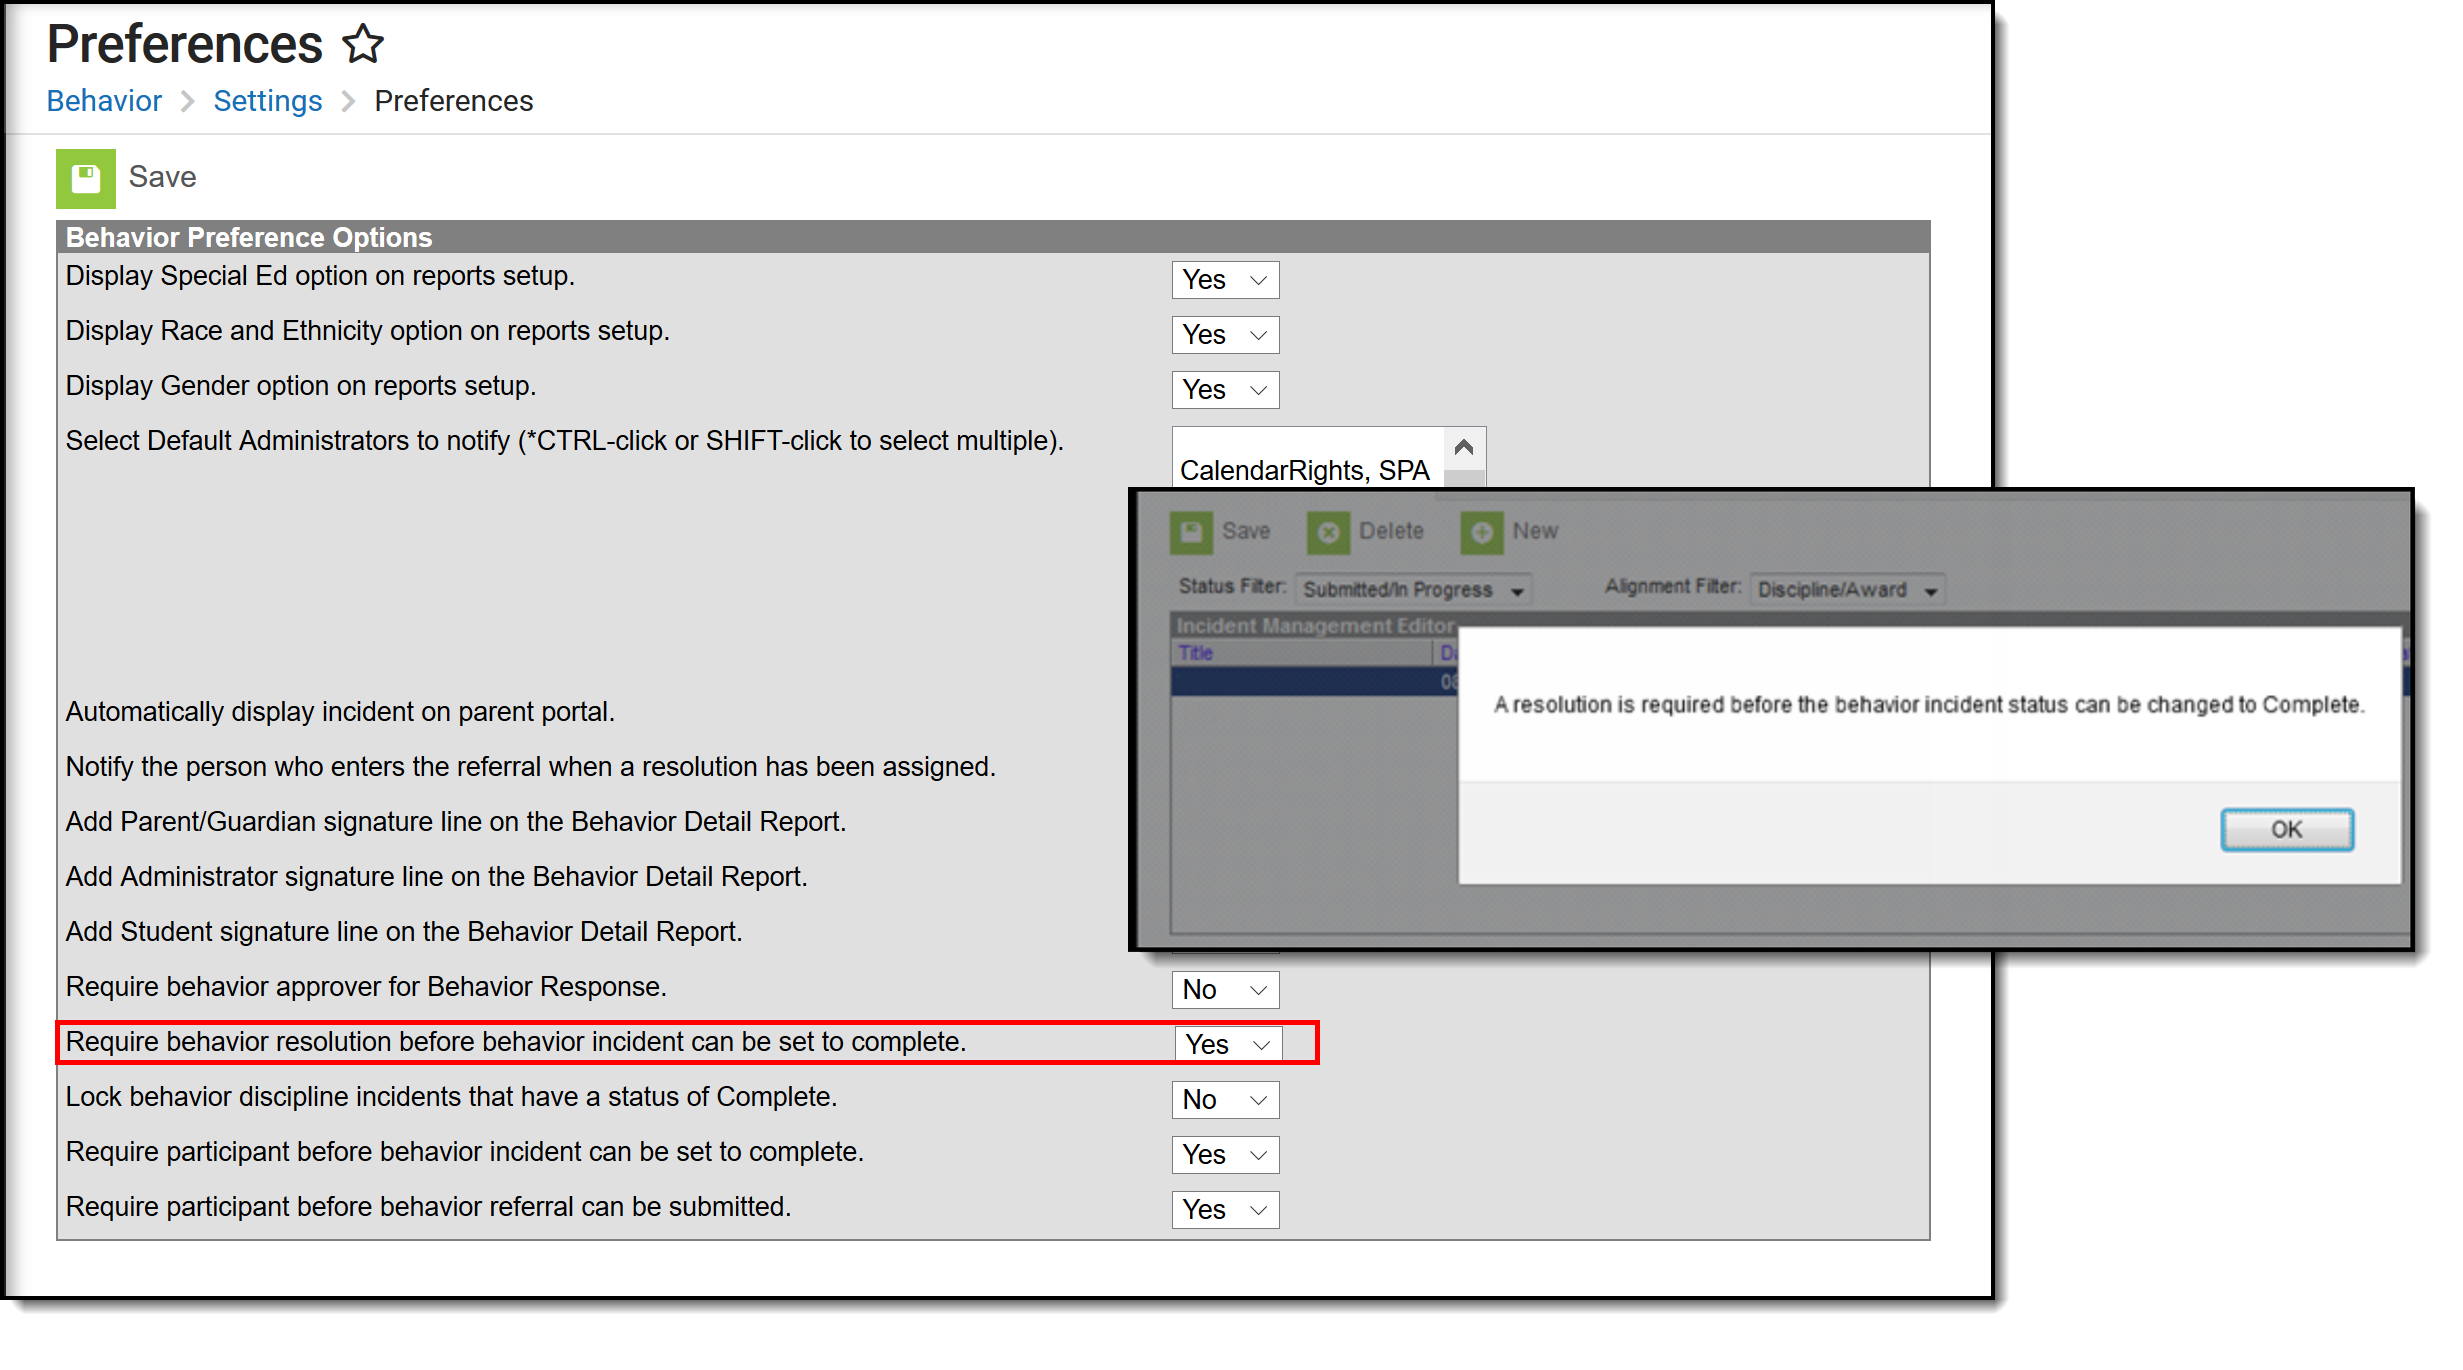
A Behavior Preference is available to require a resolution before marking an incident complete.
- When this preference is set to Yes and there is no resolution assigned to participants, a warning message displays indicating this is needed (see image below).
- When this preference is set to No, or when it is set to Yes and there are resolutions assigned to participants, the incident saves without error.
 Saving an Incident without a Resolution
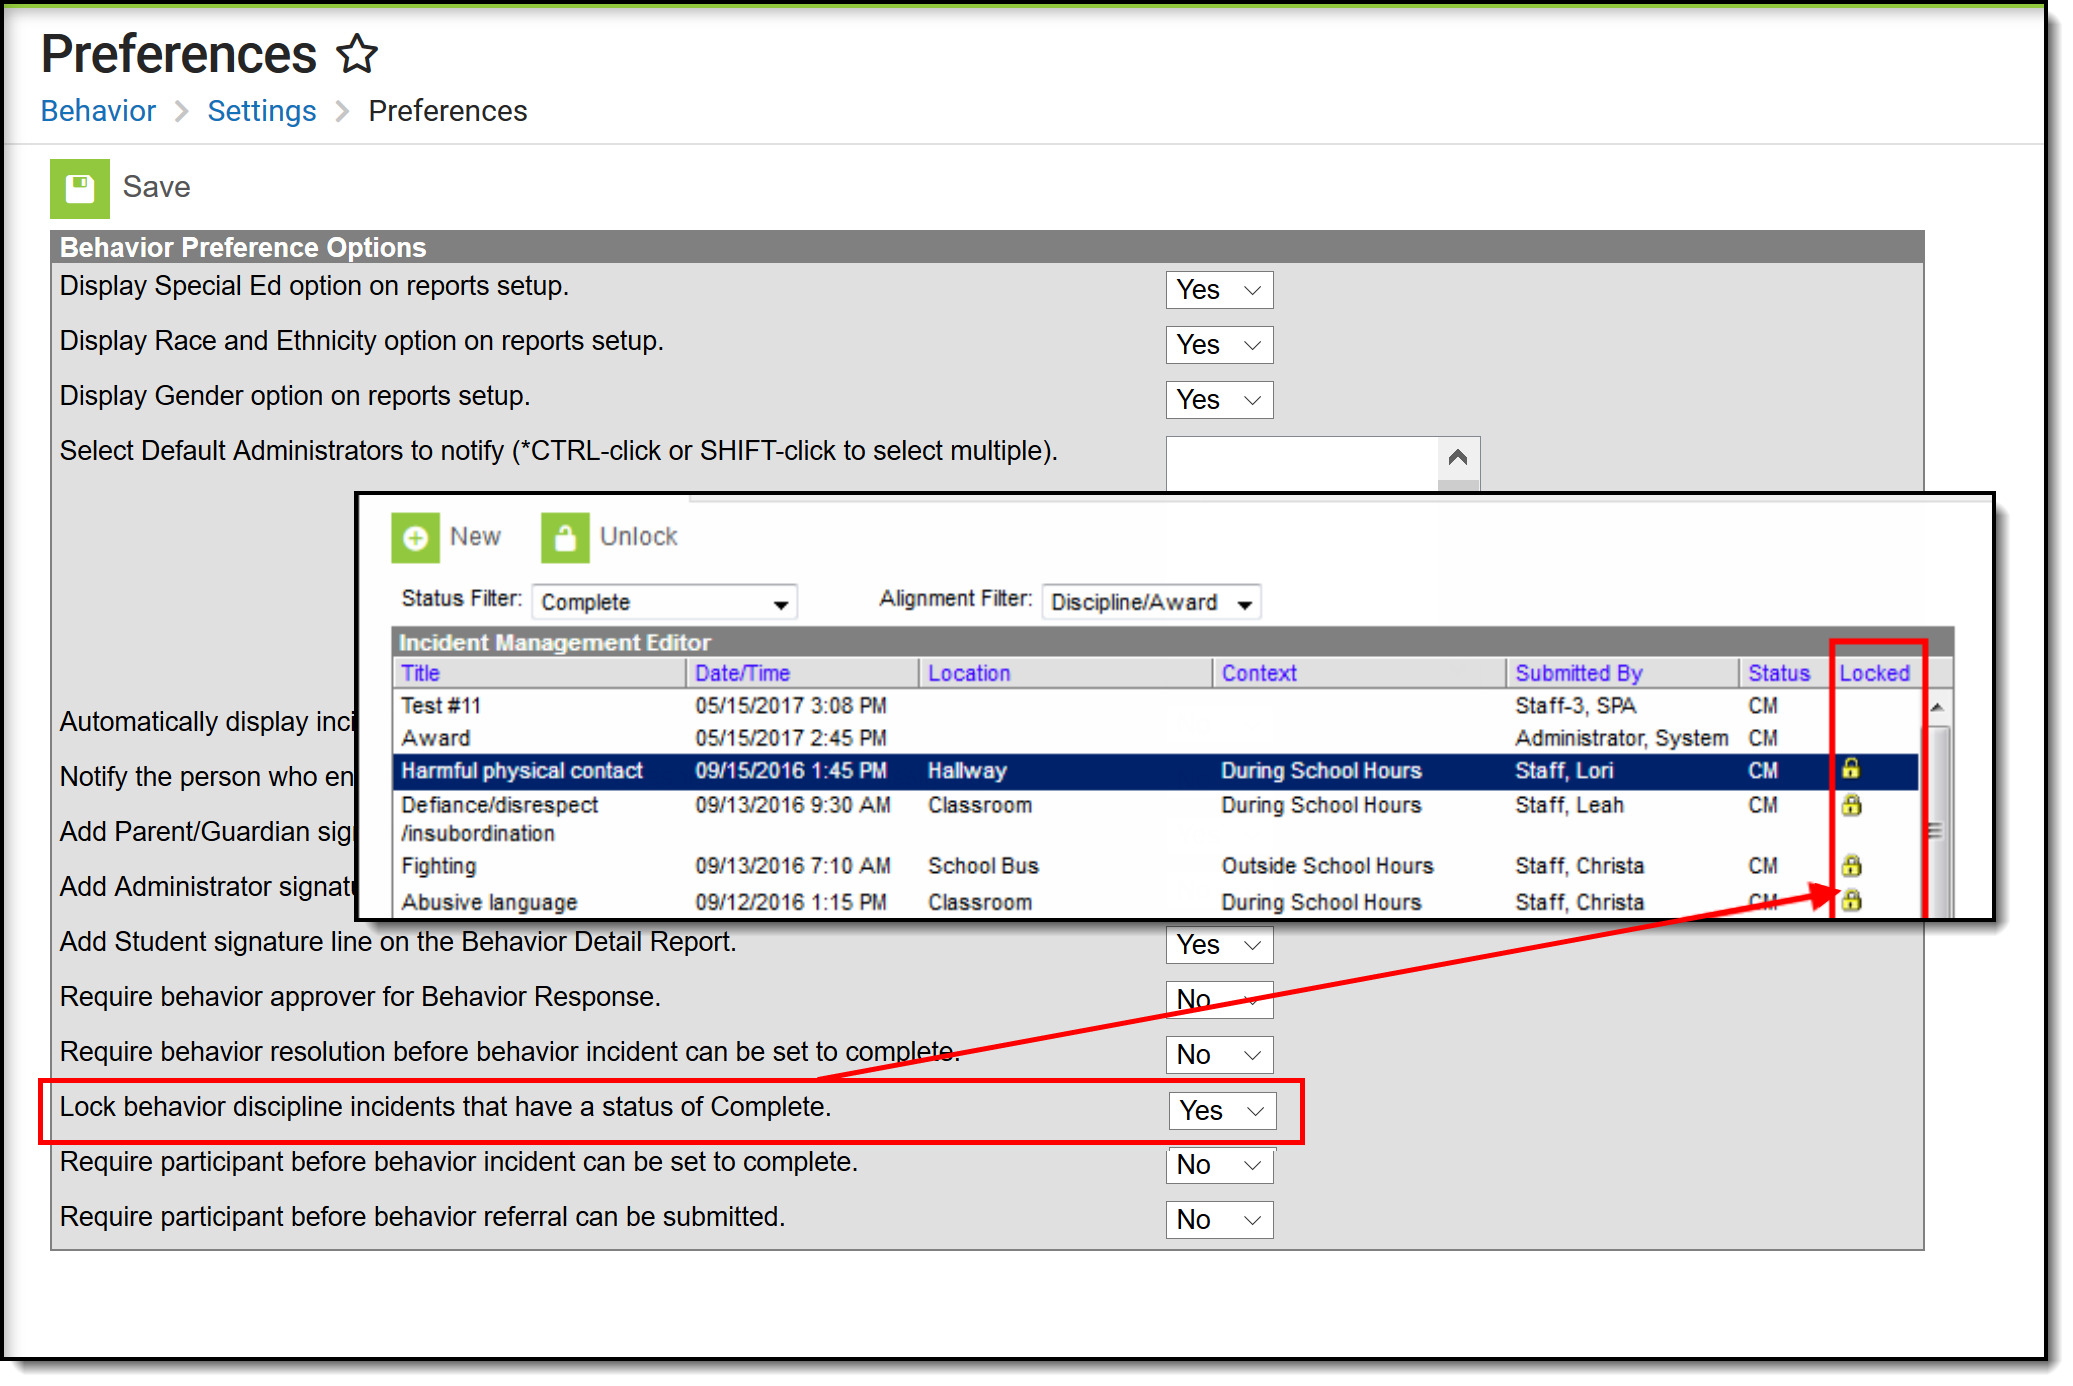
A Behavior Preference is available that locks the modification of that incident (does not affect award incidents) once it is marked complete. When this preference is set to Yes, a locked icon displays next to all completed behavior discipline incidents.
 Locked Behavior Discipline Incidents
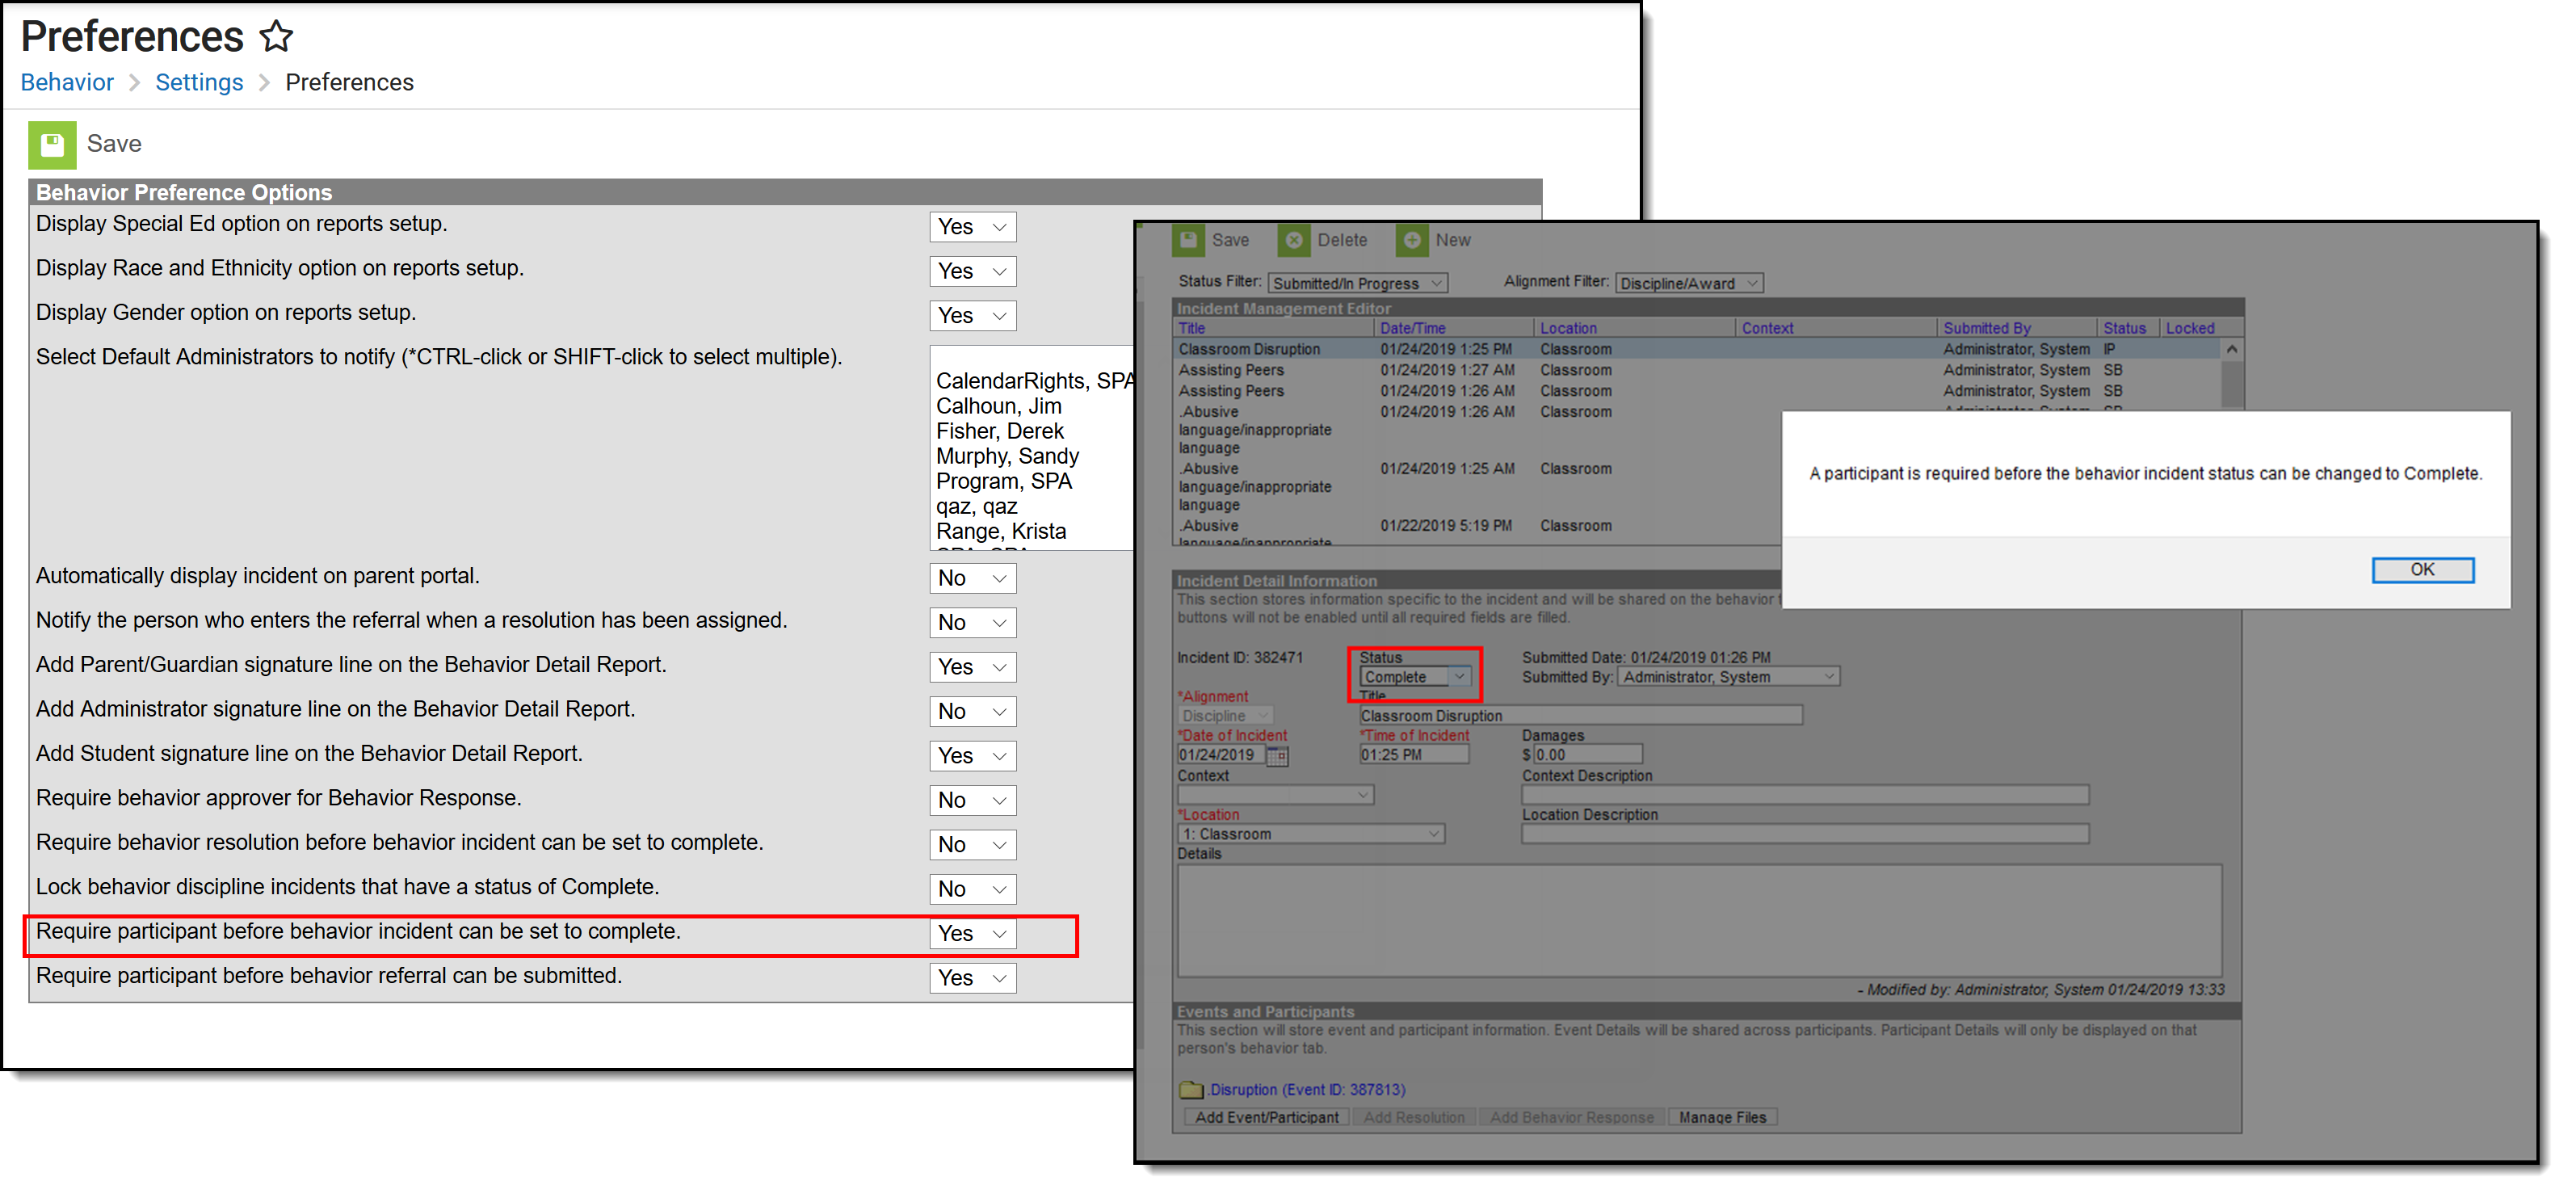
A Behavior Preference is available that requires a participant to be assigned to the behavior incident before it can be marked as complete.
- When this preference is set to Yes, at least one person (student, staff, etc.) needs to be assigned as a participant of the event before that incident can be marked as complete. When the Status of the incident is changed to Complete and a participant has not been associated with it, a message displays indicating it cannot be marked as Complete until a participant is assigned (see image below).
- When this preference is set to No or when it is set to Yes and participants have been assigned to the incident, the incident can be marked as complete without error.
 Participant Required before Marking Incident Complete
Lock and Unlock Behavior Incidents
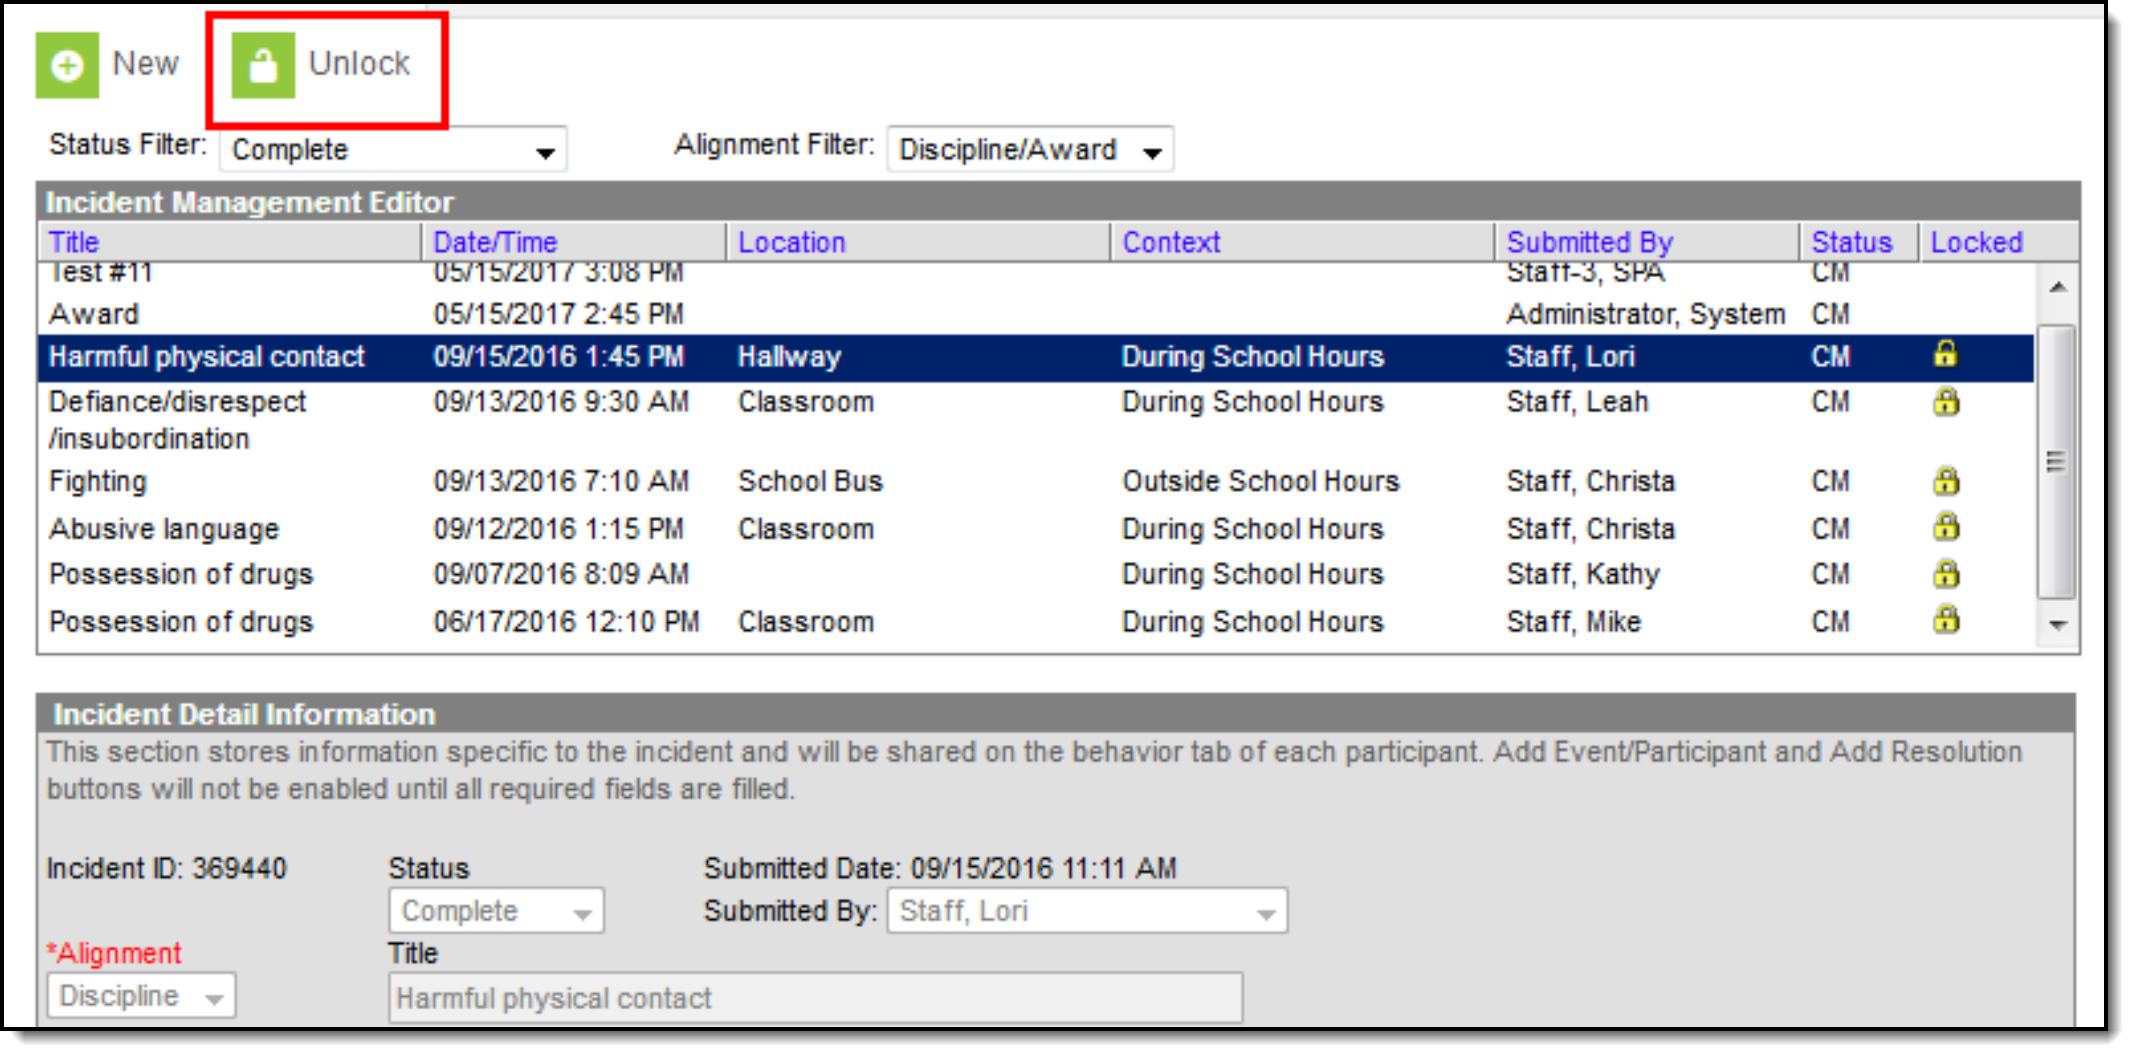
When a staff person has proper tool rights, there is an option to unlock completed incidents. Doing this sets the incident to In Progress, and additional changes can be made to that record. When a staff person does not have the proper tool rights, the locked incidents can be viewed (information displays in gray text), but not modified.
 Unlock Completed Incidents
Add and Edit Behavior Incidents
To create a new incident without entering and submitting a referral:
- Click the New button in the action bar.
- Enter details of the Incident in the Incident Detail Information editor.
- Click the Save button when finished, or continue adding Events and Participants (see below).
Add Participants to a Behavior Incident
Since participants may be involved in multiple events in different capacities (such as a student involved in a fight who was also found in possession of drugs), participants are attached to individual events.
To attach a participant to an event, Search for at least the first two characters of the Participant Name. Search results can be Filtered to include Students (active enrollment), School Employees (active district assignment), and All People (Person record in Census). This filter determines the default value in the Relationship to School field.
 Participant Name Search Results
Student names are followed by the student's:
- Gender
- Grade and Age
- Student Number
School Employees include Gender and Title, while All People only includes Gender. The student number can also be entered when searching for a student.
Click the participant's name to add the individual to the event. The Participant Details editor opens for the individual.
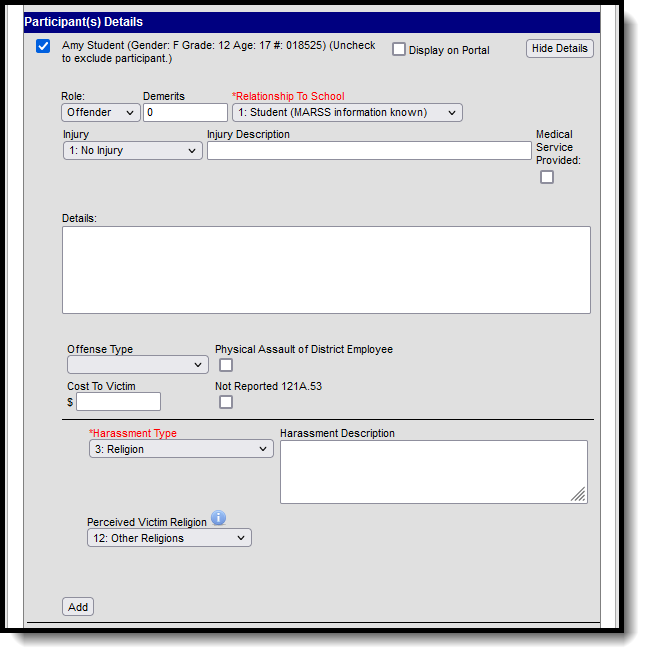 Participant Details
Enter participant details based on the following table. Options may vary by state.
Additional participants can be added by searching for a name and selecting the participants. A participant can only be searched for and added to an event once. Participant details can be condensed by clicking the Hide Details button.
To remove a participant, remove the check mark from the checkbox next to the participant's name. The participant is removed when the event is saved.
When adding participants to any events after the first one recorded, participants of other events in the incident are automatically available for selection. Mark the checkbox next to the participant's name to include them in the event.
The Review Participants displays a list of all participants, basic demographic information and parent/guardian contact information.
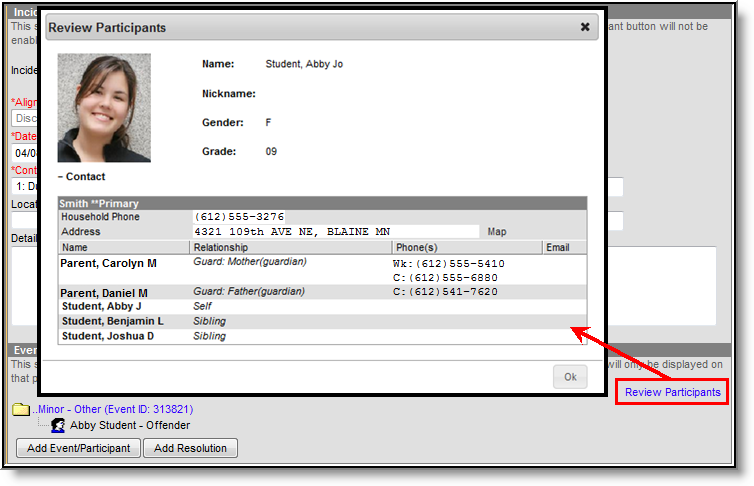 Behavior Management Review Participants
When a participant has an active, locked IEP at the time of the event, an icon displays next to the student's name.
Add a Behavior Resolution
Resolutions are added to an incident and then applied to the appropriate participants. The fields that display for resolutions vary by state and by the Sub-type of the resolution.
Note on Suspensions: Suspensions should only be associated with the event for which the student is being suspended. Overlapping suspensions on the same day are not recommended and may cause issues with attendance calculations. This applies to Suspensions mapped to the Suspension subtype.
 Add a Behavior Resolution
Resolution Editor
This editor contains localized fields. Options vary by state.
Assign a Resolution
Resolutions can only be added after an event has been added to the incident and at least one participant has been added to an event.
- From the Behavior Management tool, select the appropriate Incident from the list of items in the Incident Management Editor.
- Verify the correct event details and participants have been added to the incident by viewing the information in the Events and Participants section.
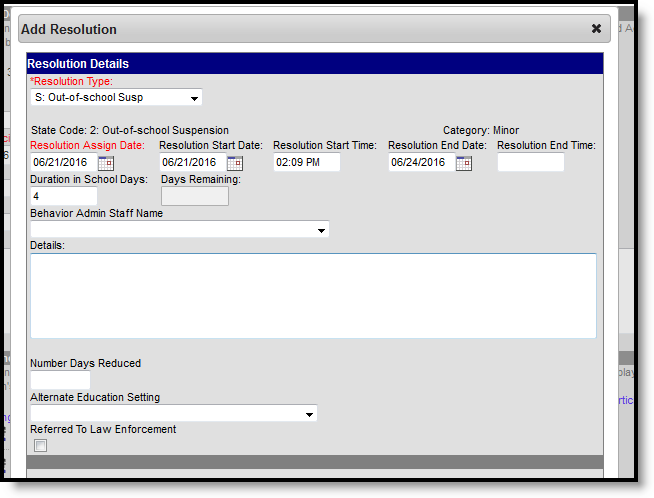
- In the Events and Participants section, click the Add Resolution button. The Resolution Details editor displays.
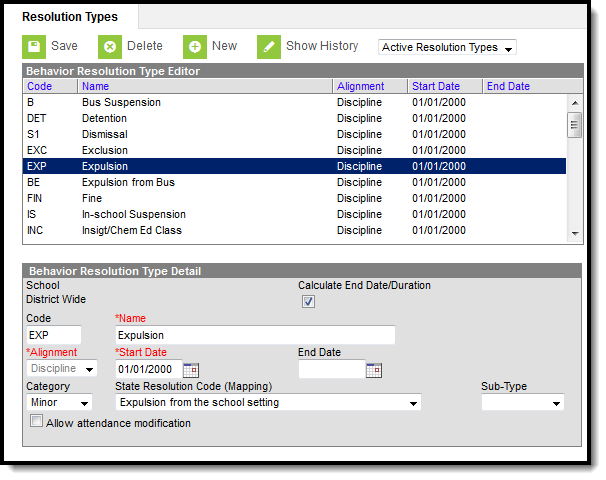
- Select the Resolution Type from the dropdown list. This list populates from the Resolution Types tool.
- Enter the Resolution Assign Date.
- Enter the Resolution Start Date. This date may be different than the Assign Date.
- Enter the Resolution Start Time.
- Enter the Resolution End Date and Resolution End Time. When the resolution is set to Calculate End Date/Duration, the Resolution End Date field populates automatically.
- Enter the Duration in School Days value. When the resolution is set to Calculate End Date/Duration, this field populates automatically.
- Select the Behavior Admin Staff Name from the dropdown list.
- Enter any additional Details about the resolution.
Apply Resolution to Participants
After entering resolution details, select to which students to assign the resolution using the Apply to checkboxes. Resolutions display under participant names in the Event/Participant tree. Multiple resolutions can be assigned to a participant, but resolutions cannot be concurrent. When a user attempts to assign resolutions that occur at the same time, a warning message displays instructing users to modify Start and End Dates before saving the record.
To modify a resolution, click the hyperlinked Resolution, make the desired modification and click Save. To delete a resolution from a participant, click the hyperlinked Resolution and click Delete.
A Behavior Preference exists that when set to Yes, a behavior resolution is required in order to complete a Behavior Incident. See the Behavior Preferences article for more information.
Calculate End Date Duration
When a Resolution Type has the Calculate End Date/Duration checkbox marked, users can enter either a Resolution End Date to auto-populate the Duration in Schools Days field, or enter a value in the Duration in School Days field to auto-populate the Resolution End Date field.
The Resolution Start Date field must be populated in order for the Resolution End Date or the Duration field to calculate properly.
 Calculate End Date/Duration Values
The Duration in School Days field updates when a user changes a Start Date or an End Date after it has already been calculated. The End Date field updates when a user changes the Duration in School Days field.
When a Behavior Resolution Type has a Sub-Type of Detention selected, the Calculate End Date/Duration checkbox cannot be marked.
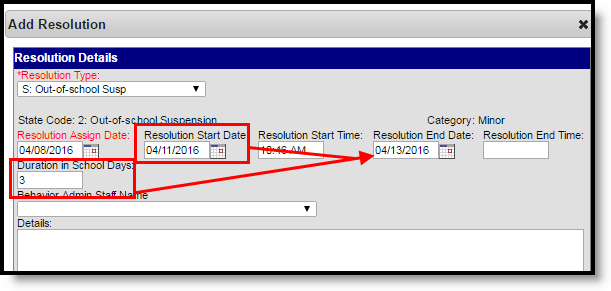
Auto-Calculate Resolution End Date
When assigning a resolution to auto-populate the Resolution End Date, enter the number of days the resolution applies to student in the Duration in School Days field.
For example, a student has been assigned Out-of-School Suspension for a total of three days for fighting with another student that begins on April 11, 2016. The Out-of-School Suspension resolution has the Calculate End Date/Duration checkbox marked. The staff person administering the resolution can enter the Resolution Start Date of 04/11/2016, then enter a value of 3 in the Duration in School Days field. The Resolution End Date populates with 4/13/2016.
The date populates as soon as the user tabs to the next field or clicks into another field on the editor.
 Auto-calculate Resolution End Date Field
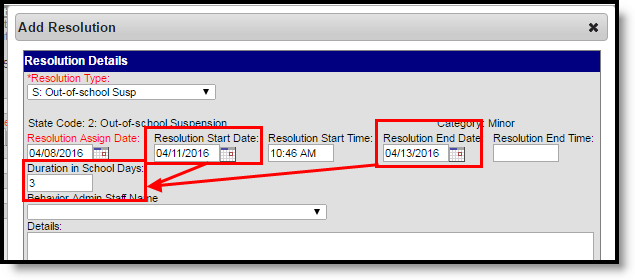
Auto-Calculate Duration in School Days Field
When assigning a resolution to auto-populate the Duration in School Days field, enter the Resolution End Date, indicating the last day the student is serving the resolution.
For example, a student has been assigned Out-of-School Suspension for a total of three days for fighting with another student that begins on April 11, 2016 and ends on April 13, 2016. The Out-of-School Suspension resolution has the Calculate End Date/Duration checkbox marked. The staff person administering the resolution can enter the Resolution Start Date of 04/11/2016 and the Resolution End Date populates with 4/13/2016. The Duration in School Days field populates with a value of 3.
The value populates as soon as the user tabs to the next field or clicks into another field on the editor.
 Auto-calculation Duration in School Days Field
Calendars with Multiple Schedule Structures
- When a calendar has multiple schedule structures, a school and schedule structure must be selected before a resolution can be added.
- When a calendar has multiple schedule structures, a behavior resolution with a sub-type auto-populates the Duration in School Days field when the Resolution End Date field is populated.
- When a calendar has multiple schedule structures, a behavior resolution with a sub-type auto-populates the Resolution End Date field when the Duration in School Days field is populated.
Link Behavior Records and Attendance Records
When a school has chosen to link behavior records with attendance records, the following steps must be done.
| Task | Tool |
|---|---|
| Mark the appropriate attendance codes that relate to behavior resolutions. | Attendance Codes |
| Mark the appropriate behavior resolution types to allow for attendance modification. | Resolution Types |
| Create a behavior incident, assigning events and participants. | |
| Enter a behavior resolution for one of the event participants. | |
| Verify the entered behavior event and resolution, and mark the incident complete. | Behavior Management |
| Verify the behavior event displays on the student's behavior record. | Student Behavior |
| Verify the attendance record displays an entry for the behavior resolution. | Student Attendance |
| Generate a report looking for any inconsistencies in linked behavior/attendance records. | Behavior Attendance Audit Report |
Note that attendance codes can only be selected AFTER a behavior incident has been marked Complete.
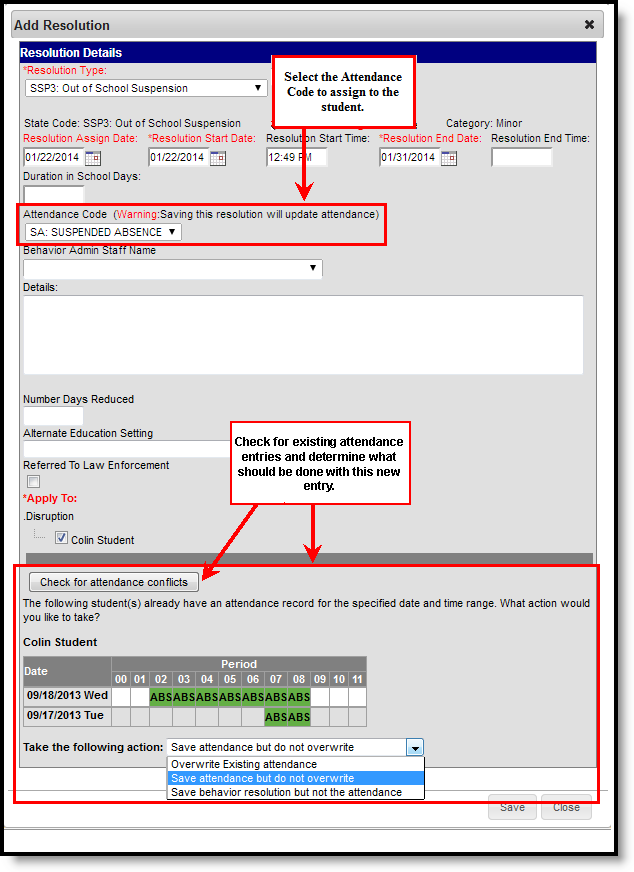
For those resolutions where a student is absent from school, that attendance code can be assigned on the resolution. Doing this eliminates additional staff being needed to assign the record. When adding a resolution:
- Select the Attendance Code from the dropdown list. All attendance codes display here, not just the ones marked for Behavior.
- Mark the students to whom the resolution applies in the Apply To section.
- Click the Check for attendance conflicts button to verify the student does not have existing attendance records. When there are existing attendance records:
- Overwrite Existing attendance - when selected, existing attendance records are overwritten with new attendance records based the Attendance Code selected for the behavior resolution for all dates encompassed within the resolution.
- Save attendance but do not overwrite - when selected, attendance records created by the behavior resolution are saved but any existing attendance records which overlap attendance records created by the behavior resolution are not overwritten. This option is not available for Kentucky users. Please see the Kentucky Behavior article for more information.
- Save behavior resolution but not the attendance - when selected, behavior resolution data saves but existing attendance records are not modified or replaced.
- Click the Save button when finished. The assigned resolution is saved and displays on the student's behavior record and is stored with the behavior management entry, and depending on the options chosen for the attendance entry, the student's attendance record is also updated with attendance information related to the behavior incident.
 Behavior and Attendance Records Linking
A Behavior Preference exists that when set to Yes, a behavior resolution is required in order to complete a Behavior Incident. See the Behavior Preferences article for more information.
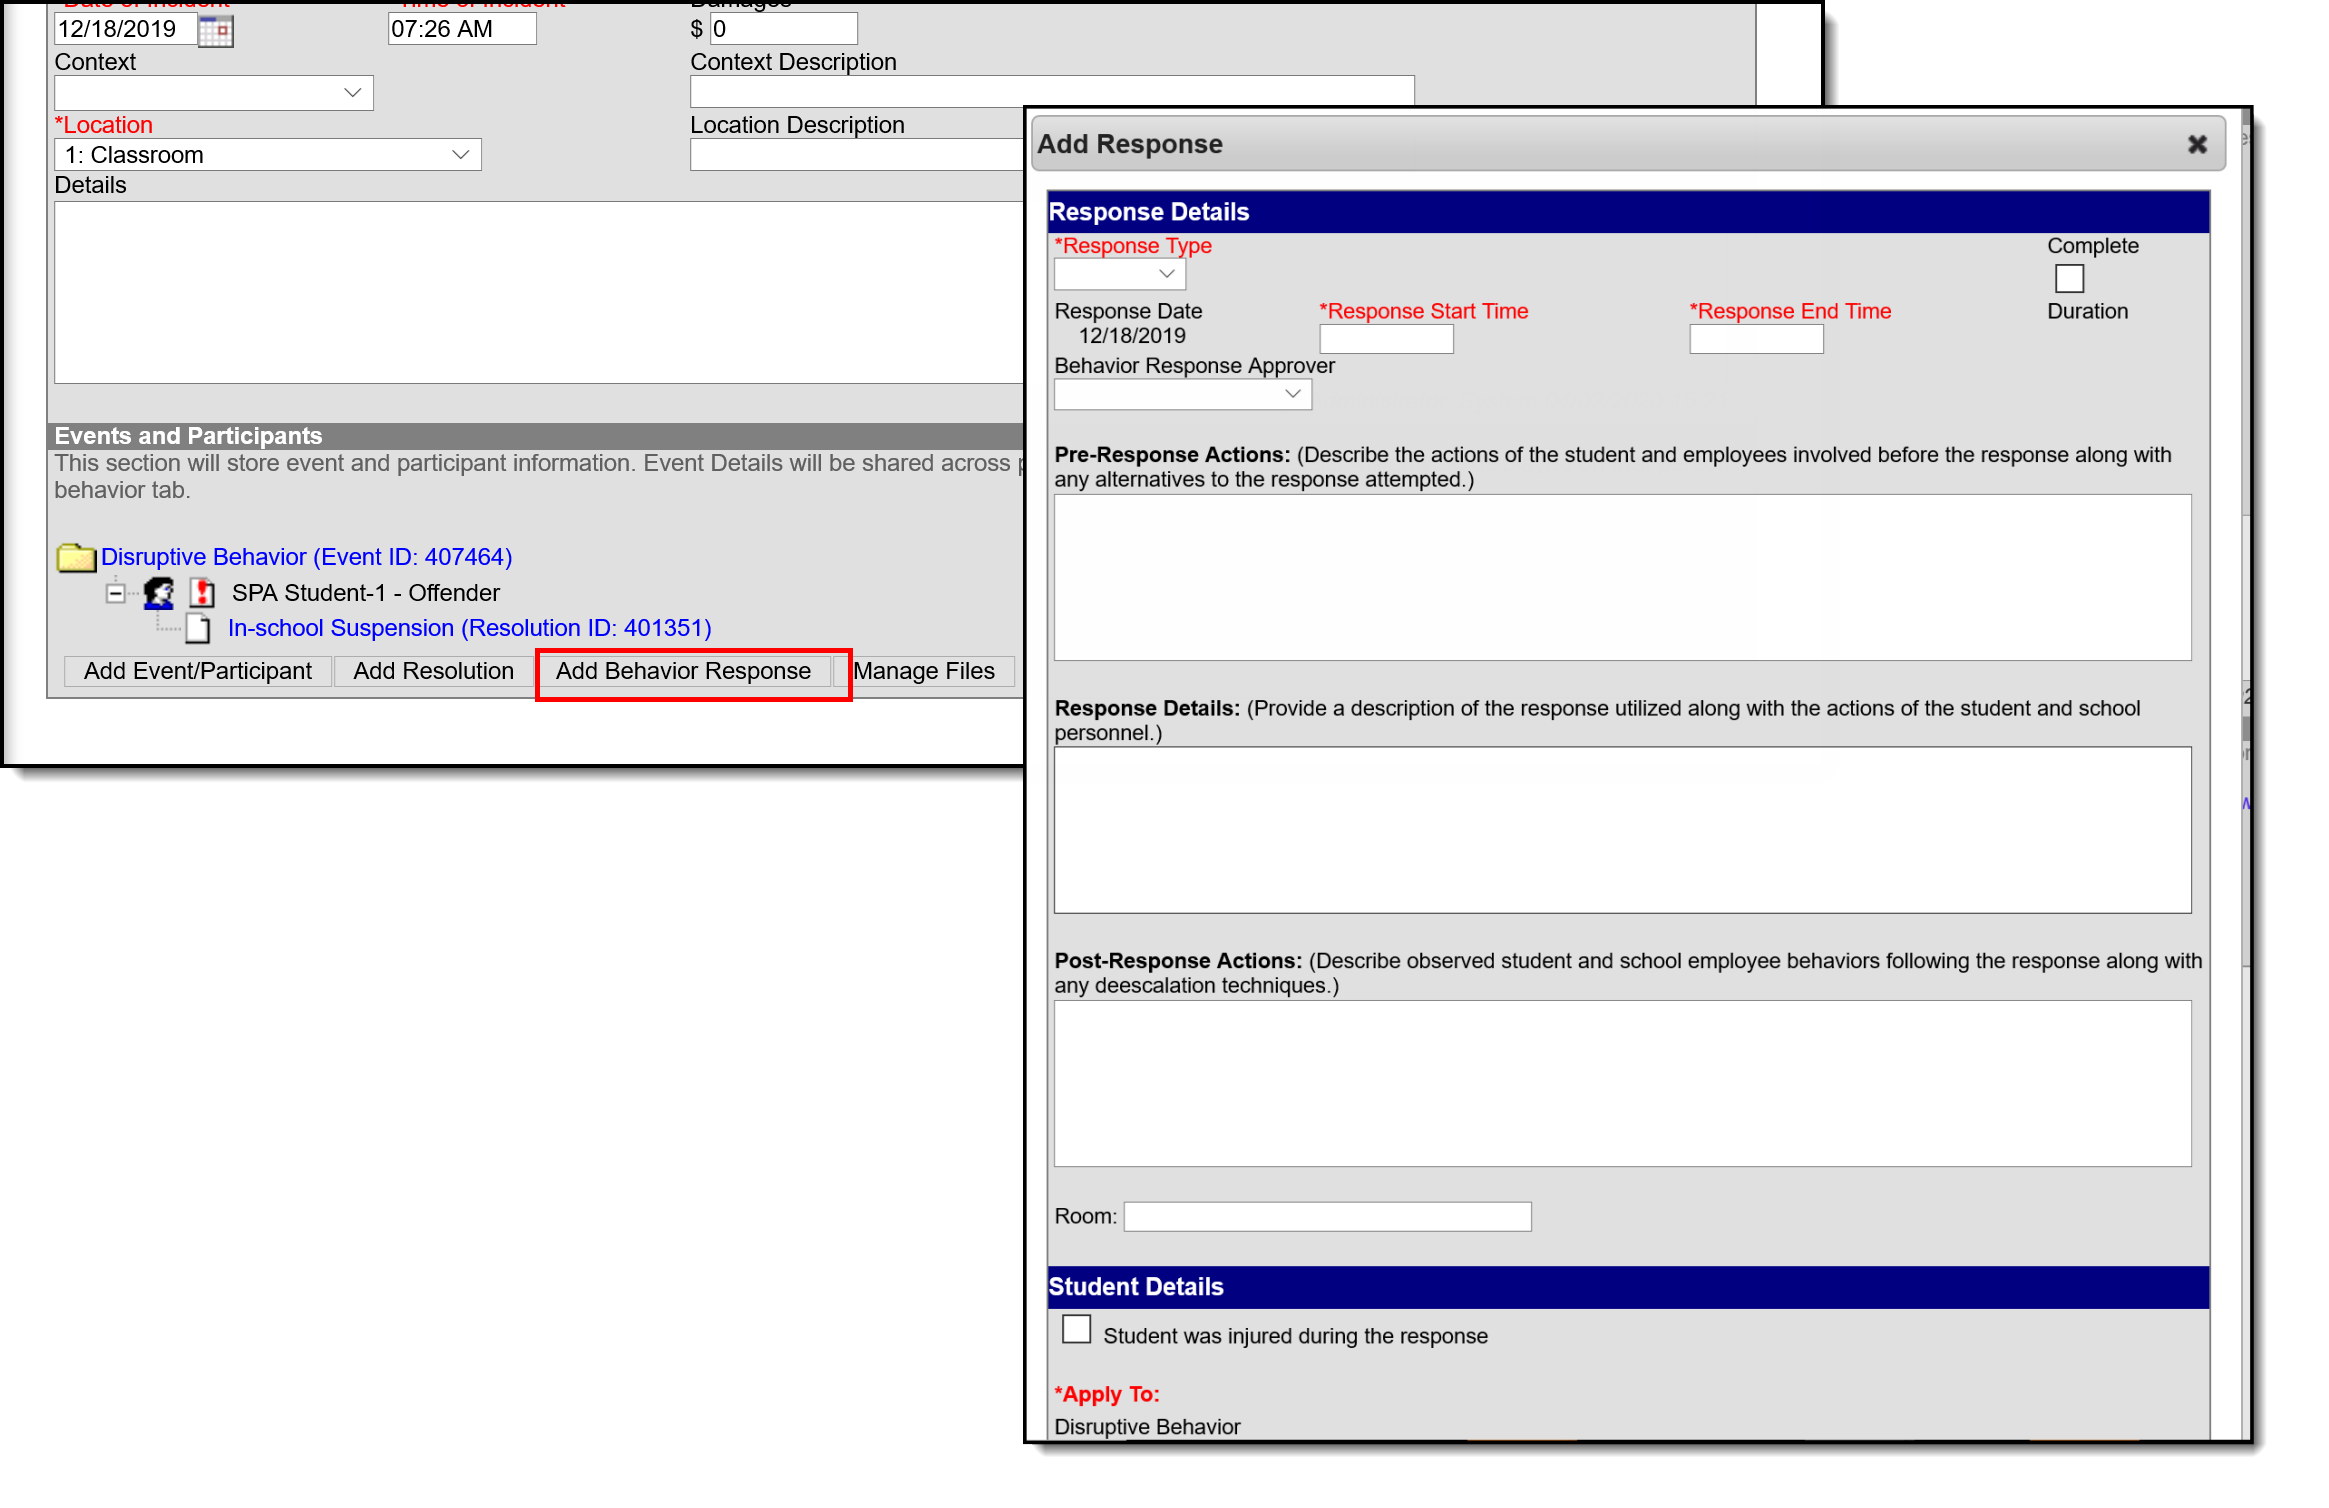
Add Behavior Responses
A Behavior Response is added to an event when a staff member needs to administer a restraint on the student, following recommended training and guidelines. This option is available for selection when:
- The incident alignment is a discipline event.
- At least one Response Type has been created.
- At least one Behavior Event has been created.
- At least one participant has been added to the event.
In addition, Response Types must be created in the Behavior Admin toolset before a behavior response is added.
The following setup is optional:
- At least one staff member at the school building can be designated as a Behavior Response Approver on their District Assignment record.
- At least one staff person at the school building can have an active Crisis Intervention Credential.
 Behavior Response Editor
When a Behavior Incident has been marked with "This incident requires a Behavior Response," but a behavior response has not been entered, the Event and Participant editor displays an orange icon with "Behavior response missing" verbiage indicating that the behavior response information is missing. The orange icon persists after the behavior response has been added. See the Events and Participants section above for additional information.
 Behavior Response Missing Indicator
Behavior Response Editor
Sync Behavior Responses
The Behavior Response Editor is not available in State Edition, but response data added by the district does sync to State Edition and state edition users can add new records, edit or delete existing records as needed (based on assigned tool rights).
- Kentucky - records are synced as long as the Behavior Response has a state code and is linked to an event that also has a state code.
- Montana - all behavior response records are synced.
- Maine - records are synced as long as the Behavior Response has a state code and is linked to an event and a resolution that also have a state code.
- BIE - records are synced as long as a BIE Behavior Response code is entered and is linked to an event that also has a BIE event code.
- South Dakota - records are synced as long as the Behavior Response has a state code and is linked to an event that also has a state code.
See the State Behavior Information for more details.
Manage Files Attached to Behavior Events and Participants
Images, documents, videos, etc. can be associated with a particular student involved in a behavior event, or associated with a particular behavior event. The district MUST be using Campus Digital Repository in order to use this feature.
 Manage Files for Behavior Events and Participants of a Behavior Event
Digital Repository settings must be enabled to display the Manage Files button:
- Mark the Behavior checkbox on the Digital Repository Preferences tool.
- Mark which Behavior tools (Behavior Management, Behavior Referral, Student Information General) allow files to be uploaded on the Digital Repository Preferences tool.
See the File Types article for information on which types of files can be uploaded.
Also, uploaded files cannot exceed the total max file size selected in Campus Digital Repository. There is no limit to the number of files that can be uploaded.
Attach Files to an Event/Participant
- Select the desired Incident from the Incident Management Editor.
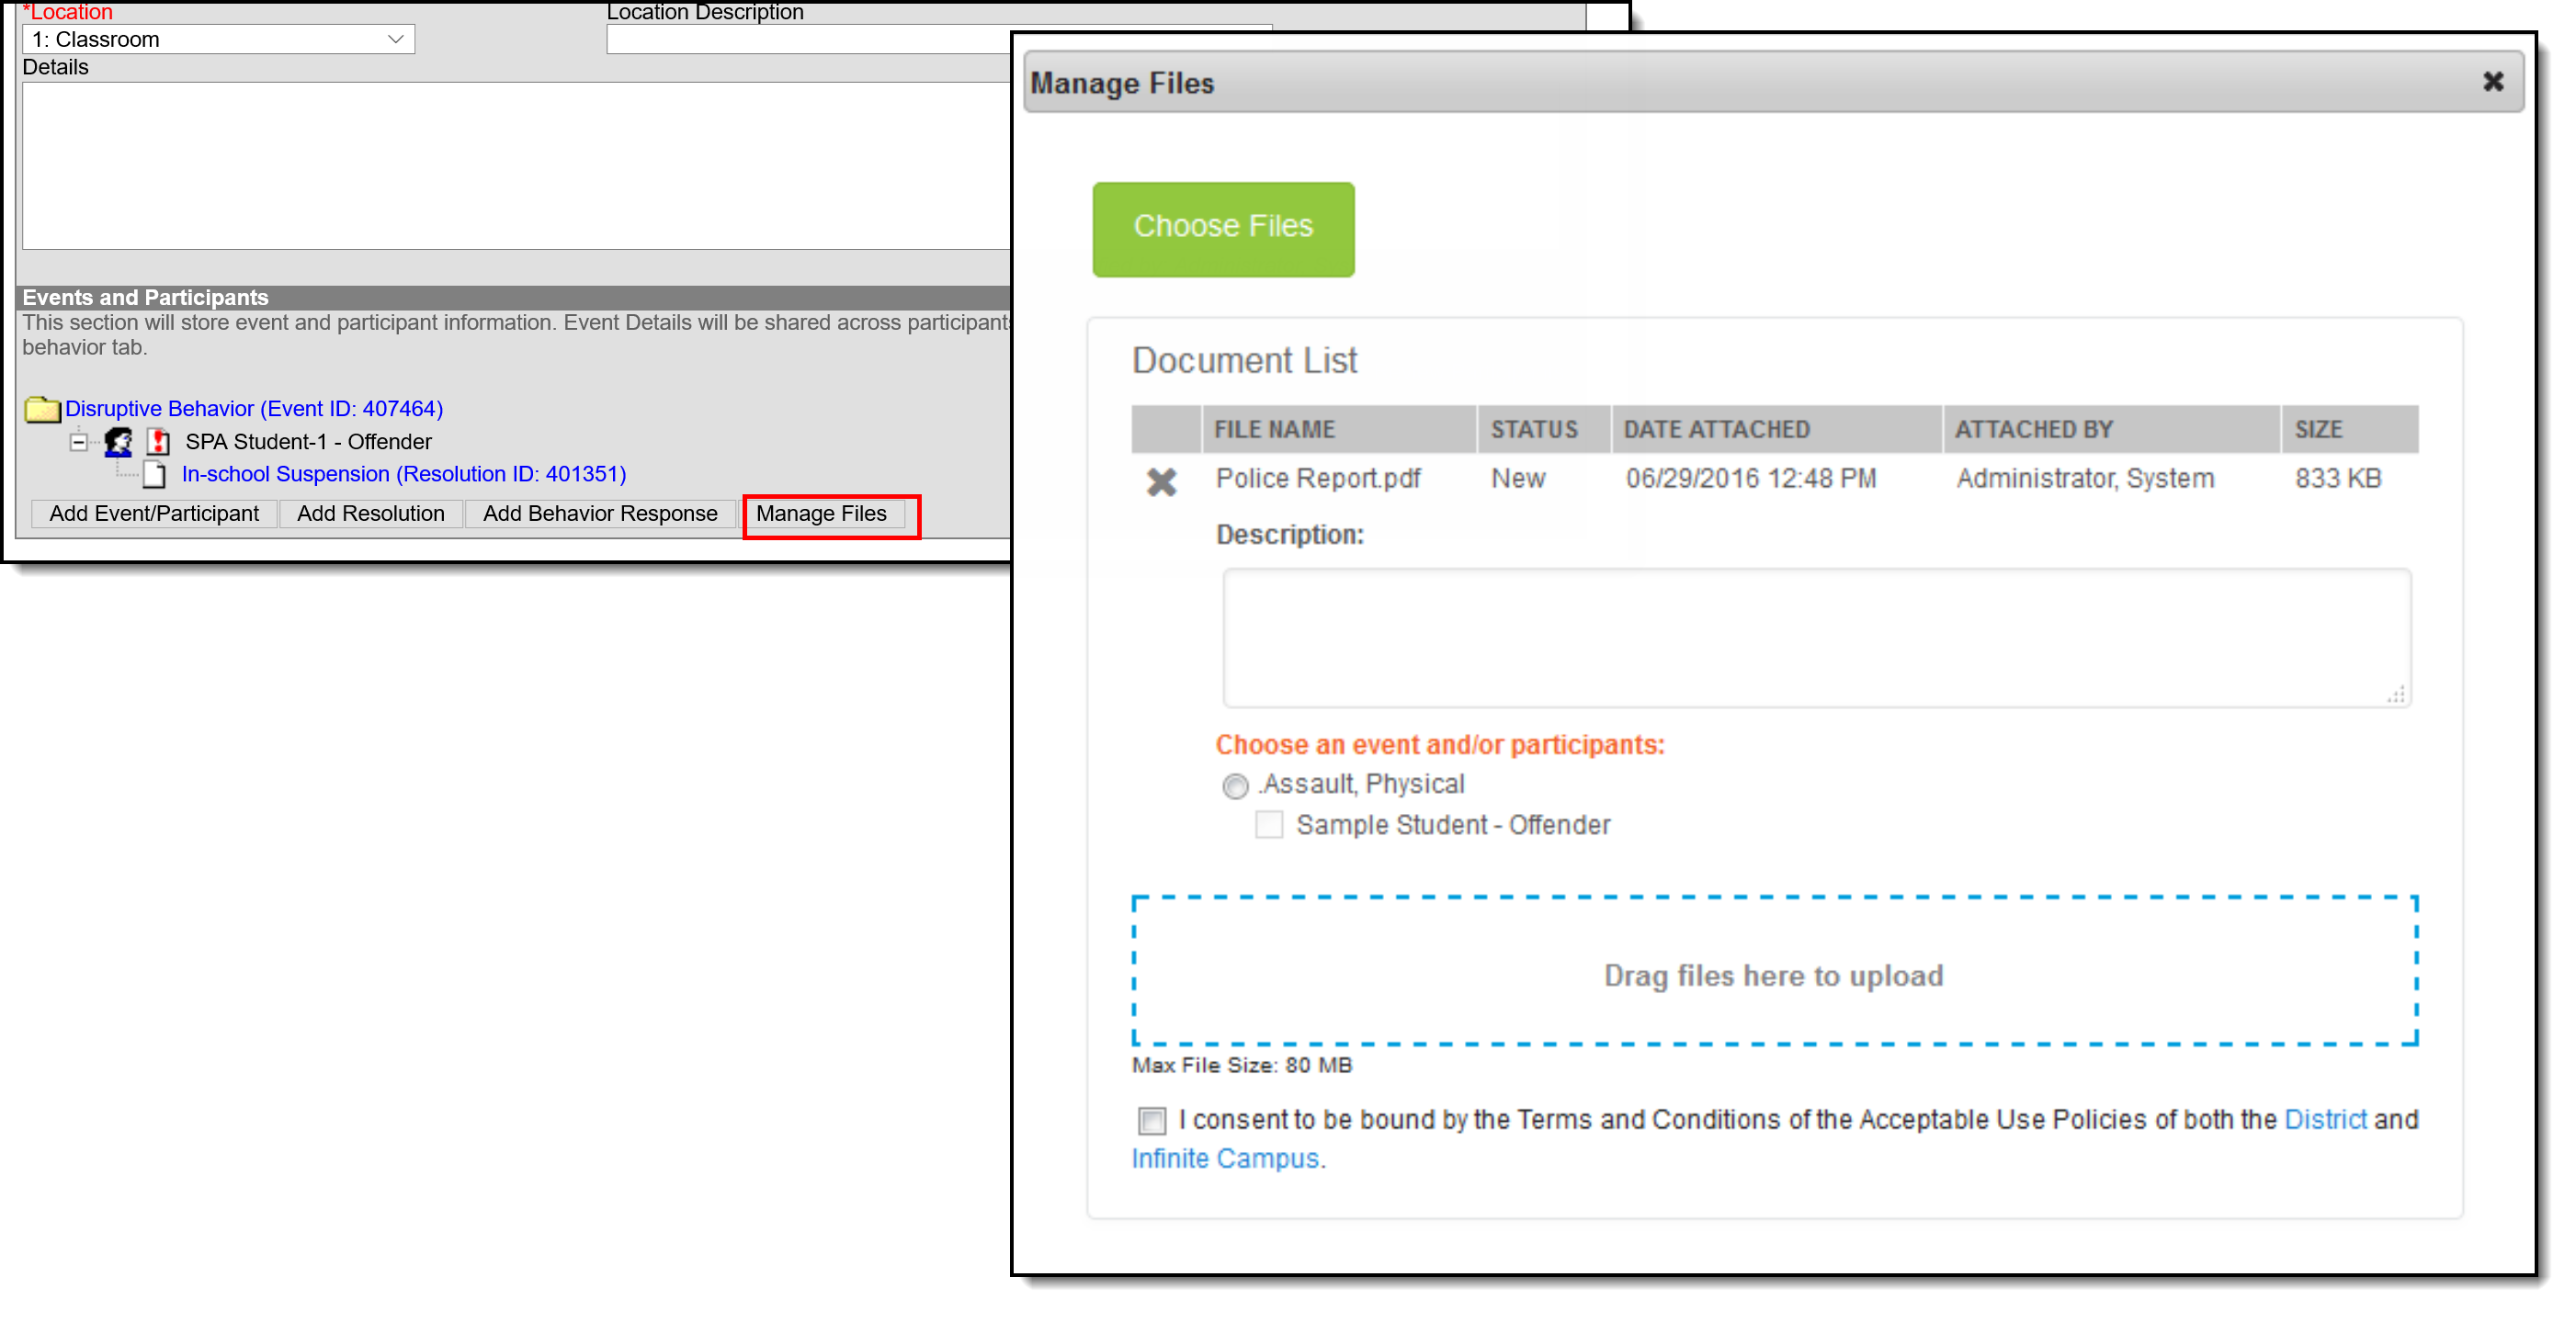
- In the Events and Participants section, click the Manage Files button. A Manage Files modal displays.
- Click the Choose Files button in the upper left-hand corner. Files can also be dragged from a user's desktop to the Drag Files to be Uploaded space.
- Locate the file to upload following the standard file upload procedures of your computer. Once located and selected to upload, the file displays in the Document List. When more than one file need to be added, locate all at one time.
- Enter a Description of the file, if desired.
- Determine if the file should be associated with the event and the student, or just the event. This needs to be selected for each file that is uploaded.
- Select the event by marking the radio button next to the event name. This must be selected in order to attach the file: files must be associated with an event, but may be associated with students or other participants.
- Select the student(s) by marking the checkbox. This does not need to be selected.
- Mark the Terms and Conditions checkbox. This is a required selection for any file that is uploaded.
- Click the Save button when finished. The file is uploaded and a paperclip icon display next to the event and/or the participant names. Only one paperclip displays regardless of the number of files that are uploaded.
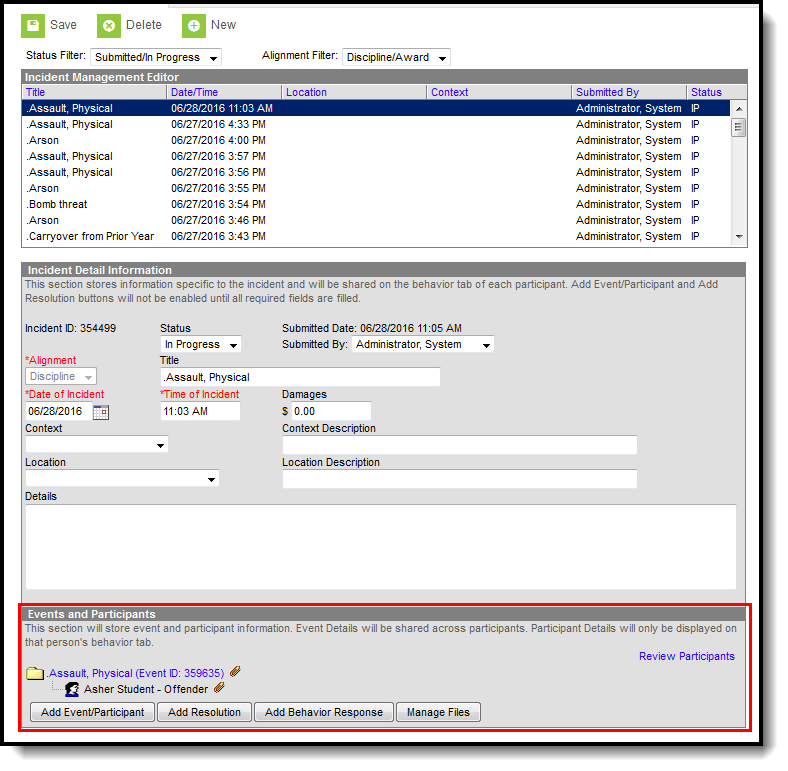 File Attached to Event and Student
View Uploaded Files
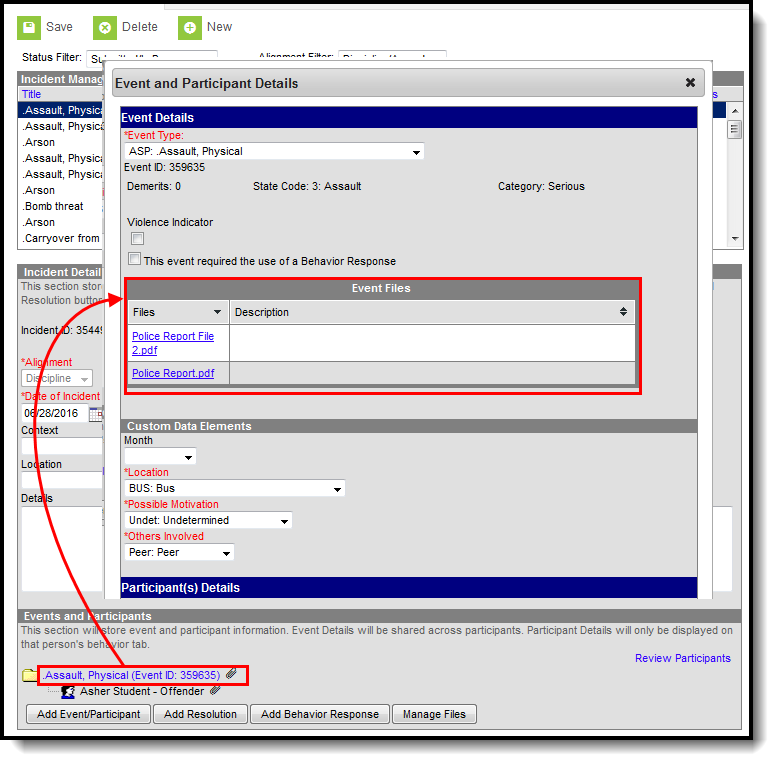
From the Events and Participants editor, click the Event name. The files that are associated with that event display in an Event Files section in the Event Details section. Click the link for the file to view it.
 View Uploaded Files
When files were associated with a participant, those files are also viewable here in the Participant Details section in a Participant Files section. When more than one student is associated with the event, and the file was associated with multiple participants, each participant displays a separate Participant Files section.
When the participants are students, files can also be viewed with proper tool rights from the Student Behavior tool (when Digital Repository preferences for that are turned on).
Manage Attached Files
Use the Manage Files button to make any necessary changes with the uploaded files:
- Click the X next to the file name to remove the file completely. The file is removed once the Save button is clicked (the status column changes from Attached to Remove on Save).
- Click the X next to the file to set the file to be deleted. The file status changes to Remove on Save and is deleted upon saving.
- Re-select the X button of a file to negate the Remove on Save delete command, and have the file remain.
- Remove the checkbox selection for alignment with a participant.
- Upload more files for the selected event.
- Modify the description of the file as needed.
Save any changes that were made before exiting the Manage Files modal.
State-Specific Information
Fields vary by state. Follow the link to view behavior information for your state.
