Tool Search: Staff Planner
The Staff Planner allows schools the ability to establish the following boundaries as it relates to a teacher and a course:
- Teacher to Course Constraints - how many courses a teacher can teach during the day.
- Teacher to Room Constraints - where the teacher teaches those courses.
- Teacher Placement Constraints - when the teacher teaches those courses.
Here, the teacher's maximum amount of periods taught, the maximum courses per term that are able to be taught (based on teacher contract), and the maximum consecutive periods taught can be entered, given a percentage of FTE for each teacher.
Submit feedback for the new Staff Planner by clicking the Feedback button in the bottom right-hand corner of the tool. This takes you to the Campus Community Staff Planner forum topic, where you can add your suggestions for the Staff Planner.
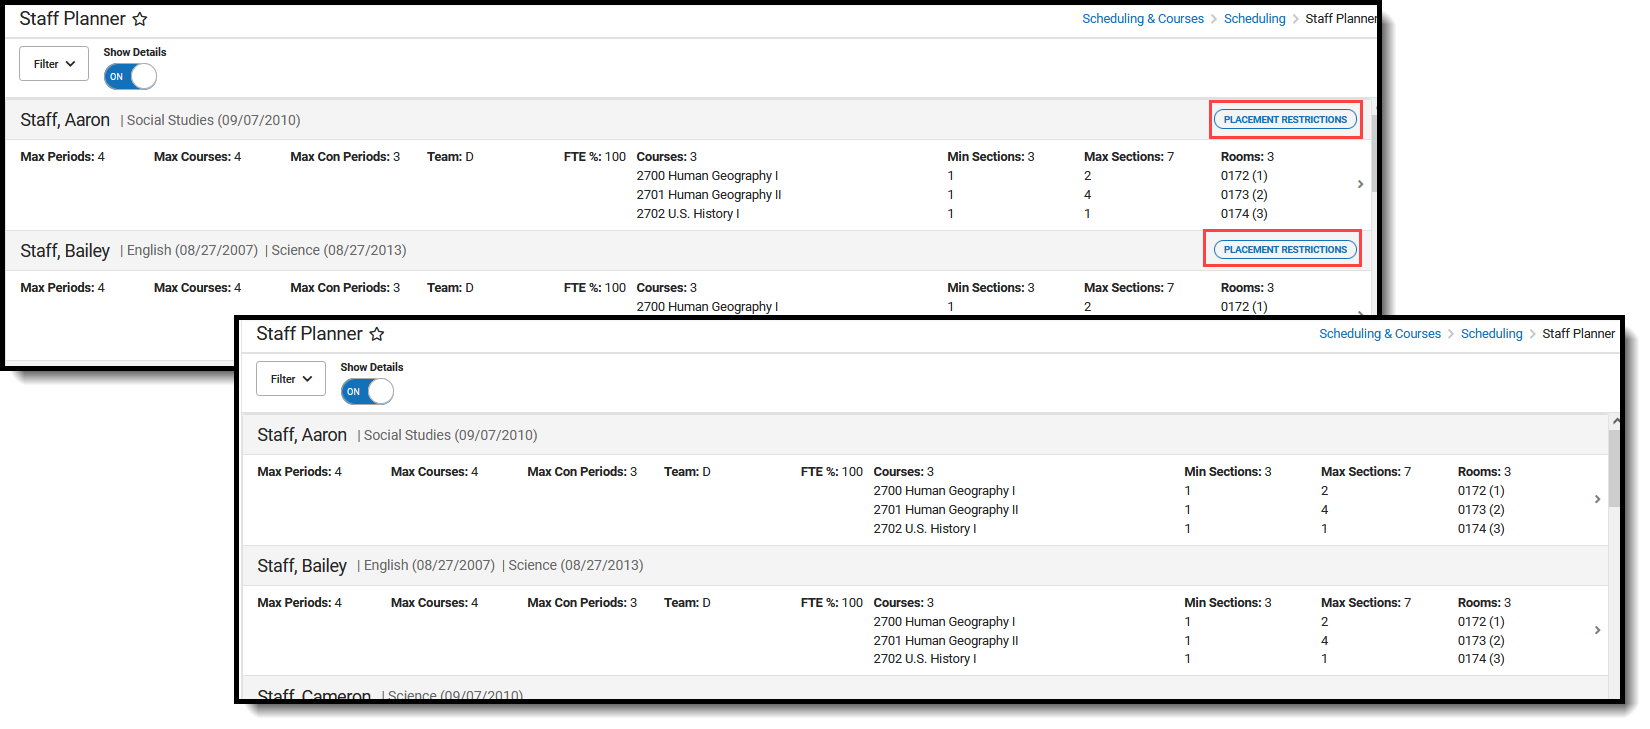
 Staff Planner
See the Staff Planner Tool Rights article for information about rights needed to use this tool.
When to use the Staff Planner
- AFTER calendars for the next school year are created.
- AFTER enrollments have been rolled forward.
- AFTER student requests for next year are entered.
- BEFORE using the Course Planner (to make the constraints on the courses easier to manage and for all planning information to be used when building the courses and sections).
Navigation of Staff Planner
A Year, School and Calendar (and Structure when applicable) MUST be selected in the Campus toolbar in order to display information.
When there are no active staff in the selected calendar, a warning message displays.
Locked Trial
When viewing the Staff Planner for a Scheduling Trial that is currently locked (e.g., someone is working on that trial in the Scheduling Board), a banner displays at the top of the Staff Planner indicating such. This banner displays only when navigating to the Staff Planner from the outline (not using the quick access from the Scheduling Board.)
Changes made in Staff Planner in a locked trial cannot be saved.
 Locked Trial Indicator
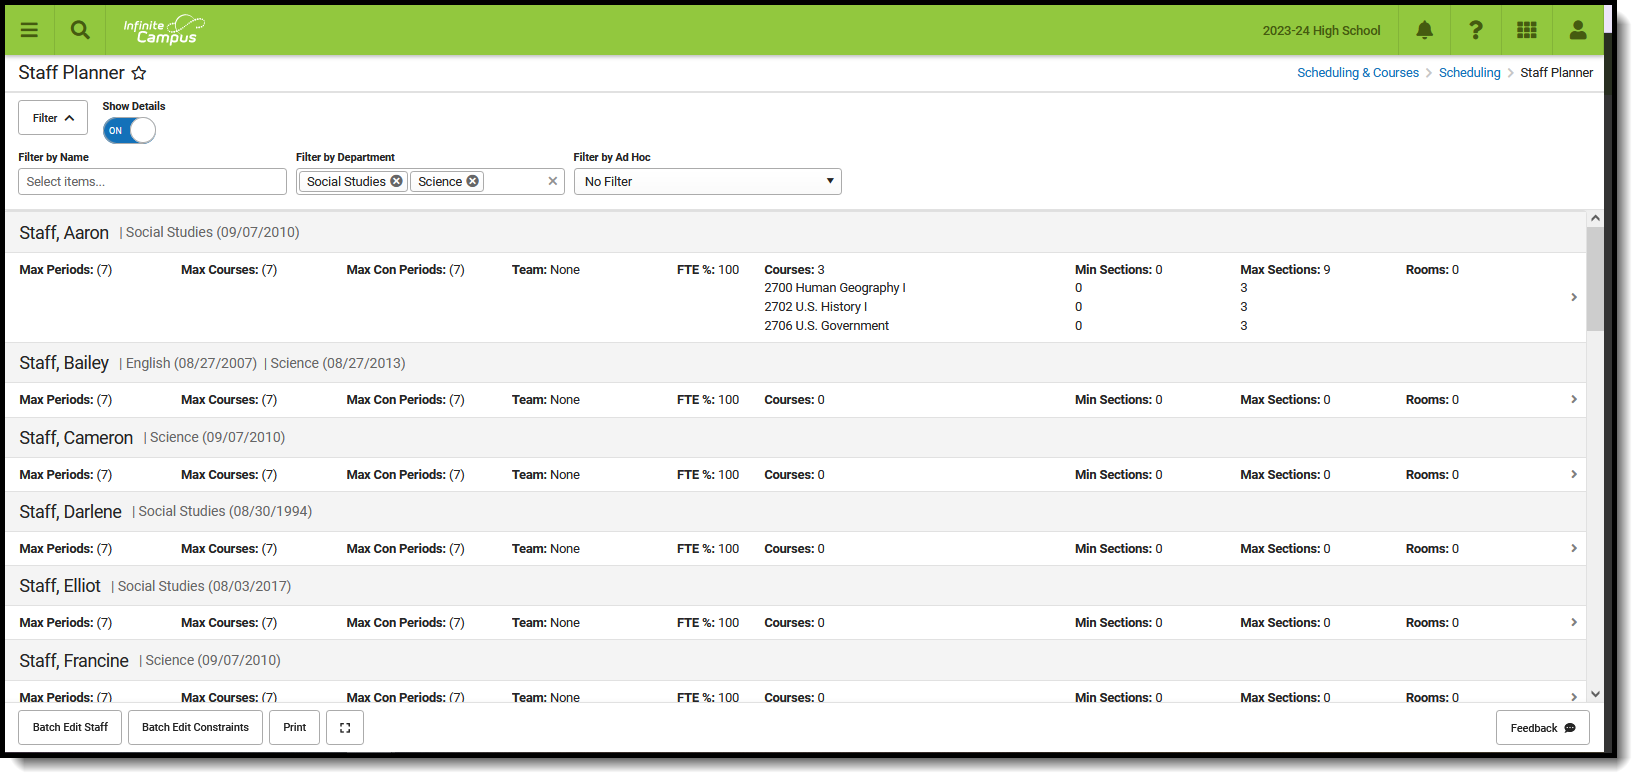
Filter Options
Use the Filter by Name, Filter by Department and Filter by Ad hoc options to assign courses and rooms for a particular staff person, for an entire department or for a previously created list (in Filter Designer) of staff. Begin typing in the field by entering a last name, a first name, a letter in a name, the start of a department name, etc. Matching results display and are further refined as more letters are entered. A message displays when no matching results are found.
 Staff Planner Filter Options
Click the Filter toggle arrow up or down to show or hide the filter options.
- Filter by Name. When a staff person is selected here, only that person's information displays. This is helpful when the staff person has specific constraints for their course schedule, maybe the prep period needs to be at a certain time or their courses can only meet in a particular room. Choose the staff person by expanding the dropdown list or by typing the first or last name of the staff person.
- Filter by Department. Multiple departments can be selected at one time. Only those staff who are assigned to a particular department are listed. This allows planning for ALL staff members for English or Science, for example. Departments must be created and Departments must be assigned to the staff person's District Assignment.
- Filter by Ad hoc. Filters created in Filter Designer using the Data Type of Census/Staff are available for selection. Any staff person who included in the selected filter and who has an active employment record in the selected school and calendar display.
Selected Filter By options remain when navigating to other tools for the next time the Staff Planner is accessed.
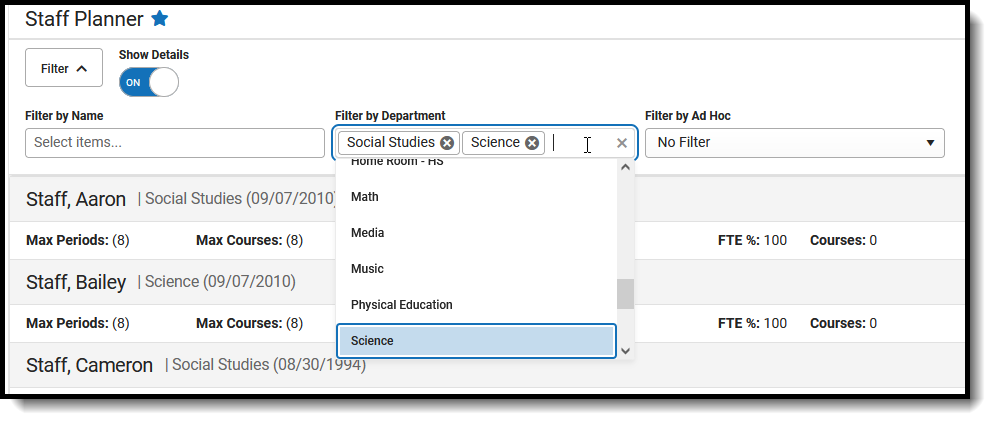
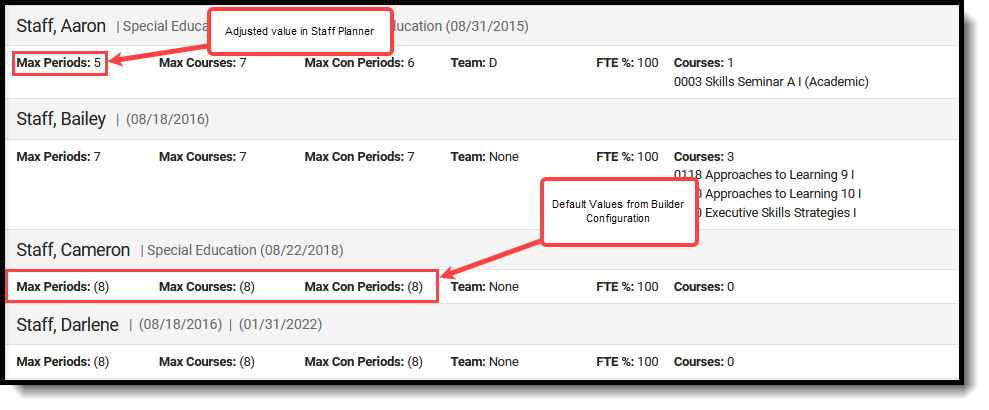
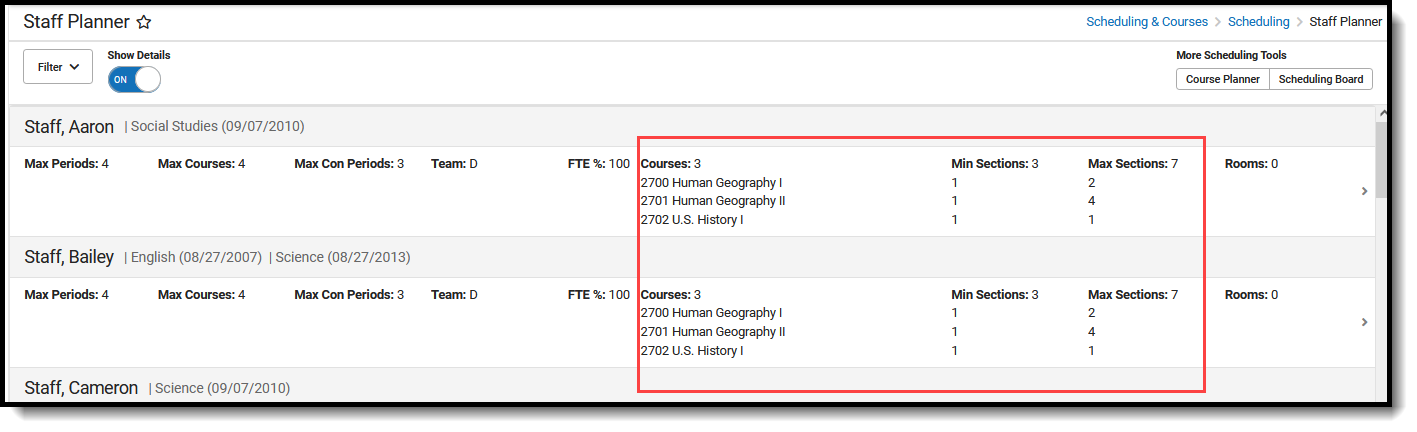
For staff who are assigned to multiple departments in the same school, the departments are listed by the start date of the District Assignment, with the earliest start date first. In the following image, the teacher Aaron Staff has two District Assignments for the same high school - one for Science with a start date of August 2013 and one for English with a start date of August 2007. The Science department is listed first because he has a teaching assignment for Science that is five years before his English teaching assignment.
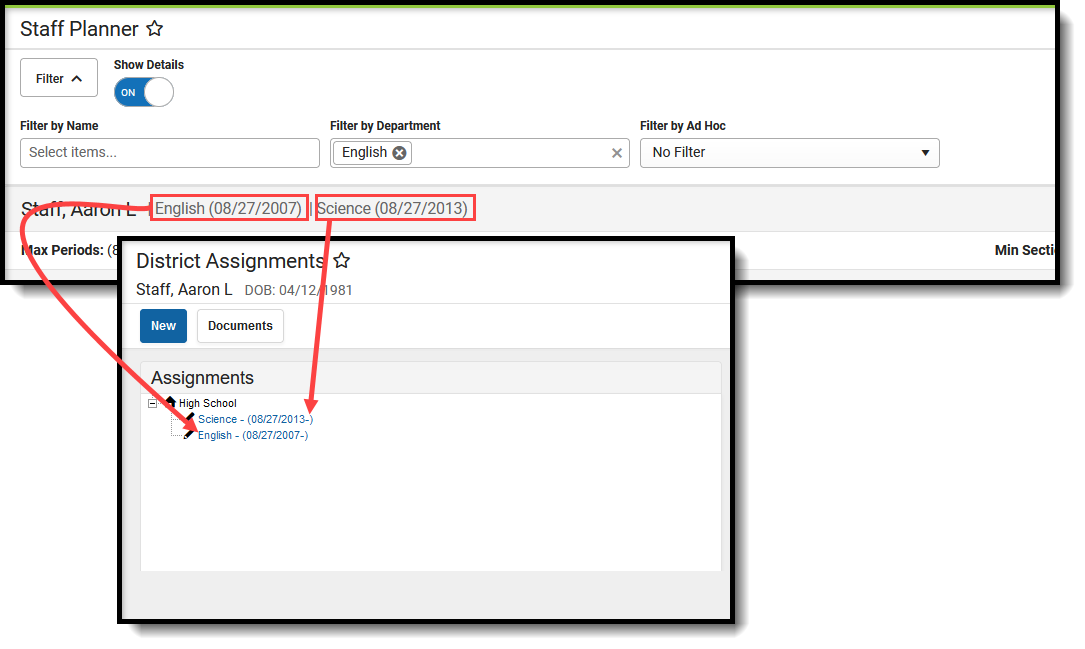 Staff Assigned Multiple Departments at one school
Since the Department assignment is optional, teachers who are not assigned to a department are listed in alphabetical order by name with the start date of their District Assignment in parentheses.
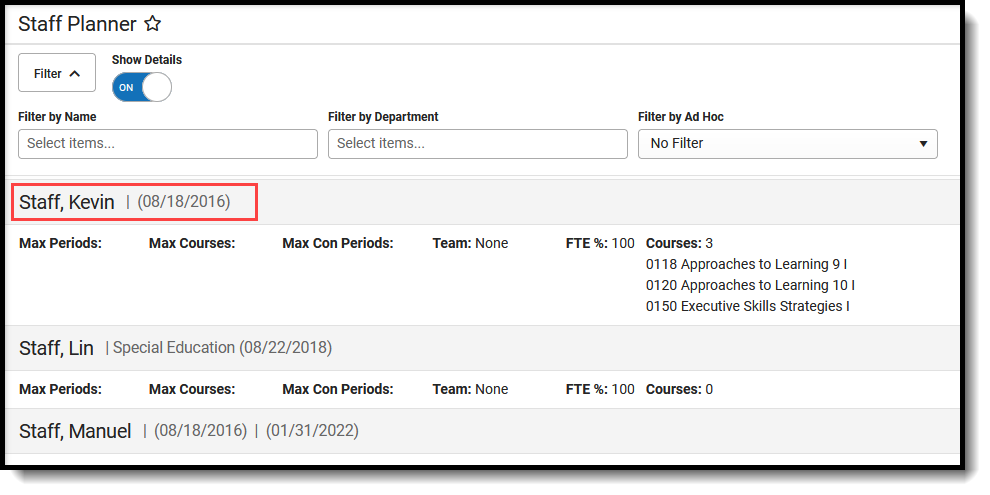 Staff Planner - No Department Assigned
When a teacher has active District Assignments at multiple schools, only the information for the school selected in the Campus toolbar (Context Switcher) is listed.
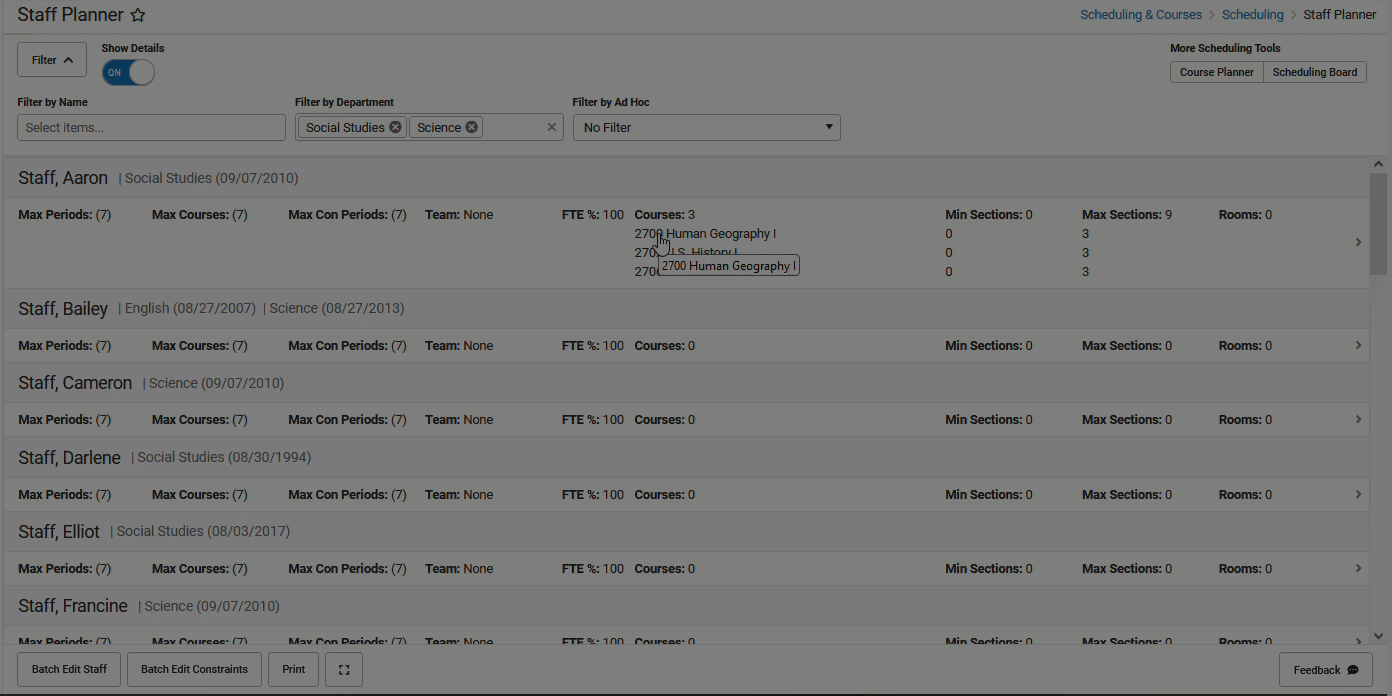
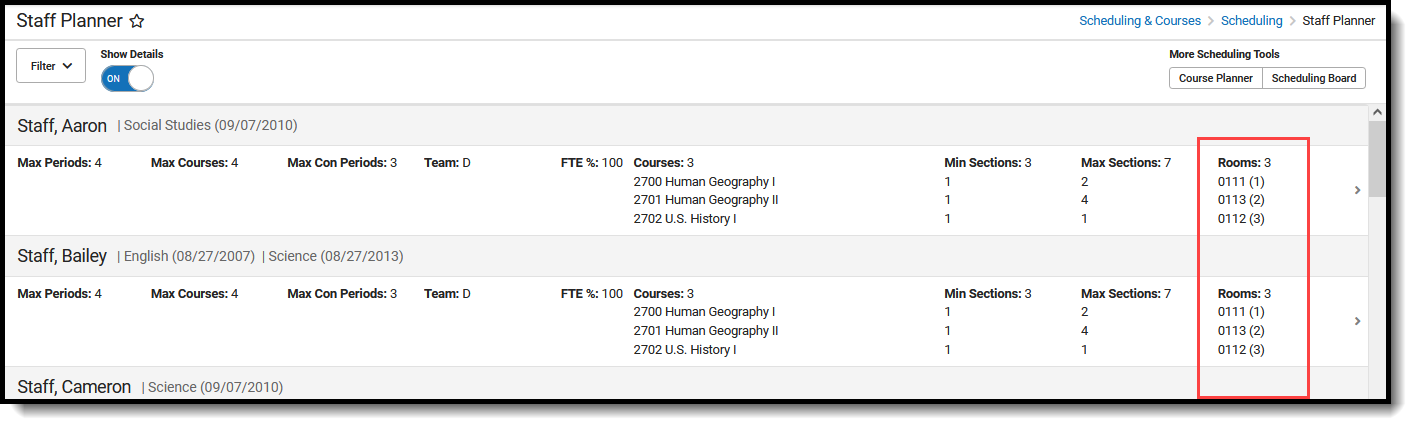
Show Details
Move the Show Details setting to OFF to display just the totals of the courses, sections and rooms for each staff person. Move the setting to ON to show the names of the courses assigned to the staff person, the number of sections for each course, and in which room the section meets.
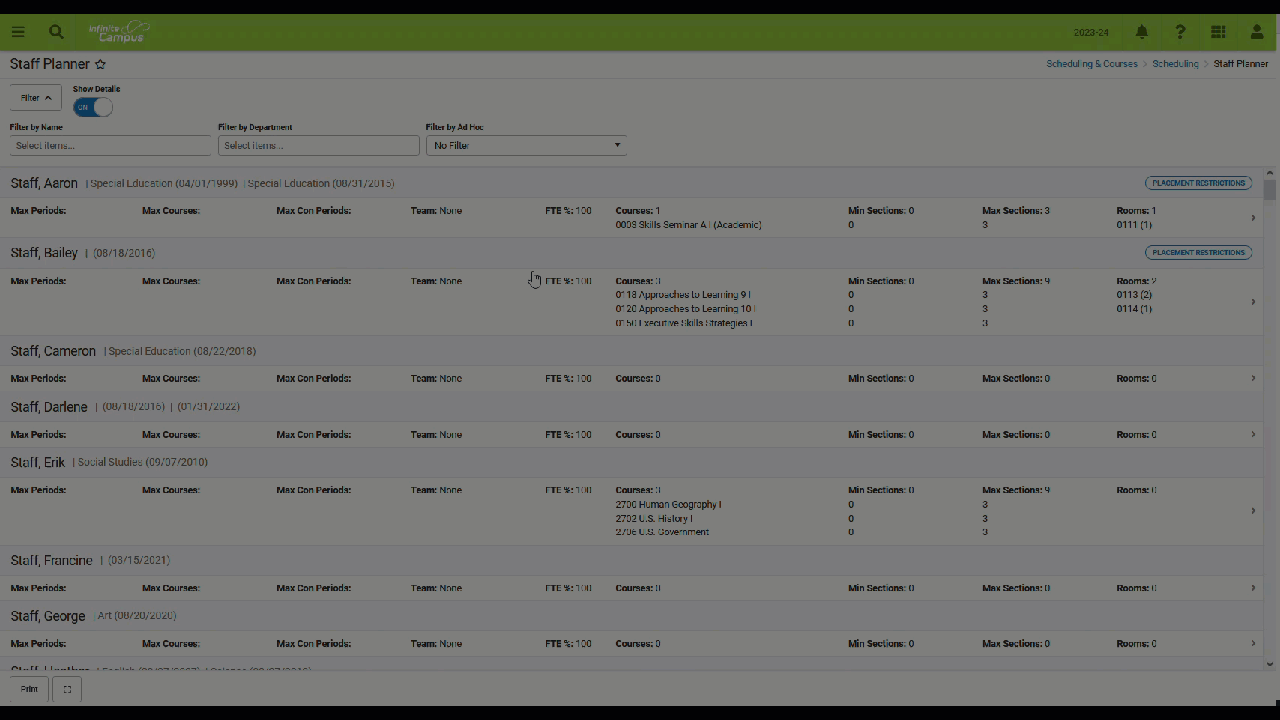 Staff Planner Display Options
More Scheduling Tools
Access the Course Planner and the Scheduling Board from the Staff Planner by clicking either of the options in the upper right corner.
This ONLY displays when navigating to the Staff Planner FROM the Scheduling Board. When opening Staff Planner from the index, More Scheduling Tools DOES NOT display.
 Access to Course Planner and Scheduling Board
Action Bar Options
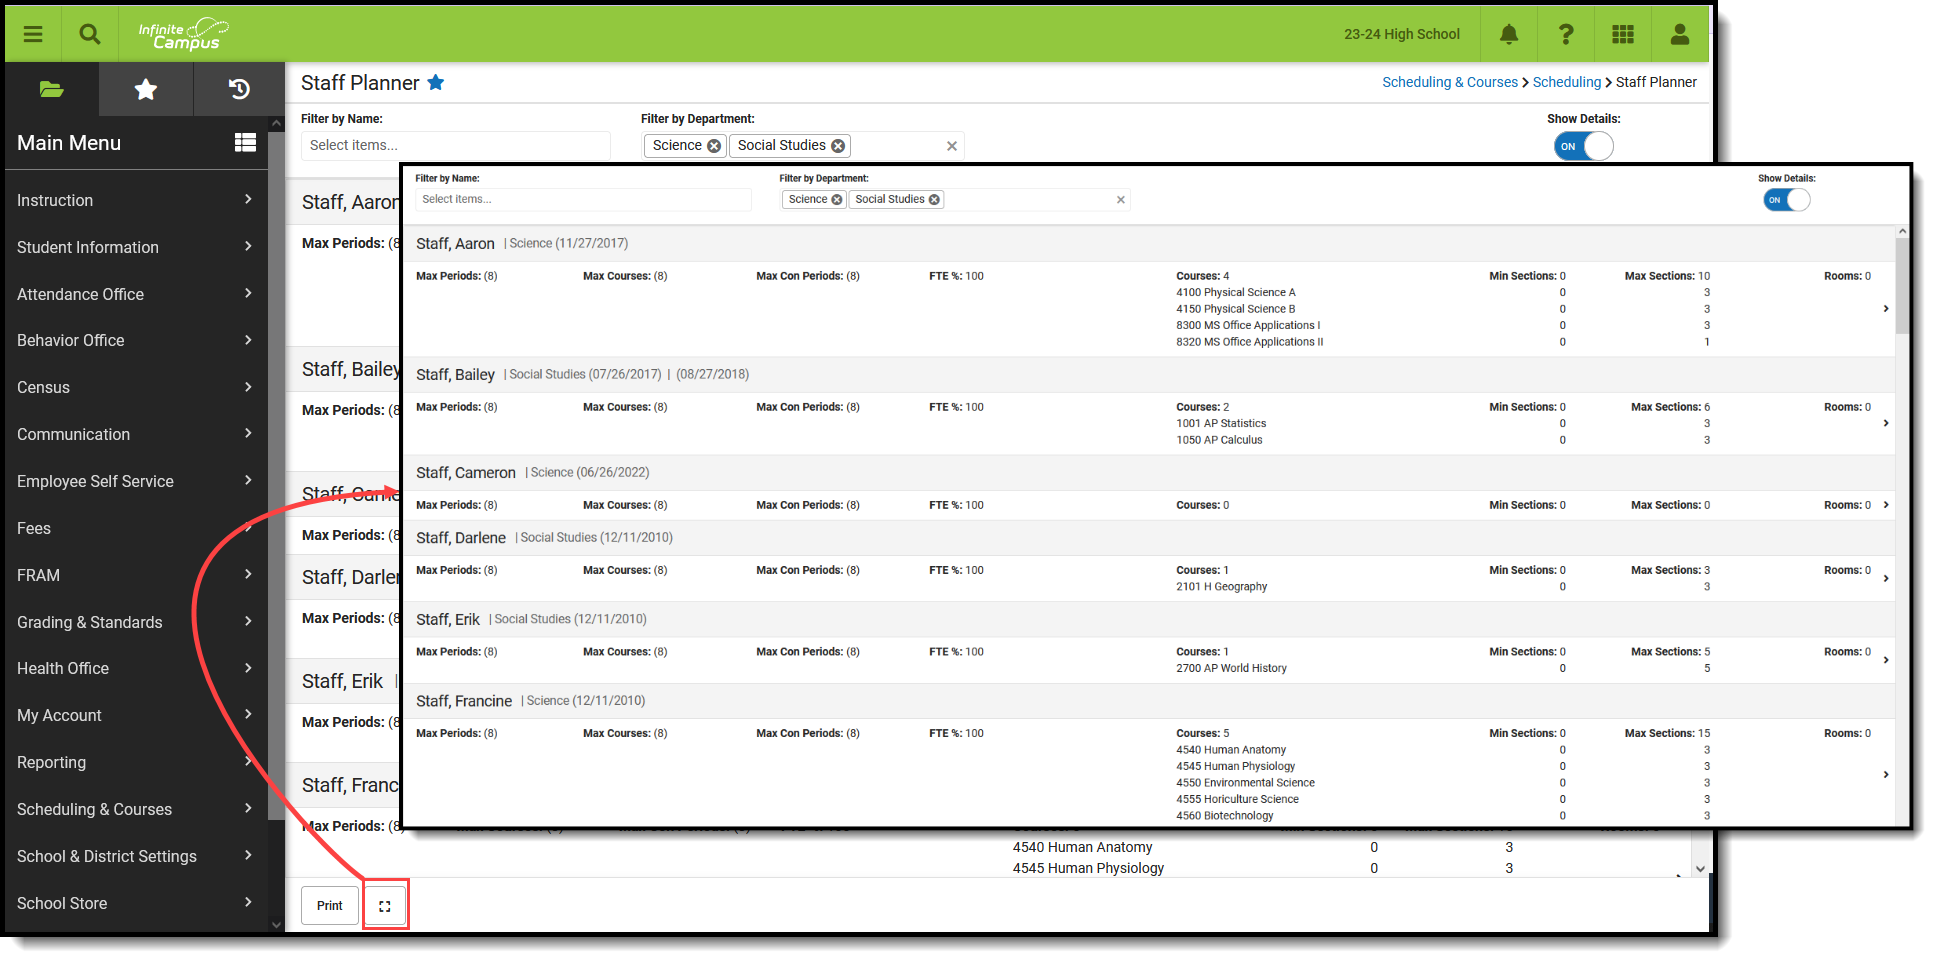
Across the bottom of the Staff Planner is the Action Bar. Available is the ability to print staff information and to view the Staff Planner in full screen mode.
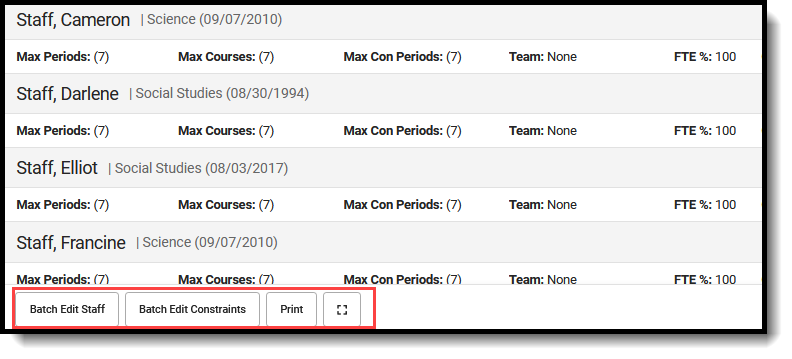 Staff Planner Action Bar
| The Batch Edit Staff option adds or replaces the values for the staff information that displays on the main view of the Staff Planner.
It is recommended that Filter options be added prior to using this option. |
 Batch Edit Staff Information
|
| The Batch Edit Constraints option allows the updating of courses, rooms, and placement restrictions for the staff person's assigned courses.
After filtering the list of staff to an entire department or a single staff person, for example, set constraints to set the minimum and maximum section numbers for courses, or set the room for a particular staff person to always teach in room 100, or to not have any Social Science teachers teach a section during first period for a monthly staff meeting. It is recommended that Filter options be added prior to using this option. |
 Batch Edit Constraints for Staff |
| A .csv export of the Staff Planner grid can be generated by clicking the Print button. It lists the same information that displays in the grid, but in spreadsheet format. | 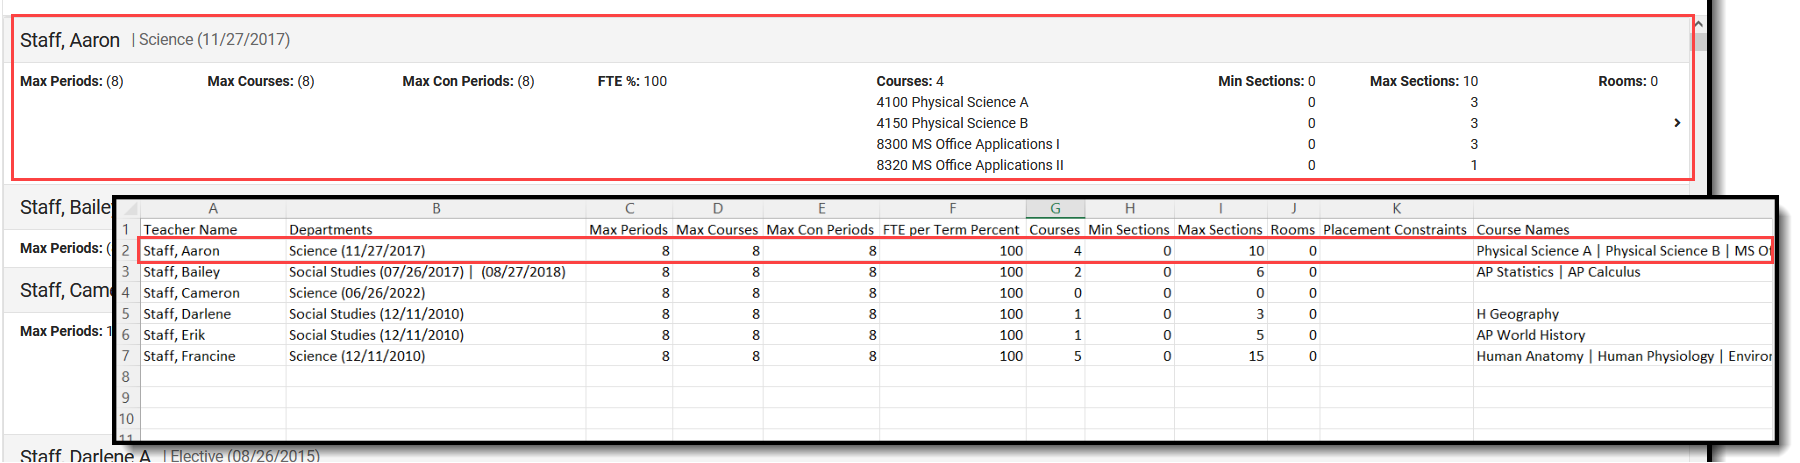 Print Staff Planner
|
| The Staff Planner can be viewed in full screen if needed. Click the Full Screen button to remove Campus toolbar and tool header, as well as the Campus outline.
Click the button again or use the ESC key to return to standard view. |
 Full Screen Display
|
Staff Planner Logic
When selecting a room for a placed Section, the logic in the build process used in the Scheduling Board follows this order:
- Selects the Room from Staff Planner when Rooms are designated in both Course Planner and Staff Planner, AND the Room for the Section to Build appears in both Planners.
- Selects the Room from Course Planner when Rooms are designated in both Course Planner and Staff Planner, AND the Room for the Section to Build appears only in the Course Planner.
- Selects the Room from Course Planner when Rooms are designated in only the Course Planner.
- Selects the Room from Staff Planner when Rooms are designated in only the Staff Planner.
- When Rooms are not designated in either Planner, a room is not automatically assigned for the section.
Rooms assigned a Room Type list that room type in parentheses.
Staff Planner Layout
The Staff Planner lists the names of teachers alphabetically who have an active District Assignment record with the Teacher checkbox marked in the selected school. Dates of the teacher's active district assignment record(s) display after their name in parentheses.
 Staff Planner Layout
Main View
The main view of Staff Planner lists the maximum amount of periods and courses a staff person can teach, based on the teacher's contract and/or district requirements.
The first three fields on the Staff Planner are pulled from the Builder Configuration tool in the Scheduling Board. Default values are noted in the parentheses, but they can be modified in the side panel. Click the Expand section below for descriptions of all listed fields.
 Staff Planner and Builder Configuration Fields
| Fields | Description | Builder Configuration Field |
|---|---|---|
| Max Periods | Maximum number of instructional periods the teacher can teach during the day.
|
Periods Taught for 100% FTE
defaults to this number, but can be modified |
| Max Courses | Maximum number of courses in instructional periods the teacher can teach during the day. | Maximum Different Courses Taught per Day |
| Max Consecutive Periods | Maximum number of consecutive instructional periods the teacher can teach during the day.
This reflects a negotiated or preferred number of courses a teacher is allowed to teach in a row without a prep period/other break. |
Maximum Consecutive Periods Taught per Day |
| Team | Scheduling Team assigned to the teacher. When a teacher is assigned to teach a course section with a specific Scheduling Team assigned, that value is pushed to the course section when the teacher is assigned as the Primary Teacher in the Scheduling Board, either manually or via the auto-build configuration.
When there are NO Teams/Scheduling Groups created for the school, this column does not display. |
N/A |
| Role | Determines the assigned position of the primary teacher, teacher, or section staff. This is used in state reports to indicate the teacher of record for the section, or that the assignment is not state-reported. See the Role Assignments section below for information on how this field works with Staff Planner and Scheduling Board. | N/A |
| FTE | Full-Time Equivalent. This value is automatically calculated from the Max Periods field divided by the Max Courses field.
It is possible to have FTE greater than 100%. When a school day is 8 periods, but a teacher is required to be on site after the end of the day for an additional hour, the teacher's Max Periods would be 9, making their FTE be 112%.
Each district defines full time employment as something different. Some districts require teachers to teach all periods of the day, while others give teachers a prep period sometime during the day. Each period and each course taught calculates the FTE value of the staff person.
When a teacher has a contract that allows a prep period, the maximum periods taught may be one less than the total instructional periods in the school day. This would also mean that the number of courses that can be taught is reduced by that prep period.
When a course section spans multiple periods, each period associated with that section is included in this value.
Courses taught is not the same as Sections taught. A teacher may be teaching two different courses, but each one has 3 sections throughout the day.
The FTE fields on the District Assignment and the District Employment records ARE NOT THE SAME AS and DO NOT affect this field. |
Max Periods divided by the default value of Periods Taught for 100% (whatever shows in parentheses) |
| Courses | Number of courses that are currently assigned to the teacher. | N/A |
| Min Sections | Least amount of sections that can be assigned to the teacher. | N/A |
| Max Sections | Most amount of sections that can be assigned to the teacher. | N/A |
| Rooms | Number of different rooms that are assigned to the course sections for the teacher. | N/A
|
Role Assignments
The Role assigned to a Primary Teacher or a Teacher on the Section Staff History tool also displays in the Staff Planner and the Scheduling Board.
Role names/titles are entered in the Attribute/Dictionary.

Scheduling Board Role Assignment
On the Scheduling Board, the Section side panel includes an Assign Teacher(s) and Roles area that can be collapsed, if needed. To assign a role to the primary teacher, a primary teacher must be selected.
- Assigning a Role in the Scheduling Board populates the Section Staff History Role field with the same selection. The Staff Planner Role field is not populated.
- Updating the existing Role for Primary Teachers overrides the Role on the Section Staff History.
 Scheduling Board - Assign Primary Teacher and Teacher Roles
Staff Planner Role Assignment
On the Staff Planner, the Role can be assigned on the Staff side panel, where Courses & Rooms and Placement Restrictions are assigned, AND in the Batch Edit Staff Information side panel.
 Staff Planner - Role Assignment
 Staff Planner - Batch Edit Staff Information
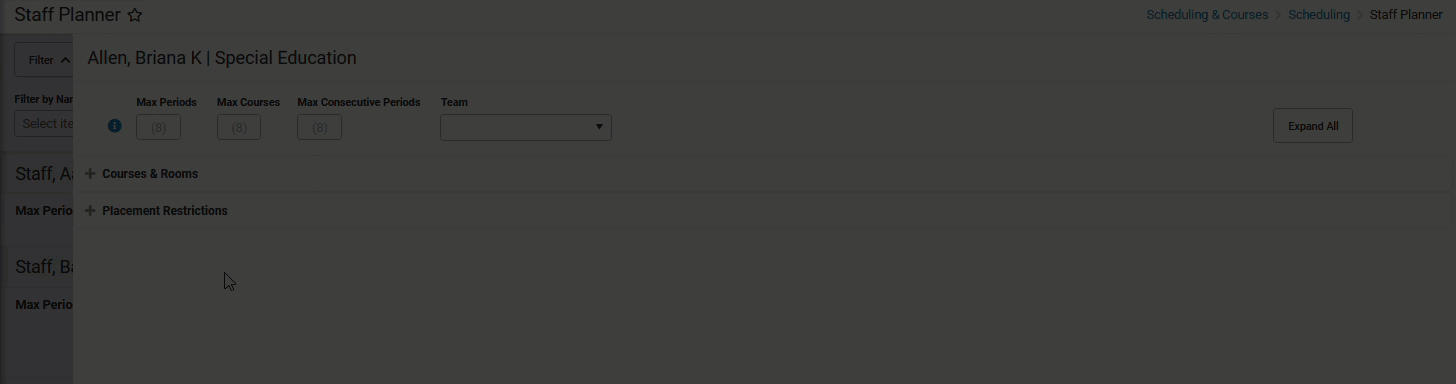
Staff Planner Side Panel
Click anywhere on that row or click the chevron at the end of the row by Rooms to display more information about the teacher's courses. Use the fields on this side panel to modify the information.
 Staff Planner Side Panel
Clicking the headers of the Course Number/Name/Department, Minimum/Maximum, or the Room/Priority tables does nothing.
Collapse or Expand Staff Planner Cards
Use the Expand All button to show the detail of the Courses & Rooms card and the Placement Restrictions card. When adjusting the max periods/courses values for several teachers, it may be easier to leave those cards in their collapsed state. The cards can be expanded one at a time by clicking the plus sign. Once either card is expanded, the Expand All button changes to read Collapse All.
 Expand or Collapse Staff Planner Cards
When saving information on the side panel, there are three options:
- Save & Next. Saves the modified data on the selected teacher and then moves to the next teacher in the list, based on any filtering of staff from the main view. The next staff is also listed in the far right corner of the side panel. Save & Next is the default save option, unless the last course in the list is displayed, is which case Save & Next is not available.
- Save & Stay. Saves the modified data on the selected teacher and then remains on that teacher for further updates.
- Save & Close. Saves the modified data on the selected teacher and then closes the side panel, displaying the main Staff Planner view.
To not save any changes made in the side panel, click the Cancel button.
Change Max Periods, Max Courses, Max Consecutive Periods Values
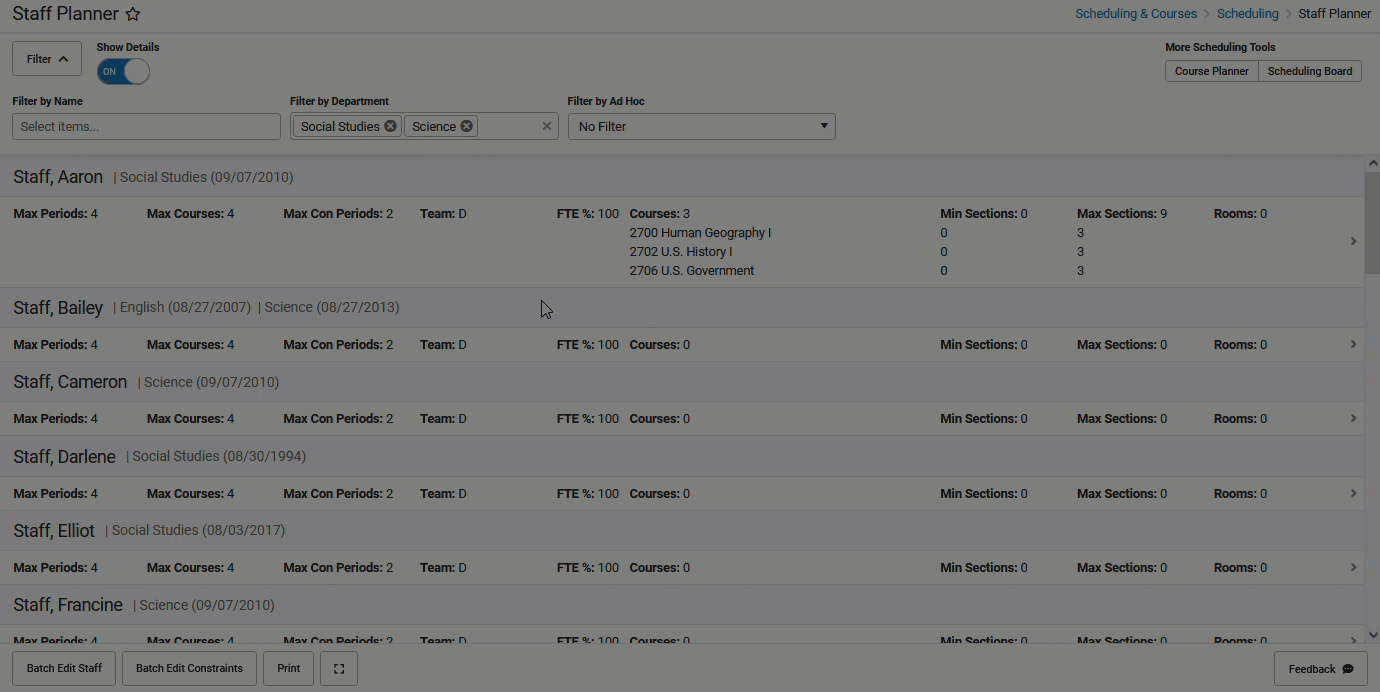
On the Main Staff Planner view, the teacher's current settings of periods, courses and consecutive periods display. Those in parentheses are the default values from the Builder Configuration settings for the active trial; values not in parentheses indicate the original value has been adjusted in the Staff Planner.
 Staff Planner Adjusted Values vs. Default Values
- Open the side panel by clicking in the row or clicking the caret on the far right side of the row for the appropriate teacher.
- Enter the appropriate values for the selected teacher for Max Periods, Max Course, Max Consecutive Periods by typing in the field.
- If this is the only update that needs to be made, click the Save & Next, Save & Stay or Save & Close button. Otherwise, continue making adjustments for this selected staff person.
 Adjusting Max Periods, Courses, Consecutive Periods Values
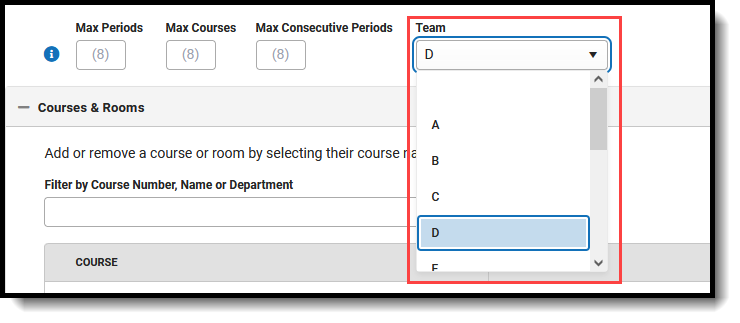
Team Selection
Teams (Scheduling Groups) are assigned to a Course Section. A Team can be selected from the dropdown on the Staff Planner Side Panel. This team selection is then pushed to the Course Section when the course is built in the Scheduling Board.
Scheduling Groups must be available in the selected calendar to assign them to a staff person.
Select the appropriate team from the dropdown. Click one of the save options when finished.
 Staff Planner Team Selection
On the main view of the Staff Planner, use the Team Filter Option to display only those staff who have been assigned to the selected Team.
The Team assigned here also appears on the Scheduling Board in the Section Side Panel.
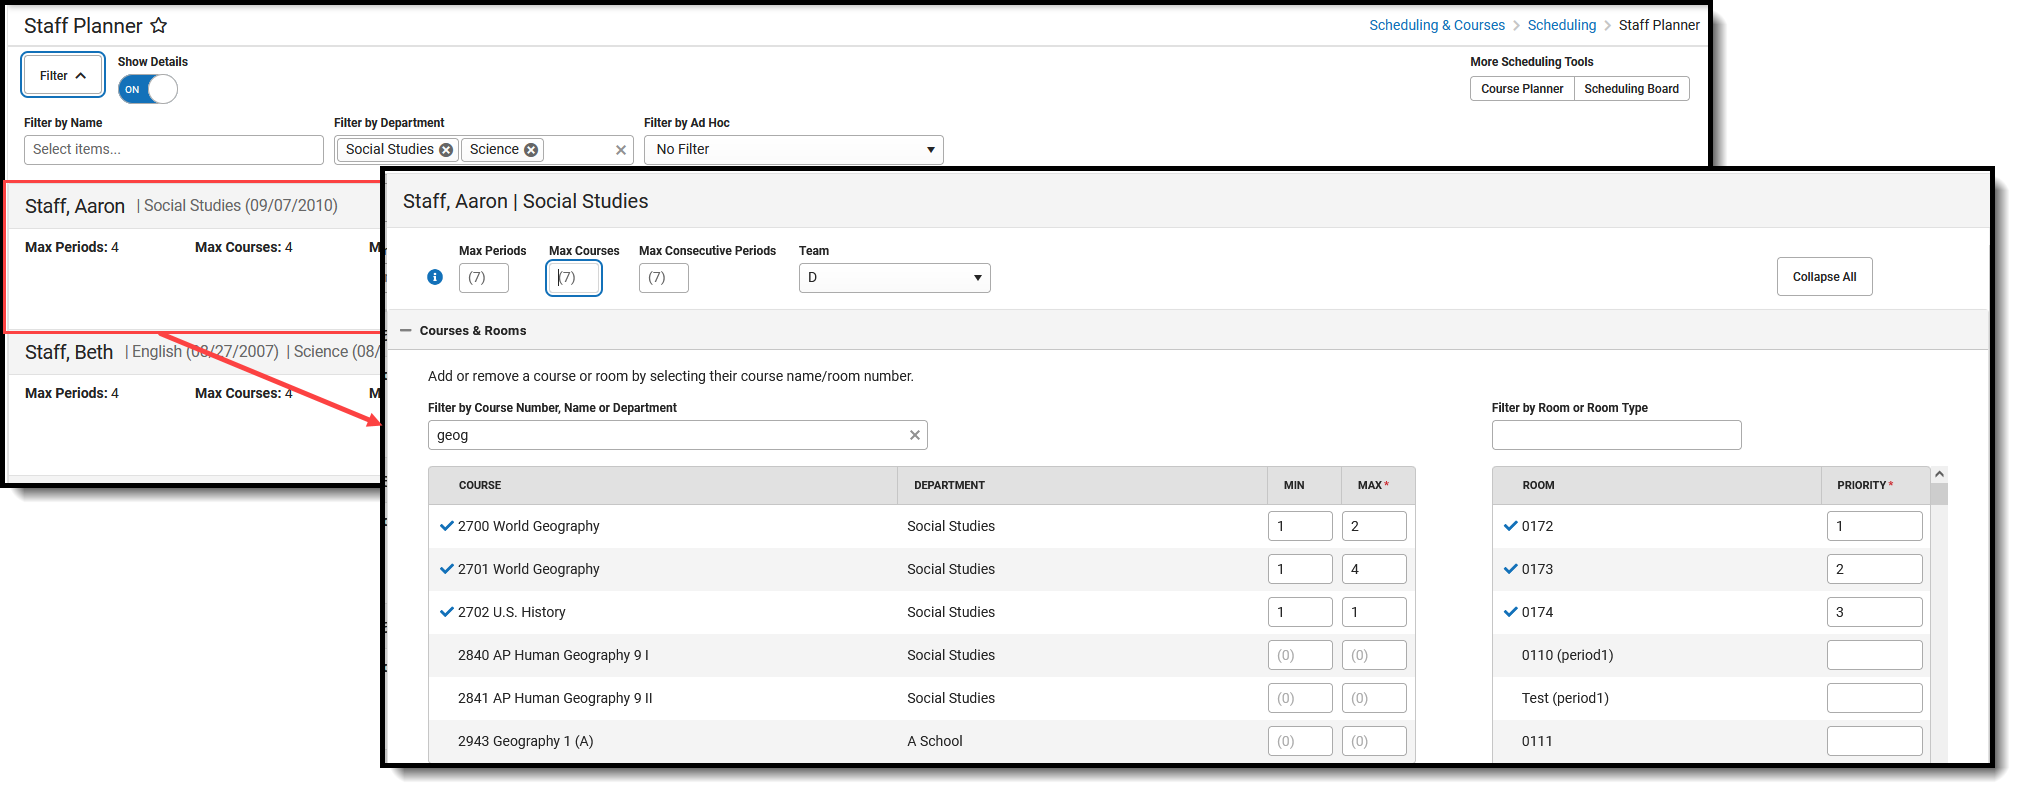
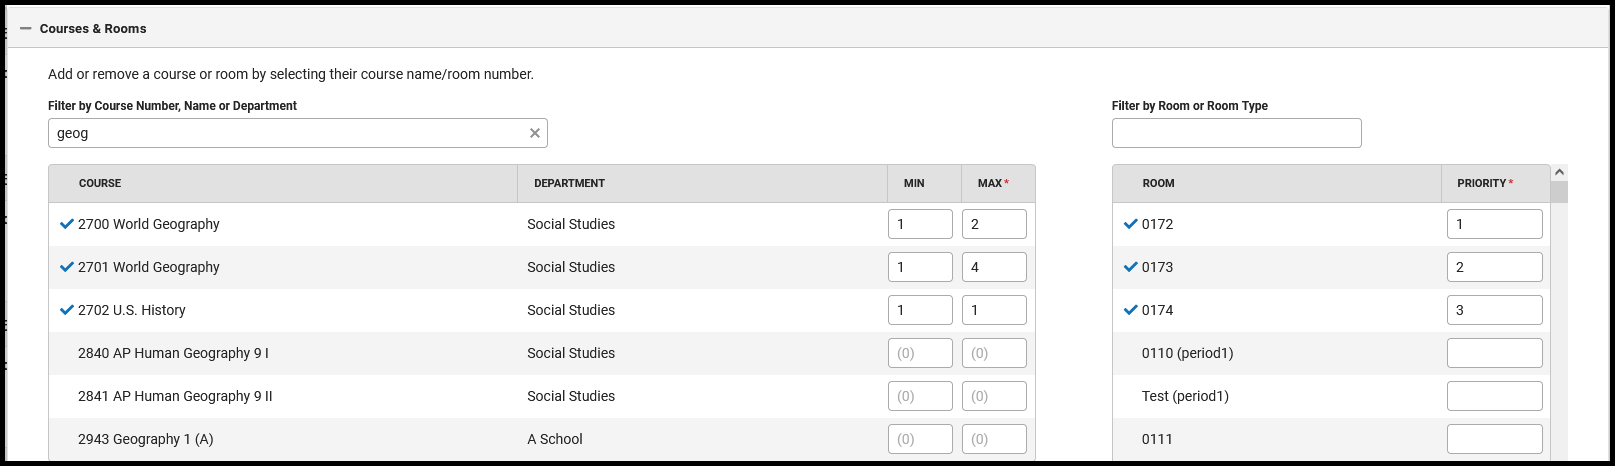
Course and Room Selection
The Courses & Rooms card lists all active courses in the selected calendar and a list of all AVAILABLE rooms displays. Courses are listed in course number order. Both courses and rooms can be narrowed to a smaller list by entering text in the Filter fields.
 Staff Planner - Course and Rooms
- The list of courses can be filtered by the Course Name, Course Number or Department.
- The list of rooms can be filtered by the Room Name or Room Type. When creating rooms, a Name is required entry, but a Room Type can also be added. Room Types are created in the Attribute/Dictionary and are more descriptive than just a room number or name. It could be LAB or GYM or POOL, for example. When a school has multiple labs or multiple gyms, the Room Type would be LAB and the Room Number might be LAB A.
The filter fields are dynamic, meaning any text entered into them instantly filters to list matching results.
Assign Courses to the Teacher
- Expand the Courses & Rooms card.
- Filter the Courses and Rooms, if desired.
- Click anywhere in the row for the course to assign it to the teacher. A blue checkmark displays next to a course when it has been assigned, and the MIN/MAX fields populate automatically.
- Modify the MIN/MAX value as needed for this staff person. These values are required.
- Assign all courses here at one time.
- Click one of the Save options when needed.
Assign Rooms to Selected Teachers
- Filter the list of rooms to those appropriate for the selected courses.
- Select the desired rooms for the teacher's courses by clicking in that room row. A blue checkmark displays next to selected rooms. When more than one room is selected for a particular course, or there are several rooms in which the teacher can teach that course, select all appropriate rooms and add a priority. Priority is also automatically assigned; a value of 1 indicates that is the preferred room and was selected first.
- Click one of the Save options when needed.
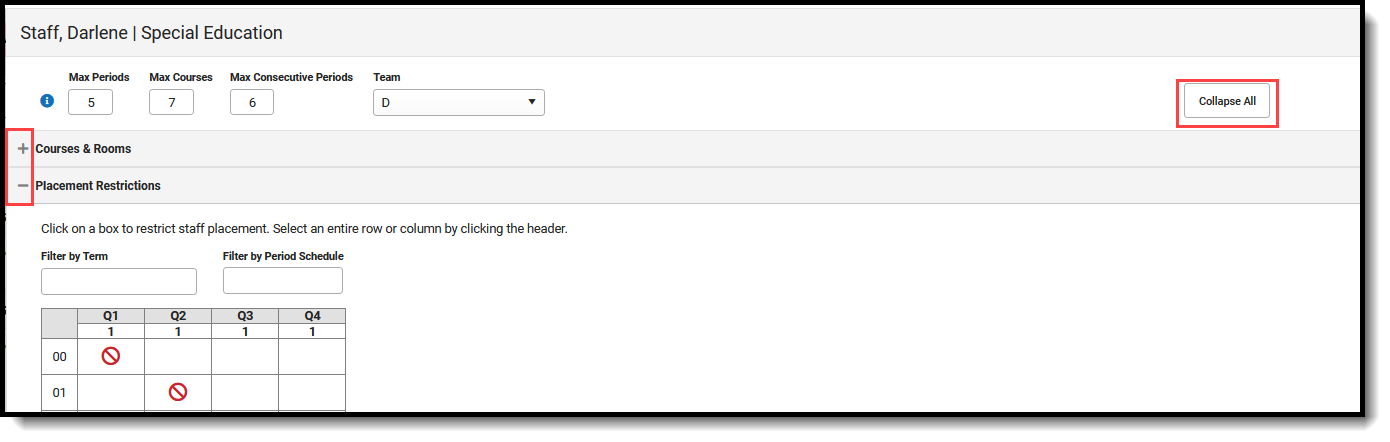
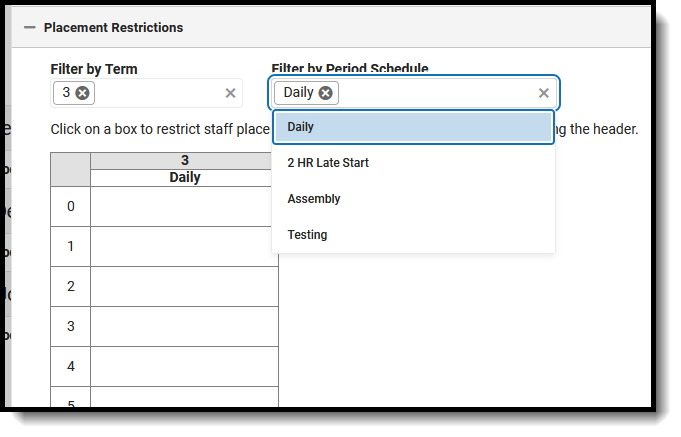
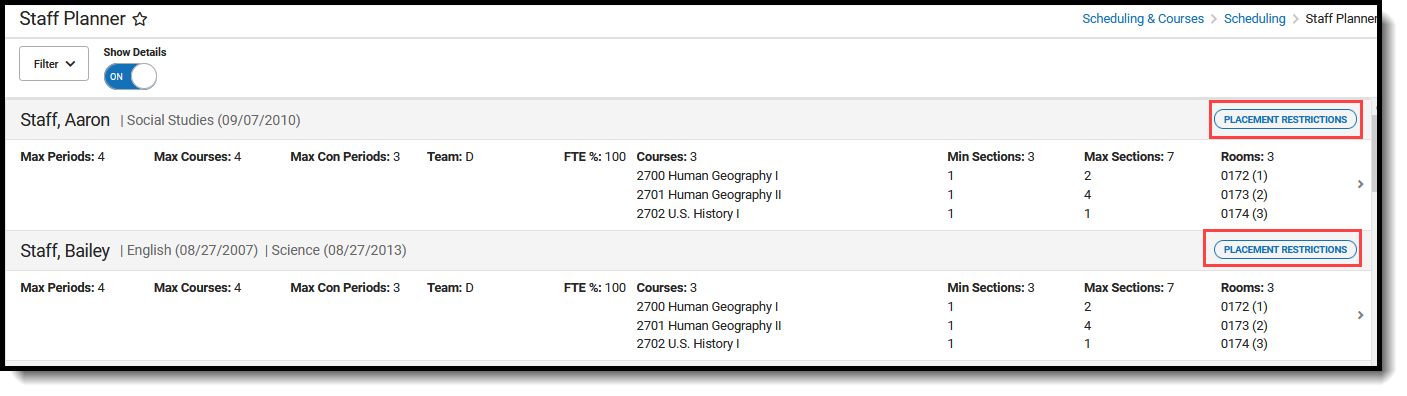
Placement Restrictions
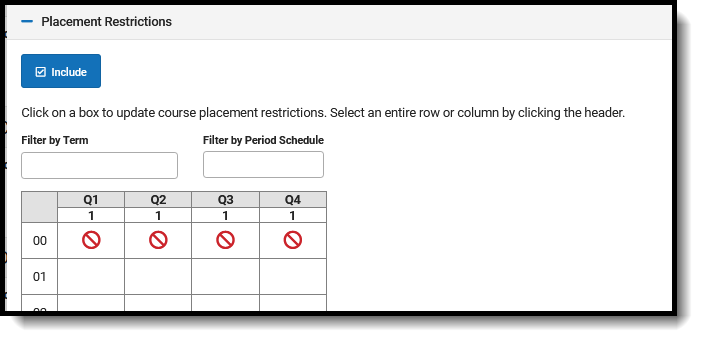
The Placement Restrictions section creates a constraint on that period and term. This restriction can be for a selected period, a term or a schedule, or a combination of each. The restriction indicates a section is not placed in that period, schedule, or term.
Use the Filter by Term field to change the schedule grid to only display the entered Term number. Use the Filter by Period Schedule to only display that particular period schedule. Or, use them together to only display Term 3 and the Daily Period Schedule. These filter selections remain when moving to the next staff person.
 Placement Restriction Filtered Display
When a restriction is added, the No Symbol ( ) is added to the period. Restrictions can be added for a period across all terms by clicking the period number row (image 1); to a period schedule by clicking that schedule name (image 2); for an entire term by clicking the term number (image 3); for a single period (image 4).
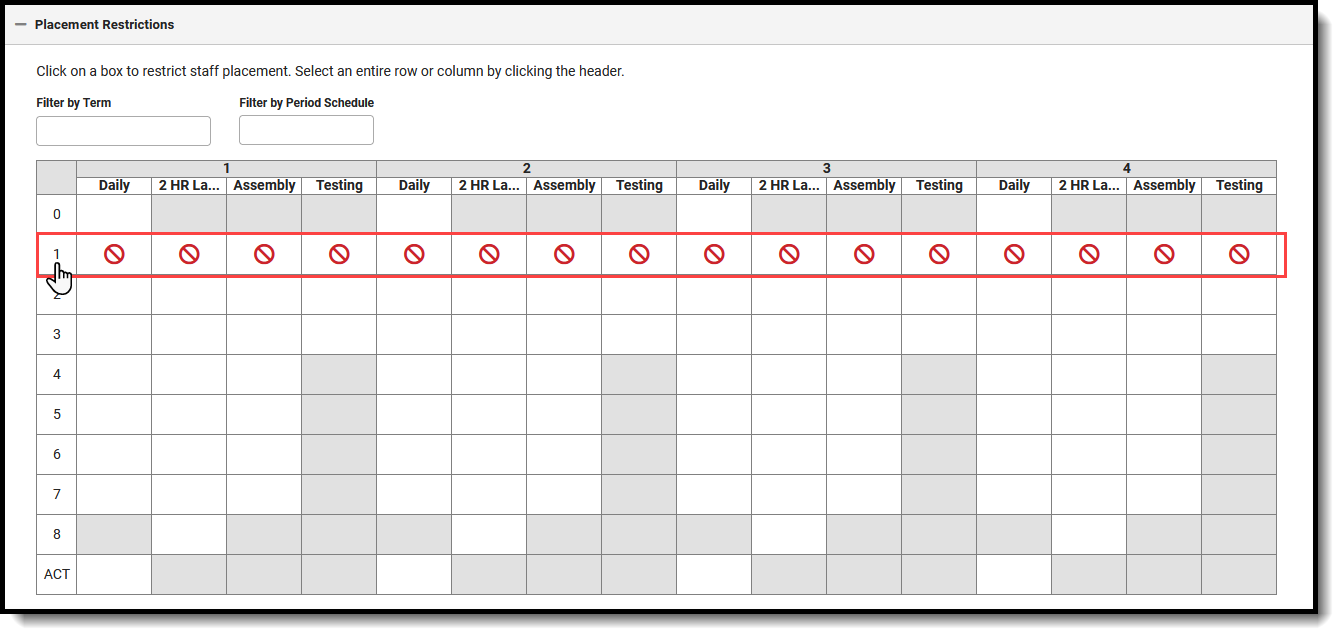 1. Period Restriction
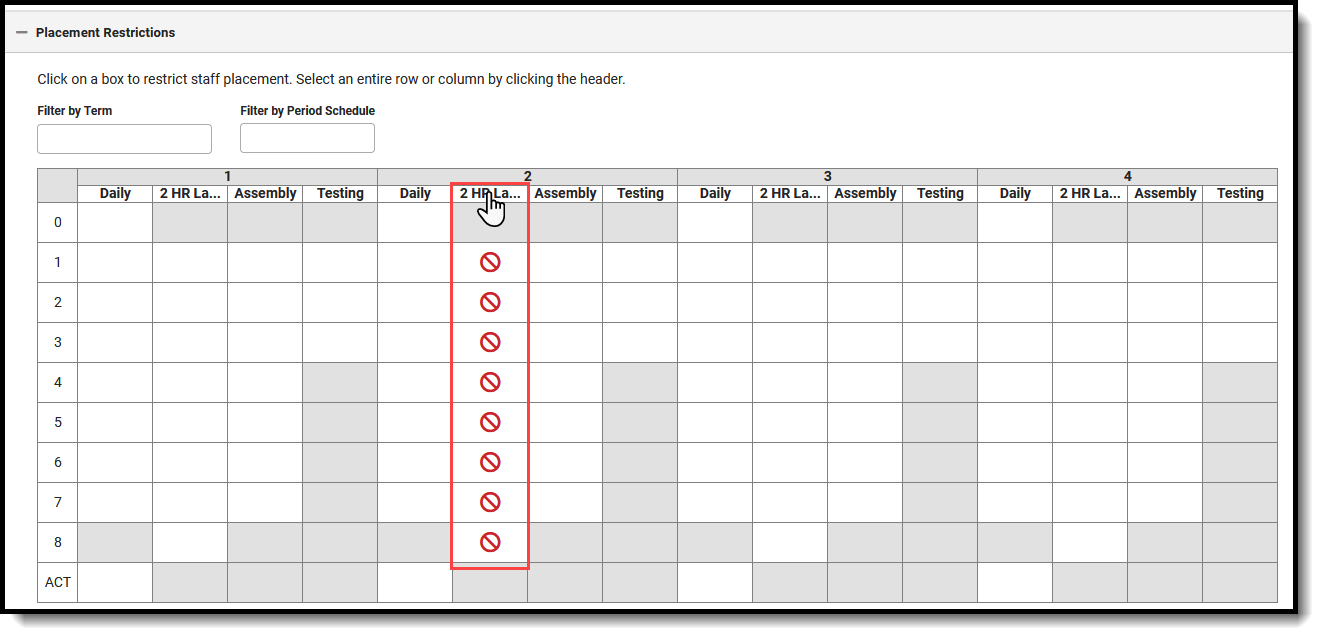 2. Late Start Schedule Restriction
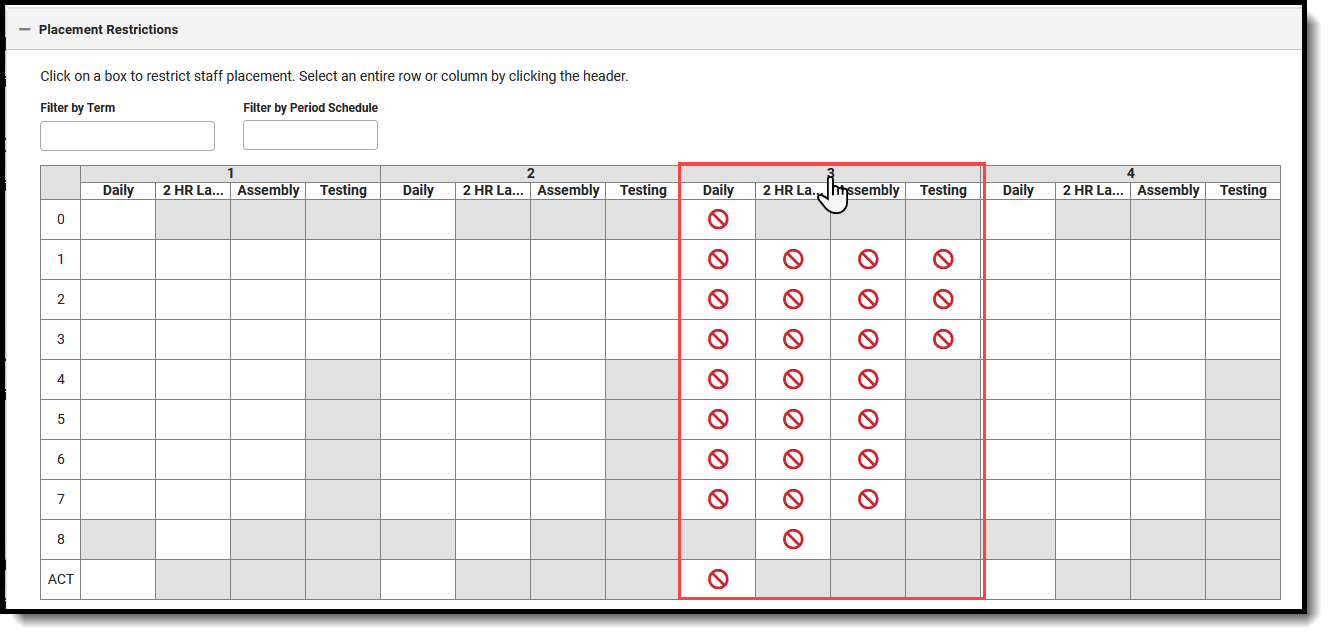 3. Term Restriction
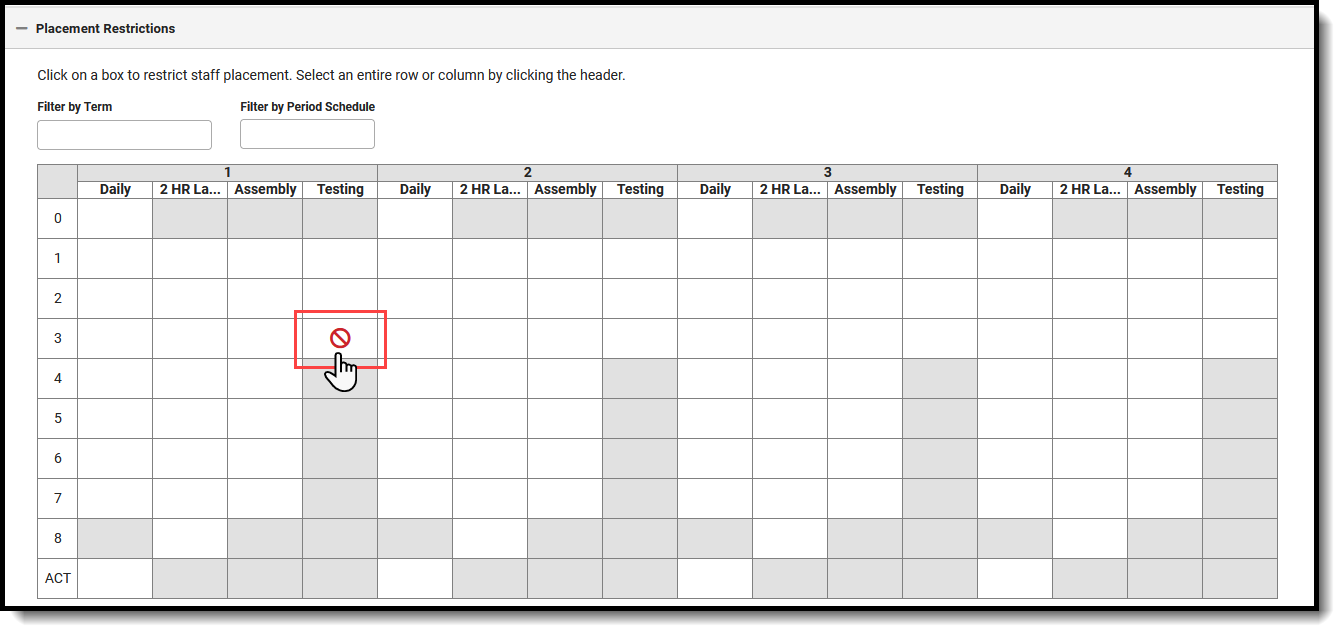 4. Single Period Restriction
To remove the symbol, click in that cell again.
Restrictions are added for any period schedule or term that is not displayed due to filtering by term or schedule. When saved, a validation message displays to alert the user that changes were made to hidden terms/period schedules.
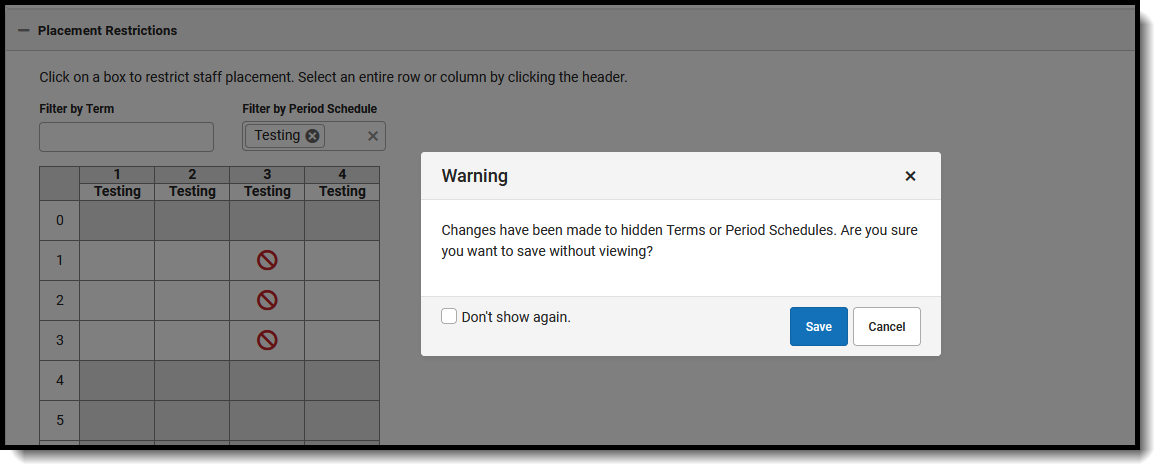 Restriction assigned to Hidden Terms/Schedules
Previous and Next Staff
When finished adding courses, rooms and adding placement restrictions, use the Previous and Next buttons in the bottom right to add courses, rooms and placement restrictions to other staff without leaving the Side Panel view. Changes do need to be saved before viewing another staff person.
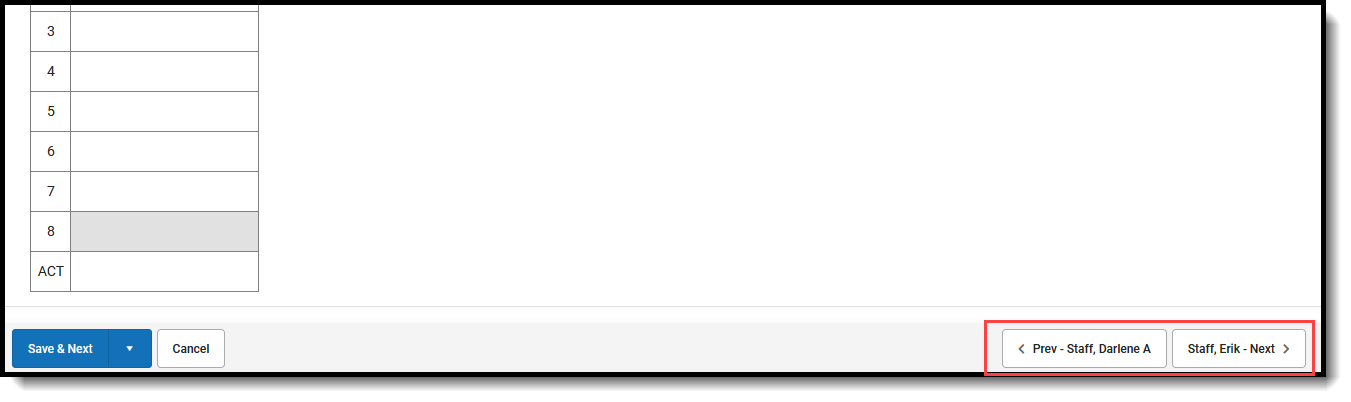 Previous and Next Buttons
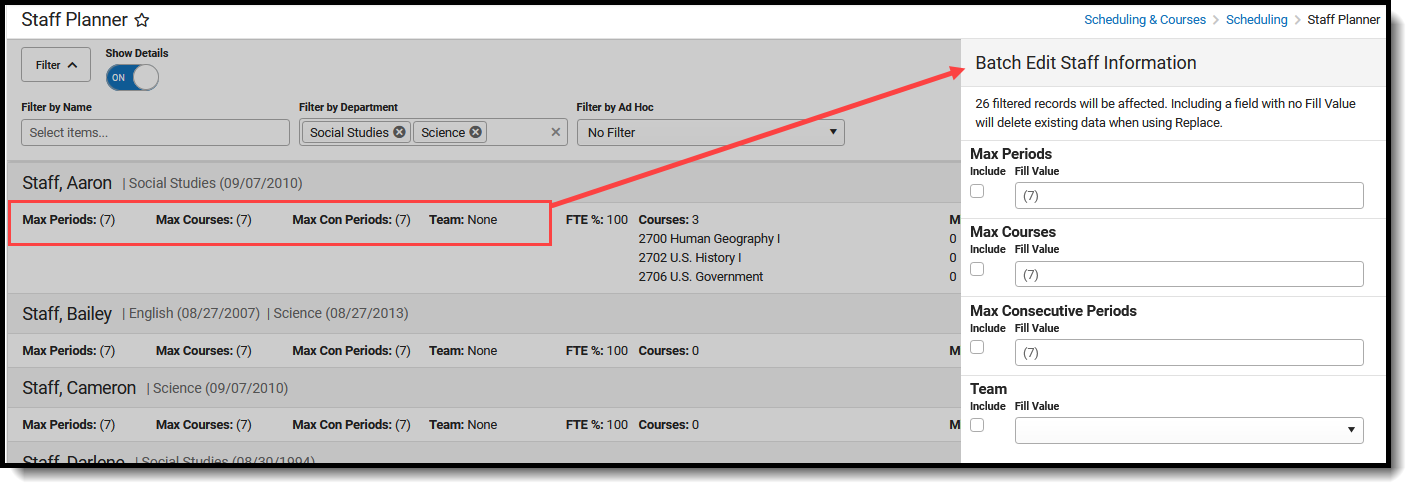
Modify Staff Planner Information Using Batch Functionality
Prior to using either of the Batch Edit options, filter the list of courses in the selected calendar to a limited number using one or all of the available Filter options - by Course Number or Name, by Department or by Ad hoc. Then, the batch process affects a limited number of records.
 Batch Edit Staff - Filtered Records
These two Batch Edit options replace the following tools:
Batch Edit Staff
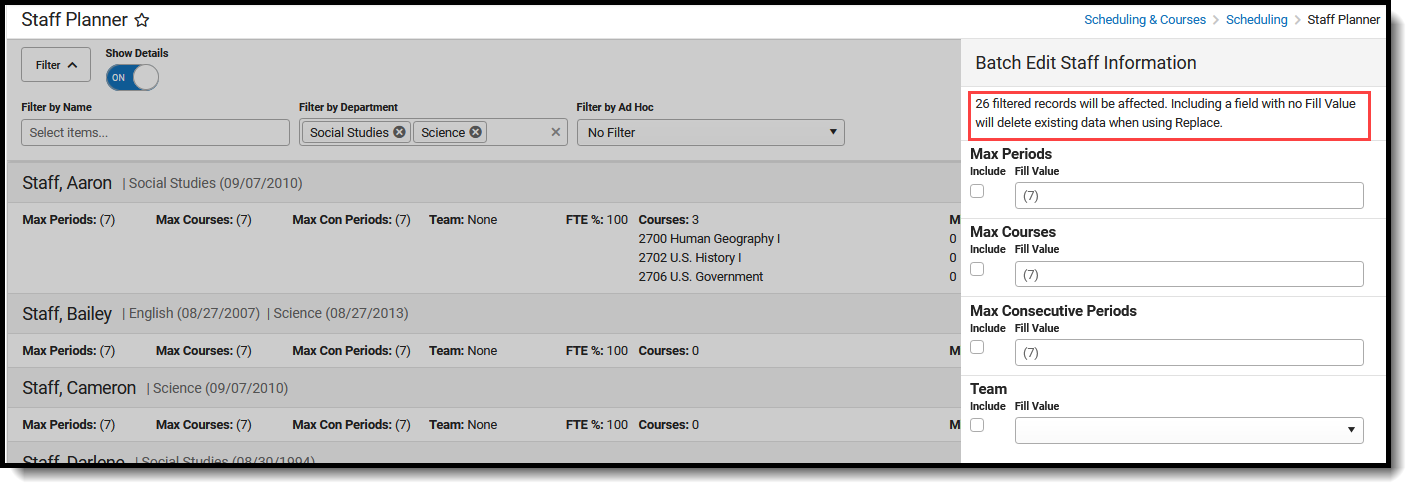
The same values that can be modified on the Staff Planner Side Panel for one staff member can also be modified for multiple staff members using the Batch Edit Staff option.
 Available Fields for Batch Edit Staff
When adding values to the fields in the side panel, make sure the Include checkbox is marked. This selection ensures the item is updated with the entered value. Also note that when Include is marked, but the Fill Value is not populated, existing information is replaced with no value (e.g., the value is deleted).
Add Staff Information
Adding staff information ADDS the entered values to the filtered staff list who do not already have values entered (other than the default value). For example, all Social Studies teachers are currently assigned just the default values for Maximum Periods, Maximum Course, Maximum Consecutive Periods and no Team assigned. Using Batch Edit Staff to ADD a value of 4 Maximum Periods, Maximum Courses, 2 Maximum Consecutive Periods, and align them to Team D updates the filtered staff list for these new values.
- Click Batch Edit Staff in the Action Row. The Batch Edit Staff Information side panel displays.
- Enter the desired value for each listed field. Not every field needs to have a value.
- Mark the Include checkbox to apply the entered value to the field.
- Click the Add button. The Staff Planner processes and when complete, the new values are added for each staff member included in the filtered list.
 Batch Edit Staff - Add Values
Replace Staff Information
Replacing staff information UPDATES the entered values for the filtered list of staff where values already exist. For example, the Social Studies teachers are currently assigned 4 Max Periods, 4 Max Courses, 2 Max Consecutive Periods and are assigned to Team D. Using Batch Edit Staff to REPLACE the Max Consecutive Periods value of 2 updates that value for the staff included in the filtered list of staff to 3.
When there is existing data for staff, using Replace OVERWRITES that data and replaces it with the newly entered values.
When replacing values to the fields in the side panel, make sure the Include checkbox is marked. This selection ensures the item is updated with the entered value. Also note that when Include is marked but the Fill Value is not populated, existing information is replaced with no value (e.g., the value is deleted).
- Click Batch Edit Staff in the Action Row. The Batch Edit Staff Information side panel displays.
- Enter the desired value for each listed field. Not every field needs to have a value.
- Mark the Include checkbox to apply the entered value to the field.
- Click the Replace button. The Staff Planner processes and when complete, the values are replaced for each staff member included in the filtered list.
 Batch Edit Staff - Replace Values
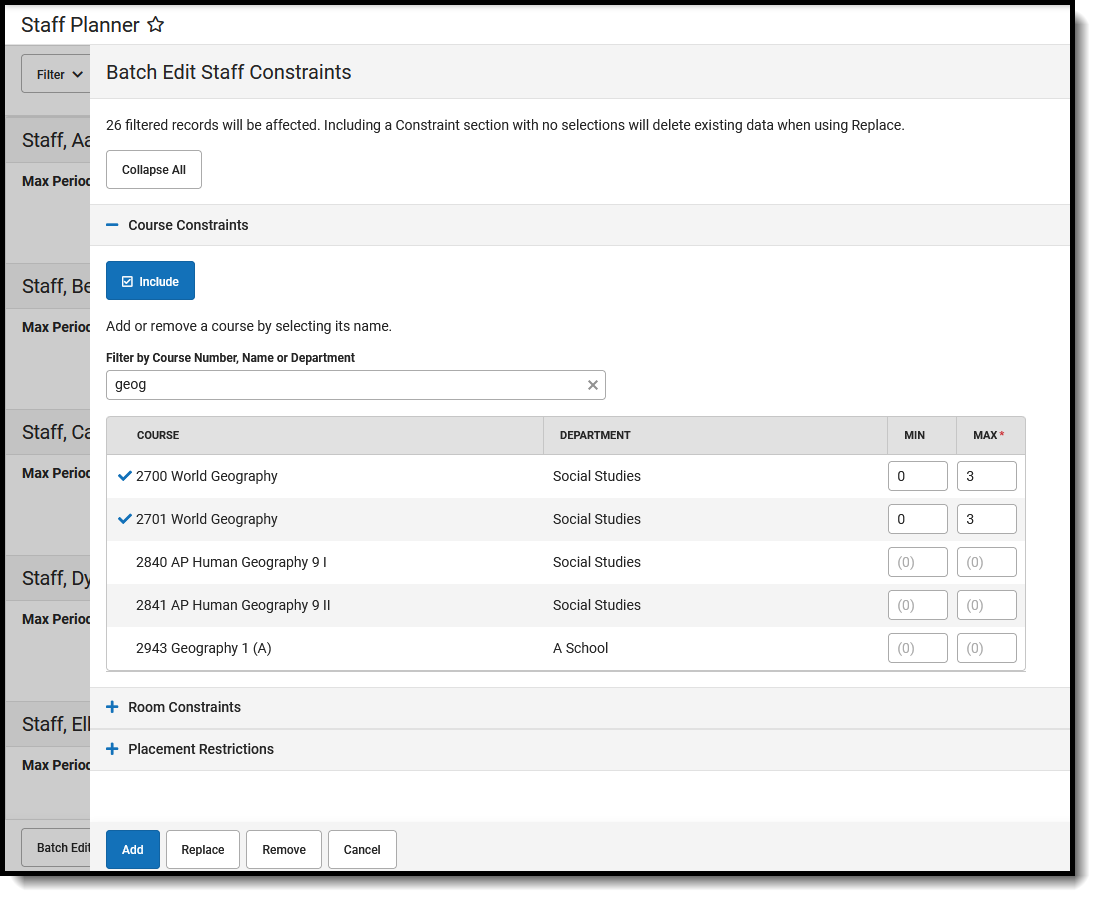
Batch Edit Constraints
Batch Edit Constraints modifies the Course Constraints, Room Constraints, and Placement Restrictions for the filtered staff by adding constraints where values did not previously exist (blank values); by replacing existing values with new values; or by removing existing values.
Use the Collapse All/Expand All button to view the Course Constraints, Room Constraints, and Placement Restriction cards at one time.
Add Constraints
Adding constraints updates a course assignment, room assignment or placement restriction for the filtered list of staff to contain a value where a course, room or placement restriction was not previously assigned to staff or adds an additional course, room or placement restriction.
To add course constraints, room constraints and placement restrictions:
- Click Batch Edit Constraints. The Batch Edit Staff Constraints Side Panel opens.
- In the side panel (Expand All to open all cards):
- For Course Constraints, click next to the course name to assign staff to courses, and modify the MIN and MAX values for each course marked. Follow the steps outlined in Assign Courses to the Teacher.
- For Room Constraints, click next to the desired room numbers to add those rooms to the courses. Follow the steps outlined in Assign Rooms to Selected Teachers.
- For Placement Restrictions, click in any period row, term row, or period schedule row to add a placement restriction for the courses. Refer to the Placement Restrictions for guidance.
- Click Add. The courses, rooms and placement restrictions are now assigned to the entire list of staff from the filtered options.
Repeat the same steps to add any missed courses, rooms or placements.
Example: Using Batch Edit Constraints to modify Course assignments
Staff shown in the image below here are not currently assigned to courses, to rooms or have any placement restrictions.
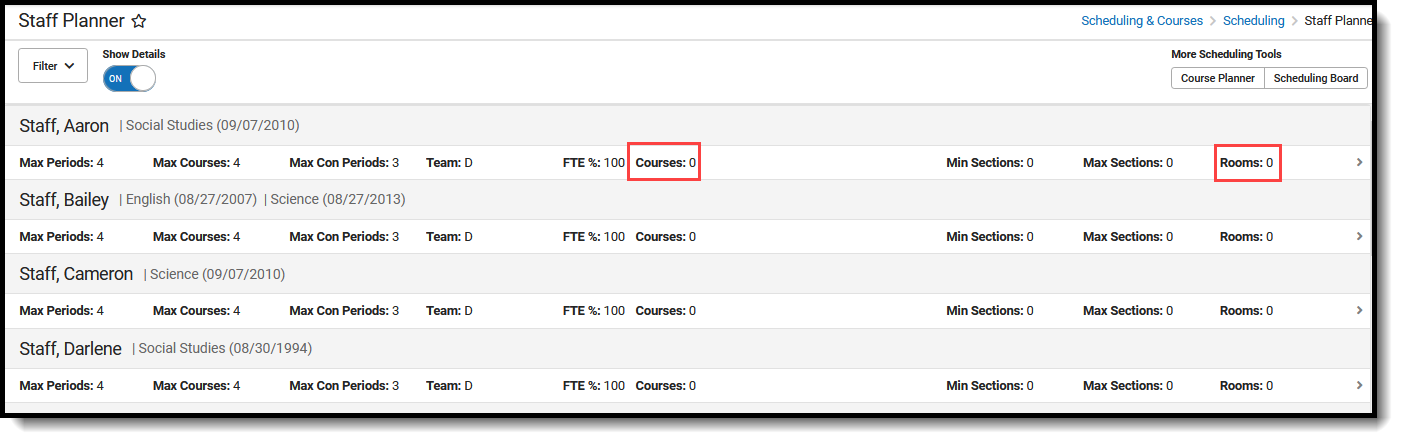 Staff Planner - No Current Constraints
Click Batch Edit Constraints and expand the Course Constraints card. Use the Filter field to locate course numbers starting with '270'. Place a green check next to courses 2700, 2701 and 2702. Then, the MIN and MAX fields can be modified to indicate the minimum and maximum number of sections each teacher can teach for each course. A value of 1 is entered for the MIN column, and values of 2, 4 and 1 are added to the MAX column.
Now, click Add. The list of 26 staff is now assigned to the three courses with the MIN and MAX section values.
 Courses, Minimum Sections, Maximum Sections Added
Replace Constraints
Replacing constraints OVERWRITES previous selections of courses, rooms and placements and updates those selections to different courses, rooms and placements.
To replace course constraints, room constraints and placement restrictions:
- Click Batch Edit Constraints. The Batch Edit Staff Constraints Side Panel opens.
- In the side panel (Expand All to open all cards):
- For Course Constraints, click next to the desired course names to assign staff to courses, and modify the MIN and MAX values for each course marked. These selections need to be different than what is already selected for the teachers.
- For Room Constraints, click next to the desired room numbers to add those rooms to the courses. The selected rooms need to be different than what is already selected for the teachers.
- For Placement Restrictions, click in any period row, term row, or period schedule row to add a placement restriction for the courses.
- Click Replace. The courses, rooms and placement restrictions have been modified.
Example: Using Batch Edit Constraints to Replace Room Assignments
There are three rooms currently assigned to the Social Studies staff to teach their Human Geography and US History courses. However, those rooms need to be changed to other rooms due to the technology limitations in the current rooms. Rooms 0172, 0173, and 0174 need to replace rooms 0111, 0112, and 0113.
 Staff Planner - Current Rooms Assigned
Click Batch Edit Constraints and expand the Room Constraints card. Use the Filter field to locate room numbers starting with 017'. Place a green check next to rooms 0172, 0173, and 0174.
Now, click Replace. The room numbers for the filtered list of staff have been changed from 0111, 0112 and 0113 to 0172, 0173 and 0174.
 Staff Planner - Rooms Replaced
Remove Constraints
Removing course, room or placement restrictions values selected in the side panel from the filtered courses (i.e., the user selected the exact values that ought to be removed from existing records).
To remove those assignments and placement restrictions:
- Click Batch Edit Constraints. The Batch Edit Staff Constraints Side Panel opens.
- In the side panel (Expand All to open all cards):
- For Course Constraints, select the SAME course name that are currently assigned to staff.
- For Room Constraints, select the SAME room numbers that are currently assigned to assigned courses.
- For Placement Restrictions, select the SAME period that is currently set for no placement.
- Click Remove. The courses, rooms and placement restrictions are removed and set back to the default values.
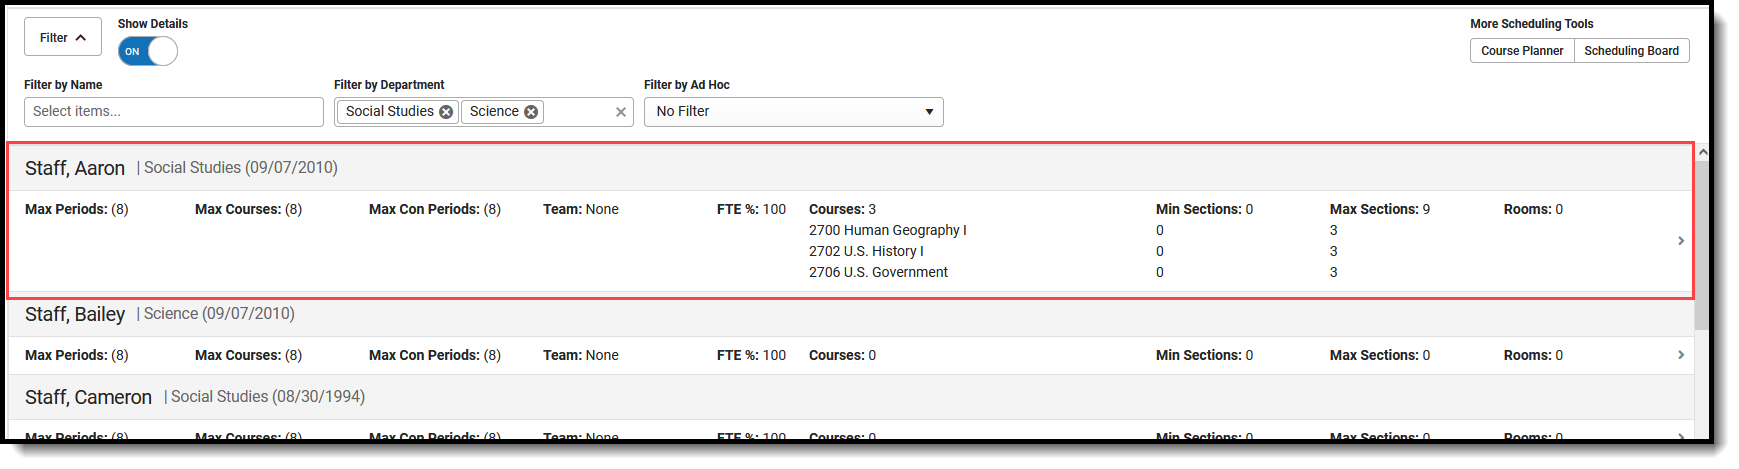
Example: Using Batch Edit Constraints to Remove Placement Restrictions
The Social Studies Department has decide to change their meeting time for their monthly department meeting. Currently, the 26 Social Studies teachers all have Placement Restrictions during 00 Period. The new meeting has not yet been decided, so for now, that restriction needs to be removed.
The details of the restriction do not display on the main view of the Staff Planner, just an indication that there is a Placement Restriction.
 Current Placement Restriction for Social Studies
Click Batch Edit Constraints and expand the Placement Restrictions card. Add the No Symbol (
 ) to Period 00 for all four quarters.
 Placement Restriction for Period 00
Now, click Remove. The Placement Restrictions have been removed.
 Placement Restrictions Removed
Next Steps
- Review the Scheduling Center and/or Checklist for Scheduling for remaining scheduling tasks.
- Use the Scheduling Board to build the courses and load the student requests.
- Use the Course Planner to compare student request and course sections to ensure the correct number of course sections is available for scheduling.
- Generate scheduling reports to review the placement of courses.
- When all scheduling items have been completed, mark the Scheduling Board Trial active.
